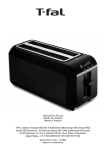
1
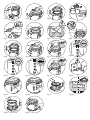
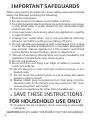
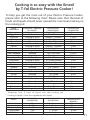
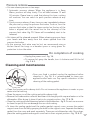
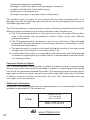
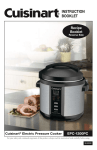
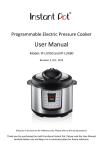
JPM & Associés • marketing-design-communication • 10/2011 Ref. NC00020674 Instructions for Use 1a 1e 1b 1c 1f 1d 2a 2b 21 MAX 3a 3b 20 4 5 10 11 13 15 6 12 14 16 17 9 18 19 7 8 MAX MAX Recipes fig.1 fig.2 fig.3 fig.4 MAX 2 2 MAX 1 1 MAX fig.5 fig.6 fig.7 fig.8 CLICK MAX fig.9 fig.10 fig.11 fig.12 fig.13 fig.14 fig.15 fig.16 1 2 fig.17 fig.18 fig.21 fig.22 fig.19 fig.20 IMPORTANT SAFEGUARDS When using electrical appliances, basic safety precautions should always be followed including the following: 1. Read all instructions. 2. Do not touch hot surfaces. Use handles or knobs. 3. To protect against electrical shock do not immerse cord, plugs, or any other parts in water except for the removable insert and accessories. 4. Close supervision is necessary when any appliance is used by or near children. 5. Unplug from outlet when not in use and before cleaning. Allow to cool before putting on or taking off parts. 6. Do not operate any appliance with a damaged cord or plug or after the appliance malfunctions or has been damaged in any manner. Return appliance to the nearest authorized service facility for examination, repair or adjustment. 7. The use of accessory attachments not recommended by the appliance manufacturer may cause injuries. 8. Do not use outdoors. 9. Do not let the cord hang over edge of table or counter, or touch hot surfaces. 10. Do not place on or near a hot gas or electric burner, or in a heated oven. 11. Do not move the product when in use or when the steam pressure valve is closed. 12. Always attach plug to appliance first, then plug cord into the wall outlet. To disconnect, turn any control to "off", then remove plug from wall outlet. 13. Do not use appliance for other than intended use. SAVE THESE INSTRUCTIONS. FOR HOUSEHOLD USE ONLY. 14. 15. To reduce the risk of electric shock, cook only in removable container. CAUTION: DO NOT CARRY THE PRODUCT BY THE LID HANDLES. 5 Read and follow the instructions for use. Keep them for future use. SAFETY INSTRUCTIONS 1. This appliance complies with the safety regulations and conditions in effect at the time of manufacture. 2. Check that the power supply voltage corresponds to that shown on the appliance (alternating current) and that there's a grounded plug. 3. Given the diverse standards in effect, if the appliance is used in a country other than that in which it is purchased, have it checked by an approved service center. 4. This appliance is intended for household use only. 5. In case of commercial use, inappropriate use or failure to comply with the instructions, the manufacturer accepts no responsibility and the guarantee does not apply. 6. This appliance is not intended for use by persons (including children) with reduced physical, sensory or mental capabilities, or lack of experience and knowledge, unless they have been given supervision or instruction concerning use of the appliance by a person responsible for their safety. 7. Children should be supervised to ensure that they do not play with the appliance. 8. Replace the sealing gasket every 2 years, or sooner if you see the gasket is worn or in need of replacement. Use only original parts available in authorized repair centers. CONNECTING TO THE POWER SUPPLY 1. Make sure the plug is connected properly to both the appliance and the outlet. 2. Only connect the appliance to grounded electrical outlets which have a minimum load of 15A. If the sockets and plug on the appliance are not compatible, consult a professional qualified technician to replace the outlet with a more suitable one. 3. Do not use the appliance if: - It or its cord is damaged. 6 - The appliance has been dropped, shows visible damage, or does not work properly. In these cases, the appliance must be sent to an approved Service Center. Do not take the appliance apart yourself. 4. Do not use an extension cord. If you accept liability for doing so, only use a grounded extension cord which is in good condition and is suited to the wattage of the appliance. 5. If the power cord is damaged, it must be replaced by the manufacturer, an authorized Service Center or a similarly qualified person in order to avoid any danger. 6. Do not leave the cord hanging. 7. Do not unplug the appliance by pulling on the cord. 8. Always unplug the appliance immediately after use; when moving it; prior to any cleaning or maintenance. USE OF THE APPLIANCE 1. Use a flat and stable, heat resistant work surface, away from any water splashes. 2. Always place your Electric Pressure Cooker on a dry surface. 3. Always check the pressure release devices for clogging before use. 4. Make sure that the Electric Pressure Cooker is properly closed before bringing it up to pressure. 5. It is highly recommended not to move the Electric Pressure Cooker when it is under pressure. The pressure limit valve may move: this could cause burns by steam being released. 6. Do not touch the hot surfaces. Be careful, metal parts and especially the lid are very hot. Always wear oven mitts. 7. Do not touch the hot surfaces. Use the carrying handles and not the lid handle. Always wear oven mitts. 8. Never use the insert handle to carry the product, use the carrying handle on the product body. 9. Your Electric Pressure Cooker cooks under pressure. Burns could result from boiling over if not used properly. 10. Do not open the pressure cooker until the unit has cooled and all internal pressure has been released. If the handles are 7 difficult to push apart, this indicates that the cooker is still pressurized : do not force it open. Any pressure in the cooker can be hazardous. 11. Do not try to open the lid until the float valve is down. 12. Never use your Electric Pressure Cooker without liquid; when the cooking pot is empty or without the cooking pot: this could cause serious damage. 13. Do not remove the cooking pot while the appliance is working. 14. Do not fill your Electric Pressure Cooker above maximum level. For food that expands considerably during cooking, such as rice, dehydrated vegetables or compotes, do not fill the Electric Pressure Cooker more than half full. Respect the levels indicated in the recipes. 15. After cooking meat which has an outer layer of skin, which could swell due to the effects of pressure, to avoid burns do not pierce the skin after cooking if it appears swollen. Pierce food before cooking to avoid burns. 16. When cooking food with a thick texture (chick peas, rhubarb, compotes, etc.) the Electric Pressure Cooker should be shaken slightly before opening to ensure that the food does not spurt out. 17. Do not use the Electric Pressure Cooker to fry under pressure using oil. 18. The bottom of the removable insert and the heating plate should be in direct contact. Any objects inserted between them or food residue remaining on either surface will affect performance. 19. Wipe clean the bottom of the removable insert and the heating plate after every use. 20. Do not use other cooking pots in the pressure cooker in place of the removable insert. Only replace the removable insert with an original spare part designed to be used with this product. 21. Use the removable insert in the pressure cooker ONLY. Do not use it to cook on stovetops, in the oven etc. 22. During cooking & steam release, the appliance exhausts heat and steam. Keep your face and hands away from the steam flow. Do not touch the lid during cooking. Do not obstruct the steam outlet. 8 23. When opening the lid, always hold the lid by its handle. In some cases, boiling water may be trapped between the steam shield and the lid. This can cause severe scalding. 24. Use the product ONLY IF the removable bowl is correctly placed in the unit and the handle is correctly inserted above the carrying handles. 25. If large amounts of steam are released from the rim of the lid, turn power OFF and unplug the power cord at once. Carefully clean the lid, sealing gasket and sealing gasket support cover to ensure that food residue is not interfering with proper operation. If the problem persists after cleaning, consult an authorized Service Center for repair. 26. If pressure is released continuously (during more than 1 minute) while pressure cooking, switch off the appliance and release pressure, and consult an authorized Service Center for repair. 27. Do not immerse the pressure cooker housing in water, or pour water or food directly on to the heating plate without the removable insert in place. If you inadvertently do so, consult an authorized Service Center for repair. 28. Do not touch the float valve and the limit pressure valve except when cleaning and maintaining in accordance with instructions. 29. Do not place foreign objects on top of or blocking the steam valve. Do not replace the valve. 30. Do not use a cloth between the lid and the housing to leave it open. 31. If any part of the appliance is damaged, bring the appliance to service center. 32. Do not substitute other sealing gaskets. 33. Any repairs should be made by an authorized service center using original spare parts. 34. Do not use the appliance if any part is damaged. 35. When using the browning and sauté function, always remove the lid. 9 36. Be aware that certain foods, such as applesauce, cranberries, pearl barley, oatmeal or other cereals, split peas, noodles, macaroni, rhubarb, or spaghetti can foam, froth, and sputter, and clog the pressure release device (steam vent). These foods should not be cooked in a pressure cooker. ELECTRICAL REQUIREMENTS This appliance has a grounded plug. Do not attempt to modify the plug in any way. • A short power-supply cord has been provided to reduce risk resulting from becoming entangled in or tripping over a longer cord. • If an extension cord is used: - The marked electrical rating of the extension cord should be compatible with the electrical rating of the appliance. - The cord must be arranged so that it will not drape over the countertop or tabletop where it can be pulled on by children or tripped over unintentionally. Your appliance contains many materials which can be recycled. Take it to a local civic collection point. 10 Cooking is so easy with the Emeril by T-fal Electric Pressure Cooker ! To help you get the most out of your Electric Pressure Cooker, please refer to the following chart. Please note that the level of foods and liquids should never exceed the max level marking on the cooking pot. FRESH VEGETABLES COOKING METHOD: STEAMING*/ COOKING IN LIQUID** AMOUNT / PREPARATION (SUGGESTED) AMOUNT / PREPARATION (SUGGESTED) Asparagus Eggplant Artichoke Beets Broccoli Carrots Carrots Mushrooms Mushrooms Green cabbage Green cabbage Brussel sprouts Cauliflower Cauliflower Zucchini Spinach Spinach Green beans Turnips Turnips Green peas Leeks Squash Potatoes Potatoes Cooking in liquid. Steamed Cooking in liquid Steamed Steamed Steamed Cooking in liquid Steamed Cooking in liquid Steamed Cooking in liquid Steamed Cooking in liquid Steamed Cooking in liquid Steamed Cooking in liquid Steamed Steamed Cooking in liquid Steamed Steamed Steamed Steamed Cooking in liquid 8 stalks / Whole 2 lbs / Sliced 4 pieces / Trimmed 1 lb / Diced 1 lb / Small flowerets 1 - 2 lbs / Sliced 4 pieces / Trimmed 1 lb / Thin Slices 1 lb / Whole 1 lb / Thin slices 1 lb / Leaves 1 lb / Whole 1 lb / Small flowerets 1 lb / Small flowerets 2 - 3 lbs / Sliced 1 lb / Leaves 1 lb / Leaves 1 lb / Very thin 1 lb / Diced 1 lb / Diced 1 lb / Whole 1 lb / Thin slices 1 lb / Large pieces 1 lb / Sliced 1 lb / Sliced 5 min 7 min 13 min 16 min 5 min 10 min 7 min 5 min 6 min 10 min 12 min 10 min 5 min 6 min 6 min 6 min 5 min 10 min 8 min 6 min 4 min 18 min 9 min 14 min 12 min * Steaming: Pour 3 cups of liquid into the cooking pot ** Cooking in liquid : Cover the ingredients with liquid. MEATS AMOUNT (SUGGESTED) LIQUID AMOUNTS (SUGGESTED) TIME IN MINUTES LOW PRESSURE (APPROX.) Beef cubes Lamb chops Chicken breast Turkey breast Fish filets 2 lbs 2 - 3 lbs 1 - 2 lbs 2 lbs 1 lb 2 - 3 cups 1 - 2 cups 1 cup 2 - 3 cups 1 - 2 cups 30 min 30 min 15 min 20 min 5 min 11 Description 1a 1b 1c 1d 1e 1f 2a 2b pressure limit valve pressure limit valve chimney float valve push rod (safety opening system) lid handle lid sealing gasket sealing gasket support cover 3a 6 L cooking pot 3b integrated basket supports 4 5 6 7 8 9 upper ring carrying handles stainless steel housing heating plate with temperature sensor base removable power cord Control panel 10 digital timer: counts down remaining cooking time 11 high pressure light 12 low pressure light 13 browning light 14 sauté light 15 simmer light 16 keep warm light 17 menu button: press to select a cooking menu 18 timer selection: 1 minute increments up to 40 min 5 minute increments from 40 to 99 min 19 start / cancel Accessories 20 condensation collector 21 steaming basket Before first use Remove packaging • Take your appliance out of its packaging, remember to read the operating instructions before using the appliance for the first time - fig. 1. • Place your appliance on a flat surface. Remove the lid by grasping the handle, then turn it clockwise and lift the lid off- fig. 2 & 3. • Remove all packaging materials from the inside of the appliance: plastic bags, accessories (steaming basket & condensation collector) as well as the plug - fig. 1. • Remove the promotional sticker on the product before using your appliance for the first time. • Place the pressure limit valve (1a) onto the pressure limit valve chimney (1b). Cleaning • Wash the cooking pot, condensation collector and steaming basket in the dishwasher or by hand. • The lid, pressure limit valve and sealing gasket support cover can only be washed by hand (and completely submersed in water). • The other parts should only be washed by hand and cannot be submersed in water. Unroll the power cord • Unroll the power cord; connect it to the appliance, checking it is fully pushed in. 12 Instructions for use Remove the lid • To remove lid, grasp the handle, then turn it clockwise and lift the lid off - fig. 2 & 3. Fit the condensation collector into place • Fit the condensation collector (20) to the back of the appliance as shown in - fig. 17. Take the cooking pot out and add the ingredients • Remove the cooking pot - fig. 6. • Add food and liquid to the cooking pot as the recipe directs. • For pressure cooking: Please note that the level of foods and liquids should never exceed the max level marking on the cooking pot. Some foods will expand during cooking. For such foods (dried vegetables, grains, rice, etc), please ensure you do not exceed 50% of the capacity of the cooking pot. When pressure cooking, the cooking pot should always be filled to at least 20% of its capacity. • For steam cooking: Pour water into the cooking pot to at least 20% of its capacity (approx 40.5 ounces). Less water may be needed depending on recipes and cooking time but always use a minimum of 16.5 ounces water. Place the steaming basket so that it rests on the integrated basket support (3b) or simply place it at the bottom of the cooking pot (3a) - fig. 20. • You can cook food in the cooking pot and steam at the same time. • When steaming, ensure the food in the steaming basket doesn’t touch the lid. • Use wooden or plastic utensils to protect the non-stick coating of the cooking pot. Place the cooking pot in the appliance • Wipe clean the bottom of the cooking pot and remove any food residue from the heating plate - fig. 7. Then place the cooking pot into the appliance - fig. 8. • Do not use your appliance without the cooking pot. Close and lock the lid • Check that the sealing gasket is securely placed on the sealing gasket supporting cover. To do this, slightly rotate the sealing gasket in both directions to ensure that it is well positioned. • Place the lid on the appliance, in the position shown in - fig. 9 (with the handle positioned at 'ten minutes to 4 o'clock'). Then turn it counter-clockwise until it is fully locked - fig. 10. so that the arrow on the lid is now completely covering the "lock" illustration on the sticker on the top of the upper ring. 13 Position the pressure limit valve • Position the pressure limit valve to ensure that the dot on the pressure limit valve is aligning to the raised line on the pressure limit valve chimney - fig. 11. Also check that the float valve (1c) is down before you start pressure cooking (this will mean that the lid is properly sealed). If the float valve is not down, gently move the float valve and if necessary, remove any food particles. Plug in the power cord • Connect the power cord to the appliance and then to the outlet - fig. 5. The LED display will indicate . Make sure the power cord is connected properly to both the appliance and the outlet. • Ensure that the appliance is placed on a flat, stable, dry and heatresistant work surface. Pressure Cooker settings Please refer to the table below. 14 COOKING SETTING FEATURES COMMENTS Low pressure Low pressure setting preserves more vitamins during cooking compared to high pressure setting. Ideal when cooking fish and delicate vegetables in water or in the steam basket. This setting can be used for cooking meat and poultry but the cooking time will be slightly longer. Always cook with the lid closed. High pressure This setting allows faster cooking of meats, poultry or frozen foods. High pressure can also be used for fast cooking of dense vegetables such as potatoes and beets. Always cook with the lid closed. Browning Use this setting to brown foods before cooking or when frying in a small amount of fat. Always cook with the lid open. Brown foods before pressure cooking. The preset temperature for this setting is 356°F. COOKING SETTING FEATURES COMMENTS Sauté Use this setting to soften foods before cooking. Suitable with a small amount of fat or liquid. Always cook with the lid open. Soften foods before pressure cooking. The pre-set temperature for this setting is 284°F. Simmer This setting enables you to cook at a low temperature. It is primarily used when adding ingredients at the end of the cooking cycle or to finish off cooking. Always cook with the lid open. The pre-set temperature for this setting is 356°F. Keep Warm Automatically switches on after cooking. Keeps food warm for up to 12 hours. When cooking is finished, you will hear a beeping sound and the Keep Warm indicator light will switch on. It is not recommended to use the Keep Warm setting for more than 1 hour, particularly with fragile food and rice as textures may change. Cooking instructions High or low pressure cooking • When the appliance is in stand by, the LED display shows . To pressure cook on high or low, press the button until the desired cooking setting is reached. The cook setting light will illuminate and flash on and off to indicate the selected setting. • After adding your ingredients and locking the lid in place, press the button to set the desired cooking time - fig. 13. • The timer can only be used with the High & Low Pressure cooking settings. - Time increases in 1 minute increments up to 40 minutes. - Time increases in 5 minute increments from 40 to 99 minutes. • Now press the button and the pressure cooker will start the pressure cooking process - fig. 14. When the LED screen stops flashing this indicates the internal temperature has been reached, the appliance is under pressure and the countdown timer starts. • If you don't want to indicate any desired cooking time, you can simply press start after choosing your setting mode. • The LED display will countdown the remaining time. means that cooking will be finished in 10 minutes. 15 • Once pressure has built up in the appliance, the float valve will rise. The double safety lock in the lid is then activated and the lid will not be able to be opened during cooking. Never attempt to open the lid during pressure cooking. • Steam cooking is only possible when using the High and Low Pressure cooking settings. • When using the pressure cooker for the first few times, you may notice a slight leaking of steam from the pressure level indicator and the sealing gasket. This is normal and only occurs as pressure builds up. • During cooking it is normal for a small amount of steam to escape from the pressure limit valve (1a), as it is a safety valve. Brown, Simmer or Sauté setting • Always leave the lid open when using the Browning, Simmer or Sauté settings. • When the appliance is in stand by, the LED display shows . To brown, sauté or simmer, press the button until the desired cooking setting is reached. The cook setting light will illuminate and flash on and off to indicate the selected setting. • Now press the button and the pressure cooker will start to preheat the cooking pot - fig. 14. The selected cook setting light will also now stop flashing. When the dot in the lower right hand corner of the LED screen stops flashing and becomes fixed , this indicates it has reached temperature and you can now add the ingredients. • When using your pressure cooker for the first time, there might be a slight odor. This is normal. Keep Warm • Once the cooking cycle is completed, the appliance will automatically switch to Keep Warm. • Maximum duration for Keep Warm is 12 hours. • In the Keep Warm setting , condensation may build up in the upper ring. This is normal. • After 12 hours, the appliance will go into stand by and the LED display will show . • To avoid any bacteria from developing, do not use the Keep Warm setting with foods that cannot be stored at an ambient temperature (i.e.) meat, fish, dairy products and eggs… Cancel button • You can reset the cook setting or cancel the timing at any time during the initial set up or during cooking by pressing the button - fig. 14. 16 Pressure release • You can release pressure in two ways. 1. Automatic pressure release: When the appliance is in Keep Warm, pressure will drop slowly. This will take between 12 and 30 minutes. Please bear in mind that during this time, cooking will continue. You can switch to quick pressure release at any time. 2. Quick pressure release: At any time you can immediately release the pressure by using the pressure limit valve. To do so, turn the pressure limit valve so that the steam symbol on the top of the valve is aligned with the raised line on the chimney of the pressure limit valve- fig. 15. Steam will immediately start to be released. • Hot steam will be released upwards. When releasing pressure, keep your hands and face away from hot steam ejected from the pressure limit valve. • As the pressure limit valve may be hot, we recommend using a kitchen utensil like tongs or a wooden spoon or using gloves for protection to turn the valve. On completion of cooking • Unplug the power cord - fig. 16. • To remove lid, grasp the handle, turn it clockwise and lift the lid - fig. 2 & 3. Cleaning and maintenance • Once your food is cooked, unplug the appliance before cleaning it - fig. 16. It is recommended to clean your appliance after each use. Pay specific attention to the cleaning of the sealing gasket. • Clean the housing with a damp cloth. Do not immerse the appliance in water or pour water into the housing. • Clean the upper rim of the cooking pot with a damp cloth. • Remove the condensation collector and clean it thoroughly with soap and water or in the dishwasher. After drying it, place it back in its original position - fig. 17 & 18. • Clean the cooking pot and steaming basket in the dishwasher - fig. 4. Do not use a scourer to clean the pot as this can damage the non stick coating. • To clean the sealing gasket and the sealing gasket support cover, remove the gasket support cover from the lid by grasping the knob on the support cover. Seperate the sealing gasket from the cover and wash seperately. These are not dishwasher safe. Once clean, place the sealing gasket and support cover back in their original position - fig. 19 & 21. 17 • Handle the non-stick cooking pot with care and do not bang the rim hard with kitchen utensils. • When the sealing gasket and support cover are removed, it is easy to wash the following parts with soap and water. These parts are not dishwasher safe, but can be fully submersed in water: - Inside of the lid - Pressure limit valve: Remove it, clean it and place it back in place. • The other parts are not dishwasher safe and cannot be fully submersed in water: - Float valve : gently move the float and rinse away any food from the valve. • The duct in the pressure limit valve should be checked regularly to prevent blockage. • Always use the cooking pot provided. Do not pour water or food directly into the appliance. • If you inadvertently immerse your appliance in water or spill water directly on the heating element (when the pot is not in place), take it to your service center for repair. • In order to prevent trapped odors, do not store the lid on the unit. • Do not carry the appliance by the lid handle. Use the 2 side handles to move the product. • Since the sealing gasket is a safety device designed to release the pressure in case of abnormal overload of pressure, you must change it every 2 years. Important • Please follow the instructions closely. Do not place the appliance close to an open flame or a flammable object. Always place your appliance on a flat, stable, dry and heat resistant surface. • Please ensure you respect the recommendations on the volume of food and water. • Do not damage the sealing gasket. Do not use any other type or brand of gasket that has not been made by T-fal for this particular model of appliance. • Always ensure the pressure limit valve protective cover; the pressure limit valve and the float valve are clean. • Do not open the lid until the float is down. • Do not place any foreign objects on the top of the pressure limit valve. Do not replace the valve. • Do not use a cloth between the lid and the housing to leave it ajar. • Keep the bottom of the cooking pot and the heating plate clean. • Do not heat up the cooking pot using any other heat source nor replace it with another pot. 18 • Use a wooden or plastic spoon to prevent any damage to the coating of the cooking pot. Never cut food directly in the cooking pot. • During cooking & steam release, the appliance emits heat and steam. Keep your face and hands away from the steam flow. Do not touch the lid during cooking - fig. 22. • If a great deal of steam is released from the rim of the lid, unplug the power cord at once, and send the appliance to our service center for repair. • If the alarm beeping sound is on for more than 1 minute, please do not use the appliance and send the product to a service center. • Do not carry the appliance by the lid handle. Use the 2 side handles to transport the product. • You must not take the appliance apart or replace any components yourself (except the sealing gasket). This can be done by an authorized service center only. • Do not replace the power cord with other cords. • Keep out of the reach of children. • Do not use the cooking pot on the stove or in any appliances. • If pressure is released continuously (for more than 1minute) while pressure cooking, send the appliance to a service center for repair. • Do not operate the pressure cooker without the cooking pot. • When opening the lid, always hold the lid by its handle. In some cases, boiling water may be trapped between the gasket support cover and the lid. This can cause severe scalding. Troubleshooting TROUBLE The appliance beeps and the display shows . The appliance automatically switches to Keep Warm without going through a complete cooking cycle. Lid will not lock. POSSIBLE REASONS SOLUTION • The appliance is unable to build up pressure. • Check that the lid is closed properly and that the pressure limit valve is in the correct position - fig. 11. • When there is not enough water in the • Add more water in the cooking pot, cooking pot and restart the appliance will switch the cooking cycle. to the Keep Warm setting. • Properly install the sealing gasket and the sealing gasket support cover. • The sealing gasket and • If this occurs just after sealing gasket support cooking, remove the valve. cover are not installed Then close the lid and properly. place the valve back into • The float stays up. position. If the product has not been used and is cold, push the push rod in directly with your hands. 19 TROUBLE 20 POSSIBLE REASONS SOLUTION Cannot open the lid after steam released. • The float is still up. • In certain rare cases after your appliance has depressurised, the float valve may remain in the high position meaning that the lid cannot be opened. • In this case, allow your appliance to cool off completely so as to be sure that there is no more pressure inside it. The amount of time it takes for your appliance to cool off depends on the quantity of food that has been cooking inside it. • Only then should you gently turn the float valve using tongs. Make sure you keep your face well away from the handle. Air is escaping from the rim of the lid. • No sealing gasket. • Food stuck in sealing gasket. • Sealing gasket needs to be replaced. • Lid not locked properly. • Install the sealing gasket. • Clean the sealing gasket. • Replace the sealing gasket. • Lock the lid again. Steam is released from the float valve. • Food stuck in the sealing gasket of the float valve. • The sealing gasket on the float is damaged. • Clean the sealing gasket. • Replace the sealing gasket. • Change the sealing gasket every two years. • Check that the sealing gasket is perfectly cleaned. The float doesn’t rise, meaning the unit will not go under pressure. • The pressure limit valve is not positioned • Position the valve to . properly. Put more food and • Not enough food and • water in the cooking water in the cooking pot. pot. Send the product to • Steam is released from • our service center for the rim of the lid and repair. the pressure limit valve. If the pressure cooker still does not work, please call our consumer service center. MANUFACTURER’s WARRANTY : www.t-falusa.com With a strong commitment to the environment, most of T-fal products are repairable during and after the warranty period. Before returning any defective products to the point of purchase, please call T-fal consumer service directly at the phone number below for repair options. Your help to sustain the environment is appreciated! The Warranty This product is guaranteed by T-fal for 1 year against any manufacturing defect in materials or workmanship, starting from the initial date of purchase. The manufacturer’s warranty by T-fal is an extra benefit which does not affect consumer’s Statutory Rights. The T-fal warranty covers all costs related to restoring the proven defective product so that it conforms to its original specifications, through the repair or replacement of any defective part and the necessary labor. At T-fal’s choice, a replacement product may be provided instead of repairing a defective product. T-fal’s sole obligation and your exclusive resolution under this warranty are limited to such repair or replacement. Conditions & Exclusions The T-fal warranty only applies within USA and is valid only on presentation of a proof of purchase. The product can be taken directly in person to an authorized service center or must be adequately packaged and returned, by recorded delivery (or equivalent method of postage), to a T-fal authorized service center. Full address details for each country’s authorized service center are listed on the T-fal website (www.t-falusa.com) or by calling the appropriate telephone number listed below to request the appropriate postal address. T-fal shall not be obligated to repair or replace any product which is not accompanied by a valid proof of purchase. This warranty will not cover any damage which could occur as a result of misuse, negligence, failure to follow T-fal instructions, use on current or voltage other than as stamped on the product, or a modification or unauthorized repair of the product. It also does not cover normal tear and wear, maintenance or replacement of consumable parts, and the following: - using the wrong type of water or consumable; - scaling (any de-scaling must be carried out according to the instructions for use); - ingress of water, dust or insects into the product; 21 - mechanical damages, overloading; - damages or bad results due to wrong voltage or frequency; - accidents including fire, flood, lightning, etc; - professional or commercial use; - damage to any glass or porcelain ware in the product. This warranty does not apply to any product that has been tampered with, or to damages incurred through improper use and care, faulty packaging by the owner or mishandling by any carrier. The T-fal manufacturer’s warranty applies only for products purchased and used in USA. Where a product purchased in one country and then used in another one: a) The T-fal guarantee duration is the one in the country of usage of the product, even if the product was purchased in another listed country with different guarantee duration. b) The T-fal guarantee does not apply in case of non conformity of the purchased product with the local standards, such as voltage, frequency, power plugs, or other local technical specifications. c) The repair process for products purchased outside the country of use may require a longer time if the product is not locally sold by T-fal. d) In cases where the product is not repairable in the new country, the T-fal guarantee is limited to a replacement by a similar product or an alternative product at similar cost, where possible. Consumer Statutory Rights This T-fal manufacturer’s warranty does not affect the statutory rights a consumer may have or those rights that cannot be excluded or limited, nor rights against the retailer from which the consumer purchased the product. This warranty gives a consumer specific legal rights, and the consumer may also have other legal rights which vary from State to State or Country to Country or Province to Province. The consumer may assert any such rights at his sole discretion. Additional information Accessories, Consumables and end-user replaceable parts can be purchased, if locally available, as described in T-fal internet site. U.S.A. GROUPE SEB USA 2121 Eden Road Millville, NJ 08332 800-395-8325 : www.t-falusa.com 22 23 24