1
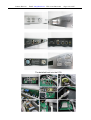
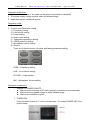
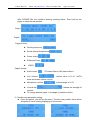
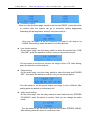
Contact: Rita Cai
Email: [email protected]
Web: www.fmuser.net
skype: rita.cai87
FSN-301 30W 1U FM
Transmitter
User Manual
Contact: Rita Cai
Email: [email protected]
Web: www.fmuser.net
skype: rita.cai87
Outstanding Features:
l 0~30W power adjustable
l Dual reverb microphone input port
l External encoder input (for external SCA or RDS encoder)
l VSWR protection, and can set the start value of the standing wave protection.
l Over-temperature protection, can set the start value of over temperature protection.
l Controllable fan forced cooling system, ensure stability and also increase the
working life of the fan
l Automatic volume control function. Input volume can be detected and adjusted
automatically to ensure the best modulation.
l 4 commonly used function keys, easy and fast to set the parameters of the machine.
Technical parameters:
* Power supply:AC100V~240V/50Hz/60Hz
* Working Frequency:87~108MHz(OEM 76~92MHz)
* Frequency stabilization method: PLL
* Frequency step: 0.1MHz
* Modulation way: WFM
* Power ouput:0~30W adjustable, maximum 30W
* Output Impedence:50Ω/Coaxial
* Stray radiation:<-60db
* Audio level: 15dbV
* Frequency Response:50~15KHz
* SNR:70db
* Separation:40db
* Temperature:0~45℃
Contact: Rita Cai
Email: [email protected]
Web: www.fmuser.net
The detailed look into the PCB
skype: rita.cai87
Contact: Rita Cai
Email: [email protected]
Web: www.fmuser.net
skype: rita.cai87
Operation Attentions:
1. Make sure the antenna or the Load can be ground connected to transmitter
2. The power supply voltage must be within the allowed range.
3. Make sure the fan ventilation is good.
Operation step:
1. Power on
2. Function and Parameter setting
1) Frequency setting
2) Line volume setting
3) Power setting
4) Audio mode setting
5) Temperature protection setting
6) VSWR protection setting
7) Microphone volume setting
8) Shorcut:
There are 4 shortcut button for easier and fasting parameter setting:
FREQ:Frequency setting
LINE:Line Volume setting
RF-PWR:Power setting
MIC:Microphone Volume setting
Operation Instruction:
1. Attention for POWER ON/OFF:
l Make sure the antenna or RF load is properly connected to the transmitter
l Make sure the supplied voltage is within allowed range.
l Make sure ventilation is good.
2. POWER ON。
Press the power button to “I” to turn on the power. “O” means POWER OFF. See
picture below:
Contact: Rita Cai
Email: [email protected]
Web: www.fmuser.net
skype: rita.cai87
After POWER ON, the interface showing working status. There will be two
pages to show the parameters:
Page1:
Page2:
Page1 shows:
l Working frequency
l Actual internal temperature
l Power output
l Reflected Power:
l
VSWR:
。
Page2 shows:
l Audio mode:
, ST means Stereo, MO means Mono.
l Line Volume:
,
volume value is 0~12,AUTO
mean automatic volume control.
l Microphone volume:
l Volume bar:
,volume range is 0~79.
, it shows the strength of
volume.
l To change between page 1 and page 2, press the switch.
3. Function and parameter setting:
l Press the switch, you will see the menu. Turn the rotary switch, there will be
altogether 8 items rotating displaying on the screen.
Contact: Rita Cai
Email: [email protected]
Web: www.fmuser.net
skype: rita.cai87
l Frequency setting.
When you see the mune page, switch to the first item”FREQ”. press the switch
to confirm, then the system will go to frequency setting page(power
forwarding will be temporarily closed), see picture below::
Now, turn the switch to set the frequency you need, it will step on by
0.1MHZ. After setting, press the switch to confirm and exit.
l Line volume setting:
On the menu page, turn the rotary switch to select the second item “LINE
VOLUME”, press the switch to confirm, now you can set the volume.
Turn the switch to set the line volume, the range is from 0-79. After setting,
press the switch to confirm and exit.
l Power setting
On the menu page, turn the rotary switch to select the thrid item”POWER
SET”, then press the switch to confirm, now you can set the power:
Turn the switch to set the power output, the range is from 0-30watt. After
setting press the switch to confirm and exit.
l Audio mode setting:
On the menu page, turn the rotary switch to select thefourth item “STEREO
OR MONO”, press the switch to confirm. Now you can change the audio
mode:
Turn the switch fo set the mode, there are two modes: STEREO, MONO.
After setting, press the switch to confirm and exit.
Contact: Rita Cai
Email: [email protected]
Web: www.fmuser.net
skype: rita.cai87
l Temperature protection setting:
On the menu page, turn the rotary swtich to selet the fifth item “TMPE
SET”, press the switch to confirm. Now you can set the temperature
protecton:
Turn the switch to set the temperature you want to protect the machine
from burned, the available range is from 50-70℃. After setting, press the
switch to confirm and exit.
l VSWR setting:
On the menu page, turn the rotary switch to selet the sixth item “SWR SET”,
then press the switch to confirm. Now you can set the SWR.
Turn the switch to set the SWR value, the available range is 1.5-3.5, after
setting, press the swtich to confirm and exit.
l Microphone volume setting:
On the munu page, turn the rotary switch to choose item7 “MIC VOLUME”,
then press the switch to confirm. Now you can adjust the volume:
Turn the switch to adjust the microphone volume, the available range is
0-79. After setting, press the switch to confirm and exit.
3. Shorcut buttons:
l There are 4 shortcut buttons on the controlling panel:
FREQ:Frequency set
LINE: Line volume set
RF-PWR: Power output set
MIC: Microphone volume set

![0 [转换] - E](http://vs1.manualzilla.com/store/data/005652607_1-2481a9abdfba0e217374eff291a1529a-150x150.png)