1
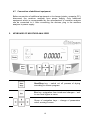
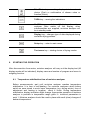
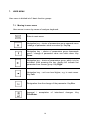
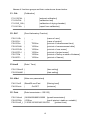
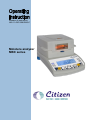
Number of instruction:
LMI-11-02/01/08/ENG-C
Moisture analyzer
MBC series
JANUARY 2008
2
1. TECHNICAL PARAMETERS ................................................................. 5 2. BASIC INFORMATION .......................................................................... 6 2.1. 2.2. 2.3. 2.4. 2.5. 2.6. 2.7. Balance appropriation ................................................................................. 6 Usage conditions ........................................................................................ 6 Principles of safety operation ..................................................................... 7 Warranty ..................................................................................................... 7 Supervision over metrological parameters of moisture analyzer ................ 8 Data in user manual ................................................................................... 8 Operation competence ............................................................................... 8 3. TRANSORT AND STORAGE ................................................................ 8 3.1. Delivery check ............................................................................................ 8 3.2. Packaging ................................................................................................... 8 4. UNPACKING, INSTALLATION AND DEVICE CHECKING ................... 9 4.1. 4.2. 4.3. 4.4. 4.5. 4.6. 4.7. Place of installation, place of use ............................................................... 9 Unpacking .................................................................................................. 9 Setting ...................................................................................................... 11 List of standard elements of the delivery .................................................. 11 Cleaning of moisture analyzer .................................................................. 11 Connecting to mains ................................................................................. 11 Connection of additional equipment ......................................................... 12 5. KEYBOARD OF MOISTURE ANALYZER ........................................... 12 6. STARTING THE OPERATION ............................................................. 13 6.1. Temperature stabilization time of moisture analyzer ................................ 13 7. USER MENU ........................................................................................ 14 7.1. Moving in user menu ................................................................................ 14 7.2. Back to weighing function ......................................................................... 16 8. WEIGHING ........................................................................................... 16 9. MAIN PARAMETERS OF MOISTURE ANALYZER. ADJUSTMENT OF
MOISTURE ANALYZER TO CONDITIONS IN OPERATION PLACE .. 17 9.1. 9.2. 9.3. 9.4. 9.5. Filter setting .............................................................................................. 18 Autozero function...................................................................................... 19 Access to library of drying procedures...................................................... 20 Backlit of weighing result (display screen) ................................................ 21 Signal „beep” – reaction to pressing the key ............................................ 22 10. CALIBRATION ..................................................................................... 22 10.1. External calibration ................................................................................... 23 10.2. Calibration test.......................................................................................... 24 10.3. Calibration of drying chamber ................................................................... 25 10.4. Calibration report printout ......................................................................... 28 11. PRINTOUTS FOR GLP PROCEDURES ............................................. 29 12. SETTING TIME AND DATE ................................................................. 32 12.1. Time setting .............................................................................................. 32 12.2. Date setting .............................................................................................. 33 13. FUNCTIONS CONNECTED WITH USE OF RS 232 ........................... 33 13.1. Choice of transmission speed .................................................................. 33 13.2. Determination of data type sent through RS 232 ...................................... 34 13.3. Printout time ............................................................................................. 35 3
14. DRYING PROCESS WITH USE OF SHORTENED MENU................. 35 14.1. Way of drying process finish ..................................................................... 36 14.2. Profile according to which drying process is carried out ........................... 37 14.3. Type of displayed result ............................................................................ 41 15. DRYING PROCESS WITH USE OF PROGRAM PROCEDURES
LIBRARIES ........................................................................................... 42 16. DRYING PROCESS ............................................................................. 43 4
1.
TECHNICAL PARAMETERS
Type
MB 50 C
Max capacity
50 g
Reading unit
1 mg
Accuracy of
moisture reading
0,01 / 0,001% (0,001% for samples to 1,5g)
Tare range
Max mass of
sample
Drying
temperature
range
Drying modes
Auto switch off
options
Working
temperature
Power supply
-50 g
50 g
max. 160°C (optional 250°C)
standard, quick, step, mild
time defined, moisture stabilisation, time optimal, manual
+15 °C - +40 °C
Adaptor 230V 50Hz AC
Display
Drying chamber
dimensions
LCD (backlit)
120 x 120 x 20 mm
Dimensions:
5
2.
BASIC INFORMATION
CAUTION!
Utilization of MBC 50 moisture analyzer conversely to safety provisions
and user manual may be hazardous to health and life. Never use the
moisture analyzer is explosive area. Moisture analyzer is not prepared to
use in areas with danger of explosion. The interior part of drying chamber
may heat up to 400 °C. nominal power supply of moisture analyzer is 230
V, thus it is necessary to use the device according to safety principles.
2.1. Balance appropriation
Moisture analyzer is a device used for determination of relative humidity of
small samples of various materials, determination of dry mass in small samples
of various materials and determination of mass of weighed objects. It
guarantees fast and precise determination of water content in tested sample,
and through application of LCD or graphic display it provides easy use and
operation. Moisture analyzer series MBC 50 can be used to determine humidity
content of multiple materials.
At the initial stage of measurement, the device precisely determines the mass
of object placed on its weighing pan. Following this, there is fast heating of the
sample with halogen or IR lamps. This causes evaporation of humidity from the
tested sample. While sampling, the moisture analyzer is continuously checking
the decline of mass, and after calculation, it displays current indications on the
display of the balance.
Compared to conventional methods of humidity content determination in
various materials, application of moisture analyzer series MBC 50 significantly
shortens measurement time and simplifies testing procedure. Moisture
analyzer allows for setting of multiple parameters which influence testing of a
sample, like temperature, time, drying profiles, etc.
2.2. Usage conditions
CAUTION!
If drying process is active do not allowed to open drying chamber. Moisture
analyzer is equipped with a halogen lamp which is very powerful heat source.
Thus, user should pay special attention no to touch those elements of moisture
analyzer that get hot while drying procedure (disposable pan, handle of pan,
and internal cover of drying chamber). Please remember, that some elements
may become dangerous if heated (poisoning vapours, danger of ignition or
explosion).
Moisture analyzer can not be used for dynamic weighing. Even if small masses
are added to taken off from weighing pan, than weighing result should only be
6
read if stability marker
is displayed. Do not put magnetic materials on
weighing pan of a moisture analyzer. This can defect the measuring set of the
device. Do avoid dynamic loading of weighing pan, and do not exceed maximal
capacity of the device. Please consider applied tare mass when calculating
mass of tested object. Never use moisture analyzer in explosive area. Moisture
analyzer is not designed and adjusted to operate in explosive conditions. Do
not perform any modifications to the device.
2.3. Principles of safety operation
Use of MBC 50 moisture analyzer conversely to safety principles and user
manual may be hazardous to operator’s health and life. It is obligatory to
acknowledge with safety principles listed in user manual:
use moisture analyzer onto to determine humidity content in samples and
determination of sample mass. Any other use of moisture analyzer may be
dangerous either to the device or the user,
before switching on the moisture analyzer, make sure that the nominal
power of the device specified on its data plate, is compatible with the
supply in the mains to which moisture analyzer is connectable,
protect moisture analyzer against contacts with liquids,
as the area around moisture analyzer gets heated, do not put any
inflammable objects or substances in close distance to device,
substance containing toxic or caustic vapour should be tested in a
chamber which absorbs the vapours,
samples of substances that produce inflammable vapours if heated should
have relatively small mass, and drying process should be performed in low
temperatures,
please remember that aggressive substances may cause corrosion to the
device.
2.4. Warranty
Warranty does not cover below mentioned cases:
● Not observing the regulation listed in user manual,
● Use of the moisture analyzer conversely to its application,
● Any modifications of moisture analyzer,
● Mechanical defects and defects caused by media, liquids and natural
wearing off,
● Improper placing of defects of electrical network / mains,
● Overloading of measuring mechanism of the moisture analyzer.
7
2.5. Supervision over metrological parameters of moisture analyzer
Metrological features of the moisture analyzer should be checked by the user in
set period of time. This period depends on environmental factors of moisture
analyzer’s location, kinds of performed processes and quality system
introduced byte user.
2.6. Data in user manual
Read the user manual carefully before switching on the device, even if the user
is experienced with this kind of devices.
2.7. Operation competence
Moisture analyzer should only be operated and supervised by trained
personnel with experience in usage of this kind of devices.
3.
TRANSORT AND STORAGE
3.1. Delivery check
Please check delivered package and device immediately after receipt and
evaluate whether its free from any external defects.
3.2. Packaging
Please keep on stock all the elements of the packaging, in case future
transport of a moisture analyzer is needed. Only the original packaging of the
moisture analyzer is suitable for transportation purposes. Before packing,
please unplug the device from mains, and take out all moveable parts (pan,
covers, etc.). parts of moisture analyzer should be put into original packaging,
so that they are protected while transport.
8
4.
UNPACKING, INSTALLATION AND DEVICE CHECKING
4.1. Place of installation, place of use
•
•
•
•
•
•
Moisture analyzer should be stored and used in places free from vibration
and shakes, free of wind and breeze, dust free and not higher than 2000
meters above sea level,
Operation place should be situated in place with good air circulation,
especially around the device (20 cm around the moisture analyzer, and 1
meter from top of the device).
Room temperature should equal:
+15 °C ÷ +40 °C,
Relative humidity of operation room should not exceed 80% in 31°C, and
decrease linearly to 50% of in 40°C,
Moisture analyzer should be placed on a wall console or a stable table, free
of vibration and shakes , and distant from heat sources,
Special attention should be paid to weighing magnetic materials, as balance
is equipped with a strong magnet.
4.2. Unpacking
Gently take the moisture analyzer from package, take off plastic, cartoon and
foil transport protections, and gently put the device in previously prepared
operation place. Install components of moisture analyzer according to below
schema:
9
Montage schema for parts of moisture analyzer:
-
Install cover of
drying chamber,
Install weighing pan
handle,
Install pan
supporter,
Put disposable
weighing pan in
prepared place.
Setting pan supporter:
When installing weighing pan supporter,
pay special attention to positioning of the
weighing pan mandrel cross. The mandrel
is equipped with special cut for unique
positioning of the handle towards the
cross, which eliminates their contact and
friction. Positioning of weighing pan cross:
-
-
10
After placing the weighing pan cross
on the mandrel, turn the cross
slightly, so that the cutting on the
mandrels are situation in correct
position,
When turning the mandrel, use most
gentle movements so that
mechanism of the moisture analyzer
is not damaged
4.3. Setting
Before switching on the device, please level the moisture
analyzer using the feet situated at the back of its casing. The
bubble of the level should be situation in the centre of the
ring.
4.4. List of standard elements of the delivery
•
•
•
•
•
•
•
•
Moisture analyzer.
Insert for base of the drying chamber.
Drying chamber cover.
Pan holder.
Cross.
Disposable pan.
Power cable.
User manual.
4.5. Cleaning of moisture analyzer
Moisture analyzer should be cleaned with use of a damp cloth. Gently rub dirty
places. Weighing pan must be removed from the moisture analyzer for
cleaning. Cleaning weighing pan when it is installed may cause damage of
moisture analyzer mechanism. Remember about disconnecting the
moisture analyzer from power supply before the cleaning.
4.6. Connecting to mains
Moisture analyzer can be connected to mains only by means of original
supply wire which is basic equipment of balance. Rated voltage (given on
data plate) should be consistent with mains rated voltage.
Supply wire can be connected only to socket with ground contact. Switch on
supply of moisture analyzer – plug of supply wire should be connected to the
socket on the back of analyzer casing.
Display of moisture analyzer will indicate name and number of program, next
display will indicate 0.000 g (for balances with accuracy of 1 mg) or 0.0000 g
(for balances with accuracy of 0,1 mg). If indication is different from zero, press
TARE key.
11
4.7. Connection of additional equipment
Before connection of additional equipment or its change (printer, computer PC),
disconnect the moisture analyzer from power supply. Only additional
equipment which is recommended by the manufacturer of moisture analyzer
can be connected to it. After connecting the devices, plug in the moisture
analyzer to power supply.
5.
KEYBOARD OF MOISTURE ANALYZER
Start/Stop key – switch on/ off process of drying
according to chosen program.
Esc key, resignation from introduced changes / exit
to one level higher in menu.
Group of navigation keys – change of parameters
value; moving in menu.
12
Print/Enter key – sending display state to external
device (Print) or confirmation of chosen value or
function (Enter).
TARA key – zeroing the indications.
On/Off key – switch on/off display of moisture
analyzer. After switch off the display, other
subassemblies are supplied, moisture analyzer will
be in standby mode
Display key – changes type of data displayed during
and after drying process.
Setup key – enter to main menu.
Test menu key – starting choice of drying modes.
6.
STARTING THE OPERATION
After disconnection from mains, moisture analyzer will carry out the display test (All
display marks will be indicated), display name and number of program and move to
weighing function.
6.1. Temperature stabilization time of moisture analyzer
Before measurements, wait until moisture analyzer reaches temperature
stabilization. It is time of self-heating. For moisture analyzers which before
switch on were stored in much lower temperature (e.g. during winter), time of
adjustment and heating is together about 4 hours. During temperature
stabilization, display indication might change. Appropriate operation of moisture
analyzer is possible in temperature range given in technical parameters in
point 1. Moisture analyzer should be used in place with small (slow) changes of
ambient temperature.
13
7.
USER MENU
User menu is divided into 5 basic function groups.
7.1. Moving in user menu
User moves in menu by means of analyzer keyboard:
Enter to main menu
Navigation key – choice of parameters group upwards menu
/ change of parameter value one value up. Key Up.
Navigation key – choice of parameters group downwards
menu / change of parameter value one value down. Key
Down.
Navigation key – choice of parameters group, which is to be
activated. After pressing the key, display will indicate first
parameter from chosen group. Key Right.
Navigation key – exit one level higher, e.g. to main menu.
Key Left.
Resignation from the change of the parameter. Key Esc.
Approval / acceptation
Print/Enter.
14
of
introduced
changes.
Key
Names of functions groups and their contents are shown below:
P1 CAL
[Calibration]
P1-01 ECAL |
P1-02 tCAL |
P1-03 tE_CAL |
P1-04 CALr |
P2 GLP
P2-01 USr
P2-02 PrJ
P2-03 Ptin
P2-04 PdAt
P2-05 PUSr
P2-06 PPrJ
P2-07 PId
P2-08 PFr
P3 tinnE
[external calibration]
[calibration test]
[calibration of drying chamber]
[report from calibration]
[Good Laboratory Practice]
|
|
|
|
|
|
|
|
_
_
YES/no
YES/no
YES/no
YES/no
YES/no
YES/no
[name of user]
[name of project]
[printout of measurement time]
[printout of meauserement date]
[printout of user name]
[printout of project name]
[printout of factory number of balance]
[printout of frames]
[Date / Time]
P3-01 StinnE |
P3-02 SdAtE |
P4 rEAd
P4-01 AuE
P4-02 Auto
P5 Print
[time setting]
[date setting]
[Main user parameters]
|Stand/SLouu/Fast
|
On/OFF
[filtering level]
[autozero]
[Date transmission – RS 232]
P5-01 bAud | 2400/4800/9600/19200 [speed transmission]
P5-02 PStb | YES/no
[result printout: stable or unstable]
P5-03 LinE_t | 1/2/3/5/10/20/30/60/120/180
[printout time]
15
[Other functions]
P6 othEr
P6-01 Libr
P6-02 bL
P6-03 bEEP
P6-04 PrnS
|
|
|
|
YES/no
YES/no
YES/no
[program library]
[backlight]
[beep]
[parameters printout]
7.2. Back to weighing function
CAUTION
Introduced changes in memory of moisture analyzer will be
saved after return to weighing with application of saving changes
procedure.
Press few times key Esc, until display indicates SAuE ?
After indication, press:
8.
•
Print/Enter
•
Esc
- changes confirmation
- resignation from introduced changes.
WEIGHING
Before measurements or in case of significant external conditions changes (e.g. big
changes of ambient temperature) moisture analyzer should be calibrated.
Procedure of calibration is described in further part of instruction.
•
•
before measurements load the pan few times with load close to max
capacity,
after unload, check if unloaded moisture analyzer indicates zero and if
measurement is stable - symbol
, if not press key TARA,
16
•
•
place on the pan of moisture analyzer weighed load and when indications
are stable, read out the weighing result from the display,
mass indication of placed on pan can be tarred many times by pressing
TARA key (sum of tares mass introduced to memory of moisture analyzer
can not exceed its max capacity).
During break between measurements series, do not disconnect the balance from
mains. It is advised to switch off only the display with On/Off key. After pressing
On/Off key, moisture analyzer is ready to operate.
9.
MAIN PARAMETERS OF MOISTURE ANALYZER. ADJUSTMENT OF
MOISTURE ANALYZER TO CONDITIONS IN OPERATION PLACE
•
•
•
•
•
Setting filter mode – AuE.
Autozero function – Auto.
Access to library of drying programs – Libr.
Weighing result backlit - bl.
Signal „beep” – reaction to pressing the key – bEEP.
User can adjust the balance to external environmental conditions (change of Digital
filters), or to one’s need (autozero operations or display backlit), thanks to
parameters in group of functions connected to adjustment of balance to conditions
in place of use.
17
9.1. Filter setting
- Ussing navigation keyss, choose value of filter which is needed
d,
E = StAnd
AuE
AuE
E = Slouu
AuE
E = Fast
- (standard) – norma
al operating conditio
ons,
- (slow) – bad opera
ating conditions – vib
brations etc.,
- (fast) – good operrating conditions – without vibrations
e
etc.
CAUTION
er weighing time.
The higher filterring mode, the longe
18
9.2. Autozero function
To assure accurate indications of moisture analyzer, program autozero function
was introduced (Auto). The task of this function is automatic control and
correct of moisture analyzer zero function. When function is active, comparison
of consecutive results takes place in declared time intervals e.g. every 1 s. If
these results vary of value smaller than in declared range of autozero e.g. 1
division, then moisture analyzer automatically zeroes and marker of stable
result is displayed –
.
When autozero function is on, then each measurement starts from precise
zero. There are special cases when this function interrupts in measurements.
Such example can be very slow loading the pan (e.g. exact load). In such case
zero indication correction system can also correct indication of Real mass load.
Auto = On - autozero on,
Auto = OFF - autozero off.
19
9.3. Access to library of drying procedures
To use programs procedures library choose one of the options:
no
YES
- drying programs libraries are not accessible,
- drying programs libraries are accessible.
20
9.4. Backlit of weighing result (display screen)
Function enables to switch on or off backlit of weighing result.
bl = 1
bl = 2
bl = 3
- backlit on,
- backlit on permanently,
- backlit on temporarily.
21
9.5. Signal „beep” – reaction to pressing the key
- signal beep on,
- signal beep off.
bEEP = On
bEEP = OFF
10. CALIBRATION
Because acceleration of gravity (gravity force) changes depending on geographical
location, each moisture analyzer should be adjusted to place of use.Calibration
process must take place during first installation of moisture analyzer in its place of
use and after each change of this place (similarly to change of ambient
temperature).
To ensure high accuracy, periodic check of moisture analyzer accuracy by carrying
out calibration is required.
Calibration should be carried out:
-
before starting the weighing,
when there are long breaks between consecutive measurement series.
Type of calibration:
-
calibration with external calibration mass
Remember to carry out the calibration when pan is unloaded!
In case when pan is overloaded, display will indicate Er 1 Hi.
22
Calibration process can be stopped when needed. To stop the calibration
press TARA.
10.1. External calibration
External calibration should be carried out by means of calibration mass class
F2 or more precise one.
Start process of external calibration,
choose function CAL, balance will display indication unLoAd – unload the pan
(pan must be empty) and press key Print/Enter. Display will indicate value of
calibration mass which should be placed on the pan – press key Print/Enter.
When calibration is completed, moisture analyzer will return to menu P1-01
ECAL.
CAUTION
- To stop calibration process, press key Esc.
- In case when pan is loaded during calibration, display will indicate Er 1
Hi.
Return to weighing
(according to procedure in 8.2 – return to weighing function).
23
10.2. Calibration test
It consists in comparison of calibration mass with value of last calibration saved
in balance memory. This process takes place automatically and display
indicates its result (if balance is connected through RS 232 port to computer or
to printer, calibration test will be printed). After pressing key Print/Enter,
display will return to previous window.
24
10.3. Calibration of drying chamber
Calibration of drying chamber is a process which task is to calibrate
temperature sensor of moisture analyzer. To carry out the temperature
calibration of moisture analyzer, place the control thermometer in drying
chamber hole as show on the picture below.
25
Choose menu P1-03 tE_CAL, calibration process will be initiated.
Display indicates current temperature of moisture analyzer. After 15 minutes
display will indicate (pulsing) temperature value. Set temperature current
temperature of moisture analyzer. Using key Print/Enter, start further part of
calibration. Moisture analyzer will switch on halogen and during next 15
minutes will be heating up drying chamber and displaying current temperature.
Afterwards, display will indicate pulsing value, which should be change
according to current temperature off moisture analyzer. After inserting the
temperature, finish calibration process with key Print/Enter.
26
Only for moisture analyzer with drying temperature 250 °C.
Display indicates current temperature of moisture analyzer. After 15 minutes
display will indicate (pulsing) temperature value. Set current temperature of
moisture analyzer. Using key Print/Enter, start further part of calibration.
Moisture analyzer will switch on halogen and during next 15 minutes will be
heating up drying chamber and displaying current temperature. After 15
minutes display will indicate (pulsing) temperature value. Set current
temperature of moisture analyzer. Using key Print/Enter, start further part of
calibration. Moisture analyzer will switch on halogen and during next 15
minutes will be heating up drying chamber and displaying current temperature.
Afterwards, display will indicate pulsing value, which should be change
according to current temperature off moisture analyzer. After inserting the
temperature, finish calibration process with key Print/Enter.
27
Return to weighing
(according to procedure in 8.2 – return to weighing function).
10.4. Calibration report printout
After each calibration report can be printed. The report is printed on
external printer or sent to computer and recorded in the file to
archiving.
YES
no
- report will be printed.
- report will not be printed
Remember that after setting parameter to value YES, report will be generated
and sent automatically.
Contents of calibration report depends on balance settings in GLP submenu.
All options which have YES attributes, will be printed.
28
Exemplary printout if calibration report:
11. PRINTOUTS FOR GLP PROCEDURES
P2 GLP is the group of parameters enabling to declare variables, which are on
calibration printout and measurements printout.
P2 GLP
P2.1
USr
|
P2.2
PrJ
|
P2.3
Ptin
|
YES
P2.4
PdAt
|
YES
P2.5
PUSr
|
YES
P2.6
PPrJ
|
YES
P2.7
PId
|
YES
P2.8
PFr
|
YES
•
P2-01 USr
Option enables to introduce user name. User has possibility to introduce name
of max 6 alphanumeric signs. Name can be introduced by mans of moisture
analyzer keyboard or by navigation keys Up, Down, Left, Right.
29
Available signs and their equivalents displayed by moisture analyzer are shown
below:
Exemplary user name introduced in capital letters:
WILK
Exemplary user name introduced in small letters:
wilk
30
•
P2-02 Prj
Option enabling to introduce project name (e.g. relating to specific test).
Exemplary project name introduced in capital letters:
POLON
Exemplary project name introduced in small letters:
polon
•
P2-03 Ptin
Option enabling to print measurement time
•
P2-04 PdAt
Option enabling to print date of measurement
•
P2-05 PUSr
Option enabling to print user name
•
P2-06 PPrj
Option enabling to print project name
•
P2-7 Pld
Option enabling to print factory number
•
P2-08 PFr
Option enabling to print frames on printout
For above described parameters choose values:
no
YES
- not to print during report,
- print during report
31
Return to weighing
(according to procedure in 8.2 –return to weighing function).
12. SETTING TIME AND DATE
12.1. Time setting
Parameter enabling to set time of moisture analyzer – to change settings use
navigation keys Up, Down, Left, Right.
32
12.2. Date setting
Parameter enabling to set date of moisture analyzer – to change settings use
navigation keys Up, Down, Left, Right.
13. FUNCTIONS CONNECTED WITH USE OF RS 232
13.1. Choice of transmission speed
33
To choose required speed value:
- 2400 bit/s
- 4800 bit/s
- 9600 bit/s
- 19200 bit/s.
Return to weighing
(according to procedure in 8.2 –return to weighing function).
13.2. Determination of data type sent through RS 232
YES
no
- sending stable weighing result,
- sending stable or temporary weighing result.
Return to weighing
(according to procedure in 8.2 –return to weighing function).
34
13.3. Printout time
Printout time determines how often information about drying process will be
sent through RS 232. Possible settings: 1, 2, 3, 5, 10, 20, 30, 60, 120, 180
seconds.
14. DRYING PROCESS WITH USE OF SHORTENED MENU
In menu drying procedures following procedures should be set:
- way of drying process finish,
- profile according to which drying process is carried out,
- type of displayed result.
To start drying process with use of shortened menu, switch off access to programs
library– P6-01 Libr.
To change parameters settings, enter to drying menu with key Test menu. Group
marker way of drying process finish will start flashing. Next using navigation key
Right, start settings of parameters group. With navigation keys Up
and Down, set one of options and accept changes (pressing twice key Print/Enter)
or continue setting the parameters (pressing once key Print/Enter).
35
14.1. Way of drying process finish
Parameter way of drying process finish has values:
1
2
3
4
5
– automatic finish (change of mass 1mg / in time range 20s)
- automatic finish (change of mass 1mg / in time range 50s)
- automatic finish (change of mass 1mg / in time range 120s)
- automatic finish (change of mass 1mg / in time range 180s)
- automatic finish (change of mass 1mg / in time range 240s)
- manual finish (after pressing key Start/Stop)
- time finish (max time 9 hours 59 minutes):
36
To accept changes press three times key Print/Enter.
14.2. Profile according to which drying process is carried out
37
To accept changes press three times key Print/Enter.
Parameter profile according to which drying process is carried out has
values:
•
STANDARD drying profile
In standard profile, set temperature tmP in which sample will be tested,
•
QUICK drying profile
In quick profile, set temperature tmP in which sample will be tested,
This profile is characterised by quick increase of temperature in relatively short
period of time. Drying temperature is increased of 30% in time of 180 seconds,
after which temperature decreases to temperature set in profile settings.
•
MILD drying profile
In mild profile, set temperature tmP in which sample will be tested and time t1
in which moisture analyzer should reach this temperature.
38
•
STEP drying profile
In step profile, set temperature tmP in which tested sample should be, step
temperatures tmP1 and tmP2 and time between step temperatures t1 and t2.
39
40
14.3. Type of displayed result
To accept changes, press twice key Print/Enter.
•
percentage weight loss
displays change of mass registered during drying process in percents,
•
part of dry mass received in drying process in percents,
part of sample which remained on the pan, after humid evaporation is the
result,
•
humid / dry mass ratio received in drying process in percents
part of sample which vaporized during drying process is the result,
41
•
mass change
mass of change registered during drying process is the result.
15. DRYING PROCESS WITH USE OF PROGRAM PROCEDURES LIBRARIES
To start drying process with use of program libraries, switch on access to programs
libraries P6-01 Libr. Moisture analyzer has 20 libraries, which can be freely
configured, saved and use by entering specific library.
To change parameters settings, enter to drying menu with key Test menu. Group
marker way of drying process finish will start flashing. Next using navigation key
Right, start settings of parameters group. With navigation keys Up
and Down, set one of options and accept changes (pressing twice key Print/Enter)
or continue setting the parameters (pressing once key Print/Enter).
To change parameters of drying from particular libraries, follow the
procedures from point 14 DRYING PROCESS WITH USE OF
SHORTENED MENU
To use specific library in drying process:
To exit from mode of use from program libraries, switch off access to libraries
according to point pkt. 10.3.
42
16. DRYING PROCESS
To start drying process:
start drying procedures by pressing key Start/Stop and next, after unloading the
pan, press key TARA. Open drying chamber, place tested sample on pan of
moisture analyzer and close drying chamber.
43
To change during process displayed data press key Display.
44
To stop drying process, press key Start/Stop and confirm with key Print/Enter. The
exception is way of manual drying process finish – after pressing key Start/Stop –
moisture analyzer will finish drying process without option of confirmation with key
Print/Enter.
45
Number of instruction:
LMI 11/02/01/08/ENG-C
46
47