1
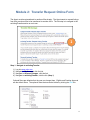
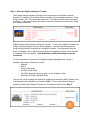
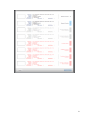
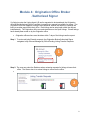
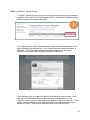
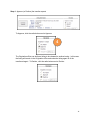
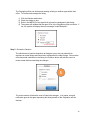
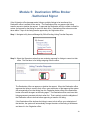
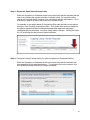
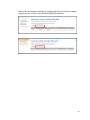
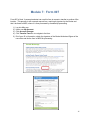
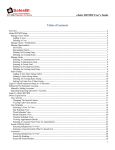
ezListingTransfer USER MANUAL | We’ll guide you through 1 Table of Contents Module 1: New Features .......................................................................................................................... 3 Module 2: Transfer Request Online Form ............................................................................................. 4 Module 3: Checking the Status on a Transfer Request ...................................................................... 7 Module 4: Origination Office Broker / Authorized Signer .................................................................... 9 Module 5: Destination Office Broker / Authorized Signer ................................................................. 13 Module 6: Transfer Request Cancellations ......................................................................................... 16 Module 7: Form 807................................................................................................................................ 17 Module 8: Listing Transfer FAQ’s ......................................................................................................... 18 2 Module 1: New Features Agents will be able to request a listing transfer from one office to another in a few short steps. The ezListingTransfer Request link is now available for an agent to submit a transfer request electronically. There are several new features in using this ezListingTransfer request: No more faxing the Listing Transfer Request form by Agents requesting their listings to be transferred from one office to another. Listings must have the agent as the Listing Agent and be eligible to transfer. Eligibility depends on status of the listing, whether the listing was already transferred or the whether the listing agent ID was changed by the Origination office. The online form is submitted to the Origination office’s Broker or Authorized Signer for approval electronically, similar to ezJoin applications. Their approval must be completed within 7 days of the request or the request will be cancelled. If approved, the request is submitted to the Destination office’s Broker or Authorized Signer for approval electronically. Their approval must be completed within 7 days of the Origination office’s Broker or Authorized Signer approval or the request will be cancelled. Email notifications are sent to the agent that the ezListingTransfer request has been submitted for approval. Email notifications are sent to the Origination office’s Broker or Authorized Signer for approval and the Destination office’s Broker or Authorized Signer for approval. Reminder email notifications are sent to the Broker or Authorized Signer before the 7 day timeframe for approval expires. Email notification is sent to the Origination office that the transfer was completed. Once an ezListingTransfer is approved by the Destination office, the listing transfer is completed immediately by the system. 3 Module 2: Transfer Request Online Form The Agent must have transferred to another office already. The Agent wants to request listings from their previous office to be transferred to another office. The first step is to navigate to the ezListingTransfer section on mris.com: 1 Step 1: Navigate to ezListingTransfer 1) 2) 3) 4) Log into www.mris.com. Navigate to My Account, click the link. Navigate to Account Changes, click the link. Navigate to ezListingTransfer, click the link (Step 1) Optional filters are defaulted but the user can change them. Eligible and Pending Approval are the default filters. The optional filters feature can be hidden by clicking the hide link. 4 Step 2: Select the Eligible Llistings to Transfer The Ineligible listings checkbox will display the listings that are not eligible to transfer because, for example, of their listing status or because they are already transferred. These listings will be in red. They cannot be transferred. The Request Status column will display the reason. In the example below the reason it cannot be transferred is because the listing was already transferred. Eligible listings can be selected for Request Transfer. In order to be eligible for transfer the listing must have the agent ID of the requesting agent. If the office has reassigned the listing through Keystone, that listing is not eligible to request. The listing status must be Active, Contingent - with or without kickout, Application Registered, Rental, Under Contract or Temporarily Off of the Market. Sold, Withdrawn and Expired listings may not be transferred. For the convenience of customers, the Eligible listings are displayed with a photo, if available, and property information such as: o Address o MLS # o Status of the listing o List Price of the listing o List Office where the listing currently is in the Origination office o Bedrooms, Full Baths and Half Baths The user can use the optional sort feature for displaying the listings by MLS # (default view) or change the listing to MLS# or by Transfer eligibility. Once a user selects a listing to transfer by checking the Request Transfer box, the selection will turn blue (Step 2). 2 5 Step 3: Submit Your Request A confirmation screen of the listings requested will display. The user clicks the Submit button. The user sees a message that indicates that their request has been recorded and the Origination office has been notified to review their request. The system sends an email notification to the agent who requested the listings to be transferred. The system sends an email notification to the Origination office’s Broker/Authorized Signers to review. 6 Module 3: Checking the Status on a Transfer Request An agent may return to the ezListingTransfer request form to view the progress of their request at any time during the approval process. Each listing will have a Request Status column with notations on the request: Request Transfer with a blue line means the listing has been selected to go through the approval process. Pending Origination Broker Approval that is greyed out means the listing has been submitted to the Origination Broker’s office for review. This status is during the 7 day period allowed for review by the office. Pending Destination Broker Approval that is greyed out means the listing has been approved by the Origination Broker’s office and is now in review by the Destination Broker’s office. This status is during the 7 day period allowed for review by the office. Ineligible Status that is red means the listing no longer has an eligible status to be transferred. Origination Broker Declined that is red means the listing has been declined by the Origination Broker’s office and may have been reassigned to another agent in that office. Destination Broker Declined that is red means the listing has been declined by the Destination Broker’s office. The system leaves the listing in the Origination office but changes the listing’s status to Withdrawn. Expired Origination Broker inaction that is red means the listing request has been cancelled since the Origination Broker did not act within the 7 days allowed. The agent may submit a new listing transfer request to start the process again. Expired Destination Broker inaction that is red means the listing request has been cancelled since the Destination Broker’s office did not act within the 7 days allowed. Listing already transferred that is red means the listing request has already been processed. Unauthorized that is red means the listing request has been reassigned by the Origination office and cannot be transferred. 7 8 Module 4: Origination Office Broker /Authorized Signer If a listing is under the Listing Agent’s ID and is requested to be transferred, the Origination office Broker/Authorized Signer is notified via email that a request is available for review. The Origination office can approve a listing to be transferred, decline the request or reassign the listing to another agent within their office. Each listing can be acted upon within the request independently. The Origination office can make decisions on the Open listings. Closed listings have already been acted on by the Origination office. Origination office actions must be taken within 7 days of the listing transfer request. Step 1: To review ezListingTransfer requests, the Origination Broker/Authorized Signer navigates to My Account/Manage My Office/Pending Listing Transfer Requests. 1 Step 2: The user can select the Red door when reviewing requests for listings to leave their office. The Green door is to review listings to come into the office. 2 9 Step 3: Review the Transfer Request To review a transfer request, the user will click the line where there are open transfer requests. Click the blue link under the Open column. Closed links will display listings where a decision has already been made. 3 The Outgoing Listing Transfer Request Details screen will provide information on the agent requesting the listing transfer. Their current office and contact information is displayed. The Listings that are being requested will appear with the Listing Information and a set of radio buttons on the right for Decisions. The Origination office can approve a listing to be released to another broker; in this case that is the Destination office or where the agent has transferred to. The Origination office must have ended their listing agreement with their seller first. That is entirely under the obligation of the Origination office to do that before approving a transfer of a listing. All listings will have No Action as the default setting. 10 Step 4: Approve (or Decline) the transfer request To Approve, click the radio button next to Approve. 4 The Origination office can decline a listing to be released to another broker. In this case, the listing will remain in the Origination office and under the listing agent ID of the transferred agent. To Decline, click the radio button next to Decline. 11 The Origination office can decline and reassign a listing to another agent within their office. To Decline and reassign the listing: 1) 2) 3) 4) Click the Decline radio button. Check the Assign to box. Enter in the MRIS ID of the agent that will now be reassigned to that listing. The system will validate that the agent ID is in the Origination office and active. If not, the system will display the error message “Invalid Recipient”. Step 5: Review the Decision The office does not need to disposition all listings at once; they can submit their decisions on some listings and return later to disposition the other listings. But once the office has made a decision on the listing, the Continue button will take the user to a review screen before committing the changes. 5 The review screen will allow the user to Submit the changes. In all cases, an email notification goes to the agent requesting the listing transfer of the Origination office’s decision. 12 Module 5: Destination Office Broker /Authorized Signer If the Origination office has approved a listing or multiple listings to be transferred, the Destination office is notified to take action. The Destination office can approve the listing transfer request or decline the request. If approved the Destination office is notified via email to review, the request for that listing to come into their office. Destination office actions must be taken within 7 days of the listing transfer approval by the Origination office. Step 1: Navigate to My Account/Manage My Office/Pending Listing Transfer Requests. Step 2: Select the Green door when they are reviewing requests for listings to come into their office. The Red door is for listings outgoing from the office. The Destination office can approve or decline the request. When the Destination office approves the listing to come to their office, upon submission of that approval the system will automatically move that listing from the Origination broker office to the Destination broker office with the agent as the listing agent. The Destination office must have their listing agreement executed with their seller first. That is entirely under the obligation of the Destination office to do that before approving a transfer of a listing. If the Destination office declines the listing to come to their office, upon submission of that decline, the system will automatically change the status of the listing to Withdrawn and leave it in the Origination office. 13 Step 3: Review the Open/Closed Column Links Either the Origination or Destination broker can review listing transfer requests that are new or are revisiting the request to decide on another listing. So long as the office returns to the request before it expires, they can make a decision and submit it. Once a decision is made on a listing, they move to the Closed column. For example, in the caption below an Origination office sees that there is one request that has 1 out of 2 listings in the open column. This means there were two listings on the agent’s request and that one listing has already been approved, declined or reassigned and was submitted. One more listing needs a decision. Clicking the Open link 1/2 will display the listing that still needs a decision. Step 4: Review the Listing Transfer History (by either Origination or Destination Broker) Either the Origination or Destination broker can review listing transfer requests that their respective offices made decisions on. To navigate to the history screens, click the Closed link through Incoming or Outgoing requests. 14 Either office can change to incoming or outgoing requests by clicking the ‘change request type’ link to return to the Green and Red door selectors. 15 Module 6: Transfer Request Cancellations If an agent’s status changes to inactive the listing transfer request will be cancelled. If the office’s status changes to inactive, the listing transfer request will be cancelled. If the seven days elapse without Origination or Destination office action, the transfer request will be cancelled. The agent can submit a new request again so long as the listings are still eligible (their listing agent ID is on the listing and the status makes the listing eligible). 16 Module 7: Form 807 Form 807 Is New! A personal assistant can use this form to request a transfer to another office location. This process is still a manual request form, requiring a signature by the Broker and that it be faxed to MRIS, where it is then processed by membership processing. 1) 2) 3) 4) 5) Log into Mris.com. Hover over My Account. Click Account Changes. Click Transfer Form link to navigate to the form. Print form, fill in information, obtain the signature of the Broker/Authorized Signer of the new office and fax the form to MRIS for processing. 17 Module 8: Listing Transfer FAQ’s Q: How can I transfer listings to another office? A: You must use the ezListingTransfer link on mris.com. Q: Do I have to fax in paperwork? A: No! All requests are handled online from agent submission to approvals by both offices. No more paper to sign or fax! Q: When can I transfer listings from one office to another? A: You must have submitted and successfully transferred yourself to a new office. Use the convenient ezAgentTransfer link on mris.com to request a transfer. Q: Who can transfer listings? A: If your MRIS ID is the Listing Agent ID on that listing in a previous office, you may request a listing be transferred. The system will indicate if the listing or listings are eligible to be transferred. Q: What listings are eligible to transfer? A: Listing(s) that have you as the Listing Agent ID with the following statuses can be requested to transfer to another office: Active App Reg TempOff Contingency NOKO Contingency KO Contract Q: What listing statuses are ineligible to transfer? A: Listing(s) that has you as the Listing Agent ID with the following statuses cannot be requested to transfer to another office: Sold Expired Withdrawn Rented 18 Q: What are other reasons for listings to be ineligible to transfer? A: If the Origination office has reassigned a listing to another agent within their office, the listing is ineligible for transfer. Q: Who must approve a listing transfer request? A: There is a two-step online approval process. The Origination Office’s (the office you are transferring a listing from) Broker of Record or their designated Authorized Signer for that office may approve a listing to be released for transfer to another location. The Destination Office’s (the office you are transferring a listing to) Broker of Record or their designated Authorized Signer for that office may approve a listing to come into their office. Q: How long do the Origination and Destination offices have to approve a listing transfer request? A: Each of the offices has a seven day time period to approve or decline the request. Q: Are email reminders sent before time runs out? A: Yes! The office is notified when there are three days left to approve or decline the request. You also receive this notification. Q: What happens if no office approval is completed in the seven day timeframe? A: The request will expire. You may make another request as long as the listings are eligible. Q: When does a listing transfer complete? A: When the Destination office approves the listing transfer. The system will transfer the listing under your Listing Agent ID to the Destination office. Q: How do I know where my listing transfer request is in the process? A: Two ways! The system will send you emails at each step of the approval process and when complete. You can also click the ezListingTransfer request link and the system will tell you the current real-time status of that requested listing. Each listing requested may move through the approval system quicker than others but you will always see the current status. Q: What happens if my listing request is declined by the Origination office? A: The Origination office may reassign the listing or leave you as the Listing Agent but the listing remains in that office. The system will not transfer that listing. Q: What happens if the listing request is approved by the Origination office but declined by the Destination office? A: The listing will remain in the Origination office but the status of the listing will automatically be set to Withdrawn. 19