1
CHARON-AXP for Linux, version 4.5
XML to PDF by RenderX XEP XSL-FO Formatter, visit us at http://www.renderx.com/
CHARON-AXP for Linux, version 4.5
Publication date 02 June 2014
XML to PDF by RenderX XEP XSL-FO Formatter, visit us at http://www.renderx.com/
Table of Contents
1. Preface ................................................................................................................... 1
1.1. Ownership Notice ......................................................................................... 1
1.2. Trademarks .................................................................................................. 1
1.3. Life support applications ................................................................................ 1
1.4. End User License Agreement ........................................................................ 1
1.4.1. Grant of License ................................................................................. 1
1.4.2. Ownership of Software ....................................................................... 2
1.4.3. Access and Transfers ......................................................................... 2
1.4.4. Term .................................................................................................. 2
1.4.5. Limited Warranty ................................................................................ 2
1.4.6. Intellectual Property Infringement ........................................................ 3
1.4.7. Export ............................................................................................... 3
1.4.8. Applicable Law; Claims and Disputes .................................................. 3
2. Overview ................................................................................................................. 5
2.1. General Description ...................................................................................... 5
2.2. CHARON-AXP User Guide Structure ............................................................. 5
2.3. CHARON-AXP hardware compatibility ........................................................... 7
3. CHARON-AXP hosting and performance ................................................................... 8
3.1. Host operating system requirements .............................................................. 8
3.2. Host operating system requirements .............................................................. 8
3.2.1. Common requirements ....................................................................... 8
3.2.1.1. CPU selection ......................................................................... 8
3.2.1.2. Host system hardware platform recommendations ..................... 9
3.2.1.3. Host system memory ............................................................... 9
3.2.1.4. Disk storage ............................................................................ 9
3.2.2. Linux specific requirements ................................................................. 9
3.2.2.1. Ethernet adapters .................................................................... 9
3.2.2.2. Specific account to run CHARON ........................................... 11
3.2.2.3. Other host system requirements ............................................. 11
3.3. General performance considerations ............................................................ 12
3.3.1. AXP CPU performance ..................................................................... 12
3.3.2. Disk I/O subsystem .......................................................................... 12
3.3.3. Network connections ........................................................................ 12
3.3.4. Enhancing virtualization layer reliability .............................................. 13
4. CHARON licensing ................................................................................................ 14
4.1. General description ..................................................................................... 14
4.1.1. General parameters ......................................................................... 14
4.1.2. Products parameters ........................................................................ 15
4.1.3. Optional parameters ......................................................................... 15
4.2. CHARON licensing models .......................................................................... 16
4.2.1. Licensing by usage of locally installed Sentinel HASP keys ................. 16
4.2.2. Licensing by usage of the specific Network Sentinel HASP keys ......... 16
4.2.3. Licensing by software license (SL) ..................................................... 16
4.3. Multiple licenses configuration ..................................................................... 17
4.4. License installation ...................................................................................... 17
4.4.1. Installation from scratch .................................................................... 17
4.4.2. Replacement of currently installed Sentinel run-time to other one ........ 18
4.4.3. Installation of CHARON Software License .......................................... 18
4.5. License management .................................................................................. 19
4.5.1. Sentinel Admin Control Center .......................................................... 19
4.5.1.1. General Description ............................................................... 19
4.5.1.2. Disabling remote keys access via Sentinel Admin Control
Center .............................................................................................. 20
4.5.1.3. Accessing the Sentinel Admin Control Center from remote
host .................................................................................................. 20
iii
XML to PDF by RenderX XEP XSL-FO Formatter, visit us at http://www.renderx.com/
CHARON-AXP for Linux, version
4.5
4.5.2. License management specifics .......................................................... 21
4.6. Switch to backup key in CHARON ................................................................ 21
4.7. Software Licenses Management .................................................................. 22
4.7.1. Software Licenses Transfer ............................................................... 22
4.7.2. Software License Remove ................................................................ 23
4.8. License Deinstallation ................................................................................. 23
4.9. Backup license keys .................................................................................... 23
4.10. Important Notes ........................................................................................ 24
5. Installing CHARON-AXP for Linux ........................................................................... 25
5.1. Installing the CHARON-AXP products .......................................................... 25
5.2. CHARON directories structure ..................................................................... 27
5.3. Configuring the HP Alpha virtualization layer ................................................. 27
5.4. Running CHARON-AXP .............................................................................. 28
5.5. Uninstalling ................................................................................................. 31
6. Configuring Virtual HP Alpha .................................................................................. 32
6.1. The HP Alpha system architecture ............................................................... 32
6.2. The configuration command syntax .............................................................. 32
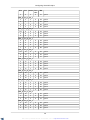
6.3. The virtual AXP models specifics ................................................................. 33
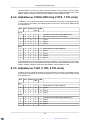
6.3.1. AlphaServer 400 (DECchip 21072, 3 PCI slots) .................................. 33
6.3.2. AlphaServer 800 (DECchip 21172, 4 PCI slots) .................................. 34
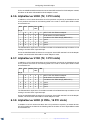
6.3.3. AlphaServer 1000 (DECchip 21072, 3 PCI slots) ................................ 34
6.3.4. AlphaServer 1000A (DECchip 21072, 7 PCI slots) .............................. 35
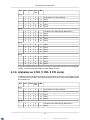
6.3.5. AlphaServer 1200 (1 IOD, 6 PCI slots) ............................................... 35
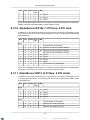
6.3.6. AlphaServer 2000 (T2, 3 PCI slots) ................................................... 36
6.3.7. AlphaServer 2100 (T2, 3 PCI slots) ................................................... 36
6.3.8. AlphaServer 4000 (2 IODs, 16 PCI slots) ........................................... 36
6.3.9. AlphaServer 4100 (1 IOD, 8 PCI slots) ............................................... 37
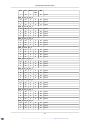
6.3.10. AlphaServer DS10L (1 PCI bus, 4 PCI slot) ...................................... 38
6.3.11. AlphaServer DS15 (2 Pchips, 4 PCI slots) ........................................ 38
6.3.12. AlphaServer DS20 (2 Pchips, 6 PCI slots) ........................................ 39
6.3.13. AlphaServer DS25 (2 Pchips, 6 PCI slots) ........................................ 40
6.3.14. AlphaServer ES40 (2 Pchips, 10 PCI slots) ...................................... 40
6.3.15. AlphaServer ES45 (2 Pchips, 10 PCI slots) ...................................... 41
6.3.16. AlphaServer GS80 (2 QBBs, 8 PCI busses, 27 PCI slots) ................. 42
6.3.17. AlphaServer GS160 (4 QBBs, 16 PCI busses, 55 PCI slots) .............. 43
6.3.18. AlphaServer GS320 (8 QBBs, 32 PCI busses, 111 PCI slots) ............ 45
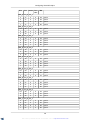
6.4. Multi instance support ................................................................................. 49
6.4.1. General description .......................................................................... 49
6.4.2. Running several instances of CHARON ............................................. 50
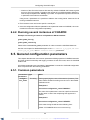
6.5. General configuration parameters ................................................................ 50
6.5.1. Common parameters ........................................................................ 50
6.5.2. Specific configuration parameters ...................................................... 53
6.5.3. Examples ........................................................................................ 54
6.6. Console interface ........................................................................................ 55
6.6.1. Types of serial line emulation ............................................................ 55
6.6.2. "physical_serial_line" parameters ...................................................... 55
6.6.3. "virtual_serial_line" parameters ......................................................... 57
6.6.4. "operator_console" parameters ......................................................... 59
6.6.5. "ttyY" notation specifics ..................................................................... 60
6.7. Specifying emulated memory ....................................................................... 60
6.7.1. Syntax ............................................................................................. 60
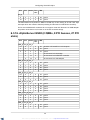
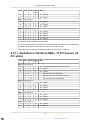
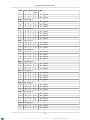
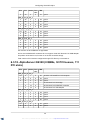
6.7.2. Parameters of emulated RAM for various hardware models of virtual
HP Alpha system ....................................................................................... 60
6.8. System time and date .................................................................................. 61
6.9. Virtual HP Alpha SRM console environment .................................................. 62
6.9.1. Firmware and console environment parameters ................................. 62
6.10. CPU Architecture ...................................................................................... 63
6.11. Virtual HP Alpha interval timer .................................................................... 64
iv
XML to PDF by RenderX XEP XSL-FO Formatter, visit us at http://www.renderx.com/
CHARON-AXP for Linux, version
4.5
6.12. Data storage in the virtualization layer ........................................................
6.12.1. Types of data storage .....................................................................
6.12.1.1. Physical disks and disk images .............................................
6.12.1.2. Physical tapes and tape images ...........................................
6.12.1.3. Physical CD/DVD drives and CD/DVD images .......................
6.12.2. Virtual Acer Labs 1543C IDE/ATAPI controller ..................................
6.12.3. Virtual KZPBA PCI SCSI adapter .....................................................
6.12.3.1. Attaching virtual KZPBA PCI SCSI Adapter to virtual system ...................................................................................................
6.12.3.2. Configuring virtual KZPBA PCI SCSI Adapter ........................
6.12.3.2.1. KZPBA general parameters .......................................
6.12.3.2.2. KZPBA mapping to system resources ........................
6.12.4. Virtual DEC-KGPSA-CA (EMULEX LP8000) PCI Fibre Channel adapter .........................................................................................................
6.12.4.1. Attaching virtual KGPSA PCI Fibre Channel Adapter to virtual
system ..............................................................................................
6.12.4.2. Configuring virtual KGPSA PCI Fibre Channel Adapter in
Fabric virtualization mode ..................................................................
6.12.4.2.1. KGPSA general parameters ......................................
6.12.4.2.2. KGPSA mapping to system resources ........................
6.12.4.3. Configuring virtual KGPSA PCI Fibre Channel Adapter for
CHARON PCI Pass Through ..............................................................
6.12.4.3.1. Building and configuration of PPT driver (kernel object)
for KGPSA PCI Fibre Channel Adapter driver ..............................
6.12.4.3.2. Configuring virtual KGPSA PCI Fibre Channel Adapter
for CHARON PCI .......................................................................
6.12.4.3.3. Supported physical EMULEX LightPulse PCI/PCIX/PCIe FC adapters ...................................................................
6.13. Virtual PCI Ethernet controllers ..................................................................
6.13.1. Virtual DE435, DE450, DE500AA and DE500BA network adapters .......................................................................................................
6.13.1.1. Attaching virtual DE435, DE450, DE500AA and DE500BA to
virtual system ....................................................................................
6.13.1.2. Configuring virtual DE435, DE450, DE500AA and DE500BA
network adapters ...............................................................................
6.13.2. CHARON Packet Port .....................................................................
6.13.2.1. Attaching CHARON Packet Port to virtual system ..................
6.13.2.2. Configuring CHARON Packet Port ........................................
6.13.2.2.1. CHARON Packet Port general parameters .................
6.13.2.2.2. CHARON Packet Port mapping .................................
6.14. Using CHARON with Linux virtual Network Interfaces ..................................
6.14.1. Prerequisites ..................................................................................
6.14.2. Using virtual Network Interfaces if firewall is enabled on host system ...........................................................................................................
6.14.3. Starting virtual network interfaces ....................................................
6.14.4. Creating bridge ..............................................................................
6.14.5. Starting the bridge ..........................................................................
6.14.6. Usage a virtual interface in CHARON configuration ..........................
7. Operating CHARON-AXP .......................................................................................
8. CHARON-AXP Utilities ...........................................................................................
8.1. Overview ....................................................................................................
8.2. "mkdskcmd" utility .......................................................................................
8.2.1. Transferring disk images ...................................................................
8.3. "mtd" utility .................................................................................................
8.4. "hasp_srm_view" utility ................................................................................
8.4.1. Software Licenses Transfer ...............................................................
8.4.2. Software License Remove ................................................................
8.5. "idle" utility ..................................................................................................
v
XML to PDF by RenderX XEP XSL-FO Formatter, visit us at http://www.renderx.com/
65
65
65
65
65
66
66
66
67
67
71
74
74
74
74
78
79
79
81
81
82
82
82
83
86
86
86
86
87
88
88
88
89
89
89
90
91
92
92
92
93
94
95
96
96
97
CHARON-AXP for Linux, version
4.5
8.6. WebUI overview .......................................................................................... 98
A. Installing and transferring an original host software to CHARON ............................... 99
A.1. Using Local Area Network ........................................................................... 99
A.2. Using a physical disk drive .......................................................................... 99
A.3. Using a tape ............................................................................................... 99
B. Configuration files examples ................................................................................. 100
B.1. Virtual HP AlphaServer ES40 configuration template. (e.g. es40.cfg.template) .............................................................................................................. 100
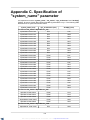
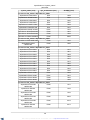
C. Specification of "system_name" parameter ............................................................ 107
vi
XML to PDF by RenderX XEP XSL-FO Formatter, visit us at http://www.renderx.com/
Chapter 1. Preface
1.1. Ownership Notice
Stromasys SA, Geneva, Switzerland, owns all rights, including proprietary rights, copyrights,
trademarks, and world-wide distribution rights to a methodology for the execution of HP Alpha
applications and system software by means of a software virtualization layer, henceforth referred to as CHARON-AXP. The right to use CHARON-AXP software is governed by a license
allowing the execution of the software on a single computer system. The CHARON-AXP license
does not transfer ownership of the CHARON-AXP encrypted binary executable, nor does it
provide any rights to decrypt, view, analyze, copy or reverse engineer the CHARON-AXP
binary or source code. Possession and use of the software described in this publication is
authorized only pursuant to a valid license.
Stromasys makes no representations that the use of the CHARON-AXP software as described
in this publication will not infringe on existing or future patent rights, nor do the descriptions
contained in this publication imply the granting of licenses to make, use, or sell equipment or
software in accordance with the description.
1.2. Trademarks
The CHARON name with logo is a trademark of Stromasys. AXP, XMI, VMS and OpenVMS
are trademarks of the Hewlett-Packard Company. Pentium, Xeon are registered trademarks
in the United States and other countries, licensed exclusively through Intel Corporation, USA.
Athlon and Opteron are registered trademarks of Advanced Micro Devices. All other trademarks
and registered trademarks are the property of their respective holders.
1.3. Life support applications
The CHARON products of Stromasys are not designed for use in systems where malfunction
of a CHARON product can reasonably be expected to result in a personal injury. Stromasys’
customers using or selling our CHARON products for use in such applications do so at their
own risk and agree to fully indemnify Stromasys for any damages resulting from such improper
use or sale.
1.4. End User License Agreement
This is an agreement between Stromasys SA of Geneva, Switzerland, Licensor, and you, the
end user, Licensee;
YOU ACKNOWLEDGE THAT YOU HAVE READ THIS SOFTWARE LICENSE CONTRACT
AND LIMITED WARRANTY, UNDERSTAND IT, AND AGREE TO BE BOUND BY ITS
TERMS AND CONDITIONS.
1.4.1. Grant of License
The Licensor grants to the Licensee, a non-exclusive right to use the licensed functionality
of the Software Product (hereinafter the "SOFTWARE") in accordance with the terms contained
in this License. Unless the contrary is specifically indicated in the product specification, this
License permits the Licensee to run a single instance of the SOFTWARE on the computer.
1
XML to PDF by RenderX XEP XSL-FO Formatter, visit us at http://www.renderx.com/
Preface
1.4.2. Ownership of Software
STROMASYS retains the copyright, title and ownership of the SOFTWARE and the written
materials regardless of the form or media in or on which the original and other copies may
exist.
1.4.3. Access and Transfers
The Licensee defines who may access the licensed SOFTWARE. The Licensee is permitted
to transfer the SOFTWARE from one of its computers to another one of its computers provided
the SOFTWARE is transferred without modification and the other computer’s configuration
is appropriate for the SOFTWARE as per its Software Product Description. The Licensee is
not permitted to transfer the SOFTWARE to a third party (a person or a company).
1.4.4. Term
If the term is limited in time, this License is valid as long as the system date of the computer
used is set to the correct date according to the Gregorian calendar. This License commences
upon the installation of the SOFTWARE and expires at the time indicated by either the hardware License key, the License certificate or as embedded in the SOFTWARE by means of
a termination date or run-time limitation. This License terminates automatically without notice
from STROMASYS upon the expiration of its term or if the Licensee fails to comply with any
provision of this License. If the term of the License is classified as unlimited or perpetual and
paid in full, the License will only terminate if the Licensee fails to comply with any provision
of this License. Upon termination of the License, the Licensee shall remove the SOFTWARE
from its computer.
1.4.5. Limited Warranty
STROMASYS warrants the media on which the SOFTWARE is furnished to be free of defects
in material and workmanship, under normal use, for a period of ninety (90) days following the
date of delivery to the Licensee. In the event of defects, STROMASYS' shall replace the defective media that has been returned to STROMASYS or the supplier with the Licensee’s
dated invoice and is shown to be defective. In the event that STROMASYS is unable to replace
defective media or functionality, STROMASYS can refund the price paid by the Licensee for
the product upon return of the License key and media.
This SOFTWARE and accompanying documentation (including instructions for use) are
provided "as is" without warranty of any kind. STROMASYS does not warrant, guarantee, or
make any representations regarding the use, or the results of use of the SOFTWARE or
documentation in terms of correctness, accuracy, reliability or otherwise. The entire risk as
to the results and performance of the SOFTWARE is assumed by the Licensee.
STROMASYS disclaims all other warranties, either express or implied, including but not limited
to the implied warranties of merchantability and fitness for a particular purpose.. No oral or
written information or advice given by STROMASYS, its dealers, distributors, agents or employees shall create a warranty or in any way increase the scope of this warranty and the Licensee may not rely on any such information or advice.
Neither STROMASYS nor anyone else who has been involved in the creation, production or
delivery of this product shall be liable for any direct, indirect, consequential or incidental
damages (including damages for loss of business profits, business interruption, loss of business
information, and the like) arising out of the use or inability to use such product even if
STROMASYS has been advised of the possibility of such damages.
Should any other warranties be found to exist, such warranties shall be limited in duration to
ninety (90) days following the date of delivery to the Licensee. In no event will STROMASYS'
2
XML to PDF by RenderX XEP XSL-FO Formatter, visit us at http://www.renderx.com/
Preface
liability for any damages to the Licensee or any other person exceed the amount paid for the
license to use the SOFTWARE.
You acknowledge that you understand that this software is not designed or licensed for use
in applications in hazardous environments such as operation of nuclear facilities, aircraft
navigation or control or life critical applications. STROMASYS expressly disclaims any liability
resulting from use of the software in any such applications and accepts no liability in respect
of any actions or claims based on the use of the software in any such applications by you.
For the purpose of this paragraph the term “Life critical application” means an application in
which the functioning or malfunctioning of the software may result directly or indirectly in
physical injury or loss of human life.
1.4.6. Intellectual Property Infringement
STROMASYS shall defend, indemnify and hold the Licensee harmless from and against any
third party claim alleging the infringement of any patent, copyright, trademark or other intellectual property right asserted against the Licensee by a third party based upon Licensee’s
authorized use of the SOFTWARE. If Licensee’s use of any of the SOFTWARE is, or in
STROMASYS’ opinion is likely to be, enjoined due to the type of infringement specified above,
or if required by settlement, STROMASYS will either: (a) substitute for the SOFTWARE
substantially functionally similar programs and documentation; (b) procure for the Licensee
the right to continue using the SOFTWARE; or if (a) and (b) are commercially impracticable,
(c) terminate the Agreement and refund the license fees and maintenance fees paid by the
Licensee as reduced to reflect the use of the SOFTWARE from the applicable license purchase
date prorated over a three (3) year period.
The foregoing indemnification obligation of STROMASYS shall not apply: (1) if the SOFTWARE
is modified by any party other than STROMASYS without STROMASYS prior written consent,
but solely to the extent the alleged infringement is caused by such modification; (2) the
SOFTWARE is combined with other non-STROMASYS products or process not contemplated
by the Documentation, but solely to the extent the alleged infringement is caused by such
combination; (3) to any use of the Software that is not authorized by the Documentation.
If a claim under this Section is received by the Licensee, the Licensee will provide STROMASYS: (i) prompt notice of such claim giving (but in any event notice in sufficient time for
STROMASYS to respond without prejudice, but not later than 5 (five) days from receipt of
such claim); (ii) the exclusive right to control and direct the investigation, defense, and settlement of such claim; and (iii) all reasonable necessary cooperation, at STROMASYS expense.
1.4.7. Export
The Licensee agrees not to export or re-export products or any part thereof including media
in any form without obtaining the appropriate government licenses, if required.
1.4.8. Applicable Law; Claims and Disputes
This License shall be governed and construed in accordance with the laws of Switzerland.
Any claim or dispute between the Licensee and STROMASYS or against any agent, employee,
successor or assignee of STROMASYS, whether related to this Agreement shall be resolved
by binding arbitration in Geneva in accordance with the Swiss Rules of International Arbitration.
This Agreement constitutes the entire agreement between the end user and STROMASYS.
YOU ACKNOWLEDGE THAT YOU HAVE READ THIS SOFTWARE LICENSE AND LIMITED
WARRANTY, UNDERSTAND IT, AND AGREE TO BE BOUND BY ITS TERMS AND
CONDITIONS. YOU ALSO AGREE THAT THIS IS THE COMPLETE AND EXCLUSIVE
3
XML to PDF by RenderX XEP XSL-FO Formatter, visit us at http://www.renderx.com/
Preface
STATEMENT OF AGREEMENT BETWEEN THE PARTIES AND SUPERSEDES ALL
PROPOSALS OR PRIOR AGREEMENTS, ORAL OR WRITTEN, AND ANY OTHER COMMUNICATIONS BETWEEN THE PARTIES RELATING TO THE SUBJECT MATTER OF
THIS SOFTWARE LICENSE AND LIMITED WARRANTY.
4
XML to PDF by RenderX XEP XSL-FO Formatter, visit us at http://www.renderx.com/
Chapter 2. Overview
2.1. General Description
Modern software operating systems contain a hardware abstraction layer or HAL. The HAL
creates a software layer on top of the hardware to "virtualize" the functionality of the hardware
components. The CHARON-AXP products are essentially HALs of complete HP Alpha systems,
including the HP Alpha I/O devices. They are mathematically precise models of HP Alpha
hardware, and contain modules of HP ALPHA CPUs, the console subsystem, the buses and
I/O adapters, disks and tapes.
After installation of CHARON-AXP on a general purpose host platform, it provides an exact
model of a working HP Alpha system. On this 'virtual' system you install your HP Alpha operating system and HP Alpha applications, just as if you had purchased new HP Alpha hardware.
No conversion or sources are needed, and you boot your HP Alpha system as usual. The
CHARON-AXP systems execute the same binary HP Alpha code and the same I/O drivers
as on the original hardware. We tested with the original HP Alpha hardware diagnostics to
verify compatibility.
What you obtain is an HP Alpha, typically running at comparable speed and with a significantly
smaller footprint, a reduction in cost of maintenance and energy consumption. An additional
advantage of CHARON-AXP over HP Alpha hardware is the scalability with its host system.
CHARON-AXP performance is proportional to the host system performance, and every time
you move to a faster host system your ‘virtual Alpha’ will also get faster.
Another improvement over the hardware is the amount of memory each model of CHARONAXP supports; most emulated models supports up to 32 GB of operating memory (up to 64
Gb for GS80, up to 128 GB for GS160, and up to 256 GB for GS320).
This guide covers:
• The selection of a suitable host system, essentially a multi-core server configured for the
specific requirements of a CHARON-AXP product. Each product has its optimal host platform
to get the best HP Alpha system performance. Ask Stromasys or one of its Resellers for
configuration details for your specific system requirements.
• The installation process of the CHARON-AXP product, which is not significantly different
from the installation of any other applications.
• The CHARON-AXP configuration settings that allow you to specify the HP Alpha system
configuration of your choice
• The HP Alpha software installation process is not described in detail, since it is identical
to HP Alpha hardware, and your HP Alpha software documentation applies. Solutions are
provided to transfer the contents of the existing HP Alpha system and user disks, avoiding
a complete system re-installation in most cases.
Like the original HP Alpha system CHARON-AXP can run the same supported operating
systems, such as Tru64 and OpenVMS. Windows NT and Linux are not supported.
2.2. CHARON-AXP User Guide Structure
Stromasys has been building cross platform computer system virtualization products since
1999. The CHARON-AXP product line, which provides Hewlett-Packard Alpha hardware
functionality as a virtualization layer on industry standard servers, has followed a development
path comparable to the original DEC (now HP) Alpha hardware.
5
XML to PDF by RenderX XEP XSL-FO Formatter, visit us at http://www.renderx.com/
Overview
For even higher performance, CHARON-AXP can be clustered with shared storage or network
clusters. With this technology, it is possible to replace large DEC Alpha data centers with a
single rack of modern servers.
To get the best performance from the CHARON-AXP virtualization layer, it is essential to use
a high performance 64-bit host system. This manual provides the guidelines for host system
selection, CHARON-AXP installation and operation.
The Stromasys products and virtual AXP systems covered in this guide are:
• Product: CHARON-AXP/4100, includes the following virtual AXPs:
• CHARON-AXP/AS400, a single 64-bit CPU HP AlphaServer replacement.
• CHARON-AXP/AS800, a single x64 CPU HP AlphaServer replacement.
• CHARON-AXP/AS1000, a single x64 CPU HP AlphaServer replacement.
• CHARON-AXP/AS1000A, a single x64 CPU HP AlphaServer replacement.
• CHARON-AXP/AS1200, a 2 64-bit CPU HP AlphaServer replacement.
• CHARON-AXP/AS2000, a 2 64-bit CPU HP AlphaServer replacement.
• CHARON-AXP/AS2100, a 4 64-bit CPU HP AlphaServer replacement.
• CHARON-AXP/AS4000, a 2 64-bit CPU HP AlphaServer replacement.
• CHARON-AXP/AS4100, a 4 64-bit CPU HP AlphaServer replacement.
• Product: CHARON-AXP/DS10, includes the following virtual AXPs:
• CHARON-AXP/DS10L, a single 64-bit CPU HP AlphaServer replacement.
• CHARON-AXP/DS15, a single 64-bit CPU HP AlphaServer replacement.
• Product: CHARON-AXP/DS20, includes the following virtual AXPs:
• CHARON-AXP/DS20, a 2 64-bit CPU HP AlphaServer replacement.
• CHARON-AXP/DS25, a 2 64-bit CPU HP AlphaServer replacement.
• Product: CHARON-AXP/ES40, includes the following virtual AXPs:
• CHARON-AXP/ES40, a 4 64-bit CPU HP AlphaServer replacement.
• CHARON-AXP/ES45, a 4 64-bit CPU HP AlphaServer replacement.
• Product: CHARON-AXP/GS80, includes the following virtual AXPs:
• CHARON-AXP/GS80, an 8 64-bit CPU HP AlphaServer replacement.
• Product: CHARON-AXP/GS160, includes the following virtual AXPs:
• CHARON-AXP/GS160, a 16 64-bit CPU HP AlphaServer replacement.
• Product: CHARON-AXP/GS320, includes the following virtual AXPs:
• CHARON-AXP/GS320, a 32 64-bit CPU HP AlphaServer replacement.
6
XML to PDF by RenderX XEP XSL-FO Formatter, visit us at http://www.renderx.com/
Overview
2.3. CHARON-AXP hardware compatibility
The CHARON-AXP virtualization layers are tested with the UETP set of tests. HP has verified
that the CHARON-AXP test results correspond to correctly functioning HP Alpha hardware.
HP provides OpenVMS and layered product licenses for the transfer from a hardware (HP
Alpha) to CHARON-AXP; see the following web page:
http://h71000.www7.hp.com/openvms/vax-emulator.html
When CHARON-AXP is running on HP products, the transfer licenses maintain the HP
OpenVMS/Alpha and layered software warranties.
The HP Alpha components represented in CHARON-AXP are designed to operate like their
hardware equivalents. In addition to AXE like set of the CPU tests (physical Alpha CPU was
sampled with billions of the instruction test cases covering various instruction/operand forms
and compared with emulation up to 100% binary equivalence which gives conformance with
Alpha architecture) we use HP Alpha hardware diagnostics to verify that a virtual HP Alpha
component corresponds to its hardware. To avoid adding unnecessary complexity, the virtual
components do not include diagnostic logic that was not used in normal hardware operation.
Wherever possible without compromising compatibility, the virtual devices were 'redesigned'
to avoid hardware limitations. For example, some virtual HP Alphas support a total emulated
memory of up to 256 GB, despite restrictions of particular hardware models.
The purpose of HP Alpha virtualization is to replace HP Alpha hardware and any HP Alpha
operating system or binary application that runs on HP Alpha hardware. Depending on emulated hardware model of virtual HP Alpha system OpenVMS 6.2-1H3, 7.1, 7.1-1H1, 7.2, 7.21, 7.2-2, 7.3, 7.3-1, 7.3-2, 8.3, and 8.4 and Tru64 3.2C, 4.0a – 4.0g, 5.0, and 5.1 with various
patch levels were specifically tested.
Since the performance of a virtual HP Alpha depends on the host system hardware, its
components operate at a different speed compared to the equivalent HP Alpha hardware.
This is similar to moving a HP Alpha operating system and its applications to a HP Alpha with
faster hardware components. The HP Alpha operating system will schedule the various application requests as before and applications will simply complete faster. Virtual real-time
components, for instance the HP Alpha system clock, receive the correct timing interrupts
and will operate as expected, provided the host system meets the specified minimum system
requirements.
Every effort has been made to handle unusual HP Alpha coding sequences correctly. Selfmodifying HP Alpha binary code, as is used in Oracle RDB, is part of the verification tests
and executes correctly. Note that (generally undesirable) coding techniques like using NOOPs
for software delay loops can give unexpected results as Virtual HP Alpha CPU executes
NOOPs very quickly.
7
XML to PDF by RenderX XEP XSL-FO Formatter, visit us at http://www.renderx.com/
Chapter 3. CHARON-AXP hosting and
performance
This chapter describes the minimum hardware and software requirements the host system
must meet for the CHARON-AXP virtualization layer to work properly. Some requirements
are checked during installation and/or execution time. If these limits are not met, CHARONAXP will simply not install or operate. Other limits are 'soft' and invoke a performance reduction
('safe mode') as described in this manual below.
3.1. Host operating system requirements
The CHARON virtualization layers are designed for a Linux server platform.
Currently supported Linux x64 versions:
• Fedora Core 16 and higher
• Red Hat Enterprise Linux 6.2 - 6.5
STROMASYS provides separate distribution packages for each supported Linux version.
The CHARON virtualization layers may also work on some other versions of Linux (including
most modern ones), but STROMASYS cannot guarantee of CHARON proper functioning if
any other version of Linux is used.
3.2. Host operating system requirements
3.2.1. Common requirements
3.2.1.1. CPU selection
The CHARON-AXP products require a multi-processor host system for their operation. The
host system must have a physical CPU core available for each virtual Alpha CPU. CHARONAXP uses extra host CPU cores to perform I/O and DIT (Dynamic Instruction Translation)
compilation tasks. Thus, the number of extra CPU (cores) required depends on the particular
configuration and operation conditions. The optimal configuration is achieved when on top
load you have at least one host CPU (core) idle 100% available for the host operation system
use. Leaving too less number of the host CPU (cores) to the I/O and ACE (DIT) will result in
performance reduction and malfunction especially in SMP environment. The recommended
host configurations for the specific CHARON-AXP products are as follows:
• For systems with light load, number of available physical CPU cores should be greater
than or equal to 1.5 times number of emulated AXP CPUs. For example, for lightly loaded
GS80 system with 8 AXP cores a hosting server with at least 12 CPU cores are required.
• For systems with medium to heavy load, number of available physical CPU cores should
be greater than or equal to 2 times number of emulated AXP CPUs. For example, for heavy
loaded GS80 system with 8 AXP cores a hosting server with at least 16 CPU cores are
required.
• CPU type recommendations:
• Generally Intel CPUs give advantage to CHARON-AXP over AMD CPUs.
8
XML to PDF by RenderX XEP XSL-FO Formatter, visit us at http://www.renderx.com/
CHARON-AXP hosting and performance
• For configurations with 8 or less virtual AXP CPU cores: Intel Xeon 5600 series or newer,
at least 3GHz
• For configurations with 7 or more virtual AXP CPU cores: Intel Xeon 7500 series or
newer, at least 2.26 GHz
• If AMD CPUs are the only available option, Opteron 6100 series or newer, at least 2.2
GHz. (AMD CPUs older than K10 do not support cmpxchg16b instruction required for
normal CHARON-AXP SMP operations)
Please refer to the SPDs for the additional information.
3.2.1.2. Host system hardware platform recommendations
HP Proliant server products (ML-series towers, DL-series rack mount or BL-series blade
servers) with sufficient CPU cores, memory, storage, and network adapter capacity are recommended
For predictable HP Alpha performance the host system must be dedicated to the CHARONAXP virtualization layer, with the possible exception of a co-resident HP Alpha console terminal or X-terminal emulator
3.2.1.3. Host system memory
The minimum host memory size depends on the amount of HP Alpha memory that is requested
from the HP Alpha virtualization layer and on the number of CHARON instances running on
one host. As a rule of thumb, the minimum host memory is the amounts of HP Alpha memory
multiplies by the number of the instances +2 GB, with a minimum of 2048Mb (a recommended
amount of memory is 4096Mb).
The maximum amount of HP Alpha memory that can be created in the CHARON-AXP products
and is supported by OpenVMS/Alpha is 32 GB. For details, see the HP Alpha memory size
specification
3.2.1.4. Disk storage
The CHARON-AXP virtualization layer requires approximately 30 MB disk space, not counting
any (virtual) HP Alpha disks. HP Alpha disks can be in the form of physical disks (locally or
on an external storage subsystem) or as HP Alpha disk images, which appear as standard
files. When HP Alpha disk images are used to represent HP Alpha disk drives, the disk image
files have the same size as the equivalent HP Alpha disk hardware, regardless of their degree
of utilization
When physical disks are used for the virtual Alpha, these disks are connected as SCSI devices
to the host platform (locally, via FibreChannel or iSCSI), regardless of the disk architecture
configured in the HP Alpha environment. These physical disks are formatted by the HP Alpha
operating system and cannot be used by the host system.
3.2.2. Linux specific requirements
3.2.2.1. Ethernet adapters
Host adapter to be used for CHARON must support dynamic MAC address changes. Most
modern adapters support necessary functionality. There are two reasons for the requirement
of dedicated Ethernet adapters:
• A host system protocol of the same type (e.g. TCP/IP) would interfere with the same protocol
running on its virtual instance.
9
XML to PDF by RenderX XEP XSL-FO Formatter, visit us at http://www.renderx.com/
CHARON-AXP hosting and performance
• For security reasons, the virtual network adapter uses special code that excludes access
from the external network to anything but the Ethernet drivers running on the virtual operating system. This prevents penetration of malicious code into the host system from the
external network
The recommended way to dedicate an Ethernet adapter to CHARON is through Ethernet
adapter configuration script located in "/etc/sysconfig/network-scripts/ifcfg-ethN" (where N is
number of the interface to be used for CHARON). It is absolutely necessary to remove all the
IP-setup related parameters.
Example 3.1.
# Intel Corporation 82540EM Gigabit Ethernet Controller
DEVICE=eth1
HWADDR=00:07:E9:17:DF:71
ONBOOT=no
Some modern network cards may support offload processing. It may results in CHARON
networking malfunction. To avoid it please use "ethtool" utility to switch off all the offload
parameters a particular network adapter provides.
A first step is to find out what additional paramaters are currently set to "on" on the host network adapter to be used for CHARON. Do do that issue:
ethtool -k <device>
ethtool will return the Ethernet adapter available offload parameters and their values:
Example 3.2.
$ethtool -k eth1
Offload parameters for eth1:
rx-checksumming: on
tx-checksumming: on
scatter-gather: on
tcp-segmentation-offload: off
udp-fragmentation-offload: off
generic-segmentation-offload: on
generic-receive-offload: off
large-receive-offload: off
Then use ethtool to switch off all the offload parameters:
ethtool -K <device> <parameter> off
For the example above it will look like this:
Example 3.3.
ethtool -K eth1 rx off
ethtool -K eth1 tx off
ethtool -K eth1 sg off
ethtool -K eth1 gso off
Please note that this procedure must be executed on each reboot of CHARON host, so it is
strongly recommended to put that offload parameters switching off commands to some script
file and include it to the system startup sequence or in a custom-made CHARON starting
script. Please refer to your Linux documentation on how to do that, since this procedure may
vary from one version to another one.
Please also refer to ethtool manual for more details.
10
XML to PDF by RenderX XEP XSL-FO Formatter, visit us at http://www.renderx.com/
CHARON-AXP hosting and performance
3.2.2.2. Specific account to run CHARON
It is recommended to create user "charon" prior installation of CHARON and use it for running
CHARON. This user must have rights to logon locally and it must have permissions to write
to "/var/lock" directory. If it is planned to have direct access to host devices (such as physical
CD/DVD drives, disks, tapes etc) the user "charon" must be a member of the groups "disk",
"tape" and "cdrom". If some physical serial lines are used by CHARON the "charon" user
must be a member of the "dialout" group. Same requirements apply to any other user that is
going to run CHARON.
Privileges for CHARON executables are assigned automatically during installation by CAPABILITIES kernel feature. If some capabilities are missing (depending on specific CHARON
configuration), CHARON reports it to its log file. In this case please use "setcap" utility to assign
required additional rights.
If CHARON is started from the "root" account it has all the privileges by default.
It is always required to install CHARON from "root" account, whether any other possible accounts having the features described before can be used for running CHARON.
3.2.2.3. Other host system requirements
The host system must provide a USB port for the USB license key. The license key is used
constantly by CHARON during its runtime; it is recommended to connect the key directly to
the system USB hub and not via an external USB hub which can cause access problems.
Key disconnection causes termination of operation within a few minutes. Note that a quick
reconnection of the key might not cancel termination.
The CHARON virtualization layer interacts directly in several areas with the host system
hardware. Where possible without compromising reliability, virtual peripherals are 'mapped'
to the local hardware. Some host peripherals that work in Linux will not function correctly with
the CHARON layer. For example, Ethernet adapters which cannot change their MAC address
without a power cycle and some classes of peripherals connected to the host system via USB
or Firewire connections.
It is mandatory to use "xterm" as terminal to start CHARON, since only this terminal provides
correct overall usability in HP operating systems like Tru64/OpenVMS/RSX11 etc. To achieve
full compatibility with VT100 model targeting by CHARON the following command must be
issued in xterm CHARON console:
set term /dev=vt100/perm
Note that the layout of the right part of PC keyboard is not mapped to the layout of VT100
keyboard by default. There is a workaround of this problem - usage of special script created
by Geoff Kingsmill:
http://www.decuslib.com/decus/freewarev50/decxterm/decxterm
After execution of the script xterm will run correctly with CHARON.
Please also note that telnet session to CHARON console ports does not support ESC sequences of the VT100 by default. To enable it open xterm, connect to CHARON and press
"Ctrl-]" once connected. Then issue a command "mode char" to enable “character” mode.
If it is also required to map right part of the keyboard correctly please use the xterm started
by the Geoff Kingsmill’s script (see above).
To control a number of available to CHARON host CPUs and their mapping use "affinity"
parameter in CHARON configuration file. For more details see the "CHARON common
parameters" section.
11
XML to PDF by RenderX XEP XSL-FO Formatter, visit us at http://www.renderx.com/
CHARON-AXP hosting and performance
3.3. General performance considerations
The configurations referred to earlier in this chapter was the target systems used for best
performance during product design. The functionality of the HP Alpha virtualization layer is
the same (in essence an accurate model of the corresponding HP Alpha system) for every
host platform that meets the minimum requirements. The effective HP Alpha system performance delivered by CHARON-AXP depends on the host system. This allows for instance
CHARON-AXP/ES40 to meet or exceed HP AlphaServer ES40 performance when executing
on an HP Proliant. CHARON-AXP delivers approximately 380 SPEC2000 INT and 370
SPEC2000 FP per CPU when run on a Xeon 5680 host.
For lower performance requirements, CHARON-AXP can be used on smaller platforms. Since
each of Virtual HP Alpha components puts its own requirements on the host system, it is important to look at your specific requirements before deciding what type of host system to use.
Experience shows that the three main areas of performance consideration are: HP Alpha
CPU performance, disk I/O speed and network connections.
3.3.1. AXP CPU performance
The component in the virtualization layer that creates a HP Alpha CPU runs several concurrent
tasks using a complex proprietary algorithm to optimize performance.
Above 2 GHz host CPU frequency, the memory bandwidth and latency becomes an important
virtualization layer performance factor in the current host CPU architecture. Important parameters are host cache memory size (the larger the better) and host memory latency (the
lower the better). In addition, the HP Alpha CPU floating point performance is quite dependent
on the host CPU design.
The multiple CPU emulation processes that can run in the virtualization layer require a significant amount of host system memory, as specified earlier in this chapter. If less host memory
is momentarily available (for example, because another application has started on the same
host system), the CPU emulation process becomes less effective and can shut down completely, reducing performance. Therefore, concurrent operation of the CHARON-AXP virtualization layer with other applications on the same system is not recommended.
3.3.2. Disk I/O subsystem
CHARON-AXP Disk I/O throughput scales with the host I/O bandwidth and can exceed that
of hardware HP Alpha systems with an order of magnitude. In general disk I/O is rarely a
bottleneck.
3.3.3. Network connections
On a high performance host platform Virtual HP ALPHA Ethernet adapter operates approximately the same speed (1 Gbps) as counterpart, but it will not always reach the full 1 Gbps
throughput of modern adapters. 1 Gbps host adapters can be used in most cases, and multiple
adapters can be configured.
The use of multiple adapters will not necessary increase aggregate throughput beyond that
of a single 1 Gbps host adapter. Dropping incoming packets due to temporary overload is
acceptable (this happens on hardware HP Alpha systems as well) if the communications
protocol can retransmit lost packets in time. For sensitive protocols, (i.e. the communication
between instances of the OpenVMS distributed lock manager), configuring a separate Ethernet
link reduces the risk of critical packet loss.
12
XML to PDF by RenderX XEP XSL-FO Formatter, visit us at http://www.renderx.com/
CHARON-AXP hosting and performance
3.3.4. Enhancing virtualization layer reliability
CHARON-AXP executes a number of interrelated processes; each needs sufficient host
system performance to provide a stable system. At several levels CHARON-AXP protects itself
against a lack of host system capabilities:
• If the frequency of any of the host CPUs is below 1400 MHz, CHARON-AXP will not install.
If an installed executable is started on a system below that frequency, execution will terminate. Note that laptop or desktop systems in low power mode often reduce the clock frequency
of their CPU(s) below their rated speed. Disable this through the power management control
panel.
• If the number of host CPUs is less than requested, execution stops and the virtual layer
shuts down completely.
• When insufficient HP Alpha memory can be locked in physical host memory, safe mode is
entered to reduce memory requirements. Below a critical size, the virtualization layer shuts
down, dependent on the model being virtualized.
• Additional host system load due to other applications running concurrently can prevent
timely access to the USB license key, causing CHARON-AXP not to start or to shut down.
• It is possible to run two or more CHARON-AXP virtualization layers on the same host system,
once the number of the host CPU (cores) permits the multi-instance operation as well as
product license.
As far as possible, a lack of host system resources is reported in the CHARON-AXP log file
For production use, CHARON-AXP should use a dedicated host system.
13
XML to PDF by RenderX XEP XSL-FO Formatter, visit us at http://www.renderx.com/
Chapter 4. CHARON licensing
4.1. General description
CHARON products are protected with licenses, issued by STROMASYS for each customer
individually. The CHARON license contains all the specifics of the particular CHARON distribution.
The license is implemented in form of a hardware dongle, namely Sentinel HASP key or a
software license. Please be careful with your license key since in case of its loss/damage
CHARON will not start anymore unless the license key is replaced. For extra protection
STROMASYS recommends to use additional backup license keys (purchased separately)
that may replace the main license key for restricted period of time in case of its damage/loss.
It is also important to connect HASP license keys to computer from time to time even if
CHARON is not used, since the keys contain build-in accumulator that needs to be charged.
If the accumulator is completely discharged license keys may be fatally damaged.
CHARON license is read on start of each instance of CHARON and then it is re-checked with
some frequency defined by the license content. In case if CHARON detects absence (or
malfunction) of license key / software license it displays a warning requesting to connect the
license key (enable software license) again in some given period of time. If the time is run
out CHARON exits. Note that if the time-restricted license is used and it is suddenly expired
CHARON tries to find its replacement (if available, i.e. connected to the host or present on
network in case of network license) automatically and if it is found CHARON proceeds with
using that license.
Note
The present CHARON implementation assumes that the expired license must be
removed firstly to allow running CHARON to switch to some other (valid) one.
Note
CHARON software license is not distributed in case of Proof-of-Concept and evaluation
installations. Only hardware dongles are used in this case.
Update of CHARON license can be performed w/o CHARON stopping ("on fly"). On next license check CHARON will use the updated license normally.
The following sections list all the main parameters of CHARON licensing mechanism.
4.1.1. General parameters
• Physical key ID
• License Number
• End user name
• Master key ID
• License release date and time
• Update Number
14
XML to PDF by RenderX XEP XSL-FO Formatter, visit us at http://www.renderx.com/
CHARON licensing
• Purchasing Company name. In most cases the company to which the key was issued originally
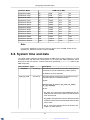
4.1.2. Products parameters
CHARON license can contain a number of product sections licensing different CHARON
products. Each of them contains the following parameters:
• Commercial product name
• Commercial product code
• Commercial product version and range of build numbers suitable for running
• Range of CHARON virtual models available for running
• Type of host CPU required
• Host operating system required
• Number of virtual CPUs enabled for virtual SMP systems
• Minimum number of host CPU cores required
• Minimum host memory required
• Maximum memory emulated. If not present the value defaults to the maximum memory
possible for the particular virtual system. Note that the maximum memory may not be
available to the virtual system if the host computer has no sufficient memory.
• Number of CHARON instances that can be run in the same time
• Whether or not CHAPI (CHARON API) can be used with this product
• Product and Field Test expiration dates (if any)
• Product and Field Test executions counter (if any)
• Number of hosts that may run CHARON in the same time (in case of networking license)
• Level of support (if any), end date of any support contract, the "First Line" Service Provider
• Frequency of CHARON license checking during CHARON execution
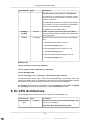
4.1.3. Optional parameters
CHARON license may also contain some optional parameters defining possible restrictions/extensions and additional information:
• Possibility to attach hardware QBUS/UNIBUS hardware via adapter
• Parameter that reduces the maximum speed of the program
• Parameter that enables the product to support additional serial lines through an option
board from a company such as DIGI
• Parameter that prohibits use of Advanced CPU Emulation. If not present the Advanced
CPU Emulation is enabled
• Parameter that enables emulation of IEQ11-A IEEE488 Controller (on top of DCI-3100
IEEE488 Controller) (this parameter is applicable only for CHARON-VAX/PDP11 products)
15
XML to PDF by RenderX XEP XSL-FO Formatter, visit us at http://www.renderx.com/
CHARON licensing
• Parameter that enables emulation of DRV11-WA I/O controller (on top of DCI-1100 I/O
controller) (this parameter is applicable only for CHARON-VAX/PDP11 products)
4.2. CHARON licensing models
CHARON licensing models are divided in 3 groups:
4.2.1. Licensing by usage of locally installed Sentinel
HASP keys
This is most common way of CHARON licensing. CHARON license is embedded in Sentinel
HASP dongle. It is applicable only on the host where the dongle is physically installed.
CHARON installation procedure takes care of the Sentinel HASP run-time (driver) installation,
so once CHARON product has been installed it is possible to plug-in the license key and start
CHARON usage.
Number of CHARON instances to be run on a particular host may be restricted by the license
content (see above).
4.2.2. Licensing by usage of the specific Network Sentinel HASP keys
The network Sentinel HASP key can be shared between several hosts running CHARON
(including the host on which the network license is installed). If CHARON is running on the
host where the network key is installed no additional steps are required in this case. If the
host does not have CHARON installed it can distribute the connected network license to
CHARON instances running on other hosts - in this case the Sentinel driver must be installed
on that host manually.
The Sentinel drivers are distributed as separate RPM package as a part of CHARON kit.
Please see the "License Installation" section of this chapter for details.
Once the driver is installed it allows running CHARON on all the host in this particular network
segment using a locally connected network license.
Note
The network license key contains a specific parameter for restriction of the number
of hosts allowed to run CHARON at the same time. Together with a parameter defining
the number of CHARON instances running at the same time the network license sets
the total number of running CHARON instances on allowed number of hosts.
4.2.3. Licensing by software license (SL)
CHARON software license does not require any hardware to be connected to license host,
but it still assumes that the Sentinel run-time must be installed. SL is a "virtual" key and it has
exactly the same functionality as the hardware dongles.
Software licenses are always network-wide on Linux, so they behave the same way as the
network HASP keys.
There is also a special type of SL license called "Provisional" (demo). It has restricted period
of validity.
16
XML to PDF by RenderX XEP XSL-FO Formatter, visit us at http://www.renderx.com/
CHARON licensing
4.3. Multiple licenses configuration
Despite a type of licensing CHARON can use only one valid ("active") license (of given
vendor code) at the time. This active license is displayed by hasp_srm_view utility. The
utility provides its number and ID / IP address of the hosts where the active license is installed.
The current conception is that CHARON cannot check all the available license keys / SL,
choose needed one, switch from one key to another one etc. This functionality is not supported
at the moment
If multiple licenses (with the same vendor code) are installed in a given network segment at
the time, CHARON (and the Sentinel run-time) uses the following algorithm (not fully tested):
1. Firstly CHARON software licenses (if any) are accessed.
2. If the software licenses are not found one of the locally installed keys are accessed. The
particular accessed key is defined by internal number of USB port, so to the end user this
choice may look almost as random.
3. If there is no locally installed license keys the network keys are accessed. The particular
accessed key is defined by internal logic of Sentinel run-time, so it this choice is hardly
predictable
General recommendation is to avoid usage of multiple keys in one network segment. Use
only locally installed license per one host or network license for some local network segment
containing several CHARON hosts.
If there is a need to extend existing license with some new CHARON products it can be done
by requesting STROMASYS to provide license update for existing hardware or software license.
In case if it is absolutely impossible to avoid usage of multiple licenses there are some recommendations:
• For the hosts intended to use only locally installed licenses disable an ability to use remote
licenses with a help of Sentinel Admin Control Center (see below)
• Avoid connection of multiple license keys to one host. If it impossible plug in the license
key to be accessed first in the firstly checked USB slot (can be defined experimentally)
• Disable not needed licenses via Sentinel Admin Control Center (see below)
4.4. License installation
4.4.1. Installation from scratch
Installation of CHARON license consists of:
• Installation of Sentinel run-time. By default it is done automatically by CHARON installation
on Windows and by installing of “aksusbd” RPM package on Linux (this RPM package is
included in each CHARON for Linux distribution).
• Physically connecting HASP license key in case of hardware dongle protection
• Collecting system fingerprint (*.c2v file), sending it to STROMASYS and applying update
(*.v2c file) in case of software license. See the details below.
17
XML to PDF by RenderX XEP XSL-FO Formatter, visit us at http://www.renderx.com/
CHARON licensing
Sometimes manual installation of Sentinel run-time may be required. In this case open up
CHARON kit folder and proceed the following way:
Example 4.1. Installation of Sentinel daemon RPM included in CHARON kit
rpm --nodeps -ihv aksusbd-2.2-1.i386.rpm
Note
Some additional packages may be needed in certain cases, for example glibc.i686
4.4.2. Replacement of currently installed Sentinel runtime to other one
Replacement of currently installed Sentinel Run-time can be needed in case of:
• Upgrade to newer version
• Installation of specific run-time provided by STROMASYS
Below please find step-by-step instructions on the run-time replacement:
• Remove the current run-time with the command “rpm -e aksusbd –nodeps"
• Change directory to where the new run-time RPM resides and issue the command: “rpm
-ihv aksusbd<…>.rpm --nodeps"
Note
Some additional packages may be needed in certain cases, for example glibc.i686
4.4.3. Installation of CHARON Software License
• Collect a v2c file provided by STROMASYS (in return on system fingerprint *.c2v file) and
put it somewhere on CHARON host.
• Start any web browser on this system and go to http://localhost:1947, to access Sentinel
HASP Admin Control Center (ACC) or configure ACC for remote access (please see the
details given in the ACC section of this chapter).
• In the ACC use the following menu items - first "Browse" for the v2c file and then secondly
"Apply File".
• Ensure that the license appears in the “Sentinel Keys” menu.
In case of "Provisional" (demo) license there is no need to collect system fingerprint. Just
proceed with applying the v2c license file as described above.
Note
Content of the installed software license is not shown by the Sentinel HASP Admin
Control Center. To see it please run "hasp_srm_view" utility from local console or
configure remote access according to the instructions given in the "hasp_srm_view"
utility section.
18
XML to PDF by RenderX XEP XSL-FO Formatter, visit us at http://www.renderx.com/
CHARON licensing
4.5. License management
The CHARON license management is performed by usage of Sentinel Admin Control Center
and specific utilities described in sub-sections below.
4.5.1. Sentinel Admin Control Center
4.5.1.1. General Description
Sentinel Admin Control Center is a web-interface to the Sentinel run-time. It allows viewing/managing available keys, enable/disable them, allow/prohibit usage of remote keys etc.
Note
Sentinel Admin Control Center is not able to display CHARON licenses - there are
specific utilities for that. They will be described later.
To access Sentinel Admin Control Center start any web browser, enter http://localhost:1947
and press Enter: The browser will display web interface of Sentinel Admin Control Center.
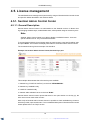
The screenshot below gives an example of its interface:
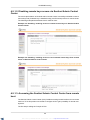
Example 4.2. Sentinel Admin Control Center, Sentinel Keys part
This example demonstrates that 4 license keys are available:
1. Network key ("HASP-HL NetTime") on the host "XEON4WAYW7"
2. Network key installed locally
3. HASP-HL installed locally
4. Network-wide software license on the host "RH64"
Sentinel Admin Control Center reports that there is one open session on the key (4), the
other ones are not used at the moment
With a help of Sentinel Admin Control Center it is possible to check available keys, hosts on
which they reside, open sessions etc. For more detailed description of Sentinel Admin Control
Center please refer to its "Help" section.
19
XML to PDF by RenderX XEP XSL-FO Formatter, visit us at http://www.renderx.com/
CHARON licensing
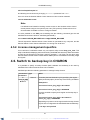
4.5.1.2. Disabling remote keys access via Sentinel Admin Control
Center
The most helpful feature of Sentinel Admin Control Center is an ability to disable access to
remote keys and (if network key is installed locally) cut off license provision for remote hosts.
The following examples demonstrate how it could be done:
Example 4.3. Disabling / enabling access to remote license keys via Sentinel Admin
Control Center
Example 4.4. Disabling / enabling access to local network license keys from remote
hosts via Sentinel Admin Control Center
4.5.1.3. Accessing the Sentinel Admin Control Center from remote
host
The Sentinel Admin Control Center (ACC) forbids accessing its web interface from a remote
machine. To fix this problem one needs to configure ACC to get a possibility of remote management.
The first step is editing the "hasplm.ini" file:
20
XML to PDF by RenderX XEP XSL-FO Formatter, visit us at http://www.renderx.com/
CHARON licensing
edit /etc/hasplm/hasplm.ini
and allowing remote access by changing ACCremote parameter from 0 to 1.
Once it is done the Sentinel Admin Control Center run-time must be restarted:
/etc/init.d/aksusbd restart
Note
If CHARON host firewall is blocking remote access to the Sentinel Admin Control
Center please configure it to open the port 1947 (TCP protocol). Please refer to Linux
documentation for details on how to configure firewall.
It is also possible to use SSH port forwarding with the following command (put the real
CHARON host name instead of "CHARON_MACHINE"):
ssh -L8080:CHARON_MACHINE:1947 root@CHARON_MACHINE
This will expose the Sentinel Admin Control Center on port 8080 to any computer, and the
Sentinel Admin Control Center will believe it is coming from local host.
4.5.2. License management specifics
Linux versions of CHARON contain only one specific utility named hasp_srm_view. This
utility is intended for displaying the license used by CHARON and collect key status information
as well as host fingerprint (C2V files). Applying updates ("*.v2c" files) can be done using
Sentinel Admin Control Center. Please refer to Utilities part for more details on the utility usage
and syntax.
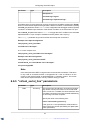
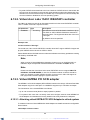
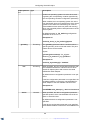
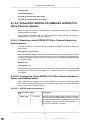
4.6. Switch to backup key in CHARON
It is possible to specify a backup license (both hardware and software) to be used by
CHARON if the main license becomes not accessible.
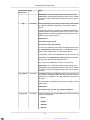
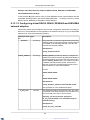
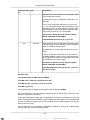
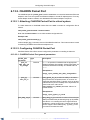
CHARON provides the following parameter to manage backup license:
"set session" Type
parameters
Value
license_key_id[N],
N=0 or 1
A number (decimal Sentinel key ID) specifying the regular
(N=0) and backup (N=1) license key to be used by CHARON.
Numeric
Example 4.5.
set session license_key_id[0] = 1877752571
set session license_key_id[1] = 354850588
it is also possible to specify both regular and backup key in
one line:
set session license_key_id[0] = 1877752571 license_key_id[1] = 354850588
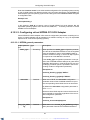
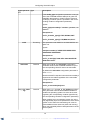
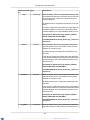
Depending on presence of the regular and/or backup license
key IDs in the configuration file CHARON behaves differently:
1. No keys are specified
21
XML to PDF by RenderX XEP XSL-FO Formatter, visit us at http://www.renderx.com/
CHARON licensing
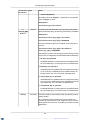
"set session" Type
parameters
Value
CHARON behaves as usual (performs unqualified search
for any suitable key). If no keys are found, CHARON exits.
2. Both keys are specified
CHARON performs qualified search for regular license key.
If it is not found, CHARON performs qualified search for
backup license key. If it is not found, CHARON exits.
3. Only regular key is specified
CHARON performs qualified search for regular license key.
If it is not found, CHARON performs unqualified search for
any suitable key. If it is not found, CHARON exits.
4. Only backup key is specified
CHARON behaves as usual (performs unqualified search
for any suitable key). If no keys are found, CHARON exits.
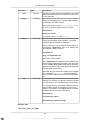
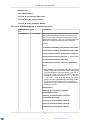
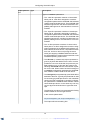
4.7. Software Licenses Management
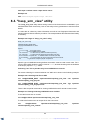
4.7.1. Software Licenses Transfer
Software Licenses (SL) can be transferred from one host to another one with a help of
"hasp_srm_view" utility and "Sentinel Admin Control Center" (ACC). The following example
demonstrates the transfer procedure.
Let's suppose that a Software License must be transferred from a host "SourceHost" to a
host "RecipientHost":
1. Collect a specific information about the "RecipientHost" to issue a transfer license for it.
To do that run "hasp_srm_view" utility on the "RecipientHost" with the following parameters:
hasp_srm_view -idf
As result a file "recipient.id" will be created in the directory from which "hasp_srm_view"
utility runs.
2. Copy the "recipient.id" file to the "SourceHost".
Note
"recipient.id" file is an ASCII file, so use "ascii" option in case of FTP transfer.
3. On the "SourceHost" open up the "Sentinel Admin Control Center" (ACC) (by going to
http://localhost:1947), note the number of the software license you are going to update.
4. Run the "hasp_srm_view" utilityin the following way to create a transfer license for the host
"RecipientHost":
hasp_srm_view -tfr <license number> recipient.id
The "license number" is the value collected at the step 3.
22
XML to PDF by RenderX XEP XSL-FO Formatter, visit us at http://www.renderx.com/
CHARON licensing
Example 4.6. Collecting a transfer license
hasp_srm_view -tfr 12345678 recipient.id
As result a "<license number>.v2c" file will be created in the current directory. In the example
above the name of the transfer license will be "12345678.v2c"
5. Copy the resulting "<license number>.v2c" file to the "RecipientHost".
Note
"<license number>.v2c" file is an ASCII file, so use "ascii" option in case of FTP
transfer.
6. On the "RecipientHost" open up the "Sentinel Admin Control Center" (ACC) (by going
to http://localhost:1947) and apply the "<license number>.v2c" file the way described in
this chapter of the Guide.
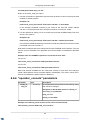
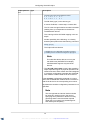
4.7.2. Software License Remove
It is also possible to remove Software License completely from a host. As result the license
will be dumped to a specific license file *.v2c, so it can be re-applied if needed.
To remove a software license from a host do the following:
1. Open up the "Sentinel Admin Control Center" (ACC) (by going to http://localhost:1947),
note the number of the software license you are going to remove.
2. Run the "hasp_srm_view" utilityin the following way to remove the license:
hasp_srm_view -tfr <license number>
The "license number" is the value collected at the step 3.
Example 4.7. Collecting a transfer license
hasp_srm_view -tfr 12345678
As result a "<license number>.v2c" file will be created in the current directory. In the example
above the name of the transfer license will be "12345678.v2c"
3. Lately it is possible to re-apply the created *.v2c file to restore the deleted software license.
4.8. License Deinstallation
Remove Sentinel run-time daemon:
Example 4.8. Deinstallation of Sentinel daemon
rpm -e aksusbd --nodeps
4.9. Backup license keys
Backup keys are provided by STROMASYS along with standard license dongles. It is strongly
recommended to order one to have instant backup for situation of damage / loss of the main
license key. Please note that the backup keys may have restricted functionality:
23
XML to PDF by RenderX XEP XSL-FO Formatter, visit us at http://www.renderx.com/
CHARON licensing
• Run time is typically limited to 720 hours in total. It should be enough time to get replacement
from STROMASYS.
• Backup license may be valid only by certain date. Please check it with STROMASYS
management.
4.10. Important Notes
Please note that license key has built-in battery which must not be completely discharged.
So it is strongly recommended to connect not used license keys to USB ports of some computer from time to time for charging.
24
XML to PDF by RenderX XEP XSL-FO Formatter, visit us at http://www.renderx.com/
Chapter 5. Installing CHARON-AXP for
Linux
The CHARON-AXP distribution kit contains a numbered CHARON-AXP USB license key.
The latest versions of the CHARON-AXP SPD, user manual, performance benchmark, and
release notes are available online on www.stromasys.com [http://www.stromasys.com]. We
recommend you to review the release notes before starting the installation of CHARON-AXP.
The release notes indicate any changes to the documentation, software or installation procedure since the release of this manual.
Your CHARON license key represents the full value of your CHARON-AXP product. It
will not be replaced free of charge if lost or destroyed; we recommend to establish an
appropriate security procedure for this high value item.
In the very unlikely case that the CHARON key fails, DO NOT DISCARD THE KEY and
contact Stromasys immediately for replacement and recovery of the key’s internal information.
For very high availability requirements, a runtime limited backup key can be purchased.
Some CHARON kits may be protected with so-called "Software License" (SL), a virtual license
key installed on the system. It is managed the same way as the hardware Sentinel HASP
key - for example it can be viewed with hasp_srm_view Utility.
In case of Fedora Core operating system it is possible to install "WebUI" web user interface
for running and configuring CHARON (see its brief description for more details). For complete
information on installing and operating WebUI see the User's Guide "CHARON WEB UI for
CHARON products for Linux".
Before installing CHARON-AXP for Linux:
1. Make sure that you logged in as user "root". Note that all the CHARON-AXP installations/deinstallations must be performed from "root" account, whether some custom accounts
can be used for running CHARON-AXP.
2. Issue a command "yum install glibc.i686" to install libraries required by CHARON-AXP.
5.1. Installing the CHARON-AXP products
1. Extract the content of the distribution TAR.GZ file:
tar -xvzf charon-axp-PRODUCT-VER-BN.VC.ZZ.tar.gz
where:
'PRODUCT" - CHARON-AXP product, for example "es40"
'VER" - Product version, for example 4.6
'BN' - Build number, for example 16002
'VC' - Vendor code, for example 68704
‘ZZ’ – Target operating system identifier. For Fedora Core 16 ‘ZZ’ the value is ‘fc16’, for
Red Hat Linux v6.2 the value is ‘el62’.
Switch to the installation directory:
cd charon-VER-BN.VC.ZZ/charon-axp-PRODUCT-VER-BN.VC.ZZ
25
XML to PDF by RenderX XEP XSL-FO Formatter, visit us at http://www.renderx.com/
Installing CHARON-AXP for Linux
2. Note the RPM file for each specific CHARON-AXP products in that directory:
Table 5.1. CHARON-AXP products distribution files
File name
Description
charon-axp-ds10-VER-BN.ZZ.x86_64.rpm CHARON-AXP/DS10
charon-axp-ds20-VER-BN.ZZ.x86_64.rpm CHARON-AXP/DS20
charon-axp-es40-VER-BN.ZZ.x86_64.rpm CHARON-AXP/ES40
charon-axp-gs80-VER-BN.ZZ.x86_64.rpm CHARON-AXP/GS80
charon-axp-gs160-VER-BN.ZZ.x86_64.rpm CHARON-AXP/GS160
charon-axp-gs320-VER-BN.ZZ.x86_64.rpm CHARON-AXP/GS320
charon-axp-as4100-VER-BN.ZZ.x86_64.rpm CHARON-AXP/AS4100
The distributive directory also contains the following RPM files for additional material, libraries and utilities:
Table 5.2. CHARON-AXP additional distribution files
File name
Description
aksusbd-2.2-1.i386.rpm
HASP Run-time
charon-base-VER-BN.VC.ZZ.x86_64.rpm
CHARON Libraries
charon-hasp-VER-BN.VC.ZZ.x86_64.rpm
hasp_srm_view utility
charon-webui-VER-BN.VC.ZZ.x86_64.rpm CHARON Web User Interface
3. CHARON Web User Interface requires installation of additional material like Django and
Python of certain versions, so proceed with full installation of all the provided RPMs according to the following format:
For Red Hat Linux v6.x:
yum install *.rpm ftp://ftp.stromasys.ru/python-psutil-0.6.1-1.el6.x86_64.rpm
ftp://ftp.stromasys.ru/Django-1.3.1-2.el6.noarch.rpm ftp://ftp.stromasys.ru/python272.7.3-6.2.el6.nux.x86_64.rpm
ftp://ftp.stromasys.ru/python27-libs-2.7.36.2.el6.nux.x86_64.rpm
For Fedora Core:
yum install *.rpm python-psutil ftp://ftp.stromasys.ru/Django-1.3.1-2.fc16.noarch.rpm
It is possible to skip the CHARON WebUI installation, in this case the installation command
looks like the following:
yum install --exclude=charon-webui* *.rpm
It is also possible to install not all but some particular products from the whole package.
Just specify only needed product RPMs in the installation command.
Note
According to the installation command CHARON needs some additional packages
to be collected from different Internet repositories. These packages are required
only for one CHARON utility - WebUI. If the WebUI utility is not needed there is
no need to install them - as well as the python-psutil
26
XML to PDF by RenderX XEP XSL-FO Formatter, visit us at http://www.renderx.com/
Installing CHARON-AXP for Linux
Note
In case of isolated network without access to Internet it is strongly recommended
to collect all the additional packages beforehand from the provided URLs using a
system having Internet access, then put them beside CHARON RPMs and issue
the following command for full installation:
For Red Hat Linux v6.x:
yum install *.rpm
For Fedora Core:
yum install *.rpm python-psutil
4. Connect your license key containing you license to the host USB port
5. Re-login to apply the PATH settings. As it was mentioned before, it is recommended to
use specific account ‘charon’ for running CHARON-AXP.
5.2. CHARON directories structure
By default CHARON is installed in the "/opt/charon" directory. The following subdirectories
are created there:
Table 5.3. CHARON for Linux installation directories
Directory
Description
/bin
Contains all executables
/cfg
Contains templates of configuration files
/lib
Contains product libraries
/doc
Contains documentation
/log
Contains log files
/disks
Contains disk containers
/webui
Contains WebUI files
/drivers
Contains CHARON drivers
5.3. Configuring the HP Alpha virtualization
layer
After installation you should edit a configuration file for the virtual HP Alpha and install a HP
Alpha operating system, for instance OpenVMS/Alpha.
Copy the corresponding configuration templates (residing in the ‘/opt/charon/cfg/’ directory
by default) to some files having meaningful name.
Example 5.1.
cp /opt/charon/cfg/ds10l.cfg.template /opt/charon/cfg/my_ds10l.cfg
The template configuration files contain examples and explanations of many parameters that
tune CHARON-AXP to achieve desired configuration. These files can be used as starting
point for creating user specific configuration files.
27
XML to PDF by RenderX XEP XSL-FO Formatter, visit us at http://www.renderx.com/
Installing CHARON-AXP for Linux
The configuration procedure is described in details in the next chapters.
5.4. Running CHARON-AXP
For running CHARON-AXP AlphaServer models please use the following symbolic link names:
Table 5.4.
Link name
Emulator to run
ds10l
AlphaServer DS10L
ds15
AlphaServer DS15
ds20
AlphaServer DS20
ds25
AlphaServer DS25
es40
AlphaServer ES40
es45
AlphaServer ES45
gs80
AlphaServer GS80
gs160
AlphaServer GS160
gs320
AlphaServer GS320
as400
AlphaServer 400
as800
AlphaServer 800
as1000
AlphaServer 1000
as1000a
AlphaServer 1000A
as1200
AlphaServer 1200
as2000
AlphaServer 2000
as2100
AlphaServer 2100
as4000
AlphaServer 4000
as4100
AlphaServer 4100
Run corresponding CHARON-AXP AlphaServer model with the created configuration file:
Example 5.2.
ds10l /opt/charon/cfg/my_ds10l.cfg
To exit from the SRM console of the running emulator use "power off" command or press
‘F6’ button.
It is also possible to run CHARON as a daemon. In this case CHARON process will be detached from its parent process and from the terminal window in which it is started.
To install and run CHARON as daemon:
1. Copy the sample script /opt/charon/utils/charon ( /opt/charon/utils/charon.service for Fedora
Core Linux ) to your home directory, for example:
cp /opt/charon/utils/charon /my_charon_files/services/as400_services/as400_daemon
2. Edit the renamed file to replace sample values of the following parameters to desired ones:
• exec, prog and config (in case of Red Hat Linux)
• ExecStart and WorkingDirectory (in case of Fedora Core Linux)
28
XML to PDF by RenderX XEP XSL-FO Formatter, visit us at http://www.renderx.com/
Installing CHARON-AXP for Linux
Example 5.3. Setting CHARON daemon parameters on Red Hat Linux
exec="/opt/charon/bin/as400"
prog="charon"
config="/opt/charon/cfg/as400-service.cfg"
Example 5.4. Setting CHARON daemon parameters on Fedora Core Linux
ExecStart=/opt/charon/bin/as400 -d /opt/charon/cfg/as400-service.cfg
WorkingDirectory=/my_charon_files/services/as400_services/
3. Edit configuration file ( "as400-service.cfg" in the examples above ) to make sure that the
following pre-requisites are met:
• OPA0 must be configured as virtual port or physical console, not as operator console
Example 5.5. Configuration of OPA0 as virtual port
load virtual_serial_line OPA0 port=10003
#load operator_console OPA0
• Use only absolute paths to log, toy clock, nvram files and all the other data such as
disk images etc. The names of the references files must be unique too.
Example 5.6. Absolute paths to CHARON data
...
set rom container="/my_charon_files/services/as400_services/MyAlphaServer_400.bin"
set toy container="/my_charon_files/services/as400_services/MyAlphaServer_400.dat"
set PKA container[0]="/my_charon_files/services/as400_services/as400_boot_disk.vdisk"
...
• Make sure that the same physical devices are not used by other CHARON daemons
4. Once configuration file is ready issue the following commands:
On Red Hat Linux:
• Register daemon by creating a link:
ln -sf <path to my script>/<name of the script> /etc/init.d/<name of the script>
• Create startup links
chkconfig <name of the script> on
• Start CHARON daemon:
/etc/init.d/<name of the script> start
Example 5.7. Installing new CHARON daemon on Red Hat Linux
ln -sf /my_charon_files/services/as400_services/as400_daemon /etc/init.d/as400_daemon
chkconfig as400_daemon on
/etc/init.d/as400_daemon start
On Fedora Core:
29
XML to PDF by RenderX XEP XSL-FO Formatter, visit us at http://www.renderx.com/
Installing CHARON-AXP for Linux
• Register daemon by creating a link:
systemctl enable <path to my script>/<name of the script>.service
• Start CHARON daemon:
systemctl start <name of the script>.service
Example 5.8. Installing new CHARON daemon on Fedora Core Linux
systemctl enable /my_charon_files/services/as400_services/as400_daemon.service
systemctl start as400_daemon.service
To stop CHARON daemon use the following command:
• On Red Hat Linux:
/etc/init.d/<name of the script> stop
Example 5.9. Stopping CHARON daemon on Red Hat Linux
/etc/init.d/as400_daemon stop
• On Fedora Core Linux:
systemctl stop <name of the script>.service
Example 5.10. Stopping CHARON daemon on Fedora Core Linux
systemctl stop as400_daemon.service
The same way it is possible to get status of CHARON daemon (issuing "status" instead of
"stop") and restart it ((issuing "restart" instead of "stop").
To remove CHARON daemon use the following command (assuming that CHARON daemon
has already stopped):
• On Red Hat Linux:
chkconfig <name of the script> off
rm -f /etc/init.d/<name of the script>
Example 5.11. Removing CHARON daemon on Red Hat Linux
chkconfig as400_daemon off
rm -f /etc/init.d/as400_daemon
• On Fedora Core Linux:
systemctl disable <path to my script>/<name of the script>.service
Example 5.12. Removing CHARON daemon on Fedora Core Linux
systemctl disable /my_charon_files/services/as400_services/as400_daemon.service
30
XML to PDF by RenderX XEP XSL-FO Formatter, visit us at http://www.renderx.com/
Installing CHARON-AXP for Linux
Note that only local console can be used for running CHARON - no telnet, ssh, vnc etc can
be used to run CHARON remotely. There is a workaround if remote running is needed - requesting CHARON license on Sentinel Network HASP key or as Software License. Please
see the chapter on CHARON licensing for details.
Another workaround is configuring CHARON as a Linux daemon.
5.5. Uninstalling
To uninstall some CHARON particular product login as "root" user and issue the following
command:
yum remove <CHARON product name>
Example 5.13. Uninstallation of the AlphaServer ES40 v 4.5 Build 15502
yum remove charon-axp-es40-4.5-155002
If it is required to uninstall all the products completely (including all the compartment components and drivers) use the following command:
yum remove aksusbd-2.1-1.i386 `rpm -q -a | grep charon`
31
XML to PDF by RenderX XEP XSL-FO Formatter, visit us at http://www.renderx.com/
Chapter 6. Configuring Virtual HP Alpha
6.1. The HP Alpha system architecture
In hardware HP Alpha system, the CPU, memory, peripheral controllers and adapters are
connected through the central system buses.
CHARON-AXP implements these central system buses, the HP Alpha CPU(s), memory,
disk/tape controllers and the Ethernet components. When CHARON-AXP starts, it follows a
configuration script and assembles a virtual HP Alpha system by combining models of the
buses, the HP Alpha CPU, memory and controllers into a working unit and loading this into
the host system.
The virtual peripheral devices are mapped in the configuration script to a device or service
on the host system. For instance, a virtual DE500BA Ethernet adapter is associated with a
dedicated physical Ethernet controller in the host system, thus connecting Virtual HP Alpha
to a physical Ethernet network.
When the configuration script is fully executed, CHARON-AXP has created a complete virtual
HP Alpha system. It then hands over control to the HP Alpha CPU, which will boot the HP
Alpha system software in the same manner as would happen on HP Alpha hardware.
The configuration script consists of one or more text files with a .cfg extension. To facilitate
structuring of large configurations, a part of the configuration can be stored in a separate file.
Such file is incorporated in the main script with the include command.
Follow the steps below for a quick start with a custom configuration:
1. Choose an emulated Alpha model you would like to run, and copy the relevant default
configuration file to your private configuration file (for example: my_es40.cfg)
2. Write a comment at the top of the my_es40.cfg to define the purpose for this configuration
3. Define the amount of RAM you require (for example: set ram size=1024). By default the
memory amount is set to different values depending on the HP Alpha models
4. Define the virtual operator console with "load operator_console OPA0" command.
5. Define storage units (for example: “set PKA container[0]="file-name.vdisk"). This first
unit will appear in CHARON-AXP as DKA0 in CHARON-AXP SRM console
6. Define the Ethernet NIC device connection in the configuration file, for example:
load DE500BA/dec21x4x EWA interface=EWA0
load packet_port/chnetwrk EWA0 interface="eth0"
7. Now you can run the configured system
6.2. The configuration command syntax
There are two types of configuration commands:
• The load command instructs CHARON to add a component to a system bus
• The set command defines the characteristics of a loaded component
32
XML to PDF by RenderX XEP XSL-FO Formatter, visit us at http://www.renderx.com/
Configuring Virtual HP Alpha
To be able to load and manipulate more than one copy of a particular component a logical
name is assigned to each loaded component as the following example shows:
Example 6.1.
load "component A" NAME1
load "component B" NAME2
NAME1 and NAME2 are freely chosen names that are only relevant within the configuration
file. These names have no meaning and will never show up in the operating system running
on the virtual environment
Using their logical names the two identical components (for instance two DE500BA Ethernet
adapters) can be given individual parameters (for instance the IDs of the host adapters they
should use). The example configuration files show how the logical names are used.
The parameters used with the set commands are typically assigned to a value, which can be
true/false, a number or a text string. Numbers can be expressed in different formats, as it
can be more convenient to use octal or hexadecimal formats:
• For octal use a number starting with 0; use the symbols 0 – 7. Example: 07665
• For decimal use a number starting with 1 - 9. Example: 12345
• For hexadecimal use a number starting with 0x; 0 - 9 and a – f. Example: 0x1234abc
The set commands are listed separately in this guide; however any load command can be
extended with one or more of relevant set commands to get a more compact configuration
file. For instance:
Example 6.2.
load "component A" NAME1 <parameter>="abcd"
Is equivalent to:
load "component A" NAME1
set NAME1 <parameter>="abcd"
6.3. The virtual AXP models specifics
All the emulators included to the CHARON-AXP have specific PCI bus configuration and
peripherals. This specific reflects original HP Alpha system hardware configurations and is
implemented in CHARON-AXP to provide better compatibility with original HP Alpha operating
systems (presumably old versions of HP Tru64 UNIX Operating System)
6.3.1. AlphaServer 400 (DECchip 21072, 3 PCI slots)
In addition to 3 PCI vacant slots there are 2 PCI positions occupied by on-board devices. All
5 PCI positions are listed in the following table in the order in which Alpha SRM console
enumerates them.
Slot
PCI
Device Function
IRQ
pci_0
-
0
6
0
11
NCR 53C810 PCI SCSI Adapter
33
XML to PDF by RenderX XEP XSL-FO Formatter, visit us at http://www.renderx.com/
Configuring Virtual HP Alpha
Slot
PCI
Device Function
IRQ
-
0
7
0
-
0
0
11
0
10
option
1
0
12
0
15
option
2
0
13
0
9
option
Intel i82378 PCI ISA Bridge (SATURN)
The IRQ stands for ISA IRQ Number because all interrupts are routed through the Intel i82378
PCI ISA Bridge (SATURN) resident cascade of Intel i8259 interrupt controllers.
So far the CHARON-AXP emulators do not support virtual NCR 53C810 PCI SCSI adapter.
Instead, virtual QLOGIC ISP1040B PCI SCSI adapter is used.
6.3.2. AlphaServer 800 (DECchip 21172, 4 PCI slots)
In addition to 4 PCI vacant slots there are 3 PCI positions occupied by on-board devices. All
7 PCI positions are listed in the following table in the order in which Alpha SRM console
enumerates them.
Slot
PCI
Device Function
IRQ
pci_0
-
0
5
0
0
QLOGIC ISP1020 PCI SCSI Adapter
-
0
6
0
0
S3 Trio32/64 Display Adapter
-
0
7
0
-
Intel i82375 PCI EISA Bridge (MERCURY)
0
0
11
0
10
option
1
0
12
0
15
option
2
0
13
0
9
option
3
0
14
0
7
option
The IRQ stands for input line of ASIC interrupt controllers. It has nothing to do with "EISA"
style interrupts. So far, the CHARON-AXP emulators do not emulate S3 Trio32/64 Display
Adapter. So position of the device 6, function 0 on the PCI 0 remains empty.
6.3.3. AlphaServer 1000 (DECchip 21072, 3 PCI slots)
In addition to 3 PCI vacant slots there are 2 PCI positions occupied by on-board devices. All
5 PCI positions are listed in the following table in the order in which Alpha SRM console
enumerates them.
Slot
PCI
Device Function
IRQ
pci_0
-
0
6
0
12
NCR 53C810 PCI SCSI Adapter
-
0
7
0
-
Intel i82375 PCI EISA Bridge (MERCURY)
0
0
11
0
0
option
1
0
12
0
4
option
2
0
13
0
8
option
34
XML to PDF by RenderX XEP XSL-FO Formatter, visit us at http://www.renderx.com/
Configuring Virtual HP Alpha
The IRQ stands for input line of ASIC interrupt controllers. It has nothing to do with "EISA"
style interrupts. So far, the CHARON-AXP emulators do not emulate NCR 53C810 PCI SCSI
adapter. Instead, emulation of QLOGIC ISP1040B PCI SCSI adapter is used.
6.3.4. AlphaServer 1000A (DECchip 21072, 7 PCI slots)
In addition to 7 PCI vacant slots there are 3 PCI positions occupied by on-board devices. All
10 PCI positions are listed in the following table in the order in which Alpha SRM console
enumerates them.
Slot
PCI
Device Function
IRQ
pci_0
-
0
7
0
-
Intel i82375 PCI EISA Bridge (MERCURY)
-
0
8
0
-
DECchip 21050 PCI-to-PCI Bridge)
0
0
11
0
1
option
1
0
12
0
2
option
2
0
13
0
3
option
-
1
0
0
0
NCR 53C810 PCI SCSI Adapter
3
1
1
0
7
option
4
1
2
0
9
option
5
1
3
0
11
option
6
1
4
0
13
option
pci_0
The IRQ stands for input line of ASIC interrupt controllers. It has nothing to do with "EISA"
style interrupts. So far, the CHARON-AXP emulators do not emulate NCR 53C810 PCI SCSI
adapter. Instead, emulation of QLOGIC ISP1040B PCI SCSI adapter is used.
6.3.5. AlphaServer 1200 (1 IOD, 6 PCI slots)
In addition to 6 PCI vacant slots there are 2 PCI positions occupied by on-board devices. All
8 PCI positions are listed in the following table in the order in which Alpha SRM console
enumerates them.
Slot
PCI
Device Function
IRQ
pci_1
-
1
1
0
4
NCR 53C810 PCI SCSI Adapter
0
1
2
0
8
option
1
1
3
0
12
option
2
1
4
0
16
option
-
0
1
0
-
Intel i82375 PCI EISA Bridge (MERCURY)
3
0
2
0
8
option
4
0
3
0
12
option
5
0
4
0
16
option
pci_0
35
XML to PDF by RenderX XEP XSL-FO Formatter, visit us at http://www.renderx.com/
Configuring Virtual HP Alpha
So far, the CHARON-AXP emulators do not emulate NCR 53C810 PCI SCSI adapter. Instead,
emulation of QLOGIC ISP1040B PCI SCSI adapter is used.
6.3.6. AlphaServer 2000 (T2, 3 PCI slots)
In addition to 3 PCI vacant slots there are 3 PCI positions occupied by on-board devices. All
6 PCI positions are listed in the following table in the order in which Alpha SRM console
enumerates them.
Slot
PCI
Device Function
IRQ
pci_0
-
0
0
0
2
DEC TULIP PCI Ethernet adapter
-
0
1
0
1
NCR 53C810 PCI SCSI Adapter
-
0
2
0
-
Intel i82375 PCI EISA Bridge (MERCURY)
0
0
6
0
0
option
1
0
7
0
4
option
2
0
8
0
5
option
The IRQ stands for input line of T2 resident cascade of Intel i8259 interrupt controllers. It has
nothing to do with “EISA” style interrupts.
So far the CHARON-AXP emulators do not support virtual NCR 53C810 PCI SCSI adapter.
Instead, virtual QLOGIC ISP1040B PCI SCSI adapter is used.
6.3.7. AlphaServer 2100 (T2, 3 PCI slots)
In addition to 3 PCI vacant slots there are 3 PCI positions occupied by on-board devices. All
6 PCI positions are listed in the following table in the order in which Alpha SRM console
enumerates them.
Slot
PCI
Device Function
IRQ
pci_0
-
0
0
0
2
DEC TULIP PCI Ethernet adapter
-
0
1
0
1
NCR 53C810 PCI SCSI Adapter
-
0
2
0
-
Intel i82375 PCI EISA Bridge (MERCURY)
0
0
6
0
0
option
1
0
7
0
4
option
2
0
8
0
5
option
The IRQ stands for input line of T2 resident cascade of Intel i8259 interrupt controllers. It has
nothing to do with “EISA” style interrupts.
So far the CHARON-AXP emulators do not support virtual NCR 53C810 PCI SCSI adapter.
Instead, virtual QLOGIC ISP1040B PCI SCSI adapter is used.
6.3.8. AlphaServer 4000 (2 IODs, 16 PCI slots)
In addition to 16 PCI vacant slots there are 2 PCI positions occupied by on-board devices.
All 18 PCI positions are listed in the following table in the order in which Alpha SRM console
enumerates them.
36
XML to PDF by RenderX XEP XSL-FO Formatter, visit us at http://www.renderx.com/
Configuring Virtual HP Alpha
Slot
PCI
Device Function
IRQ
pci_1
-
1
1
0
4
NCR 53C810 PCI SCSI Adapter
-
1
2
0
8
option
-
1
3
0
12
option
-
1
4
0
16
option
-
1
5
0
20
option
-
0
1
0
-
Intel i82375 PCI EISA Bridge (MERCURY)
-
0
2
0
8
option
-
0
3
0
12
option
-
0
4
0
16
option
-
0
5
0
20
option
-
3
2
0
8
option
-
3
3
0
12
option
-
3
4
0
16
option
-
3
5
0
20
option
-
2
2
0
8
option
-
2
3
0
12
option
-
2
4
0
16
option
-
2
5
0
20
option
pci_0
pci_3
pci_2
So far the CHARON-AXP emulators do not support virtual NCR 53C810 PCI SCSI adapter.
Instead, virtual QLOGIC ISP1040B PCI SCSI adapter is used.
6.3.9. AlphaServer 4100 (1 IOD, 8 PCI slots)
In addition to 8 PCI vacant slots there are 2 PCI positions occupied by on-board devices. All
10 PCI positions are listed in the following table in the order in which Alpha SRM console
enumerates them.
Slot
PCI
Device Function
IRQ
pci_1
-
1
1
0
4
NCR 53C810 PCI SCSI Adapter
-
1
2
0
8
option
-
1
3
0
12
option
-
1
4
0
16
option
-
1
5
0
20
option
-
0
1
0
-
Intel i82375 PCI EISA Bridge (MERCURY)
-
0
2
0
8
option
pci_0
37
XML to PDF by RenderX XEP XSL-FO Formatter, visit us at http://www.renderx.com/
Configuring Virtual HP Alpha
Slot
PCI
Device Function
IRQ
-
0
3
0
12
option
-
0
4
0
16
option
-
0
5
0
20
option
So far the CHARON-AXP emulators do not support virtual NCR 53C810 PCI SCSI adapter.
Instead, virtual QLOGIC ISP1040B PCI SCSI adapter is used.
6.3.10. AlphaServer DS10L (1 PCI bus, 4 PCI slot)
In addition to 4 PCI vacant slots there are 5 PCI positions occupied by on-board devices. All
9 PCI positions are listed in the following table in the order in which Alpha SRM console
enumerates them.
Slot
PCI
Device Function
IRQ
pci_0
-
0
7
0
-
ALi M1543C PCI ISA bridge
-
0
9
0
29
DECchip 21143 PCI Ethernet Adapter
-
0
11
0
30
DECchip 21143 PCI Ethernet Adapter
-
0
13
0
-
ALi M1543C PCI IDE/ATAPI controller
1
0
14
0
35
option
2
0
15
0
39
option
3
0
16
0
43
option
4
0
17
0
47
option
-
0
19
0
11
ALi M1543C PCI USB adapter
So far, the CHARON-AXP emulators do not support virtual ALi M1543C PCI USB adapter.
The position of the device 19, function 0 on the PCI 0 remains empty.
6.3.11. AlphaServer DS15 (2 Pchips, 4 PCI slots)
In addition to 4 PCI vacant slots there are 7 PCI positions occupied by on-board devices. All
11 PCI positions are listed in the following table in the order in which Alpha SRM console
enumerates them.
Slot
PCI
Device Function
IRQ
pci_2
1
2
7
0
40
option
2
2
8
0
36
option
3
2
9
0
24
option
4
2
10
0
20
option
-
0
7
0
-
ALi M1543C PCI ISA bridge
-
0
8
0
-
Adaptec AIC-7899 (channel 0)
-
0
8
1
-
Adaptec AIC-7899 (channel 1)
pci_0
38
XML to PDF by RenderX XEP XSL-FO Formatter, visit us at http://www.renderx.com/
Configuring Virtual HP Alpha
Slot
PCI
Device Function
IRQ
-
0
9
0
-
Intel i82559 PCI Ethernet Adapter
-
0
10
0
-
Intel i82559 PCI Ethernet Adapter
-
0
13
0
-
ALi M1543C PCI IDE/ATAPI controller
-
0
19
0
-
ALi M1543C PCI USB adapter
The IRQ stands for bit position in DRIR of TITAN chip. It has nothing to do with “ISA” style
interrupts which are routed to IRQ 55 (including ALi M1543C PCI IDE/ATAPI controller).
So far the CHARON-AXP emulators do not emulate Adaptec AIC-7899. Instead, emulation
of QLOGIC ISP1040B is used.
So far the CHARON-AXP emulators do not emulate Intel i82559. Instead, emulation of
DECchip 21143 is used.
So far the CHARON-AXP emulators do not emulate ALi M1543C PCI USB adapter. So position
of the device 19, function 0 on the PCI 0 remains empty.
6.3.12. AlphaServer DS20 (2 Pchips, 6 PCI slots)
In addition to 6 PCI vacant slots there are 5 PCI positions occupied by on-board devices. All
11 PCI positions are listed in the following table in the order in which Alpha SRM console
enumerates them.
Slot
PCI
Device Function
IRQ
pci_1
4
1
7
0
47
option
5
1
8
0
43
option
6
1
9
0
39
option
-
0
5
0
-
-
0
6
0
19
Adaptec AIC-7895 (channel 0)
-
0
6
1
18
Adaptec AIC-7895 (channel 1)
-
0
15
0
-
ALi M1543C PCI IDE/ATAPI controller
-
0
19
0
-
ALi M1543C PCI USB adapter
1
0
7
0
31
option
2
0
8
0
27
option
3
0
9
0
23
option
pci_0
ALi M1543C PCI ISA bridge
The IRQ stands for bit position in DRIR of Tsunami/Typhoon Chip. It has nothing to do with
“ISA” style interrupts which are routed to IRQ 55 (including ALi M1543C PCI IDE/ATAPI
controller).
Unless SCSI option is plugged into PCI slot 4, 5, or 6, the onboard SCSI controllers appear
as PKA (pka7.0.0.6.0) and PKB (pkb7.0.0.106.0) respectively.
So far the CHARON-AXP emulators do not support virtual Adaptec AIC-7895 PCI SCSI adapter. Instead, virtual QLOGIC ISP1040B PCI SCSI adapter is used.
39
XML to PDF by RenderX XEP XSL-FO Formatter, visit us at http://www.renderx.com/
Configuring Virtual HP Alpha
So far the CHARON-AXP emulators do not support virtual ALi M1543C PCI USB adapter.
So position of the device 19, function 0 on the PCI 0 remains empty.
6.3.13. AlphaServer DS25 (2 Pchips, 6 PCI slots)
In addition to 6 PCI vacant slots there are 7 PCI positions occupied by on-board devices. All
13 PCI positions are listed in the following table in the order in which Alpha SRM console
enumerates them.
Slot
PCI
Device Function
IRQ
pci_0
-
0
7
0
-
ALi M1543C PCI ISA bridge
-
0
8
0
-
Intel i82559 PCI Ethernet Adapter
1
0
9
0
24
option
2
0
10
0
12
option
-
0
16
0
-
ALi M1543C PCI IDE/ATAPI controller
-
0
19
0
-
ALi M1543C PCI USB adapter
3
1
1
0
28
option
4
1
2
0
32
option
-
2
1
0
-
Adaptec AIC-7899 (channel 0)
-
2
1
1
-
Adaptec AIC-7899 (channel 1)
-
2
5
0
-
BroadCom BCM5703 PCI Ethernet Adapter
5
3
1
0
36
option
6
3
2
0
40
option
pci_1
pci_2
pci_3
The IRQ stands for bit position in DRIR of TITAN Chip. It has nothing to do with “ISA” style
interrupts which are routed to IRQ 55 (including ALi M1543C PCI IDE/ATAPI controller).
So far the CHARON-AXP emulators do not emulate Intel i82559. Instead, emulation of
DECchip 21143 is used.
So far the CHARON-AXP emulators do not emulate ALi M1543C PCI USB adapter. So position
of the device 19, function 0 on the PCI 0 remains empty.
Unless SCSI option is plugged into PCI slot 1, 2, 3, or 4, the onboard SCSI controllers appear
as PKA (pka7.0.0.1.2) and PKB (pkb7.0.0.101.2) respectively.
So far the CHARON-AXP emulators do not emulate Adaptec AIC-7899. Instead, emulation
of QLOGIC ISP1040B is used.
So far the CHARON-AXP emulators do not emulate BroadCom BCM5703. Instead, emulation
of DECchip 21143 is used.
6.3.14. AlphaServer ES40 (2 Pchips, 10 PCI slots)
In addition to 10 PCI vacant slots there are 3 PCI positions occupied by on-board devices.
All 13 PCI positions are listed in the following table in the order in which Alpha SRM console
enumerates them.
40
XML to PDF by RenderX XEP XSL-FO Formatter, visit us at http://www.renderx.com/
Configuring Virtual HP Alpha
Slot
PCI
Device Function
IRQ
pci_1
5
1
1
0
24
option
6
1
2
0
28
option
7
1
3
0
32
option
8
1
4
0
36
option
9
1
5
0
40
option
10
1
6
0
44
option
1
0
1
0
8
option
2
0
2
0
19
option
3
0
3
1
16
option
4
0
4
0
20
option
-
0
5
0
-
ALi M1543C PCI ISA bridge
-
0
15
0
-
ALi M1543C PCI ISA bridge
-
0
19
0
-
ALi M1543C PCI USB adapter
pci_0
The IRQ stands for bit position in DRIR of Tsunami/Typhoon chip. It has nothing to do with
“ISA” style interrupts which are routed to IRQ 55 (including ALi M1543C PCI IDE/ATAPI
controller).
So far the CHARON-AXP emulators do not support virtual ALi M1543C PCI USB adapter.
So position of the device 19, function 0 on the PCI 0 remains empty.
6.3.15. AlphaServer ES45 (2 Pchips, 10 PCI slots)
In addition to 10 PCI vacant slots there are 3 PCI positions occupied by on-board devices.
All 13 PCI positions are listed in the following table in the order in which Alpha SRM console
enumerates them.
Slot
PCI
Device Function
IRQ
pci_0
-
0
7
0
-
ALi M1543C PCI ISA bridge
1
0
8
0
20
option
2
0
9
0
24
option
3
0
10
0
12
option
4
0
11
0
16
option
-
0
16
0
-
ALi M1543C PCI IDE/ATAPI controller (DQA, DQB)
-
0
19
0
-
ALi M1543C PCI USB adapter
5
1
1
0
28
option
6
1
2
0
32
option
7
2
1
0
8
option
8
2
2
0
44
option
pci_1
pci_2
41
XML to PDF by RenderX XEP XSL-FO Formatter, visit us at http://www.renderx.com/
Configuring Virtual HP Alpha
Slot
PCI
Device Function
IRQ
pci_3
9
3
1
0
36
option
10
3
2
0
40
option
The IRQ stands for bit position in DRIR of TITAN chip. It has nothing to do with “ISA” style
interrupts which are routed to IRQ 55 (including ALi M1543C PCI IDE/ATAPI controller).
So far the CHARON-AXP emulators do not support virtual ALi M1543C PCI USB adapter.
So position of the device 19, function 0 on the PCI 0 remains empty.
6.3.16. AlphaServer GS80 (2 QBBs, 8 PCI busses, 27 PCI
slots)
Slot
PCI
Device Function
IRQ
qbb_0_pca_0_pci_0
0/1
0
1
0
36
QLOGIC ISP1040B PCI SCSI Adapter
2
0
2
0
40
option
3
0
3
0
44
option
-
0
7
0
-
ALi M1543C PCI ISA bridge
-
0
15
0
-
ALi M1543C PCI IDE/ATAPI controller
-
0
19
0
-
ALi M1543C PCI USB adapter
qbb_0_pca_0_pci_1
4
1
4
0
48
option
5
1
5
0
52
option
6
1
6
0
56
option
7
1
7
0
60
option
qbb_0_pca_1_pci_0
0/1
2
0
0
32
option
2
2
2
0
40
option
3
2
3
0
44
option
qbb_0_pca_1_pci_1
4
3
4
0
48
option
5
3
5
0
52
option
6
3
6
0
56
option
7
3
7
0
60
option
qbb_1_pca_0_pci_0
0/1
8
0
0
32
option
2
8
2
0
40
option
3
8
3
0
44
option
qbb_1_pca_0_pci_1
4
9
4
0
48
option
5
9
5
0
52
option
42
XML to PDF by RenderX XEP XSL-FO Formatter, visit us at http://www.renderx.com/
Configuring Virtual HP Alpha
Slot
PCI
Device Function
IRQ
6
9
6
0
56
option
7
9
7
0
60
option
qbb_1_pca_1_pci_0
0/1
10
0
0
32
option
2
10
2
0
40
option
3
10
3
0
44
option
qbb_1_pca_1_pci_1
4
11
4
0
48
option
5
11
5
0
52
option
6
11
6
0
56
option
7
11
7
0
60
option
PCI 2 and 3 on each QBB are not populated.
So far the CHARON-AXP emulators do not support virtual ALi M1543C PCI USB adapter.
So position of the device 19, function 0 on the PCI 0 remains empty.
Total number of PCI devices configured through CFG file may not exceed 27.
6.3.17. AlphaServer GS160 (4 QBBs, 16 PCI busses, 55
PCI slots)
Slot
PCI
Device Function
IRQ
qbb_0_pca_0_pci_0
0/1
0
1
0
36
QLOGIC ISP1040B PCI SCSI Adapter
2
0
2
0
40
option
3
0
3
0
44
option
-
0
7
0
-
ALi M1543C PCI ISA bridge
-
0
15
0
-
ALi M1543C PCI IDE/ATAPI controller
-
0
19
0
-
ALi M1543C PCI USB adapter
qbb_0_pca_0_pci_1
4
1
4
0
48
option
5
1
5
0
52
option
6
1
6
0
56
option
7
1
7
0
60
option
qbb_0_pca_1_pci_0
0/1
2
0
0
32
option
2
2
2
0
40
option
3
2
3
0
44
option
qbb_0_pca_1_pci_1
4
3
4
0
48
option
5
3
5
0
52
option
43
XML to PDF by RenderX XEP XSL-FO Formatter, visit us at http://www.renderx.com/
Configuring Virtual HP Alpha
Slot
PCI
Device Function
IRQ
6
3
6
0
56
option
7
3
7
0
60
option
qbb_1_pca_0_pci_0
0/1
8
0
0
32
option
2
8
2
0
40
option
3
8
3
0
44
option
qbb_1_pca_0_pci_1
4
9
4
0
48
option
5
9
5
0
52
option
6
9
6
0
56
option
7
9
7
0
60
option
qbb_1_pca_1_pci_0
0/1
10
0
0
32
option
2
10
2
0
40
option
3
10
3
0
44
option
qbb_1_pca_1_pci_1
4
11
4
0
48
option
5
11
5
0
52
option
6
11
6
0
56
option
7
11
7
0
60
option
qbb_2_pca_0_pci_0
0/1
16
0
0
32
option
2
16
2
0
40
option
3
16
3
0
44
option
qbb_2_pca_0_pci_1
4
17
4
0
48
option
5
17
5
0
52
option
6
17
6
0
56
option
7
17
7
0
60
option
qbb_2_pca_1_pci_0
0/1
18
0
0
32
option
2
18
2
0
40
option
3
18
3
0
44
option
qbb_2_pca_1_pci_1
4
19
4
0
48
option
5
19
5
0
52
option
6
19
6
0
56
option
7
19
7
0
60
option
qbb_3_pca_0_pci_0
0/1
24
0
0
32
option
2
24
2
0
40
option
44
XML to PDF by RenderX XEP XSL-FO Formatter, visit us at http://www.renderx.com/
Configuring Virtual HP Alpha
Slot
PCI
3
24
Device Function
3
IRQ
0
44
option
qbb_3_pca_0_pci_1
4
25
4
0
48
option
5
25
5
0
52
option
6
25
6
0
56
option
7
25
7
0
60
option
qbb_3_pca_1_pci_0
0/1
26
0
0
32
option
2
26
2
0
40
option
3
26
3
0
44
option
qbb_3_pca1_pci_1
4
27
4
0
48
option
5
27
5
0
52
option
6
27
6
0
56
option
7
27
7
0
60
option
PCI 2 and 3 on each QBB are not populated.
So far the CHARON-AXP emulators do not support virtual ALi M1543C PCI USB adapter.
So position of the device 19, function 0 on the PCI 0 remains empty.
Total number of PCI devices configured through CFG file may not exceed 27.
6.3.18. AlphaServer GS320 (8 QBBs, 32 PCI busses, 111
PCI slots)
Slot
PCI
Device Function
IRQ
qbb_0_pca_0_pci_0
0/1
0
1
0
36
QLOGIC ISP1040B PCI SCSI Adapter
2
0
2
0
40
option
3
0
3
0
44
option
-
0
7
0
-
ALi M1543C PCI ISA bridge
-
0
15
0
-
ALi M1543C PCI IDE/ATAPI controller
-
0
19
0
-
ALi M1543C PCI USB adapter
qbb_0_pca_0_pci_1
4
1
4
0
48
option
5
1
5
0
52
option
6
1
6
0
56
option
7
1
7
0
60
option
qbb_0_pca_1_pci_0
0/1
2
0
0
32
option
2
2
2
0
40
option
45
XML to PDF by RenderX XEP XSL-FO Formatter, visit us at http://www.renderx.com/
Configuring Virtual HP Alpha
Slot
PCI
3
2
Device Function
3
IRQ
0
44
option
qbb_0_pca_1_pci_1
4
3
4
0
48
option
5
3
5
0
52
option
6
3
6
0
56
option
7
3
7
0
60
option
qbb_1_pca_0_pci_0
0/1
8
0
0
32
option
2
8
2
0
40
option
3
8
3
0
44
option
qbb_1_pca_0_pci_1
4
9
4
0
48
option
5
9
5
0
52
option
6
9
6
0
56
option
7
9
7
0
60
option
qbb_1_pca_1_pci_0
0/1
10
0
0
32
option
2
10
2
0
40
option
3
10
3
0
44
option
qbb_1_pca_1_pci_1
4
11
4
0
48
option
5
11
5
0
52
option
6
11
6
0
56
option
7
11
7
0
60
option
qbb_2_pca_0_pci_0
0/1
16
0
0
32
option
2
16
2
0
40
option
3
16
3
0
44
option
qbb_2_pca_0_pci_1
4
17
4
0
48
option
5
17
5
0
52
option
6
17
6
0
56
option
7
17
7
0
60
option
qbb_2_pca_1_pci_0
0/1
18
0
0
32
option
2
18
2
0
40
option
3
18
3
0
44
option
qbb_2_pca_1_pci_1
4
19
4
0
48
option
5
19
5
0
52
option
6
19
6
0
56
option
46
XML to PDF by RenderX XEP XSL-FO Formatter, visit us at http://www.renderx.com/
Configuring Virtual HP Alpha
Slot
PCI
7
19
Device Function
7
IRQ
0
60
option
qbb_3_pca_0_pci_0
0/1
24
0
0
32
option
2
24
2
0
40
option
3
24
3
0
44
option
qbb_3_pca_0_pci_1
4
25
4
0
48
option
5
25
5
0
52
option
6
25
6
0
56
option
7
25
7
0
60
option
qbb_3_pca_1_pci_0
0/1
26
0
0
32
option
2
26
2
0
40
option
3
26
3
0
44
option
qbb_3_pca1_pci_1
4
27
4
0
48
option
5
27
5
0
52
option
6
27
6
0
56
option
7
27
7
0
60
option
qbb_4_pca_0_pci_0
0/1
32
0
0
32
option
2
32
2
0
40
option
3
32
3
0
44
option
qbb_4_pca_0_pci_1
4
33
4
0
48
option
5
33
5
0
52
option
6
33
6
0
56
option
7
33
7
0
60
option
qbb_4_pca_1_pci_0
0/1
34
0
0
32
option
2
34
2
0
40
option
3
34
3
0
44
option
qbb_4_pca_1_pci_1
4
35
4
0
48
option
5
35
5
0
52
option
6
35
6
0
56
option
7
35
7
0
60
option
qbb_5_pca_0_pci_0
0/1
40
0
0
32
option
2
40
2
0
40
option
3
40
3
0
44
option
47
XML to PDF by RenderX XEP XSL-FO Formatter, visit us at http://www.renderx.com/
Configuring Virtual HP Alpha
Slot
PCI
Device Function
IRQ
qbb_5_pca_0_pci_1
4
41
4
0
48
option
5
41
5
0
52
option
6
41
6
0
56
option
7
41
7
0
60
option
qbb_5_pca_1_pci_0
0/1
42
0
0
32
option
2
42
2
0
40
option
3
42
3
0
44
option
qbb_5_pca_1_pci_1
4
43
4
0
48
option
5
43
5
0
52
option
6
43
6
0
56
option
7
43
7
0
60
option
qbb_6_pca_0_pci_0
0/1
48
0
0
32
option
2
48
2
0
40
option
3
48
3
0
44
option
qbb_6_pca_0_pci_1
4
49
4
0
48
option
5
49
5
0
52
option
6
49
6
0
56
option
7
49
7
0
60
option
qbb_6_pca_1_pci_0
0/1
50
0
0
32
option
2
50
2
0
40
option
3
50
3
0
44
option
qbb_6_pca_1_pci_1
4
51
4
0
48
option
5
51
5
0
52
option
6
51
6
0
56
option
7
51
7
0
60
option
qbb_7_pca_0_pci_0
0/1
56
0
0
32
option
2
56
2
0
40
option
3
56
3
0
44
option
qbb_7_pca_0_pci_1
4
57
4
0
48
option
5
57
5
0
52
option
6
57
6
0
56
option
7
57
7
0
60
option
48
XML to PDF by RenderX XEP XSL-FO Formatter, visit us at http://www.renderx.com/
Configuring Virtual HP Alpha
Slot
PCI
Device Function
IRQ
qbb_7_pca_1_pci_0
0/1
58
0
0
32
option
2
58
2
0
40
option
3
58
3
0
44
option
qbb_7_pca_1_pci_1
4
59
4
0
48
option
5
59
5
0
52
option
6
59
6
0
56
option
7
59
7
0
60
option
PCI 2 and 3 on each QBB are not populated in emulator.
So far the CHARON-AXP emulators do not support virtual ALi M1543C PCI USB adapter.
So position of the device 19, function 0 on the PCI 0 remains empty.
Total number of PCI devices configured through CFG file may not exceed 27.
6.4. Multi instance support
6.4.1. General description
CHARON supports several instances of the emulators running simultaneously on the same
host. Number of instances allowed to run simultaneously is encoded into CHARON license
key.
In order to run several instances simultaneously, please note the following steps:
1. The host system must have enough CPU cores and memory to cover the requirements of
all the instances at the same time.
Each virtual CPU occupies one host CPU, so the total number of CPUs should be greater
than a sum of all the emulated CPUs. Note that some CPUs needs to be used for I/O
processing and at least one CPU – for the operating system housekeeping. Thus the total
amount of the host CPUs depends on the number of the CPUs needed for I/O. The general
recommendation is to leave at least 1/3 of the CPUs available to an instance for the instance
I/O, but depending on data flow this number can be increased / decreased for each instance
separately.
The minimal host memory is calculated as a sum of emulated memory of each CHARON
instance plus at least 2 GB of additional memory.
2. Each instance must have its own configuration and log files, toy etc containers. Configuration file of each CHARON instance should exactly specify the following:
• The number of CPUs to emulate (“n_of_cpus”). By default this parameter is equal to
the number of the CPUs the particular emulated model supports. But this number can
be reduced by changing the parameter or by the license restrictions
• The number of CPUs chosen for I/O operations (“n_of_io_cpus”). By default this parameter is equal to 1/3 of the CPUs available for certain emulator (round by 1). It is possible
to dedicate a chosen number of CPUs for I/O processing in case of intensive or, in opposite case, very shallow data flow.
49
XML to PDF by RenderX XEP XSL-FO Formatter, visit us at http://www.renderx.com/
Configuring Virtual HP Alpha
• Number of the CPUs the instance allocates. By default CHARON-AXP instance grabs
as many CPUs as possible. To balance the number of host CPUs between different instances a special parameter “affinity” is provided. This parameter specifies what CPUs
in particular each instance can allocate.
Using those 3 parameters it is possible to balance the hosting server resources for all
running CHARON instances.
3. Each instance must use its own specific console port.
4. Once the configuration files are updated for each particular instance CHARON, it is recommended to test those configurations separately.
6.4.2. Running several instances of CHARON
Example 6.3. Running 2 instances of AlphaServer GS160 emulator
gs160 gs160_first.cfg
gs160 gs160_second.cfg
Please refer to set session_name parameter in order to name the CHARON instances
See the next chapter for detailed description of the set session n_of_cpus, set session n_of_io_cpus, and set session affinity parameters.
6.5. General configuration parameters
This chapter describes the most common parameters defining specifics of CHARON execution
and most general functionality and logging, numbers of host CPU used, name of CHARON
instance etc.
All of these parameters are controlled by "set session" command in CHARON configuration
file accompanied with the following parameters:
6.5.1. Common parameters
"set session" Type
parameters
configuration_name
Text string
Value
A string specifying the name of the session (instance). This
name will be showed if scrolling over the icon in the taskbar
notification area.
Example 6.4.
set session configuration_name=”MSCDV1”
The value of this parameter is used as a prefix to the event
log file name in case if the multiple log files approach is
chosen.
Example 6.5.
set session configuration_name=”SERVER”
in this case the log file will have the following form:
AS400-YYYY-MM-DD-hh-mm-ss-xxxxxxxxx.log
50
XML to PDF by RenderX XEP XSL-FO Formatter, visit us at http://www.renderx.com/
Configuring Virtual HP Alpha
"set session" Type
parameters
Value
xxxxxxxxx is an increasing decimal number starting from
000000000 to separate log files with the same time of creation
(in case if the log is being written faster than one log file per
second).
log
Text string
A string specifying a file name to store the log of the session
or a directory where the log files for each session will be
stored.
If an existing directory is specified, CHARON automatically
enables creation of individual log file for each session. If the
log parameter is omitted CHARON will create logs for each
session in the current directory.
Example 6.6.
set session log=”log.txt”
set session log="/charon/logs"
In case if just a directory specified in the log parameter and
the configuration_name parameter of the session is specified too the log file name is composed as follows:
configuration_name-YYYY-MM-DD-hh-mm-ss-xxxxxxxxx.log
otherwise if the configuration_name parameter is omitted,
the log name will have the following format:
hw_model-YYYY-MM-DD-hh-mm-ss-xxxxxxxxx.log
xxxxxxxxx is an increasing decimal number starting from
000000000 to separate log files with the same time of creation
(in case if the log is being written faster than one log file per
second).
log_method
Text string
"overwrite" (default) or "append". Determines if previous log
information is maintained. Note that this parameter must be
specified only in addition to the “log” parameter on the same
line with it.
This parameter is applicable only if the log is stored in exactly
specified file.
Example 6.7.
set session log=”log.txt” log_method=”append”
log_locale
Text string
Sets the language of message database. So far the following
values are supported:
• “Dutch"
• “English”
• “Swedish”
• “Spanish”
51
XML to PDF by RenderX XEP XSL-FO Formatter, visit us at http://www.renderx.com/
Configuring Virtual HP Alpha
"set session" Type
parameters
Value
• “Chinese-Simplified”
By default it is set to “English”. If specified an unsupported
value, “English” is used.
Example 6.8.
set session log_locale=”Dutch”
license_key_id[N],
N=0 or 1
Numeric
A number (decimal Sentinel key ID) specifying the regular
(N=0) and backup (N=1) license key to be used by CHARON.
Example 6.9.
set session license_key_id[0] = 1877752571
set session license_key_id[1] = 354850588
it is also possible to specify both regular and backup key in
one line:
set session license_key_id[0] = 1877752571 license_key_id[1] = 354850588
Depending on presence of the regular and/or backup license
key IDs in the configuration file CHARON behaves differently:
1. No keys are specified
CHARON behaves as usual (performs unqualified search
for any suitable key). If no keys are found, CHARON exits.
2. Both keys are specified
CHARON performs qualified search for regular license key.
If it is not found, CHARON performs qualified search for
backup license key. If it is not found, CHARON exits.
3. Only regular key is specified
CHARON performs qualified search for regular license key.
If it is not found, CHARON performs unqualified search for
any suitable key. If it is not found, CHARON exits.
4. Only backup key is specified
CHARON behaves as usual (performs unqualified search
for any suitable key). If no keys are found, CHARON exits.
affinity
Text string
Overrides initial process’s affinity mask provided by host operating system.
Once specified it allows binding the running instance of
emulator to particular host CPUs. Might be used for soft partitioning host CPU resources, for isolating host CPUs for other
applications.
52
XML to PDF by RenderX XEP XSL-FO Formatter, visit us at http://www.renderx.com/
Configuring Virtual HP Alpha
"set session" Type
parameters
Value
By default the emulator instance allocates as many host CPUs
as possible. The “affinity” overrides that and allows explicit
specification on which host CPU the instance shall run.
Host CPUs are enumerated as comma separated list of host
system assigned CPU numbers.
Example 6.10.
set session affinity=”0, 2, 4, 6”
n_of_io_cpus
Numeric
Says how many host CPUs (of those specified by “affinity”
parameter, if any) the emulator shall use for I/O handling.
By default the emulator instance reserves one third of available host CPUs for I/O processing (round down, at least one).
The “n_of_io_cpus” overrides that by specifying number of
I/O host CPUs explicitly
Example 6.11.
set session n_of_io_cpus=2
6.5.2. Specific configuration parameters
Set paramet- Type
ers for the
session
hw_model
Text string
Value
Virtual HP Alpha system hardware model for which the configuration file is created.
Tip: use a default configuration template for a particular
model as a starting point for a custom configuration. This
would ensure that the parameter is set correctly.
Example 6.12.
set session hw_model="AlphaServer_DS20"
See Appendix section for proper combination of "cpu_architecture", "hw_model" and "dsrdb[0]" parameters according
to the chosen "system_name" value.
n_of_cpus
Numeric
Limits number of emulated CPUs.
Example 6.13.
set session n_of_cpus=3
Maximum number of CPUs enabled by CHARON is specified
by the license key, but cannot exceed the original hardware
restrictions:
• AlphaServer_AS400 – 1 CPU
• AlphaServer_AS800 – 1 CPU
53
XML to PDF by RenderX XEP XSL-FO Formatter, visit us at http://www.renderx.com/
Configuring Virtual HP Alpha
Set paramet- Type
ers for the
session
Value
• AlphaServer_AS1000 – 1 CPU
• AlphaServer_AS1000A – 1 CPU
• AlphaServer_AS1200 – 2 CPUs
• AlphaServer_AS2000 – 2 CPUs
• AlphaServer_AS2100 – 4 CPUs
• AlphaServer_AS4000 – 2 CPUs
• AlphaServer_AS4100 – 4 CPUs
• AlphaServer_DS10L – 1 CPU
• AlphaServer_DS15 – 1 CPU
• AlphaServer_DS20 – 2 CPUs
• AlphaServer_DS25 – 2 CPUs
• AlphaServer_ES40 – 4 CPUs
• AlphaServer_ES45 – 4 CPUs
• AlphaServer_GS80 – 8 CPUs
• AlphaServer_GS160 – 16 CPUs
• AlphaServer_GS320 – 32 CPUs
At startup emulator adjusts the number of emulated CPUs
accordingly to the number of available host CPU cores (enabled by “affinity” if any).
This option overrides automatic adjustment.
Note that in any case emulator reserves at least one host
CPU core for I/O management, so that given N host CPU
cores emulator supports up-to N-1 emulated CPUs.
6.5.3. Examples
Example 6.14. hw_model example
set session hw_model="AlphaServer_ES40"
This command specifies HP Alpha Server model the configuration file is designed for. It must
be the first command in a configuration file. Various CHARON products create specific virtual
CPU models and have different configuration commands. This command helps to detect errors
and prevents execution in case an incorrect virtual model is started. If the set session
hw_model="...." statement is not found, the configuration file is ignored, and the emulator
will not be activated.
54
XML to PDF by RenderX XEP XSL-FO Formatter, visit us at http://www.renderx.com/
Configuring Virtual HP Alpha
Example 6.15. Logging
set session log="clipper.log" log_method="append"
Creates a log file in the directory where CHARON starts. Specify the full path to locate the
log file elsewhere. The specified log file is created or overwritten at each start depending on
the log_method parameter. The log_method parameter must be specified on the same line
with the “log” parameter.
6.6. Console interface
Virtual HP Alpha system supports one serial console port, which in CHARON-AXP is identified
with the logical name OPA0. To use the OPA0 a physical or virtual serial line connection
must be loaded in the configuration file.
Emulated Alpha models AS400 and DS10 also have a second console port, TTA0
Terminals can also be connected to CHARON-AXP via TCP/IP or LAT terminal servers.
6.6.1. Types of serial line emulation
Type
Function
physical_serial_line This command associates a TTY port in the Linux host system with
the OPA0 console port. The TTY port can be a physical port part of
the host system hardware or a logical TTY port as created by, for
example, an Ethernet serial port device.
virtual_serial_line
This command associates a network connection in the Linux host
system with the OPA0 console port.
operator_console
This command associates the current TTY console CHARON runs
in with the OPA0 console port (if CHARON has not been started as
service)
Example 6.16.
load physical_serial_line OPA0
6.6.2. "physical_serial_line" parameters
Parameter
line
Type
Text string
Description
A defined TTY port on the Linux host system. See explanation below for more details:
• /dev/tty<N> - virtual serial lines
• /dev/ttyS<N> - onboard serial lines
• /dev/ttyUSB<N> - modem or usb serial lines adapters
baud
Numeric
Forces the baud rate of the corresponding TTY port to
the specified value. Variety of supported values depends on underlying physical communication resource
(TTY port that is). The most widely used values are:
300, 1200, 9600, 19200, 38400.
55
XML to PDF by RenderX XEP XSL-FO Formatter, visit us at http://www.renderx.com/
Configuring Virtual HP Alpha
Parameter
Type
Description
Example 6.17.
load physical_serial_line OPA0 baud=38400
break_on
Text string
Specifies which byte sequences received over physical
serial line shall trigger HALT command with switching
to CHARON SRM console.
This parameter works only for console line (For
CHARON-VAX it is the only line of UART and the
line[3] of QUART).
Specify the following values: "Crtl-P", or "none" to
disable triggering HALT condition.
Example 6.18.
break_on="Crtl-P"
The default value is "Crtl-P " for CHARON-AXP.
The default value is "Break" for line 3 of QUART and
"none" – for other lines for CHARON-VAX/PDP11
stop_on
Text string
Specifies which byte sequences received over virtual
serial line shall trigger STOP condition. The STOP
condition causes CHARON to terminate.
Specify value as a comma separated combination of
the following: “Application”, “F6”, or as “none” to disable triggering STOP condition.
Example 6.19.
stop_on="Application,F6"
The default value is "none".
Set to "Application" to trigger the STOP condition when
the associated application terminates. Use this option
only for virtual_serial_lines configured for automatic
application invocation (where the application parameter
specifies a valid application).
Set to "F6" to trigger the STOP condition upon reception
of the sequence "<ESC>[17~". Terminal emulators
may send these sequences when pressing the F6 button
log
Text string
A string specifying a file name to store content of the
OPA0 or TT0 sessions or a directory where the log files
for each OPA0 or TT0 individual session will be stored.
If an existing directory is specified, CHARON automatically enables creation of individual log file for each
OPA0 or TT0 session. If the log parameter is omitted
CHARON will not create any console log.
56
XML to PDF by RenderX XEP XSL-FO Formatter, visit us at http://www.renderx.com/
Configuring Virtual HP Alpha
Parameter
Type
Description
Example 6.20.
set OPA0 log=”log.txt”
set OPA0 log=”/opt/charon/logs"
Provided that the physical serial line connects a terminal to CHARON, pressing the "Break"
button on the terminal’s keyboard will generate a SPACE condition on the serial line. Setting
the break_on parameter value to "Break" in the configuration file will trigger the HALT (Reset)
condition in CHARON upon detection of the SPACE condition on the associated TTY port.
Set the break_on parameter value to "Ctrl-P" to trigger the HALT condition in the emulated
Alpha/VAX/PDP-11 upon reception of Ctrl-P character (ASCII code 10 (hex)).
The break_on parameter is ignored for all the lines except the console line.
Example 6.21. Alpha Configuration
load physical_serial_line OPA0
set OPA0 line="/dev/ttyS1"
or in a more compact form:
load physical_serial_line OPA0 line="/dev/ttyS1"
Example 6.22. VAX Configuration
load physical_serial_line/chserial DEF
set DEF break_on="Ctrl-P,Break" line="/dev/ttyS2"
set quart line[3]=DEF
Note
In the examples above DEF is a logical name for the serial line emulation. That name
is only used as a reference within a configuration file. It has no influence on the
naming of the devices inside an Alpha/VAX/PDP-11 operating system. The names
used can be helpful identifiers, use any character string you wish.
6.6.3. "virtual_serial_line" parameters
Parameter
host
Type
Text string
Description
The remote host’s IP address or host name and optionally remote TCP/IP port number for the virtual serial
line to connect to. If omitted, the virtual serial line does
not initiate connection to remote host while still listening
for incoming connection requests.
Specify the value in the following form:
host=”<host-name>[:<port-no>]”
If the <port-no> is not specified the virtual serial line
uses TCP/IP port number specified by the "port" parameter (see below).
57
XML to PDF by RenderX XEP XSL-FO Formatter, visit us at http://www.renderx.com/
Configuring Virtual HP Alpha
Parameter
Type
Description
port
Numeric
TCP/IP port number for the virtual serial line. The virtual
serial line always listens on this port for incoming connection requests.
break_on
Text string
Specifies which byte sequences received over physical
serial line shall trigger HALT command with switching
to CHARON-AXP SRM console.
Specify the following values: "Crtl-P", "F5", "Break"
or "none" to disable triggering HALT condition.
Example 6.23.
break_on="Crtl-P"
The default value is "F5" and "Break"
stop_on
Text string
Specifies which byte sequences received over virtual
serial line shall trigger STOP condition. The STOP
condition causes CHARON to terminate.
Specify value as a comma separated combination of
the following: “Application”, “F6”, or as “none” to disable triggering STOP condition.
Example 6.24.
stop_on="Application,F6"
The default value is "none".
Set to "Application" to trigger the STOP condition when
the associated application terminates. Use this option
only for virtual_serial_lines configured for automatic
application invocation (where the application parameter
specifies a valid application).
Set to "F6" to trigger the STOP condition upon reception
of the sequence "<ESC>[17~". Terminal emulators
may send these sequences when pressing the F6 button
log
Text string
A string specifying a file name to store content of the
OPA0 or TT0 sessions or a directory where the log files
for each OPA0 or TT0 individual session will be stored.
If an existing directory is specified, CHARON automatically enables creation of individual log file for each
OPA0 or TT0 session. If the log parameter is omitted
CHARON will not create any console log.
Example 6.25.
set OPA0 log=”log.txt”
set OPA0 log=”/opt/charon/logs"
Example 6.26.
load virtual_serial_line OPA0
58
XML to PDF by RenderX XEP XSL-FO Formatter, visit us at http://www.renderx.com/
Configuring Virtual HP Alpha
set OPA0 port=10003 stop_on="F6"
Notes on the virtual_serial_line option:
1. Use the combination of parameters port and host as follows to start a 3rd party terminal
emulator or similar program.
Example 6.27.
load virtual_serial_line/chserial TTA0 host="192.168.1.1" port=10000
In this example CHARON connects to port 10000 of the host with TCP/IP address
192.168.1.1 and at the same time it accepts connections on local port 10000.
2. It is also possible to specify port on a remote host (note that CHARON always acts as a
server). The syntax is:
Example 6.28.
load virtual_serial_line/chserial TTA0 host="192.168.1.1:20000" port=10000
In this example CHARON will accept connection on local port 10000 and connects to remote
port 20000 of the host 192.168.1.1
Note that the examples above are mainly used for inter-CHARON communications. They are
used to connect CHARON to an application that communicates to CHARON as described
below.
Example 6.29. Two CHARON systems are connected to each other
On host "A":
load virtual_serial_line/chserial TXA0 port=5500 host="B"
On host "B":
load virtual_serial_line/chserial TXA0 port=5500 host="A"
Both hosts execute CHARON, the two TXA0 lines connect to each other, thus creating a
"serial" cable between the two emulated Alphas, VAXes/PDPs. The order in which the instances of CHARON are started makes no difference.
6.6.4. "operator_console" parameters
Parameter
break_on,
stop_on
Type
Text string
Description
Those parameters are hardcoded to the following values
that cannot be changed
Example 6.30. Hardcoded values for "break_on"
and "stop_on" parameters
stop_on=" F6"
break_on="Ctrl-P,F5"
Example 6.31. Defining a local session as the serial console terminal
load operator_console OPA0 stop_on="Ctrl-P,F5"
59
XML to PDF by RenderX XEP XSL-FO Formatter, visit us at http://www.renderx.com/
Configuring Virtual HP Alpha
6.6.5. "ttyY" notation specifics
Note that the "ttyY" notation can have different form depending on the nature of the device
used:
1. Linux virtual tty (switchable by alt+F1-atl+F12 on a text console) – are represented as
"/dev/ttyN" where N is from 0 to 11. Those tty devices must be free from the Linux
getty/mgetty and similar programs (specified in "/etc/inittab")
2. Onboard serial lines are represented as "/dev/ttySN" where N is a number. For example
"/dev/ttyS1"
3. Proprietary (depending on a driver) devices are represented as "/dev/ttyXXX" where XXX
is a complex letter/number notation. For example "/dev/ttyR01" is a first port of the MOXA
card and the "/dev/ttyaa" stands for the first port of the DIGI card.
6.7. Specifying emulated memory
6.7.1. Syntax
The memory subsystem is permanently loaded and has the logical name ram. The effective
amount of memory is determined in steps, starting with the set ram size statement in the
configuration file.
ram parameter
Type
size
Description
Numeric
Size of emulated memory in MB.
Example 6.32.
set ram size = 512
creates 512 MB of emulated memory
Note
• Where applicable, the memory is capped to the maximum as defined in the
CHARON license key
• In addition, CHARON generates an error message in the log file and reduce its
effective memory size if the host system cannot allocate enough memory to map
the requested emulated memory
6.7.2. Parameters of emulated RAM for various hardware
models of virtual HP Alpha system
Hardware Model
RAM size (in MB)
Min
Max
Default
Increment
AlphaServer 400
64
1024
512
64
AlphaServer 800
256
8192
512
256
AlphaServer 1000
256
1024
512
256
AlphaServer 1000A
256
1024
512
256
AlphaServer 1200
256
32768
512
256
60
XML to PDF by RenderX XEP XSL-FO Formatter, visit us at http://www.renderx.com/
Configuring Virtual HP Alpha
Hardware Model
RAM size (in MB)
AlphaServer 2000
64
2048
512
64
AlphaServer 2100
64
2048
512
64
AlphaServer 4000
64
32768
512
64
AlphaServer 4100
64
32768
512
64
AlphaServer DS10L
64
32768
512
64
AlphaServer DS15
64
32768
512
64
AlphaServer DS20
64
32768
512
64
AlphaServer DS25
64
32768
512
64
AlphaServer ES40
64
32768
512
64
AlphaServer ES45
64
32768
512
64
AlphaServer GS80
256
65536
512
256
AlphaServer GS160
512
131072
512
512
AlphaServer GS320
1024
262144
1024
1024
Note
If no set ram statement is found, the memory size is set to 512MB, except for the
AlphaServer_GS320 for which it is set to 1024MB
6.8. System time and date
The virtual system maintains its time and date via TOY (time-of-year) component. In order
to preserve time and date while virtual system is not running the TOY component uses a
binary file on the host system. A name of the file is specified by “container” option of the
TOY component.
ram parameter
container
Type
Text string
Description
Specifies the name of file in which the virtual system
preserves its time and date during “offline” period.
By default it is left unspecified.
sync_to_host
Text string
Specifies whether and how the guest OS time is synchronized with the CHARON host time.
Syntax:
set TOY sync_to_host = "{as_vms | as_tru64 |
as_is}[, nowrite]"
where:.
• as_vms - If the guest OS is OpenVMS/AXP and its
date and time must be set to the host's date and time
each time it boots
• as_tru64 - If the guest OS is Tru64 UNIX and its date
and time must be set to the host's date and time each
time it boots
• as_is - If the TOY date and time must be set to the
host's UTC date and time
61
XML to PDF by RenderX XEP XSL-FO Formatter, visit us at http://www.renderx.com/
Configuring Virtual HP Alpha
ram parameter
Type
Description
• nowrite - Disable undesirable updates to the TOY
from the guest OS.
Example 6.33.
set TOY sync_to_host = "as_vms, nowrite"
To synchronize the guest OS with TOY, use the following commands:
On OpenVMS/AXP:
$ set time
On Tru64 UNIX:
# date -u `consvar -g date | cut -f 3 -d ' '`
The default value is not specified - it means that by
default CHARON does not synchronize its guest OS
time with the CHARON host time, but collect date and
time from the file specified with "container" parameter.
Example 6.34.
set TOY container=”my_virtual_system.dat”
set TOY sync_to_host="as_vms"
The virtual system may have its time and date different from system time and date of the host
system, but relies on correctness of the host’s system time and date to calculate duration of
“offline” period (i.e. while virtual system is not running).
6.9. Virtual HP Alpha SRM console environment
Virtual HP Alpha system implements a subset of Alpha SRM console environment according
to Alpha Architecture Reference Manual. Virtual HP Alpha SRM console environment is a
part of virtual HP Alpha ROM (which also contains virtual HP Alpha firmware).
6.9.1. Firmware and console environment parameters
In order to preserve console environment settings (such as default boot device, boot OS
flags, boot file name, etc.) while virtual system is not running, the ROM component ("rom")
uses 2MB binary file on the host system. Name of the file is specified by “container” option
of the ROM component.
rom parameter
container
Type
Text string
Description
Specifies the name of file in which the virtual system
preserves its firmware image and console environment
during “offline” period.
By default it is left unspecified.
system_name
Text string
This parameter allows changing the system name.
system_serial_number
Text string
This parameter allows changing the system serial
number, for example:
62
XML to PDF by RenderX XEP XSL-FO Formatter, visit us at http://www.renderx.com/
Configuring Virtual HP Alpha
rom parameter
Type
Description
set rom system_serial_number = NY12345678
Any sequence of characters can be used as a serial
number. Sequences longer than 16 symbols are truncated to 16 symbols.
Serial Numbers should be according to DEC standard:
10 characters. First two characters are capital letters,
remaining 8 characters are decimal digits.
By default it is set to SN01234567
dsrdb[0],
dsrdb[1]
Numeric
version
Text string
DSRB - Dynamic System Recognition Data Block.
These parameters allow changing the emulated hardware model type
Sets Console and PALcode versions in the following
way:
1. Set SRM Console version to X.Y-Z:
set rom version[0] = x.y-z
2. Set OpenVMS PALcode version to X.Y-Z:
set rom version[1] = x.y-z
3. Set Tru64 UNIX PALcode version to X.Y-Z:
set rom version[2] = x.y-z
Example 6.35.
set rom container=”my_virtual_alpha.bin”
set rom system_name=”Alpha Server 1000 4/200”
set rom dsrdb[0]=1090
set rom version[0] = 7.3-1 version[1] = 1.98-104 version[2] = 1.92-105
The same file also carries copy of virtual HP Alpha/VAX/PDP11 etc firmware. Each new
version (new build number is considered as new version too) of CHARON software updates
the firmware preserved in the file thus clearing console environment variables.
See Appendix section for proper combination of "cpu_architecture", "hw_model", "dsrdb[0]"
and "dsrdb[1]" parameters according to the chosen "system_name" value.
6.10. CPU Architecture
The virtual Alpha CPU architecture can be configured in the following way:
ace parameter
cpu_architecture
Type
Identifier
Description
Specifies the architecture of the virtual Alpha CPU. Can
be one of the following:
EV4, EV45, EV5, EV56, EV6, EV67, EV68
63
XML to PDF by RenderX XEP XSL-FO Formatter, visit us at http://www.renderx.com/
Configuring Virtual HP Alpha
Example 6.36.
set ace cpu_architecture = EV6
Apart from that, nice to keep the System Manufacturing Model (SMM, a number identifying
a particular Alpha model) and the System Name in sync:
set rom dsrdb[0] = <SMM> system_name = "<System Name>"
Example 6.37.
set session hw_model = AlphaServer_ES40
set ace cpu_architecture = EV67
set rom dsrdb[0] = 1820 system_name = "AlphaServer ES40 6/667"
See Appendix section for proper combination of "cpu_architecture", "hw_model" and
"dsrdb[0]" parameters according to the chosen "system_name" value.
6.11. Virtual HP Alpha interval timer
The CHARON-AXP virtualization layer provides interval timer interrupts to virtual Alpha CPU(s)
at frequency 100Hz (100 interrupts a second). This is default behavior which may be changed
through “clock_period” configuration parameter of virtual ISA or EISA bus, depending on
emulated hardware model of virtual HP Alpha system. Value of the parameter is interval timer
period in microseconds. By default it is set to 10000. By changing it to 1000 frequency of
virtual interval timer interrupts may be increased to 1000Hz (1000 interrupts a second).
isa/eiza paramet- Type
er
clock_period
Numeric
Description
Specifies period of interval timer, in microseconds. Only
two values are supported:
• 10000 (which corresponds to 100Hz interval timer)
• 1000 (which corresponds to 1000Hz interval timer)
By default it is set to 10000.
Example 6.38. Example for AlphaServer 400, DS, ES, GS
set ISA clock_period=1000
Example 6.39. Example for AlphaServer 800, 1000, 1000A, 1200, 2000, 2100, 4000, 4100
set EISA clock_period=1000
Note
Higher interval timer frequency creates higher load for virtual Alpha CPU which may
cause degradation of overall virtual system performance.
64
XML to PDF by RenderX XEP XSL-FO Formatter, visit us at http://www.renderx.com/
Configuring Virtual HP Alpha
6.12. Data storage in the virtualization layer
6.12.1. Types of data storage
6.12.1.1. Physical disks and disk images
The following options are supported for the disk storage in CHARON environment:
1. Disk images, which are essentially binary files in the host file system. They could be located
on a local or remote storage. They are easy to maintain and deliver good performance.
Backup could be performed with standard operating system tools, making lengthy OpenVMS
backups unnecessary. By copying an HP Alpha system or user disk back in place, the disk
is fully restored.
The disk images can easily be compressed and sent to a remote site, facilitating remote
maintenance and upgrade of CHARON systems.
It is NOT recommended to define disk images in network shared directories. A disconnect
of the network storage will permanently disable access from CHARON to the remote disk
image.
2. Physical SCSI disk drives connected to the Linux host system by host bus adapter or
iSCSI Initiator. These disk drives must not be mounted in the host operating system; otherwise the drive is not available for use in CHARON-AXP.
Using a host SCSI or iSCSI connection permits the use of FC, (S)ATA or SCSI drives on
a storage backend and the possibility to configure these physical disks in a high reliability
RAID of OpenVMS disk cluster configuration.
3. SAN attached storage volumes. These volumes must not be mounted in the host operating system; otherwise the drive is not available for use in CHARON-AXP.
4. CD and DVD devices on the host server can be used by the virtualization layer by specifying the usual Linux device name in the configuration script. For example: "/dev/sr0"
Note
Disk images and physical SCSI disks offer similar I/O throughput. Disk images can
be generated with the mkdskcmd utility.
6.12.1.2. Physical tapes and tape images
Tape handling is implemented in CHARON in the following ways:
A SCSI tape drive can be connected to a SCSI controller in the Linux host system. The tape
device is referenced in the configuration file with its usual Linux device name or file name.
For instance "/dev/sgN" is a tape drive connected to the host system, and "/tape_images/mkc500.vtape" represents a virtual tape connected to a container file. Tape operation
speed is essentially limited by the capabilities of the physical tape drive and the throughput
of the SCSI connection.
6.12.1.3. Physical CD/DVD drives and CD/DVD images
The following options are supported for CD/DVD storage for virtual HP Alpha system:
• CD/DVD images, which are essentially binary files on the host system. They could be located
on a local or remote storage. They are easy to maintain and deliver good performance.
65
XML to PDF by RenderX XEP XSL-FO Formatter, visit us at http://www.renderx.com/
Configuring Virtual HP Alpha
• Physical CD/DVD drives attached to the host. Media in CD/DVD drives is shared with the
host and may be mounted in both host and guest operating systems simultaneously. Nevertheless it is recommended to keep it mounted only in one system at a time and keep the
automount daemon disabled on the host operating system.
6.12.2. Virtual Acer Labs 1543C IDE/ATAPI controller
The "ide" is an instance name for an integrated virtual Acer Labs 1543C IDE/ATAPI controller.
Thus no “load” command is required to use it.
ide parameter
container
Type
Text string
Description
Specifies the name of SCSI Generic interface to physical ATAPI or SATA CD/DVD-ROM drive attached to
the host system. The supported values are of the form
"/dev/sgN".
By default it is left unspecified.
Example 6.40.
set ide container="/dev/sg0"
The virtual Acer Labs 1543C IDE/ATAPI controller does NOT support CD/DVD images and
physical CD/DVD drives other than ATAPI or SATA.
Please disable all the CD-ROM automount demons/software to avoid any problems accessing
CD-ROM by CHARON-AXP.
Note
When running HP OpenVMS/Alpha Operating System on top of CHARON-AXP virtualization layer the specified CD/DVD-ROM drive is available as DQA0: device.
Note
Please note that the virtual Acer Labs 1543C IDE/ATAPI can me mapped ONLY TO
PHYSICAL CD-ROM DRIVES. In case if a CD-ROM container or ISO file should be
used it is required to utilize KZPBA controller for that since it offers full support of
both physical and virtual mappings to system resources.
6.12.3. Virtual KZPBA PCI SCSI adapter
The KZPBA is a PCI SCSI adapter (DEC-KZPBA, based on the QLogic ISP1040 Fast Wide
SCSI adapter chip) for the HP Alpha. In CHARON it supports up to 120 disks and tapes.
The I/O behavior of the virtual KZPBA is as follows:
• Up to 120 connected units (disks or tapes) operate in parallel.
• For systems with more than 16 heavily used units configure several virtual KZPBA PCI
SCSI adapters and distribute the heavily loaded units evenly between the adapters.
6.12.3.1. Attaching virtual KZPBA PCI SCSI Adapter to virtual system
To create an instance of virtual KZPBA PCI SCSI Adapter use “load” command in configuration
file as follows:
load kzbpa <instance-name>
66
XML to PDF by RenderX XEP XSL-FO Formatter, visit us at http://www.renderx.com/
Configuring Virtual HP Alpha
Note that <instance-name> is not visible outside configuration file. Operating systems running
on top of virtual system use different naming policy and name assigned to virtual KZPBA PCI
SCSI Adapter by those operating systems has nothing to do with <instance-name> assigned
in configuration files.
Example 6.41.
load kzpba SCSI_A
In this example, SCSI_A is instance name of virtual KZPBA PCI SCSI Adapter. But HP
OpenVMS operating system uses names PKA,PKB,PKC,… to identify instances of virtual
KZPBA PCI SCSI Adapters
6.12.3.2. Configuring virtual KZPBA PCI SCSI Adapter
Virtual KZPBA PCI SCSI Adapter offers several configuration parameters controlling its behavior in virtual hardware and its appearance to software running on it (e.g. HP OpenVMS
Alpha and HP Tru64 UNIX operating systems).
6.12.3.2.1. KZPBA general parameters
kzpba paramet- Type
ers
media_type
Text string
Description
When specified, the media_type configuration parameter instructs the CHARON software to use the supplied
value as PRODUCT field in SCSI INQUIRY data returned to software running on virtual HP Alpha system
in response to SCSI INQUIRY command.
If the media_type configuration parameter is not specified, the CHARON software attempts to guess SCSI
INQUIRY data based on virtual SCSI device type and
underlying container (which is specified in the corresponding container configuration parameter).
Example 6.42.
set SCSI_B media_type[0]=”HSZ70”
set SCSI_B media_type[600]=”RRD43”
removable
Boolean
When set to TRUE, the removable configuration
parameter instructs the CHARON software to report
the corresponding virtual SCSI device as removable.
By default the removable configuration parameter is
set to FALSE.
Note that virtual SCSI tape and cdrom devices are always reported as removable regardless of the removable configuration parameter.
Example 6.43.
set SCSI_A removable[400]=true
use_io_file_fuffering
Boolean
When set to TRUE, the use_io_file_buffering configuration parameter instructs the CHARON software to
67
XML to PDF by RenderX XEP XSL-FO Formatter, visit us at http://www.renderx.com/
Configuring Virtual HP Alpha
kzpba paramet- Type
ers
Description
enable host operating system I/O cache when reading/writing the corresponding container (specified by
the corresponding container configuration parameter).
When enabled, the host operating system I/O cache
may significantly improve I/O performance of the virtual
system. At the same time maintaining I/O cache requires additional host resources (CPU and memory)
which may negatively affect overall performance of the
virtual system.
By default the use_io_file_buffering configuration
parameter is set to FALSE.
Example 6.44.
set SCSI_A use_io_file_buffering[0]=true
geometry
Text string
The geometry parameter tells the emulator about a
specific geometry of the connected media. The parameters above can be omitted.
Syntax:
geometry[unit-number]= "<n_of_sectors>/<n_of_tracks>/<n_of_cylinders>"
Example 6.45.
set SCSI_A geometry[0] = ”255/255”
bus
Text string
When specified, the bus configuration parameter tells
the CHARON software the virtual PCI bus to which
Virtual HP Alpha system shall connect the virtual
KZPBA PCI SCSI Adapter.
By default the bus configuration parameter is not specified.
If the bus configuration parameter is not specified, the
CHARON software connects the virtual KZPBA PCI
SCSI Adapter to the first available virtual PCI bus.
Example 6.46.
load KZPBA SCSI_A bus=pci_1 device=1 function=0
device
Numeric
When specified, the device configuration parameter
specifies position of the virtual KZPBA PCI SCSI Adapter on virtual PCI bus.
By default the device configuration parameter is not
specified.
If the device configuration parameter is not specified,
the CHARON software connects the virtual KZPBA PCI
68
XML to PDF by RenderX XEP XSL-FO Formatter, visit us at http://www.renderx.com/
Configuring Virtual HP Alpha
kzpba paramet- Type
ers
Description
SCSI Adapter at the first available position of the virtual
PCI bus.
Example 6.47.
load KZPBA SCSI_A bus=pci_1 device=1 function=0
function
Numeric
When specified, the function configuration parameter
specifies position of the virtual KZPBA PCI SCSI Adapter on virtual PCI bus.
By default the function configuration parameter is not
specified.
If the function configuration parameter is not specified,
the CHARON software connects the virtual KZPBA PCI
SCSI Adapter at the first available position of the virtual
PCI bus.
Example 6.48.
load KZPBA SCSI_A bus=pci_1 device=1 function=0
irq_bus
Text string
When specified, the irq_bus configuration parameter
specifies virtual bus routing interrupt requests from virtual KZPBA PCI SCSI Adapter to virtual Alpha CPUs
in Virtual HP Alpha system.
By default the irq_bus configuration parameter is not
specified.
The irq_bus configuration parameter must be set to
“ISA” for virtual KZPBA SCSI Adapter in virtual AlphaServer 400. For virtual HP Alpha systems other
then AlphaServer 400 the irq_bus configuration parameter must be left as is (i.e. not specified).
Example 6.49.
load KZPBA SCSI_B irq_bus=isa
irq
Numeric
When specified, the irq configuration parameter assigns
interrupt request to the virtual KZPBA PCI SCSI Adapter
in Virtual HP Alpha system.
By default the irq configuration parameter is not specified.
If the irq configuration parameter is not specified, the
CHARON software uses the correct values depending
on the selected PCI position of virtual KZPBA PCI SCSI
Adapter in the virtual system.
Example 6.50.
load KZPBA SCSI_A bus=pci_1 device=1 function=0
irq=24
69
XML to PDF by RenderX XEP XSL-FO Formatter, visit us at http://www.renderx.com/
Configuring Virtual HP Alpha
kzpba paramet- Type
ers
scsi_id
Numeric
Description
The scsi_id configuration parameter specifies self
SCSI ID (Initiator SCSI ID) of the virtual KZPBA PCI
SCSI Adapter. The same SCSI ID is also used by virtual
KZPBA PCI SCSI Adapter when it is configured as virtual SCSI target in virtual SCSI cluster configuration.
By default the scsi_id configuration parameter is set
to 7.
Example 6.51.
set SCSI_B scsi_id=6
port
Text string
When specified, the port configuration parameter specifies local end-point (TCP/IP port on local host) of virtual SCSI connection between the virtual KZPBA PCI
SCSI Adapter and a virtual KZPBA PCI SCSI Adapter
on remote host in virtual SCSI cluster configuration.
By default the port configuration option is not specified.
Syntax:
host[connection-number]=”host-name{:tcpip-portno}”
where
connection_number = remote_scsi_id * 100 + lun_id
Example 6.52.
set SCSI_B port[600]=17060 host[600]=”localhost:16070”
host
Text string
When specified, the host configuration parameter specifies remote end-point (remote host name and, optionally, TCP/IP port on remote host) of virtual SCSI connection between the virtual KZPBA PCI SCSI Adapter
and a virtual KZPBA PCI SCSI Adapter on remote host
in virtual SCSI cluster configuration.
By default the host configuration option is not specified.
Syntax:
host[connection-number]=”host-name{:tcpip-portno}”
where
connection_number = remote_scsi_id * 100 + lun_id
Example 6.53.
set SCSI_B port[600]=17060 host[600]=”localhost:16070”
70
XML to PDF by RenderX XEP XSL-FO Formatter, visit us at http://www.renderx.com/
Configuring Virtual HP Alpha
Example 6.54.
load KZPBA SCSI_B
set SCSI_B container[0]=”dkb0.vdisk”
set SCSI_B media_type[0]=”HSZ70”
set SCSI_B media_type[600]=”RRD43”
6.12.3.2.2. KZPBA mapping to system resources
kzpba paramet- Type
ers
container
Text string
Description
When specified this configuration parameter instructs
the CHARON software to create virtual SCSI device
and connect to the virtual system through the virtual
KZPBA SCSI Adapter. Type of the virtual SCSI device
depends on value of the configuration parameter
Syntax:
container[unit-number]=”{file-path/}file-name.vdisk”
container[unit-number]=”{file-path/}file-name.vtape”
container[unit-number]=”{file-path/}file-name.iso”
container[unit-number]="/dev/sdL" (L is letter here)
container[unit-number]=”/dev/sgN”
container[unit-number]=”/dev/srN"|"/dev/cdrom”
where
• unit-number = scsi_id * 100 + lun_id is number of
virtual storage element attached to the virtual KZPBA
PCI SCSI Adapter. In this formula scsi_id is from 0
through 15 and lun_id is from 0 through 7. This gives
the following valid unit numbers: 0, 1, ..., 7, 100, 101,
..., 107, 200, ..., 1507. Note that storage unit number
assigned by HP OpenVMS Alpha operating system
running on virtual HP Alpha system (appears on
device name) is the same as unit number given by
the above formula.
Example 6.55.
set SCSI_A container[0]="/opt/charon/disks/dka0.vdisk"
set SCSI_A container[300]="/opt/Charon/disks/mka300.vtape"
set SCSI_B container[400]=”/dev/sda”
set SCSI_B container[500]=”/dev/sg2”
set SCSI_B container[501]=”/dev/sr0”
71
XML to PDF by RenderX XEP XSL-FO Formatter, visit us at http://www.renderx.com/
Configuring Virtual HP Alpha
kzpba paramet- Type
ers
Description
Types of container parameters:
• The .vdisk file represents container of virtual disk.
When path to .vdisk file is assigned to container
configuration parameter the CHARON-AXP software
creates virtual SCSI disk device. The CHARON-AXP
software supports also .dsk files for backward compatibility, although use of .dsk extension is not recommended.
• The .vtape file represents container of virtual tape.
When path to .vtape file is assigned to container
configuration parameter the CHARON-AXP software
creates virtual SCSI tape device. The CHARON-AXP
software supports also .mtd files for backward compatibility, although use of .mtd extension is not recommended.
• The .iso file represents container of virtual cdrom.
When path to .iso file is assigned to container configuration parameter the CHARON-AXP software creates virtual SCSI cdrom device. It is possible to switch
from one .iso file to other one (having the same
name) w/o stopping CHARON-AXP. But note that
the CD-ROM device must be dismounted first on the
CHARON operating system level.
• The /dev/sdL (L is letter here) object represents logical or physical disk attached to the host. It is also
possible to use not a whole disk, but previously created partitions on it. In this case the syntax is the
following: /dev/sdLN where N is the number of partition to be used. When certain /dev/sdN is assigned
to container configuration parameter the CHARONAXP software creates virtual SCSI disk device.
• The /dev/sgN object represents physical SCSI device
attached to the host. Typically this parameter is used
for connecting physical tape drives. In this case when
certain /dev/sgN is assigned to container configuration parameter the CHARON-AXP software creates
virtual SCSI tape device. In the same way one may
connect physical SCSI devices of type other than
tape.
The following procedure is recommended for finding
needed values for the /dev/sgN devices:
In the console please issue:
cat /proc/scsi/sg/device_hdr; cat /proc/scsi/sg/devices
The output will look something like:
72
XML to PDF by RenderX XEP XSL-FO Formatter, visit us at http://www.renderx.com/
Configuring Virtual HP Alpha
kzpba paramet- Type
ers
Description
host chan id lun type opens qdepth bus online
4 0 0 0 5 1 1
0 1
5 0 0 0 0 1 1
0 1
The fifth field ("type") is the device type.
5 means CD-ROM, 1 means tape, 0 means disk
The "N" in the /dev/sgN is the line number in this table
(starting from 0) corresponded to the devices
CHARON-AXP will use.
Thus /dev/sg0 will be CD-ROM mapping in this example.
Another possibility is the following: on a freshly
booted system please issue the following command:
dmesg | grep sg
The output will look like that:
[ 1.503622] sr 4:0:0:0: Attached scsi generic sg0 type 5
[ 1.780897] sd 5:0:0:0: Attached scsi generic sg1 type 0
Note
This table lists all the devices, not only the
real SCSI ones (SATA/IDE for example).
CHARON-AXP supports only real SCSI
devices.
• The /dev/srN (/dev/cdrom syntax is also possible)
object represents logical or physical optical drive attached to the host. When certain /dev/srN is assigned
to container configuration parameter the CHARONAXP software creates virtual SCSI cdrom device.
If the container configuration parameter is not specified, the CHARON-AXP software does not create virtual SCSI device for the corresponding unit number.
By default the container configuration parameter is not
specified.
Note
The /dev/sgN and the /dev/sdL devices should
be used very carefully since in the case of
specifying some partitions or disks incorrectly
(providing that the user has all the required
rights) the Linux system may be damaged or
even destroyed completely.
73
XML to PDF by RenderX XEP XSL-FO Formatter, visit us at http://www.renderx.com/
Configuring Virtual HP Alpha
Example 6.56.
load KZPBA SCSI_B
set SCSI_B container[0]=”dkb0.vdisk”
set SCSI_B container[600]=”/dev/cdrom”
6.12.4. Virtual DEC-KGPSA-CA (EMULEX LP8000) PCI
Fibre Channel adapter
CHARON supports emulation of DEC-KGPSA-CA (EMULEX LP8000) PCI FC adapter by
loading instances of KGPSA.
Every instance of KGPSA works in a fabric virtualization mode (creating virtual fabric in
combination with virtual FC-3 Storage Controller.
6.12.4.1. Attaching virtual KGPSA PCI Fibre Channel Adapter to
virtual system
To create an instance of virtual KGPSA PCI FC Adapter use “load” command in configuration
file as follows:
load kgpsa <instance-name>
Note that <instance-name> is not visible outside configuration file. Operating systems running
on top of virtual system use different naming policy and name assigned to virtual KGPSA PCI
FC Adapter by those operating systems has nothing to do with <instance-name> assigned
in configuration files.
Example 6.57.
load kgpsa FC_A
In this example, FC_A is instance name of virtual KGPSA PCI FC Adapter. But HP OpenVMS
operating system uses names FGA,FGB,FGC,… to identify instances of virtual KGPSA PCI
FC Adapters
6.12.4.2. Configuring virtual KGPSA PCI Fibre Channel Adapter in
Fabric virtualization mode
Virtual KGPSA PCI FC Adapter offers several configuration parameters controlling its behavior in virtual hardware and its appearance to software running on it (e.g. HP OpenVMS Alpha
and HP Tru64 UNIX operating systems).
6.12.4.2.1. KGPSA general parameters
kgpsa paramet- Type
ers
media_type
Text string
Description
When specified, the media_type configuration parameter instructs the CHARON software to use the supplied
value as PRODUCT field in FC INQUIRY data returned
to software running on virtual HP Alpha system in response to FC INQUIRY command.
74
XML to PDF by RenderX XEP XSL-FO Formatter, visit us at http://www.renderx.com/
Configuring Virtual HP Alpha
kgpsa paramet- Type
ers
Description
If the media_type configuration parameter is not specified, the CHARON software attempts to guess FC
INQUIRY data based on virtual FC device type and
underlying container (which is specified in the corresponding container configuration parameter).
Syntax:
media_type[unit-number]=”<vendor>,<product>,<revision>”
Example 6.58.
set FC_B media_type[0]=”DEC,HSG80,V89F”
set FC_B media_type[1]=”HP,MSA1000,V100”
wwid
Text string
This parameter sets WWID for emulated KGPSA adapter unit.
Syntax:
wwid[unit-number]=”XXXX-XXXX-XXXX-XXXXXXXX-XXXX-XXXX-XXXX”
Example 6.59.
set FC_A wwid[2]="6008-05F3-0005-2950-BF8E0B86-A0C7-0001"
removable
Boolean
When set to TRUE, the removable configuration
parameter instructs the CHARON software to report
the corresponding virtual FC device as removable.
By default the removable configuration parameter is
set to FALSE.
Note that virtual FC tape and cdrom devices are always
reported as removable regardless of the removable
configuration parameter.
Example 6.60.
set FC_A removable[400]=true
use_io_file_fuffering
Boolean
When set to TRUE, the use_io_file_buffering configuration parameter instructs the CHARON software to
enable host operating system I/O cache when reading/writing the corresponding container (specified by
the corresponding container configuration parameter).
When enabled, the host operating system I/O cache
may significantly improve I/O performance of the virtual
system. At the same time maintaining I/O cache requires additional host resources (CPU and memory)
which may negatively affect overall performance of the
virtual system.
75
XML to PDF by RenderX XEP XSL-FO Formatter, visit us at http://www.renderx.com/
Configuring Virtual HP Alpha
kgpsa paramet- Type
ers
Description
By default the use_io_file_buffering configuration
parameter is set to FALSE.
Example 6.61.
set FC_A use_io_file_buffering[0]=true
geometry
Text string
The geometry parameter tells the emulator about a
specific geometry of the connected media. The parameters above can be omitted.
Syntax:
geometry[unit-number]= "<n_of_sectors>/<n_of_tracks>/<n_of_cylinders>"
Example 6.62.
set FC_A geometry[0] = ”255/255”
host_bus_location
Text string
The parameter triggers CHARON PCI Pass Through
mode on and connects the instance of emulated DECKGPSA-CA PCI FC adapter to a physical EMULEX
LightPulse PCI/PCI-X/PCIe FC adapter plugged into
host’s PCI/PCI-X/PCIe slot.
Example 6.63. Example for Windows
load KGPSA FC_A host_bus_location=“PCI bus
3,device 1,function 0”
Example 6.64. Example for Linux
load KGPSA FC_A host_bus_location=“/dev/kgpsa0”
bus
Text string
When specified, the bus configuration parameter tells
the CHARON software the virtual PCI bus to which
Virtual HP Alpha system shall connect the virtual KGPSA PCI FC Adapter.
By default the bus configuration parameter is not specified.
If the bus configuration parameter is not specified, the
CHARON software connects the virtual KGPSA PCI
FC Adapter to the first available virtual PCI bus.
Example 6.65.
load KGPSA FC_A bus=pci_1 device=1 function=0
device
Numeric
When specified, the device configuration parameter
specifies position of the virtual KGPSA PCI FC Adapter
on virtual PCI bus.
76
XML to PDF by RenderX XEP XSL-FO Formatter, visit us at http://www.renderx.com/
Configuring Virtual HP Alpha
kgpsa paramet- Type
ers
Description
By default the device configuration parameter is not
specified.
If the device configuration parameter is not specified,
the CHARON software connects the virtual KGPSA PCI
FC Adapter at the first available position of the virtual
PCI bus.
Example 6.66.
load KGPSA FC_A bus=pci_1 device=1 function=0
function
Numeric
When specified, the function configuration parameter
specifies position of the virtual KGPSA PCI FC Adapter
on virtual PCI bus.
By default the function configuration parameter is not
specified.
If the function configuration parameter is not specified,
the CHARON software connects the virtual KGPSA PCI
FC Adapter at the first available position of the virtual
PCI bus.
Example 6.67.
load KGPSA FC_A bus=pci_1 device=1 function=0
irq_bus
Text string
When specified, the irq_bus configuration parameter
specifies virtual bus routing interrupt requests from virtual KGPSA PCI FC Adapter to virtual Alpha CPUs in
Virtual HP Alpha system.
By default the irq_bus configuration parameter is not
specified.
The irq_bus configuration parameter must be set to
“ISA” for virtual KGPSA FC Adapter in virtual AlphaServer 400. For virtual HP Alpha systems other then AlphaServer 400 the irq_bus configuration parameter
must be left as is (i.e. not specified).
Example 6.68.
load KGPSA FC_B irq_bus=isa
irq
Numeric
When specified, the irq configuration parameter assigns
interrupt request to the virtual KGPSA PCI FC Adapter
in Virtual HP Alpha system.
By default the irq configuration parameter is not specified.
If the irq configuration parameter is not specified, the
CHARON software uses the correct value depending
77
XML to PDF by RenderX XEP XSL-FO Formatter, visit us at http://www.renderx.com/
Configuring Virtual HP Alpha
kgpsa paramet- Type
ers
Description
on the selected PCI position of virtual KGPSA PCI FC
Adapter in the virtual system.
Example 6.69.
load KGPSA SCSI_A bus=pci_1 device=1 function=0
irq=24
Example 6.70.
load KGPSA FC_A bus=pci_1 device=1 function=0 irq=24
set FC_A media_type[100]=”DEC,HSG80,V89F”
set FC_A removable[100]=true
set FC_A use_io_file_buffering[100]=true
6.12.4.2.2. KGPSA mapping to system resources
kgpsa paramet- Type
ers
container
Text string
Description
When specified this configuration parameter instructs
the CHARON software to create virtual FC device and
connect to the virtual system through the virtual KGPSA
FC Adapter. Type of the virtual FC device depends on
value of the configuration parameter
Syntax:
container[unit-number]=”{file-path/}file-name.vdisk”
container[unit-number]="/dev/sdL" (L is letter here)
where
• unit-number is number of virtual storage element
attached to the virtual DEC-KGPSA-CA PCI FC adapter. The unit-number is 0 through 99998. The unitnumber 99999 is reserved.
• The /dev/sdL (L is letter here) object represents logical or physical disk attached to the host.
Example 6.71.
set FC_A container[100]=”/opt/charon/disks/disk1.vdisk"
set FC_B container[128]=”/dev/sdb”
Description:
• The .vdisk file represents container of virtual disk.
When path to .vdisk file is assigned to container
configuration parameter the CHARON-AXP software
78
XML to PDF by RenderX XEP XSL-FO Formatter, visit us at http://www.renderx.com/
Configuring Virtual HP Alpha
kgpsa paramet- Type
ers
Description
creates virtual SCSI disk device. The CHARON-AXP
software supports also .dsk files for backward compatibility, although use of .dsk extension is not recommended.
• The /dev/sdL (L is letter here) object represents logical or physical disk attached to the host. It is also
possible to use not a whole disk, but previously created partitions on it. In this case the syntax is the
following: /dev/sdLN where N is the number of partition to be used. When certain /dev/sdN is assigned
to container configuration parameter the CHARONAXP software creates virtual disk device.
If the container configuration parameter is not specified,
the CHARON-AXP software does not create virtual disk
device for the corresponding unit number.
Example 6.72.
load KGPSA FC_A
set FC_A container[100]=”disk2.vdisk"
6.12.4.3. Configuring virtual KGPSA PCI Fibre Channel Adapter for
CHARON PCI Pass Through
The CHARON PCI Pass Through mode allows connection between virtual DEC-KGPSA-CA
PCI FC adapter and physical EMULEX LightPulse PCI/PCI-X/PCIe FC adapter plugged into
host’s PCI/PCI-X/PCIe slot.
Note
CHARON PCI Pass Through driver for EMULEX LightPulse PCI/PCI-X/PCIe FC adapter must be installed, up, and running.
6.12.4.3.1. Building and configuration of PPT driver (kernel object) for KGPSA
PCI Fibre Channel Adapter driver
Before proceeding with installation please make sure that:
• Supported model of KGPSA is installed on host system
• The number of installed KGPSA controllers is known
• The building tools and include files must be installed. If they are absent install them
Example 6.73.
yum groupinstall “Development Tools”
yum install kernel-headers kernel-develop
79
XML to PDF by RenderX XEP XSL-FO Formatter, visit us at http://www.renderx.com/
Configuring Virtual HP Alpha
Note
The kernel version must match the version of the installed kernel-headers (i.e.
this packages must have same versions. It can be verified via rpm -q -a | grep
kernel- ) Please check that the kernel and the kernel-headers have the same
version, and ensure that system is booted from this kernel version (not from some
older one and etc) with uname -a command.
The installation consists of the following steps:
1. Open xterm and change the default directory to /opt/charon/drivers/kgpsa
2. Issue make clean; make commands to build kernel object
3. Check that there are no compilation errors and the file ppt_kgpsa.ko has been built
4. Unload standard lpfc driver; to do that issue the following command:
rmmod lpfc
5. Load ppt_kgpsa.ko driver; to do that issue the following command:
insmod ppt_kgpsa.ko
6. Issue dmesg command and check that no error appeared during the driver loading, also
check that the driver has found all KGPSA devices.
7. Add the KGPSA driver loading to Linux startup:
• Disable auto-loading of Linux standard lpfc driver on boot. To do that add lpfc to the
black list file /etc/modprobe.d/blacklist.conf
• Copy the KGPSA kernel module to the location of Linux kernel modules
Example 6.74.
cp
/opt/charon/drivers/kgpsa/ppt_kgpsa.ko
200.fc19.x86_64/kernel/drivers/scsi/
/lib/modules/3.10.9-
The particular path may be different, depending on the kernel version and Linux distribution.
• Enable auto load of the module:
Example 6.75. Auto load of KGPSA module on RedHat
echo modprobe ppt_kgpsa >> /etc/rc.modules
Example 6.76. Auto load of KGPSA module on Fedora Core
echo ppt_kgpsa > /etc/modules-load.d/ppt_kgpsa.conf
• Regenerate new initramfs image with mkinitrd:
Example 6.77.
mkinitrd -f /boot/initramfs-3.10.9-200.fc19.x86_64.img 3.10.9-200.fc19.x86_64
80
XML to PDF by RenderX XEP XSL-FO Formatter, visit us at http://www.renderx.com/
Configuring Virtual HP Alpha
Note
If kernel of the host system has been upgraded or reinstalled all the steps of the PPT
KGPSA driver installation must be repeated
Note
It is prohibited to use a module built on a certain version of kernel on another one.
6.12.4.3.2. Configuring virtual KGPSA PCI Fibre Channel Adapter for CHARON
PCI
After the PPT KGPSA driver installation, the following device files appear in the /dev/ directory:
/dev/kgpsaX - there X is the number from 0 to 9 depends on how many KGPSA adapters
have been found.
The connection between virtual DEC-KGPSA-CA PCI FC adapter and physical EMULEX
LightPulse PCI/PCI-X/PCIe FC adapter is setup through “host_bus_location” parameter as
follows.
Syntax:
host_bus_location=”/dev/kgpsa<X>”
Example 6.78.
load KGPSA FC_A host_bus_location=“/dev/kgpsa0”
6.12.4.3.3. Supported physical EMULEX LightPulse PCI/PCI-X/PCIe FC adapters
The following is the list of EMULEX LightPulse PCI/PCI-X/PCIe FC adapters supported by
CHARON PCI Pass Through driver and suitable for emulation of DEC-KGPSA-CA PCI FC
adapter in CHARON PCI Pass Through mode:
• LP8000
• LP9000
• LP9002
• LP9802
• LP10000
• LP10000DC
• LP10000-S
• LPX1000
• LP11002
• LPe11002 (FC2242SR, A8003A)
• LPe1105
Not supported:
• LPe1150 (FC2142SR, A8002A)
81
XML to PDF by RenderX XEP XSL-FO Formatter, visit us at http://www.renderx.com/
Configuring Virtual HP Alpha
Not tested:
• LPe11000
6.13. Virtual PCI Ethernet controllers
CHARON-AXP implements the following virtual PCI Network controllers:
• DE435
• DE450
• DE500AA
• DE500BA
Each of them is a PCI Ethernet adapter (based on the DEC21040 (DE435, DE450, DE500AA
and DE500BA) PCI Ethernet adapter chips) for the HP Alpha. CHARON-AXP maps the virtual
adapter to a dedicated Ethernet adapter in the Linux host system.
The Ethernet adapter in the Linux host system must support dynamic changes of its MAC
address (i.e. no reboot of the host system is required to change the MAC address), which is
the case with nearly all modern Ethernet adapters.
The proper sequence is to first load an instance of virtual Ethernet controller, then load an
instance of virtual network interface connected to the "ethN" network interface, and then finally
link the two virtual entities.
Example 6.79. DEC21040 chip adapters (DE435, DE450, DE500AA and DE500BA)
load DE500BA/dec21x4x IFC
load packet_port/chnetwrk IFC0 interface=”eth0”
set IFC interface=IFC0
6.13.1. Virtual DE435, DE450, DE500AA and DE500BA
network adapters
6.13.1.1. Attaching virtual DE435, DE450, DE500AA and DE500BA
to virtual system
To create instances of virtual DExx series network adapters use “load” command in configuration file as follows:
load DE435/dec21x4x <instance-name>
load DE450/dec21x4x <instance-name>
load DE500AA/dec21x4x <instance-name>
load DE500BA/dec21x4x <instance-name>
Note that <instance-name> is not visible outside configuration file. Operating systems running
on top of virtual system use different naming policy and name assigned to virtual DExx series
network adapters by those operating systems has nothing to do with <instance-name> assigned in configuration files.
82
XML to PDF by RenderX XEP XSL-FO Formatter, visit us at http://www.renderx.com/
Configuring Virtual HP Alpha
Example 6.80. DEC21040 chip adapters (DE435, DE450, DE500AA and DE500BA)
load DE500AA/dec21x4x NI_A
In this example, NI_A is instance name of virtual DE500AA series network adapter. But HP
OpenVMS operating system uses names EWA,EWB,EWC,… to identify instances of virtual
DE435, DE450, DE500AA or DE500BA network adapters
6.13.1.2. Configuring virtual DE435, DE450, DE500AA and DE500BA
network adapters
Virtual DExx series network adapters offer several configuration parameters controlling its
behavior in virtual hardware and its appearance to software running on it (e.g. HP OpenVMS
Alpha and HP Tru64 UNIX operating systems).
DExxx paramet- Type
ers
interface
Text string
Description
This parameter connects the logical name representing
a DExxx instance to the logical name of a host network
port ("IFC0" in the following example), after the host
network port has been loaded.
Example 6.81.
set NI_A interface=IFC0
station_address
Text string
station_address provides an ability to configure the
adapter’s permanent address. By default the adapter’s
permanent address is read from the host system’s NIC.
Set the station_address when you need to configure
a satellite (remotely booted) system which will run
DECnet or when the migrated software uses the permanent address on the network adapter.
Format:
XX-XX-XX-XX-XX-XX
or
XX:XX:XX:XX:XX:XX
Example 6.82.
set NI_A station_address=“E2:F4:00:A6:07:D2"
See Appendix for more detailed description.
rx_fifo_size
Numeric
This parameter sets the receive FIFO size. The value
is specified in Kb and by default is pre-calculated from
the connected port’s size of receive queue.
Typically, you do not need to specify the
rx_fifo_size parameter. It is available mostly for
extended tuning.
Example 6.83.
set NI_A rx_fifo_size=256
83
XML to PDF by RenderX XEP XSL-FO Formatter, visit us at http://www.renderx.com/
Configuring Virtual HP Alpha
DExxx paramet- Type
ers
bus
Text string
Description
When specified, the bus configuration parameter tells
the CHARON software the virtual PCI bus to which the
virtual system shall connect the virtual DExx series
network adapters.
By default the bus configuration parameter is not specified.
If the bus configuration parameter is not specified, the
CHARON software connects the virtual DExx series
network adapters to the first available virtual PCI bus.
Example 6.84. DEC21040 chip adapters (DE435,
DE450, DE500AA and DE500BA)
load DE500AA/dec21x4x NI_A bus=pci_1 device=1
function=0
device
Numeric
When specified, the device configuration parameter
specifies position of the virtual DExx series network
adapters on virtual PCI bus.
By default the device configuration parameter is not
specified.
If the device configuration parameter is not specified,
the CHARON software connects the virtual DExx series
network adapters at the first available position of the
virtual PCI bus.
Example 6.85. DEC21040 chip adapters (DE435,
DE450, DE500AA and DE500BA)
load DE500AA/dec21x4x NI_A bus=pci_1 device=1
function=0
function
Numeric
When specified, the function configuration parameter
specifies position of the virtual DExx series network
adapters on virtual PCI bus.
By default the function configuration parameter is not
specified.
If the function configuration parameter is not specified,
the CHARON software connects the virtual DExx series
network adapters at the first available position of the
virtual PCI bus.
Example 6.86. DEC21040 chip adapters (DE435,
DE450, DE500AA and DE500BA)
load DE500AA/dec21x4x NI_A bus=pci_1 device=1
function=0
irq_bus
Text string
When specified, the irq_bus configuration parameter
specifies virtual bus routing interrupt requests from vir-
84
XML to PDF by RenderX XEP XSL-FO Formatter, visit us at http://www.renderx.com/
Configuring Virtual HP Alpha
DExxx paramet- Type
ers
Description
tual DExx series network adapters to virtual Alpha CPUs
in Virtual HP Alpha system.
By default the irq_bus configuration parameter is not
specified.
The irq_bus configuration parameter must be set to
“ISA” for virtual DExx series network adapters in virtual
AlphaServer 400. For virtual HP Alpha systems other
then AlphaServer 400 the irq_bus configuration parameter must be left as is (i.e. not specified).
Example 6.87. DEC21040 chip adapters (DE435,
DE450, DE500AA and DE500BA)
load DE500AA/dec21x4x NI_A irq_bus=isa
irq
Numeric
When specified, the irq configuration parameter assigns
interrupt request to the virtual DExx series network adapters in Virtual HP Alpha system.
By default the irq configuration parameter is not specified.
If the irq configuration parameter is not specified, the
CHARON software uses the correct value depending
on the selected PCI position of virtual DExx series network adapters in the virtual system.
Example 6.88. DEC21040 chip adapters (DE435,
DE450, DE500AA and DE500BA)
load DE500AA/dec21x4x NI_A bus=pci_1 device=1
function=0 irq=24
Example 6.89.
load DE435/dec21x4x EWA interface=EWA0
set EWA station_address=“E2:F4:00:A6:07:D2"
set EWA bus=pci_1 device=1 function=0 irq=24
set EWA irq_bus=isa
This example assumes that the network packet port is defined as EWA0
It is recommended to review the sample configuration files to see the correct structure of the
Ethernet configuration commands.
If your OpenVMS/Alpha system disk is configured for automatic TCP/IP startup and you use
UCX, not loading an Ethernet adapter in the CHARON-AXP configuration can cause OpenVMS
to crash. The problem appears only if UCX is enabled while the networking device is missing.
DECnet works correctly.
For the extended set of the adapter configuration parameters, tuning and troubleshooting
please refer to the ‘Charon networking Guide’.
85
XML to PDF by RenderX XEP XSL-FO Formatter, visit us at http://www.renderx.com/
Configuring Virtual HP Alpha
6.13.2. CHARON Packet Port
The CHARON specific "packet_port" interface establishes a connection between an Ethernet
adapter in the Linux host system and Ethernet adapter in Virtual HP Alpha system. For every
virtual adapter instance loaded, one dedicated host Ethernet adapter is required.
6.13.2.1. Attaching CHARON Packet Port to virtual system
To create instances of CHARON Packet Port use “load” command in configuration file as
follows:
load packet_port/chnetwrk <instance-name>
Note that <instance-name> is not visible outside configuration file.
Example 6.90.
load packet_port/chnetwrk pp_1
In this example, pp_1 is instance name of CHARON Packet Port. This instance name is used
for attaching CHARON virtual Ethernet adapters to it.
6.13.2.2. Configuring CHARON Packet Port
CHARON Packet Port offers several configuration parameters controlling its behavior.
6.13.2.2.1. CHARON Packet Port general parameters
packet_port
parameter
port_enable_mac_addr_change
Type
Boolean
Description
If true is specified, CHARON sets the appropriate
Ethernet address automatically. If false is specified, set
the Ethernet address manually. The default value is
true.
Example 6.91.
set pp_1 port_enable_mac_addr_change=false
port_ignore_on_rx
Numeric
port_ignore_on_rx provides the ability to shutdown
the port when the sequential errors "on receive" exceeds the specified number. Typically, errors on receive
indicate serious (unrecoverable) errors. By default, the
value is set to the value of the
port_pending_rx_number parameter. Value of ‘0’
means infinite.
Example 6.92.
set pp_1 port_ignore_on_rx=16
port_retry_on_tx
Numeric
port_retry_on_tx controls the number of times the port
attempt to transmit the packet until giving up. By default,
the value is 3. Increasing this value might introduce
problems in carrier loosing logic, because not all NIC
drivers support carrier status query. Typically, you do
not need to increase the value.
86
XML to PDF by RenderX XEP XSL-FO Formatter, visit us at http://www.renderx.com/
Configuring Virtual HP Alpha
packet_port
parameter
Type
Description
Example 6.93.
set pp_1 port_retry_on_tx=8
port_pending_rx_number
Numeric
port_pending_rx_number sets the number of pending
receive buffers. The default value is 63. The maximum
value allowed is 195. You may want to increase the
port_pending_rx_number when you have very busy
networking and experience problems like losing connections not related to the carrier loss. Typically, you do
not need to change this parameter.
Example 6.94.
set pp_1 port_pending_rx_number=128
port_pending_rx_number
Numeric
port_pending_tx_number sets the number of buffers
the port uses to transmit. The default value is 62. You
may want to increase the port_pending_tx_number
value if the log file indicates dropped TX packets due
to TX queue overflow. Typically, you do not need to
change this parameter.
Example 6.95.
set pp_1 port_pending_rx_number=128
suspend_msg_on_mac_change
Boolean
To avoid confusion arising from non critical errors during
MAC address change, by default, logging is suppressed
(default value is true). To enable tracing during MAC
address change set this parameter to false
Example 6.96.
set pp_1 suspend_msg_on_mac_change=false
6.13.2.2.2. CHARON Packet Port mapping
packet_port
parameter
interface
Type
Text string
Description
This parameter Identifies the dedicated Ethernet adapter in the Linux host system.
Syntax:
set <name> interface=”<adapter>”
Example 6.97.
set pp_1 interface=”eth0”
Example 6.98.
load DE500BA/dec21x4x IFC
87
XML to PDF by RenderX XEP XSL-FO Formatter, visit us at http://www.renderx.com/
Configuring Virtual HP Alpha
load packet_port IFC0 interface=”eth0”
set IFC interface=IFC0
Example 6.99.
load DEQNA XQA
load packet_port XQA0 interface=”eth0”
set XQA interface=XQA0
6.14. Using CHARON with Linux virtual Network
Interfaces
CHARON allows usage of the Linux virtual Network Interfaces (TUN/TAP) and mapping them
to Ethernet adapters’ emulations of individual CHARON instances.
6.14.1. Prerequisites
The following packages need to be installed at a first step:
• bridge-utils
• tunctl
Providing that the host operating system is FC20 the following versions of those packages
can be installed for example:
• bridge-utils-1.2-9.fc20.x86_64
• tunctl-1.5-4.fc16.x86_64 or openvpn-2.1.1-2.fc20.x86_64
The installation is performed with a help of standard RPM procedure or with “yum install”.
The second step is setting a physical network interface to be dedicated to the whole network
bridge (to be created later) to the promiscuous mode with the following command:
/sbin/ifconfig eth<N> 0.0.0.0 promisc up
The promiscuous mode allows the physical network interface (as well as the virtual one) to
accept the entire volume of the incoming packets. This mode is essential for consistence of
the whole information transfer.
6.14.2. Using virtual Network Interfaces if firewall is enabled on host system
In case if firewall is enabled on host system the following command should be executed to
allow bridge to forward IP packets:
/sbin/iptable -I FORWARD -m physdev --physdev-is-bridged -j ACCEPT
This command can also be performed from the bridge configuration script. It has to be executed
each time the iptables service started or restarted.
It is also possible to make this setting system-wide. There is 2 ways to do that:
88
XML to PDF by RenderX XEP XSL-FO Formatter, visit us at http://www.renderx.com/
Configuring Virtual HP Alpha
1. Issue the given command from the firewall control panel.
2. Add the following line:
-I FORWARD -m physdev --physdev-is-bridged -j ACCEPT
to the end of the /etc/sysconfig/iptables file.
6.14.3. Starting virtual network interfaces
Starting desired number of virtual network interfaces (TAPs) can be performed in following
way:
tunctl [-t tap<N>]
where “tap<N>” is a name of an instance of the virtual network interface, i.e. “tap0”, “tap1”
etc.
Once each virtual network interface instance is created it must be set to the promiscuous
mode too:
/sbin/ifconfig tap<N> promisc up
6.14.4. Creating bridge
To interconnect the physical and virtual network interfaces created at the previous steps the
network bridge must be introduced in the following way:
/usr/sbin/brctl addbr br0
where “br0” stands for a name of the created bridge.
Now it is possible to add the network interfaces to the created bridge in the following way:
/usr/sbin/brctl addif br0 eth<N>
/usr/sbin/brctl addif br0 tap0
…
/usr/sbin/brctl addif br0 tap<N>
Example 6.100.
/usr/sbin/brctl addif br0 eth1
/usr/sbin/brctl addif br0 tap0
The proposed configuration assumes one and only one network bridge, so loops are not
possible. It means it is required to turn off the spanning tree protocol with the following command:
/usr/sbin/brctl stp br0 off
6.14.5. Starting the bridge
To start the created bridge “br0” use the following command:
/sbin/ifconfig br0 up
89
XML to PDF by RenderX XEP XSL-FO Formatter, visit us at http://www.renderx.com/
Configuring Virtual HP Alpha
6.14.6. Usage a virtual interface in CHARON configuration
Once as number of the “tap<N>” interfaces have been created and connected to the corresponding bridge “br0” it is possible to tell CHARON to use those interfaces in the following
way:
load tap_port/chnetwrk EWA0 interface="tap<N>"
90
XML to PDF by RenderX XEP XSL-FO Formatter, visit us at http://www.renderx.com/
Chapter 7. Operating CHARON-AXP
Open "xterm" console. It is mandatory to use "xterm" as console to start CHARON, since only
this console provides correct overall usability in Tru64/OpenVMS. To achieve full compatibility
with VT100 model targeting by CHARON-AXP the following command must be issued in
xterm console:
set term /dev=vt100/perm
Once it is done CHARON-AXP can be started with the following command:
<emulator name> <configuration file name>
The names of the emulators are specified in the Installation section of this Guide.
Example 7.1.
es40 /charon/my_configurations/my_es40.cfg
When CHARON-AXP starts, license checking takes a few seconds. If you remove the license
key while CHARON-AXP is running, a warning message is given after a few minutes, and
you have a maximum of 1 hour to save your files and shut down your virtual system.
For more information of running CHARON-AXP please refer to the installation section of this
Guide.
91
XML to PDF by RenderX XEP XSL-FO Formatter, visit us at http://www.renderx.com/
Chapter 8. CHARON-AXP Utilities
8.1. Overview
CHARON-AXP provides the following set of utilities:
Utility
Description
mkdskcmd
An utility for creation of CHARON virtual disk containers of custom
or standard types. This utility also has has functionality to transfer
virtual disks of one type to virtual disks of other type.
hasp_srm_view
An utility for viewing CHARON licenses, collect host system fingerprint
and information about existing licenses. It is also capable of transferring software licenses from one host to another one.
mtd
An utility for creating CHARON tape images from physical tapes and
writing tape images back to a physical tapes
Idle
An utility that significantly reduces CHARON host CPU usage
whenever a VMS system running on CHARON is idle
All the described utilities can be invoked from command line, Idle package is located in
/opt/charon/disks
8.2. "mkdskcmd" utility
The "mkdskcmd" utility creates empty disk images of given standard disk types or of custom
disk size and can transfer existing disk images of one type to disk images of other type.
The first step is obtaining the name of the disk that should be created:
mkdskcmd --list
This command results in getting a list of all supported disk types. Choose a desired disk (for
example RZ22) and command the "mkdskcmd" to create a virtual disk image:
mkdskcmd --disk rz22 --output rz22.vdisk
The disk container "rz22.vdisk" will be created in the current directory.
Note
A file rz22.avdisk will be created in addition. This file helps CHARON to recognize a
specific disk image type more accurately. So it is recommended to put the .avdisk
file beside the created disk image.
It is also possible to create custom disk image using switches "--blcount" (blocks count)
and "--blsize" (blocks size).
To get all the available parameters please use the switch "--help":
92
XML to PDF by RenderX XEP XSL-FO Formatter, visit us at http://www.renderx.com/
CHARON-AXP Utilities
Usage:
mkdskcmd [Options]
Options:
--help
-h
- to see help screen
- to see help screen
--output <full name> - to specify output file name
-o <full name>
- to specify output file name
--disk <disk name> - to specify the disk name from Disk table
-d <disk name>
- to specify the disk name from Disk table
--blsize <number> - to specify the block size in bytes (custom disk image)
-z <number>
- to specify the block size in bytes (custom disk image)
--blcount <number> - to specify number of the blocks (custom disk image)
-c <number>
- to specify number of the blocks (custom disk image)
--avtable <full_name> - to specify AVDISK table file
-a <full_name>
- to specify AVDISK table file
--list <full_name> - to display AVDISK table
-l <full_name>
- to display AVDISK table
--silent
-s
- silent mode running
- silent mode running
--transfer
-t
- please see the '--transfer' options description
- please see the '-t' options description
Return value:
0
- for Success
Non zero - in case of failure
Examples:
mkdskcmd -h
mkdskcmd -l
mkdskcmd -a /opt/charon/utils/mkdsk.vtable -o /etc/rk07.vdisk -d rk07
mkdskcmd -o /etc/custom.vdisk -z 512 -c 16384
Note
The parameters "--avtable" is added for usage of an alternative disk specification
database - or to point to the standard one ("mkdsk.vtable") if it is located in some
other directory.
8.2.1. Transferring disk images
The "mkdskcmd" utility is able to transfer of a disk image of one type to a disk image of
other type. This operation is needed for example to obtain more free space on a disk image
already having some data.
Note
If a disk image is initially larger than the disk image it will be transferred to, the extra
data is lost. If the disk image is initially shorter, it will be extended, and the extended
part will be filled up with null bytes ('\0')
The syntax is following:
mkdskcmd --transfer <source disk file name> <source disk parameters>
93
XML to PDF by RenderX XEP XSL-FO Formatter, visit us at http://www.renderx.com/
CHARON-AXP Utilities
where:
• <source disk file name> - a file name of the disk image to be transferred
• <source disk parameters> - the name of the disk from the list of available on "mkdskcmd --list" request or the disk geometry specification (see below).
Example 8.1.
mkdskcmd --transfer \etc\rz22.vdisk rz25
It is also possible to specify the disk parameters manually with "--blcount / -c" (blocks
count) and "--blsize / -z" (blocks size) switches:
mkdskcmd --transfer <source disk file name> -blsize <number> -blcount <number>
Example 8.2.
mkdskcmd -t \etc\custom.vdisk -z 512 -c 262134
Note
There is a certain delay between a moment when the utility reports that a disk
image has been transferred and its actual availability to CHARON. This delay
can reach to several minutes in case of very big disks to transfer to. It happens
because the host operating systems needs some time for actual allocation of
the enlarged file on HDD.
8.3. "mtd" utility
The "mtd" utility allows creating CHARON tape image from a physical tape and writing tape
image to a physical tape. It is a command line utility. Usage is the following:
mtd [options] <tape device name> <tape container name>
where the option are:
Parameter
Description
-l <file name>
Creates the execution log in the file “file
name”.
-r <number>
Specifies a number of attempts to read a
damaged data bock
-i
Directs to ignore bad blocks and continue
processing w/o interruption. It implies "-r 0"
-n
Do not rewind tape
-p
Disable progress reporting
-v
Enable verbose trace of data transfer (implies
"-p")
Example 8.3.
mtd -l tape1.txt -r 10 /dev/st5 /charon/tapes/tape1.vtape
Using the following syntax it is possible to write a content of a tape container to a physical
tape:
94
XML to PDF by RenderX XEP XSL-FO Formatter, visit us at http://www.renderx.com/
CHARON-AXP Utilities
mtd <tape container name> <tape device name>
Example 8.4.
mtd /charon/tapes/tape1.vtape /dev/st5
8.4. "hasp_srm_view" utility
The "hasp_srm_view" utility allows seeing content of the license that is embedded in your
CHARON-AXP HASP license key. Just run this utility w/o any parameters to see the license
details.
It is also able to collect key status information as well as host fingerprint information and
manage software license transfer procedure. The example below demonstrates functionality
of the utility:
Example 8.5. Usage of "hasp_srm_view" utility
#hasp_srm_view -help
CHARON Sentinel HASP utility
Copyright: STROMASYS SA, 2013
Options:
-? or -h or -help - to see help screen
-l
- to see CHARON license details
-c2v <C2V file>
- to collect the key status information (C2V file)
-fgp <C2V file>
- to collect the host fingerprint information (C2V file)
-tfr <LicenseID> <recipient file> - to transfer HASP SL license (V2C file)
-tfr <LicenseID> - to remove HASP SL license (V2C file) from the local host
-idf
- to get transfer recipient (ID) file "recipient.id"
Specific type of CHARON licensing defines what switch must be used in each case. For licensing with HASP dongle the switch must be "-c2v", whereas licensing with the Software
License (SL) requires "-fgp" switch.
Collecting "c2v" file is possible only from CHARON host console.
For remote collecting it is recommended to use "ssh" as it is shown in the following example:
Example 8.6. Collecting C2V file via SSH
ssh root@CHARON_HOST /opt/charon/utils/axp/hasp_srm_view -c2v /opt/charon/utils/axp/my_hasp_key.c2v
ssh root@CHARON_HOST /opt/charon/utils/axp/hasp_srm_view -fgp
on/utils/axp/my_host_fingerprint.c2v
/opt/char-
There is also a special command for viewing CHARON license if remote access is used:
Example 8.7. Viewing/collecting CHARON license via SSH
To see the license text on console:
ssh root@localhost /opt/charon/utils/axp/hasp_srm_view
To collect the license text to an output file on the host server:
ssh
root@localhost
/opt/charon/utils/axp/hasp_srm_view
on/utils/axp/hasp_srm_view.txt
95
XML to PDF by RenderX XEP XSL-FO Formatter, visit us at http://www.renderx.com/
/opt/char-
CHARON-AXP Utilities
The "hasp_srm_view" utility always reports Id and IP address of the hosts where active licenses are found. It helps in situation of multiple licenses.
8.4.1. Software Licenses Transfer
Software Licenses (SL) can be transferred from one host to another one with a help of
"hasp_srm_view" utility and "Sentinel Admin Control Center" (ACC). The following example
demonstrates the transfer procedure.
Let's suppose that a Software License must be transferred from a host "SourceHost" to a
host "RecipientHost":
1. Collect a specific information about the "RecipientHost" to issue a transfer license for it.
To do that run "hasp_srm_view" utility on the "RecipientHost" with the following parameters:
hasp_srm_view -idf
As result a file "recipient.id" will be created in the directory from which "hasp_srm_view"
utility runs.
2. Copy the "recipient.id" file to the "SourceHost".
Note
"recipient.id" file is an ASCII file, so use "ascii" option in case of FTP transfer.
3. On the "SourceHost" open up the "Sentinel Admin Control Center" (ACC) (by going to
http://localhost:1947), note the number of the software license you are going to update.
4. Run the "hasp_srm_view" utilityin the following way to create a transfer license for the host
"RecipientHost":
hasp_srm_view -tfr <license number> recipient.id
The "license number" is the value collected at the step 3.
Example 8.8. Collecting a transfer license
hasp_srm_view -tfr 12345678 recipient.id
As result a "<license number>.v2c" file will be created in the current directory. In the example
above the name of the transfer license will be "12345678.v2c"
5. Copy the resulting "<license number>.v2c" file to the "RecipientHost".
Note
"<license number>.v2c" file is an ASCII file, so use "ascii" option in case of FTP
transfer.
6. On the "RecipientHost" open up the "Sentinel Admin Control Center" (ACC) (by going
to http://localhost:1947) and apply the "<license number>.v2c" file the way described in
the "Licensing" chapter of this Guide.
8.4.2. Software License Remove
It is also possible to remove Software License completely from a host. As result the license
will be dumped to a specific license file *.v2c, so it can be re-applied if needed.
96
XML to PDF by RenderX XEP XSL-FO Formatter, visit us at http://www.renderx.com/
CHARON-AXP Utilities
To remove a software license from a host do the following:
1. Open up the "Sentinel Admin Control Center" (ACC) (by going to http://localhost:1947),
note the number of the software license you are going to remove.
2. Run the "hasp_srm_view" utilityin the following way to remove the license:
hasp_srm_view -tfr <license number>
The "license number" is the value collected at the step 3.
Example 8.9. Collecting a transfer license
hasp_srm_view -tfr 12345678
As result a "<license number>.v2c" file will be created in the current directory. In the example
above the name of the transfer license will be "12345678.v2c"
3. Lately it is possible to re-apply the created *.v2c file to restore the deleted software license.
See the "Licensing" chapter of this Guide for details.
8.5. "idle" utility
The "Idle" utility significantly reduces the CHARON-AXP host CPU usage whenever a
VMS/Alpha system running on CHARON-AXP is idle. "Idle" utility stalls the emulated CPU
(note that at the moment it supports the models emulating just 1 CPU only, namely: AlphaStation 400, 800, 1000, 1000A and DS10L) when it detects an OpenVMS idle condition. While
the "Idle" utility is running the emulated CPU consumes, on average, less host system CPU
time. However it is not recommended to employ "Idle" utility in real-time process control environments.
The supported OpenVMS versions are from V6.2-1H3 up to V8.4. The provided PCSI distributive is used for all the versions of OpenVMS.
Note
On Linux this utility can be used only with models with single CPU emulation
The "Idle" utility is provided in form of a virtual disk image named "idle_vms_pkg.vdisk". Mount
this disk with the "over=id" qualifier under the emulated VMS/Alpha operating system and
go to the "[000000.AXP]" directory.
The following files are resided there:
README.TXT
SRI-AXPVMS-IDLE-V0102--1.PCSI
VMS62TO71U2_PCSI-V0200.PCSI-DCX_AXPEXE
VMS62TO71U2_PCSI-V0200.TXT
At the first step it is needed to apply a specific PCSI patch "VMS62TO71U2_PCSI" if the
target VMS/Alpha operating system version is below V7.2. Copy the "VMS62TO71U2_PCSIV0200.PCSI-DCX_AXPEXE" file to some directory on any spare disk and run this file from
there:
$ RUN VMS62TO71U2_PCSI-V0200.PCSI-DCX_AXPEXE
97
XML to PDF by RenderX XEP XSL-FO Formatter, visit us at http://www.renderx.com/
CHARON-AXP Utilities
then proceed with the patch installation:
$ PRODUCT INSTALL VMS62TO71U2_PCSI /SOURCE=<directory containing the
VMS62TO71U2_PCSI kit>
Once the installation is over please return to the "[000000.AXP]" directory of the
"idle_vms_pkg.vdisk" and proceed with installation of the "Idle" utility itself:
$ PRODUCT INSTALL IDLE /SOURCE=<directory containing the IDLE kit>
Once the "Idle" utility is installed it starts to take effect immediately, reducing the host system
CPU usage if VMS/Alpha system running on CHARON-AXP is idle. No reboot is required.
The utility is loaded automatically on reboot, no additional configuring or startup sequence is
needed.
Deinstallation of the "Idle" utility:
$ PRODUCT REMOVE IDLE
The utility stops working after the system reboot.
Please also refer to the supplied documents "README.TXT" and "VMS62TO71U2_PCSIV0200.TXT" for more details.
8.6. WebUI overview
"WebUI" is a specific utility controlling and running CHARON instances on a host where
CHARON is installed. WebUI is a server application interacting with end user with its Java
interface that can be open with an internet browser installed on client operating systems.
WebUI has the following basic capabilities:
• Create, manage and delete CHARON instances
• Configure CHARON instances
• Monitor log files created by CHARON instances
• Emulate VT terminalas CHARON console
• Run standard TV terminal emulation available on client's host system and use it as
CHARON console
• Create virtual disk images
• Provide information about CHARON license
• Collect information about host system
• Manage CHARON environment files
To know more about installation, running and using the WebUI please refer to its User's Guide
"CHARON WEB UI for CHARON products for Linux" distributed separately.
98
XML to PDF by RenderX XEP XSL-FO Formatter, visit us at http://www.renderx.com/
Appendix A. Installing and transferring
an original host software to CHARON
There are several ways to transfer data from an original system to CHARON:
A.1. Using Local Area Network
First, perform a standard installation of your host Operating System from the manufacturer’s
original media using CD-ROM drive. Then configure a network (DECnet and/or TCP/IP) to
your CHARON for your existing Network with a unique address, and use DECnet or TCP/IP
to copy your applications and data to your CHARON system. If for any reason installing a
host Operating System from scratch is a problem, call your CHARON sales contact for help.
Once you have CHARON connected to your network, you may use standard utilities to
transfer the required data. Before copying the data you will have to configure CHARON with
adequate free space on disks, or on disk images which can be created with the MkDisk
(Windows) or "mkdskcmd" (Linux) utilities.
A.2. Using a physical disk drive
You can remove a SCSI disk from your original system and reconnect it to a SCSI adapter
on CHARON host operating system. Assign the SCSI disk within the CHARON configuration
file to a disk controller, and it becomes a disk drive in the CHARON. If the SCSI disk is a
bootable disk you can boot CHARON from it.
A.3. Using a tape
CHARON supports the connection of a SCSI tape drive to a SCSI adapter in your CHARON
host system. Assign the tape drive in the CHARON configuration file to access the tape drive
by the operating system running on CHARON. This way you can boot from standalone tape
to restore your system backup.
99
XML to PDF by RenderX XEP XSL-FO Formatter, visit us at http://www.renderx.com/
Appendix B. Configuration files
examples
B.1. Virtual HP AlphaServer ES40 configuration
template. (e.g. es40.cfg.template)
This section provides the following configuration file example: "Virtual HP AlphaServer ES40
configuration template. (e.g. es40.cfg.template)"
This file contains basic information on how to set configuration parameters for the emulated
devices provided by CHARON-AXP AlphaServer ES40. Make a copy and edit it to set up the
connections to your disks, disks images, tape drives, network adapters, etc.
Note
In the CHARON-AXP installation directory you can find the as400.cfg.template,
as800.cfg.template, as1000.cfg.template, as1000a.cfg.template, as1200.cfg.template,
as2000.cfg.template, as2100.cfg.template, as4000.cfg.template, as4100.cfg.template,
ds10l.cfg.template, ds15.cfg.template, ds20.cfg.template, ds25.cfg.template,
es40.cfg.template, es45.cfg.template, gs80.cfg.template, gs160.cfg.template, and
gs320.cfg.template files for the particular model installed.
100
XML to PDF by RenderX XEP XSL-FO Formatter, visit us at http://www.renderx.com/
Configuration files examples
#
# Copyright (C) 1999-2012 STROMASYS
# All rights reserved.
#
# The software contained on this media is proprietary to and embodies
# the confidential technology of STROMASYS. Possession, use, duplication,
# or dissemination of the software and media is authorized only pursuant
# to a valid written license from STROMASYS.
#
#============================================================================
#
# Sample configuration file for AlphaServer ES40 machines.
#
#---------------------------------------------------------------------------set session hw_model = AlphaServer_ES40
#============================================================================
#
# Select name of the instance to differentiate it among other instances
# running on the same host.
#
#---------------------------------------------------------------------------#set session configuration_name = AlphaServer_ES40
#============================================================================
#
# Disable rotating LOG and enable single file LOG. Select either appending or
# overwriting it on every instance start. Then specify desired log file name
# and path to it.
#
#---------------------------------------------------------------------------#set session log_method = append
#set session log_method = overwrite
#set session log = AlphaServer_ES40.log
#============================================================================
#
# Overrides system assigned process's CPU affinity. The session changes
# the process's CPU affinity to the one specified.
#
#---------------------------------------------------------------------------#set session affinity="0, 1, 2, 3"
#============================================================================
#
# The 'n_of_io_cpus' option overrides number of host CPU cores reserved for
# I/O processing. If omitted the session reserves 33% of available host CPU
# cores for I/O processing. Note that total amount of available host CPU
# cores is determined based on process's CPU affinity.
#
#---------------------------------------------------------------------------#set session n_of_io_cpus=1
#set session n_of_io_cpus=2
#set session n_of_io_cpus=...
#============================================================================
#
# AlphaServer ES40 6/500
#
#---------------------------------------------------------------------------#set ace cpu_architecture = EV6
101
XML to PDF by RenderX XEP XSL-FO Formatter, visit us at http://www.renderx.com/
Configuration files examples
#set rom dsrdb[0] = 1816 system_name = "AlphaServer ES40 6/500"
#set rom version[1] = 1.98-4 version[2] = 1.92-5
#============================================================================
#
# AlphaServer ES40 6/667
#
#---------------------------------------------------------------------------set ace cpu_architecture = EV67
set rom dsrdb[0] = 1820 system_name = "AlphaServer ES40 6/667"
#============================================================================
#
# The 'n_of_cpus' option reduces number of emulated Alpha CPUs in the
# configuration.
#
#---------------------------------------------------------------------------#set session n_of_cpus=1
#set session n_of_cpus=2
#set session n_of_cpus=3
#============================================================================
#
# Override default System Serial Number.
#
#---------------------------------------------------------------------------#set rom system_serial_number = SN01234567
#============================================================================
#
# Specify size of RAM from 256MB up to 32768MB (32GB) in 256MB extents.
#
#---------------------------------------------------------------------------#set ram size=256
#set ram size=512
#set ram size=1024
#set ram size=4096
#set ram size=32768
#============================================================================
#
# Uncomment to allow the SRM console environment be preserved across
# emulator restarts.
#
#---------------------------------------------------------------------------#set rom container="clipper.bin"
#============================================================================
#
# Uncomment to allow saving CMOS NVRAM content, so that to preserve
# Time & Date information.
#
#---------------------------------------------------------------------------#set toy container="clipper.dat"
#============================================================================
#
# Select connection for the console serial line OPA0.
#
#----------------------------------------------------------------------------
102
XML to PDF by RenderX XEP XSL-FO Formatter, visit us at http://www.renderx.com/
Configuration files examples
#load physical_serial_line OPA0 line="/dev/ttyN"
#load virtual_serial_line OPA0 port=10003
load operator_console OPA0
#---------------------------------------------------------------------------#
# Uncomment to allow 'F6' to terminate the running emulator.
#
#---------------------------------------------------------------------------#set OPA0 stop_on = F6
#============================================================================
#
# Improve granularity of emulated AXP timer.
#
#---------------------------------------------------------------------------#set isa clock_period=1000
#============================================================================
#
# Uncomment to connect the emulator's DQA0 to host's ATAPI CD/DVD-ROM drive.
#
#---------------------------------------------------------------------------#set ide container = "/dev/sg<N>"
#============================================================================
#
# Load optional DE500BA PCI Ethernet Adapter (EWA).
#
#---------------------------------------------------------------------------#load DE500BA/dec21x4x EWA interface=EWA0
#load packet_port/chnetwrk EWA0 interface="eth0"
#============================================================================
#
# Load another optional DE500BA PCI Ethernet Adapter (EWB).
#
#---------------------------------------------------------------------------#load DE500BA/dec21x4x EWB interface=EWB0
#load packet_port/chnetwrk EWB0 interface="eth1"
#============================================================================
#
# Load another optional DE500BA PCI Ethernet Adapter (EWC).
#
#---------------------------------------------------------------------------#load DE500BA/dec21x4x EWC interface=EWC0
#load packet_port/chnetwrk EWC0 interface="eth2"
#============================================================================
#
# Uncomment to enable emulation of DEC-KZPBA SCSI controller.
#
#---------------------------------------------------------------------------#load KZPBA PKA scsi_id = 7
#============================================================================
#
# Uncomment to connect the emulator's DKA0 to the disk image.
#
103
XML to PDF by RenderX XEP XSL-FO Formatter, visit us at http://www.renderx.com/
Configuration files examples
#---------------------------------------------------------------------------#set PKA container[0] = "<file-name>.vdisk"
#============================================================================
#
# Uncomment to connect the emulator's DKA100 to host's disk drive.
#
#---------------------------------------------------------------------------#set PKA container[100] = "/dev/sd<L>"
#============================================================================
#
# Uncomment to connect the emulator's GKA200 to an unknown SCSI device.
#
#---------------------------------------------------------------------------#set PKA container[200] = "/dev/sg<N>"
#============================================================================
#
# Uncomment to connect the emulator's DKA300 to host's CD/DVD-ROM drive.
#
# Device name may be different depending on particular version of host
# operating system. Choose one which suits best.
#
#---------------------------------------------------------------------------#set PKA container[300] = "/dev/cdrom"
#set PKA container[300] = "/dev/cdrom1"
#set PKA container[300] = "/dev/cdrom<N>"
#set PKA container[300] = "/dev/sr0"
#set PKA container[300] = "/dev/sr<N>"
#============================================================================
#
# Uncomment to connect the emulator's DKA400 to .ISO file (CD/DVD-ROM image).
#
#---------------------------------------------------------------------------#set PKA container[400] = "<file-name>.iso"
#============================================================================
#
# Uncomment to connect the emulator's MKA500 to host's SCSI tape drive.
#
#---------------------------------------------------------------------------#set PKA container[500] = "/dev/sg<N>"
#============================================================================
#
# Uncomment to connect the emulator's MKA600 to .VTAPE file (tape image).
#
#---------------------------------------------------------------------------#set PKA container[600] = "<file-name>.vtape"
#============================================================================
#
# Uncomment to enable emulation of secondary DEC-KZPBA SCSI controller (PKB).
#
#---------------------------------------------------------------------------#load KZPBA PKB scsi_id = 7
104
XML to PDF by RenderX XEP XSL-FO Formatter, visit us at http://www.renderx.com/
Configuration files examples
#============================================================================
#
# Uncomment to connect the emulator's DKB0 to the disk image.
#
#---------------------------------------------------------------------------#set PKB container[0] = "<file-name>.vdisk"
#============================================================================
#
# Uncomment to connect the emulator's DKB100 to host's disk drive.
#
#---------------------------------------------------------------------------#set PKB container[100] = "/dev/sd<L>"
#============================================================================
#
# Uncomment to connect the emulator's GKB200 to an unknown SCSI device.
#
#---------------------------------------------------------------------------#set PKB container[200] = "/dev/sg<N>"
#============================================================================
#
# Uncomment to connect the emulator's DKB300 to host's CD/DVD-ROM drive.
#
# Device name may be different depending on particular version of host
# operating system. Choose one which suits best.
#
#---------------------------------------------------------------------------#set PKB container[300] = "/dev/cdrom"
#set PKB container[300] = "/dev/cdrom1"
#set PKB container[300] = "/dev/cdrom<N>"
#set PKB container[300] = "/dev/sr0"
#set PKB container[300] = "/dev/sr<N>"
#============================================================================
#
# Uncomment to connect the emulator's DKB400 to .ISO file (CD/DVD-ROM image).
#
#---------------------------------------------------------------------------#set PKB container[400] = "<file-name>.iso"
#============================================================================
#
# Uncomment to connect the emulator's MKB500 to host's SCSI tape drive.
#
#---------------------------------------------------------------------------#set PKB container[500] = "/dev/sg<N>"
#============================================================================
#
# Uncomment to connect the emulator's MKB600 to .VTAPE file (tape image).
#
#---------------------------------------------------------------------------#set PKB container[600] = "<file-name>.vtape"
#============================================================================
#
# Uncomment to enable emulation of DEC-KGPSA-CA PCI FC Adapter.
#
105
XML to PDF by RenderX XEP XSL-FO Formatter, visit us at http://www.renderx.com/
Configuration files examples
#---------------------------------------------------------------------------#load KGPSA FGA
#============================================================================
#
# Uncomment to connect the emulator's $1$DGA0 to the disk image.
#
#---------------------------------------------------------------------------#set FGA container[0] = "<file-name>.vdisk"
#============================================================================
#
# Uncomment to connect the emulator's $1$DGA100 to host's disk drive.
#
#---------------------------------------------------------------------------#set FGA container[100] = "/dev/sd<L>"
#============================================================================
#
# Uncomment to enable emulation of secondary DEC-KGPSA-CA PCI FC Adapter.
#
#---------------------------------------------------------------------------#load KGPSA FGB
#============================================================================
#
# Uncomment to enable PCI Pass Through access to physical EMULEX LP FC HBA,
# use two adapters to provide multipath with failover.
#
#---------------------------------------------------------------------------#set FGA host_bus_location = "/dev/kgpsaX"
#set FGB host_bus_location = "/dev/kgpsaY"
# this is the end of the configuration file #################################
106
XML to PDF by RenderX XEP XSL-FO Formatter, visit us at http://www.renderx.com/
Appendix C. Specification of
"system_name" parameter
It is important to have the "system_name", "hw_model", "cpu_architecture" and "dsrdb[0]"
(DSRB - Dynamic System Recognition Data Block) parameters in sync. The following table
illustrates how to synchronize those values:
system_name (rom)
cpu_architecture (ace)
dsrdb[0] (rom)
set session hw_model = AlphaServer_400
AlphaStation 200 4/100
EV4
1156
AlphaStation 200 4/133
EV4
1088
AlphaStation 205 4/133
EV4
1250
AlphaStation 255 4/133
EV4
1257
AlphaStation 200 4/166
EV4
1087
AlphaStation 205 4/166
EV4
1251
AlphaStation 255 4/166
EV4
1258
AlphaStation 400 4/166
EV4
1086
AlphaStation 205 4/200
EV4
1252
AlphaStation 255 4/200
EV4
1259
AlphaStation 200 4/233
EV45
1151
AlphaStation 205 4/233
EV45
1253
AlphaStation 255 4/233
EV45
1260
AlphaStation 400 4/233
EV45
1152
AlphaStation 205 4/266
EV45
1254
AlphaStation 255 4/266
EV45
1261
AlphaServer 300 4/266
EV45
1593
AlphaStation 400 4/266
EV45
1153
AlphaStation 400 4/266
EV45
1154
AlphaStation 200 4/300
EV45
1157
AlphaStation 205 4/300
EV45
1255
AlphaStation 255 4/300
EV45
1262
AlphaStation 400 4/300
EV45
1160
AlphaStation 205 4/333
EV45
1256
AlphaStation 255 4/333
EV45
1263
set session hw_model = AlphaServer_800
AlphaServer 600 5/333
EV56
1310
AlphaServer 800 5/333
EV56
1310
AlphaServer 800 5/400
EV56
1584
AlphaStation 600A 5/500
EV56
1590
AlphaServer 800 5/500
EV56
1585
set session hw_model = AlphaServer_1000
AlphaServer 1000 4/200
EV4
1090
107
XML to PDF by RenderX XEP XSL-FO Formatter, visit us at http://www.renderx.com/
Specification of "system_name"
parameter
system_name (rom)
cpu_architecture (ace)
dsrdb[0] (rom)
AlphaServer 1000 4/233
EV45
1091
AlphaServer 1000 4/266
EV45
1264
AlphaServer 1000 5/300
EV5
1269
AlphaServer 1000 5/333
EV5*
1559
AlphaServer 1000 5/400
EV56*
1312
AlphaServer 1000 5/500
EV56*
1582
AlphaServer 1000 5/500
EV56*
1583
set session hw_model = AlphaServer_1000A
AlphaServer 1000A 4/266
EV45
1265
AlphaServer 1000A 5/300
EV5
1270
AlphaServer 1000A 5/333
EV5
1558
AlphaServer 1000A 5/400
EV56
1311
AlphaServer 1000A 5/500
EV56
1580
AlphaServer 1000A 5/500
EV56
1581
set session hw_model = AlphaServer_1200
AlphaServer 1200 5/300
EV5
1722
AlphaServer 1200 5/300
EV5
1724
AlphaServer 1200 5/400
EV56
1726
AlphaServer 1200 5/400
EV56
1728
AlphaStation 1200 5/400
EV56
1758
AlphaStation 1200 5/400
EV56
1760
AlphaServer 1200 5/466
EV56
1730
AlphaServer 1200 5/466
EV56
1732
AlphaStation 1200 5/466
EV56
1762
AlphaStation 1200 5/466
EV56
1764
AlphaServer 1200 5/533
EV56
1734
AlphaServer 1200 5/533
EV56
1736
AlphaServer 1200 5/533
EV56
1746
AlphaServer 1200 5/533
EV56
1748
AlphaStation 1200 5/533
EV56
1766
AlphaStation 1200 5/533
EV56
1768
AlphaStation 1200 5/533
EV56
1778
AlphaStation 1200 5/533
EV56
1780
AlphaServer 1200 5/600
EV56
1738
AlphaServer 1200 5/600
EV56
1740
AlphaServer 1200 5/600
EV56
1750
AlphaServer 1200 5/600
EV56
1752
AlphaStation 1200 5/600
EV56
1770
AlphaStation 1200 5/600
EV56
1772
AlphaStation 1200 5/600
EV56
1782
AlphaStation 1200 5/600
EV56
1784
108
XML to PDF by RenderX XEP XSL-FO Formatter, visit us at http://www.renderx.com/
Specification of "system_name"
parameter
system_name (rom)
cpu_architecture (ace)
dsrdb[0] (rom)
AlphaServer 1200 5/666
EV56
1742
AlphaServer 1200 5/666
EV56
1744
AlphaServer 1200 5/666
EV56
1754
AlphaServer 1200 5/666
EV56
1756
AlphaStation 1200 5/666
EV56
1774
AlphaStation 1200 5/666
EV56
1776
AlphaStation 1200 5/666
EV56
1786
AlphaStation 1200 5/666
EV56
1788
set session hw_model = AlphaServer_2000
AlphaServer 2000 4/200
EV4
1123
AlphaServer 2000 4/233
EV45
1171
AlphaServer 2000 4/275
EV45
1127
AlphaServer 2000 5/250
EV5
1131
AlphaServer 2000 5/300
EV5
1175
AlphaServer 2000 5/375
EV56
1505
AlphaServer 2000 5/400
EV56
1517
set session hw_model = AlphaServer_2100
AlphaServer 2100 4/200
EV4
1059
AlphaServer 2100 4/200
EV4
1135
AlphaServer 2100 4/233
EV45
1179
AlphaServer 2100 4/233
EV45
1187
AlphaServer 2100 4/275
EV45
1115
AlphaServer 2100 4/275
EV45
1139
AlphaServer 2100 5/250
EV5
1119
AlphaServer 2100 5/250
EV5
1143
AlphaServer 2100 5/300
EV5
1183
AlphaServer 2100 5/300
EV5
1191
AlphaServer 2100 5/375
EV56
1509
AlphaServer 2100 5/375
EV56
1513
AlphaServer 2100 5/400
EV56
1521
AlphaServer 2100 5/400
EV56
1525
set session hw_model = AlphaServer_4000
AlphaServer 4000 5/266
EV5
1409
AlphaServer 4000 5/266
EV5
1411
AlphaServer 4000 5/266
EV5
1421
AlphaServer 4000 5/266
EV5
1423
AlphaServer 4000 5/266
EV5
1433
AlphaServer 4000 5/266
EV5
1435
AlphaServer 4000 5/266
EV5
1445
AlphaServer 4000 5/266
EV5
1447
AlphaServer 4000 5/300
EV5
1413
109
XML to PDF by RenderX XEP XSL-FO Formatter, visit us at http://www.renderx.com/
Specification of "system_name"
parameter
system_name (rom)
cpu_architecture (ace)
dsrdb[0] (rom)
AlphaServer 4000 5/300
EV5
1415
AlphaServer 4000 5/300
EV5
1425
AlphaServer 4000 5/300
EV5
1427
AlphaServer 4000 5/300
EV5
1437
AlphaServer 4000 5/300
EV5
1439
AlphaServer 4000 5/300
EV5
1449
AlphaServer 4000 5/300
EV5
1451
AlphaServer 4000 5/400
EV56
1417
AlphaServer 4000 5/400
EV56
1419
AlphaServer 4000 5/400
EV56
1429
AlphaServer 4000 5/400
EV56
1431
AlphaServer 4000 5/400
EV56
1441
AlphaServer 4000 5/400
EV56
1443
AlphaServer 4000 5/400
EV56
1453
AlphaServer 4000 5/400
EV56
1455
AlphaServer 4000 5/466
EV56
1634
AlphaServer 4000 5/466
EV56
1636
AlphaServer 4000 5/466
EV56
1654
AlphaServer 4000 5/466
EV56
1656
AlphaServer 4000 5/533
EV56
1638
AlphaServer 4000 5/533
EV56
1640
AlphaServer 4000 5/533
EV56
1642
AlphaServer 4000 5/533
EV56
1644
AlphaServer 4000 5/533
EV56
1658
AlphaServer 4000 5/533
EV56
1660
AlphaServer 4000 5/533
EV56
1662
AlphaServer 4000 5/533
EV56
1664
AlphaServer 4000 5/600
EV56
1646
AlphaServer 4000 5/600
EV56
1648
AlphaServer 4000 5/600
EV56
1666
AlphaServer 4000 5/600
EV56
1668
AlphaServer 4000 5/666
EV56
1650
AlphaServer 4000 5/666
EV56
1652
AlphaServer 4000 5/666
EV56
1670
AlphaServer 4000 5/666
EV56
1672
set session hw_model = AlphaServer_4100
AlphaServer 4100 5/266
EV5
1313
AlphaServer 4100 5/266
EV5
1317
AlphaServer 4100 5/266
EV5
1337
AlphaServer 4100 5/266
EV5
1341
AlphaServer 4100 5/266
EV5
1361
110
XML to PDF by RenderX XEP XSL-FO Formatter, visit us at http://www.renderx.com/
Specification of "system_name"
parameter
system_name (rom)
cpu_architecture (ace)
dsrdb[0] (rom)
AlphaServer 4100 5/266
EV5
1365
AlphaServer 4100 5/266
EV5
1385
AlphaServer 4100 5/266
EV5
1389
AlphaServer 4100 5/300
EV5
1321
AlphaServer 4100 5/300
EV5
1325
AlphaServer 4100 5/300
EV5
1345
AlphaServer 4100 5/300
EV5
1349
AlphaServer 4100 5/300
EV5
1369
AlphaServer 4100 5/300
EV5
1373
AlphaServer 4100 5/300
EV5
1393
AlphaServer 4100 5/300
EV5
1397
AlphaServer 4100 5/400
EV56
1329
AlphaServer 4100 5/400
EV56
1333
AlphaServer 4100 5/400
EV56
1353
AlphaServer 4100 5/400
EV56
1357
AlphaServer 4100 5/400
EV56
1377
AlphaServer 4100 5/400
EV56
1381
AlphaServer 4100 5/400
EV56
1401
AlphaServer 4100 5/400
EV56
1405
AlphaServer 4100 5/466
EV56
1594
AlphaServer 4100 5/466
EV56
1598
AlphaServer 4100 5/533
EV56
1602
AlphaServer 4100 5/533
EV56
1606
AlphaServer 4100 5/533
EV56
1610
AlphaServer 4100 5/533
EV56
1614
AlphaServer 4100 5/600
EV56
1618
AlphaServer 4100 5/600
EV56
1622
AlphaServer 4100 5/666
EV56
1626
AlphaServer 4100 5/666
EV56
1630
set session hw_model = AlphaServer_DS10L
AlphaServer DS10 6/466
EV6
1839
AlphaStation DS10 6/466
EV6
1879
AlphaStation XP900 6/466
EV6
1879
AlphaServer DS10L 6/466
EV6
1961
AlphaServer DS10L 67/616
EV67
1962
AlphaStation DS10 67/616
EV67
1962
AlphaServer DS10 67/616
EV67
1970
set session hw_model = AlphaServer_DS15
AlphaServer DS15 68CB/1000
EV68
2047
AlphaStation DS15
68CB/1000
EV68
2048
AlphaServer TS15 68CB/1000
EV68
2049
111
XML to PDF by RenderX XEP XSL-FO Formatter, visit us at http://www.renderx.com/
Specification of "system_name"
parameter
system_name (rom)
cpu_architecture (ace)
dsrdb[0] (rom)
set session hw_model = AlphaServer_DS20
AlphaServer DS20 6/500
EV6
1838
AlphaServer DS20E 6/500
EV6
1840
AlphaServer DS20 6/500
EV6
1920
AlphaServer DS20 6/500
EV6
1921
AlphaServer DS20E 67/667
EV67
1939
AlphaStation DS20E 6/500
EV6
1941
AlphaStation DS20E 67/667
EV67
1943
AlphaServer DS20E 68A/833
EV68
1964
AlphaServer DS20E 68A/833
EV68
1982
AlphaServer DS20L 68A/833
EV68
2006
set session hw_model = AlphaServer_DS25
AlphaServer DS25 68CB/1000
EV68
1994
AlphaStation DS25
68CB/1000
EV68
1995
set session hw_model = AlphaServer_ES40
AlphaServer ES40 6/500
EV6
1813
AlphaServer ES40 6/500
EV6
1861
AlphaServer ES40 6/500
EV6
1869
AlphaServer ES40 6/500
EV6
1923
AlphaServer ES40 6/500
EV6
1931
AlphaServer ES40 6/667
EV6
1817
AlphaServer ES40 6/667
EV6
1865
AlphaServer ES40 6/667
EV6
1873
AlphaServer ES40 6/667
EV6
1927
AlphaServer ES40 6/667
EV6
1935
AlphaStation ES40 67/667
EV67
1949
AlphaStation ES40 67/667
EV67
1957
AlphaStation ES40 68/833
EV68
1984
AlphaStation ES40 68/833
EV68
1988
set session hw_model = AlphaServer_ES45
AlphaServer ES45/3B
68CB/1000
EV68
1971
AlphaServer ES45/2
68CB/1000
EV68
1975
AlphaServer ES45/2B
68CB/1000
EV68
1975
AlphaServer ES45/1B
68CB/1000
EV68
2002
AlphaServer ES45/3B
68CB/1250
EV68
2013
AlphaServer ES45/2
68CB/1250
EV68
2017
112
XML to PDF by RenderX XEP XSL-FO Formatter, visit us at http://www.renderx.com/
Specification of "system_name"
parameter
system_name (rom)
cpu_architecture (ace)
dsrdb[0] (rom)
AlphaServer ES45/2B
68CB/1250
EV68
2017
AlphaServer ES45/1B
68CB/1250
EV68
2021
set session hw_model = AlphaServer_GS80
AlphaServer GS80 67/728
EV67
1967
AlphaServer GS1280
EV67
2038
set session hw_model = AlphaServer_GS160
AlphaServer GS160 67/728
EV67
1968
AlphaServer GS1280
EV67
2039
set session hw_model = AlphaServer_GS320
AlphaServer GS320 67/728
EV67
1969
AlphaServer GS1280
EV67
2040
AlphaServer GS1280, AlphaServer GS1280 and AlphaServer GS1280 also require the
parameters dsrdb[1] and dsrdb[2] to be set in the following way:
• AlphaServer GS1280: dsrdb[1]=50 dsrdb[2]=3050
113
XML to PDF by RenderX XEP XSL-FO Formatter, visit us at http://www.renderx.com/