1
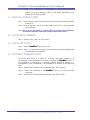
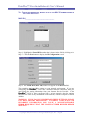
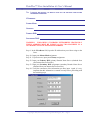
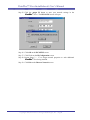
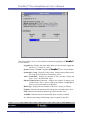
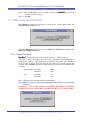
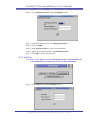
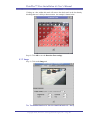
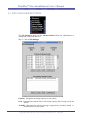
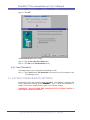
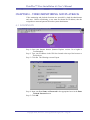
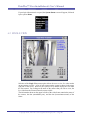
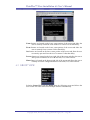
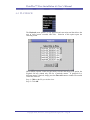
INSTALLATION & USER’S
MANUAL
VistaPlex™ is a Registered Trademark of Innovative Converged Technologies, Inc.
VistaPlex™ Dvrs Installation & User’s Manual
Table of Contents
Chapter 1 - Overview ....................................................................................................................................1
1.1 Package Contents ................................................................................................................................1
1.2 System Features...................................................................................................................................1
Chapter 2 - Installation ..................................................................................................................................3
2.1 Connect Cameras.................................................................................................................................3
2.2 Connect RJ45 Cable ............................................................................................................................3
2.3 Install Power Cord...............................................................................................................................4
2.4 Activate Cameras ................................................................................................................................4
2.5 Activate Dvrs.......................................................................................................................................4
2.6 Connect Workstation...........................................................................................................................4
Chapter 3 - Configuration..............................................................................................................................5
3.1 Network Settings .................................................................................................................................5
Chapter 4 - System Administration ...............................................................................................................9
4.1 General Settings ................................................................................................................................11
4.2 User Manager Settings ......................................................................................................................12
4.2.1 Change Passwords .................................................................................................................12
4.2.2 Add User................................................................................................................................13
4.2.3 Delete User ............................................................................................................................14
4.2.4 User Rights ............................................................................................................................14
4.3 Camera Settings.................................................................................................................................16
4.3.1 Detection................................................................................................................................17
4.3.2 Image .....................................................................................................................................19
4.3.3 Name......................................................................................................................................20
4.3.4 Recording Schedule...............................................................................................................21
4.4 File Manager Settings........................................................................................................................22
4.4.1 Move......................................................................................................................................23
4.4.2 Copy.......................................................................................................................................23
4.4.3 Delete.....................................................................................................................................23
4.4.4 Download...............................................................................................................................23
4.4.5 Cancel Download...................................................................................................................24
4.5 Saving Configuration Settings...........................................................................................................24
Chapter 5 - Shutdown / Rebooting System .................................................................................................25
Chapter 6 - Video Monitoring and Playback...............................................................................................27
6.1 Logging In .........................................................................................................................................27
6.2 Single View .......................................................................................................................................28
6.3 Group View .......................................................................................................................................29
6.4 Playback ............................................................................................................................................31
6.4.1 Download Clip.......................................................................................................................33
6.4.2 Player Program ......................................................................................................................35
6.4.3 Save Event Clip .....................................................................................................................39
Copyright 2002, Innovative Converged Technologies, Inc. – Page i
VistaPlex™ Dvrs Installation & User’s Manual
CHAPTER 1 - OVERVIEW
Congratulations on your purchase of a VistaPlex™ Digital Video Recorder / Server
(DVRS). This DVRS allows you to record real-time action at one location while
simultaneously allowing you to monitor the action from a different location (e.g.
home, office, motel room, etc.) via the Internet. VistaPlex™ DVRS uses a standard
Internet browser interface and features Local Viewing, Remote Viewing, and Remote
Configuration. Data transmissions via the Internet are encrypted and password
protected to prevent unauthorized access.
Before commencing installation and configuration of your VistaPlex™ DVRS you
should first verify that all of the components described in the “Package Contents” are
enclosed.
If you have an existing CCTV system, some components may need to be replaced or
upgraded. However, VistaPlex™
VistaPlex™ DVRS will work with most units.
1.1 PACKAGE CONTENTS
One (1) VistaPlex™ DVRS unit
One (1) VistaPlex™ DVRS Installation Manual
One (1) VistaPlex™ DVRS Utility Disk entitled “Discover Network Dialog”.
1.2 SYSTEM FEATURES
VistaPlex™ is a full featured DVRS that can be integrated into a properly configured
network environment.
It requires PAL or NTSC cameras.
For remote capabilities, a Cable Modem, DSL or other dedicated high-speed Internet
connection is recommended.
Copyright 2002, Innovative Converged Technologies, Inc. – Page 1
VistaPlex™ Dvrs Installation & User’s Manual
For remote viewing, any computer with Internet access and a standard browser.
Internet Explorer 5 (or above) is suitable.
VistaPlex™ DVRS includes features of a traditional video surveillance system, plus
additional features which make the DVRS much more powerful and user-friendly.
Those features include:
§
§
§
§
§
§
§
§
§
§
§
§
§
§
§
High quality digital video
Two user definable frame rates per camera
Real-time local and remote monitoring
User definable compression ratio
Single or group view monitoring layouts
Remote playback
Unlimited users viewing from remote locations
Automatic file management
Adjustable post motion detection recording
User definable capture rate
Triggered event browsing
Fast database searching
Scheduled recording times for each camera
Motion detection settings for each camera
Remote viewing of multiple cameras simultaneously
Copyright 2002, Innovative Converged Technologies, Inc. – Page 2
VistaPlex™ Dvrs Installation & User’s Manual
CHAPTER 2 - INSTALLATION
2.1 CONNECT CAMERAS
Step 1: Connect a camera cable to each camera.
Step 2: Connect the opposite end of each camera cable to a BNC Video Input
connector located on the back of the VistaPlex™ DVRS.
TIP: AS EACH CAMERA IS CONNECTED TO THE BNC VIDEO INPUT, IT WOULD BE
HELPFUL IN THE FUTURE IF YOU WOULD MAKE A WRITTEN NOTE
IDENTIFYING EACH CAMERA BY A SPECIFIC NAME (OR LOCATION) AND THE
CONNECTOR NUMBER (E.G. HALLWAY – CAMERA 1).
2.2 CONNECT RJ45 CABLE
Step 1: Insert the RJ45 cable into the NIC local connector on the back of the DVRS.
Step 2: Insert the opposite end of the RJ45 cable into the device that routes your
TCP packets over the Internet. This device may be a phone line, cable
Copyright 2002, Innovative Converged Technologies, Inc. – Page 3
VistaPlex™ Dvrs Installation & User’s Manual
modem, Local Area Network (LAN), or the bridge provided by your
Internet Service Provider (ISP).
2.3 INSTALL POWER CORD
Step 1: Insert the power cord securely into the power connector located on the back
of the DVRS.
Step 2: Plug the opposite end of the power cord securely into a surge protected
electrical outlet.
TIP: USE OF A BATTERY BACK UP SYSTEM (UPS) IS STRONGLY RECOMMENDED
TO INSURE CONTINUED OPERATION DURING POWER DISRUPTIONS.
2.4 ACTIVATE CAMERAS
Step 1: Turn the power “ON” for each camera.
2.5 ACTIVATE DVRS
Step 1: Turn the VistaPlex™ DVRS power “ON”.
Step 2: After 1 – 2 minutes have elapsed, you should hear two beeps indicating that
the installation was successful.
2.6 CONNECT WORKSTATION
You must have access to a Local PC or laptop (hereinafter referred to as
“workstation”) at the installation site in order to configure the VistaPlex™ DVRS. If
the workstation is connected to a network, proceed directly to Chapter 3 –
Configuration. If the workstation is not connected to a network, do the following
steps.
Step 1: Turn the power switch on the workstation to the “OFF” position.
Step 2: Connect the workstation to the VistaPlex™ DVRS via a cross-over cable
connection.
Step 3: Turn the power switch on the workstation to the “ON” position.
Copyright 2002, Innovative Converged Technologies, Inc. – Page 4
VistaPlex™ Dvrs Installation & User’s Manual
CHAPTER 3 - CONFIGURATION
The VistaPlex™ DVRS will automatically detect the operating interfaces such as
network type (e.g. Ethernet or Local PC), network speed (e.g. 10 MBPS or 100
Mbps), and camera type (e.g. NTSC or PAL). However, there are additional
configuration settings that must be made at the time of installation. This chapter
addresses each of those settings.
3.1 NETWORK SETTINGS
The most important aspect of setting up the VistaPlex™ DVRS for future easy access
is in the proper configuration of the network settings. The disk entitled “Discover
Network Dialog” contains an IP configuration utility which allows you to set the
TCP/IP properties for your network, including IP Address, Netmask, Gateway, and
DNS.
Step 1: Insert the “Discover Network Dialog” utility disk into the workstation’s
drive / tray.
Step 2: Click Start, then click Run and the following screen will appear.
Step 3: In the “Open” field, type the “drive:\ipconfig.exe” (Ex: c:\ipconfig.exe).
Step 4: Click OK. The Discover Network dialog screen will appear.
Step 5: Click the Discover button. The MAC ID of your network will be detected.
Copyright 2002, Innovative Converged Technologies, Inc. – Page 5
VistaPlex™ Dvrs Installation & User’s Manual
TIP: FOR FUTURE REFERENCE, MAKE A NOTE OF THE MAC ID NUMBER SHOWN IN
THE FOUND DVS FIELD.
MAC ID #________________________________
Step 6: Highlight the Found DVS number that is shown in the field by clicking on it.
Step 7: Click the Next button to display the IP Configuration screen.
Step 8: The Found DVS (MAC ID) number will appear in the DVS ID field.
The remaining settings will be unique to your network environment. If you are
configuring the VistaPlex™ DVRS into a dedicated Internet connection, then you
must obtain the setting information from your Internet Service Provider. If the
VistaPlex™ DVRS is being configured into a private network, then the settings
should be the same as any workstation on the network, with the exception of the IP
Address.
WARNING: IF YOU DO NOT UNDERSTAND THESE SETTINGS, PLEASE
GET HELP BEFORE PROCEEDING! ENTERING CONFLICTING OR
INCORRECT INFORMATION MAY CAUSE A NON-RECOVERABLE
ERROR REQUIRING THAT THE MANUFACTURER RENDER REPAIR
SERVICES.
Copyright 2002, Innovative Converged Technologies, Inc. – Page 6
VistaPlex™ Dvrs Installation & User’s Manual
TIP: IT WOULD BE HELPFUL TO MAKE A NOTE OF THE SETTINGS FOR FUTURE
REFERENCE PURPOSES.
IP ADDRESS:
SUBNET MASK:
GATEWAY:
PRIMARY DNS:
SECONDARY DNS:
WARNING: FOLLOWING STANDARD NETWORKING PROTOCOLS,
THE IP ADDRESS MUST BE UNIQUE AS NO TWO MACHINES IN A
NETWORK CAN HAVE THE SAME IP ADDRESS.
Step 9: In the IP Address field, input the IP Address that you wish to assign to the
DVRS.
Step 10: Input your Subnet Mask assignment.
Step 11: If you have one, input your Gateway assignment.
Step 12: Input your Primary DNS (primary Domain Name Server (obtained from
your Internet Service Provider).
Step 13: Input your Secondary DNS assignment (secondary Domain Name Server
(obtained from your Internet Service Provider).
Step 14: Verify the correctness of the information you have input. Again, it is very
important that this information is entered correctly before proceeding with
the remaining steps.
Copyright 2002, Innovative Converged Technologies, Inc. – Page 7
VistaPlex™ Dvrs Installation & User’s Manual
Step 15: Click the Assign IP button to store your network settings in the
VistaPlex™ DVRS. The IPCONFIG screen will open.
Step 16: Click OK on the IPCONFIG screen.
Step 17: Click Finish on the IP Configuration screen.
Step 18: Repeat Steps 3 – 17 to assign network properties to each additional
VistaPlex™ DVRS being installed.
Step 19: Click Exit on the Discover Network screen.
Copyright 2002, Innovative Converged Technologies, Inc. – Page 8
VistaPlex™ Dvrs Installation & User’s Manual
CHAPTER 4 - SYSTEM ADMINISTRATION
Step 1: Open your Internet browser (Internet Explorer version 5.0, or higher) is
recommended.
Step 2: Input the IP Address that you assigned in Chapter 3.1 into the URL Address
box located at the top of the browser.
Step 3: Click Go, or press the Enter key.
Step 4: Input the following default administrator information:
Username:
Password:
admin
2222
Step 5: Click OK. You should then see the System Status screen.
Copyright 2002, Innovative Converged Technologies, Inc. – Page 9
VistaPlex™ Dvrs Installation & User’s Manual
The System Status screen reveals pertinent information regarding your VistaPlex™
VistaPlex™
DVRS as follows:
Logged in as: Displays the status under which you are currently logged into
the DVRS (i.e. “admin” or “user”).
System Firmware Version: Displays the VistaPlex™ DVRS version number.
System has been up: Displays (in days, hours, minutes and seconds) exactly
how long the DVRS has been consecutively active.
Active Connections: Displays the number of users currently viewing the
DVRS’ “Live” and “Recorded” video.
Physical Camera Port Connected: Displays the number of camera ports
available on the DVRS. Active camera port numbers are highlighted.
Inactive camera port numbers are dimmed.
Disk Usage: Displays the current status of the DVRS’ storage, as follows:
Capacity: Indicates the maximum disk storage space available on the DVRS.
Used: Indicates the amount of disk storage space currently in use.
Available: Indicates amount of unused disk space currently available.
%: Indicates percentage of disk storage space occupied by data files.
Copyright 2002, Innovative Converged Technologies, Inc. – Page 10
VistaPlex™ Dvrs Installation & User’s Manual
The Menu Bar is located on the title bar at the top of the Internet Explorer window.
It contains a drop-down list for Users and the Administrator.
The options listed on the left side of the Menu / Advanced drop-down list are
available to both Users and the Administrator.
The options listed on the right side of the Menu / Advanced drop-down list are
visible only when someone is logged in as “admin”. Those options are disabled
when someone is logged in as “user”.
4.1 GENERAL SETTINGS
General Settings are accessed by selecting the sixth option under the Advanced
drop-down list.
This screen allows you to do the following::
Select video standard: Allows you to configure your video settings as
either:
NTSC (National Television System Committee) – the format used in the
United States; or
PAL (Phase Alternating Line) – the format used in European countries.
VGA Output: Allows you to view the cameras on a “Local” VGA Monitor.
WARNING: THE VIDEO STANDARD SELECTED AT THIS POINT WILL
BE IN EFFECT THE NEXT TIME THE SYSTEM IS “REBOOTED”.
Step 1: Select the Video Standard appropriate for your cameras.
Copyright 2002, Innovative Converged Technologies, Inc. – Page 11
VistaPlex™ Dvrs Installation & User’s Manual
Step 2: Select Local View only if you want to allow your VistaPlex™ DVRS to be
utilized for local viewing.
Step 3: Click OK.
4.2 USER MANAGER SETTINGS
User Manager settings are accessed by selecting the second option under the
Advanced drop-down menu list.
The User Manager screen allows you to Add User, Delete User, assign User
Rights and Change Passwords.
4.2.1 Change Passwords
VistaPlex™ DVRS allows two levels of password access – “admin” and “user”.
The “admin” level is the highest level of security and enables the administrator to
configure the settings, assign passwords, and perform all general user functions.
Users are able to access the DVRS only for the purposes of viewing current and
recorded video. Default passwords existing in the DVRS at the time of installation are
as follows:
Administrator: Username
Password
=
=
admin
2222
User:
=
=
user
1111
Username
Password
Step 1: Determine a new password for the administrator.
TIP: MAKE A NOTE OF THE NEW PASSWORD AND STORE IT IN A SECURE
LOCATION.
WARNING: ONCE THE ADMIN PASSWORD HAS BEEN CHANGED,
THERE IS NO WAY TO RETRIEVE OR RECOVER IT AT A LATER TIME.
Copyright 2002, Innovative Converged Technologies, Inc. – Page 12
VistaPlex™ Dvrs Installation & User’s Manual
Step 2: Click Change Passwords on the User Manager screen.
Step 3: Click the drop-down box beside Change password for.
Step 4: Click on admin.
Step 5: In the New Password box, type your new password.
Step 6: Retype the new password in the Confirm Password box.
Step 7: Click OK to save the new password.
4.2.2 Add User
TIP: A LIST OF ALL USER’S, AND THE PASSWORD FOR EACH, SHOULD BE KEPT BY
THE ADMINISTRATOR IN A SECURE PLACE FOR FUTURE REFERENCE.
Step 1: Click Add User on the User Manager screen.
Copyright 2002, Innovative Converged Technologies, Inc. – Page 13
VistaPlex™ Dvrs Installation & User’s Manual
Step 2: Type the new user’s name into the User Name box.
Step 3: Type the new user’s password in the New Password box.
Step 4: Retype the new user’s password in the Confirm Password box.
Step 5: Click OK to add the new user.
Step 6: Repeat Steps 1 – 5 for each new user. A maximum of 256 users are allowed.
4.2.3 Delete User
Step 1: Click Del User on the User Manager screen.
Step 2: Select the User’s Name from the drop-down list.
Step 3: Click OK to delete the selected user.
4.2.4 User Rights
Step 1: Click User Rights on the User Manager screen.
Copyright 2002, Innovative Converged Technologies, Inc. – Page 14
VistaPlex™ Dvrs Installation & User’s Manual
Step 2: Select User’s name from the drop-down list on the User Rights screen. The
User Rights for “user” will then open.
The Camera Permissions section of the User Rights for “user (i.e., name of user)”
allows the administrator to set the rules, by camera, for the user. Definitions for each
option are as follows:
View: Allows the user to view the images currently being viewed by the
camera.
Playback: Allows the user to playback images previously captured by the
camera.
Copyright 2002, Innovative Converged Technologies, Inc. – Page 15
VistaPlex™ Dvrs Installation & User’s Manual
Config: Allows the user to configure the settings for the camera.
PTZ: Allows the user to reposition the angle of the camera via the Pan-TiltZoom features of the camera.
By clicking on the box adjacent to the option, you can put a check mark in the box, or
remove a check mark from the box. A check mark in the box indicates that the user
has access rights to that feature.
Step 3: For each camera, put a check mark beside each option that you want the user
to have rights to access.
The System Permissions section allows the administrator to set the rules governing
each user’s access to the system settings. Definitions for each option are as follows:
File Manager: Allows user to copy and delete files.
Network Settings: Allows user to change network settings.
Time/Date Settings: Allows user to reset time and date settings.
General Settings: Allows user to change camera types etc.
Shutdown/Reboot: Allows user to shutdown or reboot the system.
By clicking on the box adjacent to the option, you can put a check mark in the box, or
remove a check mark from the box. A check mark in the box indicates that the user
has access rights to that feature.
Step 4: For each System Permission that you wish to grant to the user, put a check
mark in the appropriate box.
Step 5: Click OK to accept the designated User Rights.
Step 6: Repeat Steps 1 – 5 for each user.
4.3 CAMERA SETTINGS
The Camera Settings option on the Advanced Menu allows the system
administrator to set the properties of each camera. The camera property settings
affect the video image reflected on the screen, and the text displayed above the video
image.
Step 1: Click on Camera Settings in the Advanced Menu. The following Camera
Settings screen will open.
Copyright 2002, Innovative Converged Technologies, Inc. – Page 16
VistaPlex™ Dvrs Installation & User’s Manual
Step 2: Select the desired camera from the Select Camera drop-down list.
Step 3: Click OK. The following Camera Settings: “[camera name]” screen will
open.
4.3.1 Detection
The Detection tab allows the system administrator to set the appropriate values for
each of the camera setting parameters.
Step 1: Click on the Detection tab located on the Camera Settings: “[camera
name]” screen.
Step 2: Noise Threshold: All cameras generate internal noise that is not detectable
by the human ear or eye. The VistaPlex™ DVRS does detect the internal
noise and may consider it to be motion. Such camera noise detection may
cause “false triggers” which can result in non-events being recorded by the
camera. This setting compensates for the internal noise generated by a
Copyright 2002, Innovative Converged Technologies, Inc. – Page 17
VistaPlex™ Dvrs Installation & User’s Manual
camera. The lower this setting, the less compensation for noise and a
higher risk of a “false trigger” when no motion is occurring. Default value
for this setting is 70. Input the desired value for this setting.
TIP: A CONSTANT RECORDING STATE CAN BE PRODUCED BY SETTING THIS VALUE
TO “0”.
Step 3: Sensitivity: This parameter establishes how sensitive the camera will be to
motion. The higher the setting, the more sensitive the camera will be. Set
this value as high as possible while avoiding a “false trigger” when no
motion is occurring. Default value is 70. Input the desired value for this
setting.
Step 4: Pre FPS: This parameter establishes the number of Frames Per Second
(FPS) that is displayed prior to motion being detected. The smaller the
number, the more system resources are available for motion detection and
capture. Input the desired value for this setting.
Step 5: Post FPS:
This parameter establishes Frames Per Second (FPS) the
VistaPlex™ DVRS will capture video when motion is detected. For non-
critical areas, such as parking areas, a setting of 4 or 5 is usually ample.
Experiment with this setting to determine the smallest acceptable number.
Input the desired value for this setting.
Step 6: Post Rec Frames: This parameter establishes how many frames will be
recorded after detected motion has stopped. Hard disk usage must be
considered when defining this value; therefore, you should enter as small
of a number as possible. Available options are from 1 to 999. Default
value is 1. Input the desired value for this setting.
Step 7: Detection Zones: When this option is clicked, a new screen will open
revealing one frame.
Copyright 2002, Innovative Converged Technologies, Inc. – Page 18
VistaPlex™ Dvrs Installation & User’s Manual
Clicking on a box within this mask will remove the check mark in the box thereby
disabling that area’s ability to detect motion. An example is shown below:
Step 8: Click OK to save the Detection Zone settings.
4.3.2 Image
Step 1: Click on the Image tab.
TIP: THE RANGE FOR EACH OF THE FOLLOWING FIELDS IS 0% - 100%)
Copyright 2002, Innovative Converged Technologies, Inc. – Page 19
VistaPlex™ Dvrs Installation & User’s Manual
Step 2: Image Quality: This parameter sets the amount of compression of the
stored JPEG images. The higher the setting, the better the image quality.
Default value is 50%. Input the desired value.
Step 3: Brightness: This parameter establishes the brightness of the image. The
higher the setting, the brighter the image. Default value is 50%. Input the
desired value.
Step 4: Contrast: This parameter establishes the contrast of the image. The higher
the value, the more definition between the light and dark areas of the
image. Default value is 50%. Input the desired value.
Step 5: Color: This parameter establishes the amount of color in the image. The
higher the value, the more intense the color. Default value is 50%. Input
the desired value.
Step 6: Hue: This parameter establishes the hue of the image. Hue is what is
usually defined as the color of an object. The hue of the sky is blue, the
hue of a banana is yellow, and the hue of an apple is red. Default value is
50%. Input the desired value.
Step 7: Click OK to save the new settings.
4.3.3 Name
Step 1: On the Camera Settings screen, click the Name tab.
TIP: EACH CAMERA MUST HAVE A UNIQUE NAME.
Step 2: Input a name for the camera that you can easily recognize in the future.
Step 3: Click OK to save your settings.
Copyright 2002, Innovative Converged Technologies, Inc. – Page 20
VistaPlex™ Dvrs Installation & User’s Manual
4.3.4 Recording Schedule
Step 1: On the Camera Settings screen, click the Rec. Schedule tab.
Step 2: Store video for: Establishes the number of days that the images will be
recorded and stored in the primary storage folder. For example, if the
number of days specified is 15, the system will keep 15 completed days of
recorded video, plus the current incomplete day. On the 17th day, the data
file for day 1 will be deleted, still leaving you with 15 days of recordings,
puss the current incomplete day. Input the number of days that you want
to store in the primary storage folder.
Step 3: Record on days: Allows you to designate the day of the week and times
during that day that images are to be recorded and stored in the primary
storage folder. The times are based on military time. Input the hours for
each day of the week that you want to record and store video.
TIP: IF THE DESIGNATED START TIME IS EARLIER THAN THE END TIME, THE
FRAMES WILL RECORD WHEN MOTION IS DETECTED BETWEEN THOSE TIMES.
IF THE DESIGNATED START TIME IS LATER THAN THE END TIME, THE
FRAMES WILL RECORD WHEN MOTION IS DETECTED BETWEEN THOSE TIMES,
THEN RECORD FROM THE START TIME TO THE END OF THE DAY.
Step 4: Click OK to save the new settings.
Copyright 2002, Innovative Converged Technologies, Inc. – Page 21
VistaPlex™ Dvrs Installation & User’s Manual
4.4 FILE MANAGER SETTINGS
The File Manager option in the Advanced Menu allows the administrator to
manage and view stored data files.
Step 1: Click on File Manager.
Capacity: Designates the storage capacity of your system.
Used: Designates the amount of the of the storage capacity that is being used by the
system.
Available: Designates the amount of storage capacity that is currently unused, i.e.
available for use, by the system.
Copyright 2002, Innovative Converged Technologies, Inc. – Page 22
VistaPlex™ Dvrs Installation & User’s Manual
Primary Storage Folder: Contains the recorded files for each Camera
Name and the date of the recording in the form of Year, Month and
Day, as designated by the administrator in the Camera Settings
section. The files are automatically deleted upon expiration of the
number of days set in the Recording Schedule section, unless
manually moved to the Secondary Storage Folder.
Secondary Storage Folder: Allocated for permanent storage of recorded
files. Files stored in this folder will remain there until manually
deleted by the administrator.
4.4.1 Move
This feature allows the administrator to move a stored file to a different folder.
Step 1: Click on the desired file name to select it.
Step 2: Click the Move button located directly under the storage folder in which the
file is originally located.
Step 3: The file is automatically moved to the other folder.
4.4.2 Copy
This feature allows the administrator to maintain a duplicate copy of a file in both
folders.
Step 1: Click on the desired file name to select it.
Step 2: Click the Copy button located directly under the storage folder in which the
file is originally located.
Step 3: The file is automatically copied into the other folder.
4.4.3 Delete
This feature allows the administrator to permanently delete a file from a folder.
Step 1: Click on the desired file name to select it.
Step 2: Click the Del button.
Step 3: The file is now permanently deleted from the storage folder.
4.4.4 Download
This feature allows the administrator to download a file to a remote location.
Step 1: Click on the desired file name to select it.
Step 2: Click the Download button.
Step 3: Click the file name on the System Message screen.
Copyright 2002, Innovative Converged Technologies, Inc. – Page 23
VistaPlex™ Dvrs Installation & User’s Manual
Step 4: Click OK.
The File Download screen will open.
Step 5: Click the Save this file to disk button.
Step 6: Click OK on the File Download screen.
4.4.5 Cancel Download
This feature allows you to cancel the downloading of a file.
Step 1: Click Cancel on the File Download screen and you will be returned to the
File Manager screen
4.5 SAVING CONFIGURATION SETTINGS
Performance of all steps contained above in Chapter 3 and Chapter 4 completes the
initial configuration settings for the VistaPlex™ DVRS. Follow the instructions in
Chapter 5 to reboot or shut down the system to save the new settings.
WARNING!!! DO NOT PUSH THE POWER SWITCH WITHOUT DOING A
PROPER SYSTEM SHUTDOWN.
Copyright 2002, Innovative Converged Technologies, Inc. – Page 24
VistaPlex™ Dvrs Installation & User’s Manual
CHAPTER 5 - SHUTDOWN / REBOOTING SYSTEM
The VistaPlex™ DVRS must be shutdown properly. It cannot be shutdown by hitting
the power switch as doing so will result in data loss and corruption of the storage
drive. The system must be rebooted or shutdown via the Shut Down option in the
Advanced Menu.
Step 1: Select the Shutdown option on the Advanced Menu. The following screen
will appear.
Step 2: Click either the Shut Down or Reboot option.
Step 3: Click OK. The following two screens will appear.
Copyright 2002, Innovative Converged Technologies, Inc. – Page 25
VistaPlex™ Dvrs Installation & User’s Manual
Step 4: After hearing the beeps referred to in the System Message screen, you may
push the “power” switch if you are shutting down the system.
WARNING: IF YOU HEAR 1 SHORT BEEP, FOLLOWED BY A LONG
BEEP AND ANOTHER SHORT BEEP, THIS IS AN ADVISORY THAT THE
SYSTEM WAS SHUT DOWN IMPROPERLY AND IS NOW
REFORMATTING ITSELF FOR PROPER OPERATIONS. YOU WILL
THEN NEED TO VERIFY THAT ALL OF YOUR CONFIGURAITON
SETTINGS ARE CORRECT AND, IF NOT, RECONFIGURE THEM AS
NEEDED.
Copyright 2002, Innovative Converged Technologies, Inc. – Page 26
VistaPlex™ Dvrs Installation & User’s Manual
CHAPTER 6 - VIDEO MONITORING AND PLAYBACK
Video monitoring and playback functions are accessible by both the administrator
and users. Before commencing, a user must first obtain the IP address, then his
assigned user name and password from the system administrator.
6.1 LOGGING IN
Step 1: Open your Internet browser (Internet Explorer version 5.0 or higher is
recommended).
Step 2: Type your IP Address in the URL box located at the top of the browser as
shown above.
Step 3: Click Go. The following screen will open.
Step 4: Input your User Name and Password in the appropriate boxes in the Enter
Network Password screen.
Step 5: Click OK.
Copyright 2002, Innovative Converged Technologies, Inc. – Page 27
VistaPlex™ Dvrs Installation & User’s Manual
If your login information is accepted, the System Status screen will appear, followed
by the system Menu.
6.2 SINGLE VIEW
Selection of the Single View menu option allows the user to view live video action
on one camera at a time. A list of each camera on the system is shown in the upper
right side of the screen. However, the system will by default display the view from
the first camera. By clicking on the name of the camera that you wish to view, the
live video from the selected camera becomes visible.
The information shown on the upper left side of the video frame contains the name of
the camera, the date (month-date-year), and the time (hour:minute:second) of the
frame.
Copyright 2002, Innovative Converged Technologies, Inc. – Page 28
VistaPlex™ Dvrs Installation & User’s Manual
Zoom features are located on the lower center portion of the screen and allow the
user to remotely control the zoom feature of a camera if it has that ability.
Focus features are located on the lower center portion of the screen and allow the
user to remotely focus a camera if it has that ability.
Iris features are located on the lower center portion of the screen and allow the user
to remotely open and close the iris of a camera if it has that ability.
Presets features are located on the lower right side of the screen and allow the user to
enter preset coordinates for use with most Pan, Tilt, Zoom cameras.
Menu feature is located on the bottom right side of the screen and allows the user to
remotely access the configuration menu of most Pan, Tilt, Zoom cameras.
6.3 GROUP VIEW
Selecting Group View from the Menu opens the following screen and allows the
user to view live video frames from multiple cameras simultaneously.
Copyright 2002, Innovative Converged Technologies, Inc. – Page 29
VistaPlex™ Dvrs Installation & User’s Manual
To Select Cameras to include in your Group View:
Step 1: Click on the check box located to the left of the camera name. Repeat this
action for each camera to be viewed simultaneously.
Step 2: Click OK.
The following screen will open to display live video frames from each camera
selected.
To focus your attention on a particular camera image, simply Click on that image
window and the screen will automatically change to a single view of that image.
Click once more on the image to see an enlarged view of the same image.
To return to the Group View, click the Back button on your browser’s toolbar two
(2) times.
Copyright 2002, Innovative Converged Technologies, Inc. – Page 30
VistaPlex™ Dvrs Installation & User’s Manual
6.4 PLAYBACK
The Playback menu option is a very powerful and convenient tool that allows the
user to easily browse recorded video files. Selection of this option opens the
following screen.
When initially opened, if video was previously viewed in the Single View option, the
Playback list may contain only files for a particular camera. If playback for a
different camera is desired, simply press the Show All button to include all recorded
video files in the list.
Step 1: Click on the file you wish to view.
Step 2: Click OK.
Copyright 2002, Innovative Converged Technologies, Inc. – Page 31
VistaPlex™ Dvrs Installation & User’s Manual
The following screen will open.
Listed below is a description of each available option on the Playback screen.
Filename: displays the name of the file currently opened for playback. Clicking on
the actual filename will also allow you to download the entire file.
Open File: clicking on this button will allow you to select a different file for
playback.
Event List: contains a list of recorded events (indexed by hour) and the number of
video frames captured during that hour. There are 24 event entries contained
in the list (one for each hour of the day). If “0” is indicated as the number of
video frames captured, that means no motion occurred during the designated
hour. To view the frames captured during a specific hour, double click on
the specific even shown in the list.
Start Time/End Time: allows the user to manually enter specific time periods for
events which you wish to playback. The time is entered in military time (i.e.,
00:00:01 equals 12:00:01 A.M. and 23:59:59 equals 11:59:59 P.M.).
Download Clip: clicking on this feature will allow the user to download the segment
of the file that was recorded during the times designated in the Start Time /
End Time.
Loop: if this option is selected, when the video has reached the end of an event, the
system will automatically rewind (loop) the file to the beginning of the event
and resume playback.
Play: commences playback of the recorded images.
Stop: ceases playback of the recorded images.
Copyright 2002, Innovative Converged Technologies, Inc. – Page 32
VistaPlex™ Dvrs Installation & User’s Manual
Pause: stops playback of the recorded images for a brief period. Playback is
reactivated by clicking on the Pause button a second time.
Playback Rate: indicates the speed at which the playback will be conducted. Adjust
the Playback Rate by sliding the “speed indicator bar”. The default speed is
100%. Moving the bar to the left decreases the playback speed. Moving the
bar to the right increases the playback speed.
Fast Forward: allows for fast forwarding thru captured video and also allows you to
optimize the playback for your network/internet connection. When a critical
event is detected, press the Pause button and note the time in the frame. To
view the image in more detail, enter the Start Time then reset Fast Forward
to 1x.
WARNING!!! WE DO NOT RECOMMEND SETTING THIS OPTION TO
ANYTHING OTHER THAN 1X WHEN REVIEWING FILES THAT
CONTAINS IMPORTANT EVIDENCE AS THE SYSTEM WILL SKIP
VIDEO FRAMES IN ORDER TO COMPENSATE FOR SLOW INTERNET
CONNECTIONS.
TIP: FOR DETAILED REVIEW OF IMAGES, DOWLOAD THE CLIP AND REVIEW IT VIA
THE VISTAPLEX™ STAND-ALONE PLAYER.
6.4.1 Download Clip
If it is determined that there is a need to download a portion of the video for further
review or later use, do the following:
Step 1: Make sure that the Start Time and End Time on the Playback screen
includes the time of the event you wish to download.
Step 2: Click on the Download Clip option. The File Download screen will open.
Copyright 2002, Innovative Converged Technologies, Inc. – Page 33
VistaPlex™ Dvrs Installation & User’s Manual
Step 3: Click the Save this file to disk option.
Step 4: When the Save As screen opens, select a directory in which to store the file.
Step 5: Enter a Filename for the downloaded file.
Step 6: Click the Save button.
Copyright 2002, Innovative Converged Technologies, Inc. – Page 34
VistaPlex™ Dvrs Installation & User’s Manual
The following screen will be open during the download process.
After the download is completed, the file will be located on the local machine hard
drive and can be viewed whenever desired.
6.4.2 Player Program
The only program that has the ability to view or play downloaded clips is the
application file entitled “Player.exe” which is included on your VistaPlex™ DVRS
Utility Disk. The Player.exe file should be copied to a directory on the local machine
and will run in the same manner as any Windows program.
TIP: FOR EASY ACCESS, A SHORTCUT ICON FOR THE PLAYER.EXE APPLICATION
SHOULD BE PLACED ON YOUR DESKTOP.
Step 1: Open (Run) the Player.exe application and the following screen will open.
Copyright 2002, Innovative Converged Technologies, Inc. – Page 35
VistaPlex™ Dvrs Installation & User’s Manual
Step 2: Select File, and then select Open from the Menu.
Step 3: When the following dialog box appears, select the directory and filename for
the downloaded file.
Step 4: Click Open.
Copyright 2002, Innovative Converged Technologies, Inc. – Page 36
VistaPlex™ Dvrs Installation & User’s Manual
The filename you selected will now be in the filename area of the player screen.
Step 5: Click the Build Event List button to the right of the filename.
The message “Building Event List” will appear in the Event List window. When the
process is complete, a chronological list of available video will appear in the window.
If there is no available video for a time segment, “0 frames” will appear next to that
hour. A number (other than “0”) appearing prior to “frames” indicates the number of
images (frames) that are included in the video event.
Copyright 2002, Innovative Converged Technologies, Inc. – Page 37
VistaPlex™ Dvrs Installation & User’s Manual
Step 6: To view the video, double click on the Hour shown in the Event List. The
Start and End times will be automatically displayed in the Time Search
fields. The Time Search Start and End times can also be entered
manually if desired.
Step 7: Once the desired times are shown in the Time Search fields, click the
Search button.
When the frames are found for the designated times, the following dialog Message
screen will appear.
Step 8: Click OK. The file can now be played for review.
The following control buttons will assist in ease of viewing the video:
Start: will return to the beginning of the video clip.
<Step: will reverse 1 frame backward.
<Play: will play the video in reverse.
Copyright 2002, Innovative Converged Technologies, Inc. – Page 38
VistaPlex™ Dvrs Installation & User’s Manual
Stop: will halt the playing of the video.
Play>: will play the video forward.
Step>: will advance the video 1 frame.
Progress: a slider that indicates the viewed frame relative to the start and
end of the clip. Click and hold the slider to move through the clip.
Speed: a slider that controls the speed of the playback.
6.4.3 Save Event Clip
Step 1: When the player window displays the first image of the desired clip event
sequence, click the Set Start button located on the left side of the video
clip.
Step 2: Play the clip event until the last desired image is displayed in the player
window and then click the Set End button.
Step 3: Click the Save Clip button. The Save dialog screen will appear.
Step 4: Enter the directory, desired filename, and then save the clip.
TIP: IF THE CLIP IS TO BE PROVIDED TO A THIRD-PARTY FOR REVIEW, YOU MUST
ALSO PROVIDE A COPY OF THE PLAYER.EXE FILE TO THE THIRD-PARTY AS
THE PLAYER.EXE FILE IS THE ONLY VIEWER THAT WILL OPEN THE FILE.
Copyright 2002, Innovative Converged Technologies, Inc. – Page 39