1
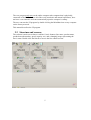
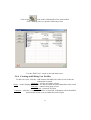
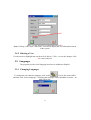
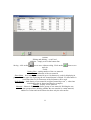
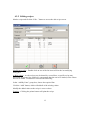
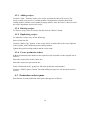
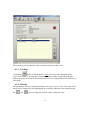
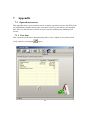
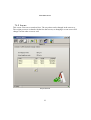
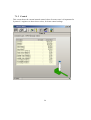
MinuMan II
Blenders and Line Control Management Software
USER MANUAL
MANUAL NUMBER: MINUMAN V1
March 2009
Sysmetric claims proprietary rights to the material contained herein. It shall
not be reproduced, disclosed, or used for manufacturing purposes without the
express written permission of Sysmetric ltd.
Copyright 2003,2004
Sysmetric ltd.
P.O.B. 1055 Afula 18550
Israel
Tel 972-4-6405857
Fax: 972-4-6405911
www.sysmetric-ltd.com [email protected]
1
INTRODUCTION.............................................................................................. 4
1.1
MAIN FEATURES ............................................................................................ 4
1.2 HOW TO USE THIS MANUAL ....................................................................... 4
2
GETTING STARTED ....................................................................................... 4
2.1 CONFIGURATION ........................................................................................... 4
2.2 STRUCTURE AND SCREENS ........................................................................ 5
2.3 LINE SCREENS ................................................................................................ 6
2.4 AUTHORIZATION ........................................................................................... 7
2.4.1 LOGIN
7
2.4.2 LOGOUT
7
2.4.3 USER PROFILE DEFINITION ................................................................ 7
2.4.4 CREATING AND EDITING USER PROFILES ...................................... 8
2.4.5 DELETING A USER ................................................................................. 9
2.5 LANGUAGES.................................................................................................... 9
2.5.1 CHANGING LANGUAGES ..................................................................... 9
3
CHANGING SET-POINTS ............................................................................ 10
3.1 CHANGING SET-POINTS DIRECTLY ........................................................ 10
3.2 LOADING PRODUCTION ORDER ............................................................ 10
4
CREATING AND HANDLING PRODUCTION ORDERS ....................... 10
4.1 RAW MATERIALS ......................................................................................... 10
4.2 RECIPE MANAGEMENT .............................................................................. 12
4.2.1 SORTING
12
4.2.2 EDITING RECIPES ................................................................................ 13
4.2.3 ADDING RECIPES ................................................................................. 14
4.2.4 DELETING RECIPES ............................................................................. 14
4.2.5 DUPLICATING RECIPES...................................................................... 14
4.2.6 CREATE PRODUCTION ORDERS ...................................................... 14
4.3 PRODUCTION ORDERS QUEUE ................................................................. 14
4.3.1 LOADING
15
4.3.2 PRIORITY
15
4.3.3 EDITING AN ORDER’S RECIPE .......................................................... 16
4.3.4 MOVING PRODUCTION ORDERS BETWEEN MACHINES............ 16
4.3.5 DELETING PRODUCTION ORDERS .................................................. 16
4.4 ERP COMMUNICATION ............................................................................... 16
4.4.1 IMPORT PRODUCTION ORDERS ....................................................... 16
4.4.2 EXPORT PRODUCTION ORDERS ...................................................... 17
5
DATABASE ...................................................................................................... 17
2
6
REPORTS ......................................................................................................... 17
6.1 CONSUMPTION REPORTS........................................................................... 17
6.2 MATERIAL CONSUMPTION REPORT ....................................................... 17
6.2.1 DATABASE UPDATE ACTION ........................................................... 17
6.2.2 CONSUMPTION REPORT BY PRODUCTION ORDER .................... 18
6.2.3 CONSUMPTION REPORT BY PRODUCT .......................................... 19
6.2.4 CONSUMPTION REPORT BY TIME ................................................... 20
6.3 DOSING TRACE REPORT ............................................................................ 21
7
APPENDIX ....................................................................................................... 22
7.1 OPERATION SCREENS ................................................................................. 22
7.1.1 LINE DATA 22
7.1.2 LAYERS
23
7.1.3 CONTROL
24
7.1.4 DOSING
25
7.2 REPORTS 26
MATERIAL CONSUMPTION BY PRODUCTION ORDER ............... 26
MATERIAL CONSUMPTION BY PRODUCT ..................................... 27
MATERIAL CONSUMPTION BY TIME PERIOD, GROUPED BY
MATERIALS
28
7.2.4 MATERIAL CONSUMPTION BY TIME PERIOD, GROUPED BY
LINES 29
7.2.5 RAW CONSUMPTION REPORT BY TIME PERIOD ......................... 30
7.2.6 RAW CONSUMPTION REPORT BY TIME PERIOD, GROUPED
BY LINES
31
7.2.7 DOSING TRACE REPORT .................................................................... 32
7.2.8 PRODUCTION ORDERS QUEUE REPORT ........................................ 33
7.2.1
7.2.2
7.2.3
3
1
Introduction
The Minuman software system is designed to manage and control Sysmetric’s
gravimetric blenders and screw control systems. This manual describes Minuman,
software version 2.01
1.1 Main Features
View line status and change set-points.
Recipe management – saving and subsequent loading of recipes according to Production
Orders.
Flexible material consumption reports based on acquired data.
Control several lines from one computer.
The program and all of its features can be run from each computer in the factory network.
Modular system enabling the easy addition of lines.
1.2 How to use this manual
Section 2, Getting Started, shows how to start the program and initial orientation. Read
the section in order to become familiar with the terms used throughout the manual.
Section 3, Changing Set-points - shows how to control the line’s features (change setpoints).
Section 4, Create and Handle production orders - explanation of recipes and production
orders.
Section 5, Database – explanation of database.
Section 6, Reports - shows how to produce reports.
Section 7, Appendix – examples of various screens and reports that may vary between
different installations.
2
Getting Started
This section shows how to start the program and how to find your way around.
2.1 Configuration
The program can run simultaneously on a number of computers on the factory network
and therefore consists of a core program and a UI (User Interface) program.
4
The core program only runs on the online computer (the computer that is physically
connected to the PLCs), it does all of the work (automatic and manual operations), does
not have a user interface and runs automatically upon the computer’s startup.
The user can start the UI program by double clicking the MinuMan icon on any computer
on the factory network.
This manual describes the UI program.
2.2 Structure and screens
The software's main screen shows each line’s basic features (line name, product name,
production order number, speed, capacity etc.) and a changing image representing the
line’s status. Double click the line tab to access the line control screens.
Main screen
5
2.3 Line Screens
After double clicking on the specific line tab in the Main Screen the Line Screen appears:
The actual contents of the screens are described in the appendix, since the screens vary
between different installations.
button.
Return to the main screen by clicking the
6
2.4 Authorization
The MinuMan program allows user controlled access to specific tables and actions,
defining which actions each user can perform. Each operation can only be activated by an
authorized operator.
Each network computer is set up with a default authorization level.
2.4.1 Login
Click on the
icon in the main toolbar. The following login dialog box appears:
Enter user name and password and click √. If the user is not recognized by the system an
error message will appear.
Login should be performed when an operation requires a higher level of authorization
than the computer station’s default level. The system will now grant access in accordance
with the user name.
2.4.2 Logout
To logout click the
icon on the main toolbar:
Logging out will reset authorization to the default level.
Remember: If you login as a user with a higher authorization level in order to perform a
specific task, it is important to logout at the end of the task to prevent unauthorised
activities.
Note: Automatic logout will occur after 30 minutes of inactivity.
2.4.3 User Profile Definition
The system administrator defines new users and their access privilege levels.
Access privileges levels are set by group. Groups are created for users who require
similar access to a resource. Each user is then assigned to a group by his or her user type.
7
Click on the
icon on the left hand side of the main toolbar.
Click "Manage users" to open the following screen:
Use the “Edit Users” screen to edit and delete users.
2.4.4 Creating and Editing User Profiles
To add a new user, click the "Add" button (left hand side of the screen). Enter the
information required:
Nickname – used as user name at login
Name – used to display current user, it is shown on the lower left hand side of the screen
User type – authorization group of user
Password – password for login
Computer - when the "Computer" checkbox is ticked the workstation will be identified
automatically by the system without the need to login
8
Click √ to save and exit, to cancel and exit click X.
Note: Clicking "edit" in the “Edit Users” screen will display the user information stored
in the system.
2.4.5 Deleting a User
Use the mouse to highlight the user then click "delete". Click √ to save the changes, click
X to cancel and exit.
2.5 Languages
The program provides local language interfaces in addition to English.
2.5.1 Changing Languages
To change the user interface language, click on the
icon on the main toolbar
and then click “Select Language”. Changing the language causes MinuMan to restart – no
data will be lost.
9
3
Changing set-points
Most of the line’s features have set-points and actual values. A set-point value can be
changed, the actual value is displayed as it is read.
Some set-points do not affect the control system, but are merely there for documentation
purpose, such as distance between drippers (in drip lines), production order ID, name of
material etc.
Set-points can be changed directly or by loading a recipe (loading a production order).
3.1 Changing set-points directly
Changing set-points directly is used for making minor and local modifications to the
process.
To directly change set-point:
Mark the value for modification.
Click the
button or double click the value. An appropriate modifying dialog box for
this value will appear.
3.2 Loading production order
Another way to change the set-points is to load the next production order as explained in
“Production order queue” section.
4
Creating and Handling Production Orders
Each product has its own recipe containing the dosing and control values (control values,
if exist, are weight per meter, layer percentage, speed etc.).
The recipes are stored in the program’s database. To create a production order, add a
recipe to the production order parameters and send it to the line. The production order
will wait in the line’s queue to be loaded.
4.1 Raw Materials
The raw materials are of utmost importance in the recipes and must always be kept up to
date.
Click the
button to access the raw material screen:
10
Actions
Editing and deleting – as in Excel.
Addition – simply write in the bottom line.
Saving – click on the
icon to save without exiting. Click on the
icon to save
and exit.
Fields
Catalog Num –catalog number of the raw material
Name –full name of the raw material
Short Name – short name of raw material (up to 10 characters), used for displaying in
places where the space for displaying the raw material name is limited. If a short name is
not defined the first 10 characters of the full name will be used.
Bulk Density – bulk density of raw material (weight of material per cm3) – takes into
consideration the air between pellets for example).
Density – density of raw material
Material – Numeric field used to define groups of raw material. Dividing the raw
materials into groups allows defining whether the raw material is a main material,
additive or colour and can be filtered to show only the relevant list.
11
4.2 Recipe management
Some products can be produced on a certain line only, others may be produced on a few
lines and hence the recipes are delegated to specific lines. Similar lines share the same
recipes.
Click the
button to access the recipes management screen:
4.2.1 Sorting
The list on the dialog box can be sorted as follows:
Choosing the relevant line will update the list accordingly (showing the line’s recipes
only).
By default, the recipes are sorted by their ascending catalog numbers. Checking the check
box
will sort the list by ascending recipe name (product name).
12
4.2.2 Editing recipes
Mark a recipe and click the “Edit...” button to access the edit recipe screen:
Modifying a value – Double click on one of the list items will invoke its modifying
dialog box.
Adding values – As the recipes may be shared by several lines, a specific recipe may
have been saved on a line with fewer components than the one to be loaded, so the values
have to be added. To add these values do the following:
In the “Add By Lines” group box, choose the required line.
Click the “Add” button, which will add all of the missing values.
Modify the added values to the recipe’s correct values.
Printing – Clicking the printer button will print the recipe.
13
4.2.3 Adding recipes
Click the “Add...” button to make a new recipe and open the edit recipe screen. The
newly created recipe receives a default product catalog number. Replace the default
catalog number with the correct product catalog number, enter the correct values for all of
the recipe ingredients and save the recipe.
4.2.4 Deleting recipes
To delete a recipe, select it from the list and click the “Delete” button.
4.2.5 Duplicating recipes
To duplicate a recipe carry out the following:
Select it from the list.
Click the “Make Copy” button. A new recipe will be created which is the exact duplicate
of the original, with a different product catalog number.
Update the product catalog number and the recipe name.
4.2.6 Create production orders
Add the production order number to the required recipe and send it to the required line as
follows:
Select the required line on the combo box.
Select the required recipe from the list
In the “Production Order” group box, fill in the production order number.
Click the “Add To Queue” button. An acknowledge message box will notify the action’s
success.
4.3 Production orders queue
Each line has its own production order queue that appears as follows:
14
The current (active) production order is shown on the top of the screen.
4.3.1 Loading
Clicking the
button will load the list’s first order to the line, changing all the
recipe’s set-points. A message box will appear asking whether to return the old order
back to the queue (sometimes the old order has not been completed and will continue at a
later stage).
4.3.2 Priority
The production orders are loaded according to the queue (top row first). The order of the
queue can be changed by first highlighting the required production order and then using
the
and
icons to change the position of the production order.
15
4.3.3 Editing an order’s recipe
It is possible to edit a queue’s production order’s recipe, editing this recipe will affect the
order’s recipe only and will not have any effect on the original recipe.
To edit a queue’s production order carry out the following:
Select the desired production order.
Click the
button or double click the desired production order, this will invoke the
edit recipe dialog box, as described in “Recipe editing” section with the following
exceptions:
Changing the product catalog number, product name, or performing “Adding values” are
not allowed.
Dosing systems values cannot be changed, channel switching can be achieved by
dragging, using the right mouse button. Some of the materials that are going to be used
are already in the dosing system’s channels, changing the recipe’s channels will utilize
these materials.
4.3.4 Moving Production Orders between Machines
In order to move a production order from one machine to another:
Highlight the required production order.
Click on the
icon. Select the required machine on the dialogue box that appears.
4.3.5 Deleting Production Orders
In order to move a production order from one machine to another:
Highlight the required production order.
Click on the
icon.
4.4 ERP communication
The InjMan program can communicate with external systems, receive machine
production orders and return performance reports.
The communication is by XML files whose format varies between installations.
4.4.1 Import production orders
The ERP program can prepare a production order and send it to the MinuMan program.
The production order will be added to the designated line.
16
4.4.2 Export production orders
Upon finishing an order, whether it has returned to the queue or not, the MinuMan
program issues a performance report of totals and time ranges.
5
Database
The MinuMan program database is MSDE (a compact version of SQL Server).
The MinuMan program automatically backs up the database and therefore requires no
maintenance.
6
Reports
6.1 Consumption reports
Some of the data available about the line accumulates over time, such as material
consumption, number of drippers, motor working time, etc.
The MinuMan program saves these values at the end of every shift, production order
loading or changing of a material name therefore the reports are restricted to these times.
Note:
In general, it is more accurate to measure material entering the machine or absolute
measurable values (injections), rather than material exiting the machine (products)
because it is difficult or sometimes impossible to define the approved part of material
measured in the machine exit. It is therefore preferable to issue reports of absolute
accumulations or entries into the machine.
6.2 Material consumption report
To produce a raw material consumption report, click the right part of the
button
and select the “Material Consumption” menu. An option dialog box will appear, as
described below.
6.2.1 Database update action
As mentioned above, the database update is carried out upon shift changing. If an up-todate report must be produced (there is no information of what happened from the
beginning of the shift until this point) a database update action can be forced by clicking
the “Write History” button. Now an up-to-date report can be produced.
17
6.2.2 Consumption report by production order
Choose the desired order and click the
button.
Filtering
Narrowing down the production orders list can be done in the “Filter Production Orders”
group box as follows:
Define time boundaries. Only the orders that started between the given times boundaries
will appear in the combo box’s list. Time boundaries is optional, e.g. if not checked, the
time boundary is ignored.
On “Product ID” combo box, choose the desired production order. Only the orders of that
product will appear in the combo box’s list. The “Product ID” combo box’s list is filled
according to the time boundaries. The “Product ID” filter is optional, e.g. if it left empty,
all the production orders between the given times will appear on the combo box list.
18
6.2.3 Consumption report by product
Enter the time boundaries and choose the correct line option as follow:
Line – Checking this check box allows choosing a designated line.
Unchecking the check box will cause the report to show all of the lines.
Now click the
button to invoke the report.
19
6.2.4 Consumption report by time
Enter the time boundaries and choose from the following options:
Line – As mentioned above, checking this check box allows choosing a designated line.
Product ID – Choose the desired product. The report will contain the consumption of this
product only. The “Product ID” filter is optional, e.g. if it is left empty, the report will
contain the consumptions of all of the products between the given time boundaries.
Group by Line – Check this check box to sort the report by lines.
Group by Materials – Check this check box to report the total amount of each material.
Uncheck this check box to show all the database table’s records as is (for debugging).
Now click the
button to invoke the report.
20
6.3 Dosing trace report
All dosing manipulation actions are documented in the database.
To trace dosing manipulations, click the right part of the
button and select “Dose
Settings report” menu. An option dialog box will appear, as described below.
Time boundaries – The report will show all the actions carried out between the given
times boundaries.
Line – Checking the line check box will cause the lines combo box
to appear. Select the required line for reporting. Uncheck
the check box to produce a report containing all of the lines.
21
7
Appendix
7.1 Operation screens
This appendix shows some operation screen examples. Operation screens may differ from
one installation to another and in some cases there will be screens that are not described
here. However the structure of all the screens is similar enabling easy handling of all
screens.
7.1.1 Line data
This screen shows the line’s manufacturing values, some of them are set-points which
can be edited by clicking the
button.
22
Line data screen
7.1.2 Layers
This screen exists on co-extruders lines. The set-points can be changed in the same way.
The weight per meter is shared with the line data screen, so changing it on one screen will
change it on the other screen as well.
Layers Screen
23
7.1.3 Control
This screen shows the current internal control values. In some cases it is important for
Sysmetric’s engineers to know these values, for better control settings.
Control screen
24
7.1.4 Dosing
This screen shows the line’s dosing systems.
Clicking the
button of one of the dosing systems opens the dosing editing screen,
which allows editing the formula and sending it to the dosing system. The “Set” values
will change immediately, and the “Active” values will change at the beginning of the next
dosage preparation.
The “Active” values are used by the dosing system for preparing the dosage. It is
separated from the “Set” values to allow changing of the “Set” values while the dosing
system is in the middle of a dosage preparation. This way, the dosage will be finished
correctly and will only use the new formula on the next dosage.
Dosing Screen
25
7.2 Reports
This appendix contains examples of reports. Custom reports can be added by Sysmetric
on demand.
The program uses SQL server data base enabling the user to create custom reports.
7.2.1 Material consumption by production order
The report’s upper section shows the production order number and manufacturing periods
including the producing line number and the recipe name (product name).
The actual report shows the material consumption for each raw material separately, by
producing lines (the order could be made by more than one line), and the total weight of
that order.
Example of Material Consumption by Production Order Report
26
7.2.2 Material consumption by product
Report of each product's material consumption between given time boundaries.
Example of Material Consumption by Product Report
27
7.2.3 Material consumption by time period, grouped by
materials
Report of material consumption between given time boundaries.
Example of Material Consumption by Time, Grouped by Materials Report
28
7.2.4 Material consumption by time period, grouped by lines
Report of material consumption between given time boundaries for each line separately.
Example of Material Consumption by Time, Grouped by Lines Report
29
7.2.5 Raw consumption report by time period
This report shows the database table for tracing and debugging purposes.
Example of Raw Consumption by Time Period Report
30
7.2.6 Raw consumption report by time period, grouped by
lines
Same as the previous, except that now it shows each line separately.
Example of Raw Consumption by Time Period, Grouped by Lines Report
31
7.2.7 Dosing trace report
Example of Dosing Trace Report
32
7.2.8 Production Orders Queue Report
The report can show a specific line or all of the lines.
The currently active orders are marked with√.
Example of Production Orders Queue report
33