1
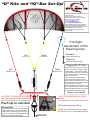
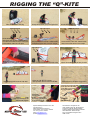
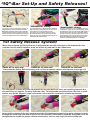
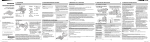
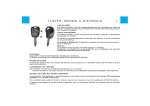
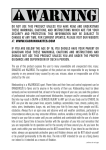
“Q”-Kite and “IQ”-Bar Manual
WARNING:
Kiteboarding can be dangerous!
Kites can be extremely dangerous depending on the size of kite and the strength of wind. Please pay
close attention to the recommended wind-range of your kite and make sure that your skills and ability
matches the prevailing conditions. Please read the entire manual before starting and be sure you fully
understand all of the information given. When you first use your new kite make sure not to fly it at the
top of its recommended wind-range and instead take your time to get to know the equipment. Never
underestimate the power of your kite. Even a beginner kite can develop several hundred kilos of pull
depending on kite size and wind strength. This can cause serious injury or result in death.
The manufacturer disclaims all liability for any injury, death or damage caused by or during the use of
the kite to the user or any third party.
Kites können je nach Größe des Kites und der Windstärke lebensgefährlich sein. Bitte beachte die
Windtabellen Deines Kites und fliege immer nur Deinen Fähigkeiten und Fertigikeiten entsprechend.
Bitte lese die Gebrauchsanleitung vor dem ersten Gebrauch des Kites ausführlich durch und sei sicher,
sie vollständigverstanden zu haben. Starte Deinen neuen Kite bei den ersten Flügen nie im oberen
Windbereich. Nimm Dir die Zeit, das neue Sportgerät in der Handhabung kennen zu lernen. Unterschätze
nie die Zugkräfte des Kites. Auch ein Einsteigerschirm kann bei entsprechenden Windgeschwindigkeiten
und Größe Zugkräfte von mehreren Hundert Kilogramm entwickeln. Das kann zu schweren Verletzungen
oder gar zum Tod führen. Der Hersteller übernimmt keine Haftung für Schäden, die durch den Gebrauch
oder den Besitz beim Piloten, Besitzer oder Dritten entstehen.
Kites peuvent être très dangereux selon leur grandeur et la force du vent. Il faut regarder le tableau du
vent de votre Kite et il faut voler conformément à vos capacités et votre aptitude. Il faut lire le mode
d'emploi détaillé et entièrement avant le premier usage du Kite et soyez sûr de l'avoir compris
complètement. Ne volez jamais votre nouveau Kite pour les premiers vols dans l'étendue (la zone) de
vent tout en haut. Prenez le temps pour faire connaissance le maniement de l'équipement.
Ne mésestimez jamais la force de traction du Kite. Même un Kite pour les débutants peut développer
une force de traction des centaines de kilogrammes dépendant de la vitesse de vent et de la grandeur
du Kite. Cela peut provoquer des graves blessures ou même mener à la mort (causer la mort).
Le producteur décline toute responsabilité (ne porte pas garant) en cas de dégats causer par l'usage
inapproprié du Kite.
Kites pueden ser segun el tamano del Kite y la fuerza del viento muy peligrosos para la propia seguridad.
Por favor tenga cuidado por el viento tabulario de sus Kites y vuele siempre conforme a sus capacidades.
Por favor lean minusiosamente las instrucciones de empleo antes de usarlo por primera vez y tiene que
estar seguro de haberlo entendido completamente. No arranque su nuevo Kite en los primeros vuelos
nunca en la zona areal de viento superior. Tome suficientemente tiempo para conocer su nuevo aparato
deportivo en todo su manejo. No menosprecie nunca la fuerza de traccion del Kites. Tambien el Paragua
de subida puede desarrollar por las correspondientes velocidades de viento una gran fuerza de traccion
de mas de cien kilogramos, esto puede causar graves lesiones o peligro de muerte. El Fabricante no se
hace cargo de ninguna responsabilidad por los danos causados por el uso inadecuado de los Pilotos,
Propetarios o terceras personas.
“Q” Kite and “IQ”-Bar Set-Up!
Spleene Watersports GmbH & Co. KG
Fritz-Kopp-Str. 6,
88090 Immenstaad / Germany
Phone Office: +49 (0) 7545 - 555998
Fax: +49 (0) 7545 - 555997
Web: www.spleene.com
E-Mail: [email protected]
Gerichtsstand: Amtsgericht Ulm
HRA 720696 USt-ID-Nr.: DE256102213
Persönlich haftende Gesellschafterin:
Spleene Watersports Verwaltungs-GmbH
Geschäftsführer: Rainer Kauper
Sitz: Immenstaad Amtsgericht Ulm
HRB 721387
Pre-flight
adjustment of the
Steering-lines.
Left
Right
Front-Line
Front-Line
Standard
(small white marking)
Highwind
(good unhooked Set-Up)
Rigging the “Q”-Kite!
Left
Right
Steering-Line
Depowerline Spectra 4mm
Adjuster
Steering-Line
Unfold your “Q” and pump up the
kite to a maximum of 8psi via the
“Inflate Valve”. Secure the Inflate
Valve with the two velcro tabs and
close all of the One Point Inflation
Clips on the struts.
Turn the kite over (face down)
and secure with plenty of sand.
Now unwind the lines from the “IQ”
Bar and attach them as illustrated
in the graphic on the left.
Before launching make sure once
more that all lines are without twist
and/or tangles and that everything
is connected to the right place.
Always ride safely!!!
1st SAFETY RELEASE SYSTEM
2nd TOTAL RELEASE SYSTEM
(Kills the kites power but the rider remains
connected to the Kite via the chickenloop)
(Completely disconnects Rider from the Kite)
Push Up to activate!
HP-Leash Connection Ring
Please Note:
When riding without an external Safety
Leash (HP-Leash), make sure that the
Chickenloop is properly secured to the
hook on the Harness-Spreaderbar at all
times by using the Donkey-Dick.
(Please clip Handlepass Leash onto O’Ring,
HP-Leash is not incl. in the kite/bar package)
Donkey-Dick
RIGGING THE “Q”-KITE
Take the kite out of the bag
Unclip the tie down strap and open kite
Unroll the kite from the centre outwards
Wind-direction
Wind-direction
Wind-direction
Unroll all the way
and check that the two “Deflate Valves”
are closed and that the clips of the One
Point Inflation tubes are all open
Stick pump-hose into the “Inflate Valve”
and pump up the kite to a max. of 8psi
Once inflated, close the “Inflate Valve”
and secure with the two velcro taps
Wind-direction
Make sure to close all the plastic clips
on the One Point Inflation tubes
Turn over the kite and secure with sand
Check the bridling and put into position
Unwind flying lines from the “IQ”-Bar
Place the “IQ”-Bar face down
and separate all lines towards the kite
Place the two front-lines into position
Turn bar the right way up,
hook into the chickenloop and secure with
the donkey-dick.
Attach yellow ends
of the front-lines to the
yellow front-bridle pigtails
Attach the red
steering-line
to the red pigtail and
the black steering-line
to the black pigtail
Spleene Watersports GmbH & Co. KG
Fritz-Kopp-Str. 6,
88090 Immenstaad / Germany
Phone Office: +49 (0) 7545 - 555998
Fax: +49 (0) 7545 - 555997
Web: www.spleene.com
E-Mail: [email protected]
Ready
to launch!
Gerichtsstand: Amtsgericht Ulm
HRA 720696 USt-ID-Nr.: DE256102213
Persönlich haftende Gesellschafterin:
Spleene Watersports Verwaltungs-GmbH
Geschäftsführer: Rainer Kauper
Sitz: Immenstaad Amtsgericht Ulm
HRB 721387
“IQ”-Bar Set-Up and Safety Releases!
“IQ”-BAR:
“HOOKED-IN” Riding:
“UNHOOKED” Riding:
The “IQ”-Bar can be used with or without an
external Safety-Leash (Handlepass-Leash).
Both Safety-Releases will be fully functional,
regardless of the Set-Up chosen by the rider.
On the “IQ”-Bar the left hand side is coloured
red and the right hand side is coloured grey.
For riders who don’t unhook from the Chickenloop and always ride hooked in, the “Q” can be
used without an external Safety-Leash.
The riders only connection to the kite is the
Chickenloop. When using this type of Set-Up,
make sure that the Chickenloop is secured via
the Donkey-Dick at all times!!
For riders who like to ride “Unhooked” aswell as
“Hooked-In” simply clip an external Safety-Leash
(Handlepass-Leash) onto the metal O’Ring that is
already attached to the side of the Chickenloop.
For riders who don’t unhook and/or don’t use an
external Safety Leash we recommend to remove
the metal O’Ring as it might otherwise get lost
when the Total Safety Release is activated.
1st Safety Release System!
When the red push-up Safety-Release is activated the bar will slide approx 2m towards the kite
and the kite will totally depower, drop out of the sky and wait to be relaunched.
PUSH-UP to activate!
PUSH-UP to activate!
PUSH-UP to activate!
To activate the Safety Release simply push-up the red plastic release mechanism and let go of it.
The red plastic release will slide up against the bar and both will carry on travelling towards the
kite until they are approx. 2m away from the rider. To reassemble the release the rider has to work
his/her way up the depower-rope until he/she can reach the red plastic release mechanism.
Now pull the release all the way back towards the Chickenloop and guide the metal release pin back
through the metal loop that sits on top of the Chickenloop. Bend the pin upwards and guide it into its
designated slot inside the plastic release mechanism. You are now ready to relaunch the kite.
2nd Total Release System!
In some rare instances (i.e. when the kite gets tangled in another kite) it could be necessary that
the rider is able to totally disconnect him/herself from the kite. By pulling on the white toggle release which is located on the side of the Chickenloop the rider is totally disconnected from the
kite in one move. Please Note: The Total Release System should be looked upon as an emergency
system. When activated the kite will fly away and can potentially endanger innocent bystanders.
PULL WHITE TOGGLE to activate!
PULL WHITE TOGGLE to activate!!
To activate the Total Release System simply pull sharply on the white toggle and let go of it.
The Chickenloop will open up and totally release the rider from the kite. Even if an external safety
leash (Handlepass-Leash) is connected to the designated metal O’ring, the short, red rope of the
O’ring will be released at the same time. Please remove the metal O’ring before use if no external
leash is connected as it will otherwise get lost during the activation of the Total Release System.
To reassemble the Chickenloop after the Total Release System has been activated simply push the
open end back through the webbing loop and back through the small red loop on the side of the CL.
If the external safety leash O’ring was used, also feed the short red rope of the O’ring back through
the small red loop of the CL and then secure all elements by pushing the metal safety pin through
the red loop/s and back into the webbing pouch positioned on the top side of the Chickenloop (CL).
“IQ”-Bar Untwisting Function!
After rotations simply un-spin the bar until the lines aren’t crossed over anymore and then pull the
bar towards you. The two Depowerropes will be forced apart and the top of the Chickenloop will
automatically untwist the Depowerropes. The flying lines will thus always remain untwisted.
POWER ADJUSTER!
LESS POWER
The kites power can be adjusted
during flight or before take-off
via the Power Adjuster.
For less Power pull down the red
webbing loop, marked ”Power-”
For more Power pull down the blue
webbing loop, marked “Power+”.
MORE POWER