1
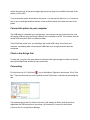
Quick Start Guide Most PolyPrinters are delivered to where they will be used, and the PolyPrinter representative will normally install and set up the printer to make sure it is ready for use. However, if the printer is to be moved, or was shipped or carried to the new location, the following information may help you get it set up. Initial Setup The PolyPrinter has been tested at the factory, and adjusted to correct settings. However, it is quite possible that some of the shaking and stirring it received along its journey to your hands have slightly changed the relationship between some of its parts. It is even possible that the transport service has won the battle to destroy or maim the PolyPrinter, in spite of our best efforts to protect it. Therefore, it is best to go through some simple steps right away to make sure it is in good working order For printers shipped (not delivered in person) Unpacking ● ● ● ● ● ● Remove Accessory box Tilt box onto side and slide out of printer crate Tilt printer create upright Unbuckle the three hold down straps from printer crate Remove the left and right side panels from printer crate Remove the front and rear panels from printer crate ● ● ● ● ● ● Remove top panel from printer crate Lift out your PolyPrinter 229, be sure to lift by putting your hands under the bottom of the printer. It’s much easier with two people. Remove the film that covers all the sides and front cover. Cut and remove the zip-tie holding the Y carriage back, on the right side. Remove any tape holding the air filter in place, if it covers the filter. Save the box and all of the corner protectors, in case there is some reason to ship the Polyprinter. It is not easy to ship safely without its box. Set it somewhere The PolyPrinter needs about two feet of flat table or desk depth to rest properly on its rubber feet. The front hood needs enough room in front of that to swing forward and up and over. Install the user software Download the latest installation package from polyprinter.com. The 64-bit Windows package is the normal install, but 32-bit is usable if necessary, though it is not recommended to use an older computer that runs Windows 32-bit, if you have any choice in the matter. (MacOS is also partially supported - please inquire.) NOTE: The installer must be run as an Administrator. After downloading, open the downloads folder and right-click on the installer .exe file and choose "Run as Administrator". This will give it the necessary security privileges to install the serial driver. Follow the steps prompted by the software and be sure to run the serial port driver installation that should start up as the last step. You should have some new icons: ● ● ● ● PolyPronter Kisslicer NetFabb Slic3r The Obvious Plug it in! But first, make sure that the power cord is of the correct type for your country. THe PolyPrinter is shipped set for 110 Volts. If you are not on a 110 Volt grid, make sure that the red switch along the side of the power supply (big silvery box deep in the middle of the back of the printer) is set to 230v. Turn on the power switch at the back of the printer. You may see the light turn on. If it does not, turn on one or both light switches that are on the small blue switch box under the hood of hte printer. Connect the printer to your computer The USB cable is a standard type, with the large, more square end going into the printer, and the regular USB end going into a free USB port in the computer or a hub. (The camera uses the smaller USB connector which is a different cable.) If the PolyPrinter power is on, you should get the normal USB “dong” sound from your computer, immediately after connecting the USB cable, as it recognizes that it has been connected. Check a few things first To start with, just give a firm push down on the left and the right carriages to make sure the left and right threaded rods and the nuts are seated fully. Connecting Find the blue icon for “PolyPrinter” , in your Start Menu. Right-click and choose “Pin to Task Bar”. Then click that new icon on the task bar launch PolyPronter. It should look something like this: The important part is the Port. Most of the time, it will already be filled in with the port that represents the USB connection to the printer. We’ll assume it’s correct for the moment. Check for the Port using Device Manager The port should be listed under “Ports COM & LPT”. It will probably say something like “Teensy USB Serial”. If no port is shown: It’s possible that the USB driver did not get installed properly. Go to the “C:\Program Files\PolyPrinter\PrintrboardSerialInstall” folder, and right-click on the “serial_install.exe” program, and choose “Run as Administrator”. Follow the prompts and it should install the serial driver. Close and re-open PolyPronter, and see if a serial port is present. If not, try rebooting. If it still doesn’t appear, contact PolyPrinter Support. Press the “Connect” button. Some text should appear in the window on the right side of PolyPronter, including the phrase: “Connected”. If it does not: Try pressing the red Reset button on the side of the blue switch box under the hood, then press Connect again. ● ● ● ● ● ● If you see “M104” or “Connecting..” but nothing happens, then the serial port is incorrect. Check the dropdown box and select any alternate port it has there. You may need to go to the WIndows Device Manager and see what serial ports are listed. it will likely be the only one listed. If you do have the correct port, and nothing happens, open the front cover, and press the red Reset button on the Polyprinter, and then try the “Connect again”. If still nothing happens, disconnect the USB cable, open the front cover, and press the red Reset button on the Polyprinter, reconnect the USB cable, and then try the “Connect again”. if it still fails... Restart PolyPronter, try another USB port, turn off printer.... Try again. If that fails, please call us! If it says “Connected...” then you can proceed with the next steps. If it doesn’t connect, open the User Manual and turn to Troubleshooting, Connecting and follow the more involved problem solving there. Check Computer Power and Update Settings It is very important to set your computer up so that it does not interrupt printing. In short: ● Set power settings to not sleep or hibernate ● Set Automatic Updates to require your approval before installation and especially rebooting. Lowering the Head The PolyPrinter is shipped with its Z carriage all the way up against its upper stops, to prevent movement. You will need to tell the printer to move all the way down. This will also confirm that PolyPronter is actually talking to your printer. PolyPronter, has a “Z-Home” button on the lower right quadrant of the circular motion command area that takes up the left half of the interface. Press that, and the carriage should immediately start descending. It takes a while. Just as the head is about to hit the bed it should stop, go up a bit, then settle down again. Installing the Filament Reel ● ● ● If it’s a new reel you will have to unpack it and find the end, (which should normally be threaded through a hole in the rim of the reel) taking care not to let it slip under any of the other turns of filament. Make sure you can loosen the end, but don’t let it unravel. If there is no hole in the rim to secure the end with, hold onto the end. While securing the end of the filament, slip the reel over the reel mount so that the filament will come up through the hole in the filament guide arm, and continue up toward the filament pulley. Viewed from the front of the PolyPrinter, the end will be pointing upwards and will be on the left side of the reel, where it needs to go through the hole in the black filament guide arm. Feed it through that hole, and bring it forward toward the extruder. You don’t need to put it over the pulley until you have fed it into the extruder, although you may do so. Trimming the Filament ● If the end of the filament is irregular, bent or blobbed, then you must trim it using the handy filament cutter that is mounted on the upper cross bar. Swipe the filament through the gap in the cutter, holding both sides. Feeding Filament Into the Extruder ● ● ● Press down firmly on the left end of the yellow lever, so that it goes down, which moves the drive pressure ball bearing away from the filament drive wheel and lets the flament past. Push the filament down through the hole in the top of the lever, and ensure that it goes all the way down and into the filament tube that is just below the drive wheel. It should go into the tube at least an inch. Push the filament, still holding the lever down, until it won’t easily go any further. Let go of the lever. Closing the Filament Detector ● ● ● Hook the filament over the pulley and move the pulley and filament together up toward the switch. Its magnets should pull it into position with a firm click. PolyPronter should display “Filament OK”. Ensure the Filament is Ready ● ● ● ● ● Using PolyPronter, set the head temperature to 230 C (ABS). That’s as hot as a stovetop element. It will cause severe burns if you touch it, even momentarily. You can also set the bed warming to 110 C if you want to cut a little waiting time off the print. The bed gets hot enough to boil water. Don’t touch it! Click the checkbox in PolyPronter labeled “Monitor Printer”. It will start updating the temperature displays every few seconds. Once the head is up to temperature, press the “Extrude” button. The filament drive gear should turn with a little hum, some filament should be drawn into the extruder, and a bit of plastic may come out of the nozzle. Press the button a few more times, and soon there should be plastic coming out of the nozzle each time. If there is not, make sure that the end of the filament has actually gone down inside the filament tube If the end is curled, you may need to straighten it, cut it, (easy to do with the Filament Cutter) or flex and twist it around a bit to get the end into the filament tube. Printing Your First Part ● ● Press “Load File” in PolyPronter, Find the “samples” folder under your software installation (e.g. C:\Program Files\PolyPrinter\samples” and choose the “Calib Steps and Hole.gcode” file. Press “Print”. It will move the carriages a little, and then it will wait until the bed has headed up fully. This can take up to 13 minutes, depending on room temperature. You should see the temperature display climbing up to 110 C as it heats up. The PolyPronter log window will show a new line every second or show, as it get updated temperatures ● while waiting. Once the bed has heated up fully, the carriage will again move a bit, pause for a few seconds, and then printing should begin. There is a lot more to know about using the PolyPrinter, but if you now have a printed part sitting on the bed, you have already come a long way. Getting parts off the bed ● ● ● ● If you let it all cool completely down, it often just comes loose. Use a knife with curved blade, a sharp scraper, or, if you have the PolyPrinter toolkit, the included separator tool, which can be slid flat under the part. Get the curved part of the blade to hook under or into one corner of the part, without digging into the tape. Twist the knife to cause upward force. Do NOT push the blade into the part or under it. Make the twist or an upward force do the work - such that the blade cannot suddenly shoot in its cutting direction and injure you. You should use a blade that is on the dull side to reduce the chance of such an injury. Parts will tend to almost instantaneously go from being very stuck to completely free. Always clean the bed off completely ● Make sure you clean all the plastic off the bed before starting any print. Check the home corner too. But don’t use your hands or fingers, - you could burn yourself, as well as get oils on the bed - and then the plastic will not stick there. ● You can often use the part you just took off (if it’s not too hot to hold) to scrape off the outer ring of plastic that was laid down around it (the “skirt”). What do I do now? It’s generally best to start printing smaller parts at first, and work your way up into longer prints as you gain a bit of experience and confidence. If anything needs adjustment (shipping the printer is likely to cause some changes), or if you need to get used to choosing settings, it’s better to find out with a small part rather than a large one. What should I try to print? Look in the Samples folder under the installation folder for some GCODE and STL files of things we recommend trying. The GCODE files can each be loaded into PolyPronter immediately, and printed without learning anything more than you already have. The STL files will require learning how to “slice” them to create the GCODE files that PolyPronter can load and print from. For that, please open the User Manual and go to the Kisslicer chapter. But this would also be a good time to read the User Manual from the beginning, because there are vital safety warnings and tips there that you really need to absorb and understand before going any further.