1
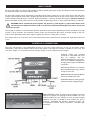
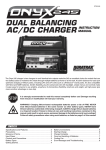
®
™
The DuraTrax® Onyx™ 240 charger is two chargers in
one! It’s an excellent choice for electric powered models
which use two NiCd or NiMH batteries simultaneously, or
modelers who rotate through multiple batteries while at
the field or the track. Charge current options of 800mA,
1.5A, 3A, and 5 amps – plus 4 to 8 cell NiCd or NiMH
compatibility for each output makes this charger great for
batteries for 1/18th to 1/8th scale electrics, nitro receiver
packs, and transmitter batteries. A tiny AC power supply
is built-in, plus DC input capability and twin LCDs with
blue backlights make this charger easy to transport and
use in any environment.
It is strongly recommended to completely read this manual before use! Damage resulting from misuse
or modification will void your warranty.
INDEX
SPECIFICATIONS .......................................................... 1
SPECIAL FEATURES..................................................... 2
IMPORTANT PRECAUTIONS ........................................ 2
GLOSSARY OF TERMS................................................. 2
INPUT POWER .............................................................. 3
CONTROLS & CONNECTIONS ..................................... 3
DETERMING BATTERY TYPE & SPECIFICATIONS ..... 4
GETTING STARTED ...................................................... 4
STARTING CHARGE...................................................... 5
CHARGE COMPLETE – TRICKLE CHARGE ................ 5
VIEW DATA SCREENS .................................................. 6
RESETTING THE CHARGER ........................................ 6
CARE & HANDLING OF NiMH BATTERIES .................. 6
ERROR MESSAGES & TROUBLESHOOTING GUIDE ......6
5-YEAR LIMITED WARRANTY – U.S.A. & CANADA ONLY.......7
SPECIFICATIONS
AC input:
DC input:
Protective devices:
Case size:
Weight:
110V AC 60Hz
11 to 15V DC, built-in lead with alligator clips
solid-state reverse polarity and current overload
7.95" x 6" x 1.97" [202 x 153 x 50mm]
27.8 oz. [789g]
Specifications for Each Output
Battery types:
Battery capacity range:
Fast charge current:
Fast charge termination:
Fast charge safety timer:
Peak sensitivity:
Auto-trickle current:
Controls:
Display type:
*Output connections:
Audible tones:
4 to 8 NiCd or NiMH (4.8 to 9.6V)
750 to 7500mAh
0.8A, 1.5A, 3A, 5A linear (40W)
peak detection
90 minutes
8mV for NiCd, 4mV for NiMH
1/20 fast charge setting
3 push buttons
7-segment custom LCD with blue backlight
built-in lead with standard connector, built-in jack for 4 to 5 cell Rx packs or Tx packs
indicates start, stop, errors
* Adapter - Standard to Deans® Ultra® male available separately (GPMM3131)
* Adapter - Standard to Vendetta, MiniQuake, RS4 Battery available separately (DTXC2210)
SPECIAL FEATURES
• TWO independent outputs, each with identical features and functions.
• A tiny built-in switching AC power supply is great for portability and cramped pit areas, yet can deliver up to 5 amps
of charge current for each output!
• Selectable charge currents of 800mA, 1.5A, 3A, and 5 amps, with auto-trickle – each output.
• NiCd and NiMH compatibility, with custom peak detection and automatic trickle charge – each output.
• A unique built-in jack is included for charging 4 to 5 cell Rx packs for nitro models, even Tx packs – each output.
• Custom LCD with blue backlight shows battery voltage, charge current, time, and capacity – one for each output.
• Simple push button controls and audible tones aid in setup and use – each output.
• A DC power lead with alligator clips easily connects to many 12V DC power sources.
• Solid-state reverse polarity and current overload protection ensure trouble-free operation.
IMPORTANT PRECAUTIONS
Disconnect the battery and remove input power from the charger immediately if the charger becomes hot!!
• Do not attempt to charge incompatible types of rechargeable batteries as permanent damage to the battery and
charger could result.
• Do not use automotive type battery chargers to power the charger.
• Do not allow water, moisture or foreign objects into the charger.
• Do not block the air intake holes, which could cause the charger to overheat.
• Do not attempt to use batteries with more cells or total voltage than listed in the specifications.
• Do not leave the charger unattended while in use.
• Do not place the charger or battery on flammable surfaces or near combustible materials while in use, such as a
carpet, cluttered workbench, paper, plastic, vinyl, leather, and wood, inside an R/C model or full sized automobile!
• Do not overcharge batteries as permanent damage could result. Do not use a charge current that exceeds the safe
level of the battery.
• Do NOT connect the charger’s AC and DC input connectors to any power source at the same time.
• Allow the charger or battery to cool down before reconnecting.
• Always disconnect from power source when not in use.
GLOSSARY OF TERMS
Amps (A): The unit of measure for charge current.
Milli-amps (mA): A unit of measure for current, being amps (A) multiplied by 1000 and listed as “mA”. So 2.5A is the
same as 2500mA (2.5 x 1000). Or, to convert mA to amps, divide the mA number by 1000. So 25mA is the same as
0.025A (25 divided by 1000).
Capacity and milli-amp hours (mAh): The amount of energy a battery can store is called its capacity, which is defined
as how much current a battery can supply constantly over one hour of time. Most hobby batteries are rated for capacity
in “mAh” or milli-amp hours. A 650mAh battery can deliver 650mA of current for one hour (650mA x 1hr = 650mAh).
A 3200mAh battery can deliver 3200mA (3.2A) of current for one hour (3200mA x 1hr = 3200mAh), etc.
“C” rating: Capacity is also referred to as the “C” rating. Some battery suppliers recommend charge currents based on
the battery’s “C” rating. A battery’s “1C” current is the same number as the battery’s rated capacity number, but noted
in mA or amps. A 600mAh battery has a 1C current value of 600mA, and a 3C current value of (3 x 600mA) 1800mA or
1.8A. The 1C current value for a 3200mAh battery would be 3200mA (3.2A), etc.
2
INPUT POWER
AC Input: For indoor use, this charger includes a built-in switching AC power supply that delivers power by connecting
the AC power cord to a common 110V AC outlet.
DC Input: This charger can be powered by a portable 12V DC power source for use at the track. On the left side of the
charger, connect the DC power cord’s alligator clips directly to the output terminals on the 12V DC power source. Always
match polarities (red lead to red “+” terminal, black lead to black “-“ terminal). To utilize the charger’s absolute maximum
power capabilities the DC power source must be capable of delivering at least 12 amps while maintaining 12 volts DC.
WARNING! Never accidentally short together the positive (+) and negative (-) input connections when
connected to 12V DC power. Failure to do so could result in permanent damage to the power source and
the charger.
This charger is rated for a maximum output power of 40 watts for each output. Depending on certain conditions (if charge
current is set to maximum, the maximum number of cells are connected to the output, and input voltage is low), the
actual current delivered to the battery might be slightly less than the setting. This is normal.
The charger will be on at all times when connected to input power. Disconnect the charger from input power when not
in use.
CONTROLS & CONNECTIONS
The Onyx 240 charger is two independent chargers in one case. Each output has its own set of controls, output
connections, and LCD. No function which occurs with Output 1 will affect the function of Output 2 in any way, and
vise-versa. Output 1 is on the left half of the charger. Output 2 is on the right half of the charger.
OUTPUT LEAD: The standard
connector is compatible with most
R/C car batteries. See the
SPECIFICATIONS chart on page 1
for a list of additional adapters for
charging battery types with different
connectors.
SETTING BUTTON: For selecting
NiCd or NiMH battery type, and the
charge current rate.
DATA BUTTON: For selecting different
data to be viewed on the LCD.
START BUTTON: For starting charge.
Also for manually stopping charge.
RADIO BATTERY JACK: A unique jack is located on the front
edge of the charger, for charging of NiCd or NiMH 4 or 5 cell
receiver batteries for nitro vehicles, or even 8 cell transmitter
batteries! One jack is included for each output. This jack is
universal – compatible with Futaba-J, Airtronics-Z, Hitec, JR,
and Spektrum receiver battery connectors, and BEC type
connectors.
3
For some transmitters, opening the battery compartment and disconnecting the battery’s lead will reveal if the battery’s
own plug can be connected directly to this jack on the charger. Or, if you wish to connect the charger to a transmitter’s
built-in charge jack, check with your local retailer for the appropriate charge adapter listed below:
Part number
GPMM3100
GPMM3101
GPMM3102
Description
BEC to Futaba® Tx Charge Jack Adapter
BEC to Hitec® / Airtronics® Tx Charge Jack Adapter
BEC to JR® / Spektrum® Tx Charge Jack Adapter
WARNING! Do NOT attempt to charge one battery through the main lead on Output 1, and another
through the jack on the front edge of Output 1 at the same time!! The same rule applies to Output 2.
Failure to do so will permanently damage the charger.
DETERMINING BATTERY TYPE & SPECIFICATIONS
Always read your battery’s label and/or instruction sheet before use, and determine:
1. TYPE: Is the battery a nickel-metal hydride (NiMH) or nickelcadmium (NiCd)?
2. RATED CAPACITY: What is the battery’s rated capacity, in “mAh” (“milliamp hours”)?
3. RATED VOLTAGE: If not printed on the battery’s label, consult your
battery supplier or determine the proper pack voltage as shown in the
chart at right.
GETTING STARTED
All functions and settings for Output 1 are totally independent of those for Output 2. All instructions listed below apply to
each output.
1. Connect the charger to input power.
2. Every time the charger is connected to input power, the default setting is to charge a NiMH battery at 5 amps. If this
setting matches your battery and needs, skip to STARTING CHARGE below. Otherwise, to adjust the battery type and
charge current settings for either output, proceed as follows…
3. Battery type: Determine the output you wish to charge the battery. Press
the SETTINGS button briefly for that output to choose between “NiCd” or
“NiMH” battery types. This will allow the charger to automatically set the
peak sensitivity value to 8mV for NiCd batteries, or 4mV for NiMH batteries,
to achieve the most accurate peak charges for your battery.
4. Charge current:
a. Press and hold the SETTINGS button for 3 seconds. The charge
current setting will show on the LCD.
b. Briefly press the SETTINGS button again to scroll through all charge
current options – 0.8A, 1.5A, 3.0A, and 5.0A. Refer to the chart at right
for a list of recommended charge currents for different size batteries.
c. Once the desired current is found, press and HOLD the SETTINGS
button again for 3 seconds. The LCD will return to the opening screen.
4
STARTING CHARGE
Linear current will be supplied to NiCd and NiMH batteries during charge. The peak detection method will be used to find
the highest battery voltage during charge. Once peak voltage is detected, the charger will automatically stop fast charge
and start trickle charge.
1. For 6 or 7 cell batteries, connect the battery to the charger’s output lead. Make sure the polarities of the battery and
charger’s leads match (red charger wire to red battery wire, black charger wire to black battery wire). Skip to step 3.
2. For 4 or 5 cell receiver batteries or 8 cell transmitter packs, insert the battery’s plug in the RADIO BATTERY jack
on the front edge of the charger, or use the proper adapter to do so (see page 4). Make sure the battery’s black or
brown wire is on the right side when inserting into the jack.
Caution: Make sure the charge current setting is safe for your battery to prevent overheating of the cells. “AAA”, “AA”,
“A”, and “2/3A” size batteries generate heat more quickly than large sub-C batteries. It’s NOT recommended to attempt
to charge batteries having a rated capacity under 750mAh with this charger. Most radio batteries should NOT be charged
at currents greater than 1.5A. Failure to follow this recommendation could permanently damage your battery!
3. To START CHARGE, press and HOLD the START button for 3 seconds.
4. During charge, the LCD will alternate between the battery voltage and charge current screens so you can quickly
determine if charge is progressing correctly.
5. Pressing the DATA button during charge will manually scroll the LCD through these screens like shown below.
Note that when the LCD shows the battery’s voltage during charge, the reading will seem slightly higher than normal.
This is due to the loading effect of the charger, and is normal. A higher load will skew the reading more than a smaller
load. When fast charge is finished, battery voltage readings will be more accurate.
If you wish to manually stop a charge process, either disconnect the battery from the charger, or press START. Tones will
sound, and the LCD will return to the opening screen.
CHARGE COMPLETE – TRICKLE CHARGE
When the charger has detected peak it will automatically stop charge and show “End” on the LCD. Audible tones will
also sound for about 10 seconds (pressing START while the tones are sounding will turn them off). The charger will
automatically change to trickle charge mode at this time.
The trickle charge current value is set automatically by the charger as
shown in the chart at right, and shown in amps “A”. The charger will
remain in trickle charge mode until the battery is disconnected from
the charger, or the START button is pressed again.
A backup safety timer is built into this charger to automatically stop fast
charge if peak is not detected in 90 minutes. If the “min” display shows
“Stop”, this safety timer stopped charge (and not the peak detection circuit). You might want to attempt to re-peak the
battery by starting another charge. Refer to the TROUBLESHOOTING GUIDE for more details.
5
VIEW DATA SCREENS
After peak charge has been detected, you can review the four different data screens to see the final results of the peak charge.
While “End” is showing, repeatedly press DATA to scroll through the screens like shown above to view the final results of the
charge process. The screen will automatically revert back to “End” three seconds after a button is pressed last.
RESETTING THE CHARGER
When a peak charge has finished, press START to reset the charger. The LCD will return to the opening screen, and the
charger will stop delivering trickle current to the battery. Pressing the DATA button will scroll through the different data
screens on the LCD.
CARE & HANDLING OF NiMH BATTERIES
• Do not to allow NiMH batteries to overheat! Disconnect overheated batteries from the charger immediately and allow
to cool.
• Store NiMH packs with some voltage remaining on the cells (refer to battery supplier).
• It is important to recharge NiMH batteries immediately prior to use, as they have a high self-discharge rate.
• “AAA”, “AA” and “A” size radio batteries can safely be peak charged at currents up to 1.5C to 2C (battery capacity x 1.5
or 2.0). High charge currents can overheat batteries and thus reduce service life, especially for smaller size cells.
ERROR MESSAGES & TROUBLESHOOTING GUIDE
Several safety features are included in this charger to protect itself and the battery against certain unwanted conditions,
as follows:
LCD
“Err.1“
PROBLEM AND SOLUTION
The DC input voltage is below 11.0V or exceeds 15V DC. Make sure the input voltage is within
this range.
“Err.2”
A battery is not connected to the output. Make sure a good connection exists between the
battery and charger and re-try.
“Err.3”
The battery is connected backwards to the output. Re-connect the battery to the charger’s
output with the proper polarity.
“Err.4”
The battery has become disconnected during charge. Re-establish a good physical connection
between the battery and charger, and re-start charge.
“Err.5”
Some type of electronic interruption or malfunction has occurred. If you believe that some
external force might have caused the charger to err, and that a true circuit malfunction has
not occurred, you might attempt to re-start charge. Otherwise, if you believe the charger is
not functioning properly, disconnect the battery from the charger, and the charger from input
power, and contact Hobby Services for further details.
The charger has somehow fallen out of calibration. Contact Hobby Services for further details.
“Err.6”
“Stop”
The 90 minute backup safety timer has expired. You can re-start charge, or disconnect the
battery from the charger.
Other possible problems:
PROBLEM – LCD does not work when unit is connected to input power: Check power supply for improper power. Check
input connections for solid contact. DC input power might be connected backwards…reverse input connection. Contact
Hobby Services for further details.
PROBLEM – Battery voltage low after charge (below 1.2V per cell): The capacity setting, charge current setting, and/or
backup safety timer settings are too low. NiCd/MH peak sensitivity setting might be too low or too high…re-adjust setting.
Perhaps poor quality charge leads…replace with new.
6
5-YEAR LIMITED WARRANTY – *U.S.A. & CANADA ONLY
DuraTrax warrants this product to be free from defects in materials and workmanship for a period of five (5) years
from the date of purchase. During that period, DuraTrax will, at its option, repair or replace without service charge any
product deemed defective due to those causes. You will be required to provide proof of purchase (invoice or receipt). This
warranty does not cover damage caused by abuse, misuse, alteration or accident. If there is damage stemming from
these causes within the stated warranty period, DuraTrax will, at its option, repair or replace it for a service charge not
greater than 50% of its then current retail list price. Be sure to include your daytime telephone number in case we need
to contact you about your repair. This warranty gives you specific rights. You may also have other rights, which vary from
state to state.
For service on your DuraTrax product, warranty or non-warranty, send it post-paid and insured to:
HOBBY SERVICES
3002 N. Apollo Drive Suite 1
Champaign, IL 61822
(217) 398-0007
[email protected]
*For warranty and service information if purchased outside the USA or Canada, see the additional warranty information
insert (if applicable) or ask your retailer for more information.
Entire Contents © Copyright 2008 Made in Korea
DTXZ4240 for DTXP4240 V1.0
7
OTHER ITEMS AVAILABLE FROM DURATRAX
DuraTrax Pit Tech™ Deluxe Car Stand
This convenient workstation for R/C cars and trucks features a rotating top plate for easy access from all sides and a
dropped center section that provides a stable work platform for models with uneven chassis bottoms. Includes an extralarge parts tray and built-in holes to keep shocks handy when rebuilding. DTXC2370
DuraTrax Ultimate Tool Set w/Pouch
DuraTrax Ultimate tools have hardened steel tips plus a blue-anodized aluminum handle that’s knurled for a no-slip
grip. This set has ‘em all – 4 each of metric and SAE hex drivers, 3 each of slotted and Phillips screwdrivers – plus an
Ultimate Body Reamer. And to keep them handy and organized, DuraTrax includes a 15-pocket, book-style tool pouch
with zipper. DTXR0400