1
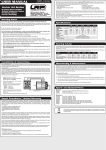
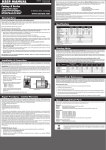
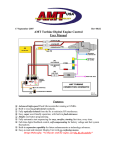
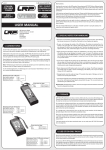
© LRP electronic GmbH 2010
MA00218
ORDER#:
32172
Z.21R Spec.3
Pullstart
2.12 HP
34.900 RPM
user guide
LRP electronic GmbH
Wilhelm-Enssle-Str. 132-134
73630 Remshalden
Germany
[email protected]
www.LRP.cc
.21 (3.49ccm)
Exhaust
Rear
Bore
16.40mm
Stroke
16.40mm
Liner
Number of ports
Proceed according to the user guide in order to understand your LRP Z.21R Spec.3 Pullstart
engine better. Please take your time as you will have much more joy with your product if you
know it exactly.
This user manual shall be kept in a safe place. If another customer is using this product, this
manual has to be handed out together with it.
Never run without a pipe since this will cause excessive overheating and may damage your
engine. A good pipe has a very huge effect on the performance of a 2-stroke engine. For the LRP
Z.21R Spec.3 Pullstart, we recommend using our LRP Enduro-46 1/8 Off-Road exhaust system
(No. 36250) for maximum performance.
ABC
12.0mm / 9.0mm bore / SG-shaft
Lightened crankshaft pin area
Crankcase
Black coloured LRP XTEC .21 Heavy Duty Competition
Connecting Rod
Please read the following instructions carefully before you start using your LRP Z.21R Spec.3
Pullstart engine. This user guide contains important notes for the installation, the safety, the
use and the maintenance of this product. Thus protecting yourself and avoid damages of the
product.
3+1 (3x transfer-, 1x exhaust-port)
Crankshaft
Piston
thank you for your trust in this LRP product. By purchasing a LRP nitro engine, you have chosen
a high-performance and highly sophisticated product, which doesn´t make any compromise
between maximum performance and easy tuneability. We hope you enjoy your new engine.
5. exhaust system
1. specification
Engine size
Dear Customer,
Specially lightened, high-silicium alloy
Oversized and made from extra stron aluminium
Glowplug
LRP Standard style R5 (No. 35051) included
Carburetor
XTEC PowerCarb 14S-2 with 7.5mm venturi
Made from lightweight Aluminium
Power Output*
2.12 PS
Max. RPM*
34.900
Weight
6. Pullstarter
Always pull the handle straight and don’t let the cord rub on anything. Do not fully extent the cord
as this may abuse and damage the pull starter (using about 2/3 of the complete length of the cord
is enough to start your engine). Don’t let fuel get in contact with the pull starter as this may weaken it. The Pull Starter is designed to start the engine running in a counterclockwise rotation.
Forcing the flywheel clockwise will cause sever damage to the pull starter.
410g
*Figures may vary depending on used fuel, exhaust system and tuning.
2. fuel
Never use regular gasoline or airplane fuel. Use fresh 2-stroke model car fuel only! We recommend using our line of LRP Energy Power fuels (No. 35711: 25% 1L / No. 35731: 25% 3,5L). For
the LRP Z.21R Spec.3 Pullstart, we recommend a fuel with 25% nitro. Never exceed 36% nitro. A
higher nitro content will decrease your engine‘s lifetime.
3. airfilter
A good airfilter is very important for the life of your engine. Never run without an airfilter, as
quick and permanent damage will result! Don’t forget to impregnate the airfilter with a suitable
oil before usage. Carefully clean the airfilter at least after every tenth tank. Replace the airfilter
every 3 litres (~1 gallon) of usage.
We recommend the use of our LRP Hi-Flow 2-Stage oval airfilter (No. 36565) together with our
LRP Hi-Flow airfilter oil (No. 36590).
7. carburetor
The factory settings of the engine are as following and are a good starting point for you, if you
are not satisfied with your carburetor settings. Turn in the needles completely (Caution: Do not
overtighten them!) and loosen them the required number of turns again:
• Mid range:
• Main:
3,0 turns
3,0 turns
3
Idle screw (No.1):
Adjusts the air flow when carburetor is fully
closed. Turn CW for higher idle-speed and
CCW for lower idle-speed. Should be open 0.51.0mm.
1
2
Mid range needle (No.2):
Adjusts the mid/low-speed flow rate of the fuel.
Turn CW for leaner and CCW for richer setting.
Main speed needle (No.3):
Adjusts the main flow rate of the fuel (when the throttle is opened
significantly). Turn CW for leaner and CCW for richer setting.
8. run-in
4. glowplug
Use only Standard style glow-plugs for this engine. We recommend using our line of high-quality
LRP Platinum / Iridium glowplugs (No. 35031 - No. 35061, availabe as R3 to R6). Check them
frequently and never run with worn-out or old glow-plugs since they could damage your engine.
They turn dull when your engine was too lean and should be replaced. They should stay bright
like chrome. If the glowplugs wear out too fast, an additional 0.1mm shim between burnroom
and liner is recommended. Whenever you have trouble with the engine stalling for no reason,
replace the glow-plug first!
TIP: Under normal conditions, use a LRP Platinum / Iridium R5 (No. 35051) plug for the LRP
Z.21R Spec.3 Pullstart engine. When using fuel with higher Nitro content or at very hot
days, use a LRP Platinum / Iridium R6 (No. 35061) plug.
MA00218_LRP_Z21R_Spec3_Pullstart_manual_E_100629_fv.indd 1
Proper run-in of the engine is a very important step in ensuring that you get the highest performance and lifetime of your engine. Take your time for proper run-in. Do not use run-in benches,
but use your car for run-in. Use the same fuel as you will be using for the life of the engine.
Special run-in fuel is not needed. If your engine doesn’t start easily you may try loosen the glowplug by ½-turn to decompress the engine and try again. Don’t forget to tighten the glow-plug
again once the engine started!
Procedure:
• Start the engine and set the main-needle very rich, i.e. excessive smoke coming from the
muffler.
• Let the engine idle for 2mins first to warm it up.
• Now start driving your car, it will be slow and sluggish, but this is an important step.
• Do not allow the engine to rev-up too high, run the engine at half speed on the straightaway.
• The engine should not be too cold and not too hot during run-in, 70-80°C (160-180°F) is perfect.
• Let the engine cool down for 15mins after each tank during the run-in period.
• We recommend doing so for 5 tanks of fuel before you start tuning your engine.
29.06.2010 18:30:04
9. tuning
12. trouble shooting guide
It never hurts to have the mixture too rich, but NEVER let the mixture get too lean. Always tune
from rich to lean. If in doubt, richen it up first! Never try to tune a cold engine, run 2-3 minutes to
get the engine up to running temperature before doing any adjustments!
PROBLEM
Engine does not start
Basic tuning procedure is as follows:
1. Set the engine’s idle speed up slightly higher than normal.
2. Start tuning your engine with the settings too rich.
3. Always tune main-speed needle (top-end) first.
4. Tune mid-range needle next.
5. Reset idle speed screw.
Engine stops after a
short time after glow
plug igniter has been
disconnected
Procedure:
1. Set the idle speed so your engine doesn’t stall (slightly higher then normal).
2. Go to the track with the main-needle set too rich, there should be heavy smoke coming from
the muffler now.
3. Tune the engine by leaning the main-needle 1/8 turn at a time (turn clockwise).
- Your goal will be that the engine will just reach maximum RPM on the straightaway.
- Open the main-needle again by an 1/8 turn (turn counter-clockwise) when you have reached
that point. This should be the perfect setting for the main-needle. Temperature of 95-105°C
(200-225°F).
- If the main-needle is set too lean, the engine will overheat and will not accelerate smoothly.
If this happens, immediately stop the engine and richen the main-needle (counterclockwise) 1/4 turn before a new attempt.
4. Adjust the mid-range needle now. Run 3 full laps, stop the car near you and let it idle for
5secs. „Push off“. It should have slightly richened up (idle rpm gets lower), but still accelerate quickly. If it died before the 5secs, check the following:
- If the rpm constantly decreases and finally the engine stops, the mid-range needle is too
rich.
- If the idle-speed increases during idle, the mid-range needle is too lean.
5. You may have to re-adjust the idle-speed now. If it idles too high, the clutch may not release
completely and you will lose „snap“ off the corners. If it idles too low, it may stall at the start,
or at the end of the straightaway when you release the throttle.
Ways to measure the engine temperature:
• Temperature gauge method (recommended): Pull in quickly and immediately take a temperature reading. Place the gauge directly over the engine pointed at the glow plug.
• Spit method: Pull in quickly and immediately put some spit on the engine’s head. The spittle
should just slowly boil off (2-3secs). It should not dance around as if it were on a hot griddle,
nor should it lay there and steam.
10. after run
Use after-run oil to keep everything lubricated after you have finished your day. After-run oil
helps for an easy start the next time and protects your internals against rust. Use only „after-run
oil“ specially formulated for R/C engines. Do not use silicone shock oil or similar as they will
seriously harm your engine. We recommend to use our LRP After-Run oil (No. 37910), which you
should use regularly after using your engine.
Procedure:
First let the tank run completely empty at idle until it runs out of fuel (try re-starting it several
times), next put a few drops down the open carburetor and a few drops down the glow plug hole.
Spin it over with the Pullstart at least 5 times and you are done.
11. maintenance
Treat your engine with care and check it frequently. Due to the extremely high RPM this engine
produces, any fault can cause serious damage. All moving parts inside the engine are subject
to wear, you must know if a piston/liner/conrod has worn out and if they need to be replaced. If
you replace one part, please check if everything else is still in good shape at the same time. If
you only change one part and other parts are in bad shape, there’s the possibility that there will
be a new failure soon!
Some important matters:
• Clean the outside of the engine properly before you open it. Any dust or dirt which gets into
the engine could make considerable damage.
• Check the conrod frequently. If you want to replace the conrod, be sure the big end of your
crankshaft is still round and at a good size. If not, also replace the crankshaft.
• When you start putting your engine back together, make sure that each part is totally clean
before installation and please use some oil (after-run is suited well) to lubricate everything.
• Be careful that each part has its correct direction, especially piston/liner/conrod. Please also
check the explosion drawing. The lubrication hole in the conrod should be facing to the front
(direction to the carburetor).
• Before you install the combustion chamber, please doublecheck that you installed all head
shims.
• Use a hex wrench to install the screws. When you start to feel resistance, stop turning the
screw. Repeat this for each screw, use the star-technique to tighten all the screws completely. Do not overtighten them!
MA00218_LRP_Z21R_Spec3_Pullstart_manual_E_100629_fv.indd 2
Performance
decreases after
reaching operating
temperature or engine
stalls from time to time
Engine still keeps
running at high RPM
for a moment when
you release the throttle
REASON
Glow plug defective
Glow plug does not work
properly
Engine is set too rich
(too much fuel, hits back)
SOLUTION
- replace glow plug
- check the condition of the glow plug
- check the glow plug igniter
- check carburetor settings, repeat tuning
procedure
- unscrew the glow plug completely and use
startbox for 5sec
Engine is too lean
(too little fuel, does not start)
Engine doesn’t suck in the fuel
- check carburetor setting, repeat tuning procedure
Glow plug defective
Bad fuel
Bad carburetor setting
Dirt in fuel line or carburetor
Fuel line damaged
Loose glow plug or cooling head
Air filter old or dirty
Engine is set too lean
Glow plug defective or wrong
type
Engine runs too hot
Shims under comb. chamber
wrong
Bad carburetor setting
Glow plug, wrong type (too hot)
Shims under comb. chamber
wrong
- check the fuel line for possible damage
- check the carburetor setting
- replace glow plug
- replace fuel by fresh and correct type of fuel
- check the carburetor setting, repeat tuning
procedure
- clean fuel line, clean & check carburetor
- replace fuel line
- tighten glow plug and/or cooling head
- clean or replace air filter
- check the carburetor setting, repeat tuning
procedure
- replace the glow plug by a correct type
- run-in process is not completed
- check number of shims
- open mid-range needle ¼ turn at a time and
re-adjust idle-speed
- set idle speed lower
- use glow plug with higher number (e.g. go from
5 to 6)
- check number of shims
REPAIR PROCEDURES /
LIMITED WARRANTY
All products from LRP electronic GmbH (hereinafter called “LRP”) are manufactured according
to the highest quality standards. LRP guarantees this product to be free from defects in materials or workmanship for 90 days (non-european countris only) from the original date of purchase
verified by sales receipt. This limited warranty doesn’t cover defects, which are a result of
misuse, improper maintenance, outside interference or mechanical damage. This applies among
other things on:
• Engine disassembly by customer
• Any modification of the engine done by the customer
• Rust inside the engine
• Dust or dirt inside the engine
• Damaged engine due to glow plug failure
• Overheating
• Scratches inside the engine caused by dirt or dust
• Water in fuel
• Wrong break-in procedure
• Damaged piston due to piston stop devices
• Damaged cylinder exhaust port due to piston stop devices
• Breakages at high rpm without engine load
To eliminate all other possibilities or improper handling, first check all other components in your
model and the trouble shooting guide, if available, before you send in this product for repair.
If products are sent in for repair, which do operate perfectly, we have to charge a service fee
according to our pricelist.
With sending in this product, the customer has to advise LRP if the product should be repaired
in either case. If there is neither a warranty nor guarantee claim, the inspection of the product
and the repairs, if necessary, in either case will be charged with a fee at the customers expense
according to our price list. A proof of purchase including date of purchase needs to be included.
Otherwise, no warranty can be granted. For quick repair- and return service, add your address
and detailed description of the malfunction.
If LRP no longer manufactures a returned defective product and we are unable to service it,
we shall provide you with a product that has at least the same value from one of the successor
series.
The specifications like weight, size and others should be seen as guide values. Due to ongoing
technical improvements, which are done in the interest of the product, LRP does not take any
responsibility for the accuracy of these specs.
LRP-Distributor-Service:
• Package your product carefully and include sales receipt and detailed description of malfunction.
• Send parcel to your national LRP distributor.
• Distributor repairs or exchanges the product.
• Shipment back to you usually by COD (cash on delivery), but this is subject to your national
LRP distributor‘s general policy.
29.06.2010 18:30:04