1
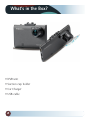
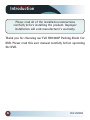
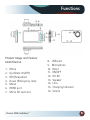
TM
1
What’s in the Box?
• DVR unit
• Suction cup holder
• Car Charger
• USB cable
2
Table of Contents
Introduction...................................................................................4
Functions .......................................................................................5
Operation.................................................................................6-12
Specifications ..............................................................................13
Disclaimer ....................................................................................14
Warranty ......................................................................................15
3
Introduction
Please read all of the installation instructions
carefully before installing the product. Improper
installation will void manufacturer’s warranty.
Thank you for choosing our Full HD1080P Parking Mode Car
DVR. Please read this user manual carefully before operating
the DVR.
4
RVS SYSTEMS
Functions
Product Image and Feature
Identification
1.Menu
2.Up (Mute On/Off)
3.REC/Snapshoot
4.Down (Emergency lock)
5. Mode
6. HDMI port
7. Micro SD card slot
Reverse With Confidence™
8. USB port
9. Microphone
10. Reset
11. ON/OFF
12. IR LED
13. Speaker
14. Lens
15. Charging Indicator
16. Screen
5
Operations
Methods to Charge Battery:
1. Connect DVR to car charger through Mini-USB port, DVR powers
on automatically to enter standby mode and start charging with red
indicator light ON.
Once DVR been fully charged, red indicator light goes out.
2. Connect DVR to computer via USB cable, DVR power on automatically to enter mode choice between ‘Mass Storage (MSDC)’ and ‘PCCam’, press ‘UP’/’DOWN’ to choose the desired mode and ‘REC/OK’
button to enter your choice and start charging.
Once DVR been fully charged, red indicator light goes out.
For the power capacity in the battery, refer to the following icons:
Full
Middle
Low
Installation and Removal of Micro SD card
1. In the direction as indicated, insert the Micro SD card into the slot
until it is held firmly.
2. To take the Micro SD card out, slightly press the Micro SD card to
eject it out.
[Note] - Observe the direction to insert the Micro SD card; if the direction is reverse, the DVR and the Micro SD card may be damaged.
6
RVS SYSTEMS
Operations
- When the Micro SD card is inserted into the DVR, the machine will
set the Micro SD card as preset storage unit and the data in the
original Micro SD card will be unreadable.
- If the Micro SD card is incompatible with the DVR, please insert
the card again or replace it for retry.
- To protect the internal circuit, please make sure DVR is OFF before
inserting micro SD card.
- 4GB-32GB/C6-C10 Micro SD card supported.
Operation Instructions
Turn On/Off DVR
1. Press the power key for 1 second to switch ON and hold for 3 seconds to switch OFF DVR manually.
2. Connect the DVR with car charger in the car. When car ignition
been turned on, DVR switches ON automatically. When car engine
shuts off or car charger been disconnected, DVR switches OFF with
10 seconds delay (as per setting).
System Setup
In Video or Photo mode, press the Menu->UP/DOWN->REC/OK key
to enter the System Setup:
Reverse With Confidence™
7
Operations
- Parking Mode (Parking Surveillance): Off/Low/Middle/High. With
‘parking mode’ set ON, DVR will provide 24/7 protection to your car,
that is, after car parking, DVR will power on to start recording automatically if any external shocks to your car have been detected. 20
seconds later, DVR powers off again automatically. During this
recording, DVR works with internal battery only. By selecting among
options Low/Middle/High, you can set the sensitivity to trigger ‘Parking Mode’.
- G-Sensor: On/Off. When G-sensor is ON, DVR will protect and lock
the current video once G-sensor been triggered by instant impacts
or shocks from traffic accident.
- File Type: Emergent Video/Common Video/Photo. Select the
specified type of files to browse at playback mode.
- Sounds: Voice Recording On/Off, Key Sound On/Off and Volume.
- Power Save: Off/10 sec./30 sec. Select to screen off automatically
after DVR continue recording for 10 sec. or 30 sec. As default, power
save is ‘Off’ and DVR screen stays on indefinitely.
- Date & Time: Date and time adjustment.
- OSD Language: English/Russian/Korean/French/Portuguese/
Chinese, etc.
- Light Freq: 50Hz/60Hz
- Format: Format the memory card. Select to format the memory
card at the first use.
- System: Factory Reset / System Info (Version) / Card Info
8
RVS SYSTEMS
Operations
- Delay shutdown: On/Off. As default, 10 sec. off delay is ON, to
avoid any improper shutdown command caused by power
interruption during recording.
Take Video and Set Video Menu
1. Take video
After power ON, DVR enters Video Mode as default, with icon
displaying at the upper-left corner of screen. Press the ‘REC/OK’ key
to start video recording after proper Micro SD card been inserted.
During recording, the red icon flashes.
[Note]
- When the DVR is mounted on the windshield with car charger connected, it will power ON and start recording automatically once car
engine starts up.
- During charging with car charger connected, it supports simultaneous recording.
2. Set Video Options
Press the Menu key to enter the setup of video options.
- Resolution: 1080P (30fps) / 720P (60fps)
- Seamless (Loop Recording): Off/1min/3min/5min. Select to
store and cycle the video files by 1 min./3 min./5 min. per section.
Reverse With Confidence™
9
Operations
- Date Stamp: On/Off. Select to stamp the date and time on video
screen as watermark.
- Motion Detection: On/Off. The DVR can be set to record ONLY
when motion is detected. This can be useful while your car is parked.
In this mode, DVR will record automatically after sensing motion and
for 10 seconds afterward. The DVR will return to standby mode if no
other motion is detected.
Take Photos and Set Photo Menu
1. Take Photos
Press the power key to enter the video mode as default; press the
Mode key to enter the Photo mode with icon displaying on the
upper-left corner of the screen.
Then, hold the DVR firmly, then press REC/OK key to take photos.
Photos will be stored into memory card automatically.
2. Set Photo Menu
During photo mode, press MENU and REC/OK key to enter photo
menu settings.
- Resolution: 12M/10M/8M/5M/2M
- Exposure: EV -2.1/-1.0/0.0/+1.0/+2.1
[Note]: It’s available to switch freely between Video Mode and Photo
Mode.
10
RVS SYSTEMS
Operations
Playback Mode
1. Browse Files
After the DVR powers ON and enter the VIDEO mode, press the
mode key twice to enter the PLAYBACK mode, press the
UP/DOWN key to browse the video files or Photo files.
[Note] If the File Type (in System Setting) is chosen to be
‘VIDEO’, then only VIDEO files (loop recording files) are available
in PLAYBACK mode. If File Type is chosen to be ‘EVENT’, then
only emergent video files are available in PLAYBACK mode. And
‘PHOTO’ File Type for photo files only browsing in PLAYBACK
mode.
2. Delete and Protect
In playback mode, press the menu key to have the options
Delete and Protection Lock. Press the UP/DOWN and REC/OK
keys to select the options “Delete the current” and “Delete All”,
press the REC/OK to enter your choice. You may add a lock to
the file. Locked file are protected to be important files and cannot be deleted until unlocking it.
Connection to computer via USB Cable
USB Backup Mode
You can upload your videos and pictures to your computer by
using the provided mini-USB cable. Make the connection while
DVR is powered off and the display will show 2 options:
Reverse With Confidence™
11
Operations
MSDC / PC-CAM. MSDC = upload to computer, Highlight the MSDC
by using the UP/DOWN keys and press REC/OK key to enter your
choice. Your computer should now unload all photos and videos.
[NOTE] To watch recorded videos, please transfer videos from memory card to the computer. This DVR is compatible with Windows XP,
Windows 7/8 and Macintosh computers.
PC-CAM
Connect the DVR to computer while DVR is powered off and the display will show 2 options: MSDC / PC-CAM. PC-CAM = use the DVR
as a web camera. Highlight the PC-CAM by using the UP/DOWN keys
and press REC/OK key to enter your choice. You are now able to
video chat with friends on Skype or Messenger.
Connection to TV via HDMI Cable
Connect DVR to TV via HDMI cable (if available). DVR screen will go
black, and TV screen comes to show the playback files (Video or
Photo). Press UP/DOWN key to select the desired file and REC/OK key
to enter your choice.
Reset
During daily operations, improper operation or incorrect memory
card probably causes DVR to freeze. Please press the small key RESET
on the bottom side of DVR to power OFF the DVR. Power ON DVR
manually and DVR will automatically restore the factory defaulted
settings.
12
RVS SYSTEMS
Specifications
Screen Size.................................. 2.7” 960x240 TFT-LCD
Lens................................................170° A+ classs Glass lens
OSD language..............................English/Russian/Chinese/etc
Video Resolution........................1080P (30fps)/720P (30fps)
Video format................................H.264 codec, AVI
Photo size.....................................12M/10M/8M/5M/2M
Photo format...............................JPG
card, support from
Memory Card...............................Micro-SD
4GB-32GB/C6-C10
Microphone/Speaker................ Built-In
Power Frequency........................50Hz/60Hz
USB.................................................USB 2.0
charger, DC12V-24V
Power supply............................... car
adapt to 5V/1000mA
Battery...........................................3.7V/300mAh
Windows 2000/XP/Vista/Win 7/
Operation System...................... Win8, MAC OSX 10.3.6 or above
[Note] We do our best to reflect accurate specifications
above, however periodic updates and changes may occur
after this manual was printed. We reserve the right to
change the parameters without prior notification.
Reverse With Confidence™
13
Disclaimer
RVS SYSTEMS and/or its affiliates does not guarantee or promise
that the user of our systems will not be in/part of an accident or
otherwise not collide with an object and/or person. Our systems are
not a substitute for careful and cautious driving or for the consistent
adherence to all applicable traffic laws and motor vehicle safety
regulations. The RVS SYSTEMS products are not a substitute for
rearview mirrors or for any other motor vehicle equipment mandated
by law. Our camera systems have a limited field of vision and do not
provide a comprehensive view of the rear or side area of the vehicle.
Always make sure to look around your vehicle and use your mirrors
to confirm rearward clearance and that your vehicle can maneuver
safely. RVS SYSTEMS and/or its affiliates shall have no responsibility
or liability for damage and/or injury resulting from accidents occurring with vehicles having some of RVS SYSTEMS products installed
and RVS SYSTEMS and/or its affiliates, the manufacturer, distributor
and seller shall not be liable for any injury, loss or
damage, incidental or consequential, arising out of the use or
intended use of the product. In no event shall RVS SYSTEMS and/or
its affiliates have any liability for any losses (whether direct or indirect, in contract, tort or otherwise) incurred in connection with the
systems, including but not limited to damaged property, personal injury and/or loss of life. Neither shall RVS SYSTEMS and/or its affiliates have any responsibility for any decision, action or inaction
taken by any person in reliance on RVS SYSTEMS
systems, or for any delays, inaccuracies and/or errors in connection
with our systems functions.
14
RVS SYSTEMS
Warranty
One Year Warranty
RVS SYSTEMS Inc. warrants this product against material defects for
a period of one year from date of purchase. We reserve the right to
repair or replace any such defective unit at our sole discretion. RVS
SYSTEMS, Inc. is not responsible for a defect in the system as a result of misuse, improper installation, damage or mishandling of the
electronic components. RVS SYSTEMS, Inc. is not responsible for
consequential damages of any kind.
This warranty is void if: defects in materials or workmanship or damages result from
repairs or alterations which have been made or attempted by others or the unauthorized use of nonconforming parts; the damage is due to normal wear and tear,
this damage is due to abuse, improper maintenance, neglect or accident; or the
damage is due to use of the RVS SYSTEMS, Inc. system after partial failure or use
with improper accessories.
Warranty Performance
DURING THE ABOVE WARRANTY PERIOD, SHOULD YOUR RVS SYSTEMS
PRODUCT EXHIBIT A DEFECT IN MATERIAL OR WORKMANSHIP, SUCH DEFECT
WILL BE REPAIRED WHEN THE COMPLETE RVS SYSTEMS, INC. PRODUCT IS
RETURNED, POSTAGE PREPAID AND INSURED, TO RVS SYSTEMS, INC. OTHER
THAN THE POSTAGE AND INSURANCE REQUIREMENT, NO CHARGE WILL BE
MADE FOR REPAIRS COVERED BY THIS WARRANTY.
Warranty Disclaimers
NO WARRANTY, ORAL OR WRITTEN, EXPRESSED OR IMPLIED, OTHER THE
ABOVE WARRANTY IS MADE WITH REGARD TO THIS RVS SYSTEMS, INC. RVS
SYSTEMS, INC. DISCLAIMS ANY IMPLIED WARRANTY OR MERCHANT-ABILITY
OR FITNESS FOR A PARTICULAR USE OR PURPOSE AND ALL OTHER WARRANTIES IN NO EVENT SHALL RVS SYSTEMS. INC. LIABLE FOR ANY INCIDENTAL, SPECIAL, CONSEQUENTIAL, OR PUNITIVE DAMAGES OR FOR ANY COSTS,
ATTORNEY FEES, EXPENSES, LOSSES OR DELAYS ALLEGED TO BE AS A CONSEQUENCE OF ANY DAMAGE TO, FAILURE OF, OR DEFECT IN ANY PRODUCT INCLUDING, BUT NOT LIMITED TO, ANY CLAIMS FOR LOSS OF PROFITS.
Reverse With Confidence™
15
If you have any questions
about this product, contact:
RVS SYSTEMS, Inc.
1797 Atlantic Avenue
Brooklyn, NY 11233
888.881.2601
BETTER CAMERAS. BETTER SERVICE.
IT’S OUR GUARANTEE.


![[VC120-2] [MENARDS] User Guide [FINAL] 20100618](http://vs1.manualzilla.com/store/data/005701495_1-e41e7e0d778d2f045f29de9890ac0ae7-150x150.png)