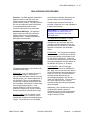
1
FMC USER’S MANUAL
8-1
FLIGHT MANAGEMENT COMPUTER
TABLE OF CONTENTS
SUBJECT
PAGE
FLIGHT MANAGEMENT COMPUTER CONVENTIONS AND USAGE.............8-3
FMC DISPLAY PAGES ACCESSED WITH MODE KEYS.................................8-7
FLIGHT MANAGEMENT SYSTEM INTERNAL FUNCTIONS .........................8-12
PRE-FLIGHT INITIALIZATION PROCESS......................................................8-14
ARRIVAL / DEPARTURE PROCEDURES ......................................................8-24
REVIEWING THE ROUTE OF FLIGHT ...........................................................8-27
FIXES AND CUSTOM WAYPOINTS IN THE FMC..........................................8-30
FMC FLIGHT PLAN MODIFICATION ..............................................................8-33
FMC TAKEOFF PROCEDURES .....................................................................8-36
FMC CLIMB OPERATIONS.............................................................................8-40
FMC CRUISE OPERATIONS ..........................................................................8-42
FMC DESCENT OPERATIONS.......................................................................8-44
FMC APPROACH PROCEDURES..................................................................8-47
FMC FLIGHT REFERENCE AND CREW SUPPORT......................................8-48
PMDG 737NG - AOM
DO NOT DUPLICATE
Revision – 1.2 15NOV03
8-2
FMC USER’S MANUAL
INTENTIONALLY BLANK
Revision – 1.2 15NOV03
DO NOT DUPLICATE
PMDG 737NG - AOM
FMC USER’S MANUAL
8-3
FLIGHT MANAGEMENT COMPUTER CONVENTIONS AND USAGE
Overview: The Next Generation 737 uses a
fully integrated Flight Management System
that is comprised of the following core
equipment:
•
•
•
•
•
•
•
•
•
•
Input from these systems is combined to
conduct comprehensive aircraft control
calculations. Output from the FMC/CDU is
sent to the following systems:
Autopilot Flight Director System
Flight Control Computers
Flight Management Computer CDUs
Autothrottle
Inertial Reference System
Navigation Equipment
Together these systems provide a fully
automatic, full regime flight control and
information display system. The FMS is
capable of providing flight control from
takeoff to rollout.
Digital Clock
Mode Control Panel
FMC Database
FMC/CDU (Crew inputs)
•
•
•
•
Integrated Display System (PFD &
ND)
Autopilot Flight Director System
Mode Control Panel
Autothrottle Servo
• Electronic Engine Controls
There are two primary tools that
crewmembers use to interface with the FMS:
the Flight Management Computer/Control
Display Units (FMC/CDU) and the Autopilot
Mode Control Panel (MCP).
Launching the FMC/CDU: The Next
Generation 737 cockpit has two FMC/CDUs
mounted at the forward end of the throttle
pedestal.
The backbone of the FMS is the Flight
Management Computer/Control Display
Unit. The FMC/CDU performs the following
major functions.
To closely model the functionality of the 737
Next Generation cockpit, the PMDG 737 is
capable of displaying two FMC/CDUs on the
screen at one time.
•
•
•
•
To activate the captain’s FMC/CDU, press
the “F” key on the panel switch device:
•
•
•
•
Flight Planning
Navigation Computation
Navigation Display
Guidance Commands (pitch, roll and
thrust)
Interface to Inertial Reference System
(IRS)
Performance Optimization
Thrust Limit Calculation
Autothrottle Control
The FMC takes input and sensory
information from many aircraft systems,
including the following:
•
•
•
•
•
•
Flight Control Computers (FCCs)
Air Data Computer
Fuel Quantity Indicating System
Weight and Balance Computer
VOR/DME/ILS Receivers
Inertial Reference System
PMDG 737NG - AOM
DO NOT DUPLICATE
Revision – 1.2 15NOV03
8-4
FMC USER’S MANUAL
The second FMC/CDU can be activated on
screen by selecting it from the
VIEWS/PANELS menu within Microsoft
Flight Simulator.
display screen is capable of showing 14
lines of data 24 characters wide in both
large and small fonts. Numeric and
Alphabetic keys are provided for crew input.
Fifteen function and mode keys are provided
to assist the crew in selecting and managing
FMC modes.
Both FMC/CDUs can be operated from
within the Virtual Cockpit as well.
Each FMC/CDU is linked to it’s own Flight
Management Computer mounted in the
aircraft’s electronics bay. Each FMC is
comprised of five processors, and integrates
data received from the air data sensors,
crew input, navigation radios, engine and
fuel sensory systems, inertial reference
system and internal navigation database.
This information is then used to provide
steering commands to the autoflight systems
in both roll and pitch modes, as well as to
the autothrottle servos. Navigation and
positional data is provided to the Navigation
Display.
Each FMC is capable of receiving input
independent of the other, and both systems
will continually compare input/process
results to ensure information consistency on
both FMCs. If inconsistencies are detected,
a resynchronization process is automatically
initiated.
FMC/CDU Layout: The FMC/CDU is
comprised of a data display screen with six
line select keys located on the left and right
sides of the screen respectively. The data
Revision – 1.2 15NOV03
FMC/CDU Display: The MCDU display
screen is comprised of 14 data lines capable
of displaying 24 characters across in large
or small font.
The display is broken into three distinct
areas:
•
•
•
Page Title Line
Text Lines (1-6)
Scratch Pad
The title line is present on every page and
describes the current page that is being
viewed along with that page’s data status.
(ACTive, MODified, etc.)
The text lines contain information that is
aligned against the left and right sides of the
display, and can be manipulated by the Line
Select Keys.
The Scratchpad is where crew data entry
will take place. All entries that are made by
the crew for entry into the FMC must first be
entered into the scratch pad.
DO NOT DUPLICATE
PMDG 737NG - AOM
FMC USER’S MANUAL
8-5
(Obviously, some information cannot be
down/up-selected. Most lines that require
information input from the crew will accept
down/up selection of information, however.)
Scratchpad: The last line of the display is a
scratchpad which allows for alpha numeric
input by the crew, or down-selection of FMC
data from other lines.
Title Line: Top line of the display. Shows
title of current page display. You can use
this line to tell immediately what page of the
FMC you have displayed.
Data Lines: Six pairs of lines that contain
data and information. Lines may also
contain prompts for data input by the crew.
The upper line in each line pair is called the
Title Line (small font), while the lower line is
called the Data Line (large font). Lines and
line pairs are referenced by the associated
LSK on either side of the display. (Hence
1L, 2L, 3L or 1R, 2R, 3R, etc.)
Line Select Keys: The FMC/CDU has six
LSKs on each side of the screen in order to
facilitate data input and manipulation. The
keys are identified by their position relative
to the display and their sequence from top to
bottom. (e.g. The LSKs are identified as
either Left or Right and are numbered from 1
to 6 starting at the top.)
The LSKs are used for the following
functions:
•
•
•
Down-selection of data from a particular
line to the scratchpad (if the scratchpad
is empty.)
Data Entry from scratchpad into
selected line.
Access to data or function identified by
LSK.
Display Norms and Prompts: The
FMC/CDU has certain norms that, if
recognized, make the unit easier to use.
To down-select information into the scratch
pad, simply press the LSK next to the data
you desire to copy. This will cause the
information to be copied to the scratch pad
line.
To up-select information from the scratch
pad to a line in the display, simply press the
LSK for the line to which the information is
targeted. This will cause the information to
be copied from the scratch pad to the
desired line in the display.
PMDG 737NG - AOM
DO NOT DUPLICATE
Revision – 1.2 15NOV03
8-6
FMC USER’S MANUAL
Required Entry Boxes: In order to
operate, the FMC requires certain
information to be entered. Gross Weight,
Fuel Reserves and Cruising Altitude are
examples of information that the FMC needs
in order to operate correctly.
Boxes in any FMC/CDU display line indicate
that information is required by the FMC.
Examples include Gross Weight, Startup
Position, etc.
Page Numbers: Many pages of information
contain more information that the FMC/CDU
screen is able to show at one time. In these
cases, the FMC/CDU will display a page
counter at the upper right corner of the
screen. (In this case, 1/3 indicates that the
display is currently showing screen one of
three total screens for POS IDENT.
Using the CLR key: Pressing the CLR key
a single time is similar to pressing the
backspace key on a conventional keyboard.
In order to facilitate erasing the scratch pad,
we have added the ability to press and hold
the CLR key to delete the entire contents of
the scratch pad. To remove all items in the
scratchpad, simply press and hold the CLR
key for one second.
LSK Prompts: At any time a ‘<’ or a ‘>’
carat is used adjacent to a line select key,
this indicates that an additional or related
menu can be accesd by pressing the
associated LSK. For example, the <INDEX
prompt above indicates that pressing the 6L
LSK will take you to the INDEX page.
Crew Data Entry/Selection Lines: Dashed
lines allow for crew entry of specific data
which is unique to each individual flight,
such as departure airport, destination
airport, speed/altitude restrictions, flap
acceleration heights, etc.
Revision – 1.2 15NOV03
DO NOT DUPLICATE
PMDG 737NG - AOM
FMC USER’S MANUAL
8-7
FMC DISPLAY PAGES ACCESSED WITH MODE KEYS
<ACT> Indicates that the sub-system is
currently active and operating.
Overview: The PMDG 737: The Next
Generation uses an FMC that has fifteen
mode keys available on the FMC/CDU.
These keys provide direct access to a
number of functions within the FMC that will
be used by the crew during various phases
of flight.
<HLD> Indicates that the pilot has selected
the sub-system but the FMC/CDU has not
yet established active communications with
that sub-system. (In this case because
ACARS functionality is not currently
available in the PMDG FMC.)
INIT REF Key: When pressed, the INIT
REF key will provide access to one of the
following pages:
•
•
•
•
•
•
MENU Key: The MENU key provides
access to the FMC and other aircraft subsystems that use the FMC/CDU for input or
control. When pressed, the MENU key
brings up the following display screen on the
FMC/CDU:
IDENT
POS
PERF
THRUST LIM
TAKEOFF
APPROACH
The FMC will automatically display the page
which is most appropriate for the current
phase of flight. During the preflight phase,
for example, the FMC will begin by
displaying the IDENT or POS pages so as to
allow the crew to begin initializing the FMC.
During the approach phase of flight, the
FMC will automatically choose the
APPROACH page, etc.
If the page displayed is not the page desired
by the crew, pressing the LSK which has the
<INDEX prompt (usually 6L) will return the
MCDU to the following screen:
In the current version of the PMDG FMC,
not all functions are active from this screen,
as evidenced by the grayed out items in the
menu. Currently only the FMC function is
available by the FMC/CDU, but ACARS
functionality is planned.
If pressed during flight, the <FMC prompt
will bring up the last displayed FMC page.
When the MENU page is active, a
<STATUS> prompt will be shown adjacent
to each FMC/CDU function.
PMDG 737NG - AOM
The INIT/REF INDEX page allows crew
access to the following initialization and
reference pages:
•
•
•
IDENT: Aircraft identification and nav
database verification page.
POS: Position Initialization (on ground)
or Position Reference page (in flight).
PERF: (Located on page 2/2 of PERF
page) Performance initialization page (Gross
weight, Fuel Loading, Cost Index, etc.)
DO NOT DUPLICATE
Revision – 1.2 15NOV03
8-8
•
•
•
FMC USER’S MANUAL
TAKEOFF: Takeoff parameter reference
and initialization page.
APPROACH: Approach reference and
initialization page.
NAVDATA: Display and list navdata
information and saved flight plans.
Other functions listed on this page are not
implemented, but are included here for
completeness and growth of future
functionality.
If the INIT/REF INDEX is reached via the
MENU key, the following menu will be
presented. (Grayed out items are not yet
implemented.)
The route being displayed is described by
the title line of the RTE display, and can be
any of the following:
RTE or ACT RTE or MOD RTE
• Route 1 was displayed.
• Route 1 is active.
• No route was activated.
Note: Currently the PMDG FMC is only
capable of displaying a single route entry.
The actual aircraft allows two.
The RTE page displays the waypoint fixes
and the method that the FMC will use to
reach each successive fix. (Jey Route,
Victor Airway, Direct, etc.)
CLB Key: The CLB key is used to display
the FMC/CDU page dedicated to climb
thrust and altitude control.
The CLB page is used to monitor the
progress and performance of the climb, as
well as to set the desired performance or
adjust the speed of the climb.
RTE Key: When pressed, the RTE key
provides access to the ROUTE page. The
ROUTE page will be blank if a new route
has not yet been loaded, or it will display
ACT RTE (route is activated) or MOD RTE
(route has been modified and needs
confirmation.)
CRZ Key: The CRZ key is used to monitor
and adjust the parameters that are being
used to manage flight during cruise.
Revision – 1.2 15NOV03
DO NOT DUPLICATE
PMDG 737NG - AOM
FMC USER’S MANUAL
8-9
The LEGS page is used frequently during
the course of flight to manage altitude and
speed constraints Additionally the legs
page is used to modify individual fixes along
the route of flight, or to enter customer
waypoints into the flight plan.
The CRZ page provides information related
to altitude, fuel and speed that can be used
by the crew to plan and manage decisions
effectively.
DES Key: The DES page provides descent
speed, fuel and planning information that
can be used to control the descent portion of
flight.
There are two methods used to calculate the
descent phase of flight, and the active
method is displayed as part of the DES page
title.
LEGS Page: The LEGS page is similar in
function to the RTE page in that it displays
the loaded route of flight. The LEGS page
differs, however in that the LEGS page will
show every single fix over which the flight
will cross, while the RTE page only shows
the major route fixes that connect the
individual navigation methods to make up
the route.
PMDG 737NG - AOM
DEP/ARR Key: The DEP/ARR key
accesses the DEPARTURES and
ARRIVALS pages and the DEP/ARR INDEX
page. These pages are used to select
published departure procedures (Standard
Instrument Departures, or SIDs) and
published terminal arrival procedures,
(Standard Terminal Arrivals, or STARs).
The DEP/ARR INDEX page allows the crew
to select (using the appropriate LSKs) either
the appropriate DEP procedure, or an ARR
procedure for either of the two possible
routes stored in the FMC
HOLD: The hold key provides control pages
through which the crew can establsih and
control the addition of holding procedures to
the active flight plan.
DO NOT DUPLICATE
Revision – 1.2 15NOV03
8 - 10
FMC USER’S MANUAL
N1 LIM Key: The N1 LIMIT page allows for
the selection and control of engine
performance limits during takeoff, climb,
cruise and descent.
PROG Page: The PROGRESS page is
used to monitor the progress of flight and
parameters such as time, distance and fuel
consumption.
FIX Key: The FIX page allows the crew to
enter desired visual waypoints onto the
Navigation display by defining them in
relation to known points within the Navaid
database.
The fixes are no required to be a part of the
active flight plan, and are displayed as green
information on the display.
EXEC Key: The EXEC key is only active
when the light bar contained within the key
is illuminated. The key is used to confirm
and changes to the vertical and lateral route
plan.
At any time the EXEC key is active, an
<ERASE prompt will appear on the MCDU
display in order to facilitate cancellation or
deletion of a proposed action.
Revision – 1.2 15NOV03
NEXT PAGE/PREV PAGE Keys: The
NEXT PAGE and PREV PAGE keys are
used in conjunction with MCDU displays
which occupy more than one page on the
MCDU display. Multiple page MCDU
displays are indicated by the use of page
numbering in the upper right hand corner of
the MCDU display.
DO NOT DUPLICATE
PMDG 737NG - AOM
FMC USER’S MANUAL
A wrap around feature is included so that if
the NEXT PAGE key is pressed again when
the current page is the last in the display,
(e.g. 5/5) then the first page of the display
PMDG 737NG - AOM
8 - 11
(1/5) will be displayed next. This feature
also works for the PREV PAGE key
DO NOT DUPLICATE
Revision – 1.2 15NOV03
8 - 12
FMC USER’S MANUAL
FLIGHT MANAGEMENT SYSTEM INTERNAL FUNCTIONS
Performance Management: The FMS is
capable of managing nearly all aspects of
aircraft performance so as to optimize
precision and economy of flight. The FMS is
only capable of providing such information if
the gross weight, cost index target altitude
and a route have been entered into the
FMC/CDU by the crew.. Vertical Navigation
can only be accomplished if the
performance initialization page is complete.
The performance model uses input from fuel
flow, engine data, altitude, gross weight of
the aircraft, flaps, airspeed, Mach,
temperature, vertical speed, acceleration
and location within a programmed flight plan
to determine the optimum performance for
the aircraft at any given moment.
The performance management modeling
used by the FMS attempts to provide a least
cost performance solution for all phases of
flight, including climb, cruise and descent.
The default cruise performance
management setting is ECON, or economy
cruise.
The airplane and engine data models are
used to provide an optimum vertical profile
for the selected performance mode, even if
ECON has been overridden by the crew.
During the climb, an optimum Mach speed
target and a corresponding thrust target are
computed by the FMS, with the speed target
transmitted to the vertical guidance function
of the autoflight director system. The AFDS
will then generate commands to the elevator
in order to maintain the correct pitch for the
required speed. Thrust setting commands
are delivered to the autothrottle servos by
the FMS, and used in conjunction with the
pitch setting commands to maintain the
optimum speed and climb as directed by the
FMS.
During cruise, an optimum Mach setting is
computed and thrust setting commands are
delivered to the autothrottle.
During descent, a vertical path is computed
based on the flight plan entered into the
FMC/CDU. The FMS will evaluate expected
wind conditions, aircraft speed, altitude,
position relative to the planned end-ofRevision – 1.2 15NOV03
descent point and any intermediate altitude
or speed constraints between the aircraft
and the end-of-descent point. This
information will be passed to the AFDS for
pitch based speed and vertical speed control
and the autothrottles for vertical speed and
thrust management. In ideal conditions, an
idle thrust optimum descent profile is flown,
however in many cases thrust and pitch will
be varied to account for wind conditions or
to ensure proper tracking of the vertical
descent profile.
Important Note Regarding MSFS: It
should be noted that the PMDG FMC uses
realistic algorithms to compute the effect of
wind conditions and reported wind
conditions on the planned descent profile.
Some weaknesses in the modeling of
weather transitions within MSFS may cause
rapid shifts in reported wind-speed and
direction, which may have the effect of
changing the predicted descent path.
For this reason, PMDG does not
recommend using this airplane with any third
party weather generation software, as we
have found large variances in manner in
which these software packages attempt to
manage sudden wind shifts within MSFS,
thus causing unreliable descent angle and
wind effect prediction.
Navigation Accuracy: The FMS
automatically selects and tunes VHR OmniRange (VOR) and Distance Measuring
Equipment (DME) in order to constantly
update the position and speed of the aircraft.
This information is used in conjunction with
the Inertial Reference System (IRS) and
Global Positioning System (GPS) to ensure
accuracy in all phases of flight.
The FMS will primarily attempt to GPS
position information, then combine range
information corrected for slant range from
two separate DME locations, and finally
position from three Inertial Reference Units
(IRUs). If no usable VOR/DME information
is available, the FMS will monitor aircraft
position based on IRS/GPS data only, until
the aircraft is determined to be in a location
where DME/VOR information is once again
DO NOT DUPLICATE
PMDG 737NG - AOM
FMC USER’S MANUAL
available for position and velocity cross
checking.
The FMS navigation management system
will also compute and provide true and
magnetic track information, drift angle,
magnetic variation for the current aircraft
location and vertical flight path information.
The FMC automatically determines which
VOR/DME combinations will yield the best
result given their position relative to the
aircraft.
Guidance Management: Two dimensional
flight path management is available along an
FMC programmed flight path in either the
vertical navigation mode (VNAV) or lateral
navigation mode (LNAV). Both of these
modes are selected by using the
LNAV/VNAV buttons on the Autopilot Mode
Control Panel (MCP). When used in
conjunction with one another, the FMS is
capable of providing fully integrated three
dimensional flight path management along
the FMC defined flight path.
The LNAV guidance function issues steering
commands to the AFDS in order to keep the
aircraft navigating correctly along the
programmed route of flight. Deviations from
the center of the desired flight track are
corrected using intercept procedures and
flight track adjustments. Normal lateral flight
path deviation should not exceed 0.1nm in
most phases of flight.
In all phases of an LNAV managed flight, the
FMS will monitor cross track error, which is
defined as the lateral distance separating
the aircraft from it’s desired path of flight.
Roll and steering commands are provided to
the AFDS Flight Control Computers in order
to correct the cross track error.
The FMS is capable of providing a great
circle Direct-To track to any point
programmed into the FMC/CDU displayed
flight path.
The VNAV guidance function controls the
aircraft along the vertical flight path as
defined by the FMC/CDU entered flight path
and the aircraft’s performance limitations.
8 - 13
VNAV takes position data from the
navigation system and compares it to the
vertical profile as defined in the FMC/CDU
entered flight plan. The vertical navigation
function then provides pitch and thrust
commands to the AFDS in order to intercept
and maintain the defined vertical profile for
the current phase of flight.
For vertical performance modes where
vertical speed is unconstrained (most
climbs) the VNAV system will provide pitch
and thrust commands to the AFDS so as to
maintain the most efficient climb based on
the current thrust mode selected. This
results in the most economically beneficial
climb gradient, not necessarily the most
rapid climb gradient.
VNAV uses essentially two basic pitch
control modes to manage the vertical flight
profile: speed or rate of climb/descent.
When speed the controlled factor the AFDS
autothrottle will be given a target thrust
setting by the vertical navigation function,
and the elevator will be used to control
speed, resulting in a variable rate of climb or
descent based upon conditions.
When vertical speed is the controlled factor,
the AFDS will issue commands to the
elevator for vertical speed control, and the
AFDS will adjust the autothrottle to maintain
speed, resulting in a fixed rate of
climb/descent and variable speed based
upon conditions.
Thrust Management: The FMS thrust
management function is capable of
performing autothrottle control law
calculations based upon commands from
the navigation function, as well as direct
crew input from the FMC, manual
adjustment of throttle position, or AFDS
autothrottle commands.
The autothrottle control law function
provides automatic N1 equalization in all
modes of flight, as well as thrust limit
protection and N1 thrust requirement
calculations to maintain MCP or AFDS
speed and thrust settings.
Autothrottle modes can be selected or
overridden by the crew as required.
PMDG 737NG - AOM
DO NOT DUPLICATE
Revision – 1.2 15NOV03
8 - 14
FMC USER’S MANUAL
PRE-FLIGHT INITIALIZATION PROCESS
Overview: When power is first applied to
the aircraft, the FMC/CDU conducts a full
self test and is then ready for preflight
initialization. The preflight portion of FMC
operation prepares the flight management
system with information that is needed in
order to manage flight.
Note: Tremendous effort has been placed
into the development of a high fidelity
FMC/CDU interface, AFDS, MCP and
predictive algorithms for flight planning and
conduct.
An FMC is not simply a sophisticated GPS,
but should be viewed as a highly
sophisticated scientific instrument. The
complexity of mathematics contained in real
FMCs has been reproduced here to an
extensive degree using actual engineering
methods and principles.
In some cases we have not included certain
functions within the FMC/CDU as they were
not deemed to be reasonably usable within
the confines of MSFS. As we continue
development of the airplane and it’s
systems, some new functions will of course
b added. Please keep your PMDG 737 up
to date by ensuring you always have the
most current Service Updates installed!
IDENT Page: When first powered, the FMC
will display the IDENT page.
The IDENT page is easily identified by the
IDENT title page line at the top of the display
screen.
Helpful Hint: Pay close attention to the
information that appears in the TITLE LINE
of the FMC/CDU screen. You will find that
the pages are intuitively named, and
learning the name of pages with specific
information will help you quickly master the
sophisticated FMC/CDU!
The data displayed on the IDENT page
identifies the aircraft by type, engine thrust
rating, navdata cycle FMC Operating
Program.
The data appearing on this page should not
change on a regular basis, but it is important
that this preflight check be accomplished in
order to protect against system faults or
improper system reloads during updates
and/or changes to the FMS or FMC navdata
information.
The following information is provided on the
IDENT page:
MODEL: The airplane model is displayed in
line 1L.
ENG RATING: The thrust rating of the
engines current installed is displayed in line
1R.
NAV DATA: The current navdada cycle
and effective dates are displayed.
PMDG has selected Richard Stefan’s
venerable AIRAC navdata cycle database
system to power the PMDG FMC. This
decision was made based on the wide
acceptance of this navdata system within
the simulation community, and the
dedication and accuracy of Richard Steffan’s
work. The navdata cycle information is
displayed in the NAV DATA line, and the
active dates for the database are displayed
under the ACTIVE title on the right side of
the screen.
Revision – 1.2 15NOV03
DO NOT DUPLICATE
PMDG 737NG - AOM
FMC USER’S MANUAL
Helpful Hint: If you see the phrase
INSTALLATION REQUIRED under the NAV
DATA title, this means that you do not have
the AIRAC navdata information properly
installed, and your FMC/CDU will not
operate correctly!
To install the navdata information correctly:
8 - 15
currently modeled however, the information
is provided below in anticipation of the IRS
position update capability being added at a
later date.
The POS INIT page is selected by pressing
LSK at the POS INIT> prompt, or by
selecting <POS INIT from the INIT/REF
INDEX page.
1) Got to www.navdata.at
2) Download and install the 767PIC/PMDG
All-In-One installer
3) Install the navdata into the following
directory:
FlightSimulator/FMCWP/NAVDATA
(replace FlightSimulator with the location of
your FS installation!)
4) Download the SID/STAR database from
our 737 Operators Information Center
5) Place all the SID/STAR files into the
FS/PMDG/SIDSTARS directory.
Now you will have access to the full range of
navdata and sid/star information for the
FMC/CDU!
OP PROGRAM: The operational program
identifier is displayed in line 4L. This
number is the part number of the FMC
operational software program. If this
number is not matched identically by both
FMCs, then the system will remain locked at
the IDENT page. (Call Maintenance! You
cannot fix this from the airplane!)
Toward the bottom of the screen, Line 6
contains two prompts, <INDEX (on the left)
and POS INIT> (on the right.)
The fields displayed on the POS INIT page
are as follows:
LAST POS: This reference position is the
last recorded position of the aircraft at the
time the aircraft was powered down, or at
the time the brakes were last set. If
determined to be applicable, this information
can be down-selected via the scratchpad to
satisfy the position initialization requirements
of line 4R.
Crews are advised to use caution when
down-selecting the LAST POS reference
position, as it may contain accumulated IRS
drift inaccuracy from the previous flight. In
addition, if the aircraft has been towed to a
new gate or moved while the IRS was not
aligned, the reference position will be
inaccurate.
Pressing the 6L LSK adjacent to the
<INDEX prompt will display the INIT REF
INDEX page. Pressing the 6R LSK adjacent
to the POS INIT> prompt will display the
Position Initialization page of the FMC.
REF AIRPORT: Entry of a reference airport
ICAO code (International Civil Aviation
Organization) will cause a reference position
to become available in 2R. This reference
position can be down-selected via the
scratchpad to satisfy the position needs of
4R if desired.
POS INIT Page: The POS INIT page allows
for position initialization of the Inertial
Reference System (IRS). In the current
version of the PMDG FMC, the IRS is not
GATE: The gate position reference is not
currently modeled in the AIRAC database
but is used to provide exact gate position
PMDG 737NG - AOM
DO NOT DUPLICATE
Revision – 1.2 15NOV03
8 - 16
FMC USER’S MANUAL
reference to the IRS during position
initialization.
by selecting the ROUTE> prompt from the
POS INIT page.
SET IRS POS: The prompt boxes at 4R
indicate that current aircraft position has not
be initialized, or that any of the IRS modules
is in the align mode. (If neither of these
conditions is true, then 4R will be blank.)
The fields displayed on the RTE page are as
follows:
To satisfy the prompt boxes at line 4R, the
reference latitude/longitude position can be
entered directly into the scratch pad, then
line selected to 4R, or by -selection of the
LAST POS or REF AIRPORT reference
position via the scratch pad.
Helpful Hint!: The IRS is not currently
modeled in the PMDG 737. As such, it is
not necessary to pass the current airplane
location to the FMC via the POS/INIT page
of the FMC. Once the PMDG 737 IRS is
installed, this function will become
necessary.
GMT MON/DAY: Line 5L displays the
current time in GMT according to the
airplane’s clock.
RTE Page: The RTE page is used to
program the route to be followed during
flight. On this page information such as
origin, destination, company route name (for
saved flight plans) flight number and
planned departure runway can be added.
ORIGIN: The airport of origin for the flight.
Valid entries include any four letter ICAO
airport code. Type the desired entry into the
scratch pad using the FMC keyboard, then
upselect to the ORIGIN by pressing the 1L
LSK. (Note that the boxes indicate that
origin and destination are required entries!)
DEST: Airport of destination. Valid entries
include any four letter ICAO airport code.
CO ROUTE: To load a previously saved
flight plan into the FMC/CDU, simply type
the name of the saved flight plan into the
scratch pad and upload it to the 2L LSK.
Helpful Hint!: Saving and loading flight
plans is covered in greater detail on page __
FLT NO: Airline code and flight number.
Valid entries are any alpha numeric
combination not including + or -. The flight
number will automatically be displayed on
the PROGRESS page as well, and may be
changed but not deleted.
REVERSE: (not always displayed) the
REVERSE cue allows you to load a saved
flightplan between to points, and to reverse
the plan in order to effect a return flight, for
example.
ACTIVATE: Once a valid origin/destination
have been added to the RTE page and a
flight plan has been entered, the FMC/CDU
will display the ACTIVATE> prompt at the 6L
LSK.
Note: Once the ACTIVATE prompt is
selected, the FMC will activate the flight plan
to make it usable. This will also trigger the
EXEC key on the FMC/CDU to illuminate,
indicating that the EXEC key should be
pressed in order to confirm the action!
The RTE page is accessed either by
pressing the RTE key on the FMC/CDU or
Revision – 1.2 15NOV03
DO NOT DUPLICATE
PMDG 737NG - AOM
FMC USER’S MANUAL
Programming the Route of Flight: Once
the ORIGIN, DEST, and FTL NO. have been
entered into the RTE page it will look similar
to this:
8 - 17
example, assume that the route of flight to
be used is described as follows:
“Depart KIAD and fly direct to WOOLY
intersection, then follow V214 to the
SWANN intersection.”
WOOLY is located approximately 20nm
north of KIAD, and V214 is a route that has
two distinct turns while crossing a half dozen
fixes and VORs before reaching SWANN
intersection.
Since KIAD has already been entered as the
origin airport, it does not need to be entered
again into the route.
Notice that the page indication has changed
from 1/1 to 1/2 this indicates that a second
page is now available and can be accessed
using the NEXT PAGE key on the
FMC/CDU.
Pressing the NEXT PAGE key will display
RTE page 2/2 as follows:
Type the first fix name (WOOLY) into the
scratch pad, and upload the fix to the 1R
LSK.
The FMC/CDU will check the database for
the intersection name that you have entered,
and if it is found to be unique, it will populate
the fix name to the appropriate place on the
screen. (Depending upon which LSK you
pressed….)
In the case of WOOLY, there are more than
one intersections that bear this name.
Geographically they are very far apart, but
the FMC/CDU will always present them to
you for validation before using one in a flight
plan!
As such, you will be presented with a screen
the looks similar to this:
The RTE page 2/2 is where crewmembers
manually enter the route of flight. This is
accomplished by typing fix names
individually into the scratch pad, then
uploading them in order to the right LSKs.
The RTE page 2/2 should be viewed as two
distinct columns based on their titles: VIA
and TO.
The TO column is where individual fixes
along the route of flight are entered. The
VIA column describes how to get there. For
PMDG 737NG - AOM
The FMC/CDU will always sort the fixes so
that the fix closest to your position will be
listed FIRST in the list. This makes
DO NOT DUPLICATE
Revision – 1.2 15NOV03
8 - 18
FMC USER’S MANUAL
selection easy, but crewmembers are still
responsible for verifying fix locations prior to
using them for flight!
To select the desired fix, press the LSK
adjacent to the name of the fix you wish to
use. (In this case 1L LSK.)
The FMC will then populate the fix name to
the RTE page 2/2 as follows:
WOOLY is now displayed under the TO
column on the RTE page 2/2. You will note
that DIRECT is displayed under the VIA
column, as the the FMC/CDU assumes that
it should fly DIRECT to any fix entered into
the RTE page.
On longer routings, a flight path may turn in
many places or cross upwards of 40
navigation fixes before reaching desired fix,
so the FMC/CDU allows crewmembers to
define the “route to follow” in the VIA column
of the RTE page 2/2 in order to prevent the
typing of every fix name along a route of
flight.
In our example, we wish to follow V214
between WOOLY and SWANN. This, we
upload SWANN as the fix following WOOLY,
but then take the additional step of adding
V214 to the VIA column describing how we
should reach SWANN.
Examining the RTE page 2/2, now shows
that our programmed flight is: DIRECT
WOOLY then V214 to SWANN.
When the entire route of flight is entered, the
RTE 2/2 page will look something like this:
The next fix described in the flight plan is
SWANN. When SWANN is entered into the
RTE page, the FMC/CDU also assumes that
DIRECT is the desired method to reach
SWANN after passing WOOLY.
This would not be a correct according to our
clearance as the cleared route of flight was
to follow V214 from WOOLY to SWANN.
(The BAL VOR is located between WOOLY
and SWANN, but is not on a direct path
between the two, so the route of flight turns
slightly at BAL.)
Revision – 1.2 15NOV03
Note: KIAD-KJFK is a very short route of
flight. On longer routes it is possible to have
5 or 6 pages of navigation information
added. Simply use the NEXT PAGE key to
reach those pages of information.
Saving a Flight Plan: Once the desired
route of flight has been entered it is always a
DO NOT DUPLICATE
PMDG 737NG - AOM
FMC USER’S MANUAL
8 - 19
good idea to save the route of flight for
future use.
To save a flight plan, return to the RTE page
1 and notice that the <SAVE prompt is now
active at the 5L LSK. (You may need to
activate your flight plan first!)
Select the NAV DATA> prompt by pressing
the 1R LSK. This will take you to the NAV
DATA screen as follows:
By pressing the <SAVE prompt, your flight
plan will be saved in a directory as a text file.
The file is saved in the following location:
C:\flightsim\PMDG\FLIGHTPLANS
(C:\flightsim is replaced by the root directory
of your MSFS installation!)
Your flight plan save will be confirmed by the
following message in the scratchpad of the
FMC/CDU:
The REF NAV DATA page is used to review
information about individual navigation
wapoints, navaids and airports from within
the naviation database.
Additionally you can review the names of
saved flight plans from this location by
pressing the FLT PLANS> prompt at the 3R
LSK.
Loading a saved flight plan: Loading
saved flight plans is simple to do and very
closely mirrors the initialization process used
by flight crews around the world to initialize
the FMC/CDU prior to flight.
This will present you with a list of flightplans
that are currently saved in your
PMDG/FLIGHTPLANS directory as follows:
To load a flight plan, press the MENU key to
bring up the FMC/CDU main menu as
follows:
PMDG 737NG - AOM
DO NOT DUPLICATE
Revision – 1.2 15NOV03
8 - 20
FMC USER’S MANUAL
Saved flight plans cannot be loaded from
this page, as the page is for display
purposes only.
places required entry boxes in all locations
where information is needed.
From this page, you can downselect to the
scratchpad the name of the flight plan that
you wish to load and activate within the
FMC/CDU.
To load and activate the flight plan, you
simply return to the RTE page, and upselect
the flight plan name to the Company Route
prompt as follows:
Note: The title line on this page displays
PERF INIT until the initialization is
completed, at which point the title changes
to ACT PERF INIT to indicate that it is
ACTIVE.
The fields displayed on the PERF INIT page
are as follows:
GW/CRZ CG: Aircraft Gross Weight in
thousands of pounds must be entered at the
1L LSK, followed by the cruise flight CG
percent of MAC (Mean Aerodynamic Chord)
setting.
This will load the saved flight plan, and
trigger the ACTIVATE> prompt so that
crewmembers can confirm the route and
EXEC it into active memory.
Note that when the route has been
successfully loaded, activated and executed,
the RTE page title changes to ACT RTE as
displayed above. ACT RTE indicates that
the route is ACTIVE.
PERF INIT Page: The performance
initialization page allows entry of critical
aircraft performance factors needed by the
FMS in order to accurately predict aircraft
performance. It is easy to determine which
items remain to be entered as the FMC
Revision – 1.2 15NOV03
Note: Currently CG functions and %MAC
functions are not modeled in the PMDG
FMC. These figures are currently static, but
will eventually be updated to make them
fully functional.
Aircraft Gross Weight must always equal the
aircraft Zero Fuel Weight plus the weight of
boarded fuel.
Normally, the gross weight figure that needs
to be entered into the GW/CRZ CG line is
reported to the crew by the airline load
planner who has calculated aircraft mass
based on the items loaded and
passengers/fuel boarded.
To simulate this process, PMDG has
allowed for manual crew entry based on
crew flight planning, or crewmembers may
alternately press the 1L LSK to automatically
populate the current aircraft gross weight to
the display.
DO NOT DUPLICATE
PMDG 737NG - AOM
FMC USER’S MANUAL
When the Gross Weight has been
confirmed, it is displayed in large font.
such as excessive headwinds, higher than
normal fuel consumption or an undetected
fuel leak.
FUEL: The FUEL indicator displays the
current weight of fuel boarded in thousands
of pounds. Total Fuel Quantity is sensed by
the Fuel Quantity Indication System (FQIS)
and reported to the FMS.
Cost Index: The cost index number is a
scale value from 0 to 1000 that helps to
determine a level of economy for aircraft
performance calculation.
If the FQIS is deactivated or inoperative,
prompt boxes will alert the crew to enter fuel
quantity manually in line 2L.
ZFW: The aircraft zero fuel weight is
displayed in line 3L. Weight is displayed in
the thousands of pounds, with an optional
decimal point. Prompt boxes alert the crew
that the ZFW must be entered manually,
however confirmation of GR WT and FUEL
fields will automatically update the ZFW
field. Again, optionally pressing the 3L LSK
will automatically populate this information to
the FMC/CDU.
RESERVES: The reserve fuel weight is
displayed at line 4L. Prompt boxes alert the
crew that a reserve fuel weight in thousands
of pounds must be entered. Even if no
reserve fuel is to be carried the crew must
enter a figure. (0 or greater)
Helpful Hint: The value entered for fuel
reserves is used by the FMS to determine
when there is no longer sufficient fuel
remaining to reach the programmed
destination with the desired amount of
reserve fuel remaining. Lowering this figure
will cause the warning to cease, or lowering
current fuel burn rates will also cease the
warning.
8 - 21
Cost index is calculated as the aircraft
operating cost divided by fuel cost. [($/hour
aircraft operating cost) / (Fuel Cost in
Cents/Pound)] A cost index of 00 will result
in the maximum cost economy, with slow
climb rates, maximum range cruise and slow
descent speeds predicted by the FMC in
order to minimize fuel burn. A high cost
index will result in higher climb rates, cruise
and descent speeds. The cost index is
designed to provide a relative index of the
cost of aircraft operation vs. time en-route.
Note: Cost index is not currently functional
in this version, but a basic model has
completed development. A fully functioning
cost index model will be added to the
FMC/CDU at a future update.
TRIP/CRZ ALT: Planned cruise altitude for
the flight can be entered in the CRZ ALT
section. (Note: Do not exceed the TRIP
altitude described here, or you will be
planning a cruise altitude that is not
economically acceptable for current aircraft
conditions and configuration.)
TANS ALT: This entry allows for manual
adjustment of the transition altitude for the
area of flight.
The completed PERF INIT page follows:
Occasionally it is possible to trigger the low
fuel warning during initial climb out when a
combination of factors such as current fuel
burn, length of flight, fuel on board and
reserve fuel desired create only a small
margin of “extra” fuel on the airplane for
current conditions. Once the aircraft is
stable at cruise flight and current fuel burn is
reduced to cruise levels, the warning will
normally cease.
Continued INSUFFICIENT FUEL warnings
should not be ignored, however as they may
be an indication of an impending problem
PMDG 737NG - AOM
DO NOT DUPLICATE
Revision – 1.2 15NOV03
8 - 22
FMC USER’S MANUAL
Upon completion of the PERF INIT page,
the N1 LIMIT> prompt will be displayed at
the 6R LSK.
N1 Limit Page: The N1 Limit page is used
to select the thrust performance desired
during takeoff and climb.
When the takeoff phase of flight is active,
the climb thrust cue will show <SEL> to
indicate that the thrust mode is not active,
but is selected to become active at the thrust
rating associated on the right side of the
display.
For example, in the image shown above, a
TO-1 derate to 22,000lbs of thrust has been
selected, with a CLB-2 derated thrust
performance
The expected engine N1 percentages for the
selected takeoff and climb (given current
conditions) are displayed in the upper right
corner of the N1 LIMIT page.
After takeoff and climb thrust rates have
been selected, the TAKEOFF> prompt at
the 6R LSK will complete the preflight
process.
Available takeoff power derates are listed on
the left side of the display while the climb
power derates are available on the right side
of the display.
TAKEOFF REF Page: The Takeoff page is
where final aircraft takeoff configuration is
programmed into the FMC/CDU.
Thrust derates are normally used when the
aircraft is lighter than maximum gross weight
and serve to normalize acceleration forces,
takeoff roll and climb rates provided that
runway length and climb clearance are not a
factor.
For example, if very few passengers are
boarded a full thrust takeoff will result in
excessive acceleration during takeoff roll
and high deck angles due to the overabundance of thrust based on the light
weight of the airplane.
Selecting a lower thrust rating will reduce
acceleration forces, deck angle during the
climb, and result on lower rates of wear and
tear on the engines over time.
When the N1 LIMIT page is brought up
during preflight planning, an <ACT> cue is
placed in he left-center column of the display
in a position to indicate that full takeoff thrust
is selected. Pressing either the 2L LSK or
3L LSK will move the <ACT> prompt down
to the associated line.
Revision – 1.2 15NOV03
The following information is displayed by the
TAKEOFF REF page:
FLAPS: The flap setting for takeoff should
be entered into the scratch pad and
upselected to the 1L LSK.
Thrust Setting: (note: Displayed as 24KN1,
22KN1, 20KN1, etc depending upon thrust
setting selected for takeoff.) The expected
N1 RPM percentage for takeoff and climb id
displayed at the 2L LSK. These entries
cannot be modified except by changing the
DO NOT DUPLICATE
PMDG 737NG - AOM
FMC USER’S MANUAL
thrust setting selected on the N1 LIMIT
page.
the speed bugs will be removed from the
primary flight display.
CG: As described earlier, CG and Trim
settings described within the FMC are not
yet functional within the PMDG FMC.
Future updates are planned to bring these
capabilities online in a realistic fashion.
This is to prevent the crew from using the
incorrect speeds after a change has been
made that will affect takeoff performance.
V1/Vr/V2: The Next Generation 737 does
not automatically populate the FMC with VSpeeds based on crew input to the
FMC/CDU. V-Speeds are normally entered
manually into the TAKEOFF REF page to
control the speed bugs on the Primary Flight
Display.
To simplify the process of looking up takeoff
performance data, PMDG has automated
the process for crewmembers. Simply click
on the 1R, 2R and 3R LSKs to automatically
populate the correct V1, Vb and V2 speeds
to the FMC.
Helpful Hint!: The Next Generation 737 is a
small yet powerful airliner. It is not
uncommon to find V1 and Vr speeds that
are identical when operating the airplane at
low takeoff weights!
8 - 23
When V-Speeds are correctly selected, the
aural warning system on the airplane will
automatically call out V1 and V2 speeds.
The Pilot Not-Flying should call out the V1
speed at the appropriate time.
The TAKEOFF REF page is normally that
last page that is used for preflight and
departure. If, when loading this page, the
PREFLIGHT COMPLETE descriptor is not
seen across the center of the screen, then
important data for the FMC/CDU preflight
process must still be entered.
Return to the INIT REF page and review all
entries to ensure that the missing data is
found, entered and a PREFLIGHT
COMPLETE message is received on the
TAKEOFF REF PAGE.
The selected speeds for takeoff are affected
by many things, including the runway
selected, climb clearances, selected takeoff
thrust, aircraft weight and desired flap
settings.
If any of these variables are changed after
the V-Speeds are selected into the FMC,
you will receive a V-SPEEDS DELETED
message in the FMC/CDU scratch pad and
PMDG 737NG - AOM
DO NOT DUPLICATE
Revision – 1.2 15NOV03
8 - 24
FMC USER’S MANUAL
ARRIVAL / DEPARTURE PROCEDURES
Overview: Many large airports throughout
the world have standardized arrival and
departure procedures in order to maximize
aircraft flow into and out of the airport
terminal control area.
These procedures are know as Standard
Instrument Departures (SID) and Standard
Terminal Arrivals (STAR).
The PMDG FMC is designed to maximize
the realism of user experience by including
access to many of the SID/STAR
procedures used throughout the world.
Note: We have included a sample of
procedures that covers approximately 1300
airports worldwide with runways greater than
5000 feet in length. This procedure
database realistically represents
approximately 1/3 of all the SID/STAR
airports worldwide, and in some cases may
not contain all the procedures for any given
airport. Additionally because the procedures
change continually you may find them to be
out of date with currently published
procedures.
We have developed a comprehensive and
easy to use programming lexicon to that will
allow even novice users to program their
own SID/STAR procedures. (see later in
this guide!)
PMDG regularly updates the SID/STAR
database for the PMDG FMC, and the most
current versions of this database will always
be available at the PMDG 737 Operators
Information Center at
www.precisionmanuals.com
Using SID/STARS: Loading a SID/STAR
procedures can at first appear complicated
to users who do not understand how
SID/STAR procedures and TRANSITIONS
are used to manage aircraft traffic flow.
The design theory behind SID/STAR
procedures is really quite simple: Guide
aircraft into and out of the airport terminal
space using predicted flight paths in order to
Revision – 1.2 15NOV03
keep arrival and departure traffic from
conflicting in controlled airspace.
To do this, SIDs are traditionally linked to
specific navigation fixes across which
departing aircraft fly. For example, a major
international airport may have as many as a
few dozen pre-defined fixes to across which
all departing traffic must cross.
Arriving traffic into an airport will be treated
similarly, with aircraft being routed along
specific routes to bring them into position
from where they can be inserted into the
final approach corridor for specific runways.
By publishing these procedures, air traffic
control is able to quickly and efficiently
assign aircraft to known routes with very
little radio work or interaction with the flight
crew.
In order to understand how the FMC/CDU
manages information related to SID/STARs,
it is helpful to imagine the flight linearly.
The first navigation fix that the airplane will
use is a runway. Thus, the FMC/CDU will
need to know which runway it the aircraft will
depart from.
The FMC/CDU will also want to know the
ROUTE OF FLIGHT that is being used to
reach the destination. (Route entry is
covered earlier in this chapter)
At the end of the flight, the FMC/CDU will
want to know what runway the airplane will
land on.
A SID and (sometimes) a TRANSITION is
used to show the FMC/CDU how the
airplane will get from the departure runway
to the ROUTE OF FLIGHT. At the other end
of the flight, a TRANSITION (sometimes)
and a STAR is used to show the FMC how it
will get from the end of the ROUTE OF
FLIGHT to the landing runway.
It is important to recognize that not all
SID/STARs serve every runway at any
specific airport. In fact it is common to find a
DO NOT DUPLICATE
PMDG 737NG - AOM
FMC USER’S MANUAL
specific SID or STAR that only serves a
portion of the runways at any given airport
and thus it is not unusual to find that
selecting certain runways will eliminate
some SID/STAR procedures from
availability.
Note: The assignment of a SID/STAR and
TRANSITION procedure is normally always
handled by ATC, as the procedures are
designed to assist ATC traffic flow
processes. Crews almost never select and
load a SID/STAR without it having been
assigned by ATC, but for the purpose of
MSFS the use of these procedures is
entirely at crew discretion.
8 - 25
return to the DEP/ARR INDEX page to
select the desired STAR procedure.
Departure airport STAR selection will be
added at a future date.
DEPARTURES Page: SID selection is
made by pressing the <DEP prompt on the
DEP/ARR INDEX page. Pressing the <DEP
prompt key will display a DEPARTURES
page for the selected airport. The
DEPARTURES page allows the crew to
select the SID and associated runway to be
used. A sample DEPARTURES page is
shown below:
DEP/ARR INDEX Page: The DEP/ARR
INDEX page allows for selection of the
published arrival and departure procedures
at the origin and destination airports.
The DEP/ARR INDEX page is accessed by
pressing the DEP/ARR key on the
FMC/CDU keypad.
SIDS: The SIDS are listed on the left side of
the display at 1L through 5L. A SID can be
selected by pressing the associated LSK.
Once a SID is selected, a <SEL> indicator
will appear next to the associated SID to
indicate that it has been selected by the
crew.
The 1L, 3L and 6L keys allow for selection of
SID procedures stored in the FMC SID
database. Keys 1R through 4R and 6R
allow for selection of STAR procedures
stored in the FMC STAR database. The
center of the display shows the crew entered
or COMPANY ROUTE entered arrival and
departure ICAO airport codes.
Helpful Note!: The current version of the
PMDG FMC does not offer the arrival STAR
procedures at the origin airport. If a return
to field is necessary, simply change the
destination airport on the RTE page 1, then
PMDG 737NG - AOM
When a SID is selected the FMC/CDU will
change the list of available runways on the
right side of the screen to reflect only those
runways that are compatible with the
selected SID.
To deselect a SID, simply press the LSK a
second time.
Runways: The available departure runways
for the selected airport are listed at 1R
through 5R. Pressing the associated LSK
will illuminate a <SEL> indicator on the
selected runway to indicate that it has been
selected by the crew.
Selection of a departure runway before
selection of a SID cause the FMC to display
DO NOT DUPLICATE
Revision – 1.2 15NOV03
8 - 26
FMC USER’S MANUAL
only those SID that are compatible with the
selected runway.
To deselect a runway, simply press the LSK
a second time.
If the DEPARTURES page displayed is for
the active route or for the airport of origin,
selecting a SID or runway will automatically
insert the appropriate fixes into the flight
plan and update the runway selection on the
RTE page. To alert the crew that these
changes have been made, and to allow for
verification, the EXEC key will illuminate.
Pressing the EXEC key will confirm the
selections, but a route discontinuity will be
inserted into the route to ensure that the
route is verified by the crew prior to being
flown.
ARRIVALS Page: STAR selection is made
by pressing the appropriate <ARR prompt
on the DEP/ARR INDEX page. Pressing the
<ARR prompt key will display an ARRIVALS
page for the selected airport. The
ARRIVALS page allows the crew to select
the STAR and associated runway to be
used. A sample ARRIVALS page is shown
below.
screen to reflect only those
approaches/runways that are compatible
with the selected STAR.
To deselect a STAR, simply press the LSK a
second time.
Approaches: The available approaches for
the selected airport and STAR are listed at
1R through 5R. Pressing the associated
LSK will illuminate a <SEL> indicator on the
selected approach to indicate that it has
been selected by the crew.
When an approach/runway is selected the
FMC/CDU will change the list of available
STARs on the left side of the screen to
reflect only those STARs that are compatible
with the selected approach/runway.
To deselect a STAR, simply press the LSK a
second time.
If the ARRIVALS page displayed is for the
active route or for the airport of destination,
selecting a STAR or an approach will
automatically insert the appropriate fixes into
the flight plan. To alert the crew that these
changes have been made, and to allow for
verification, the EXEC key will illuminate.
Pressing the EXEC key will confirm the
selections.
Selection of an ARRIVALS procedure does
not need to be accomplished during the preflight process, but is included here for
balance and clarity. Arrival procedures are
normally selected during the initial approach
planning phase of the flight.
Standard Terminal Arrival Route: The
STARs are listed on the left side of the
display at 1L through 5L. A STAR can be
selected by pressing the associated LSK.
Once a STAR is selected, a <SEL> indicator
will appear next to the associated STAR to
indicate that it has been selected by the
crew.
When a STAR is selected the FMC/CDU will
change the list of available
approaches/runways on the right side of the
Revision – 1.2 15NOV03
TRANSITIONS: In some airport
environments it is necessary to use a
TRANSITION route to move airplanes
between the end if a SID and the route of
flight, or the end of the route of flight and the
beginning of a STAR.
In cases where transitions are defined, the
DEP INDEX and ARR INDEX pages will
also list the available transitions.
Transitions, like the
SID/STARS/RUNWAY/APPROACHES, will
cause the FMC to display only those SIDs,
STARS or runways with which they are
compatible at the time they are selected.
DO NOT DUPLICATE
PMDG 737NG - AOM
FMC USER’S MANUAL
8 - 27
REVIEWING THE ROUTE OF FLIGHT
Overview: After a route is loaded and a
departure runway, SID and (if desired)
STAR and landing runway are selected, it is
always convenient to review the flight plan in
detail to ensure that it is accurate.
The Next Generation 737 includes two
primary tools to review a flight plan in detail:
•
•
FMC/CDU LEGS pages
Navigation Display
Used in conjunction with one another, the
737 provides a powerful suite of tools to
ensure that route entry into the FMC is
accurate and matches the clearance
received by the crew prior to departure.
RTE LEGS Page: The RTE LEGS page is
accessed by pressing the LEGS key on the
FMC/CDU.
The RTE LEGS page is similar to the RTE
pages in that it displays the route of flight as
entered into the FMC/CDU.
The RTE LEGS pages vary, however in that
they do not display airway (jet route or victor
airway) information, and instead will display
for the crew every single fix along a route of
flight, no matter how long or how many fixes
may exist along an airway.
The RTE LEGS pages also provides
valuable navigation information such as
distance to fix, distance between fixes as
well as planned altitude and speed
information.
Information displayed on the RTE LEGS
page includes:
FIX NAME: The name of each fix along the
route of flight is displayed in the left-most
column of the RTE LEGS page. Entries that
will be seen in this column include any VOR,
NDB, Navaid, waypoint or other geographic
fix which is defined within the navdata
database.
Additionally, conditional waypoints such as
altitudes or locations will be displayed here
contained in parenthetics.
Above each fix name, the Desired Track that
connects each fix to the next is described in
small text.
For example, after crossing WOOLY, the
desired track to BAL is 130 degrees. This is
the ground track that the airplane should fly
when transiting between these two fixes.
Leg Distance Information: The center of the
RTE LEGS display provides leg distance
information for each leg of the flight plan.
Once again, the distance displayed at 1L is
the distance from the current aircraft position
to the first navigation fix in the flight plan. All
other distance indications represent the
distance between the previous and next legs
of the flight plan.
Speed/Altitude Predictions or Constraints:
When the FMC flight plan is fully initialized,
the FMC will calculate a set of predicted
altitude and speed values for each leg of the
flight plan. These predictions appear in
small font in lines 1R through 5R. The FMS
will provide these predicted altitude and
speed values for each navigation fix unless
the crew manually enters constraint values
into the flight plan.
Constraint (or desired) values may need to
be entered by the crew in order to adhere to
PMDG 737NG - AOM
DO NOT DUPLICATE
Revision – 1.2 15NOV03
8 - 28
FMC USER’S MANUAL
published approach procedures or ATC
clearances. Constraint values are entered
by typing them manually into the scratchpad,
then up-selecting them to the desired flight
plan leg.
Altitude Constraints: The use of altitude
constraints allows the crew to enter either
ATC assigned waypoint/altitude constraints,
or to program waypoint/constraints assigned
by published approach procedures. Altitude
constraints are entered by direct entry into
the scratchpad, the up-selecting them to the
desired line of the flight plan.
The available altitude constraints are as
follows:
•
•
•
AT constraints.
AT OR ABOVE constraints.
AT OR BELOW constraints.
AT constraints are used to indicate that the
airplane must be at a specific altitude when
crossing the associated fix. Entry of AT
constraints can be in feet or flight level. (e.g.
18000 or FL180) AT constraints are simply
entered into the scratchpad and up-selected
to the desired navigation fix LSK.
Note: The following text describes AT OR
ABOVE and AT OR BELOW constraints that
are not currently modeled in this version of
the FMC. These types of constraints are
being developed for the PMDG FMC and will
be made available in a future update to the
airplane and FMC. They are described here
for completeness.
AT OR ABOVE constraints are used to
indicate that the airplane should cross the
associated fix at a specific altitude, but may
also cross at a higher altitude if the FMS
calculates that it is more efficient to do so
given the current flight disposition. The AT
OR ABOVE altitude constraint can be
entered in feet or flight level. (e.g. 18000 or
FL180) AT OR ABOVE constraints are
entered into the scratchpad in the format
XXXXXA or FLXXXA and up-selected to the
desired navigation fix LSK.
AT OR BELOW constraints are used to
indicate that the airplane should cross the
associated fix at a specific altitude, but my
also cross at a lower altitude if the FMS
Revision – 1.2 15NOV03
calculates that it is more efficient to do so
given the current flight disposition. The AT
OR BELOW altitude constraint can be
entered in feet or flight level. (e.g. 18000 or
FL180) AT OR BELOW constraints are
entered into the scratchpad in the format
XXXXXB or FLXXXB and up-selected to the
desired navigation fix LSK.
Speed Constraints: Speed constraints can
be used by the crew to comply with ATC
assigned speed constraints directly
associated with a particular navigation fix.
E.g. “Cross HFD at 250 knots.”
Speed constraints must always be entered
in association with an altitude constraint,
and are entered numeric format from 100 to
400 knots Calibrated Air Speed, followed by
the ‘/’ indicator which separates the speed
constraint from the altitude constraint. (e.g.
‘XXX/FL180A’)
ABOVE and BELOW modifiers are not
possible for airspeed constraints.
According to the sample page shown, the
flight plan calls for crossing WOOLY at 250
knots at 9000 feet, then accelerating to 275
knots while crossing BAL at 15000 feet.
Speed information entered into the RTE
LEGS page will affect VNAV operation, and
altitude information will serve to feed the
FMC with vertical planning information even
though it is still the crew’s responsibility to
manage the altitude assignment and altitude
change assignments from ATC.
Helpful Hint! When updating the speed
and/or altitude constraints, the following
formats are usable:
/FL180 (updates altitude only)
/18000 (updates altitude only)
310/FL180 (updates speed and altitude)
310/18000 (updates speed and altitude)
310/ (updates speed only)
The RTE LEGS page and the ND:
Coupled with the navigation display, the
RTE LEGS page becomes a powerful tool
that can be used to review the entire route of
flight that has been entered into the
FMC/CDU.
DO NOT DUPLICATE
PMDG 737NG - AOM
FMC USER’S MANUAL
8 - 29
When the Navigation Display is placed PLN
mode, (rotate the selector to PLN on the
EFIS MCP) a <CTR> cue will appear in the
center column of the RTE LEGS page. The
<CTR> cue identifies the fix that is currently
used to “center” the navigation display’s
Flight Plan Display.
The <CTR> indicator can be cycled through
all points of the flight plan in order to display
portions which may not be visible using the
standard range display settings of the ND.
To cycle the <CTR> cue forward, simply
press the STEP> prompt that is displayed at
the 6R LSK.
The fix that is currently the <CTR> cue in
the FMC/CDU will be highlighted in white on
the navigation display, and will be located at
the center of the ND PLAN MODE display.
The navigation display ND PLAN MODE
display is always oriented in a north-is-up
mode, and can be modified using the EFIS
MCP keys to display VOR stations, airports
and nav fixes.
With each successive press of the STEP>
prompt, the Navigation Display will move
further along the flight plan with the center of
the display being focused on the fix that is
currently identified by the <CTR> cue in the
RTE LEGS page.
PMDG 737NG - AOM
DO NOT DUPLICATE
Revision – 1.2 15NOV03
8 - 30
FMC USER’S MANUAL
FIXES AND CUSTOM WAYPOINTS IN THE FMC
Overview: The FMC/CDU is a highly
sophisticated navigation tool that can be
used to navigate the airplane to almost any
point in three-dimensional space. The
database contains tens of thousands of predefined navigation fixes that describe the
location of airports, approach fixes or
reference points in the database.
As a tool, the FMC would be slightly limited
if it were not possible for crewmembers to
define their own navigation waypoints from
within the database when needed.
The FMC is capable of navigating the
aircraft to any point in space that can be
defined using geographic reference, or
reference to a fix already included in the
FMS database.
This provides endless opportunity for crews
to define points in space that can be used
for navigation.
For example, when given ATC instructions
to “cross 15 miles west of XYZ at and
maintain seven-thousand” a fix can be
described in the FMC/CDU in order to
facilitate compliance with the instructions.
Additionally, the crew can define waypoints
simply for their convenience, or for improved
accuracy of navigation along extended
routes.
Navigation fixes can be entered into the
RTE LEGS page in a number of formats. In
most cases, crew embers will navigate using
existing navigation fixes such as published
waypoints and VORs. These types of
navigation fixes can be entered directly into
the RTE LEGS page by name, and will be
called from the stored FMC navigation
database.
FMC Custom Waypoints: In some cases,
however, it becomes necessary for
crewmembers to provide unique navigation
fixes or waypoints to the FMC in order to
satisfy the changing ATC requirements, or in
order to clearly define an unusual published
approach for the FMS. In such cases, it is
possible for the crew to define navigation
waypoints in the FMC using position and
altitude data relative to existing waypoint
entries.
Currently, the PMDG FMC is capable of
accepting custom waypoint entry in the
following formats:
•
•
•
•
Place Bearing Distance waypoints
(PBDs)
Bearing / Bearing waypoints (BBs)
Along Track waypoints (ATWs)
Latitude Longitude Waypoints
(LLWs)
The process for entering these three types
of waypoints is described below.
FMC Database Waypoints: Waypoints are
entered into the left side of the RTE LEGS
page individually via the scratchpad.
Navigation identifiers/Fixes can be represent
the following:
Place Bearing/Distance Waypoints: PBD
waypoints can be entered into the left fields
of the LEGS page by entering the fix
description into the scratchpad and upselecting to the desired line.
•
•
•
•
•
•
•
•
•
PBD waypoints describe a geographic point
that is at a specific bearing and a specific
distance from a navigation fix that is already
defined in the FMC navigation database.
Airport
Waypoint
NDB
VOR
VOR/DME
VORTAC
DME/TACAN
Runway
Final approach fixes
Revision – 1.2 15NOV03
For example, a PBD waypoint can be
described as being on a bearing of 180
degrees and 50 miles from the XYZ VOR.
DO NOT DUPLICATE
PMDG 737NG - AOM
FMC USER’S MANUAL
PBD waypoints can be defined from any
point in the navigation database.
The proper format for entering a PBD
waypoint into the scratchpad is as follows:
PPPPPBBB/DDD
Where PPPPP is the existing navigation
waypoint (1 to 5 alphanumeric characters),
BBB.B is the bearing and DDD.D is the
distance. The decimal place is considered
to be optional for both bearing and distance.
8 - 31
Latitude/Longitude Waypoints:
Latitude/Longitude waypoints are pilot
entered waypoints defined by a specific
geographic reference in a latitude/longitude
format.
The proper format for entering a
Latitude/Longitude waypoint into the
scratchpad is as follows:
NXXXXX/EXXXXXX
SXXXXX/WXXXXXX
For example, entry for a latitude/longitude
waypoint at the geographic location N33º
30.9’ W115º 56.6’ would be entered as
follows:
PBD bearing entries from 0 to 360 degrees
and distance entries from 0 to 999 miles are
valid
Once entered, a PBD is displayed in the
route as PPPSS, where PPP represents the
first three characters of the navigation fix
and SS represents an FMC assigned code
number.
In the example above, the fix will be
displayed as HNK01, and the FMC/CDU will
insert a route disconnect that needs to be
resolved and EXECUTED by the crew.
The entry is then up-selected to the desired
line in the RTE LEGS display, where it will
be condensed for display in the route, as
shown below. The expanded entry can be
redisplayed on the scratchpad by pressing
the associated LSK.
Place Bearing/Place Bearing Waypoints:
PB/PB waypoints are fixes defined by the
intersection of courses from two waypoints.
For this reason, PB/PB waypoints are also
described as Course Intersection
Waypoints. The PB/PB waypoint garners
it’s name from the fact that the waypoint is
being defined at a point which is one bearing
from one place and one bearing from
another.
For example, the geographic location where
a course of 010 from one navaid intersects a
course of 270 from a second navaid is a
PB/PB waypoint.
PMDG 737NG - AOM
DO NOT DUPLICATE
Revision – 1.2 15NOV03
8 - 32
FMC USER’S MANUAL
PB/PB waypoints are useful when a
navigation fix is defined by the intersection
of two courses, or when called upon to
navigate a specific radial from one navaid
until intercepting a specific radial of a
second navaid.
The proper format for entering a PB/PB
waypoint into the scratchpad is as follows:
Along Track Waypoints are the simplest of
the custom waypoints, because they are
entered exactly as issued by ATC.
For example, if ATC were to issue the
following climb restriction, “best rate of climb
until ten miles beyond HNK” the crew simply
enters the restriction into the FMC as an
along track fix by using the following format:
FFF/#DD
XXXXXBBB/YYYYYBBB
XXXXX and YYYYY represent the existing
navigation fixes which are being used to
describe the PB/PB waypoint. BBB.B
represents the bearing from each existing
fix. The decimal point is optional in the
bearing entries.
(Note: The # above should be replaced with
either a + or a – sign. + signifies beyond the
waypoint while a – signifies before the
waypoint.)
Once entered into the scratchpad, the
PB/PB waypoint can be up-selected into the
route by pressing desired LSK. The PB/PB
waypoint is described in the route by the
format XXXSS, where XXX represents the
first three letters of the first waypoint’s
name, and SS is an FMC assigned
sequence number.
In the example above, HFD01
PB/PB waypoints can be defined from any
fix within the navaid database.
Along Track Waypoints: Along track
waypoints are commonly used to mark a
descent or climb restriction that is issued by
ATC in reference to a navigation fix that
exists along the route of flight.
Revision – 1.2 15NOV03
DO NOT DUPLICATE
PMDG 737NG - AOM
FMC USER’S MANUAL
8 - 33
FMC FLIGHT PLAN MODIFICATION
Overview: During the course of a flight it
often becomes necessary to adjust a flight
plan in the FMC in order to keep it
consistent with ATC clearances, shortened
routings or route deviations. Using the
appropriate FMC function entry to modify a
flight plan greatly reduces crew workload
when route of flight changes are necessary.
Direct-To: Direct-To flight plan entries
instruct the FMC to fly a course direct to a
particular fix. The fix may be part of the
active flight plan, active modified flight path,
or it may be off the intended path of flight.
Direct-To routings are often used when ATC
issues a shortcut for the route of flight as
shown below:
The simplest way to perform a DIRECT-TO
change is to downselect or type the desired
fix into the scratchpad:
Then simply upselect the desired fix to the
1L LSK. This will cause the modified route
to be displayed on the Navigation Display as
a dashed white line, and will illuminate the
EXEC key on the FMC/CDU to indicate that
the route of flight change must be
EXECUTED in order to take effect.
Direct-To routings are most easily
accomplished by pressing the LEGS key on
the FMC/CDU, and using the ACT RTE
LEGS pages.
During the modification there are some
important changes to notice on the LEGS
page of the FMC.
First, when the desired fix is uploaded to the
1L position, the FMC recognizes that a
modification has been made to the route.
As such, the TITLE LINE of the page
changes to MOD RTE LEGS to indicate that
the route has been modified, but is not yet
active because it has not been EXECUTED.
Additionally, the FMC will offer an ABEAM
PTS> prompt at the 5R LSK and an
INTERCEPT CRS at the 6R LSK.
PMDG 737NG - AOM
DO NOT DUPLICATE
Revision – 1.2 15NOV03
8 - 34
FMC USER’S MANUAL
To intercept a specific inbound course to a
fix, (“Interecept the course 080 TO BOS,” for
example.) the crewmember simply needs to
enter the desired course TO the fix at the 6R
LSK.
This will cause the FMS to calculate and fly
an heading to intercept the inbound radial
specified in the INTC CRS prompt.
Pressing the EXEC key will confirm the
change, or pressing <ERASE will cancel the
Direct-To selection. Once the <EXEC key
has been pressed, the FMS will be updated
to fly Direct-To the desired fix.
the fix to the 1L LSK. This in effect tells the
FMC/CDU that you are planning to cross
that fix as the next point along your flight
path.
If you were to press the EXEC key at this
time, the FMS will provide you with a routing
directly from your present position to the fix
displayed at 1L. (This would be a Direct-To
entry!)
The clearance provided requires that a
specific radial be tracked toward the fix,
however so an additional step is required.
Intercept Course: An intercept course is
similar to the Direct-To operation. An
intercept course instructs the FMC to
intercept a particular course that should be
followed TO a specified fix. (It is always
helpful to keep in mind that for purposes of
the FMC, it must always intercept a course
TO a fix.)
Intercept Course entries are useful for
complying with SID and STAR transitions, or
for complying with an ATC instruction such
as, “fly heading 090 until intercepting the
230 degree radial of BTY Fly that radial to
BTY then the remainder of route as filed.”
Any time ATC or published route procedures
call for the crew to intercept a specific
course or heading to/from a navigation fix,
the Intercept Course entry can solve the
navigation problem via the FMC.
6R will show the current course to the
desired waypoint. If a different intercept
course is desired, it should be entered into
the scratchpad, then up-selected to 6R by
pressing the 6R key. This will instruct the
FMS to intercept the desired course to the
fix. The FMS will compute a great circle
course between the current airplane location
and the closest point of intercept to the
desired course, and display that course on
the ND as a dashed white line.
Pressing the EXEC key will confirm the
change, or pressing <ERASE will cancel the
Intercept Course selection. Once the
<EXEC key has been pressed, the FMS and
flight plan will be updated.
If the crew wishes to fly a particular heading
until intercept, this can be accomplished by
selecting that heading in the MCP heading
selector window.
An Intercept Course entry is performed on
the LEGS page. Enter the navigation fix that
is desired into the scratch pad, the upselect
Revision – 1.2 15NOV03
If LNAV is armed, LNAV will engage and
begin tracking the inbound course when the
aircraft approaches the intercept course
entered into 6R.
DO NOT DUPLICATE
PMDG 737NG - AOM
FMC USER’S MANUAL
Inserting A Navigation Fix: During flight it
may become necessary to insert a new
navigation fix into the flight plan in order to
comply with ATC procedures or instructions.
8 - 35
associated LSK. This fix identifier can then
be up-selected to the line containing the
disconnect prompt boxes. The FMC will
then re-sort the flight plan to allow the
updated routing.
This task is also accomplished using the
LEGS page in the FMC/CDU.
Enter the name of the fix directly into the
scratchpad.
The fix identifier is then up selected into the
ACT RTE LEGS page at the position that is
desired along the route of flight.
When up-selecting a navigation fix to an
existing flight plan, the FMC will add the new
fix to the line selected, and move all
following navigation fixes down in the
sequence. When inserting fixes into a flight
plan, the FMC will display a set of prompt
boxes in the line immediately following the
new fix, along with the message ROUTE
DISCONTINUITY. This alerts the crew that
they must confirm for the FMC which
navigation fix will follow the newly added fix.
Pressing the EXEC key will confirm the
change, or pressing <ERASE will cancel the
Intercept Course selection. Once the
<EXEC key has been pressed, the FMS and
flight plan will be updated.
Deleting a Navigation Fix: Navigation
fixes can be deleted from the active flight
plan using similar methods.
From the RTE LEGS page, use the NEXT
PAGE/PREV PAGE keys until the desired fix
is displayed on the page, then press the
DEL key on the FMC/MCDU keypad.
The DELETE prompt will appear in the
scratchpad, indicating that the next LSK
pressed will cause deletion of that
associated flight plan navigation fix.
The desired fix can then be deleted by
pressing the associated LSK. This will
cause the FMC produce a modification to
the active route that eliminates that fix from
the flight plan.
When deleting fixes from a flight plan, the
FMC will display a ROUTE
DISCONTINUITY that needs to be
connected using the same technique
described above.
To confirm the continuation of the route, the
waypoint identifier for the next fix in the
desired route sequence should be downselected to the scratchpad by pressing the
PMDG 737NG - AOM
DO NOT DUPLICATE
Revision – 1.2 15NOV03
8 - 36
FMC USER’S MANUAL
FMC TAKEOFF PROCEDURES
Overview: The FMC provides a number of
functions to assist with the takeoff planning
process. Specifically, the FMC is capable of
taking desired performance input from the
crew and calculating engine thrust limits,
engine takeoff thrust derates and
autothrottle management.
These features are used as part of the
normal pre-takeoff process, and are
described below.
The FMC/CDU carries a tremendous
amount of data regarding engine
performance under greatly varied conditions.
This data, combined with sensor input from
the Air Data Computers and the crew is
used to automatically manage the engines in
such a manner that engine limitations are
never exceeded. Put another way, the FMS
will allow the crew to operate the engines to
the peak of power or efficiency without
undue concern for engine damage by over
temperature conditions.
N1 LIM Page: The N1 LIMIT page provides
the crew with the ability to manually select
the thrust modes to be used by the FMS to
provide thrust limits and thrust commands to
the autothrottle servos.
The N1 LIMIT page can be displayed by
pressing the N1 LIMIT key on the
FMC/CDU, or by selecting the appropriate
LSK when the <N1 LIMIT prompt is
displayed at the INIT/REF INDEX page or
PERF INIT page during pre-flight. A sample
N1 LIMIT page is shown below:
The N1 LIMIT page displays three takeoff
thrust limit options at lines 2L through 4L.
Lines 2R through 4R display climb thrust
limit options. Additional information to help
the crew obtain a clear picture of expected
engine performance is also available from
this page.
The N1 LIMIT page contains the following
items of interest to the crew:
SEL/OAT: Selected Outside Air
Temperature and sensed Outside Air
Temperature are displayed at the 1L LSK.
Selected Outside Assumed Air
Temperature: The 1L key provides the crew
with the ability to enter an assumed air
temperature (SEL). Valid entries are one or
two digit entries from 0 to 99. This field
cannot be changed once the aircraft
exceeds sixty five knots, or after autothrottle
engagement. The field will be removed
once the aircraft becomes airborne.
The field can be removed by using the
DELETE key on the FMC/CDU.
Helpful Hint!: The SEL entry is used to
enter a temperature that is different from
that being detected by the air data
computer. For example, if a temperature
difference is expected between the current
aircraft location on the airfield and the
temperature that is expected at the runway
threshold, the expected threshold
temperature can be added so as to ensure
that an accurate estimate of thrust ratings
can be computed by the FMS.
Outside Air Temperature: The Air Data
Computer measured OAT is displayed in the
center of row 1.
Thrust Limit Mode: The currently selected
thrust limit mode is displayed in small font in
the header line for 1R. (displays 24KN1 in
this image) This header will change to
match the current thrust rating that has been
selected for the engines. In addition, the
Revision – 1.2 15NOV03
DO NOT DUPLICATE
PMDG 737NG - AOM
FMC USER’S MANUAL
N1% limit for this thrust mode is displayed in
large font at 1R. Note that if CLB-1 or CLB2 has been selected for the climb, the N1%
displayed at 1R will continue to by the full
thrust rating for the engines in the given
conditions.
24K
22K DERATE
20K DERATE
Go-Around
Continuous
Cruise
Climb
3% N1 derate
6% N1 derate
Notes Regarding Reduced Thrust: In the
interest of reduced wear on the engines,
reduced thrust should be used whenever
practical.
Takeoff thrust and Takeoff thrust Derates:
Lines 2L through 4L show the available
takeoff thrust limit modes which may be
selected by the crew. In order, they are:
•
TO: Takeoff is the normal full takeoff
thrust mode rated at 24,000lbs.
•
•
TO 1: Takeoff 1 is derated to 22,000lbs.
TO 2: Takeoff 2 is derated to 20,000lbs.
The takeoff thrust limit mode is selected by
pressing the associated LSK. When a mode
is selected, the <ACT> indicator will move to
the associated line to indicate which mode is
currently selected. In addition, the takeoff
thrust limit mode will be displayed in 1R.
Selecting either 24KN1, 22KN1 or 20Kn1
and will override any assumed air
temperature figure entered into 1L by the
crew.
Climb Thrust and Climb Thrust Derates:
Lines 2R through 4R show the available
climb thrust limit modes which may be
selected by the crew. In order, they are:
•
CLB: Climb is the normal climb thrust
mode.
•
CLB 1: Climb 1 gives 3% lower N1 and
8% lower climb thrust.
•
CLB 2: Climb 2 gives 6% lower N1 and
16% lower climb thrust.
PMDG 737NG - AOM
The desired climb thrust limit mode is armed
by pressing the associated LSK. When a
mode is selected, the <SEL> indicator will
move to the associated line to indicate which
mode is currently armed.
If a derated takeoff thrust limit was selected,
the FMC will automatically suggest an
optimal climb thrust derate given current
temperature or assumed temperature
entries. This mode can be changed by
simply selecting a different climb thrust
mode.
Following are the available thrust limit
modes:
TO
TO 1
TO 2
GA
CON
CRZ
CLB
CLB 1
CLB 2
8 - 37
Climb thrust derates are designed to lower
the climb angle and are particularly
beneficial in the following ways:
•
•
Reduce climb angle increases overthe-nose visibility in congested
airspace.
Reduced climb angle reduces the
rate of pitch-over if the aircraft
needs to level at a low altitude
initially after takeoff.
CLB-1 reduces N1 by approximately 3%
while the aircraft is below 10,000 feet and
then gradually adjusted thrust upward so
that both engines are operating at full thrust
by the time the aircraft reaches 15,000 feet.
CLB-2 reduces N1 by approximately 6%
while the aircraft is below 5,000 feet and
then gradually adjusts thrust upward so that
both engines are operating at full thrust by
the time the aircraft reaches 15000 feet.
Since both reduced thrust climb modes
operate only below 15,000 feet, the CLB
page should be used to monitor engine
thrust when below 15,000’ when climb thrust
is reduced. Once over 15,000 feet, use the
N1 LIMIT page for monitoring engine thrust.
Helful Hint!: Use the CLB and N1 LIMIT
pages to determine what power settings
should be used when hand flying the aircraft
or when flying the aircraft with the
autothrottles selected off or deferred.
DO NOT DUPLICATE
Revision – 1.2 15NOV03
8 - 38
FMC USER’S MANUAL
When flying a departure procedure that
requires the aircraft be leveled at a low
altitude immediately after takeoff, use of
CLB-2 is generally a good technique to
reduce the sensation of pitch-over that is
experienced by passengers when the
aircraft is operated at higher power settings.
In Flight Thrust Modes: When airborne, the
N1 LIMIT page will not display takeoff or
climb thrust modes. These modes will be
replaced by the in-flight thrust limit modes.
These modes will be displayed in lines 1L
through 3L of the THRUST LIM page, and
are as follows:
•
GO AROUND: Go around thrust limit.
•
CONTINUOUS: Continuous maximum
allowable thrust limit.
•
CLIMB: Full Climb Thrust
•
CRUISE: Cruise limit thrust .
To select any of the various thrust limits
available, simply press the associated LSK
and the FMC/CDU will update the FMS to
adjust the available thrust limit. Likewise,
the CLB-1 and CLB-2 derated climb thrusts
can be selected by pressing the associated
LSKs near the bottom of the display.
Go around thrust is a limit mode provided for
go around conditions, where high engine
thrust settings are required for a short period
of time.
Continuous thrust limit mode provides the
highest thrust output possible from the
engines in continuous operation. This mode
Revision – 1.2 15NOV03
is useful in situations involving engine failure
while the aircraft is at high gross weights, or
at a high cruise altitude. This thrust limit
mode will provide the highest thrust output
possible without damaging engines.
Cruise thrust limit mode is the normal
operating thrust limit mode for normal cruise
flight operations.
TAKEOFF REF Page: The TAKEOFF REF
page provides information pertaining to
takeoff performance and settings. This
information includes such settings as flap
acceleration height, engine out acceleration
height, thrust reduction height, runway slope
and wind condition information, runway
condition, takeoff speeds, trim and runway
position shift information.
Flap Setting: The planned flap setting can
be entered at line 1L. If an invalid takeoff
flap setting is entered manually at 1L, an
error message will be generated. The
takeoff flap setting must be correct in order
for the FMC to generate the correct takeoff
speeds.
Planned Thrust: The thrust selected in the
N1 LIMIT page is displayed at line 2L.
Additionally, the maximum available N1
speed is displayed in large font.
CG/Trim: Information not usable within
MSFS at this time.
Takeoff Speeds: V1, VR and V2 reference
speeds are displayed in lines 1R through
3R. The speeds are not automatically
populated to the display, but can be brought
up by pressing in the 1R, 2R and 3R LSKs
DO NOT DUPLICATE
PMDG 737NG - AOM
FMC USER’S MANUAL
8 - 39
respectively once the preflight is completed
and a flaps setting is entered at the 1L LSK.
The crew is responsible for validating the
accuracy of these computed takeoff speeds
by manually checking them against the
manufacturer specified takeoff speeds.
Takeoff speeds can be overridden or
manually entered by the flight crew if
desired. Valid entries are any three digit
number from 100 to 300.
If any changes are made to the takeoff
performance initialization, the takeoff speeds
will be removed and must be reconfirmed.
PMDG 737NG - AOM
DO NOT DUPLICATE
Revision – 1.2 15NOV03
8 - 40
FMC USER’S MANUAL
FMC CLIMB OPERATIONS
Overview: The FMC provides a number of
methods to assist the crew in planning,
managing, and effecting a precise and
economical climb regime of flight. The FMC
accepts climb performance demands from
crew member entries, and adjust aircraft
performance via the FMS and autothrottle
servos.
CLB Page: The climb page allows crew
access to current and upcoming climb
conditions and climb profile information.
The active climb speed mode is always
displayed in the CLB page.
The CLB page is accessed by pressing the
CLB key on the FMC/CDU. A typical CLB
page is shown below:
SPD REST: The SPD REST field at 3L is a
dynamic information field that will change
during the course of the climb to show the
MOST RESTRICTIVE speed that can be
allowed for the climb.
For example, when a FLAPS10 takeoff is
planned, 161/FLAPS will be displayed at 3L
as the speed and reason for the restrictive
speed limitation.
As the flaps are retracted, the 161/FLAPS
will change to 171/FLAPS, etc, indicating
that as the aircraft is cleaned up for high
speed flight it is possible to increase the
speed constraint for the climb.
When the aircraft is clean and able to
accelerate for climb, the 3L LSK prompt will
display the speed restriction as defined
below the local transition altitude.
For example, in the US, if an 10,000 foot
transition altitude is used, the 3L LSK will
display 250/10000.
Once clear of all restrictions, the restrictions
at 3L will be deleted and the aircraft will
accelerate to TGT SPD (if operated under
VNAV.)
CRZ ALT: The cruise altitude that has been
planned for the flight is displayed at 1L. The
current cruise altitude is displayed if one has
been selected and CLB is the active mode.
If the current altitude is not displayed, 1L will
contain prompt boxes which can be replaced
by up-selecting the desired cruise altitude
from the scratchpad.
TGT SPD: The Airspeed / Mach number
displayed at 2L represents that target climb
speed/mach number for the climb phase of
flight. This is the target climb speed to
which the airplane will accelerate if operated
under VNAV once the airplane is clear of
other, more restrictive speed constraints for
flaps or regulated airspace.
Revision – 1.2 15NOV03
When not operated under VNAV, the crew
may use this page to determine the current
restrictive speed or planned climb speed.
Maximum Climb Rate: The speed and climb
gradient that will yield the maximum climb
rate given the current aircraft configuration
can be attained by pressing the 5L LSK at
the <MAX RATE prompt.
Maximum Climb Angle: The speed and
climb gradient that will yield the maximum
climb angle given the current aircraft
configuration can be attained by pressing
the 6L LSK at the <MAX ANGLE prompt.
In the event of an engine failure, the MAX
ANGLE speed will be replaced with the
engine out maximum altitude figure for the
current aircraft configuration. (Engine Out
DO NOT DUPLICATE
PMDG 737NG - AOM
FMC USER’S MANUAL
8 - 41
Data Not currently modeled in the PMDG
FMC. In the event of an engine failure use
the maximum angle of climb prompt.)
Engine Out Climb Mode: (NOT MODELED)
Selecting the ENG OUT> prompt at 5R will
result in FMC calculation of engine-out
speed schedules, performance predictions
and guidance. When selected, the FMC will
detect which engines are not operating, and
adjust performance predictions and
guidance accordingly. If the FMC detects
that all engines are operating, then
performance predictions for a single
outboard engine failure will be used.
TO T/C: To Top-of-Climb describes the
estimated distance and time of crossing (in
UTC) for the Top of Climb based upon the
final cruise altitude as programmed into the
FMC/CDU.
FMC Climb Profile Logic: The FMC is
programmed for a default climb logic to
select a 250 knots climb to 10,000 feet,
followed by an economy climb to cruise
altitude. The crew may modify this climb
profile via the RTE LEGS page.
In the event that the FMC cannot comply
with the next altitude restriction programmed
into the RTE LEGS page, (either due to rate
of climb or speed related concerns) the
prompt UNABLE NEXT ALT will be
displayed.
Helpful Hint!: If you receive the UNABLE
NEXT ALT warning from the FMC, it is
almost certainly a result of trying to reach a
higher altitude than is possible given the
current climb gradient. Often times
adjusting the speed or planned altitude to
cross a specific waypoint will cause the
warning to cease.
PMDG 737NG - AOM
DO NOT DUPLICATE
Revision – 1.2 15NOV03
8 - 42
FMC USER’S MANUAL
FMC CRUISE OPERATIONS
Overview: Use of the FMC for cruise flight
operations greatly reduces en-route pilot
workload, and simplifies the process of
providing the greatest level of operating
economy possible with the aircraft. The
Cruise capabilities of the FMC include fuel
management, engine out operations, VNAV
cruise modes and altitude step climb
operations.
CRZ Page: The CRZ page provides the
crew with access to current and upcoming
cruise profile information. Information
displayed in the CRZ page includes the
current commanded cruise altitude, cruise
speed, N1% target settings, step climb size,
next step to fix, next waypoint ETA and fuel,
optimum and maximum cruise altitude and
engine out cruise setting information.
A sample CRZ page is shown below:
by selecting a new altitude using the MCP
altitude knob.
If the MCP altitude is set to an altitude that is
higher than the current cruise altitude, the
cruise altitude will be updated to the new
altitude.
If the MCP altitude is set to an altitude that is
lower than the current cruise altitude and the
aircraft is more than 50 miles from the topof-descent, the cruise altitude will be
updated to the new altitude and a descent
commenced.
If the MCP altitude is set to an altitude that is
lower than the current cruise altitude and the
aircraft is within 50 miles of the top-ofdescent, an early descent will be initiated at
a rate of 1000 fpm until the normal descent
path is intercepted.
TGT SPD: The target speed displayed at
the 2L LSK becomes active when the
aircraft levels off at cruise altitude. The
target speed will then be highlighted to
indicate that it is active.
TURB N1% (Not modeled) The N1% that
should be used in the event of entry into
turbulent air is displayed at the 3L LSK.
This is the thrust setting that will provide the
optimal turbulent air penetration speed given
the current altitude and conditions.
Information contained in the CRZ page
includes:
CRZ ALT: Line 1L shows the currently
selected cruise altitude. This information will
always be displayed unless a descent mode
is activated. Prompt boxes in the CRZ ALT
line indicate that crew entry of cruise altitude
is required. The displayed cruise altitude is
the altitude that was entered into the
flightplan as described earlier.
The selected cruise altitude can be modified
either by direct entry into the CRZ page, or
Revision – 1.2 15NOV03
FUEL AT: The 4L LSK displays the FMS
calculated planned landing fuel figure at the
destination. The number may vary slightly
during climb and initial cruise while average
fuel burn figures are higher than cruise fuel
burn.
This prompt can be highly useful when
selecting a higher/lower than planned
cruising altitude or modifying the route to
destination, or the destination itself. Before
EXECUTING the route modification, return
the the CRZ page and verify the planned
fuel at landing given the new
route/destination/altitudes.
DO NOT DUPLICATE
PMDG 737NG - AOM
FMC USER’S MANUAL
8 - 43
OPT/MAX: (Not modeled) In the center of
the display, the Optimum and Maximum
altitudes for the current aircraft weight and
flight conditions are displayed. These
values can be used to ensure proper
altitudes are being selected during the
cruise portion of flight.
Note: To be added along with active cost
index calculation and STEP TO functionality
in a future PMDG update.
TO T/D: To Top-of-Descent describes the
estimated distance and time of crossing (in
UTC) for the Top of Descent.
ENG OUT: (Not Currently Modeled.)In the
event of an engine failure in flight, selecting
the ENG OUT> prompt at 5R will instruct the
FMC to provide engine-out speed
schedules, performance predictions and
flight guidance.
In the event that the aircraft is above the
maximum engine out altitude at the time of
the engine failure, the cruise altitude will
automatically be lowered to the engine out
maximum altitude.
PMDG 737NG - AOM
DO NOT DUPLICATE
Revision – 1.2 15NOV03
8 - 44
FMC USER’S MANUAL
FMC DESCENT OPERATIONS
Overview: The FMC descent capabilities
provide for descent planning and execution.
A planned descent can only exist when a
lateral route containing at least one descent
constraint is active in the RTE LEGS page.
page. The descent constraint cannot be
updated or changed from the DES page, but
it may be deleted. Deleting the constraint
will remove it from the lateral route.
The descent planning features of the FMC
allow the crew to set speed transitions,
descent path restrictions, and waypoint
dependent speed and altitude constraints.
TGT SPD: Line 2L contains the descent
speed mode information.. The descent
speed is displayed in large font, in the
Mach/Airspeed. Information on this line
cann be updated manually if desired.
DES Page: The descent page provides the
crew with access to descent planning and
information. The DES page is selected by
pressing the DES key on the FMC/MCDU
keypad. The NEXT PAGE/PREV PAGE
keys may need to be used if the aircraft is
still at cruise altitude. A sample DES page
is displayed below:
SPD REST: Line 3L provides the crew with
the ability to enter an altitude dependent
speed restriction. The line contains
transition speed, followed by the transition
altitude in a SSS/AAAAA format. The
altitude entry must be an altitude below the
cruise altitude, but above the End of
Descent altitude.
If operating in VNAV, this speed/altitude
constraint pair will be used in planning the
deceleration prior to descent below the
designated altitude.
TO T/D: To Top-of-Descent describes the
estimated distance and time of crossing (in
UTC) for the Top of Descent.
WPT/ALT: Not currently modeled.
The following information is provided on the
DES page:
E/D ALT: The End of Descent Altitude
information displayed in 1L describes the
altitude and waypoint at which the descent is
planned to end. When no SID/TRANSITION
or APPROACH fixes are entered, this area
will be blank.
AT: Line 1R contains the descent constraint
waypoint as defined in the RTE LEGS page
of the flight plan. The header line contains
‘AT’ followed by the navigation fix identifier
to which the descent constraint is assigned.
The constraint is displayed in the DES page
exactly as it appears in the RTE LEGS
Revision – 1.2 15NOV03
DES NOW: When the aircraft is not
currently descending, but the MCP altitude
selector is set below the current altitude and
the aircraft is within 50nm of the Top-ofDescent, the DES NOW prompt will be
displayed at 6R. The DES NOW> prompt
deletes all climb/cruise constraints and
commences an early descent. The rate of
descent will be approximately 1000 feet per
minute until the aircraft intercepts the
originally planned vertical descent path
which would have commenced at the top-ofdescent mark.
Descent Methods: There are two methods
that can be used to plan descents in the
Next Generation 737. Speed based
descents and path based descents.
DO NOT DUPLICATE
PMDG 737NG - AOM
FMC USER’S MANUAL
8 - 45
The FMC prefers to calculate a path that will
allow for a throttle-idle descent path. Based
on current conditions and any wind
information entered into the DES FORCAST
page, the FMS will calculate a descent path
that will allow for the most economical
power-idle glide down from cruise flight.
This calculated descent is called a “Descent
Path.”
At the top of the previous image, the title line
contained the title ECON PATH DES. This
indicates that the descent method being
used bt the FMC is the descent path profile
that will give it the throttles-idle descent
path.
A second descent method is also available,
depending upon crew preference.
A SPEED based descent will allow the crew
to plan a descent at a specific speed, with
power and elevator being managed to
maintain the desired speed during the
descent.
The following information is provided on the
DESCENT FORECASTS page:
TRANS LVL: The transition level for the
destination airport is displayed in 1L. The
transition level can be modified by upselecting from the scratchpad.
CABIN RATE: (Not Modeled) The rate of
descent required to adjust the cabin altitude
rate of descent in order to minimize the rate
of change in cabin pressure.
TAI ON/OFF: Altitude at which anti ice is
projected to be necessary. Boeing has
disabled this capability as of this writing.
ISA DEV/QNH: Destination airport
temperature deviation from Standard
Atmoshperic Conditions and airport QNH.
This information is used to plan the descent
portion that will take place below the
Transition Level entered at the 1L LSK.
DESCENT FORECASTS Page: The
DESCENT FORCASTS page allows the
crew to enter and use forecast values for
wind, transition level, anti-ice settings and
descent wind direction information. A
sample DESCENT FORECASTS page is
shown below:
PMDG 737NG - AOM
WIND ALT/ DIR/SPD:
Wind altitude speed and direction entries are
made by the crew based upon reported
conditions, observed conditions (use the
wind indication on the Nav Dissplay!) or
forcast conditions in order to assist the FMC
in computing the descent profile as defined
in the flight plan.
Helpful Hint!: This functionality is operating
in the PMDG FMC and is very important for
accurate descent planning purposes. If you
find that you are continually receiving a
DRAG REQUIRED message during
descent, it could be that you have not
entered wind conditions into the forecast
page when a tailwind condition exists.
DO NOT DUPLICATE
Revision – 1.2 15NOV03
8 - 46
FMC USER’S MANUAL
Conversely, if you find that the descent
appears to be shallow or power is needed to
maintain the descent path, a headwind could
exist along the descent path that was not
entered into the Forecast page.
Altitude bands for the winds are entered at
the discretion of the crew.
Descent Profile Logic: The default
descent profile logic is to effect an economy
descent form cruise altitude to the transition
altitude. After passing through the transition
altitude, 240 knot descent is commanded.
The crew may manually override the default
descent profile through the use of speed
and/or altitude constraints entered into the
RTE LEGS page. The descent profile can
also be modified using the MCP speed
and/or altitude selector knobs. A
combination of RTE LEGS entries and MCP
selections can be used to adhere to ATC
instructions, or to expedite the descent
profile as needed.
During the descent, the aircraft will
occasionally reach the descent limit speed
regime while attempting to maintain the
calculated vertical profile. This can occur as
a result of headwinds or tailwinds, or wind
forecasts not being entered correctly in the
DESCENT FORCASTS page. The DRAG
REQUIRED prompt is generally a good
indication of a tail wind condition or descent
overshoot, while the THRUST REQUIRED
prompt generally indicates headwinds, or
descent undershoot.
In cases of descent undershoot and
overshoot, once the aircraft reaches the limit
speeds (upper or lower limits) the vertical
guidance function of the FMC will command
the aircraft to depart the planned vertical
profile while maintaining a descent that most
closely follows the planned descent profile.
Adding drag or thrust as required will
normally return the aircraft to the planned
descent path.
Revision – 1.2 15NOV03
DO NOT DUPLICATE
PMDG 737NG - AOM
FMC USER’S MANUAL
8 - 47
FMC APPROACH PROCEDURES
Overview: The FMC approach initialization
pages provide the crew with quick and
effective access to the landing flap and
speed selection process. The FMC provides
the crew with approach speed calculations
for weight/speed data and provides
reference information for the touchdown.
APPROACH REF Page: The approach
page provides the crew with information
directly related to the final approach to
landing process. A sample APPROACH
REF page is shown below:
the ICAO airport identifier, followed by the
runway number and L/C/R designator.
Runway length reference information is
provided in large font in 3L, and is displayed
in both feet and meters.
Helpful Note!: This information is only
displayed after an approach the the
destination has been selected in the
DEP/ARR menu.
ILS FREQUENCY/COURSE: To further
assist the crew with rapid information
management, the instrument approach
frequency and final approach course are
provided at the 4L LSK after an instrument
approach is selected to the destination
airport.
FLAPS/VREF: The Vref reference speeds
for the FLAPS15, FLAPS30 and FLAPS40
landing flaps settings are provided in lines
1R, 2R and 3R respectively. These Vref
values are directly reported from the aircraft
performance database, and will change as
the GROSS WT figure in 1L changes.
The following information is provided on the
APPROACH REF page:
GROSS WT: Line 1L provides the current
airplane gross weight in thousands of
pounds unless the figure has been manually
adjusted by the crew. Manual adjustment of
the GROSS WT figure is accomplished by
up-selecting a manually entered figure from
the scratchpad. Valid entries are three digits
with an optional decimal point. Crew
entered GROSS WT values are used for
predictive purposes only, and do not affect
aircraft computation of actual gross weight.
Runway Length: Line 3L contains runway
reference information to assist the crew in
planning the touchdown and stopping phase
of flight. The header line in 3L will display
PMDG 737NG - AOM
FLAPS/SPEED: After reviewing the
information contained in the APPROACH
REF page, the crew can select the desired
landing flap setting by down-selecting from
either 1R , 2R or 3R. This will cause the
selected landing flap setting to be
automatically populated to the 4R LSK
under the FLAP/SPD title. This line serves
as a quick reference for the currently
selected landing flap setting and approach
reference speed.
Additionally, if the crew desires to update
the landing flap speed to adjust for
windshear or gusts, the flap setting/speed
can be upselected from the scratch pad
using the format FF/SSS.
DO NOT DUPLICATE
Revision – 1.2 15NOV03
8 - 48
FMC USER’S MANUAL
FMC FLIGHT REFERENCE AND CREW SUPPORT
Overview: The FMC is capable of providing
the crew with information regarding the
performance of the aircraft during flight, as
well as supporting information which can
help the crew to make informed and
accurate decisions.
PROGRESS Pages: The progress display
occupies two display pages, and can be
called up by pressing the PROG key on the
FMC/CDU.
The first progress display page is shown
below.
•
•
•
•
Direct Ground Track from previous
fix to current fix in the flight plan.
Distance to go to current fix.
Estimated Time of Arrival at current
fix.
Predicted fuel remaining at the
current fix.
The same information for the next fix in the
flight plan is contained in line three of the
PROGRESS display.
The fourth line in the PROGRESS display
includes the destination, distance to go, ETA
at destination and estimated fuel remaining
at destination.
This line can be used to estimate arrival time
at the gate and fuel on board the aircraft any
time a route edit has been made.
TO T/D: Line Five of the display includes
planning information to display the distance
and fuel quantity on board the aircraft when
reaching the Top-Of-Decent point for the
flight plan. The estimated time of crossing
for the TOC is also displayed.
FROM / ALT/ATA/FUEL: The first line of the
PROGRESS page display contains
information related to the last flight plan fix
that was over flown.
From left to right, the information displayed
includes:
•
•
•
•
WIND: The current wind conditions as
calculated by the FMS is displayed at the 6L
LSK. This information can be downlselected
to be added to the descent forecast if
desired.
The name of the fix.
Aircraft altitude at time of fix
crossing. (in thousands)
Actual Time of Arrival at last fix.
Fuel on board at the time of fix
crossing.
NEXT / DEG / ETA / FUEL: The second line
of the PROGRESS page display contains
information describing the fix that is currently
the active fix in the flight plan.
From left to right, the information displayed
includes:
Revision – 1.2 15NOV03
DO NOT DUPLICATE
PMDG 737NG - AOM
FMC USER’S MANUAL
The second PROGESS page is reached by
using the NEXT PAGE/PREV PAGE keys,
and is displayed below:
8 - 49
error is displayed when the aircraft is in the
descent phase of flight.
The PROGRESS 2/2 page contains
additional information on the wind,
temperature and navigation accuracy of the
aircraft.
Line one contains the calculated
tailwind/headwind and crosswind component
described in knots. This information is a
vector breakdown of the wind information
contained on the PROGRESS 1/2 page.
Additional information includes:
WIND: Line 2 displays the current wind
conditions at the location and altitude as
calculated by the FMS.
SAT/ISA DEV The 2R LSK displays the
current SAT and it’s deviation from ISA
conditions.
Line 3 displays both cross track error (XTK
ERROR) and vertical track error (VTK
ERROR) in nautical miles and feet.
XTK ERROR is displayed in nautical miles
with a L and R designator to indicate that the
aircraft has drifted left or right of course
respectively. Distance values are displayed
up to 99.9 nautical miles.
VTK ERROR is displayed in feet, with a +
and – sign to indicate deviation above and
below planned flight track. Vertical track
PMDG 737NG - AOM
DO NOT DUPLICATE
Revision – 1.2 15NOV03