1
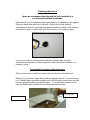
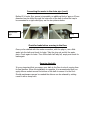
Americh International Collection Installation
and User Guide
Before you start
Please note that this product has been through our rigid quality control procedures
which include a thorough visual and physical inspection. Please unwrap the bath and
check it carefully to ensure it has not been damaged in handling or transport which is
beyond our control.
Claims regarding cracks and or face damaged must be reported within 24hrs
of receipt of the product. No such claims will be recognised after installation
as this is classed as acceptance of the product
Please do not remove the old fixture before you unpack and inspect the new unit. Upon
receipt check for shortages immediately. Store the bath in a safe place until you begin
installation to avoid damage.
Any installation should be carried out by a qualified tradesman with knowledge of
statutory and plumbing requirements in your area.
Tools needed
•
•
•
•
•
•
Spirit Level
Set of screwdrivers, both flat
and cross heads
Adjustable Pliers
Sharp knife
Silicone sealant
Drop cloth
Getting Started
Freestanding skirted baths
Certain Americh International baths have been designed so the outer skin goes all the
way to the floor, as shown in the picture below.
Installation Instructions
Some Americh International freestanding baths have been designed for floor or wall
mounted taps. The floor which the bath sits on must be as level as possible due to
the bath either sitting on the plinth or its flat base.
As the skirted baths have no panel to remove for access to the waste, an access
hole has been cut in the base of the outer skin so connection can be made for the
waste and outlet pipe. Picture (A) shows the access hole
Access
hole in
outer skin
Waste
hole in
bath
Picture (A)
The access hole can be enlarged if required, be careful not to cut into the structural
supports in the bath. The cut should not extend beyond the base up the side walls.
Damaging the bathtub while extending the access hole will void the warranty.
Plumbing the bath in
Again we recommend that the bath be fully installed by a
professional/qualified tradesman.
Once the bath is in the general position and ready to be plumbed in, we suggest
fitting the waste and overflow to the bath. Before you do this Americh
International insists you smear silicone sealant around the inside of the overflow
and waste to ensure a water tight seal. This is shown in the picture below.
You are now ready to fit the waste to the bath, please follow all waste
manufacturers instructions. Please install the waste with silicone sealant - not
plumber’s putty!
Connecting the waste to the drain pipe.
There are two ways in which you can connect the drain to the waste pipe.
Method 1) if you have a waste that comes up through the floor. You can connect
to it a flexible drain pipe which enables you to tilt the bath up and move the bath
into the required position, see picture below. To avoid water retention in the
trap, the flexible pipe should have a continuous downward flow.
Flexible pipe
Waste and p trap
Connecting the waste to the drain pipe (cont).
Method 2) if under floor access is impossible, an additional hole of approx 45 mm
diameters can be drilled through the outer skin of the bath to allow the trap to
be connected to a rigid outlet pipe, see the two pictures below.
Rigid outlet
pipe
P trap
Check for leaks before securing to the floor
Once you’re satisfied with the waste connection, with the plug in, run a little
water into the bath and check for leaks. Take the plug out and let the water
drain. Check again for leaks. Then fill the bath half way full, empty and check for
leaks again.
Securing the bath
It is very important that you secure your bath to the floor to stop it moving from
its final position. When the installation is complete, it is recommended that you
apply silicone sealant around the bottom of the bath to secure it to the floor.
Should maintenance access be needed the silicone can be released by cutting
round it with a sharp knife
Care and maintenance of your bath
It is advisable always to run in some cold water before turning on the hot tap
The acrylic has been tested to relevant standards and once formed, acrylic can only be
cracked by suffering some form of impact, stress or chemical reaction. The surface of
the acrylic is very smooth and easy to clean. Americh suggests the use of a non
abrasive cleaner. The cleaning of your bath should be on a regular basis.
Avoid cleaning products that contain acetone, ethyl alcohol, amyl or ethyl acetate, these
products can damage the finish of the bath.
Do not use cigarettes near the bath, they could damage the finish.
Safety
•
This product is intended for indoor use only. Use the bathtub only for its intended
purpose as described in this manual and do not use attachments or accessories
which are not recommended by the manufacturer.
•
Caution should always be exercised when entering or exiting the bathtubs.
•
Pregnant women should be careful of the temperature of the water when bathing
•
To reduce the risk of injury, do not permit children or persons with a disability to
use this unit unless they are closely supervised at all times.
•
Never drop or insert any object into the bath
•
Do not attempt to use/plug electrical items while in or near a filled bath.
•
Failure to comply with all instructions, requirements, and warnings contained in this
manual create a serious hazard to the bathtub user and may result in serious injury.