1
What is Stipulator?
Stipulator is a program that automates grading of programming assignments written in the Java
programming language. Instructors write a set of JUnit unit tests, which Stipulator compiles and runs
against each of the student submissions. It then collects the results into a universally-readable CSV file,
which instructors can view or import into their grading program.
Stipulator is designed to involve as little user interaction as possible. After telling Stipulator where the
student submissions and tester files are, grading a lab involves only one click. This makes it easy to
repeatedly test labs in response to student requests. Tests can also be grouped together to make it easy
to grade all assignments for one class or all classes for one assignment.
Perhaps best of all, Stipulator is free! Stipulator is licensed under the GNU General Public License,
version 3 or later.
USER MANUAL
Stipulator Overview: to use Stipulator, you need to know how it works. This overview will
explain its inner workings and what you need to do to use it.
When You First Start Stipulator: before you can start using Stipulator, you need to do some
simple configuration.
Writing Test Suites: unit tests define the behavior you expect from student code. This section
will introduce you to writing them. If you’re already familiar with unit testing, you should still
read this section for Stipulator-specific information.
Working With Scripts: Stipulator uses a script-based system to store and organize your test
configurations. This section will tell you all you need to know about creating, editing, and
grouping them.
Script Sets and Advanced Stuff: script sets help you organize your scripts. This section will
explain how to work with them, and will also explain a few advanced things.
Stipulator Overview
Put concisely, Stipulator automates grading by executing scripts which run unit tests against student
code and save the results.
A unit test is a short piece of code that exercises some other code. Usually, a unit test checks one
specific behavior of a single method, although more complex tests are occasionally used. A set of unit
tests that all test a single method or related group of methods (such as all methods in a particular class)
is known as a test suite. When you use Stipulator, you will write a test suite that checks student code to
make sure it exhibits all desired behavior, as you specified in your assignment. You will learn more
about writing test suites in a later portion of the manual (logically named Writing Test Suites).
Stipulator associates a tester and a directory containing student submissions into a script. Once you
create a script, you can run it in two clicks (one to select the script and one to click the Run button).
This makes repeatedly testing code easy. Each script can also contain information about dependencies,
such as library JARs, and a place to write results to. You can organize scripts into script sets; when you
run a script set, all scripts it contains are run. This allows you to, for example, test all assignments for a
particular class at once, or test a particular assignment for all classes at once. Results are written to a
CSV (comma-separated values) file, which can be viewed in many spreadsheet applications (for
example, Microsoft Excel). The results file will also contain information about test failures, making it
easy for you to give your students feedback about why they didn’t pass your unit tests. More
information about scripts can be found in the Working With Scripts section of the manual.
Now that you know how Stipulator works, you can start using Stipulator. The next section of the
manual, When You First Start Stipulator, explains initial configuration of Stipulator.
When You First Start Stipulator
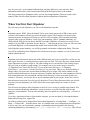
The first time you start Stipulator, you will see the Stipulator Launcher.
Stipulator requires JDK 6. Since the default VM on your system may not be a JDK or may not be
version 6, the Launcher will help you select the proper version. The Launcher will look in some
common locations for instances of javaw.exe, the Java VM executable. (This automatic detection
currently only works on Windows.) Look for a path containing “jdk1.6″ and not containing “jre”.
(JDKs include JREs, but if you choose the JRE executable, Stipulator will not have access to a Java
compiler.) If your JDK is not listed, choose “Browse…” and select the proper javaw.exe. The next time
you launch Stipulator, it will automatically launch itself with the JDK you selected.
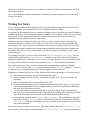
After Stipulator proper launches, you will be presented with another configuration dialog. This time,
you will be configuring where Stipulator files will be stored on your computer, as well as where your
student submissions are.
Stipulator stores information about each of the different tests you set up in script files, so after you set
them up the first time, re-running that test requires only one click. The script directory setting controls
where Stipulator saves these scripts to. The other settings are for convenience when creating scripts.
They are used as variables in path settings. For example, one of your testers may be located at
“C:/Stipulator Files/Testers/FooTest.java”. If you set the tester directory to “C:/Stipulator
Files/Testers/”, your can use “${tester}/FooTest.java” in your script. This gives you the flexibility to
change where your testers are stored without breaking all your scripts. This works similarly for the
projects and results directories: the projects directory contains directories for each assignment, which in
turn contain directories for each student, and the results directory is where test results (grades) are
written to. Of course, you are also free to specify absolute paths in your scripts. In any case, each of
these directories must exist for you to specify them here. If one of these directories does not exist the
next time you start Stipulator, you will be shown this screen again and given a chance to fix the
problem.
You also have the option to allow Stipulator to check if a new version is available upon launch. This
does not send any identifying information; it merely retrieves a text file from this web site and
compares version numbers. You can also manually check for updates by selecting Help –> Check For
Updates….
If you have exported preferences from another computer, you can use them by selecting the Import…
button and selecting your .stippref file.
All of these options can be changed later from within Stipulator by selecting Main –> Configure… or
Main –> Change JDK… from the menus. Also, if a problem with your configuration causes Stipulator
to fail to start, you can clear them by opening a command prompt, navigating to the directory
containing Stipulator.jar, and running java -jar Stipulator.jar --unwedge. This will not
affect any script files you have created; just choose the same script directory and Stipulator will load
the scripts as normal.
You’ve now finished the initial configuration of Stipulator. In the next section, you will learn about
Writing Test Suites.
Writing Test Suites
If you’re already familiar with writing test suites, you can skip down to the bulleted list below that
discusses Stipulator-specific behavior. If you’re not familiar, continue reading.
As explained in the Stipulator Overview, unit tests are short pieces of code that test a specific behavior
of another short piece of code. Stipulator works by running a set of unit tests, called a test suite, against
student code. In Java, many people use the JUnit unit testing framework to write their unit tests.
Stipulator can work with JUnit, but it is not required.
Whether or not you’re using JUnit, when you create a test suite, you will create a tester class. By
convention, this class is named FooTest, where Foo is the name of the class whose methods it tests.
(For example, if the class being tested is named Pair, the tester class would be named PairTest.) Your
tester class will contain a number of test methods that perform the actual testing; these methods will
have names that start with “test”, will be public, will take no arguments and will not return a value
(void return type).
If you want to use JUnit, your tester class will extend junit.framework.TestCase. Your test
methods will use the family of assertEquals() methods to check the student code’s behavior
against expected behavior. (Note that TestCase has a one-arg constructor, so you will need to define
a no-arg constructor. What you pass as the argument to super() doesn’t matter to Stipulator.)
If you don’t want to use JUnit, your tester class will not extend anything (implicitly extending
Object). You will use the Java assert keyword, along with the equals() method or == operator
(as appropriate), to check the student code’s behavior against expected behavior.
Regardless of whether or not you use JUnit, Stipulator has certain requirements of your tester classes:
Your tester class must have a public no-argument constructor.
Your test methods must have names starting with the string “test”. They must not take any
arguments.
Only test methods may have names starting with “test”.
Your should not depend on your test methods executing in a particular order, or on your tester
class being instantiated only once per student. (That is, your tester class should not hold data
that needs to be carried between tests.)
You should not call into student code outside of your test methods. (Only test methods are
timed, so if you called into student code in other places, the student code could enter an infinite
loop. More information on test timeouts can be found in Working With Scripts.)
You may define methods named setUp() and tearDown(). These methods must not take
arguments. If defined, setUp() will be run immediately before each test method. If defined,
tearDown() will be run immediately after each test method. You should not call into student
code in these methods.
You can download an example test suite here. The archive contains three files: Calculator.java,
which would be what students would implement, CalculatorTest.java, a test suite that doesn’t
use JUnit, and JUnitCalculatorTest.java, a test suite that does use JUnit.
In the next section of the manual, Working With Scripts, you will learn how to put your test suites to
work by creating, editing, and running scripts.
Working With Scripts
After you set up Stipulator for the first time, you’ll do most of your work in the Stipulator main
window. Let’s briefly identify and describe the components of the window.
The script list shows you all of the scripts and script sets you have created. You can work with them by
clicking on one or more, then clicking on one of the script buttons. You can create new scripts and
script sets using the New Script… and New Script Set… buttons. Clicking the Run Selection button
will move the selected scripts to the task list. The task list displays scripts that are executing, are
queued up, or have completed. The task list also gives you information on the progress of executing
scripts. The task buttons let you cancel a selected script, open a dialog to display the results of a
selected script that has finished, or remove a selected finished script from the task list.
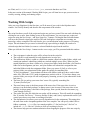
When you click the New Script… button to make a new script, you’ll be presented with this window:
The script name is what the script will be referred to in the script list.
The script ID is used internally to track dependencies in script sets.
The submissions folder is a path to a folder that contains a bunch of student folders, which each
contain one student’s submission (which may include multiple source files). When you first
started Stipulator, you chose a folder to be your projects folder. Inside that folder, you’ll make a
folder for each assignment you have, and your students will submit their assignments into
individual folders inside the assignment folder. Since you can use ${fosf} to refer to your
projects folder, your submissions folder path will typically be something like
“${fosf}/Assignment”. Your students will then create folders (with up to three words in their
name, like “Doe John 1234″) inside Assignment to put their code in. (If you later change your
projects folder, your script will still work properly, assuming you move your submissions to the
new place. )
The tester file is a path to your tester class’ source file, typically something like
“${tester}/FooTest.java”.
The tester binary name is the binary name of the tester class. If the tester class is not in a
package (is in the default package), its binary name is just its name. If the tester class is in a
package, its binary name is the name of the package, then a period, then the class name (e.g.,
“com.example.FooTest”).
The results file is the file which the test results will be written to. This will usually be something
like “${results}/FooTest.csv”. You may find the ${date} and ${time} replacements useful if you
want to prevent new tests from overwriting old results.
The dependencies list allows you to specify dependencies for the assignment. This string takes
the same form as the classpath argument to the Java compiler. You can specify either JARs or
folders containing .class files. An example might be “C:\foo bar\foo.jar;C:\foo bar\” to
include all .class files in C:\foo bar as well as everything in foo.jar.
The timeous help prevent a student submission from stopping the progress of the test script by
entering an infinite loop. The per-test timeout applies to each individual test method, and will
allow further test methods to run against the given student’s code if exceeded. The total timeout
applies to all methods run for a particular student in the script; if exceeded, the rest of that
student’s methods are not run. Both values are in milliseconds.
When you’re finished, click OK and you’ll see the script appear in the script list. You can run it by
clicking on it, then clicking Run Selection. If you created the script correctly, you’ll see it appear in the
task list and execute. You can then check the results by opening the results file.
If you want to edit your script later, click on it in the script list and then click Edit Selection…. You’ll
be presented with essentially the same dialog as you were when you created the script. Make your
changes and click OK. You can also delete your script by using the Delete Selection button. Be
careful, as you can’t undelete the script, and if the script is part of a script set, you will break the script
set. (Stipulator presently does not do reverse dependency checking.)
You now know everything you need to use Stipulator. In the next section of the manual, Script Sets
and Advanced Stuff, you’ll learn about using script sets to organize your scripts, as well as some other
miscellaneous information.
Script Sets and Advanced Stuff
A script set is a group of scripts. By creating a script set, you make it easy to run a number of scripts at
once. For example, if you teach three periods of a given class, you might group each period’s scripts
into a script set. Or, you might choose to group all three periods’ scripts for one particular assignment.
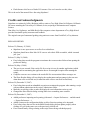
You can do both at the same time, using two script sets. To make a script set, click the New Script
Set… button, and you’ll be shown this dialog:
First, give the script set a name. The ID is used internally, so don’t worry about it. Use the Add and
Remove buttons to move scripts from the list over into the script set. Then click OK to add the script
set to the script list. Script sets are run, edited, and deleted just like regular scripts.
Be careful not to create a circular loop with your script sets. Stipulator tries to prevent this by hiding
some scripts from the list on the left, but it’s not perfect yet.
When you run a script set, all scripts in it are placed in the task list. If one of those scripts is a script set,
it will be expanded as well, and so on.
Since this is the last section of the manual, you can also learn about the advanced features in the
Advanced menu here:
Import Preferences…: you can import saved preferences (the various paths you set up the first
time you launched Stipulator) from a .stippref file here.
Export Preferences…: you can use this to create a .stippref file for importing.
Clean Temporary Directories: Stipulator compiles student code on your computer, to prevent
students from decompiling your tester from the .class files. This option will clean out those
temporary files, if for some reason your computer’s temporary directory is not automatically
cleaned periodically.
Collect Garbage: this will cause Stipulator to try to reclaim any memory it can. You probably
won’t use this unless Stipulator begins using a lot of memory.
Dump State: this generates a debug report of the script engine state. You won’t need to use this.
Flush Streams: this forces a flush of I/O streams. You won’t need to use this, either.
This is the end of the manual. Have fun using Stipulator!
Credits and Acknowledgments
Stipulator was written by Jeffrey Bosboom while a senior at Troy High School in Fullerton, California.
He is now attending the University of California, Irvine, majoring in Information and Computer
Science.
Don Allen, Joe Coglianese, and Mike Reid of the computer science department at Troy High School
provided invaluable quality assurance and feedback.
The original concept of automated grading using unit tests comes from David Poll, a Troy alumnus.
RELEASE HISTORY
Release 32 (February 15, 2009)
Stipulator is now open-source as well as free to distribute.
Stipulator should now allow Mac OS X users to select their JDK executable, which is named
just “java”.
Release 31 (May 29, 2008)
Fixed a bug that caused the program to terminate due to an assertion failure when opening the
preferences dialog.
Release 30 (May 4, 2008)
The user is now warned if the results file for a script is in use by another application (which
would result in terminating the application due to an uncaught exception after running the
script).
Compiler errors are now written to the results file like test assertion failure messages are.
The Show Results dialog will now display the student name and percentage in the text area
when those cells are clicked on (for when the table cells are too small to read from).
Release 29 (December 25, 2007)
Fixed a bug that caused an unhandled exception to terminate the program when running a script
with no student submissions in the script’s submissions folder.
Made the error dialog wider to make the displayed error information easier to read.
Changed the Show Results dialog resizing behavior to something more sensible.
Release 28 (December 11, 2007)
Added preference importing and exporting (Advanced –> Import Preferences… and Advanced
–> Export Preferences…).
Added a button to the configuration dialog to allow first-time settings to be imported.
Fixed a bug where the text box in the Show Results dialog did not update properly when
clicking on a cell in the same row as the previously clicked cell.
Fixed a small family of bugs relating to the script list not being refreshed properly.
Fixed a bug where a message about restarting Stipulator was displayed after accessing the
Change JDK dialog and clicking Cancel, even though no changes had been made.
Release 27 (December 5, 2007)
Added optional automatic update checking via the Internet.
Added manual update checking (About –> Check For Updates…).
Release 26 (December 1, 2007)
Release 26 was the first public release of Stipulator. (Previous releases were only distributed to
Troy High School for beta testing.)