1
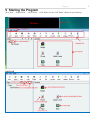
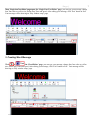
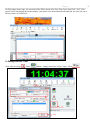
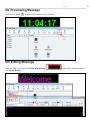
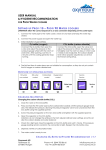
Page |
GLIC Studio User Manual
GLIC STUDIO USER MAUAL............................................................................................................... 2
I INTRODUCTION .................................................................................................................................3
II INSTALLING THE SOFTWARE ........................................................................................................3
III CONNECTING THE SIGN WITH COMPUTER................................................................................3
IV SETTING UP COMMUNICATION AND SIGN CONFIGURATION ...................................…....3-4
V STARTING THE PROGRAM........................................................................................................…...5
Tool Bar..................................................................................................................................................5
VI CREATING MESSAGE..................................................................................................................…..6
Add ew Page ........................................................................................ .............................................. 6
Creating Bold Line (Single Line) Text Message.............................…...........................................…......6
Creating Word Message..........................................................................................................................7
Using Animation and Picture.................................................................................................................. 8
Adding current time......................................................……….................................…..................…….9
VII
PREVING MESSAGE.........................................................................................................................10
VIII EDITING MESSAGE......................................................................................................................... 10
VIIII SAVING MESSAGE.......................................................................................................................... 11
X
SENDING MESSAGE..................................................................................................….....…..........11
2
Page |
I Introduction
GLIC Studio is a program to create, schedule and send messages to our LED displays.
II Installing the Software
1. Make sure you have administrative privilege or login before you install the program for window 2000 or XP
user.
2. Put the installation CD into the CD rom
3. Browse your CD rom drive by clicking into “My Computer” on your Desktop or Start menu.
4. Double click into CD rom.
5. Double click on GLIC_Studio
6. Click Next, it will ask what folder you want it to save to. Leave the default setting.
7. It will start the installation and the shortcut button will be automatically showing on your desktop.
III. Connecting the Sign With Computer
You can directly to connect the sign with the computer if you have available serial port on your computer. If you
don't have any available serial port on your computer, then you need to have a USB to serial converter. After you
plug your USB on your computer with the serial cable, you will have to install the driver that comes with the
package on a floppy disk, and look for the ‘Com’ port. Then, using USB converter to connect the sign with your
computer.
IV Setting up Communication and Sign Configuration
1.. Open the software on your desktop
2. Go to “Setup” – “Option” , page Parameter is open.
3
Page |
3. Click‘Find Com’, wait, then the computer will be automatically connected with the Sign. Go to ‘Type’, Select
‘Real Color’ for Full Color Window Sign or select “Red /Double” for Tri Color Window Sign,. Then Click ‘Ok’
4. You can change the size of ‘Play Window .
Go to ‘Type’, Change ‘ Zoom ’ from 1 to 10. The,n you can use your mouse to make Play Window wider and
Longer
4
Page |
V Starting the Program
Go to “Start” – “Program Files” – “GLIC Studio” – “GLIC Studio” (or the “GLIC Studio” shortcut on your Desktop).
TOOL BAR
5
Page |
VI Creating Message
1. Add New Page
Click button
on Tool Bar to add new page
Note: Make sure to add New Page before creating each different Message
2. Creating Bold Letter (Single Line) Text Message
Click
→
6
Page |
Then, ‘Single Line Text Editor’ page open. On ‘Single Line Text Editor’ page, you can type your message, change
font, font color as well as size, define Stay Time and speed. After editing your message, click ‘Exit’ button to Exit.
Your message will be showing on ‘Play window setup’ page.
3. Creating Word Message
Click
→
. On ‘Word Editor’ page, you can type your message, change font, font color as well as
size, define Stay Time and speed. After editing your message, click ‘Exit’ button to Exit. Your message will be
showing on ‘Play window setup’ page.
7
Page |
4. Using Animation & Pictures
Click
→
→
Animation File → Select Your Picture or animation file→ Click
browse your Picture or
. Page ‘Play Image Setup’ is open.
8
Page |
On ‘Play Image Setup’ page, you can choose Play Effect, Speed, Stay Time, Play Count, then Click ‘Exit’. Your
picture will be showing on the window display. your picture size can be automatically adjusted. It’s better for you to
choose pictures of 16x80 Pixel.
5. Adding current Time
Click ‘Add New Page’
--‘Time’
Button—Change Font color or Play Count—Click
9
Page |
VII Previewing Message
Click Preview Button
, programs will be shown on Play Window
VIII Editing Message
Click any ‘Page’ you want to edit →Click ‘Play Window’
‘V Creating Message’
VIIII Saving Message
→, then follow the instructions as
10
Page |
11
Save your message before sending message to the sign as well as save your message when you change messages and
prior to sending messages to prevent from data loss.
Go to ‘File’-‘Save’, Select Path, Name your file, and Save.
X Sending Message
Click ‘Send’ button on Standard Tool to send message