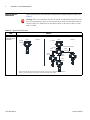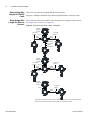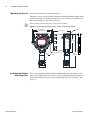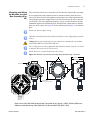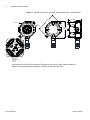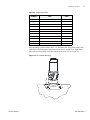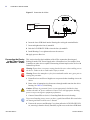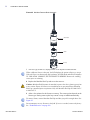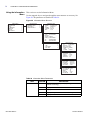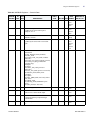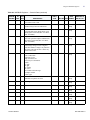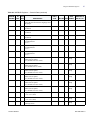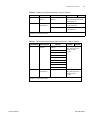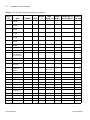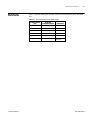
1
MERIDIAN
UNIVERSAL GAS DETECTOR
User Guide
087-0049
Rev C
Meridian User Guide
UNIVERSAL GAS DETECTOR
087-0049
Rev C
© 2014 Scott Safety. SCOTT, the SCOTT SAFETY Logo, Scott Health and Safety,
Protege, Proton, Scout, Freedom, Masterdock, are registered and/or unregistered
marks of Scott Technologies, Inc. or its affiliates.
All rights reserved. No part of this documentation may be reproduced in any form or
by any means or used to make any derivative work (such as translation,
transformation, or adaptation) without written permission from Scott Safety.
Scott Safety reserves the right to revise this documentation and to make changes in
content from time to time without obligation on the part of Scott Safety to provide
notification of such revision or change.
Scott Safety provides this documentation without warranty, term, or condition of any
kind, either implied or expressed, including, but not limited to, the implied warranties,
terms or conditions of merchantability, satisfactory quality, and fitness for a particular
purpose. Scott Safety may make improvements or changes in the product(s) described
in this documentation at any time.
While every effort has been made to ensure accuracy in this guide, no responsibility
can be accepted for errors or omissions. This publication is not intended to form the
basis of a contract, and the company reserves the right to amend the design, content,
and specifications of the detector without notice.
Scott Safety, 4320 Goldmine Road, Monroe, NC 28110, Telephone 800-247-7257,
FAX 704-291-8330, E-mail [email protected], Web
www.scottsafety.com
Microsoft, Windows, Windows 2000, Windows Me, Windows XP, Windows NT,
Windows Vista, Windows 7, Internet Explorer and MS-DOS are either trademarks or
registered trademarks of Microsoft Corporation in the United States and other
countries. Solaris and JAVA are either trademarks or registered trademarks of Sun
Microsystems, Inc. All other products or service names are the property of their
respective owners.
The international transport of this device is regulated under United States export
regulations and may be regulated by the import regulations of other countries.
087-0049
Rev C
CONTENTS
About This Guide
Guide Overview . . . . . . . . . . . . . . . . . . . . . . . . . . . . . . . . . . . . . . . . . . . . . . . . . . . . xi
Guide Conventions . . . . . . . . . . . . . . . . . . . . . . . . . . . . . . . . . . . . . . . . . . . . . . . . xii
Related Product Documentation . . . . . . . . . . . . . . . . . . . . . . . . . . . . . . . . . . . . . . xiii
Revision History . . . . . . . . . . . . . . . . . . . . . . . . . . . . . . . . . . . . . . . . . . . . . . . . . . xiv
Certifications and Approvals . . . . . . . . . . . . . . . . . . . . . . . . . . . . . . . . . . . . . . . . . xv
General Safety Information . . . . . . . . . . . . . . . . . . . . . . . . . . . . . . . . . . . . . . . . . xxix
Warnings and Cautions – Device Use and Care . . . . . . . . . . . . . . . . . . . . . . . . . xxx
Warnings and Cautions – Sensor Use and Care . . . . . . . . . . . . . . . . . . . . . . . . xxxi
CHAPTER 1
Quick Reference
Chapter Overview . . . . . . . . . . . . . . . . . . . . . . . . . . . . . . . . . . . . . . . . . . . . . . . . . . 1
Typical Quick Reference . . . . . . . . . . . . . . . . . . . . . . . . . . . . . . . . . . . . . . . . . . . . . 2
CHAPTER 2
Introduction
Chapter Overview . . . . . . . . . . . . . . . . . . . . . . . . . . . . . . . . . . . . . . . . . . . . . . . . . . 7
Device Overview . . . . . . . . . . . . . . . . . . . . . . . . . . . . . . . . . . . . . . . . . . . . . . . . . . . 8
CHAPTER 3
Installation
Chapter Overview . . . . . . . . . . . . . . . . . . . . . . . . . . . . . . . . . . . . . . . . . . . . . . . . . 13
Planning for Installation . . . . . . . . . . . . . . . . . . . . . . . . . . . . . . . . . . . . . . . . . . . . . 14
Verifying Items Shipped . . . . . . . . . . . . . . . . . . . . . . . . . . . . . . . . . . . . . . . . . . 14
Mounting Considerations . . . . . . . . . . . . . . . . . . . . . . . . . . . . . . . . . . . . . . . . . 14
Following Electrical Codes . . . . . . . . . . . . . . . . . . . . . . . . . . . . . . . . . . . . . . . . 18
Hard Wired Configurations . . . . . . . . . . . . . . . . . . . . . . . . . . . . . . . . . . . . . . . . 18
Determining Wire Length and Size for Input Power . . . . . . . . . . . . . . . . . . . . . 21
Determining Wire Length for RS-485 Cable . . . . . . . . . . . . . . . . . . . . . . . . . . . 22
Determining Wire Length for Remote Sensors . . . . . . . . . . . . . . . . . . . . . . . . . 22
An Application Solution Example . . . . . . . . . . . . . . . . . . . . . . . . . . . . . . . . . . . 23
Installation Checklist . . . . . . . . . . . . . . . . . . . . . . . . . . . . . . . . . . . . . . . . . . . . . . . 25
Mounting the Device . . . . . . . . . . . . . . . . . . . . . . . . . . . . . . . . . . . . . . . . . . . . . 26
Installing the Retrofit Mounting Plate . . . . . . . . . . . . . . . . . . . . . . . . . . . . . . . . 26
Installing the Meridian NPT Ex Seal . . . . . . . . . . . . . . . . . . . . . . . . . . . . . . . . . 28
Mounting and Wiring the Meridian Junction Box Assembly (Al or SS) . . . . . . . 31
Using the Meridian Junction Box Assembly Spacer Kit . . . . . . . . . . . . . . . . . . 33
Mounting a Meridian Detector Body Using a Duct Mount Fitting . . . . . . . . . . . 34
Connecting the Device to the Power Supply and Receiver – 3 Wire . . . . . . . . 36
Connecting the Device to the Power Supply – 2 Wire . . . . . . . . . . . . . . . . . . . 39
Connecting the Device to the Power Supply and Receiver – 4 Wire . . . . . . . . 40
Connecting from the Device to Scott Receivers . . . . . . . . . . . . . . . . . . . . . . . . 44
Connecting Relays & Remote Alarm Reset . . . . . . . . . . . . . . . . . . . . . . . . . . . 44
SCOTT SAFETY
087-0049 REV C
VI
CONTENTS
Connecting MODBUS RS-485 . . . . . . . . . . . . . . . . . . . . . . . . . . . . . . . . . . . .
Installing the Optional Communication Expansion Card (CEC) PCB . . . . . . .
Connecting the Sensor Head . . . . . . . . . . . . . . . . . . . . . . . . . . . . . . . . . . . . .
Installing/Replacing a Sensor . . . . . . . . . . . . . . . . . . . . . . . . . . . . . . . . . . . . .
CHAPTER 4
Configuration and Setup
Chapter Overview . . . . . . . . . . . . . . . . . . . . . . . . . . . . . . . . . . . . . . . . . . . . . . . . .
Configuring the Device . . . . . . . . . . . . . . . . . . . . . . . . . . . . . . . . . . . . . . . . . . . . .
User Access Levels . . . . . . . . . . . . . . . . . . . . . . . . . . . . . . . . . . . . . . . . . . . . .
Using the Information Menu . . . . . . . . . . . . . . . . . . . . . . . . . . . . . . . . . . . . . .
Configuring the Setup Menu . . . . . . . . . . . . . . . . . . . . . . . . . . . . . . . . . . . . . .
Configuring the Calibration Menu . . . . . . . . . . . . . . . . . . . . . . . . . . . . . . . . . .
Configuring the Datalog Menu . . . . . . . . . . . . . . . . . . . . . . . . . . . . . . . . . . . .
Configuring the Display Menu . . . . . . . . . . . . . . . . . . . . . . . . . . . . . . . . . . . . .
Configuring the User Access Menu . . . . . . . . . . . . . . . . . . . . . . . . . . . . . . . . .
Device Configuration Examples . . . . . . . . . . . . . . . . . . . . . . . . . . . . . . . . . . . . . . .
Configuration Defaults . . . . . . . . . . . . . . . . . . . . . . . . . . . . . . . . . . . . . . . . . . . . . .
Using the MODBUS Registers . . . . . . . . . . . . . . . . . . . . . . . . . . . . . . . . . . . . . . . .
MODBUS Message Framing . . . . . . . . . . . . . . . . . . . . . . . . . . . . . . . . . . . . . .
Using the TXCommands . . . . . . . . . . . . . . . . . . . . . . . . . . . . . . . . . . . . . . . . . . . .
CHAPTER 5
53
54
54
58
62
70
71
73
74
75
81
82
94
96
Operation
Chapter Overview . . . . . . . . . . . . . . . . . . . . . . . . . . . . . . . . . . . . . . . . . . . . . . . .
Operating the Device . . . . . . . . . . . . . . . . . . . . . . . . . . . . . . . . . . . . . . . . . . . . . .
Powering Up . . . . . . . . . . . . . . . . . . . . . . . . . . . . . . . . . . . . . . . . . . . . . . . . .
Powering Down . . . . . . . . . . . . . . . . . . . . . . . . . . . . . . . . . . . . . . . . . . . . . . .
CHAPTER 6
46
48
49
50
101
102
106
106
Maintenance
Chapter Overview . . . . . . . . . . . . . . . . . . . . . . . . . . . . . . . . . . . . . . . . . . . . . . . . 107
Calibrating the Device . . . . . . . . . . . . . . . . . . . . . . . . . . . . . . . . . . . . . . . . . . . . . 108
Calibration Hookup . . . . . . . . . . . . . . . . . . . . . . . . . . . . . . . . . . . . . . . . . . . . 108
Calibration Methods . . . . . . . . . . . . . . . . . . . . . . . . . . . . . . . . . . . . . . . . . . . 110
Zero Calibration . . . . . . . . . . . . . . . . . . . . . . . . . . . . . . . . . . . . . . . . . . . . . . . . 111
Span Calibration . . . . . . . . . . . . . . . . . . . . . . . . . . . . . . . . . . . . . . . . . . . . . . 112
Maintaining the Device . . . . . . . . . . . . . . . . . . . . . . . . . . . . . . . . . . . . . . . . . . . . 115
Replacing the Sensor . . . . . . . . . . . . . . . . . . . . . . . . . . . . . . . . . . . . . . . . . . 115
Changing the E-Chem Sensor’s Range . . . . . . . . . . . . . . . . . . . . . . . . . . . . 116
Selecting the Combustible IR Sensor’s Target Gas . . . . . . . . . . . . . . . . . . . 116
Replacing the Intrinsically Safe (IS) Barrier PCB . . . . . . . . . . . . . . . . . . . . . 116
Replacing the Power Supply PCB (3-4 Wire) . . . . . . . . . . . . . . . . . . . . . . . . 118
Replacing the Power Supply PCB (2 Wire) . . . . . . . . . . . . . . . . . . . . . . . . . . 119
Trimming the 4-20mA Loop . . . . . . . . . . . . . . . . . . . . . . . . . . . . . . . . . . . . . . 119
Replacing the Terminal/Relay/MODBUS RS-485 PCB . . . . . . . . . . . . . . . . . 120
Replacing the LCD PCB/CPU PCB . . . . . . . . . . . . . . . . . . . . . . . . . . . . . . . . 121
Replacing the Meridian NPT Ex Seal . . . . . . . . . . . . . . . . . . . . . . . . . . . . . . 121
Replacing the Meridian Detector Body Assembly . . . . . . . . . . . . . . . . . . . . . 123
Re-Mapping the Sensors . . . . . . . . . . . . . . . . . . . . . . . . . . . . . . . . . . . . . . . 124
Clearing a Sensor Fault . . . . . . . . . . . . . . . . . . . . . . . . . . . . . . . . . . . . . . . . 125
087-0049 REV C
SCOTT SAFETY
CONTENTS
VII
Troubleshooting the Device . . . . . . . . . . . . . . . . . . . . . . . . . . . . . . . . . . . . . . . . 126
APPENDIX A
Specifications
Appendix Overview . . . . . . . . . . . . . . . . . . . . . . . . . . . . . . . . . . . . . . . . . . . . . . .
Device Specifications . . . . . . . . . . . . . . . . . . . . . . . . . . . . . . . . . . . . . . . . . . . . .
Combustible (LEL), IR, Cat-bead and MOS Sensor Specifications . . . . . . . . . .
Toxic (E-Chem) Sensor Specifications . . . . . . . . . . . . . . . . . . . . . . . . . . . . . . . .
APPENDIX B
129
130
133
135
Sensor Information
Appendix Overview . . . . . . . . . . . . . . . . . . . . . . . . . . . . . . . . . . . . . . . . . . . . . . . 139
Sensor Technology Overview . . . . . . . . . . . . . . . . . . . . . . . . . . . . . . . . . . . . . . . 140
Sensor Performance Factors . . . . . . . . . . . . . . . . . . . . . . . . . . . . . . . . . . . . . . . 142
Combustible Cat-Bead Sensor K-Factors . . . . . . . . . . . . . . . . . . . . . . . . . . . . . . 143
Using Target Gas Other than Methane . . . . . . . . . . . . . . . . . . . . . . . . . . . . . . 143
Using Methane as a Surrogate Gas . . . . . . . . . . . . . . . . . . . . . . . . . . . . . . . . 143
Using Propane as a Surrogate Gas . . . . . . . . . . . . . . . . . . . . . . . . . . . . . . . . 145
Combustible IR Sensor Surrogate Test Gas . . . . . . . . . . . . . . . . . . . . . . . . . . . . 148
Toxic (E-Chem) Gas Interferences . . . . . . . . . . . . . . . . . . . . . . . . . . . . . . . . . . . 150
MOS Sensor Interferences . . . . . . . . . . . . . . . . . . . . . . . . . . . . . . . . . . . . . . . . . 151
APPENDIX C
Safety Integrity Level (SIL-2) Information
Appendix Overview . . . . . . . . . . . . . . . . . . . . . . . . . . . . . . . . . . . . . . . . . . . . . . . 153
SIL-2 Parameters . . . . . . . . . . . . . . . . . . . . . . . . . . . . . . . . . . . . . . . . . . . . . . . . 154
Proof Test Procedure . . . . . . . . . . . . . . . . . . . . . . . . . . . . . . . . . . . . . . . . . . . . . 155
APPENDIX D
Support
Appendix Overview . . . . . . . . . . . . . . . . . . . . . . . . . . . . . . . . . . . . . . . . . . . . . . . 157
Technical Service . . . . . . . . . . . . . . . . . . . . . . . . . . . . . . . . . . . . . . . . . . . . . . . . 158
Parts List . . . . . . . . . . . . . . . . . . . . . . . . . . . . . . . . . . . . . . . . . . . . . . . . . . . . . . . 160
Index . . . . . . . . . . . . . . . . . . . . . . . . . . . . . . . . . . . . . . . . . . . . . . . . . . . . . . . . . . 169
SCOTT SAFETY
087-0049 REV C
VIII
CONTENTS
087-0049 REV C
SCOTT SAFETY
087-0049
Rev C
LIST OF FIGURES
1
2
3
4
5
6
7
8
9
10
11
12
13
14
15
16
17
18
19
20
21
22
23
24
25
26
27
28
29
30
31
32
33
34
35
36
37
38
SCOTT SAFETY
Major Parts . . . . . . . . . . . . . . . . . . . . . . . . . . . . . . . . . . . . . . . . . . . . . . . . . 10
Hard Wired Sensor Configurations — Typical. . . . . . . . . . . . . . . . . . . . . . . 20
Maximum Wire Length Formula . . . . . . . . . . . . . . . . . . . . . . . . . . . . . . . . . 21
Remote Sensor Wire Length – Examples . . . . . . . . . . . . . . . . . . . . . . . . . . 22
Application Example . . . . . . . . . . . . . . . . . . . . . . . . . . . . . . . . . . . . . . . . . . 24
Device Mounting Dimensions - Aluminum & Stainless Steel . . . . . . . . . . . 26
Retrofit Mounting Plate Dimensions - Al . . . . . . . . . . . . . . . . . . . . . . . . . . . 27
Retrofit Mounting Plate Dimensions - HDPE. . . . . . . . . . . . . . . . . . . . . . . . 27
Meridian NPT Ex Seal Installation . . . . . . . . . . . . . . . . . . . . . . . . . . . . . . . 30
Meridian Junction Box Assembly Wiring and Mounting – Aluminum . . . . . 31
Meridian Junction Box Assembly Wiring and Mounting – Stainless Steel. . 32
Meridian Junction Box Assembly Spacer Usage. . . . . . . . . . . . . . . . . . . . . 33
Duct Mount Fitting Kit . . . . . . . . . . . . . . . . . . . . . . . . . . . . . . . . . . . . . . . . . 34
Duct Mount Mounting . . . . . . . . . . . . . . . . . . . . . . . . . . . . . . . . . . . . . . . . . 35
Connection for 3 Wire Sourcing . . . . . . . . . . . . . . . . . . . . . . . . . . . . . . . . . 37
Connection for 3 Wire Sinking. . . . . . . . . . . . . . . . . . . . . . . . . . . . . . . . . . . 38
Connection for 2 Wire . . . . . . . . . . . . . . . . . . . . . . . . . . . . . . . . . . . . . . . . . 40
Connection for 4 Wire Sourcing with Isolated Loop Power Supply . . . . . . . 42
Connection for 4 Wire Sinking with Isolated Loop Power Supply . . . . . . . . 43
Relay/Alarm Connection Example -Terminal/Relay/MODBUS PCB . . . . . . 45
Relays/Remote Alarm Reset Connections -Terminal/Relay/MODBUS PCB 45
MODBUS Connections - Terminal/Relay/MODBUS RS-485 PCB . . . . . . . 47
Optional Communication Expansion Card (CEC) PCB Connection . . . . . . 48
Meridian Detector Body Assembly Connection . . . . . . . . . . . . . . . . . . . . . . 50
Meridian Detector Body Assembly . . . . . . . . . . . . . . . . . . . . . . . . . . . . . . . 52
Configuration Menu Structure - (1 of 2). . . . . . . . . . . . . . . . . . . . . . . . . . . . 56
Configuration Menu Structure - (2 of 2). . . . . . . . . . . . . . . . . . . . . . . . . . . . 57
Information Menu Structure. . . . . . . . . . . . . . . . . . . . . . . . . . . . . . . . . . . . . 58
Setup Menu Structure . . . . . . . . . . . . . . . . . . . . . . . . . . . . . . . . . . . . . . . . . 62
Calibration Menu Structure . . . . . . . . . . . . . . . . . . . . . . . . . . . . . . . . . . . . . 70
Datalog Menu Structure . . . . . . . . . . . . . . . . . . . . . . . . . . . . . . . . . . . . . . . 71
Display Menu Structure . . . . . . . . . . . . . . . . . . . . . . . . . . . . . . . . . . . . . . . . 73
User Access Menu Structure. . . . . . . . . . . . . . . . . . . . . . . . . . . . . . . . . . . . 74
Text and Numerical Display . . . . . . . . . . . . . . . . . . . . . . . . . . . . . . . . . . . 102
Main Menu Display . . . . . . . . . . . . . . . . . . . . . . . . . . . . . . . . . . . . . . . . . . 105
Graphical Trending Display . . . . . . . . . . . . . . . . . . . . . . . . . . . . . . . . . . . . 105
Blind LCD . . . . . . . . . . . . . . . . . . . . . . . . . . . . . . . . . . . . . . . . . . . . . . . . . 106
Calibration Hookup Method - Both Hookup Options . . . . . . . . . . . . . . . . . 109
087-0049 REV C
VIII
LIST OF FIGURES
087-0049 REV C
SCOTT SAFETY
087-0049
Rev C
LIST OF TABLES
1
2
3
4
5
6
7
8
9
10
11
12
13
14
15
16
17
18
19
20
21
22
23
24
25
26
27
28
29
30
31
32
33
34
35
36
37
38
39
40
41
SCOTT SAFETY
Scott Safety Documentation Set . . . . . . . . . . . . . . . . . . . . . . . . . . . . . . . . xiii
Meridian User Guide Revision History . . . . . . . . . . . . . . . . . . . . . . . . . . . xiv
Certifications & Approvals - Aluminum Transmitter. . . . . . . . . . . . . . . . . . xvi
Certifications & Approvals - Stainless Steel Transmitter . . . . . . . . . . . . . . xvii
Certifications & Approvals - Aluminum Junction Box . . . . . . . . . . . . . . . . xviii
Certifications & Approvals - Stainless Steel Junction Box. . . . . . . . . . . . . xix
Certifications & Approvals - 3-4 Wire Detector Head . . . . . . . . . . . . . . . . xxi
Certifications & Approvals - 2-Wire Detector Head . . . . . . . . . . . . . . . . . xxiv
Certifications & Approvals - E-Chem Sensors. . . . . . . . . . . . . . . . . . . . . xxvii
Certifications & Approvals - Cat-Bead & MOS Sensors . . . . . . . . . . . . . xxvii
Certifications & Approvals - IR Sensors . . . . . . . . . . . . . . . . . . . . . . . . . xxviii
Typical Quick Reference . . . . . . . . . . . . . . . . . . . . . . . . . . . . . . . . . . . . . . . . 2
Major Parts . . . . . . . . . . . . . . . . . . . . . . . . . . . . . . . . . . . . . . . . . . . . . . . . . 10
Gas Density Relative to Air and CAS No. - Combustibles (LEL). . . . . . . . . 15
Gas Density Relative to Air and CAS No. - Toxic (E-Chem) . . . . . . . . . . . . 16
Hard Wired Configurations — Typical . . . . . . . . . . . . . . . . . . . . . . . . . . . . . 18
Hard Wired Configurations — Sensor Types Supported for 3-4 Wire. . . . . 19
Hard Wired Configurations — Sensor Types Supported for 2 Wire . . . . . . 19
Typical Cable Data for Input Power Length Considerations . . . . . . . . . . . . 21
Parts Required for Application Solution Example . . . . . . . . . . . . . . . . . . . . 23
Installation Checklist . . . . . . . . . . . . . . . . . . . . . . . . . . . . . . . . . . . . . . . . . . 25
Meridian Junction Box Assembly Spacer Configurations . . . . . . . . . . . . . . 33
Usage of Kit Parts . . . . . . . . . . . . . . . . . . . . . . . . . . . . . . . . . . . . . . . . . . . . 35
Sourcing and Sinking Non-Isolated (SW1) Settings . . . . . . . . . . . . . . . . . . 36
WiredHART (J3) Settings . . . . . . . . . . . . . . . . . . . . . . . . . . . . . . . . . . . . . . 37
Sourcing and Sinking Isolated (SW1) Settings . . . . . . . . . . . . . . . . . . . . . . 41
WiredHART (J3) Settings . . . . . . . . . . . . . . . . . . . . . . . . . . . . . . . . . . . . . . 41
Jumper (J1) Settings for the Device . . . . . . . . . . . . . . . . . . . . . . . . . . . . . . 46
Information Menu Parameters. . . . . . . . . . . . . . . . . . . . . . . . . . . . . . . . . . . 58
Transmitter Setup Menu Parameters . . . . . . . . . . . . . . . . . . . . . . . . . . . . . 63
Sensor X Setup Menu Parameters . . . . . . . . . . . . . . . . . . . . . . . . . . . . . . . 66
Change User Access Setup Menu Parameters. . . . . . . . . . . . . . . . . . . . . . 69
Backup/Restore Setup Menu Parameters. . . . . . . . . . . . . . . . . . . . . . . . . . 69
Calibration Menu Parameters . . . . . . . . . . . . . . . . . . . . . . . . . . . . . . . . . . . 70
Datalog Menu Parameters . . . . . . . . . . . . . . . . . . . . . . . . . . . . . . . . . . . . . 72
Display Setup Menu Parameters. . . . . . . . . . . . . . . . . . . . . . . . . . . . . . . . . 73
User Access Menu Parameters. . . . . . . . . . . . . . . . . . . . . . . . . . . . . . . . . . 74
Combustible (LEL) Example – CH4 . . . . . . . . . . . . . . . . . . . . . . . . . . . . . . 75
Toxic (E-Chem) Example – CO. . . . . . . . . . . . . . . . . . . . . . . . . . . . . . . . . . 77
Toxic (E-Chem) Example – O2 . . . . . . . . . . . . . . . . . . . . . . . . . . . . . . . . . . 79
Key Device Configuration Defaults . . . . . . . . . . . . . . . . . . . . . . . . . . . . . . . 81
087-0049 REV C
X
LIST OF TABLES
42
43
44
45
46
47
48
49
50
51
52
53
54
55
56
57
58
59
60
61
62
63
64
65
66
67
68
69
70
71
72
73
74
087-0049 REV C
MODBUS Registers — Transmitter Dynamic . . . . . . . . . . . . . . . . . . . . . . 82
MODBUS Registers — Transmitter Configuration Parameters . . . . . . . . . 86
MODBUS Registers — SensorX Data. . . . . . . . . . . . . . . . . . . . . . . . . . . . 89
MODBUS RTU Framing . . . . . . . . . . . . . . . . . . . . . . . . . . . . . . . . . . . . . . 95
Structure of Configuration Registers for TxCommand. . . . . . . . . . . . . . . . 96
TxCommand 0xXXXX with No Parameters . . . . . . . . . . . . . . . . . . . . . . . . 97
TxWriteByte 0xX200 with Param1, Param2 . . . . . . . . . . . . . . . . . . . . . . . 98
TxWriteUnit 0xX201 Upper Nibble with Param1, Param2 . . . . . . . . . . . . . 98
TxWriteLong 0xX202 with Param1, Param2, Param3 . . . . . . . . . . . . . . . . 99
TxWriteFloat 0xX203 Upper Nibble with Param1, Param2, Param3 . . . . . 99
TxWriteString 0xX204 Upper Nibble with Param1 ... Param10 (1 of 2). . 100
TxWriteString 0xX204 Upper Nibble with Param1 ... Param10 (2 of 2). . 100
LCD Items and Descriptions . . . . . . . . . . . . . . . . . . . . . . . . . . . . . . . . . . 103
Calibration Hookup Equipment . . . . . . . . . . . . . . . . . . . . . . . . . . . . . . . . 109
Recommended Calibration Frequency Guidelines . . . . . . . . . . . . . . . . . 110
Recommended Calibration Matrix . . . . . . . . . . . . . . . . . . . . . . . . . . . . . . . 111
Gases and Flow Rates for Zero Calibration for Sensor Type . . . . . . . . . . 111
Gases and Flow Rates for Span Calibration for Sensor Type . . . . . . . . . 113
Gases and Flow Rates for Span Calibration for MOS Sensor. . . . . . . . . 113
Recommended Maintenance Matrix . . . . . . . . . . . . . . . . . . . . . . . . . . . . 115
Troubleshooting Matrix . . . . . . . . . . . . . . . . . . . . . . . . . . . . . . . . . . . . . . 126
Device Specifications. . . . . . . . . . . . . . . . . . . . . . . . . . . . . . . . . . . . . . . . 130
Combustible (LEL), IR, Cat-bead and MOS Sensors Specifications . . . . 133
Toxic (E-Chem) Sensors Specifications . . . . . . . . . . . . . . . . . . . . . . . . . 135
Sensor Technology Comparison . . . . . . . . . . . . . . . . . . . . . . . . . . . . . . . 140
Sensor Performance Comparison . . . . . . . . . . . . . . . . . . . . . . . . . . . . . . 142
K-Factors for Combustible Cat-bead Sensors - Methane . . . . . . . . . . . . 144
K-Factors for Combustible Cat-bead Sensors - Propane . . . . . . . . . . . . 146
Surrogate Test Gas for Combustible IR Sensors . . . . . . . . . . . . . . . . . . 148
Gas Interferences For MOS Sensor . . . . . . . . . . . . . . . . . . . . . . . . . . . . 151
SIL Parameters . . . . . . . . . . . . . . . . . . . . . . . . . . . . . . . . . . . . . . . . . . . . 154
SIL Proof Test Results. . . . . . . . . . . . . . . . . . . . . . . . . . . . . . . . . . . . . . . 156
Parts List – Device . . . . . . . . . . . . . . . . . . . . . . . . . . . . . . . . . . . . . . . . . 160
SCOTT SAFETY
087-0049
Rev C
ABOUT THIS GUIDE
Guide Overview
This guide describes the steps required to use the Meridian Gas Detector. This
document is for gas detection personnel to manage their gas monitoring device. This
document contains information on installation, configuration, operation, maintenance
and troubleshooting.
This user guide assumes a basic knowledge of gas detection procedures.
The user guide is divided into the following topics:
•
•
•
•
•
•
•
•
•
•
Quick Reference
Introduction
Installation
Configuration and Setup
Operation
Maintenance
Specifications
Sensor Information
Safety Integrity Level (SIL-2) Information
Support
Warning: Read, understand and follow the entire content of this guide prior to use.
Failure to do so may result in serious injury or death.
SCOTT SAFETY
087-0049 REV C
XII
ABOUT THIS GUIDE
Guide Conventions
The following visual elements are used throughout this guide, where applicable:
Warning: This icon and text indicate a potentially hazardous situation, which, if not
avoided, could result in death or injury.
Caution: This icon and text indicates a potentially dangerous procedure. Instructions
contained in the warning must be followed. Failure to do so may result in damage to
the device.
This icon and text indicate the possibility of electrostatic discharge (ESD) in a
procedure that requires the reader to take the proper ESD precautions.
This icon and text designates information of special note.
087-0049 REV C
SCOTT SAFETY
Related Product Documentation
Related Product
Documentation
xiii
Table 1 lists the Scott Safety Family documentation set.
33339
Table 1 Scott Safety Documentation Set
DOCUMENT NAME
PURPOSE
DOCUMENT ID
Meridian User Guide
Provides information on the installation,
configuration, operation, maintenance and
troubleshooting.
087-0049
Provides information on the various Optional
087-0050
Meridian
Communication Guide Communication Expansion Cards (CEC) PCBs.
SCOTT SAFETY
087-0049 REV C
XIV
ABOUT THIS GUIDE
Revision History
Table 2 shows the revision history for this guide, providing a description of the
changes.
Table 2 Meridian User Guide Revision History
REVISION CHANGE
A
Initial release
B
•
•
•
•
•
C
•
•
•
•
•
087-0049 REV C
About Chapter - Updated CSA approvals.
Installation Chapter - Added clarification to 2-Wire Connection.
Configuration and Setup Chapter - Added note for MODBUS Register 40289
related to sensor codes. Changed O2 Example Current Loops Inhibit value.
Specification Appendix - Added LCD Heater Specification.
Support Appendix - Updated to include Technical Support Houston Service
Center and related information.
Configuration and Setup Chapter - Changed Firmware Version. Removed
Inhibit from TXCommand 0x200, Write Byte (Transmitter), and removed
InhibitTimer from TXCommand 0xX201, Write Unit (Sensor). Added
K-Factor parameter. Added information about Combustible IR Sensor to Gas
Type parameter. Update Firmware Version to 1.12. Added Enter and Escape
commands to Using the TXCommands section. Added CurrentHumidity
Register to the Using the MODBUS Registers section.
Maintenance Chapter - Troubleshooting section, added a sub-solution to
Troubleshooting Matrix table. Changed three Notes regarding the number of
turns to tighten the Meridian Detector Body Assembly. Added Selecting the
Combustible IR Sensor’s Target Gas section. Added an item to the
Troubleshooting the Device section about K-Factors. Added Notes in the
Span Calibration section about Combustible IR Sensor and Combustible
Cat-Bead Sensor. Changed the MOS gas PPM values for Low and High Span
Calibration. Added cross reference for IR Sensors. Added section on Clearing
a Sensor Fault. Added LCD Sensor Fault condition to troubleshooting
section.
Specifications Appendix - Device Specification section, added 4 to 20mA
Current Loop Specifications. CEC section, added Fault Loop Current
specification. Changes to six (6) Toxic (E-Chem) Sensors Specifications
(096-3473-37, 096-3473-18, 096-3473-17, 096-3473-39, 096-3473-40, &
096-3473-06. Removed three (3) Toxic (E-Chem) Sensors from
Specifications Table (096-3473-44, 096-3473-45, & 096-3473-49).
Sensor Information Chapter - Added IR Surrogate Test Gas section. Added to
the Combustible Cat-Bead Sensor K-Factors section to include Using Target
Gas Other than Methane, Using Methane as a Surrogate Gas, and Using
Propane as a Surrogate Gas sections.
Support Chapter - Added eight (8) new IR Sensors part numbers. Added
Nafion Tubing to the Low Flow Calibration Kit. Removed three (3) Sensors
(096-3473-44, 096-3473-45, & 096-3473-49).
SCOTT SAFETY
Certifications and Approvals
Certifications and
Approvals
xv
Table 3 to Table 6 shows the items have been tested and complies with the following
directives, standards, or standardized documents for the applicable Transmitter and
Junction Box Model Numbers.
Transmitter and Junction Box Special Conditions for Safe Use include the following:
•
Meridian 3-4 Wire Transmitter Models 096-3522 and 096-3526 are for use with
Detector Head Models 096-3484-01 or 096-3484-02.
•
Meridian 2 Wire Transmitter Models 096-3521 and 096-3525 are for use with
Detector Head Models 096-3484-03 or 096-3484-04.
•
All openings to the transmitter must sealed using suitable flame-proof, type 'd'
stopping boxes or type 'd' glands with a minimum IP rating of IP66.
•
All openings to the junction box must sealed using suitable glands with a minimum
IP rating of IP66.
•
Transmitter must be bonded to ground both internally and externally with suitably
sized conductors (IEC/EN 60079-0, cl. 15.3).
•
The 2 wire system may only be used with a single Electrochemical sensor and must
installed in accordance with control drawing 096-3507-B.
•
The 3-4 Wire system may be used with one to three sensors and must be installed
in accordance with control drawing 096-3506-B.
•
All Transmitter connection wire must be specified in accordance with the
following conditions:
– For Installations Ta < 60°C: Temperature rating equal to or greater than 105ºC
and be a minimum of 18AWG (1.0mm2).
– For Installations Ta > 60°C: Temperature rating equal to or greater than 120ºC
and be a minimum of 18AWG (1.0mm2).
•
SCOTT SAFETY
The equipment shall be regularly cleaned to ensure there is no dust accumulated on
the surface in excess of 5mm.
087-0049 REV C
XVI
ABOUT THIS GUIDE
.
Table 3 Certifications & Approvals - Aluminum Transmitter
MODEL NO. 096-3521 & 096-3522
TRAC13ATEX0049X
II 2(1) G Ex d [ia Ga] IIC T4 Gb
II 2(1) D Ex tb [ia Da] III C T85° C Db
-40°C < Ta < +75°C
IP66
*See Special Conditions for Safe Use
IECEx TRC 13.0017X
Ex d [ia Ga] IIC T4 Gb
Ex tb [ia Da] III C T85° C Db
-40°C < Ta < +75°C
IP66
SPECIFIC DIRECTIVES, STANDARDS
EN 60079-0 :2012
EN 60079-26 :2007
EN 50104 :2010
EN 60079-26
EN 55011 :2009 +A1 :2010
EN 60079-1 :2007
EN 60079-29-1 :2007
EN 50270 :2006
EN 61010-1 :2010
EN 60079-11 :2012
EN 60079-31 :2009
EN 50271 :2010
IEC 60079-0 :2012
IEC 60079-26 :2007
IEC 60079-26
IEC 60079-1 :2007
IEC 60079-29-1 :2007
IEC 61010-1 :2010
IEC 60079-11 :2012
IEC 60079-31 :2009
*See Special Conditions for Safe Use
See 096-3506-B and 096-3507-B
See 096-3506-B and 096-3507-B
CAN/CSA-C22.2 No. 60079-0
CAN/CSA-C22.2 No. 60079-1
CAN/CSA-C22.2 No. 60079-11
CAN/CSA-C22.2 No. 152
FM 3600
FM 3615
FM 3616
UL 913
FM 6310/6320
ANSI/ISA-12.13.01
EMC
Industry Canada
EMC
EMC Directive
ATEX Directive
087-0049 REV C
SCOTT SAFETY
Certifications and Approvals
xvii
Table 3 Certifications & Approvals - Aluminum Transmitter (continued)
MODEL NO. 096-3521 & 096-3522
SPECIFIC DIRECTIVES, STANDARDS
IEC 61508 Series
Table 4 Certifications & Approvals - Stainless Steel Transmitter
MODEL NO. 096-3525 & 096-3526
TRAC13ATEX0049X
I M2(M1) Ex d [ia Ma] I Mb
II 2(1) G Ex d [ia Ga] IIC T4 Gb
II 2(1) D Ex td [ia Da] IIIC T85° C Db
-40°C < Ta < +75°C
IP66
SPECIFIC DIRECTIVES, STANDARDS
EN 60079-0 :2012
EN 60079-26 :2007
EN 50104 :2010
EN 60079-26
EN 55011 :2009 +A1 :2010
EN 60079-1 :2007
EN 60079-29-1 :2007
EN 50270 :2006
EN 61010-1 :2010
EN 60079-11 :2012
EN 60079-31 :2009
EN 50271 :2010
*See Special Conditions for Safe Use
IECEx TRC 13.0017X
Ex d [ia Ma] I Mb
Ex d [ia Ga] IIC T4 Gb
Ex td [ia Da] IIIC T85° C Db
-40°C < Ta < +75°C
IP66
IEC 60079-0 :2012
IEC 60079-26 :2007
IEC 60079-26
IEC 60079-1 :2007
IEC 60079-29-1 :2007
IEC 61010-1 :2010
IEC 60079-11 :2012
IEC 60079-31 :2009
*See Special Conditions for Safe Use
See 096-3506-B and 096-3507-B
See 096-3506-B and 096-3507-B
SCOTT SAFETY
CAN/CSA-C22.2 No. 60079-0
CAN/CSA-C22.2 No. 60079-1
CAN/CSA-C22.2 No. 60079-11
CAN/CSA-C22.2 No. 152
FM 3600
FM 3615
FM 3616
UL 913
FM 6310/6320
ANSI/ISA-12.13.01
087-0049 REV C
XVIII ABOUT THIS GUIDE
Table 4 Certifications & Approvals - Stainless Steel Transmitter (continued)
MODEL NO. 096-3525 & 096-3526
SPECIFIC DIRECTIVES, STANDARDS
EMC
Industry Canada
EMC
EMC Directive
ATEX Directive
IEC 61508 Series
Table 5 Certifications & Approvals - Aluminum Junction Box
MODEL NO. 096-3475
TRAC13ATEX0049X
II 2 G Ex ia IIC T4 Ga
II 2 D Ex ia IIIC T80°C Da
-40°C < Ta < +75°C
IP64
*See Special Conditions for Safe Use
IECEx TRC 13.0017X
Ex ia IIC T4 Ga
Ex ia IIIC T80°C Da
-40°C < Ta < +75°C
IP64
SPECIFIC DIRECTIVES, STANDARDS
EN 60079-0 :2012
EN 60079-26 :2007
EN 50104 :2010
EN 60079-26
EN 55011 :2009 +A1 :2010
EN 60079-1 :2007
EN 60079-29-1 :2007
EN 50270 :2006
EN 61010-1 :2010
EN 60079-11 :2012
EN 60079-31 :2009
EN 50271 :2010
IEC 60079-0 :2012
IEC 60079-26 :2007
IEC 60079-26
IEC 60079-1 :2007
IEC 60079-29-1 :2007
IEC 61010-1 :2010
IEC 60079-11 :2012
IEC 60079-31 :2009
*See Special Conditions for Safe Use
087-0049 REV C
SCOTT SAFETY
Certifications and Approvals
xix
Table 5 Certifications & Approvals - Aluminum Junction Box
MODEL NO. 096-3475
See 096-3506-B and 096-3507-B
SPECIFIC DIRECTIVES, STANDARDS
CAN/CSA-C22.2 No. 60079-0
CAN/CSA-C22.2 No. 60079-1
CAN/CSA-C22.2 No. 60079-11
FM 3600
FM 3615
FM 3616
UL 913
EMC Directive
ATEX Directive
Table 6 Certifications & Approvals - Stainless Steel Junction Box
MODEL NO. 096-3520
TRAC13ATEX0049X
I M2 Ex ia I Ma
II 2 G Ex ia IIC T4 Ga
II 2 D Ex ia IIIC T80°C Da
-40°C < Ta < +75°C
IP64
SPECIFIC DIRECTIVES, STANDARDS
EN 60079-0 :2012
EN 60079-26 :2007
EN 50104 :2010
EN 60079-26
EN 55011 :2009 +A1 :2010
EN 60079-1 :2007
EN 60079-29-1 :2007
EN 50270 :2006
EN 61010-1 :2010
EN 60079-11 :2012
EN 60079-31 :2009
EN 50271 :2010
*See Special Conditions for Safe Use
IECEx TRC 13.0017X
Ex ia I Ma
Ex ia IIC T4 Ga
Ex ia IIIC T80°C Da
-40°C < Ta < +75°C
IP64
IEC 60079-0 :2012
IEC 60079-26 :2007
IEC 60079-26
IEC 60079-1 :2007
IEC 60079-29-1 :2007
IEC 61010-1 :2010
IEC 60079-11 :2012
IEC 60079-31 :2009
*See Special Conditions for Safe Use
ATEX Directive (94/9/EC)
EMC Directive (2004/108/EC)
SCOTT SAFETY
087-0049 REV C
XX
ABOUT THIS GUIDE
Table 6 Certifications & Approvals - Stainless Steel Junction Box
MODEL NO. 096-3520
See 096-3506-B and 096-3507-B
SPECIFIC DIRECTIVES, STANDARDS
CAN/CSA-C22.2 No. 60079-0
CAN/CSA-C22.2 No. 60079-1
CAN/CSA-C22.2 No. 60079-11
FM 3600
FM 3615
FM 3616
UL 913
Table 7 to Table 8 shows the items have been tested and complies with the following
directives, standards, or standardized documents for the applicable Detector Head
with Sensors Model Numbers.
Detector Head with Sensors Special Conditions for Safe Use include the following:
•
Meridian Detector Head Models 096-3484-01 and 096-3484-02 are for use with
Meridian 3-4 Wire Transmitter Models 096-3522 or 096-3526.
•
Meridian Detector Head Models 096-3484-03 and 096-3484-04 are for use with
Meridian 2 Wire Transmitter Models 096-3521 or 096-3525.
•
The 2 wire system may only be used with a single Electrochemical sensor and
must installed in accordance with control drawing 096-3507-B.
•
The 3-4 Wire system may be used with one to three sensors and must be installed
in accordance with control drawing 096-3506-B.
•
The detector head end cap (PN 096-3437-1 or 096-3437-2) must also be installed
and securely fastened during normal operations.
•
•
Sensors may only be installed or removed when the area is clean and dry.
The sensor simulator is only for temporary use under direct supervisions with the
following conditions:
– To only be used in clean, dry environments
– Must be protected from impact
•
087-0049 REV C
The equipment shall be regularly cleaned to ensure there is no dust accumulated on
the surface in excess of 5mm.
SCOTT SAFETY
Certifications and Approvals
xxi
Table 7 Certifications & Approvals - 3-4 Wire Detector Head
MODEL NO. WITH SENSOR
096-3484-01 & 096-3484-02
TRAC13ATEX0049X
I M2 Ex d ia I Mb
II 2 G Ex d ia IIC T4 Gb
II 2 D Ex ia IIIC T185°C Db
-40°C < Ta < +75°C
IP64
SPECIFIC DIRECTIVES, STANDARDS
EN 60079-0 :2012
EN 60079-26 :2007
EN 50104 :2010
EN 60079-26
EN 55011 :2009 +A1 :2010
EN 60079-1 :2007
EN 60079-29-1 :2007
EN 50270 :2006
EN 61010-1 :2010
EN 60079-11 :2012
EN 60079-31 :2009
EN 50271 :2010
For Integral Connection to Transmitter.
Any Meridian Sensor Installed.
*See Special Conditions for Safe Use
IECEx TRC 13.0017X
Ex d ia I Mb
Ex d ia IIC T4 Gb
Ex ia IIIC T185°C Db
-40°C < Ta < +75°C
IP64
IEC 60079-0 :2012
IEC 60079-26 :2007
IEC 60079-26
IEC 60079-1 :2007
IEC 60079-29-1 :2007
IEC 61010-1 :2010
IEC 60079-11 :2012
IEC 60079-31 :2009
For Integral Connection to Transmitter.
Any Meridian Sensor Installed.
*See Special Conditions for Safe Use
See 096-3506-B and 096-3507-B
For Integral Connection to Transmitter.
Any Meridian Sensor Installed.
SCOTT SAFETY
CAN/CSA-C22.2 No. 60079-0
CAN/CSA-C22.2 No. 60079-1
CAN/CSA-C22.2 No. 60079-11
FM 3600
FM 3615
FM 3616
UL 913
087-0049 REV C
XXII
ABOUT THIS GUIDE
Table 7 Certifications & Approvals - 3-4 Wire Detector Head (continued)
MODEL NO. WITH SENSOR
096-3484-01 & 096-3484-02
TRAC13ATEX0049X
I M1 Ex ia I Ma
II 1 G Ex ia IIC T4 Ga
II 1 D Ex ia IIIC T185°C Da
-40°C < Ta < +75°C
IP64
SPECIFIC DIRECTIVES, STANDARDS
EN 60079-0 :2012
EN 60079-26 :2007
EN 50104 :2010
EN 60079-26
EN 55011 :2009 +A1 :2010
EN 60079-1 :2007
EN 60079-29-1 :2007
EN 50270 :2006
EN 61010-1 :2010
EN 60079-11 :2012
EN 60079-31 :2009
EN 50271 :2010
For Remote Connection: Dependent
upon Sensor - Refer to Certificate and
User Manual. Without IR Type Sensor
Installed.
*See Special Conditions for Safe Use
TRAC13ATEX0049X
I M1 Ex ia I Ma
II 1 G Ex ia IIC T4 Ga
II 1 D Ex ia IIIC T185°C Da
-40°C < Ta < +75°C
IP64
EN 60079-0 :2012
EN 60079-26 :2007
EN 50104 :2010
EN 60079-26
EN 55011 :2009 +A1 :2010
EN 60079-1 :2007
EN 60079-29-1 :2007
EN 50270 :2006
EN 61010-1 :2010
EN 60079-11 :2012
EN 60079-31 :2009
EN 50271 :2010
For Remote Connection: Dependent
upon Sensor - Refer to Certificate and
User Manual. Without IR Type Sensor
Installed.
*See Special Conditions for Safe Use
See 096-3506-B and 096-3507-B
For Remote Connection: Dependent
upon Sensor - Refer to Certificate and
User Manual. Without IR Type Sensor
Installed.
087-0049 REV C
CAN/CSA-C22.2 No. 60079-0
CAN/CSA-C22.2 No. 60079-1
CAN/CSA-C22.2 No. 60079-11
FM 3600
FM 3615
FM 3616
UL 913
SCOTT SAFETY
Certifications and Approvals
xxiii
Table 7 Certifications & Approvals - 3-4 Wire Detector Head (continued)
MODEL NO. WITH SENSOR
096-3484-01 & 096-3484-02
IECEx TRC 13.0017X
Ex d ia I Mb
Ex d ia IIC T4 Gb
Ex ia IIIC T110°C Db
-40°C < Ta < +75°C
IP64
SPECIFIC DIRECTIVES, STANDARDS
IEC 60079-0 :2012
IEC 60079-26 :2007
IEC 60079-26
IEC 60079-1 :2007
IEC 60079-29-1 :2007
IEC 61010-1 :2010
IEC 60079-11 :2012
IEC 60079-31 :2009
For Remote Connection: Dependent
upon Sensor - Refer to Certificate and
User Manual. With IR Type Sensor
Installed.
*See Special Conditions for Safe Use
IECEx TRC 13.0017X
Ex d ia I Mb
Ex d ia IIC T4 Gb
Ex ia IIIC T110°C Db
-40°C < Ta < +75°C
IP64
IEC 60079-0 :2012
IEC 60079-26 :2007
IEC 60079-26
IEC 60079-1 :2007
IEC 60079-29-1 :2007
IEC 61010-1 :2010
IEC 60079-11 :2012
IEC 60079-31 :2009
For Remote Connection: Dependent
upon Sensor - Refer to Certificate and
User Manual. With IR Type Sensor
Installed.
*See Special Conditions for Safe Use
See 096-3506-B and 096-3507-B
For Remote Connection: Dependent
upon Sensor - Refer to Certificate and
User Manual. With IR Type Sensor
Installed.
CAN/CSA-C22.2 No. 60079-0
CAN/CSA-C22.2 No. 60079-1
CAN/CSA-C22.2 No. 60079-11
FM 3600
FM 3615
FM 3616
UL 913
EMC
Industry Canada
SCOTT SAFETY
EMC
087-0049 REV C
XXIV ABOUT THIS GUIDE
Table 7 Certifications & Approvals - 3-4 Wire Detector Head (continued)
MODEL NO. WITH SENSOR
096-3484-01 & 096-3484-02
SPECIFIC DIRECTIVES, STANDARDS
EMC Directive
ATEX Directive
Table 8 Certifications & Approvals - 2-Wire Detector Head
MODEL NO. WITH SENSOR
096-3484-03 & 096-3484-04
TRAC13ATEX0049X
I M2 Ex d ia I Mb
II 2 G Ex d ia IIC T4 Gb
II 2 D Ex ia IIIC T80°C Db
-40°C < Ta < +75°C
IP64
SPECIFIC DIRECTIVES, STANDARDS
EN 60079-0 :2012
EN 60079-26 :2007
EN 50104 :2010
EN 60079-26
EN 55011 :2009 +A1 :2010
EN 60079-1 :2007
EN 60079-29-1 :2007
EN 50270 :2006
EN 61010-1 :2010
EN 60079-11 :2012
EN 60079-31 :2009
EN 50271 :2010
For Integral Connection to Transmitter.
*See Special Conditions for Safe Use
IECEx TRC 13.0017X
Ex d ia I Mb
Ex d ia IIC T4 Gb
Ex ia IIIC T80°C Db
-40°C < Ta < +75°C
IP64
IEC 60079-0 :2012
IEC 60079-26 :2007
IEC 60079-26
IEC 60079-1 :2007
IEC 60079-29-1 :2007
IEC 61010-1 :2010
IEC 60079-11 :2012
IEC 60079-31 :2009
For Integral Connection to Transmitter.
*See Special Conditions for Safe Use
087-0049 REV C
SCOTT SAFETY
Certifications and Approvals
xxv
Table 8 Certifications & Approvals - 2-Wire Detector Head (continued)
MODEL NO. WITH SENSOR
096-3484-03 & 096-3484-04
SPECIFIC DIRECTIVES, STANDARDS
See 096-3506-B and 096-3507-B
For Integral Connection to Transmitter.
Any Meridian Sensor Installed.
CAN/CSA-C22.2 No. 60079-0
CAN/CSA-C22.2 No. 60079-1
CAN/CSA-C22.2 No. 60079-11
FM 3600
FM 3615
FM 3616
UL 913
TRAC13ATEX0049X
I M1 Ex ia I Ma
II 1 G Ex ia IIC T4 Ga
II 1 D Ex ia IIIC T80°C Da
-40°C < Ta < +75°C
IP64
EN 60079-0 :2012
EN 60079-26 :2007
EN 50104 :2010
EN 60079-26
EN 55011 :2009 +A1 :2010
EN 60079-1 :2007
EN 60079-29-1 :2007
EN 50270 :2006
EN 61010-1 :2010
EN 60079-11 :2012
EN 60079-31 :2009
EN 50271 :2010
For Remote Connection.
*See Special Conditions for Safe Use
IECEx TRC 13.0017X
Ex ia I Ma
Ex ia IIC T4 Ga
Ex ia IIIC T80°C Da
-40°C < Ta < +75°C
IP64
IEC 60079-0 :2012
IEC 60079-26 :2007
IEC 60079-26
IEC 60079-1 :2007
IEC 60079-29-1 :2007
IEC 61010-1 :2010
IEC 60079-11 :2012
IEC 60079-31 :2009
For Remote Connection.
*See Special Conditions for Safe Use
See 096-3506-B and 096-3507-B
For Remote Connection.
SCOTT SAFETY
CAN/CSA-C22.2 No. 60079-0
CAN/CSA-C22.2 No. 60079-1
CAN/CSA-C22.2 No. 60079-11
FM 3600
FM 3615
FM 3616
UL 913
087-0049 REV C
XXVI ABOUT THIS GUIDE
Table 8 Certifications & Approvals - 2-Wire Detector Head (continued)
MODEL NO. WITH SENSOR
096-3484-03 & 096-3484-04
SPECIFIC DIRECTIVES, STANDARDS
ATEX Directive (94/9/EC)
EMC Directive (2004/108/EC)
EMC
Industry Canada
087-0049 REV C
EMC
SCOTT SAFETY
Certifications and Approvals
xxvii
Table 9 to Table 11 shows the items have been tested and complies with the following
directives, standards, or standardized documents for the applicable Sensor Model
Numbers.
.
Table 9 Certifications & Approvals - E-Chem Sensors
MODEL NO. 096-3473-01 TO
096-3473-54
TRAC13ATEX0049X
IECEx TRC 13.0017X
Ex ia I Ma
Ex ia IIC T4 Ga
Ex ia IIIC T80° C Da
SPECIFIC DIRECTIVES, STANDARDS
IEC/EN 60079-0 :2012
IEC/EN 60079-26 :2007
EN 50104 :2010
IEC/EN 60079-26
EN 55011 :2009 +A1 :2010
IEC/EN 60079-1 :2007
IEC/EN 60079-29-1 :2007
EN 50270 :2006
IEC/EN 61010-1 :2010
IEC/EN 60079-11 :2012
IEC/EN 60079-31 :2009
EN 50271 :2010
EMC
Industry Canada
EMC
Table 10 Certifications & Approvals - Cat-Bead & MOS Sensors
MODEL NO. 096-3473-55 &
096-3473-57
TRAC13ATEX0049X
IECEx TRC 13.0017X
Ex ia I Ma
Ex ia IIC T4 Ga
Ex ia IIIC T185° C Da
SPECIFIC DIRECTIVES, STANDARDS
IEC/EN 60079-0 :2012
IEC/EN 60079-26 :2007
EN 50104 :2010
IEC/EN 60079-26
EN 55011 :2009 +A1 :2010
IEC/EN 60079-1 :2007
IEC/EN 60079-29-1 :2007
EN 50270 :2006
IEC/EN 61010-1 :2010
IEC/EN 60079-11 :2012
IEC/EN 60079-31 :2009
EN 50271 :2010
EMC
Industry Canada
SCOTT SAFETY
EMC
087-0049 REV C
XXVIII ABOUT THIS GUIDE
Table 11 Certifications & Approvals - IR Sensors
MODEL NO. 096-3473-56 &
096-3473-58
TRAC13ATEX0049X
IECEx TRC 13.0017X
Ex ia I Mb
Ex d ia IIC T4 Gb
Ex ia IIIC T110°C Db
SPECIFIC DIRECTIVES, STANDARDS
IEC/EN 60079-0 :2012
IEC/EN 60079-26 :2007
EN 50104 :2010
IEC/EN 60079-26
EN 55011 :2009 +A1 :2010
IEC/EN 60079-1 :2007
IEC/EN 60079-29-1 :2007
EN 50270 :2006
IEC/EN 61010-1 :2010
IEC/EN 60079-11 :2012
IEC/EN 60079-31 :2009
EN 50271 :2010
EMC
Industry Canada
087-0049 REV C
EMC
SCOTT SAFETY
General Safety Information
General Safety
Information
xxix
Ensure you adhere to the following for your safety.
Warning: Read and follow the entire content of this guide prior to use. Failure to do
so may result in serious injury or death.
Warning: All individuals who have or will have responsibility for using or testing this
product must read and understand the contents of this manual. The product will
perform as designed only if used and tested in accordance with the manufacturer's
instructions. Failure to follow manufacturer's instructions will render the warranty
and approvals null and void. Failure to follow these instructions may also result in
serious injury or death.
Scott Safety can take no responsibility for use of its equipment if it is not used in
accordance with the instructions. If further operational or maintenance details are
required but not provided in this guide, contact Scott Safety or their agent. Scott
Safety shall not be liable for any incidental or consequential damages in connection
with any modifications, errors or omissions in this guide.
All pertinent national, state, regional, and local safety regulations must be observed
when installing and using this product. For reasons of safety and to assure compliance
with documented system data, repairs to components should be performed only by the
manufacturer.
Additionally, industry standards, codes, and legislation are subject to change. Updated
copies should be obtained by users to ensure the most recently issued regulations,
standards and guidelines are available.
All pertinent state, regional, and local safety regulations must be observed when
handling and disposing of hazardous material, Toxic (E-Chem) Sensors, batteries and
other similar items that may fall under the classification of hazardous material.
Only use Scott Safety approved replacement parts.
SCOTT SAFETY
087-0049 REV C
XXX
ABOUT THIS GUIDE
Warnings and
Cautions – Device Use
and Care
Ensure you follow the applicable warnings and cautions indicated here.
Warning: This equipment must be operated and serviced by qualified personnel only.
Read and understand the guide completely before operating or servicing. Qualified
personnel as defined according to local, county, state, federal and individual company
standards.
Warning: When in doubt vacate the area immediately. You should vacate the area
immediately should the device indicate a warning or alarm condition. You should
know and understand your company's safety protocols.
Warning: Ensure the atmosphere is free from combustible and/or toxic gases prior to
starting any of the procedures.
Warning: When the primary device is off line, ensure you have another online device
to actively detect gases. The device may be off line due to such activities, like but not
limited to, calibration, installation, maintenance, troubleshooting, configuration,
wiring and other activities.
Warning: If the device does not function as described herein, remove from service and
mark for maintenance. Only use Scott Safety replacement parts.
Warning: Only use the device to monitor the atmosphere for the gases and
concentrations for which it is set-up to detect.
Warning: Verify the cover, internal PCB's and field wiring are securely in place
before applying power and operation.
Warning: Do not expose the device to electrical shock or continuous severe
mechanical shock.
Warning: Do not use the device if its enclosure is damaged, cracked, or has missing
components.
Warning: Protect the device from dripping liquids and high power sprays.
Caution: Device will not operate without power applied. Thus, it only detects gases
while powered.
Caution: Use only a sensor assembly compatible with the device and approved by
Scott Safety.
Caution: Periodically test for correct operation of the system's alarm events by
exposing the device to a targeted gas concentration above the high alarm set point.
Caution: Calibration is critical. Calibration should be performed periodically that
takes into account device use and environment conditions. Calibrate with known
target gas at start-up and check on a regular schedule. The device should always be
re-calibrated after exposure to high concentrations of toxic or combustible gases or
vapors.
087-0049 REV C
SCOTT SAFETY
Warnings and Cautions – Sensor Use and Care
Warnings and
Cautions – Sensor
Use and Care
xxxi
Ensure you follow the applicable warnings and cautions indicated here.
Warning: Extended exposure of the detector to high concentrations of toxic or
combustible gases may result in degraded sensor performance. If an alarm occurs due
to high concentration of combustible gases, recalibrate the device or, if needed,
replace the sensor.
Caution: Be aware of poisoned combustible sensors. The operation of catalytic type
combustible gas sensors may be seriously affected by silicones, free halogens,
halogenated hydrocarbons and metallic oxides present in the ambient air being
monitored. If the presence of any of these substances is suspected, increased frequency
of calibration verification is recommended.
Caution: Sensitivity of the combustible gas sensor can be adversely affected by
exposure to sulfur compounds, halogens, silicone or lead containing compounds, or
phosphorus containing compounds. Avoid exposure to these substances. Should the
detector be suspected of being exposed to such substances, perform a gas test to verify
its accuracy and that it is calibrated accordingly.
SCOTT SAFETY
087-0049 REV C
XXXII ABOUT THIS GUIDE
087-0049 REV C
SCOTT SAFETY
087-0049
Chapter 1
Rev C
QUICK REFERENCE
Chapter Overview
This chapter covers the following topic:
•
SCOTT SAFETY
Typical Quick Reference
087-0049 REV C
2
CHAPTER 1: QUICK REFERENCE
This section provides a brief amount of information as a typical quick reference. See
Table 12.
Typical Quick
Reference
Warning: This is not a substitute for the User Guide. All individuals who have or will
have the responsibility of using or servicing the device must read and understand the
contents of the User Guide prior to operation. Failure to do so may result in serious
injury or death.
Table 12 Typical Quick Reference
ITEM
Typical
Configurations
(Remote)
OBJECT
Local
Local
Remote
3-4 Wire
or 2 Wire
Remote
3-4 Wire
Ex Seal
Cable
Gland
Integral
Cable
Gland
Intrinsically Safe Cable
Cable
Gland
Cable Gland
Cable
Gland
Cable
Gland
Note: Intrinsically Safe Cable distance from Transmitter to any Sensor is 100Ft. (30.48m) Maximum.
Reference control drawings: 096-3506-B for 3-4 Wire and 096-3507-B for 2 Wire.
087-0049 REV C
SCOTT SAFETY
Typical Quick Reference
3
Table 12 Typical Quick Reference
ITEM
Mounting –
Aluminum
Device (Local)
OBJECT
6.57”(166mm)
5.85”(148mm)
3/4” NPT
5.69”(144mm)
.50
5.79”
(147mm)
ID .30”(7mm)
on 5.85”(148mm) centers
10.75”
(273mm)
3/4” NPT
Mounting –
Meridian
J-Box
Assembly (Al)
3.55”(90.17mm)
3.22”(81.79mm)
4.41”
(112.01mm)
4.70”
(119.38mm)
ID .30”(7.62mm)
on 4.41”(112.01mm) centers
SCOTT SAFETY
087-0049 REV C
4
CHAPTER 1: QUICK REFERENCE
Table 12 Typical Quick Reference
ITEM
Typical Wiring
– 3 Wire
Sourcing
OBJECT
This is an example. Other wiring configurations are possible and vary based on each application.
SW1 Up= Isloated
SW1 Down= Non-Isolated
1
3
5
ISO
SW1
NON
1
0
NORMAL
1
3
5
- +
NORMAL
Power Supply PCB
-
HART
1
3
5
-
+
+
J3
Shield
+
VDC Power
Supply
-
+
10 to 30 VDC
Common
FAULT
NO
C
NC
4-20 mA
Output
Receiver
-
ALARM3
NO
C
NC
Common
+V
+
LP1
11 + -
LP2 LP3
+ - + - B A
GND
Receiver
-
10-30VDC
+
Receiver
-
Wiring –
Meridian
J-Box
Assembly
Light blue terminal blocks indicate Intrinsically Safe circuits. Tighten plug retention screws.
JUNCTION BOX
WHITE (VADJ)
BLUE (GND)
BLACK (GND)
RED (+3.3VDC)
YELLOW (B)
GREEN (A)
6
5
4
3
2
1
Note: Intrinsically Safe Cable distance from Transmitter to any Sensor is 100Ft. (30.48m) Maximum.
Reference control drawings: 096-3506-B for 3-4 Wire and 096-3507-B for 2 Wire.
087-0049 REV C
SCOTT SAFETY
Typical Quick Reference
5
Table 12 Typical Quick Reference
ITEM
OBJECT
Wiring –
MODBUS
ALARM3
NO
C
NC
ALARM1
NC
C
NO
FAULT
NO
C
NC
ALARM2
NC
C
NO
LP1
11 + -
+V
DUP
LP2 LP3 RS-485 RS-485
+ - + - B A S B A 1
RMT
ACK
GND
GND
TERM. NOT TERM.
10-30VDC
RS-485 MODBUS
Master
A B
J3= For Last Node Only
J4= For Node 1, 2, 3, ...
Next To Last Node
To next RTU
1
2
Wiring –
Alarm/Relay
ALARM1
NC
C
NO
ALARM2
NC
C
NO
RS-485
A S B A 1
RMT
ACK
GND
Yellow Lamp
(+)
Power
(-)
Red Lamp
TERM. NOT TERM.
SCOTT SAFETY
087-0049 REV C
6
CHAPTER 1: QUICK REFERENCE
Table 12 Typical Quick Reference
ITEM
Calibration –
Zero/Span
OBJECT
Access MAIN MENU to configure via LCD. To access Calibration requires a User level password. The
default password is 0000.
MAIN MENU
INFORMATION
SETUP
CALIBRATION
DATALOG
DISPLAY
USER ACCESS
>
>
>
>
>
>
USER ACCESS
REQUIRED
FOR
CALIBRATION
SEN 1 CALIBRATION
APPLY ZERO GAS
553
>
ZERO CAL
>
SPAN CAL
CAL GAS CONC =50.0 >
SENSOR LIFE
CAL FACTOR
0
=100%
=0.411
ZERO
SET
PPM
CANCEL
CANCELLED
30
553
100 PPM
CANCEL
REMOVE
GAS
SPAN
SET
APPLY 100 GAS
CANCELLED
30
GAS CAL SET
CAL
ERROR
SAVING
50
ENTER WHEN FINISHED
Setup –
Alarm/Relay
Access MAIN MENU to configure via LCD. RO on LCD indicates a password is required. To access Setup
requires a User level password. The default password is 0000.
MAIN MENU
INFORMATION
SETUP
CALIBRATION
DATALOG
DISPLAY
USER ACCESS
>
>
>
>
>
>
SETUP MENU
MERIDIAN SETUP
>
SENSOR 1 SETUP
>
CHANGE ACCESS CODE >
BACKUP/RESTORE
>
MERIDIAN SETUP
SYSTEM
MODBUS
ALARMS
CURRENT LOOPS
GENERAL
RO SYSTEM ENABLES
SENSORS ENABLE :1
OFFLINE SENSOR1 :NO
OFFLINE SENSOR2 :NO
OFFLINE SENSOR3 :NO
USER LEVEL :0
>
>
>
>
>
RO
MODBUS
MBADDRESS : 1
MBBAUDRATE : DIS
MBPARITY
: NONE
MBSTOPBIT
:1
RO
GENERAL
H2S
GAS RANGE
:50
DEAD BAND%FS :0
DISPLAY NEG
:NO
WARM UP(SECS) :5
GAS UNITS
:PPM
SENSOR 1 SETUP
>
GENERAL
>
CALIBRATION
>
ALARMS
>
EDITOR
RO CURRENT LOOP
SENSOR
:1
4ma OFFSET :0
20ma OFFSET :0
INHIBIT (ALL) :3.8
RO
CAL SETUP
CALGAS CONC :25
PERIOD ( DAYS) :30
SPAN (SECS)
:300
PURGE (SECS)
:60
DECIMAL
:0
K FACTOR
:1.00
ACCESS ENTRY
OPERATOR :0000
SYSTEM
:0000
GENERAL
TIME/DATE
EDITOR
REGIONAL
RESTART MERIDIAN
RO ALARM 1 SETUP
ALRM 1 SET
:10
ALRM 1 RESET : 9
ALRM 2 SET
:25
ALRM 2 RESET :22
ALRM 3 SET
:50
ALRM 3 RESET :45
PERFORM BACKUP?
NO
PERFORM RESTORE?
NO
087-0049 REV C
YES
YES
SAVING
CANCELLED
RESTORING
CANCELLED
RESTORE FACTORY?
RESTORING
NO
CANCELLED
YES
>
>
>
>
TIME:
15 : 36: 12
DATE:
08 / 05/ 11
EXIT
RO SENSOR EDITOR
NAME :TankRmSen#25
GAS 1 :H2S
GAS 2 :
BACKUP/RESTORE
BACKUP SETTINGS >
RESTORE SETTINGS >
RESTORE FACTORY >
RO ALARM SETUP
LOGIC
: LATCH
RELAY
: FSAFE
OFF DLY (M) : 0
ALARMS SETUP
ALARM 1
ALARM 2
ALARM 3
NEXT
TRANS TEXT EDITOR
NAME: TankRm#A12
LAT : +00.00000
LONG: +000.00000
REGIONAL
DAYLIGHT SAVING: NO
DATE FORMAT: MDY
LANGUAGES: EN
GENERAL
TIME/DATE
EDITOR
REGIONAL
RESTART MERIDIAN
ESC
ENTER
SCOTT SAFETY
087-0049
Chapter 2
Rev C
INTRODUCTION
Chapter Overview
This chapter covers the following topics:
•
SCOTT SAFETY
Device Overview
087-0049 REV C
8
CHAPTER 2: INTRODUCTION
Device Overview
The Meridian Gas Transmitter is a fixed-point device designed to provide continuous
monitoring of Combustible gases (range: 0 to 100% LEL), Toxic gases (range: varies
based on the individual Sensor type).
The device receives inputs from up to three (3) Meridian Detector Bodies and
transmits the output to a remote monitoring system. The Meridian Detector Bodies
can be used for these applications based on the installed Sensor:
•
To detect Toxic gases in ambient atmospheres; it accepts Electrochemical
(E-Chem) Sensors. Traditional, as well as Rock Solid sensors are available. For the
detection of Hydrogen Sulfide (H2S), it also accepts Metal Oxide Semiconductor
(MOS) Sensor. (It can also be detected with a variety of E-Chem sensors).
•
To detect Hydrocarbon Combustibles in ambient atmospheres; it accepts either
Catalytic Bead (Cat-bead), or miniaturized Infrared (IR) Sensors. Miniaturized IR
sensors are also used to detect carbon dioxide.
See “Specifications” on page 129.
Except where noted, functionality of the device is not affected by the type of Sensor
installed.
Standard device features include:
087-0049 REV C
•
Selectable Sensor Ranges – Multiple ranges available to match your application
needs.
•
A LCD – For quick and easy User Interface (UI) for access to menus. The LCD
may be installed in multiple orientations using its pluggable design and is also
visible in bright sunlight. Optional heated LCD available for refrigerated
conditions.
•
Four (4) Alarm LEDs (ALM1, ALM2, ALM3 and FAULT) – For field
equipment alarm levels.
•
Truly Universal – Accepts all Sensor Types and retains Approvals regardless of
its installed Sensor.
•
Non-Volatile Memory (NV-EEPROM) – Retains all configuration parameters
of the device in the event of a power interruption or loss.
•
Equipped with MODBUS RTU (RS-485) Communications capabilities. It
supports up to 247 addressed Remote Terminal Units (RTUs). Up to 32 RTUs
per loop.
•
Automatic Calibration – Count down timer ensure Sensor Zero and Span
Calibration for better detection and safety of personnel and property.
•
Multiple Navigation Keys – For device configuration, calibration and fault
analysis without opening the enclosure.
•
Four (4) Discrete Relays and a Remote Reset connection. The four (4) Discrete
Relays can be wired to notification alarm equipment (such as lights, and
audible).
SCOTT SAFETY
Device Overview
9
•
Real Time Clock (RTC) and Calendar – Provides a time stamp capability. Thus,
allows data logging of calibrations and alarm events for recall to the LCD or
over the MODBUS RTU (RS-485) Serial port.
•
Plug-N-Play Intelligent Sensors – Sensor gas types and technologies
automatically displays on LCD, hot-swappable effortlessly to reduce downtime
and equipped with microprocessor.
•
Modular Design – For easy installation, allows up to three (3) Sensor Heads
configurable within permitted combinations for local and remote locations
using 3-4 Wire PCB.
•
•
Housings – Two (2) available options: Aluminium or Stainless Steel.
Optional Communications – Supports a variety of Communication Protocols
via PCBs to meet your communications needs.
The device ships pre-configured using the factory default settings. However, you my
want to reconfigure some of the parameters based upon your application. See
“Configuration Defaults” on page 81.
Sensors shipped with the device are calibrated at the factory. However, Spare Sensors
must be calibrated prior to use.
Warning: Periodic Calibration checks are needed to assure dependable performance.
Operating the device that has exceeded its calibration date can cause false readings of
detected gases. Readings obtained while device is out of calibration may be invalid
and could lead to death or injury.
Other accessories are available to aid you in your use of the device. For a complete
list, See “Parts List” on page 160. Here are only a few examples:
•
Meridian Junction Box Assembly – Allows mounting the Sensor at remote
locations for better detection since some gases rise and some sink.
•
Duct Mount Adaptor – Allows the monitoring of airflow in exhaust or
ventilation ducts.
•
Calibration Adaptor – Allows direct calibration flow to the sensor face without
dilution from environmental interferences such as wind.
•
Sensor Simulator – Used for easy troubling shooting, acceptance testing (SAT)
and commissioning. Simulator is for temporary use only.
If you have any questions about the device or its operation contact Scott Safety. See
“Technical Service” on page 158.
Figure 1 shows the major parts of the device.
SCOTT SAFETY
087-0049 REV C
10
CHAPTER 2: INTRODUCTION
Figure 1 Major Parts
1
1
10
9
2
3
20
4
SENSOR NAME
1 2 3
NH3
12
13
14
11
PPM
15
4
16
100
ERROR MESSAGE
5
6
17
7
8
Table 13 lists the major parts of the device.
Table 13 Major Parts
REFERENCE
NUMBER
087-0049 REV C
ITEM
1
3/4” NPT Conduit Entries (2)
2
Housing
3
Display (LCD)
4
Mounting Flange Holes (2)
5
Removable Cover
6
Meridian Detector Body less Meridian End Cap
7
Meridian End Cap
8
Calibration Port
SCOTT SAFETY
Device Overview
11
Table 13 Major Parts (continued)
REFERENCE
NUMBER
SCOTT SAFETY
ITEM
9
Grounding\Earthing Screw
10
Lid Setscrew
11
Display PCB (Optional LCD Heater available for 3-4 Wire PCB only)
12
CPU PCB
13
Optional Communication Expansion Card (CEC) PCB available for 3-4
Wire (one per device). Contact your Scott sales representative for
available PCBs.
14
Terminal/Relay/MODBUS RS-485 PCB for 3-4 Wire (4 Relays, 34to20mA (one for each Sensor) and 1 Remote Acknowledge Alarm)
15
Power Supply PCB available (select one):
• Power Supply PCB (for 3-4 Wire Isolated 4-20mA) (converts
10-30VDC to 3.3VDC, 12VDC, adjustable 2to9VDC Sensor voltage)
• Power Supply PCB (4-20mA for 2 Wire applications)
16
Intrinsically Safe Barrier PCB available (select one):
• 3-4 Wire Intrinsically Safe Barrier PCB
• 2 Wire Intrinsically Safe Barrier PCB
17
Sensor Assembly
087-0049 REV C
12
CHAPTER 2: INTRODUCTION
087-0049 REV C
SCOTT SAFETY
087-0049
Chapter 3
Rev C
INSTALLATION
Chapter Overview
This chapter covers the following topics:
•
•
SCOTT SAFETY
Planning for Installation
Installation Checklist
087-0049 REV C
14
CHAPTER 3: INSTALLATION
Planning for
Installation
Verifying Items
Shipped
This section provides the pre-installation items.
This section provides a list of the items that ship with the device. Ensure you have all
items, if not See “Technical Service” on page 158.
•
•
•
•
Device
Magnet Tool
CD
Quick Reference User Notes
Sensors are packaged separately.
Mounting
Considerations
This section outlines a few variables that should be taken into consideration when
selecting a location for mounting the device:
Each application is unique and needs to be assessed. These are only general
guidelines.
•
Orientation – For Rock Solid sensors only, always mount the device's sensor
pointing downwards.
Caution: Never mount the detector in a way that causes the sensor to be pointing
upwards. Failure to do so can result in poor sensor performance.
•
Gas Density – Some gases rise and some sink depending on their Gas Density
relative to air. For gases heavier-than-air, it is recommended that the sensor be
installed near the floor. In these applications, care should be taken to protect the
sensors from physical damage. For gases that are lighter-than-air, the sensor
should be placed near the ceiling, above the potential source of the leak, as well as
at the highest point in the room if it is an indoor application. For gases with
densities equal-to-air, mount as close to potential leak source as practical, or near
or at breathing level. Table 14 provides various gas densities for Combustibles
(LEL) and Table 15 provides various gas densities for Toxic (E-Chem).
Ensure you consult the CAS Registry Database (cas.org) for the latest and most
current information. These tables are for reference only and not meant to be the most
update source of information. The content of these tables were derived from the CAS
Registry. Additionally, review the applicable MSDS.
Remote Calibration Fittings are available. See “Parts List” on page 160.
087-0049 REV C
SCOTT SAFETY
Planning for Installation
15
Table 14 Gas Density Relative to Air and CAS No. - Combustibles (LEL)
GAS
SYMBOL
CAS NO.
VALUE
Acetone
CH3COCH3
67-64-1
2.0
Ammonia
NH3
7664-41-7
0.6
Benzene
C6H6
71-43-2
2.7
1,3-Butadiene
CH2=CH-CH=CH2
106-99-0
1.9
Butane
CH3(CH2)2CH3
106-97-8
2.0
Carbon Monoxide
CO
630-08-0
1.0
Cyclohexane
C6H12
110-82-7
2.9
Ethane
C2H6
74-84-0
1.0
Ethanol
C2H5OH
64-17-5
1.6
Ethylene
CH2=CH2
74-85-1
1.0
Ethylene Oxide
C2H4O
75-21-8
1.5
Heptane
C7H6
142-82-5
3.5
Hexane
C6H14
110-54-3
3.0
Hydrogen
H2
1333-74-0
0.1
Hydrogen Sulfide
H2S
7783-06-4
1.2
Isobutylene
CH3C(CH2)CH3
115-11-7
1.9
Isopropyl Alcohol
CH3CH(OH)CH3
67-63-0
2.1
Methane
CH4
74-82-8
0.6
Methanol
CH3OH
67-56-1
1.1
Methyl Ethyl Ketone
CH3-CO-C2H5
78-93-3
2.5
Methyl Mercaptan
CH3SH
74-93-1
1.7
Octane
C8H18
111-65-9
3.9
Pentane
C5H12
109-66-0
2.5
Propane
C3H8
74-98-6
1.5
Propylene
CH3CH=CH2
115-07-1
0.8
Toluene
C6H5CH3
108-88-3
3.2
o-Xylene
C6H4(CH3)2
95-47-6
3.7
Note: Vapor densities (Air= 1.0 atmosphere @25°C). Therefore, values
<1 raise and values >1 sink.
SCOTT SAFETY
087-0049 REV C
16
CHAPTER 3: INSTALLATION
Table 15 Gas Density Relative to Air and CAS No. - Toxic (E-Chem)
GAS
SYMBOL
CAS NO.
VALUE
Ammonia
NH3
7664-41-7
0.6
Arsine
AsH3
7784-42-1
2.7
Boron Trichloride
BCl3
10294-34-5 6.1
Bromine
Br2
7726-95-6
5.5
Carbon Dioxide
CO2
124-38-9
1.5
Carbon Monoxide
CO
630-08-0
1.0
Chlorine
Cl2
7782-50-5
2.4
Chlorine Dioxide
ClO2
10049-04-4 2.3
Diborane
B2H6
19287-45-7 1.0
Dichlorosilane
SiH4Cl2
4109-96-0
3.5
Fluorine
F2
7782-41-4
1.3
Germane
GeH4
7782-65-2
2.6
Hydrogen
H2
1333-74-0
0.1
Hydrogen Chloride
HCl
7647-01-0
1.3
Hydrogen Cyanide
HCN
74-90-8
0.9
Hydrogen Fluoride
HF
7664-39-3
0.7
Hydrogen Selenide
H2Se
7783-07-5
2.8
Hydrogen Sulfide
H2 S
7783-06-4
1.2
Methanol
CH3OH
67-56-1
1.1
Methylene Chloride
CH2Cl2
75-09-2
2.9
Methyl Iodide
CH3l
74-88-4
4.9
Nitric Oxide
NO
10102-43-9 1.0
Nitrogen Dioxide
NO2
10102-44-0 1.6
Nitrogen Trifluoride
NF3
7783-54-2
2.5
Oxygen
O2
7782-44-7
1.1
Ozone
O3
10028-15-6 1.7
Phosphine
PH3
7803-51-2
1.2
Silane
SiH4
7803-62-5
1.1
Sulfur Dioxide
SO2
7446-09-5
2.2
Note: Vapor densities (Air= 1.0 atmosphere @25°C).
Therefore, values <1 raise and values >1 sink.
•
087-0049 REV C
Potential Gas Sources – The location and nature of potential vapor/gas sources
(e.g., pressure, amount, source, temperature, and distance) need to be assessed.
Locate the device where air currents are most likely to contain the highest
concentration of escaping gas.
SCOTT SAFETY
Planning for Installation
SCOTT SAFETY
17
•
Ambient Temperature – Ensure that the device is located within an area that
complies with the specified operating temperature range. See “Specifications” on
page 129.
•
•
Vibration – Mount the device in a manner that minimizes vibration.
•
•
Accessibility – Consider future maintenance and calibration requirements.
•
Avoid water and condensing humidity – Water inside the infrared optics adversely
affects performance. Avoid mounting in locations where water can collect or
splash on the sensor head. Scott Safety recommends a rain shield for outdoor
installations.
•
Electromagnetic Fields – Although the device is designed to be RFI/EMI resistant,
mounting the device near power transformers, walkie-talkies, or other strong EM
fields may cause undesirable results. Avoid strong EM fields.
•
Use conduit seals and drain loops – Explosion proof conduit and other materials
required for electrical wiring in hazardous areas should be installed in accordance
with National Electrical Code (NEC) and Canadian Electrical Code (CEC)
requirements. All conduit connections should be sealed and contain a drain loop to
protect the device electronics from moisture.
•
Avoid direct bold sunlight – Scott Safety recommends using a sun shield if the
device is mounted in direct sunlight. See “Parts List” on page 160.
•
Environmental damage – Every effort should be made to protect sensors from
environmental damage caused by water, snow, shock, vibration, dirt, and debris.
•
Air variables – Factors such as air movement, gas density in relation to air,
emission sources, gas interferences and environmental variables should be
considered when determining the correct device location. Air movement by fans,
prevailing winds, exhaust duct, strong air-flow through a room, and convection
should be carefully evaluated to determine if a leak is more likely to raise gas
levels in certain areas within the facility. High air velocities results in inaccurate
measurement and reduce sensor life.
•
Distance – All systems that separate the Transmitter from the Sensor have distance
limit specifications. Ensure that the application’s distance requirements are within
specifications and that the appropriate gauge wiring is used.
Gas release temperature – Evaluate the behavior of the gas when it is cooled or
heated when released. For example, some heated heavier-than-air gases, such as
hydrogen sulfide, rise when first released, but settles as they cool and their density
increases above that of air.
Ingress and Egress – Consider passing traffic areas regarding items like personnel,
forklifts, motor vehicles, mobile hoists and the like.
087-0049 REV C
18
CHAPTER 3: INSTALLATION
Following Electrical
Codes
This section provides information about adhering to electrical codes when installing
the device.
Warning: To avoid an explosion or electrical fire, encase the cable connection to the
device in conduit. The conduit must meet prevailing electrical codes for
hazardous-area installations which specify conduit sealing, explosion-proof fittings,
and special wiring methods. Failure to do so could result in injury or death.
Warning: Ensure to connect the Ground Wire to the device’s Grounding Screw on its
housing.
•
For North America installations:
– To meet prevailing electrical codes, use conduit and all other materials required
for electrical wiring in hazardous areas. Install wiring according to National
Electrical Code (NEC) Articles 501-517.
– As supplied, the Sensor Head wiring is already sealed and requires no
additional sealing to conform to NEC requirements for explosion-proof
installations, as long as the detector is mounted no further than 18" (457 mm)
from the device [NEC Article 501-5(a)(1)].
•
For International installations:
– Ensure installation meets prevailing electrical codes or standards for
hazardous-area installations. For example, IEC/EN 60079-14 standard.
Hard Wired
Configurations
This section covers hard wired configurations.
Table 16 lists, and Figure 2 shows some typical hard wired configurations. Table 17
and Table 18 lists the Sensor types allowed.
Table 16 Hard Wired Configurations — Typical
TERMINAL
2 WIRE /RELAY/M
NUMBER
LOCAL
REMOTE
POWER
ODBUS
OF
LOCAL
MULTIPLE REMOTE
SENSOR SENSORS/
SUPPLY
RTU
OPTIONAL INTEGRAL SENSORS SENSOR(S) DISTANCE TRANSMIT SENSOR
PCB
(RS-485)
WIRING* (4-20MA)
COMM. PCB SENSOR
***
****
*****
TYPE
PCB
TER
3-4 Wire
N/A
Yes
1**
No J-Box
J-Box
J-Box
100’
Up to 3
2 Wire
Yes
No
N/A
No J-Box
J-Box
J-Box
100’
1
See
Table 17.
See
Table 18.
* Power Consumption vary. See “Device Specifications” on page 130.
** System allows only one Comm PCB. Consult Scott for available options.
*** Use the Seal when exiting the Device.
**** Allows different location of Sensor based on gas properties.
***** The distance is between a transmitter and any sensor. See “Device Specifications” on page 130.
087-0049 REV C
SCOTT SAFETY
Planning for Installation
19
Table 17 Hard Wired Configurations — Sensor Types Supported for 3-4 Wire
SENSOR #1
E-Chem*
O2
(096-3473-19)
Combustible
Cat-Bead
(096-3473-55)
MOS
(096-3473-57)
IR - CO2
(096-3473-58)
Combustible IR
(096-3473-56)
SENSOR #2
SENSOR #3
E-Chem
E-Chem
O2
E-Chem
O2
O2
E-Chem
E-Chem
O2
E-Chem
O2
O2
E-Chem
E-Chem
O2
E-Chem
O2
O2
E-Chem
E-Chem
O2
E-Chem
O2
O2
STOP
STOP
O2
STOP
STOP
STOP
STOP
STOP
O2
STOP
STOP
STOP
* E-Chem Sensor P/Ns 096-3473-01 thru 096-3473-18 and
096-3473-20 thru 096-3473-54 and Sensor Simulator
096-3395 only. Simulator is for temporary use only.
Note: 3-4 Wire transmitter allowed sensor combinations,
used only with IS barrier assembly 096-3448.
Warning: STOP. Do not use these combinations under any circumstances. They are
not intrinsically safe and can cause explosion.
Warning: Illegal Configuration - Not Intrinsically Safe. Sensor configuration rules
are violated or are attempted, the device automatically goes into an immediate fault
mode. Failure to adhere to this could result in injury or death.
Table 18 Hard Wired Configurations — Sensor Types Supported for 2 Wire
SENSOR #1
E-Chem - E-Chem Sensor P/Ns 096-3473-01 thru 096-3473-18 and 096-3473-20
thru 096-3473-54 and Sensor Simulator 096-3395 only. Simulator is for
temporary use only.
Note: 2 Wire transmitter allowed sensor combinations, used only with IS barrier
assembly 096-3449.
O2 (096-3473-19)
SCOTT SAFETY
087-0049 REV C
20
CHAPTER 3: INSTALLATION
Warning: Illegal Configuration - Not Intrinsically Safe. Sensor configuration rules
are violated or are attempted, the device automatically goes into an immediate fault
mode. Failure to adhere to this could result in injury or death.
Figure 2 Hard Wired Sensor Configurations — Typical
Local
Local
Remote
3-4 Wire
or 2 Wire
Remote
3-4 Wire
Ex Seal
Cable
Gland
Integral
Cable
Gland
Intrinsically Safe Cable
Cable
Gland
Cable Gland
Cable
Gland
Cable
Gland
Note: Intrinsically Safe Cable distance from Transmitter to any Sensor is 100Ft. (30.48m) Maximum.
Reference control drawings: 096-3506-B for 3-4 Wire and 096-3507-B for 2 Wire.
These are examples of typical configurations. Other combinations exist.
087-0049 REV C
SCOTT SAFETY
Planning for Installation
Determining Wire
Length and Size for
Input Power
21
This section provides key factors to determine wiring distance. You must determine
the proper wire length and size so the proper Voltage gets from the source to the
destination. If the proper Voltage is not at the destination, then the device will not
function properly. This is referred to as Voltage Loss and must be planned for when
installing.
Figure 3 provides a formula to calculate the maximum wire length that can be used.
Figure 3 Maximum Wire Length Formula
Dir = V PowerSupply - V Min
IMax x RWire x 2
Where:
Dir = Maximum wire length in feet based on the wire’s loop voltage
VPowerSupply = Power supply output voltage
VMin = Minimum current voltage of device
IMax = Maximum current in amperes
RWire = Resistance of wire in Ohms/foot
To determine the maximum wiring distance, first calculate the wiring’s maximum
allowable voltage drop by subtracting the device minimum operating voltage from the
power supply’s output voltage. Then, use the appropriate chart to determine the
maximum wiring distance. See Table 19.
Table 19 Typical Cable Data for Input Power Length Considerations
CABLE SIZE
(AWG)
CABLE SIZE
(MM2)
CONDUCTOR
CROSS
SECTION AREA
(MM2)
RESISTANCE
(OHMS/FOOT)
RESISTANCE
(OHMS/METER)
22
0.50
0.33
0.0158
0.0518
20
0.60
0.50
0.0112
0.0367
18
0.90
0.82
0.0077
0.0253
16
1.5
1.50
0.0039
0.0127
14
2.5
2.00
0.0026
0.0085
12
4.0
3.30
0.0016
0.0054
10
6.0
5.26
0.0010
0.0034
Note: Maximum allowable voltage drop can be calculated based on power supply output
voltage and the device minimum voltage and maximum current requirements. For 3-4
Wire= 10VDC* Min. input, for 2 Wire= 18VDC* Min. input.
*These values are subject to change.
Warning: Install according to applicable Intrinsically Safe wire practice or
standards. For example, IEC/ECN 60079-14. See Table 19.
SCOTT SAFETY
087-0049 REV C
22
CHAPTER 3: INSTALLATION
Determining Wire
Length for RS-485
Cable
Determining Wire
Length for Remote
Sensors
This section provides the maximum RS-485 wiring distance.
Supports 1,200Meters maximum @19.2Kbs using Belden 9841 twisted-pair cable.
This section provides some examples of the maximum wire length for remote sensors.
See Figure 4. See “Parts List” on page 160.
Figure 4 Remote Sensor Wire Length – Examples
4-20mA
10-30VDC
3-4 Wire
100 Ft. Max.
IS Cable
Ex Seal
Cable
Gland
100 Ft. Max.
IS Cable
Cable
Gland
Cable Gland
Cable Gland
100 Ft. Max.
IS Cable
Cable Gland
4-20mA
10-30VDC
3-4 Wire
100 Ft. Max.
IS Cable
Ex Seal
Cable
Gland
Cable
Gland
100 Ft. Max.
IS Cable
Cable
Gland
Cable Gland
4-20mA
10-30VDC
3-4 Wire
Ex Seal
100 Ft. Max.
IS Cable
Cable
Gland
Cable Gland
Note: Intrinsically Safe Cable distance from Transmitter to any Sensor is 100Ft. (30.48m) Maximum.
Reference control drawings: 096-3506-B for 3-4 Wire and 096-3507-B for 2 Wire.
087-0049 REV C
SCOTT SAFETY
23
Planning for Installation
An Application
Solution Example
This section provides an example of an application solution based on some specific
requirements. See Table 20 and Figure 5.
Application Requirements:
•
In first location, need to monitor for Methane (CH4) at a one location, different
area than the others, and must be extremely accurate and highly stable.
•
In second location, need to monitor for both CO and Methane (CH4) about 110Feet
away total.
•
•
•
Site is in Canada, thus must meet Canadian CSA approval.
Need to protect the CO Sensor from wash downs in that area.
Need to hook up some field lights at the two locations.
Table 20 Parts Required for Application Solution Example
REQUIREMENT
DESCRIPTION
P/N
QTY
Monitor three gases, at local and remote 3-4 Wire, Al, heated,
locations, meet CSA temperature (-40C), plastic Meridian End
hook up field lights. Thus, need the 3-4 Cap, Canada
Wire device with heated LCD, has relay
PCB for using field devices. Need two,
since one Methane must be very
accurate, which requires an IR sensor
technology and has higher power
requirements.
096-3480-03
2*
Monitor CO
CO Sensor (E-Chem)
096-3473-01
1
Monitor Methane
Methane Sensor (LEL)
Cat-Bead
096-3473-55
1
Monitor Methane with high accuracy
and stability
Methane Sensor
Combustible (LEL) IR
096-3473-56
1
Protect CO Sensor from wash down
activity
1/4 Turn Deluge-Wash
Down Fitting
096-3441
1
Accommodate the remote locations of
the Combustible (LEL) Cat-Bead
Methane Sensor, and the CO (E-Chem)
Sensor, you need the following:
IS Cables with lengths to the point of gas
detection for the two sensors.
For each point in and out of each
Meridian Junction Box Assembly you
need a Remote Cable Gland Fitting
Meridian Junction Box
Assembly
IS Cable (10Feet)
IS Cable (100Feet)
Remote Cable Gland
Fitting
096-3475
069-0096-10
069-0096-100
048-0091
3
1
1
4
Accommodate the remote location of the Meridian Detector Body 096-3484-01
CO sensor
Assembly, 3-4 Wire,
plastic Meridian End
Cap
1
For IS compliance, Meridian NPT Ex
Seal between the Transmitter and the
Meridian Junction Box Assembly
1
Meridian NPT Ex Seal
096-3483
* To meet these specific requirements, we are going to get two 096-3480-03 and then
remove the Meridian Detector Body and place one at the remote location for the CO sensor.
SCOTT SAFETY
087-0049 REV C
24
CHAPTER 3: INSTALLATION
Figure 5 Application Example
First Area Location
to monitor CH4 using a IR sensor:
Y
4-20mA
10-30VDC
3-4 Wire
Local
R
096-3480-03
096-3473-56
Integral
Second Area Location:
Local
to monitor CH4
using a Cat-Bead sensor
Remote
to monitor CO
Y
R
4-20mA
10-30VDC
3-4 Wire
096-3480-03
069-0097-10
096-3483
048-0091
069-0097-100
048-0091
048-0091
048-0091
096-3475
096-3475
096-3475
096-3484-01
096-3473-01
096-3441
096-3473-55
Note: Intrinsically Safe Cable distance from Transmitter to any Sensor is 100Ft. (30.48m) Maximum.
Reference control drawings: 096-3506-B for 3-4 Wire and 096-3507-B for 2 Wire.
This is only one example. The system solution varies on a case to case basis based on
the application variables and its objectives. Therefore, for each application, please
contact your Scott sales representative.
087-0049 REV C
SCOTT SAFETY
Installation Checklist
Installation Checklist
25
This section provides the installation requirements. Table 21 lists the individual items.
Warning: Only qualified personnel should perform the installation according to
applicable electrical codes, local regulations, and safety standards. Failure to do so
could result in injury or death. Qualified personnel as defined according to local,
county, state, federal, national and individual company standards.
Warning: Ensure the atmosphere is free from combustible and/or toxic gases prior to
starting any of the procedures.
Table 21 Installation Checklist
ITEM
Device Aluminium and Stainless Steel
See “Mounting the Device” on page 26.
Device Retrofit Mounting Plate
See “Installing the Retrofit Mounting Plate”
Meridian NPT Ex Seal
Meridian Junction Box Assembly
(Aluminum and Stainless Steel)
Meridian Junction Box Assembly Spacer
Kit
Duct Mount Fitting (both Flat and Round)
for Meridian Detector Body
3 Wire Connections from the VDC Power
Supply and Receiver to the Device
2 Wire Connections from the VDC Power
Supply to the Device
4 Wire Connections from the VDC Power
Supply and Receiver to the Device
Connections from the Device to Various
Scott Receivers (Controllers)
Relays and Remote Alarm on the
Terminal/Relay/MODBUS RS-485 PCB
Connections for MODBUS RS-485
Optional Communication Expansion Card
(CEC) PCB
Sensor Head
Sensor
SCOTT SAFETY
DETAILS
on page 26.
See “Installing the Meridian NPT Ex Seal”
on page 28.
See “Mounting and Wiring the Meridian
Junction Box Assembly (Al or SS)” on
page 31.
See “Using the Meridian Junction Box
Assembly Spacer Kit” on page 33.
See “Mounting a Meridian Detector Body
Using a Duct Mount Fitting” on page 34.
See “Connecting the Device to the Power
Supply and Receiver – 3 Wire” on page 36.
See “Connecting the Device to the Power
Supply – 2 Wire” on page 39.
See “Connecting the Device to the Power
Supply and Receiver – 4 Wire” on page 40.
See “Connecting from the Device to Scott
Receivers” on page 44.
See “Connecting Relays & Remote Alarm
Reset” on page 44.
See “Connecting MODBUS RS-485” on
page 46.
See “Installing the Optional
Communication Expansion Card (CEC)
PCB” on page 48.
See “Connecting the Sensor Head” on
page 49.
See “Installing/Replacing a Sensor” on
page 50.
087-0049 REV C
26
CHAPTER 3: INSTALLATION
Mounting the Device
This section describes how to mount the device.
Install the device to a wall or bracket using the Predrilled Mounting Flanges (that is
part of the housing). To facilitate wiring to the device enclosure, two-threaded 3/4”
NPT conduit fittings are provided. See Figure 6.
Do not attempt to mount the device using only the conduit.
Figure 6 Device Mounting Dimensions - Aluminum & Stainless Steel
6.57”(166mm)
5.85”(148mm)
3/4” NPT
5.69”(144mm)
.50
5.79”
(147mm)
ID .30”(7mm)
on 5.85”(148mm) centers
3/4” NPT
Installing the Retrofit
Mounting Plate
087-0049 REV C
10.75”
(273mm)
This section describes installing the Retrofit Mounting Plates. The plates are used
when you are mounting the device where a previous mounted Scott transmitter was
located and it allows for easier access to the Meridian End Cap. See Figure 7 and
Figure 8.
SCOTT SAFETY
27
Installation Checklist
Figure 7 Retrofit Mounting Plate Dimensions - Al
5.855 [148.72mm]
5.500 [139.70mm]
5.000 [127.00mm]
4.750 [120.65mm]
1/4-20 UNC-2B THRU
2 PLACES
3.250 [82.55mm]
.50 [12.70mm]
.99
[25.15mm]
1.32
[33.53mm]
1.77
[44.96mm]
5600 SS & 4888
Transmitters
1.72
[42.69mm]
6000 Transmitter
3.12
[79.25mm]
4.14
[105.16mm]
Meridian Transmitter
5000 Transmitter
2.25
[57.15mm]
5600 Transmitter
5.00
[127.00mm]
4600 & 4688IR
Transmitters
CL
SYMM
.50 X 45° TYP
.313 HRU, C'BORE
.688 X .33 DEEP
12 PLACES
4.060 [103.12mm]
4.750 [120.65mm]
7.00 [177.80mm]
Figure 8 Retrofit Mounting Plate Dimensions - HDPE
7.000 [177.80 mm]
5.855 [148.72 mm]
5.500 [139.70 mm]
3.250 [82.55 mm]
2.928 [74.36 mm]
1.625 [41.28 mm]
5.000 [127.00 mm]
1.320 [33.53 mm]
1.720
[43.69 mm]
4x .500 X 45° CHAMFER
A
2.500 [63.50 mm]
5600 SS & 4888
Transmitters
Meridian Transmitter
5000 Transmitter
4.080
[103.63 mm]
5.000
[127.00 mm]
]
.820 [20.83 mm]
6000 Transmitter
3.120
[79.25 mm]
[
+ 0.5 mm
.500 +- .020
.010 12.70 - 0.3
1.870 [47.50 mm]
A
4X
.3125 [7.94 mm] THRU
Ø.375 .250 BACK SIDE
PRESS FIT
1/4" - 20 THREADED
INSERT .250" [6.35 mm]
FROM THIS SIDE
5600 Transmitter
2.210 [56.13 mm]
4600 & 4688IR
Transmitters
10 x .313 [7.95 mm] THRU
Ø.688 .330
2.030 [51.56 mm]
4.060 [103.12 mm]
4.750 [120.65 mm]
SCOTT SAFETY
087-0049 REV C
28
CHAPTER 3: INSTALLATION
Installing the Meridian
NPT Ex Seal
This section describes installing the Meridian NPT Ex Seal between the device and a
Meridian Junction Box Assembly in the field. It is used to maintain the Explosion
Proof/Flame Proof integrity of the enclosure and is installed between the housings.
See Figure 9.
This procedure is only necessary if you did not originally order the device configured
in this manner from the factory.
Warning: Ensure Receivers and Power Supplies are not powered when installing
PCB into the device. Failure to do so could result in injury or death.
Warning: Ensure the atmosphere is free from combustible and/or toxic gases prior to
starting this procedure.
1 Ensure Receivers and Power Supplies are not powered when installing wire to the
device.
2 Unscrew the setscrew and Housing Cover, then pull on the LCD PCB/CPU PCB
set, removing it from the four (4) standoffs.
3 Remove the two (2) wires from the 10-30VDC TB1.
It is not necessary to remove the Wire Ribbon Cable from the upper and lower PCB
stack.
4 Disconnect the top pluggable portion of the terminal blocks in use (MODBUS,
Alarms, Fault, and Remote Acknowledge).
5 Unscrew the four (4) standoffs and lift the entire PCB stack from the housing.
6 Unscrew the two (2) screws and remove the Intrinsically Safe (IS) Terminal Block
(TB) Cover.
7 Unscrew the two (2) retention screws on the Blue IS Terminal Block then remove
the top plug-able portion of the terminal block.
The Blue IS Terminal Block’s two (2) retention screws prevent accidental dis-lodging
of the connections.
8 If a Meridian Detector Body Assembly was installed to the device, then unscrew
the six (6) screws on the light blue IS TB and remove the six (6) wires from the
TB.
9 If a Meridian Detector Body Assembly was installed to the device, then remove
the Meridian End Cap, Sensor and the Sensor Assembly.
10 Pull the six (6) wires on top of the Meridian NPT Ex Seal into the device’s 3/4” NPT
hole.
11 Screw the Meridian NPT Ex Seal into the device.
When installing the Meridian NPT Ex Seal, thread into the 3/4” NPT hole, hand
tighten, then tighten an additional minimum of one and a half turns. Care should be
taken not to twist or damage wires while threading in fitting.
087-0049 REV C
SCOTT SAFETY
Installation Checklist
29
Warning: To maintain Explosion Proof/Flame Proof a minimum of 5 threads of
engagement is required. Failure to do so could result in injury or death.
12 Insert the six (6) wires into the light blue IS TB and screw them down. See
“Connecting the Sensor Head” on page 49.
13 Replace the IS Terminal Block Cover and tighten the two (2) screws.
14 Ensure the top of all your applicable plugs with feeding wires are easely accessible
prior to replacing the PCB stack to ease re-plugging.
15 Replace the PCB stack into the housing.
16 Replace the four (4) standoffs.
17 Re-connect the tops of the plugs for any other terminal blocks in use (10-30VDC,
MODBUS, Alarms, Fault, and Remote Acknowledge).
18 Replace the two (2) wires to the 10-30VDC TB1.
19 Replace the LCD PCB/CPU PCB set into t he four (4) standoffs and screw the
Housing Cover back on.
20 Unscrew the Meridian Junction Box Assembly Cover.
21 Pull the six (6) wires on bottom of the Proof/Flame Proof Seal into the Meridian
Junction Box’s 3/4” NPT hole.
22 Screw the Junction Box Assembly onto the Meridian NPT Ex Seal.
When installing the Meridian NPT Ex Seal, thread into the 3/4” NPT hole, hand
tighten, then tighten an additional minimum of one and a half turns.
Warning: To maintain Explosion Proof/Flame Proof a minimum of 5 threads of
engagement is required. Failure to do so could result in injury or death.
23 Insert the six (6) wires into the light blue TB4 and screw them down. See
“Mounting and Wiring the Meridian Junction Box Assembly (Al or SS)” on
page 31.
24 Replace the Meridian Junction Box Assembly Cover and secure the setscrew.
SCOTT SAFETY
087-0049 REV C
30
CHAPTER 3: INSTALLATION
Figure 9 Meridian NPT Ex Seal Installation
Local
Ex Seal
087-0049 REV C
SCOTT SAFETY
Installation Checklist
Mounting and Wiring
the Meridian Junction
Box Assembly (Al or
SS)
31
This section describes how to mount and wire the Meridian Junction Box Assembly.
If your application requires that the sensor be mounted remotely from the device,
ensure you follow all code and regulatory requirements. In a remote application, the
wiring distance (the Max. length of the wire) from the sensor to the device must not
exceed 100Ft. The sensor might not function if you go over this distance or/and the
installation might not be Intrinsically Safe. When desired, conduit must be obtained
from your local vendor. See Figure 10 for the Aluminum and Figure 11 for Stainless
Steel.
Sensor type does not affect wiring.
Light blue terminal blocks indicate Intrinsically Safe circuits. Tighten plug retention
screws.
Caution: Ensure separation between each connection is maintained in accordance
with ICE/EN 60079-14 and ICE-EN 60079-11.
For a 2 Wire device wired to a Meridian Junction Box Assembly, only one (1) Sensor
is allowed. Thus, only two (2) TB’s are used.
Ensure the Cover is replaced and secure the setscrew.
Figure 10 Meridian Junction Box Assembly Wiring and Mounting – Aluminum
3.55”(90.17mm)
3.22”(81.79mm)
JUNCTION BOX
4.41”
(112.01mm)
4.70”
(119.38mm)
ID .30”(7.62mm)
on 4.41”(112.01mm) centers
WHITE (VADJ)
BLUE (GND)
BLACK (GND)
RED (+3.3VDC)
YELLOW (B)
GREEN (A)
6
5
4
3
2
1
Note: Intrinsically Safe Cable distance from Transmitter to any Sensor is 100Ft. (30.48m) Maximum.
Reference control drawings: 096-3506-B for 3-4 Wire and 096-3507-B for 2 Wire.
SCOTT SAFETY
087-0049 REV C
32
CHAPTER 3: INSTALLATION
Figure 11 Meridian Junction Box Assembly Wiring and Mounting – Stainless Steel
5.59”
(142.0 mm)
3.86”(98.0mm)
JUNCTION BOX
.33”
(8.5 mm)
4.86”
(123.5 mm)
WHITE (VADJ)
BLUE (GND)
BLACK (GND)
RED (+3.3VDC)
YELLOW (B)
GREEN (A)
6
5
4
3
2
1
Note: Intrinsically Safe Cable distance from Transmitter to any Sensor is 100Ft. (30.48m) Maximum.
Reference control drawings: 096-3506-B for 3-4 Wire and 096-3507-B for 2 Wire.
087-0049 REV C
SCOTT SAFETY
Installation Checklist
Using the Meridian
Junction Box
Assembly Spacer Kit
33
This section covers selecting the proper spacers based on the configuration. See
Table 22 and Figure 12.
Table 22 Meridian Junction Box Assembly Spacer Configurations
RETROFIT MOUNTING
PLATE BEHIND DEVICE
J-BOX
MATERIAL
SPACER
No Retrofit Mounting Plate
Al
2- 5/8”OD x.250”
With 1/2” Al Retrofit
Mounting Plate
Al
2- 5/8”OD x.750”
No Retrofit Mounting Plate
SS
2- 5/8”OD x.750”
With 3/4” HDPE Retrofit
Mounting Plate
SS
2- 5/8”OD x.750” and 2- 5/8”OD
x.250” together for the 1.0” gap
Figure 12 Meridian Junction Box Assembly Spacer Usage
1.484 [37.70 mm]
.500 [12.70 mm]
.500 [12.70 mm]
1/2” Al Retrofit
Mounting Plate
1/2” Al Retrofit
Mounting Plate
.785 [19.94 mm]
1.894 [48.10 mm]
1.878 [47.70 mm]
SS J-Box
Al J-Box
.775 [19.70 mm]
1.878 [47.70 mm] 1.878 [47.70 mm]
SCOTT SAFETY
087-0049 REV C
34
CHAPTER 3: INSTALLATION
Mounting a Meridian
Detector Body Using a
Duct Mount Fitting
This section covers the mounting of a Meridian Detector Body using a Duct Mount
Fitting.
This mounting method allows the monitoring of airflow in exhaust or ventilation
ducts without drying out the device’s sensor. For details on Flow Velocities and Duct
compatibility. See “Device Specifications” on page 130.
For use only with devices configured for remote sensor and without Meridian
Junction Box Assembly.
The Duct Mount Fitting comes in a kit that is used for either Flat and Round
applications. Most of the parts in the kit are used in either application. These are the
exceptions: one (1) flat washer (2F) is used for flat duct applications, while two (2)
curved washers (2C & 6C) are used for round duct applications. Additionally, for
round duct applications, you need to curve the plate (4) by hand to conform to
different duct shapes.
Ensure you have it assembled properly for your duct application prior to tightening
the locking nut. The locking nut digs into the washer for a lasting grip.
See Figure 13 and Table 23.
Figure 13 Duct Mount Fitting Kit
10
6
9
5
8
4
3
10
2F
1
9
6
8
5
4
7C
3
2C
1
087-0049 REV C
SCOTT SAFETY
Installation Checklist
35
Table 23 Usage of Kit Parts
REFERENCE
NUMBER
ITEM
USED
1
Locking Nut
Flat & Round
2F
Flat Washer
Flat
2C
Convex Washer
Round
3
Seal Washer
Flat & Round
4
Rivet
Flat & Round
5
Plate
Flat & Round
6
4 Self-Piercing Sheet Metal Screws
Flat & Round
7C
Concave Washer
Round
8
Body
Flat & Round
9
O-Ring
Flat & Round
10
Seal, Quad-Ring
Flat & Round
Once assembled, select location, drill 1-3/4” Diameter hole, align plate, using a drill
insert the 4 self-piercing sheet metal screws into place to install. Next, align Sensor
Pins with slot on the Body of the Duct Mount and turn to seat. See Figure 14.
Figure 14 Duct Mount Mounting
SCOTT SAFETY
087-0049 REV C
36
CHAPTER 3: INSTALLATION
Connecting the Device
to the Power Supply
and Receiver – 3 Wire
This section describes the installation of the 3 Wire connection (Sourcing and
Sinking) from the VDC Power Supply and a 4-20mA Receiver (for example, Scott
Controllers or other devices capable of measuring 4-20mA inputs) to the device.
For a the 3 Wire connection (without any options), an operating voltage of 10-30
VDC is necessary from the power supply to correctly power the device.
Warning: Ensure Receivers and Power Supplies are not powered when installing wire
to the device. Failure to do so could result in injury or death.
Warning: Ensure the atmosphere is free from combustible and/or toxic gases prior to
starting this procedure.
1 Ensure Receivers and Power Supplies are not powered when installing wire to the
device.
2 Route wires of appropriate size from source through conduit runs into the device
housing. See Table 63, Field Wiring.
Caution: RFI may be generated if wires are not appropriately shielded or share
conduit with other AC power conductors. Protect wires with appropriate shielding
practices to prevent negative equipment performance.
3 Connect Ground Wire to device’s Grounding/Earth Screw on its housing.
To prevent Grounding issues, ensure you have a good Ground/Earth Wire attached to
the housing and back to the Receiver’s Ground.
4 Unscrew the setscrew and Housing Cover, then pull on the LCD PCB/CPU PCB
set, removing it from the four (4) standoffs, to gain access to the lower PCB Stack.
It is not necessary to remove the Wire Ribbon Cable from the upper and lower PCB
Stacks.
5 Connect Positive (+) and Negative (-) leads from 10 to 30VDC Power Supply
wires to TB1 on the Terminal/Relay/MODBUS RS-485 PCB. Specifically, the
Positive (+) connects to Pin2 (+V) and Negative (-) connects to Pin1 (GND) on
TB1.
6 Connect Positive (+) and Negative (-) leads from Receivers) to TB2 on the
Terminal/Relay/MODBUS RS-485 PCB. See Figure 15, Figure 16 for details.
7 Locate SW1 (Isolated/Non-Isolated) on the Power Supply PCB. Place SW1 in the
Down position. See Table 24.
Table 24 Sourcing and Sinking Non-Isolated (SW1) Settings
SW1 ISOLATED/NON-ISOLATED
SW1 SETTINGS
Down Position
SW1 Up= Isloated
SW1 Down= Non-Isolated
8 Locate J3 (WiredHART) on the Power Supply PCB. Place J3 in the correct
position to support your application. See Table 25.
087-0049 REV C
SCOTT SAFETY
37
Installation Checklist
Table 25 WiredHART (J3) Settings
J3 NORMAL/HART
NORMAL
1
3
5
- +
HART
1
3
5
-
J3 SETTINGS
For Normal = Position 3&5 for -/+
For Hart = Position 1&3 for -/+
+
J3 only pertains to the WiredHART PCB.
Figure 15 Connection for 3 Wire Sourcing
SW1 Up= Isloated
SW1 Down= Non-Isolated
NORMAL
1
3
5
- +
NORMAL
Power Supply PCB
1
3
5
ISO
SW1
NON
-
HART
1
3
5
-
+
+
J3
Shield
+
VDC Power
Supply
-
+
10 to 30 VDC
Common
4-20 mA
Output
Receiver
-
+
Receiver
-
Common
ALARM3
NO
C
NC
FAULT
NO
C
NC
LP1
11 + -
+V
LP2 LP3
+ - + - B A
GND
10-30VDC
+
Receiver
-
These are examples. Other wiring configurations are possible and vary based on each
application.
SCOTT SAFETY
087-0049 REV C
38
CHAPTER 3: INSTALLATION
Figure 16 Connection for 3 Wire Sinking
SW1 Up= Isloated
SW1 Down= Non-Isolated
NORMAL
1
3
5
- +
NORMAL
Power Supply PCB
1
3
5
ISO
SW1
NON
-
HART
1
3
5
-
+
+
J3
Shield
+
VDC Power
Supply
+
ALARM3
NO
C
NC
10 to 30 VDC
Common
FAULT
NO
C
NC
4-20 mA
Output
Receiver
-
Common
+
+V
LP1
11 + -
LP2 LP3
+ - + - B A
GND
Receiver
-
10-30VDC
+
Receiver
-
Do not mix Sinking and Sourcing on the same PCB.
9 Insert the lower PCB Stack into the Housing after wiring the terminal blocks.
10 Insert and tighten the four (4) standoffs.
11 Push the LCD PCB/CPU PCB set into the four (4) standoffs.
12 Install Housing Cover, tighten and secure the setscrew.
13 Apply power to Receiver.
087-0049 REV C
SCOTT SAFETY
Installation Checklist
Connecting the Device
to the Power Supply –
2 Wire
39
This section describes the installation of the 2 Wire connection from the VDC Power
Supply and a 4-20mA Receiver (for example, Scott Controllers or other devices
capable of measuring 4-20mA inputs) to the device.
For a the 2 Wire connection (without any options), an operating voltage of 18-30 VDC
is necessary from the power supply to correctly power the device.
Warning: Ensure Receivers and Power Supplies are not powered when installing wire
to the device. Failure to do so could result in injury or death.
Warning: Ensure the atmosphere is free from combustible and/or toxic gases prior to
starting this procedure.
1 Ensure Receivers and Power Supplies are not powered when installing wire to the
device.
2 Route wires of appropriate size from source through conduit runs into the device
housing. See Table 63, Field Wiring.
Caution: RFI may be generated if wires are not appropriately shielded or share
conduit with other AC power conductors. Protect wires with appropriate shielding
practices to prevent negative equipment performance.
3 Connect Ground Wire to device’s Grounding/Earth Screw on its housing.
To prevent Grounding issues, ensure you have a good Ground/Earth Wire attached to
the housing and back to the Receiver’s Ground.
4 Unscrew the setscrew and Housing Cover, then pull on the LCD PCB/CPU PCB
set, removing it from the four (4) standoffs, to gain access to the lower PCB Stack.
It is not necessary to remove the Wire Ribbon Cable from the upper and lower PCB
Stacks.
5 Connect Positive (+) and Negative (-) leads from VDC Power Supply wires to TB1
on the 2 Wire Power Supply PCB. Specifically, the Positive (+) connects to Pin1
(+V) and Negative (-) connects to Pin2 (GND) on TB1. See Figure 17.
The VDC Power Supply requirements are different when using the 2 Wire PCB. See
“Device Specifications” on page 130.
SCOTT SAFETY
087-0049 REV C
40
CHAPTER 3: INSTALLATION
Figure 17 Connection for 2 Wire
+
18 to 30 VDC
-
Common
TB1
+V
GND
Receiver/Power Supply
4-20mA
+V
GND
6 Insert the lower PCB Stack into the Housing after wiring the terminal blocks.
7 Insert and tighten the four (4) standoffs.
8 Push the LCD PCB/CPU PCB set into the four (4) standoffs.
9 Install Housing Cover, tighten and secure the setscrew.
10 Apply power to Receiver.
Connecting the Device
to the Power Supply
and Receiver – 4 Wire
This section describes the installation of the 4 Wire connection (Sourcing and
Sinking) from the VDC Power Supply and a 4-20mA Receiver (for example, Scott
Controllers or other devices capable of measuring 4-20mA inputs) to the device with
Isolated Loop Power.
Warning: Ensure there is no power coming from the Receiver when installing wire to
the device. Failure to do so could result in injury or death.
Warning: Ensure the atmosphere is free from combustible and/or toxic gases prior to
starting this procedure.
1 Ensure Receivers and Power Supplies are not powered when installing wire to the
device.
2 Route wires of appropriate size from source through conduit runs into the device
housing. See Table 63, Field Wiring.
Caution: RFI may be generated if wires are not appropriately shielded or share
conduit with other AC power conductors. Protect wires with appropriate shielding
practices to prevent negative equipment performance.
3 Connect Ground Wire to device’s Grounding/Earth Screw on its housing.
To prevent Grounding issues, ensure you have a good Ground/Earth Wire attached to
the housing and back to the Receiver’s Ground.
4 Unscrew the setscrew and Housing Cover, then pull on the LCD PCB/CPU PCB
set, removing it from the four (4) standoffs, to gain access to the lower PCB Stack.
087-0049 REV C
SCOTT SAFETY
Installation Checklist
41
It is not necessary to remove the Wire Ribbon Cable from the upper and lower PCB
Stacks.
5 Connect Positive (+) and Negative (-) leads from 10 to 30VDC Power Supply
wires to TB1 on the Isolated 4-20mA PCB. Specifically, the Positive (+) connects
to Pin2 (+V) and Negative (-) connects to Pin1 (GND) on TB1.
6 Connect Positive (+) and Negative (-) leads from Receivers) to TB2 on the
Terminal/Relay/MODBUS RS-485 PCB. See Figure 18, Figure 19 for details.
7 Locate SW1 (Isolated/Non-Isolated) on the Power Supply PCB. Place SW1 in the
Up position. See Table 26.
Table 26 Sourcing and Sinking Isolated (SW1) Settings
SW1 ISOLATED/NON-ISOLATED
SW1 SETTINGS
Up Position
SW1 Up= Isloated
SW1 Down= Non-Isolated
8 Locate SW2 (WiredHART Source/Sink) on the Power Supply PCB. Place SW2 in
the correct position to support your application. See Table 27.
SW2 only pertains to the WiredHART PCB.
Table 27 WiredHART (J3) Settings
J3 NORMAL/HART
NORMAL
1
3
5
- +
SCOTT SAFETY
HART
1
3
5
-
J3 SETTINGS
For Normal = Position 3&5 for -/+
For Hart = Position 1&3 for -/+
+
087-0049 REV C
42
CHAPTER 3: INSTALLATION
Figure 18 Connection for 4 Wire Sourcing with Isolated Loop Power Supply
SW1 Up= Isloated
SW1 Down= Non-Isolated
NORMAL
1
3
5
- +
NORMAL
Power Supply PCB
1
3
5
ISO
SW1
NON
-
HART
1
3
5
-
+
+
J3
Shield
+
VDC Power
Supply
+
ALARM3
NO
C
NC
10 to 30 VDC
Common
FAULT
NO
C
NC
4-20 mA
Output
Receiver
-
Common
+V
+
LP1
+ -
LP2 LP3 RS+ - + - B A
GND
10-30VDC
Receiver
-
11
Shield
+
Receiver
-
Loop +
P. S.
- (24VDC)
These are examples. Other wiring configurations are possible and vary based on each
application.
087-0049 REV C
SCOTT SAFETY
Installation Checklist
43
Figure 19 Connection for 4 Wire Sinking with Isolated Loop Power Supply
SW1 Up= Isloated
SW1 Down= Non-Isolated
NORMAL
1
3
5
- +
NORMAL
Power Supply PCB
1
3
5
ISO
SW1
NON
-
HART
1
3
5
-
+
+
J3
Shield
+
VDC Power
Supply
+
ALARM3
NO
C
NC
10 to 30 VDC
Common
FAULT
NO
C
NC
4-20 mA
Output
Receiver
-
Common
+V
+
LP1
+ -
LP2 LP3 RS+ - + - B A
GND
10-30VDC
Receiver
-
11
Shield
+
Receiver
-
+
Loop
P. S.
(24VDC) -
Do not mix Sinking and Sourcing on the same PCB.
9 Insert the lower PCB Stack into the Housing after wiring the terminal blocks.
10 Insert and tighten the four (4) standoffs.
11 Push the LCD PCB/CPU PCB set into the four (4) standoffs.
12 Install Housing Cover, tighten and secure the setscrew.
13 Apply power to Receiver.
SCOTT SAFETY
087-0049 REV C
44
CHAPTER 3: INSTALLATION
Connecting from the
Device to Scott
Receivers
This section provides connections from the device to various Scott Receivers
(Controllers). Use MODBUS 12bit resolution to ensure compatibility with Scott
Receivers. Refer to following applicable sections based on your application. See
“Connecting the Device to the Power Supply and Receiver – 3 Wire” on page 36. See
“Connecting the Device to the Power Supply – 2 Wire” on page 39. See “Connecting
the Device to the Power Supply and Receiver – 4 Wire” on page 40.
Caution: Ensure you remap the MODBUS Registers when retrofitting the device with
an existing Scott Controller that supports MODBUS Registers.
Connecting Relays &
Remote Alarm Reset
This section describes how to connect the Relays and the Remote Alarm Reset. Using
this feature is optional.
The Terminal/Relay/MODBUS RS-485 PCB contains four (4) relays (K1, K2, K3 and
K4) and a Remote Reset.
Ensure you have already made the proper connections prior to connecting the
Terminal/Relay/MODBUS RS-485 PCB. See “Connecting the Device to the Power
Supply and Receiver – 3 Wire” on page 36. See “Connecting from the Device to Scott
Receivers” on page 44.
Warning: Ensure Receivers and Power Supplies are not powered when installing wire
to the device. Failure to do so could result in injury or death.
Warning: Ensure the atmosphere is free from combustible and/or toxic gases prior to
starting this procedure.
1 Ensure Receivers and Power Supplies are not powered when installing wire to the
device.
2 Route wires of appropriate size from source through conduit runs into the device
housing. See Table 63, Field Wiring.
3 Unscrew the setscrew and Housing Cover, then pull on the LCD PCB/CPU PCB
set, removing it from the four (4) standoffs, to gain access to the lower PCB Stack.
It is not necessary to remove the Wire Ribbon Cable from the upper and lower PCB
Stacks.
4 If desired, connect wiring from Receiver equipment to one or more of the four (4)
Relays on the Terminal/Relay/MODBUS RS-485 PCB. Relays are designated
ALARM1 (TB5, K1 for Relay1), ALARM2 (TB6, K2 for Relay2), ALARM3
(TB7, K3 for Relay3) and FAULT (TB8, K4 for Relay4). Each relay has three (3)
Pins for wiring; a Normally Open (NO), a Normally Closed (NC), and a Common
(C). See Figure 20 and Figure 21.
087-0049 REV C
SCOTT SAFETY
Installation Checklist
45
Figure 20 Relay/Alarm Connection Example -Terminal/Relay/MODBUS PCB
ALARM1
NC
C
NO
ALARM2
NC
C
NO
RS-485
A S B A 1
RMT
ACK
GND
Yellow Lamp
(+)
Power
(-)
Red Lamp
TERM. NOT TERM.
Figure 21 Relays/Remote Alarm Reset Connections -Terminal/Relay/MODBUS PCB
ALARM3
NO
C
NC
ALARM1
NC
C
NO
FAULT
NO
C
NC
ALARM2
NC
C
NO
+V
LP1
11 + -
DUP
LP2 LP3 RS-485 RS-485
+ - + - B A S B A 1
GND
10-30VDC
Remote
Alarm Reset
RMT
ACK
GND
TERM. NOT TERM.
Remote
Reset PB
Caution: Contacts are rated for resistive loads; alarm relays have dry contacts (form
C) and power must be supplied from an external source. Failure to do so could result
in failure of alarm relays.
5 If desired, connect a Remote Switch to TB3 on the Terminal/Relay/MODBUS
RS-485 PCB. This feature allows you to shut off and reset a sounding Remote
Alarm. See Figure 21.
Warning: External wiring to TB3 must be shielded and protected from noise spikes to
prevent a false alarm reset condition. Failure to do so could result in injury or death if
a false alarm reset condition occurs.
6 Insert the lower PCB Stack into the Housing after wiring the terminal blocks.
7 Insert and tighten the four (4) standoffs.
8 Push the LCD PCB/CPU PCB set into the four (4) standoffs.
9 Install Housing Cover, tighten and secure the setscrew.
SCOTT SAFETY
087-0049 REV C
46
CHAPTER 3: INSTALLATION
Connecting MODBUS
RS-485
This section describes how to connect MODBUS RS-485 to multiple devices to use
the MODBUS RS-485 Communication Protocol. Using this feature is optional.
MODBUS RS-485 connection allows a MODBUS Network connection that is used to
connect several devices to a single Receiver for monitoring purposes. It supports up to
247 addressed RTUs. Up to 32 RTUs per loop. Each connected device becomes a
Remote Terminal Unit (RTU) and requires a unique RTU address.
Consult receiver equipment instructions for information on wiring in addition to what
is provided in this manual as various equipment may have additional specific
requirements.
Warning: Ensure Receivers and Power Supplies are not powered when installing wire
to the device. Failure to do so could result in injury or death.
Warning: Ensure the atmosphere is free from combustible and/or toxic gases prior to
starting this procedure.
1 Ensure Receivers and Power Supplies are not powered when installing wire to the
device.
2 Determine if other devices (RTUs) are to be wired or if the current device (RTU) is
the last device being wired on the MODBUS Network.
3 Unscrew the setscrew and Housing Cover, then pull on the LCD PCB/CPU PCB
set, removing it from the four (4) standoffs, to gain access to the lower PCB Stack.
It is not necessary to remove the Wire Ribbon Cable from the upper and lower PCB
Stacks.
4 Set or verify J3 or J4 on the Terminal/Relay/MODBUS RS-485 PCB as follows:
a For a device at the end of the network with no other RTUs to be wired, install
the Terminating Resistor into J3.
b For device with other RTUs to be wired from the current device, install the
Terminating Resistor into J4. See Table 28.
Table 28 Jumper (J1) Settings for the Device
DEVICE’S POSITION ON THE MODBUS NETWORK
JUMPER SETTING
Device is the last RTU
J3 (Termination)
Device is NOT the last RTU
J4 (Not Terminated)
5 Connect your MODBUS Master input wire signals at TB2 Pin1 (A) and TB2 Pin2
(B) on the Terminal/Relay/MODBUS RS-485 PCB.
6 Cable shielding must connect to TB2 Pin3 (S).
7 Route Output Wiring to next RTU from TB2 Pin4 (A) and TB2 Pin5 (B). See
Figure 22.
8 For MODBUS connections to Scott Controllers, See “Connecting from the Device
to Scott Receivers” on page 44.
087-0049 REV C
SCOTT SAFETY
Installation Checklist
47
TB2 Pin1 and Pin4 are connected internally as are TB2 Pins2 and Pin5.
Figure 22 MODBUS Connections - Terminal/Relay/MODBUS RS-485 PCB
ALARM3
NO
C
NC
ALARM1
NC
C
NO
FAULT
NO
C
NC
ALARM2
NC
C
NO
+V
LP1
11 + -
DUP
LP2 LP3 RS-485 RS-485
+ - + - B A S B A 1
RMT
ACK
GND
GND
TERM. NOT TERM.
10-30VDC
RS-485 MODBUS
Master
A B
J3= For Last Node Only
J4= For Node 1, 2, 3, ...
Next To Last Node
To next RTU
1
2
9 Insert the lower PCB Stack into the Housing after wiring the terminal blocks.
10 Insert and tighten the four (4) standoffs.
11 Push the LCD PCB/CPU PCB set into the four (4) standoffs.
SCOTT SAFETY
087-0049 REV C
48
CHAPTER 3: INSTALLATION
12 Install Housing Cover, tighten and secure the setscrew.
13 When powered up, assign unique RTU address to each of the devices on the
MODBUS Network using the MODBUS Setup menu. See “Configuring the Setup
Menu” on page 62.
Installing the Optional
Communication
Expansion Card (CEC)
PCB
This section describes how to install an Optional Communication Expansion Card
(CEC) PCB when required.
The Optional Communication Expansion (CEC) PCB is automatically configured on
installation.
Warning: Ensure Receivers and Power Supplies are not powered when installing
PCB into the device. Failure to do so could result in injury or death.
Warning: Ensure the atmosphere is free from combustible and/or toxic gases prior to
starting this procedure.
1 Ensure Receivers and Power Supplies are not powered when installing wire to the
device.
2 Unscrew the setscrew and Housing Cover, then pull on the LCD PCB/CPU PCB
set, removing it from the four (4) standoffs.
3 Connect the Optional Communication Expansion Card (CEC) PCB’s female
20-pin connector (S3) into the male 20-pin connector (P3) on the CPU PCB. See
Figure 23.
4 Secure the Optional Communication Expansion Card (CEC) PCB using the three
(3) screws.
Figure 23 Optional Communication Expansion Card (CEC) PCB Connection
Ensure all related Switches and Jumpers are properly set on other applicable PCB.
087-0049 REV C
SCOTT SAFETY
Installation Checklist
49
5 Push the LCD PCB/CPU PCB and Optional Communication Expansion Card
(CEC) PCB set into the four (4) standoffs.
6 Install Housing Cover, tighten and secure the setscrew.
7 Apply power to Receiver.
Connecting the
Sensor Head
This section describes how to connect Sensor Head’s 6-Pin Plug Connector onto the
Intrinsically Safe Barrier PCB of the device.
Warning: Ensure Receivers and Power Supplies are not powered when installing wire
to the device. Failure to do so could result in injury or death.
Warning: Ensure the atmosphere is free from combustible and/or toxic gases prior to
starting this procedure.
1 Ensure Receivers and Power Supplies are not powered when installing wire to the
device.
2 Unscrew the setscrew and Housing Cover, then pull on the LCD PCB/CPU PCB
set, removing it from the four (4) standoffs, to gain access to the lower PCB Stack.
It is not necessary to remove the Wire Ribbon Cable from the upper and lower PCB
Stacks.
3 Loosen and remove the four (4) standoffs.
4 Remove the entire PCB Stack for easy wiring to terminal blocks.
5 Remove the two (2) Phillip Head screws to the Terminal Block Cover to access the
6-Pin Plug Connector (TB1).
6 Insert the 6-wires from the Meridian Detector Body Assembly through the bottom
of the threaded hole of the device.
7 Insert the 6-wires into the 6-Pin Plug Connector(TB1) 1, 2, 3, 4, 5 and 6
respectively, Green (A), Yellow (B), Red (3.3V), Black (GND), Blue (GND), and
White (Vadj). See Figure 24.
Light blue terminal blocks indicate Intrinsically Safe circuits. Tighten plug retention
screws.
SCOTT SAFETY
087-0049 REV C
50
CHAPTER 3: INSTALLATION
Figure 24 Meridian Detector Body Assembly Connection
1
TB1
2 3 4 5 6
White (Vadj) 6
Blue (GND)
5
Black (GND) 4
Red (+3.3V)
3
Yellow (B)
2
Green (A)
1
To Universal Sensor
8 Replace the Terminal Block Cover using the two (2) Phillip Head screws.
9 Insert the entire PCB Stack into the Housing after wiring the terminal blocks.
10 Insert and tighten the four (4) standoffs.
11 Push the LCD PCB/CPU PCB set into the four (4) standoffs.
12 Install Housing Cover, tighten and secure the setscrew.
Installing/Replacing a
Sensor
This section describes how to initially install/replace a Sensor.
The Sensor does not ship installed in to the device. Additionally, it should be replaced
as the need arises.
Sensors originally ordered with the device are pre-configured and only require
calibration.
Warning: To avoid the possible need of re-calibrating a calibrated sensor, verify that
the device date and time and correct prior to accepting sensors).
Warning: The device is not actively monitoring target gases when power is removed.
Verify atmosphere is safe or monitor atmosphere with another device while installing
a new sensor to prevent risk of injury or death.
Removing power is not required when installing/replacing the Sensor. Follow local
procedures and safety regulations.
087-0049 REV C
SCOTT SAFETY
Installation Checklist
51
Warning: Alarm Settings are stored in the sensor. Changing sensor changes Alarm
Settings. Verify prior to proceeding.
Removing Sensors) creates a Fault condition (FLT LED blinks, error message
alternates between System Fault and Sensor Offline on the LCD). To avoid this fault
condition, using the Menu, enter password, take sensors) offline and save the change,
then remove the sensors). The device places the sensors) back online and begins its
warm-up time.
1 Ensure the device has power.
2 Using the Menu, set Offline Sensor to the number of Sensors to be connected to the
Device (1, 2 or 3) to Yes.
3 Set Sensors Enable to the number of Sensors to be connected to the Device (1, 2 or
3).
4 Loosen and remove the Meridian End Cap.
Some E-Chem Sensors ship equipped with an E-Chem Sensor Bias Assembly. This
keeps the E-Chem Sensor warm to reduce warm up time at installation. It is not
reusable.
5 Remove the E-Chem Sensor Bias Module from the E-Chem Sensor, if applicable.
Warning: To prevent risk of injury or death, do not take the E-Chem Sensor Bias
Module into a potentially explosive atmosphere.
Warning: The order that the sensors) are installed is important. The first sensor
physically inserted becomes Sensor1 in the system, the second physically inserted
becomes Sensor2 and the third physically inserted becomes Sensor3. You must
conform to the sensor type rules per sensor position in the system configuration as
outlined in Table 17. When sensor configuration rules are violated or are attempted,
the device automatically goes into an immediate fault mode. This is an illegal
Configuration (Not Intrinsically Safe). Failure to adhere to the correct sensor
mapping could result in injury or death.
6 Insert Sensor1 into the Sensor Head, twist until it snaps into place and
acknowledge via LCD. It self aligns in the Sensor Head. See Figure 25.
SCOTT SAFETY
087-0049 REV C
52
CHAPTER 3: INSTALLATION
Figure 25 Meridian Detector Body Assembly
Sensor Head
Sensor
End Cap
7 The Gas Type, Sensor #1, displays on the LCD. Repeat for others Sensors.
When a different Sensor is detected, the LCD displays the option to Reject or Accept.
If the selection is an Intrinsically Safe violation, All LEDs flash and the LCD displays
I.S. VIOLATION. CORRECT, HIT ENTER KEY TO REBOOT. Remove the violating
sensor prior to rebooting.
8 Replace the Meridian End Cap and secure the setscrew.
Caution: Meridian End Cap must be attached to protect the device from ingress from
water or dust. Ensure all sensors) are installed prior to operation.Ensure Meridian
End Cap is installed prior to operation. Only use Meridian End Cap P/N 096-3437-1
or 096-3437-2.
9 Allow a few minutes for the Sensor to warm up. The warm up time depends on the
Sensor type. During warm-up the loop current is setup to inhibit automatically.
To remove Sensor, remove Meridian End Cap and then just pull it straight down. See
Figure 25.
Do not attempt to service Sensors in the field. If service is needed, contact the factory.
See “Technical Service” on page 158.
087-0049 REV C
SCOTT SAFETY
087-0049
Chapter 4
Rev C
CONFIGURATION AND SETUP
Chapter Overview
This chapter covers the following topics:
•
•
•
•
•
SCOTT SAFETY
Configuring the Device
Device Configuration Examples
Configuration Defaults
Using the MODBUS Registers
Using the TXCommands
087-0049 REV C
54
CHAPTER 4: CONFIGURATION AND SETUP
Configuring the
Device
This section covers the various configuration parameters for the device.
Warning: Configuration should be performed by trained individuals who have read
this manual and understand the calibration procedures. Failure to follow these
instructions may result in serious injury or death.
Warning: When the primary device is off line, ensure you have another online device
to actively detect gases. The device may be off line due to such activities, like but not
limited to, calibration, installation, maintenance, troubleshooting, configuration,
wiring and other activities.
Warning: When settings are changed, ensure those changes are communicated to all
affected personnel.
Warning: Before you begin, read and understand the MSDS and warning labels for
the calibration gases. Failure to do so may result in serious injury or death.
All device configuration variables are selected via the menu screens and those
variables are stored in its Non-Volatile Memory (NV-EEPROM). Many menu items
contain default values from the factory and require changes to better match your
applicable application.
A device may be configured using the supplied magnet and the four (4) navigation
keys in approximately 5-10 minutes. To enter the Configuration Menu, press the ENT
key. See “Operating the Device” on page 102.
Figure 26 and Figure 27 outlines the entire configuration menu structure. The
configuration menu structure of a device is divided into six (6) menu trees. They are:
Information (see Figure 28), Setup (see Figure 29), Calibration (see Figure 30),
Datalog (see Figure 31), Display (see Figure 32) and User Access (see Figure 33).
The menu screens in this chapter are based on the device’s Firmware. Version 1.12. If
your device has a different firmware version, then the menu screens will vary
somewhat.
User Access Levels
This section covers the user access levels.
These are the levels and their associated privileges.
•
No User Access:
– Allows viewing of transmitter information
•
Operator Access – OA (factory default is 0000):
– Allows viewing of transmitter information
– Allows Zeroing and Spanning the sensors
•
System Manager Access – SMA (factory default is 0000):
– Allows viewing of transmitter information
– Allows Zeroing and Spanning the sensors
087-0049 REV C
SCOTT SAFETY
Configuring the Device
55
– Allows Changing system parameters
User Access level determines the display of some parameters.
Access to certain value entry menus and individual parameters are restricted and
denoted by RO (Read Only) located in the top left hand corner of the menu screens.
They require a user access. Refer to Figure 26, Figure 27, and Table 30 to Table 37
SCOTT SAFETY
087-0049 REV C
56
CHAPTER 4: CONFIGURATION AND SETUP
Figure 26 Configuration Menu Structure - (1 of 2)
MAIN MENU
INFORMATION
SETUP
CALIBRATION
DATALOG
DISPLAY
USER ACCESS
>
>
>
>
>
>
INFORMATION
MERIDIAN INFO
CEC X INFO
SENSOR X INFO
MERIDIAN INFO
NAME
: TankRm#A12
SN
: XFRE1235
MODEL : 511CL
UPTIME : 271171
REV
: 1.0.2
>
>
>
CEC X INFO
TYPE
: NOT INSTALL
HW/FW :
TX/CEC : XXXXh
STATUS : XXXXXXXXh
TX
: XXXXXXXXXX
RX
: XXXXXXXXXX
SENSOR X INFO
GENERAL
LIVE
CAL DATES
CAL INFO
>
>
>
>
SENSOR X GEN
SN
: 115Ayyww
GAS TYP : H2S
GAS UNT : PPM
MODEL # : ECHEM
TYPE
:1
UPTIME : 270555
SENSOR X LIVE
GASCONC : 0.0
VOLTS
: 2.758
TEMP(C)
: 19.1
GAS A/D
: 20
SENSOR X DATES
MFG DATE : 00/00/00
INST DATE : 00/00/00
PRI DATE
: 00/00/00
CUR DATE
: 00/00/00
CAL TIME
: 16:21
SENSOR 1 CAL
CAL FACTOR : 0.000
CAL TEMP
: 22
ZERO
:21
SEN LIFE
:100%
CAL REQD: YES
SETUP MENU
MERIDIAN SETUP
>
SENSOR 1 SETUP
>
CHANGE ACCESS CODE >
BACKUP/RESTORE
>
MERIDIAN SETUP
SYSTEM
MODBUS
ALARMS
CURRENT LOOPS
GENERAL
SENSOR 1 SETUP
>
GENERAL
>
CALIBRATION
>
ALARMS
>
EDITOR
USER ENTRY
OPERATOR :0000
SYSTEM
:0000
RO SYSTEM ENABLES
SENSORS ENABLE :3
OFFLINE SENSOR1 :NO
OFFLINE SENSOR2 :NO
OFFLINE SENSOR3 :NO
USER LEVEL :0
>
>
>
>
>
RO
MODBUS
MBADDRESS : 1
MBBAUDRATE : DIS
MBPARITY
: NONE
MBSTOPBIT
:1
RO
GENERAL
H2S
GAS RANGE
:50
DEAD BAND%FS :0
DISPLAY NEG
:NO
WARM UP(SECS) :5
GAS UNITS
:PPM
ALARMS SETUP
RO CURRENT LOOP
SENSOR
:1
4ma OFFSET :0
20ma OFFSET :0
INHIBIT
:3.8
RO
CAL SETUP
CALGAS CONC :25
PERIOD ( DAYS) :30
SPAN (SECS)
:300
PURGE (SECS)
:60
DECIMAL
:0
K FACTOR
:1.00
GENERAL
TIME/DATE
EDITOR
REGIONAL
RESTART MERIDIAN
RO ALARM 1 SETUP
ALRM 1 SET
:10
ALRM 1 RESET :9
ALRM 2 SET
:25
ALRM 2 RESET :22
ALRM 3 SET
:50
ALRM 3 RESET :45
RO SENSOR EDITOR
NAME :TankRmSen#25
GAS 1 :H2S
GAS 2 :
BACKUP/RESTORE
BACKUP SETTINGS >
RESTORE SETTINGS>
RESTORE FACTORY >
PERFORM BACKUP?
NO
YES
PERFORM RESTORE?
NO
YES
RESTORE FACTORY?
NO
087-0049 REV C
YES
RO ALARM SETUP
LOGIC
: LATCH
RELAY
: FSAFE
OFF DLY (M) : 0
ALARM 1
ALARM 2
ALARM 3
SAVING
CANCELLED
RESTORING
CANCELLED
RESTORING
>
>
>
>
TIME:
15 : 36: 12
DATE:
08 / 05/ 11
EXIT
NEXT
TRANS TEXT EDITOR
NAME: TankRm#A12
LAT : +00.00000
LONG: +000.00000
REGIONAL
DAYLIGHT SAVING: NO
DATE FORMAT:MDY
LANGUAGES: EN
GENERAL
TIME/DATE
EDITOR
REGIONAL
RESTART MERIDIAN
ESC
ENTER
CANCELLED
SCOTT SAFETY
57
Configuring the Device
Figure 27 Configuration Menu Structure - (2 of 2)
MAIN MENU
INFORMATION
SETUP
CALIBRATION
DATALOG
DISPLAY
USER ACCESS
>
>
>
>
>
>
USER ACCESS
REQUIRED
FOR
CALIBRATION
SEN 1 CALIBRATION
APPLY ZERO GAS
>
ZERO CAL
>
SPAN CAL
CAL GAS CONC =50.0 >
SENSOR LIFE
CAL FACTOR
0
=100%
=0.411
553
ZERO
SET
PPM
CANCELLED
CANCEL
30
APPLY 10.0 GAS
553
100 PPM
CANCEL
30
GAS CAL SET
SPAN
SET
REMOVE
GAS
CANCELLED
CAL
ERROR
SAVING
50
ENTER WHEN FINISHED
DATALOG MENU
>
SHOW LOG
>
CLEAR LOG
12 09 26 EVENT LOG
______________________
0245
PW 0 ACCEPTED
0246
A1 OS110.100
0248
A1 FS18.9000
0250
PW 0 FAILED
RO DISPLAY
POWER SAVE : DISABLE
CONTRAST : 5
HEATER%
: 30
BACKLIGHT : 90
ENTER
OPERATOR
ENTER USER
>
OPERATOR
SYSTEM MANAGER >
>
FACTORY
0000
ESC
ACCEPTED
MAIN MENU
>
INFORMATION
>
SETUP
>
CALIBRATION
>
DATALOG
>
DISPLAY
ACCESS-OPER ATOR >
ACCEPTED
MAIN MENU
INFORMATION
SETUP
CALIBRATION
DATALOG
DISPLAY
ACCESS-SYS MGMT
ENTER
ENTER
SYSTEM MANAGER
0000
ESC
ENTER
ENTER
FACTORY
0000
ESC
SCOTT SAFETY
ENTER
ACCEPTED
MAIN MENU
INFORMATION
SETUP
CALIBRATION
DATALOG
DISPLAY
FACTORY
>
>
>
>
>
>
>
>
>
>
>
>
087-0049 REV C
58
CHAPTER 4: CONFIGURATION AND SETUP
Using the Information
Menu
This section covers the Information Menu.
Use the magnetic keys to navigate through the menu structure as necessary. See
Figure 28. The parameters are detailed in Table 29.
Figure 28 Information Menu Structure
MAIN MENU
INFORMATION
SETUP
CALIBRATION
DATALOG
DISPLAY
USER ACCESS
>
>
>
>
>
>
INFORMATION
MERIDIAN INFO
CEC X INFO
SENSOR X INFO
MERIDIAN INFO
NAME
: TankRm#A12
SN
: XFRE1235
MODEL : 511CL
UPTIME : 271171
REV
: 1.0.4
>
>
>
CEC X INFO
TYPE
: NOT INSTALL
HW/FW :
TX/CEC : XXXXh
STATUS : XXXXXXXXh
TX
: XXXXXXXXXX
RX
: XXXXXXXXXX
SENSOR X INFO
GENERAL
LIVE
CAL DATES
CAL INFO
SENSOR X GEN
SN
: 115Ayyww
GAS TYP : H2S
GAS UNT : PPM
MODEL # : ECHEM
TYPE
:1
UPTIME : 270555
>
>
>
>
SENSOR X LIVE
GASCONC : 0.0
VOLTS
: 2.758
TEMP(C)
: 19.1
GAS A/D
: 20
SENSOR X DATES
MFG DATE : 00/00/00
INST DATE : 00/00/00
PRI DATE
: 00/00/00
CUR DATE
: 00/00/00
CAL TIME
: 16:21
SENSOR X CAL
CAL FACTOR : 0.000
CAL TEMP
: 22
ZERO
:21
SEN LIFE
:100%
CAL REQD
: YES
Table 29 Information Menu Parameters
ITEM
Tx Information
087-0049 REV C
SUB-ITEM
DESCRIPTION*
Name
Displays the monitored point by your tag # or other
familiar terminology.
SN
Displays the Serial Number.
Model
Displays the Model Number.
Uptime
Displays the power on time in Seconds for up to 4 billion.
Revision
Displays the Revision of the Firmware.
SCOTT SAFETY
Configuring the Device
59
Table 29 Information Menu Parameters
ITEM
SUB-ITEM
DESCRIPTION*
CEC X Info
Type
(Communication
Extension Card)
Information
HW/FW
The CEC_Type
If Optional Communication PCB (CEC) is not installed in
device, then Type displays “Not Installed”.
TX/CEC
This is a bit defined status of the TX/CEC interface based
on this table. This table is defined in the TX MB register
named CECStatus (40142).
The CEC HW/FW
This is a combined CEC hardware and firmware bytes.
CECStatus
Lower byte:CEC1Status
Upper byte:Reserved
If 0=No CEC detected
bit:
0=CEC EEPROM detected
1=CEC uP comms up
2=CEC requested DataBase
3=DB download complete
4=DB mismatch
5=DB CRC error
6=Protocol error
7=Undefined error
SCOTT SAFETY
087-0049 REV C
60
CHAPTER 4: CONFIGURATION AND SETUP
Table 29 Information Menu Parameters
ITEM
SUB-ITEM
CEC X Info
Status
(Communication
Extension Card)
Information
(Continued)
DESCRIPTION*
This is the 4byte status returned by the CEC.
Device Status (byte):
bit0=Busy
bit1=Hardware Error
bit2=NVMEMORY at defaults
bit3=Spare
bit4=Spare
bit5=Spare
bit6=Lock Status
bit7=Initialize Complete
Network Status (byte):
bit0=Ready to Communicate
bit1=Spare
bit2=Spare
bit3=Spare
bit4=Spare
bit5-Spare
bit6=Connection Status (States & Status below)
bit7=Connection Status (States & Status below)
States & Status of bits6 & 7:
bit6&7state=0,0 Status=Reserved
bit6&7state=1,0 Status=Discovery:Field device is looking
for other neighbors.
bit6&7state=0,1 Status=Joining: Field device is in the join
process (typically 30S to 5Min)
bit6&7state=1,1 Status=Operational: Field device has
established communications.
Device Information (High byte):
Bits are undefined, thus always 00.
Device Information (Low byte):
Bits are undefined, thus always 00.
087-0049 REV C
TX
This is a counter that the transmitter increments to count
the bytes sent to the CEC. It is the interface between the
transmitter and the CEC.
RX
This is a counter that the transmitter increments to count
the bytes received by the CEC. It is the interface between
the transmitter and the CEC.
SCOTT SAFETY
Configuring the Device
61
Table 29 Information Menu Parameters
ITEM
Sensor X
General
Sensor X Live
Sensor X Cal
Dates
SUB-ITEM
DESCRIPTION*
SN
Displays the Serial Number.
GasType
Displays the Gas Type.
Gas Units
Displays Gas Units. %, %LEL, PPB, or PPM.
Model#
Displays the Model Number.
Type
Displays the Sensor’s technology type:
1=E-Chem
2=IR
3=Cat Bead
4=MOS
Uptime
Displays the power on time in Seconds for up to 4 billion.
Counter resets after Sensor is removed.
GasConc
Displays gas concentration from the sensor. Displays with
or without decimal points as appropriate.
Volts
Displays the Sensor Voltage.
Temp(C)
Displays the Sensor Temperature in °C.
Gas A/D
Displays the A/D output, the raw count.
Mfg Date
Displays manufactured date. Read from the Sensor.
Install Date
Displays installation date. Read from the Sensor.
Prior Date
Displays prior calibration date.
Current Date Displays the most recent calibration date.
Sensor X Cal
Info
Cal Time
Displays the last Cal Time.
Cal Factor
Displays the resolution of the Sensor.
Cal Temp
Displays the temperature (°C) of Sensor when calibrated.
Zero
Displays A/D reading when zeroed.
Sen Life
Display the sensor current life as %.
Cal Required Displays Yes or No.
* No user access required to access these particular parameters.
SCOTT SAFETY
087-0049 REV C
62
CHAPTER 4: CONFIGURATION AND SETUP
Configuring the Setup
Menu
This section covers the Setup Menu.
Use the magnetic keys to navigate through the menu structure as necessary. See
Figure 29. The parameters are detailed in Table 30, Table 31, Table 32 and Table 33.
Figure 29 Setup Menu Structure
MAIN MENU
INFORMATION
SETUP
CALIBRATION
DATALOG
DISPLAY
USER ACCESS
>
>
>
>
>
>
SETUP MENU
MERIDIAN SETUP
>
SENSOR 1 SETUP
>
CHANGE ACCESS CODE >
BACKUP/RESTORE
>
MERIDIAN SETUP
SYSTEM
MODBUS
ALARMS
CURRENT LOOPS
GENERAL
RO SYSTEM ENABLES
SENSORS ENABLE :1
OFFLINE SENSOR1 :NO
OFFLINE SENSOR2 :NO
OFFLINE SENSOR3 :NO
USER LEVEL :0
>
>
>
>
>
RO
MODBUS
MBADDRESS : 1
MBBAUDRATE : DIS
MBPARITY
: NONE
MBSTOPBIT
:1
RO
GENERAL
H2S
GAS RANGE
:50
DEAD BAND%FS :0
DISPLAY NEG
:NO
WARM UP(SECS) :5
GAS UNITS
:PPM
SENSOR 1 SETUP
>
GENERAL
>
CALIBRATION
>
ALARMS
>
EDITOR
RO CURRENT LOOP
SENSOR
:1
4ma OFFSET :0
20ma OFFSET :0
INHIBIT (ALL) :3.8
RO
CAL SETUP
CALGAS CONC :25
PERIOD ( DAYS) :30
SPAN (SECS)
:300
PURGE (SECS)
:60
DECIMAL
:0
K FACTOR
:1.00
ACCESS ENTRY
OPERATOR :0000
SYSTEM
:0000
GENERAL
TIME/DATE
EDITOR
REGIONAL
RESTART MERIDIAN
RO ALARM 1 SETUP
ALRM 1 SET
:10
ALRM 1 RESET : 9
ALRM 2 SET
:25
ALRM 2 RESET :22
ALRM 3 SET
:50
ALRM 3 RESET :45
PERFORM BACKUP?
NO
PERFORM RESTORE?
NO
087-0049 REV C
YES
YES
SAVING
CANCELLED
RESTORING
CANCELLED
RESTORE FACTORY?
RESTORING
NO
CANCELLED
YES
>
>
>
>
TIME:
15 : 36: 12
DATE:
08 / 05/ 11
EXIT
RO SENSOR EDITOR
NAME :TankRmSen#25
GAS 1 :H2S
GAS 2 :
BACKUP/RESTORE
BACKUP SETTINGS >
RESTORE SETTINGS >
RESTORE FACTORY >
RO ALARM SETUP
LOGIC
: LATCH
RELAY
: FSAFE
OFF DLY (M) : 0
ALARMS SETUP
ALARM 1
ALARM 2
ALARM 3
NEXT
TRANS TEXT EDITOR
NAME: TankRm#A12
LAT : +00.00000
LONG: +000.00000
REGIONAL
DAYLIGHT SAVING: NO
DATE FORMAT: MDY
LANGUAGES: EN
GENERAL
TIME/DATE
EDITOR
REGIONAL
RESTART MERIDIAN
ESC
ENTER
SCOTT SAFETY
63
Configuring the Device
Table 30 Transmitter Setup Menu Parameters
ITEM
System
SUB-ITEM
Sensors Enable
DESCRIPTION
Enables 1, 2 or 3 sensors within the system.
OA
SMA
†
Offline SensorX No – Allows that specific Sensor to remain
†
online.
Yes – Takes that specific Sensor Offline.
Offline may be used to prevent an alarm when
removing a sensor.
Modbus
SCOTT SAFETY
User Level
Sets the device’s Minimum/Default Access
Level. This setting is used during power up,
after power failures and after 5 minutes while
using a higher user access level.
Select from:
0, No Access = Allows viewing of transmitter
information.
1, Operator Access (OA) = Allows viewing of
transmitter information, Zeroing and Spanning
the Sensors.
2, System Manager Access (SMA) = Allows
viewing of transmitter information, Zeroing
and Spanning the Sensors, and Changing
system parameters.
See Table 37.
MBAddress
Used to map RTUs.
Each device is assigned its own RTU address.
Address range is 1 to 247. Up to 32 RTUs per
loop are supported.
Note: Each device must have its own RTU
Address while communicating on the same
two (2) wire cable to prevent bus conflicts with
Receiving Equipment.
Default= 0
†
MBBaudRate
Used to communicate with RTUs.
Select from: 9600, 19200, DISABLED
†
MBParity
Used to communicate with RTUs.
Select from: Even, Odd, None
†
MBStopBit
Used to communicate with RTUs.
Select from: 0, 1, 2
†
087-0049 REV C
64
CHAPTER 4: CONFIGURATION AND SETUP
Table 30 Transmitter Setup Menu Parameters
ITEM
Alarms
Current
Loops
SUB-ITEM
DESCRIPTION
OA
SMA
Logic
Latch – Causes the alarm to remain active even
after the condition is gone and only reset when
acknowledged via one of these three (3)
methods: MODBUS, user input via the four (4)
Keys, or Remote Acknowledge Reset Button.
No Latch – The alarm is active only while the
condition exists. The alarm clears after the
condition passes.
†
Relay
Non-Failsafe – The relay energizes during
alarm and de-energizes with no alarm.
Failsafe – The relay de-energizes during alarm
and energizes with no alarm. This is useful for
signaling alarm when device power is lost. K4
is a FAULT alarm and is always failsafe.
For example, in normal mode, power is on, and
the alarm is off. In fail mode, power is off, and
alarm is on.
†
Off Delay(M)
Allows entering a delay before clearing an
alarm after the alarm condition is gone. This is
useful for continuing an alarm function, such
as operation of an exhaust fan, for a period of
time after the alarm condition clears.
Range 0 to 120.
†
Sensor X
Selects the Sensor.
Range 1 to 3
4mA Offset
Allows adjustments to the Current Loop counts
of the Sensor.
Range 0 to 127; 0 to -128.
Note: If necessary, See “Trimming the
†
Allows adjustments to the Current Loop counts
of the Sensor.
Range 0 to 127; 0 to -128.
Note: If necessary, See “Trimming the
†
Takes the 4-20mA signal and adjusts it during
Inhibit for either individual Sensor or the entire
device.
Default= 3.8mA
Range 3.8 to 24mA in .1mA steps
†
†
4-20mA Loop” on page 119.
20mA Offset
4-20mA Loop” on page 119.
Inhibit (ALL)
087-0049 REV C
SCOTT SAFETY
65
Configuring the Device
Table 30 Transmitter Setup Menu Parameters
ITEM
General
SUB-ITEM
DESCRIPTION
OA
Time/Date
Allows editing the Time and Date settings.
N/A
Time in Military format and date is mm/dd/yy
format.
Editor
Name – An editable 16 ASCII charter text
String. Typically used to identify the
monitored point by your tag # or other familiar
terminology.
Lat – Allows entry of degrees and fraction of
degrees.
Long – Allows entry of degrees and fraction of
degrees.
Regional
Daylight Savings – Select Yes or No.
Date Format – Select MDY, DMY or YMD.
Languages – Select from list provided.
Restart Meridian Allows the reboot of the device. Select Esc or
Enter.
SMA
†
†
†
† Indicates the minimum User Access Level required to access this particular parameter.
SCOTT SAFETY
087-0049 REV C
66
CHAPTER 4: CONFIGURATION AND SETUP
Table 31 Sensor X Setup Menu Parameters
ITEM
SUB-ITEM
General Gas Type
DESCRIPTION
OA
SMA
Displays Gas Type based on the installed
Sensor.
Note: Only IR-Combustible sensors may
be changed. Selection is limited per
sensor.The Combustible IR Sensor
(096-3473-56) allows the selection of
diffeternt target gases. See “Selecting the
**
Current gas range. Displays on LCD. Also
used to change the sensor’s gas range for
applicable sensor.
Range varies based on installed Sensor.
Note: Changing a sensors Gas range
automatically changes its associated Set
and Reset values. Therefore, ensure you
verify these settings after changing its Gas
Range. See “Changing the E-Chem
†
Allows forcing low values to continue to
read zero. This is useful when there are
small amounts of background gases that
cause fluctuating readouts above zero. The
highest amount of deadband allowed is
5%. 0% FS= 0mA output.
Range 0 to 5.
†
DisplayNegative Yes – Select to display negative gas
monitor values.
No – Select not to display negative
monitor values. Causes negative values to
read the (0%) value in data displays.
†
WarmUp (SECS, Time delay set to prevent unwanted alarm
MIN, HRS)
trips while Sensor is warming up.
Ranges 10, 20, 30, 40, 50S; 1 to 59M; 1 to
180 Hrs
†
Combustible IR Sensor’s Target Gas”
on page 116.
GasRange
Sensor’s Range” on page 116.
DeadBand %FS
Gas Units
087-0049 REV C
Select from %, %LEL, PPB, or PPM.
N/A
SCOTT SAFETY
Configuring the Device
67
Table 31 Sensor X Setup Menu Parameters
ITEM
Cal
SUB-ITEM
DESCRIPTION
OA
SMA
CalGasConc
Enter value for targeted gas. Value found
on target gas cylinder. Accepts either
%Volume, PPM, PPB or %LEL. For
example, for Methane target gas, label
indicates 2.5% (50%LEL).
Range 0 to 100% of sensor range.
†
Period(DAYS)
Notifies when Calibration is needed.
Range 0 to 1024.
†
Span(SECS)
Prevents activation of alarm relays, faults
and holding loop outputs while performing
a Span Calibration.
Range 0 to 1024
†
Purge(SECS)
Enter the amount of time to allow the Span
Gas to clear.
Range 0 to 1024.
†
Decimal
Number of decimal places in gas reading
shown on LCD.
Range 0, 1, or 2.
Note: Range varies based on the installed
sensor’s range.
K Factor
Enter values for Combustible Cat-Bead
Sensors.
Default= 1.00
Range 0.10 to 1.50
See “Combustible Cat-Bead Sensor
†
†
K-Factors” on page 143.
SCOTT SAFETY
087-0049 REV C
68
CHAPTER 4: CONFIGURATION AND SETUP
Table 31 Sensor X Setup Menu Parameters
ITEM
Alarms
Editor
SUB-ITEM
DESCRIPTION
OA
AlarmX Set
Enter the Engineering Unit value. The Set †
is the gas concentration level at which the
alarm (activates), trips.
The Set and Reset values are used to
define a range between the upper and
lower trigger points. Set and Reset can be
the same value. They address hysteresis.
For example, if you are monitoring H2S,
you could make the Set 15 and the Reset
10. Conversely, if you are monitoring O2,
you could make the Set 19 and the Reset
20. This accommodates the different gas
properties and provides you the flexibility
to customize your settings.
For Combustible: Range 0 to 60% of
sensor range.
For Toxic: Range 0 to 100% of sensor
range.
AlarmX Reset
Enter the Engineering Unit value. The
†
Reset is the gas concentration level at
which the alarm (deactivates), clears.
The Set and Reset values are used to
define a range between the upper and
lower trigger points. Set and Reset can be
the same value. They address hysteresis.
For example, if you are monitoring H2S,
you could make the Set 15 and the Reset
10. Conversely, if you are monitoring O2,
you could make the Set 19 and the Reset
20. This accommodates the different gas
properties and provides you the flexibility
to customize your settings.
For Combustible: Range 0 to 60% of
sensor range.
For Toxic: Range 0 to 100% of sensor
range.
Note: Reset values cannot exceed their
corresponding Set values.
Name
Allows editing of the Sensor’s Name (16 †
ASCII character Text String). Displays on
the LCD.
Gas1
Allows editing of the Sensor’s Gas 1 (8
†
ASCII character Text String). Displays on
the LCD.
Gas2
Allows editing of the Sensor’s Gas 2 (8
†
ASCII character Text String). Displays on
the LCD.
SMA
† Indicates the minimum User Access Level required to access this particular
parameter.
**Only applies to IR-Combustibles sensors.
087-0049 REV C
SCOTT SAFETY
69
Configuring the Device
Table 32 Change User Access Setup Menu Parameters
ITEM
SUB-ITEM
DESCRIPTION
OA
SMA
User Access Operator
Allows changing the 4-digit access for
Operator Access
To change this parameter, you must already be
at System Manager Level. If not, this
parameter is RO. See Table 37.
†
System
Manager
Allows changing the 4-digit access for System
Manager
To change this parameter, you must already be
at System Manager Level. If not, this
parameter is RO. See Table 37.
†
† Indicates the minimum User Access Level required to access this particular parameter.
Table 33 Backup/Restore Setup Menu Parameters
ITEM
SUB-ITEM
DESCRIPTION
OA
SMA
Backup/Restore Backup
Settings
Yes – Performs backup
No – Cancelled backup
Note: Registers TX_OffsetMBSlaveAddress
to TX_OffsetTXLongitude registers are all
included in this function.
†
Restore
Settings
Yes – Performs restore
No – Cancelled restore
Note:Registers TX_OffsetMBSlaveAddress
to TX_OffsetTXLongitude registers are all
included in this function.
†
Restore
Factory
Enter – Performs factory restore
Esc – Cancelled factory restore
Note:The values are maintained for these
registers: TX_OffsetTXModelNumber,
TX_OffsetTXSerialNumber,
TX_OffsetTXCodeVersion,
TX_OffsetTXDataBaseVersion,
TX_OffsetInhibitCurrent_FP32=3.8,
TX_OffsetSensorsEnabled=1u. All others
values are zero.
Also, when a Restore is performed without a
prior Backup, the Restore reflects the
factory default values.
†
† Indicates the minimum User Access Level required to access this particular parameter.
SCOTT SAFETY
087-0049 REV C
70
CHAPTER 4: CONFIGURATION AND SETUP
Configuring the
Calibration Menu
This section covers the Calibration Menu.
Use the magnetic keys to navigate through the menu structure as necessary. See
Figure 30. The parameters are detailed in Table 34.
Figure 30 Calibration Menu Structure
MAIN MENU
INFORMATION
SETUP
CALIBRATION
DATALOG
DISPLAY
USER ACCESS
>
>
>
>
>
>
USER ACCESS
REQUIRED
FOR
CALIBRATION
SEN 1 CALIBRATION
>
ZERO CAL
>
SPAN CAL
CAL GAS CONC =50.0 >
SENSOR LIFE
CAL FACTOR
=100%
=0.411
APPLY ZERO GAS
553
0
ZERO
SET
PPM
CANCEL
CANCELLED
30
APPLY 100 GAS
553
100 PPM
CANCEL
30
GAS CAL SET
SPAN
SET
REMOVE
GAS
CANCELLED
CAL
ERROR
SAVING
50
ENTER WHEN FINISHED
s
Table 34 Calibration Menu Parameters
ITEM
SensorX
SUB-ITEM
DESCRIPTION
OA
Zero Cal
Activates Zero Calibration process, once
Enter Key is hit.
30 second timer starts. Use Escape Key to
Abort.
†
Span Cal
Activates Span Calibration process, once
Enter Key is hit.
30 second timer starts. Use Escape Key to
Abort.
†
Cal Gas Conc
Sets the amount of Cal Gas used based on the †
value found on the target gas cylinder, once
Enter Key is hit.
For example, for Methane target gas, label
indicates 2.5% (50%LEL). The units of
measure is Sensor dependent.
Displays results: Saved, or Aborted.
Use Escape Key to Abort.
Sensor Life
Displays the amount of Sensor Life
remaining.
Range 0 to 100%.
Cal Factor
Displays the resolution of the Sensor. The
bigger the value the less sensitive the Sensor,
conversely, the smaller the value the more
sensitive the Sensor.
Range 0.000 to 10.
SMA
†
†
† Indicates the minimum User Access Level required to access this particular parameter.
087-0049 REV C
SCOTT SAFETY
Configuring the Device
Configuring the
Datalog Menu
71
This section covers the Datalog Menu.
Use the magnetic keys to navigate through the menu structure as necessary. See
Figure 31. The parameters are detailed in Table 35.
Figure 31 Datalog Menu Structure
MAIN MENU
INFORMATION
SETUP
CALIBRATION
DATALOG
DISPLAY
USER ACCESS
SCOTT SAFETY
>
>
>
>
>
>
DATALOG MENU
>
SHOW LOG
>
CLEAR LOG
12 09 26 EVENT LOG
______________________
0245
PW 0 ACCEPTED
0246
A1 OS110.100
0248
A1 FS18.9000
0250
PW 0 FAILED
087-0049 REV C
72
CHAPTER 4: CONFIGURATION AND SETUP
Table 35 Datalog Menu Parameters
ITEM
SUB-ITEM
DataLog Show
Log*
Clear
Log*
DESCRIPTION*
Displays time stamped events. Events include: When device went in
and out of Alarms and when device went in and out of Faults. YY
MM DD: Year, month and day of the log. Each event line format is:
HHMM: Hour and minutes from the date stamp, EC: Event Code
from the logged event and EventData.
EC EVENTDATA= DESCRIPTION
SU YYMMDDHHMMSS=Startup
SD YYMMDD=Set date, with YMD
ST HHMMSS=Set time, with HMS
FC Low Volts=Brownouts below 10V
FC SV Mismatch=SV Mismatch
FC XXXXXXXXWDog=SW WDT Fire
FC XXXXXXXXDiag=Diag Safety
FC MB_Address=MB Address Changed
FC >1 HP Sensor=More than one high power sensor
FC XXXXh SnF=Sensor fault
LU Sn=Linkup, with S (Sensor number)
Ax sss.s:rrr.s=Alarm set point/reset point (right after LU event)
LD Sn=Linkdown, with S (Sensor number)
IO Sn=Inhibit on, with S (Sensor number) or SYS
IF Sn=Ihhibit off, with S (Sensor number) or SYS
NW XXXXXXXXX=New sensor, with last 9 digits of serial number
DW XXXXXXXXX=Diff sensor x, with last 9 digits of serial number
Ax (O/F) Sn XXXXXX=Alarm x, with (On/oFf), S (123), (gascons)
FA (O/F) Sn SSSS=Fault, with (On/oFf), S (123), (sensorstatus)
GD YYMMDD=Get Date, with year, month, day
GT HHMMSS=Get Time, with hour, minute, second
RC XXXX=RCON bits, with (RCON). Reserved for Technical
Support.
CL =Clear log
PW x accepted/Failed= X is user access level
Sn GasConc=Only log when changed on screen
TN TXName=
TS TXSerialNumber=
TV TXCodeVersion=
RF =Restore factory default
Rn No Latch:Fsafe=
Used to delete all current Logged Events.
* No user access required to access these particular parameters.
087-0049 REV C
SCOTT SAFETY
73
Configuring the Device
Configuring the
Display Menu
This section covers the Display Menu.
Use the magnetic keys to navigate through the menu structure as necessary. See
Figure 32. The parameters are detailed in Table 36.
Figure 32 Display Menu Structure
MAIN MENU
INFORMATION
SETUP
CALIBRATION
DATALOG
DISPLAY
USER ACCESS
>
>
>
>
>
>
RO DISPLAY
POWER SAVE : DISABLE
CONTRAST : 5
BACKLIGHT : 90
Table 36 Display Setup Menu Parameters
ITEM
LCD Setup
SUB-ITEM
DESCRIPTION
OA
Power Save
Enable: Lights when any Key is hit and then
times out to Save Power.
Disabled: LCD stays on continuously.
†
Contrast
For adjusting the LCD’s Contrast.
Range 0 to 4.
N/A
Backlight
For adjusting the LCD’s Backlight.
Range 0 to 100.
N/A
SMA
† Indicates the minimum User Access Level required to access this particular parameter.
SCOTT SAFETY
087-0049 REV C
74
CHAPTER 4: CONFIGURATION AND SETUP
Configuring the User
Access Menu
This section covers the User Access Menu.
Use the magnetic keys to navigate through the menu structure as necessary. See
Figure 33. The parameters are detailed in Table 37.
Figure 33 User Access Menu Structure
MAIN MENU
INFORMATION >
>
SETUP
CALIBRATION >
>
DATALOG
>
DISPLAY
USER ACCESS >
ENTER USER
OPERATOR
SYSTEM MANAGER
FACTORY
ENTER
OPERATOR
>
>
>
0000
ESC
ACCEPTED
MAIN MENU
>
INFORMATION
>
SETUP
>
CALIBRATION
>
DATALOG
>
DISPLAY
ACCESS-OPERATOR >
ACCEPTED
MAIN MENU
INFORMATION
SETUP
CALIBRATION
DATALOG
DISPLAY
ACCESS-SYS MGMT
ENTER
ENTER
SYSTEM MANAGER
0000
ESC
ENTER
ENTER
FACTORY
0000
ESC
ACCEPTED
ENTER
MAIN MENU
INFORMATION
SETUP
CALIBRATION
DATALOG
DISPLAY
FACTORY
>
>
>
>
>
>
>
>
>
>
>
>
Table 37 User Access Menu Parameters
ITEM
User
Access
087-0049 REV C
SUB-ITEM
DESCRIPTION
Operator
Access
(OA)
Used to Enter Operator Access. Used to restrict access to
certain parameters. Four (4) digit format. This setting times
out after 5 minutes and then defaults to the Access Level.
See Table 30.
System
Manager
Access
(SMA)
Used to Enter System Manager Access. Used to restrict
access to certain parameters. Four (4) digit format. This
setting times out after 5 minutes and then defaults to the
Access Level. See Table 30.
Factory
For Scott Safety internal use only.
SCOTT SAFETY
Device Configuration Examples
Device Configuration
Examples
75
This section provides some examples for selected parameters. Table 38 is a
Combustible, Cat-Bead, Methane Sensor example. Table 39 is a Toxic, E-Chem,
Carbon Monoxide Sensor example. Table 40 is a Toxic, E-Chem, Oxygen Sensor
example.
Warning: These are not to be used as recommendations for any application. Each
application is unique and its settings will vary on a case by case basis. These are to
provide some examples. When working in a potentially hazardous situation, which, if
not avoided, could result in death or serious injury.
Table 38 Combustible (LEL) Example – CH4
CATEGORY
Application
Displays
Automatically
when Sensor
installed into
Transmitter
ITEM
SELECTION
Sensor Technology
Cat-Bead
Gas to Detect
CH4 (Methane)
Sensor 1
Methane
New Sensor
Reject Accept
Automatic
CH4
50%
Methane
0-100 Scale
System
Sensor
Calibration
Setup
Sensor
Calibration
SCOTT SAFETY
Sensors Enable
1
Sensor #1
Online
User Access
Enter 4-Digits
Cal Gas Conc
2.5% (50%LEL) from cylinder label
Cal Gas Type
Methane
Period (DAYS)
90
Span (SECS)
180
Purge (SECS)
60
Decimal
0
K Factor
1.00 for Methane
Zero Calibration
Perform
Span Calibration
Perform (CH4 default Cal Gas)
087-0049 REV C
76
CHAPTER 4: CONFIGURATION AND SETUP
Table 38 Combustible (LEL) Example – CH4 (continued)
CATEGORY
Transmitter
Sensor
MODBUS
087-0049 REV C
ITEM
SELECTION
Alarm Logic
Latch
Relay
Non-Failsafe (NO)
Off Delay (MINS)
0
Current Loops –
4mA Offset
0
Current Loops –
20mA Offset
0
Current Loops –
Inhibit
3.8mA
Time/Date
Set/Confirm
Editor
Edit name, Lat or Long
Range
100%
Dead Band
0
Display Negative
No
Warm Up (SECS,
MINS, HRS)
1M
Gas Type
CH4
Gas Units
%
Alarm Set 1
10% (default)
Alarm Reset 1
9% (default)
Alarm Set 2
25% (default)
Alarm Reset 2
22% (default)
Alarm Set 3
50% (default)
Alarm Reset 3
45% (default)
Editor – Name
Enter unique name
Editor – Gas 1
Enter unique name
Editor – Gas 2
Enter unique name
Address
1
Baud Rate
9600
Parity
None
Stop Bit
1
SCOTT SAFETY
Device Configuration Examples
77
Table 39 Toxic (E-Chem) Example – CO
CATEGORY
Application
Displays
Automatically
when Sensor
installed into
Transmitter
ITEM
SELECTION
Sensor Technology
E-Chem
Gas to Detect
CO (Carbon Monoxide)
Sensor 1
Carbon Monoxide
New Sensor
Reject Accept
Automatic
CO
0PPM
Carbon Monoxide
0-50 Scale
System
Sensors Enable
1
Sensor #1
Online
User Access
Enter 4-Digits
Cal Gas Conc
20 to 80% Full Scale of setting
Cal Gas Type
CO
Period (DAYS)
90
Span (SECS)
300
Purge (SECS)
60
Decimal
1
Sensor
Calibration
Zero Calibration
Perform
Span Calibration
Perform (CO default Cal Gas)
Transmitter
Alarm Logic
Non-Latch
Relay
Non-Failsafe (NO)
Off Delay (M)
1
Current Loops –
4mA Offset
0
Current Loops –
20mA Offset
0
Current Loops –
Inhibit
3.8 mA
Time/Date
Set/Confirm
Editor
Edit name, Lat or Long
Sensor
Calibration
Setup
SCOTT SAFETY
087-0049 REV C
78
CHAPTER 4: CONFIGURATION AND SETUP
Table 39 Toxic (E-Chem) Example – CO (continued)
CATEGORY
Sensor
MODBUS
087-0049 REV C
ITEM
SELECTION
Range
0 to 50% is used in this example.
Note: Another range of 0 to 10% is selectable.
Dead Band
0
Display Negative
No
Warm Up (SECS,
MINS, HRS)
1M
Gas Type
Carbon Monoxide
Gas Units
0 to 50PPM
Alarm Set 1
5PPM (default)
Alarm Reset 1
4.5PPM (default)
Alarm Set 2
12.5PPM (default)
Alarm Reset 2
11PPM (default)
Alarm Set 3
27.5PPM (default)
Alarm Reset 3
22.5PPM(default)
Editor – Name
Enter unique name
Editor – Gas 1
Enter unique name
Editor – Gas 2
Enter unique name
Address
1
Baud Rate
9600
Parity
None
Stop Bit
1
SCOTT SAFETY
Device Configuration Examples
79
Table 40 Toxic (E-Chem) Example – O2
CATEGORY
Application
Displays
Automatically
when Sensor
installed into
Transmitter
ITEM
SELECTION
Sensor Technology
E-Chem
Gas to Detect
O2 (Oxygen)
Sensor 1
Oxygen
New Sensor
Reject Accept
Automatic
O2
20.9%
Oxygen
0-25% Scale
System
Sensor
Calibration
Setup
SCOTT SAFETY
Sensors Enable
1
Sensor #1
Online
User Access
Enter 4-Digits
Cal Gas Conc
•
•
•
•
Cal Gas Type
Zero with N2 (nitrogen)
Span with Zero Air
Zero with N2 (nitrogen)
Span with Zero Air
Period (DAYS)
30
Span (SECS)
300
Purge (SECS)
60
Decimal
1
Sensor
Calibration
Zero Calibration
Perform with N2
Span Calibration
Perform (Zero Air Cal Gas)
Transmitter
Alarm Logic
Non-Latch
Relay
Non-Failsafe (NO)
Off Delay (MINS)
0
Current Loops –
4mA Offset
0
Current Loops –
20mA Offset
0
Current Loops –
Inhibit
17.38mA
Time/Date
Set/Confirm
Editor
Edit name, Lat or Long
087-0049 REV C
80
CHAPTER 4: CONFIGURATION AND SETUP
Table 40 Toxic (E-Chem) Example – O2 (continued)
CATEGORY
Sensor
MODBUS
087-0049 REV C
ITEM
SELECTION
Range
0 to 25% is used in this example.
Note: Another range of 0 to 10% is selectable.
Dead Band
0
Display Negative
No
Warm Up (SECS,
MINS, HRS)
1M
Gas Type
Oxygen
Gas Units
%
Alarm Set 1
19.5% (default)
Alarm Reset 1
20.5% (default)
Alarm Set 2
16.0% (default)
Alarm Reset 2
17.0% (default)
Alarm Set 3
22.5.0% (default)
Alarm Reset 3
21.0% (default)
Editor – Name
Enter unique name
Editor – Gas 1
Enter unique name
Editor – Gas 2
Enter unique name
Address
1
Baud Rate
9600
Parity
None
Stop Bit
1
SCOTT SAFETY
Configuration Defaults
Configuration Defaults
81
Table 41 provides the default settings and ranges for the device.
Table 41 Key Device Configuration Defaults
ITEM
TX Setup
SUB-ITEM 1*
Current Loops
TX Setup/Alarms Alarm1
SUB-ITEM 2*
FACTORY DEFAULT
Inhibit (ALL)
3.8mA
Logic
No Latch
Relay
Non-Failsafe
CUSTOMER SETTINGS
OFF Delay(M) 0
Alarm2
Logic
No Latch
Relay
Non-Failsafe
OFF Delay(M) 0
Alarm3
Logic
No Latch
Relay
Non-Failsafe
OFF Delay(M) 0
TX Setup
MODBUS
MBAddress
0
Baud Rate
DIS
Parity
None
Stop Bit
0
Sensor X Setup
General
Deadband %FS Sensor dependent
Sensor X Setup
General
Display
Negative
NO
Sensor X Setup
General
Warm Up
(SECS)
Sensor dependent
Sensor X Setup
Calibration
Span
300SECS (5mins)
Sensor X Setup
Calibration
Purge
Sensor dependent
Sensor X Setup
Alarms
Alarm1 Set
These default values
are sensor dependent
and its selected range.
Examples of sensor
Alarm settings are
shown in: Table 38 on
page 75, Table 39 on
page 77 and Table 40
on page 79.
Alarm1 Reset
Alarm2 Set
Alarm2 Reset
Alarm3 Set
Alarm3 Reset
User Access
Operator
0000
System Manager
0000
*Note: Blank cells indicate no corresponding Sub-Item.
For Sensor defaults and ranges, See “Combustible (LEL), IR, Cat-bead and MOS
Sensor Specifications” on page 133. See “Toxic (E-Chem) Sensor Specifications” on
page 135.
SCOTT SAFETY
087-0049 REV C
82
CHAPTER 4: CONFIGURATION AND SETUP
Using the MODBUS
Registers
This section describes the MODBUS registers.
Warning: Executing Write Register functions will alter external devices and thus their
behavior. You must not write to any PLC address unless you understand the device
performance or operation changes that will result and have determined that the
changes will not create an unsafe situation. The following guidelines should be
followed when changing MODBUS Registers: Only qualified personnel should make
changes to MODBUS registers. Always test your changes in a test lab environment.
Always verify your MODBUS Register changes prior to implementation in a
functional plant environment. For Remote locations, verify all MODBUS changes
function as intended prior to implementation in a functional plant environment.
Failure to do so may result in serious injury or death.
Details about the MODBUS Registers are provided in the following tables: Table 42
to Table 44. Table 44 is used with the following to determine the specific MODBUS
register addresses: The offset for Sensor1 is 4096 (base in decimal) and 1000 (base in
Hex), denoted as 0x1001, the offset for Sensor2 is 8192 (base in decimal) and 2000
(base in Hex), denoted as 0x2001, the offset for Sensor3 is 12288 (base in decimal)
and 3000 (base in Hex), denoted as 0x3001. For example, to find the MODBUS
register address for the data associated with GasConc for Sensor1, Table 44 shows D0
(Hex). The offset is 1000 (Hex) + D0 (Hex) is 4096 (decimal) + 208 (decimal) = 4304
(decimal). Next, take 4304 (decimal) + 40001 (decimal) = 44305 which is the
MODBUS register address for the GasConc for Sensor1.
Table 42 MODBUS Registers — Transmitter Dynamic
REGISTER
HEX
ADD.
ACCESS
DESCRIPTION
DATA
TYPE
#BYTES
40002
1
R
Current TXTemperature
-128 to +127°C
INT8U
40081
50
R/W
TXCommand
Bits 15-12 select the device:
1= Sensor 1
2= Sensor 2
3= Sensor 3
0= TX
Some commands may have extra
parameters, that is what
TXParameter1-10 are for.
INT16U 2
40082
51
R/W
TXCmdParameter1
INT16U 2
40083
52
R/W
TXCmdParameter2
INT16U 2
40084
53
R/W
TXCmdParameter3
INT16U 2
40085
54
R/W
TXCmdParameter4
INT16U 2
40086
55
R/W
TXCmdParameter5
INT16U 2
40087
56
R/W
TXCmdParameter6
INT16U 2
40088
57
R/W
TXCmdParameter7
INT16U 2
40089
58
R/W
TXCmdParameter8
INT16U 2
40090
59
R/W
TXCmdParameter9
INT16U 2
087-0049 REV C
7800
WIRED
HART
WIRELESS
HART &
ISA100.11A
1
SCOTT SAFETY
Using the MODBUS Registers
83
Table 42 MODBUS Registers — Transmitter Dynamic (continued)
REGISTER
HEX
ADD.
ACCESS
DESCRIPTION
DATA
TYPE
#BYTES
40091
5A
R/W
TXCmdParameter10
40117
74
R
TXVoltage
INT16U 2
Voltage /10. Example: 241=24.1V
40118
75
R
Alarm1Status
bit=1: Sensor in alarm
bit 0: sensor 1
bit 1: sensor 2
bit 2: sensor 3
INT16U 2
40119
76
R
Alarm2Status
bit=1: Sensor in alarm
bit 0: sensor 1
bit 1: sensor 2
bit 2: sensor 3
INT16U 2
40120
77
R
Alarm3Status
bit=1: Sensor in alarm
bit 0: sensor 1
bit 1: sensor 2
bit 2: sensor 3
INT16U 2
40121
78
R
FaultStatus
bit=1: fault
bit0: sensor 1
bit1: sensor 2
bit2: sensor 3
INT16U 2
40122
79
R
InhibitStatus
bit=1: Sensor is in Inhibit
INT16U 2
7800
WIRED
HART
WIRELESS
HART &
ISA100.11A
INT16U 2
Normal
Alarm
bit0: sensor 1
bit1: sensor 2
bit2: sensor 3
40123
7A
R
CalStatus
bit=1: Sensor Cal Due
INT16U 2
bit0: sensor 1
bit1: sensor 2
bit2: sensor 3
40124
7B
R
SensorConnected
INT16U 2
bit0: sensor 1
bit1: sensor 2
bit2: sensor 3
40129
80
R
RelayStatus
bit0: Relay1 Status 1=Energized
bit1: Relay2 Status
bit2: Relay3 Status
bit3: Relay4 Status
bit7: GUI Edit Mode
INT16U 2
40130
81
R/W
CurrentHumidity
INT16U 2
SCOTT SAFETY
Normal
Alarm
087-0049 REV C
84
CHAPTER 4: CONFIGURATION AND SETUP
Table 42 MODBUS Registers — Transmitter Dynamic (continued)
REGISTER
HEX
ADD.
ACCESS
DESCRIPTION
DATA
TYPE
#BYTES
7800
WIRED
HART
40132
83
R
TXStatus
bit0: TX Fault (fault record holds
the fault code)
bit1: Loop1 current halt, 1=halt
bit2: Loop2 current halt, 1=halt
bit3: Loop3 current halt, 1=halt
bit4: Spare
bit5: System inhibit, 1=inhibit
bit6: GUI Edit Mode
bit7 - 10: undefined
bit11: remote configuration
lockout
bits12 - 15 undefined
INT16U 2
40133
84
R
TXOptions
bit0: 2 wire
bit1: 3-4 wire
bit2: battery option
bit3: wired HART expansion
bit4: wireless HART expansion
bit5: wireless ISA100.11A
INT16U 2
40134
85
R
Sensor1SensorStatusHL
High level status of sensor.
bit0: Sensor enabled
bit1: Alarm 1 trip
bit2: Alarm 2 trip
bit3: Alarm 3 trip
bit4: Sensor fault
bit5: Sensor inhibited
bit6: Sensor connected
bit7: Sensor calibrating
bit8: Sensor Cal due
bit9: Loop signaling (0=live,
1=fixed)
bit10: Spare
bit11: Spare
bit12: Spare
bit13: Spare
bit 14, 15: Reserved
INT16U 2
Normal
Alarm
40135
86
R
Sensor2SensorStatusHL
INT16U 2
Normal
Alarm
40136
87
R
Sensor3SensorStatusHL
INT16U 2
Normal
Alarm
40137
88
R
Sensor1GasConc10Bit
INT16U 2
200 = 0%Full Scale, 1000 = 100%
Full Scale, 0 = -25%Full Scale
RD
40138
89
R
Sensor2GasConc10Bit
INT16U 2
RD
40139
8A
R
Sensor3GasConc10Bit
INT16U 2
RD
087-0049 REV C
System
Inhibit
WIRELESS
HART &
ISA100.11A
Normal
Alarm
SCOTT SAFETY
Using the MODBUS Registers
85
Table 42 MODBUS Registers — Transmitter Dynamic (continued)
REGISTER
HEX
ADD.
ACCESS
DESCRIPTION
DATA
TYPE
#BYTES
7800
WIRED
HART
WIRELESS
HART &
ISA100.11A
40142
8D
R
CECStatus
Lower byte:CEC1Status
Upper byte:CEC2Status
If 0=No CEC detected
bit:
0=CEC EEPROM detected
1=CEC uP comms up
2=CEC requested DataBase
3=DB download complete
4=DB mismatch
5=DB CRC error
6=Protocol error
7=Undefined error
INT16U 2
40177
B0
R/W
TXCurrentDate
Transmitter’s current date. BCD
format: 00,year,month,day
INT32U 4
Tx Info
Tx Setup
40179
B2
R/W
TXCurrentTime
Transmitter’s current time. BCD
format: 00,hour,min,sec
INT32U 4
Tx Info
Tx Setup
40257
100
R
Sensor1GasConc
FP32
Linearized and temp compensated
gas concentration. These values
are floats that match the decimal
place and displayed.
4
RD
(byte
order=
BADC)
PV Main
Normal
Alarm
40259
102
R
Sensor2GasConc
FP32
4
RD
(byte
order=
BADC)
SV Main
Normal
Alarm
40261
104
R
Sensor3GasConc
FP32
4
RD
(byte
order=
BADC)
TV Main
Normal
Alarm
40263
106
R
LoopCurrent1
FP32
4
40265
108l
R
LoopCurrent2
FP32
4
40267
10A
R
LoopCurrent3
FP32
4
40337
150
R
Sensor1GasConcASCII
6 char string. This is what is
displayed on the LCD, includes
decimal point.
CHAR
8
40341
154
R
Sensor1GasUnitsASCII
CHAR
4 char string. This is what is on the
display, gas units
6
40344
157
R
Sensor2GasConcASCII
CHAR
8
40348
15B
R
Sensor2GasUnitsASCII
CHAR
6
SCOTT SAFETY
087-0049 REV C
86
CHAPTER 4: CONFIGURATION AND SETUP
Table 42 MODBUS Registers — Transmitter Dynamic (continued)
REGISTER
HEX
ADD.
ACCESS
DATA
TYPE
DESCRIPTION
#BYTES
40351
15E
R
Sensor3GasConcASCII
CHAR
8
40355
162
R
Sensor3GasUnitsASCII
CHAR
6
7800
WIRED
HART
WIRELESS
HART &
ISA100.11A
Table 43 MODBUS Registers — Transmitter Configuration Parameters
REGISTER
HEX
ADD.
ACC
ESS
40513
200
R
MBSlaveAddress
TX MODBUS address, 1-247
INT08
1
40514
201
R
MBSlaveBaudIndex
INT08
TX MODBUS baudrate, 1 = 9600,
2=19200, 2 is default
1
40515
202
R
MBSlaveParity
TX MODBUS parity type
0 = none, 1 = odd, 2 = even, even
is default
When parity even/odd, 1 stop bit
when parity none, 2 stop bits
INT08
1
40516
203
R
MBSlaveStopBit
TX MODBUS stop bits, 1 or 2
INT08
1
40518
205
R/W Regional
Languages, Dates format,
Daylight savings time
bit3-0:Languages
0=English(en)
1=Spanish(es)
2=Portuguese(pt)
3=French(fr)
4=Russian(ru)
5=Chinese(zh)
6-15=Reserved
bit5-4:Date format
0=MDY
1=DMY
2=YMD
3=Reserved
bit7-6:Daylight saving time
0=Off
1=On
2=Reserved
3=Reserved
INT08
1
087-0049 REV C
DESCRIPTION
DATA
TYPE
#BYTES
7800
HART
WIRED
HART
WIRELESS &
ISA 100.11A
SCOTT SAFETY
Using the MODBUS Registers
87
Table 43 MODBUS Registers — Transmitter Configuration Parameters (continued)
REGISTER
HEX
ADD.
ACC
ESS
40519
206
R/W Alarm1Logic
INT08
When latching, acknowledge is
required
bit0: 0 = nonlatching, 1 = latching
bit1: 0 = nonfailsafe, 1 = failsafe
1
Tx Setup
40520
207
R/W Alarm2Logic
INT08
1
Tx Setup
40521
208
R/W Alarm3Logic
INT08
1
Tx Setup
40522
209
R/W SensorsEnabled
0= disabled
1= enabled
bit 0: reserved
bit 1: sensor 2 enabled
bit 2: sensor 3 enabled
bit 3: sensor 1 offline
bit 4: sensor 2 offline
bit 5: sensor 3 offline
Note: When Sensor3 is enabled,
then Sensor2 is enabled by the
TX.
INT08
1
Main
Tx Setup
40523
20A
R/W S1CurrentLoopOffset
signed byte -128 to 127
INT08
1
Tx Setup
40524
20B
R/W S2CurrentLoopOffset
INT08
1
Tx Setup
40525
20C
R/W S3CurrentLoopOffset
INT08
1
Tx Setup
40529
210
R
INT08
1
40530
211
R/W S1CurrentLoop20mAOffset
signed byte -128 to 127
INT08
1
Tx Setup
40531
212
R/W S2CurrentLoop20mAOffset
INT08
1
Tx Setup
40532
213
R/W S3CurrentLoop20mAOffset
INT08
1
Tx Setup
40594
251
R/W Alarm1OffTimeDelay
INT16U 2
This time, in seconds, is the delay
on or off time for the alarm
relay/LED pair.
Max is 120 minutes (2 hours)
Tx Setup
40596
253
R/W Alarm2OffTimeDelay
INT16U 2
This time, in seconds, is the delay
on or off time for the alarm
relay/LED pair.
Tx Setup
40598
255
R/W Alarm3OffTimeDelay
INT16U 2
This time, in seconds, is the delay
on or off time for the alarm
relay/LED pair.
Tx Setup
SCOTT SAFETY
DESCRIPTION
S3PrevGasType
DATA
TYPE
#BYTES
7800
HART
WIRED
HART
WIRELESS &
ISA 100.11A
087-0049 REV C
88
CHAPTER 4: CONFIGURATION AND SETUP
Table 43 MODBUS Registers — Transmitter Configuration Parameters (continued)
REGISTER
HEX
ADD.
ACC
ESS
40599
256
R/W UserPassword (Access)
INT16U 2
Access for enabling operator level
functions.
binary: 4 digit number . Ie '0000'
40601
258
R/W SysMgrPassword (Access)
Access for enabling sys mgr
functions.
binary: 4 digit number . Ie '0000'
INT16U 2
40607
25E
R
INT16U 2
40659
292
R/W InhibitCurrent_FP32
FP32
The 4-20mA output that is sent
when the device is in inhibit mode
in .1mA steps.
4
Tx Setup
40753
2F0
R/W TXName
User defined name/location
2 bytes per register - 16 chars
ASCII and NULL, NULL. See
Table 43.
CHAR
18
Tx Info
40762
2F9
R
TXModelNumber
Model Number
8 chars, ASCII
CHAR
10
Tx Info
Tx Setup
40767
2FE
R
TXSerialNumber
sn: example 115Ayywwnnnnnn
115 is the company(Monroe)
A is assembly (s is subassy)
08 is the year of manufacture
16 is the week of manufacture
xxxxxx is the sequential number
produced within the week. 14
chars ASCII
CHAR
16
Tx Info
40775
306
R
TXCodeVersion
Firmware version
4 chars, ASCII
CHAR
6
Tx Info
40778
309
R/W TXLatitude
10 chars. Null terminated
CHAR
12
Tx Setup
40784
30F
R/W TXLongitude
10 chars. Null terminated
CHAR
12
Tx Setup
087-0049 REV C
DESCRIPTION
TXDataBaseVersion
High byte major, low byte minor
DATA
TYPE
#BYTES
7800
HART
WIRED
HART
WIRELESS &
ISA 100.11A
SCOTT SAFETY
Using the MODBUS Registers
89
Table 44 MODBUS Registers — SensorX Data
BASE IN
DECIMAL
BASE
IN
ACC
HEX. ESS
40059
3A
R
ZeroOffset
INT16U
2
Sensor
Gen
Sensor
Info
40097
60
R
CurrentCalTemperature
Updated by the sensor when span is
complete. xx.x°C
FP32
4
Sensor
Gen
Sensor
Info
40103
66
R/W CalGasConc
Default is 50% FS
FP32
4
Sensor
Setup
40105
68
R
CurrentCalFactor
Updated by the sensor after a successful
span
FP32
4
Sensor
Gen
Sensor
Info
Sensor
Cal
40166
A5
R
SensorStatus
bit0:Normal
bit1:Set_Defaults (factory defaults)
bit2:CRC_Fault
bit3:Comb_Under_Volt_Fault (combust
undervolt)
bit4:Comb_Over_Fault (combust overvolt)
bit5:Comb_Over_Rng (combustible
overrange flag)
bit6:Spare
bit7:Spare
bit8:Under_Volt_Fault (processor
undervolts)
bit9:Over_Volt_Fault (processor overvolts)
bit10:Sensor_Fault (mainly ADC
overrange)
bit11:Spare
bit12:NV_MEM_Fault (read verify failed
after write)
bit13:WDT_Fault
bit14:Startup_Fault (EEPROM or proc
DCO)
bit15:IIC_Fault (I2C bus error)
INT16U
2
40167
A6
R
SensorVoltage (mV)
INT16U
2
Sensor
Live
40168
A7
R
GasAtoD
10bit, 0-1023, current AtoD output
INT16U
2
Sensor
Live
40209
D0
R
GasConc
Linearized and temp compensated gas
concentration
FP32
4
Sensor
Live
40211
D2
R
SensorTemp
°C
FP32
4
Sensor
Live
SCOTT SAFETY
DESCRIPTION
DATA
TYPE
#BYTES 7800
HART
WIRED
HART
WIRELESS &
ISA 100.11A
087-0049 REV C
90
CHAPTER 4: CONFIGURATION AND SETUP
Table 44 MODBUS Registers — SensorX Data (continued)
BASE IN
DECIMAL
BASE
IN
ACC
HEX. ESS
40289
120
R
DESCRIPTION
DATA
TYPE
GasType
INT08U
This is used by the sensor to determine
which code to run. Each sensor will have a
specified number. Toxics:1-127, IR &
CB:128-255.
#BYTES 7800
HART
WIRED
1
Sensor
Gen
Sensor
Setup
INT08U
1
Sensor
Gen
Sensor
Setup
HART
WIRELESS &
ISA 100.11A
Note: The values are used for internal
purposes to identify sensors to the
transmitter.
40290
121
R
40291
122
R/W GasRangeIndex
Indicates current Gas Range
Upper nibble displays decimal point. Bits
0-3:Index to ranges/gain indexes.
Bit4,5:1,2:display DP 0=0, 1=1, 2=2
INT08U
1
Sensor
Setup
40293
124
R/W DisplayNegative
Display negative or 0 when negative
bit0:0=no, 1=yes
INT08U
1
Sensor
Setup
40294
125
R
SensorLife
Percentage of sensor life left. 0-100
INT08U
1
Sensor
Gen
Sensor
Info
Sensor
Cal
40353
160
R
SensorWarmupTime
INT16U
The amount of time, in 10 seconds, that the
sensor needs to warmup. Inhibit during this
time. Seconds x 10.
2
Sensor
Setup
40354
161
R
MfgCalTime
Calibration times. hh:mm (BCD format)
INT16U
2
40355
162
R
InstallCalTime
Calibration times. hh:mm (BCD format)
INT16U
2
40356
163
R
PriorCalTime
Calibration times. hh:mm (BCD format)
INT16U
2
40357
164
R
CurrentCalTime
Calibration times. hh:mm (BCD format)
INT16U
2
40358
165
R
MfgZeroOffset
Zero offsets. ADC count
INT16U
2
40359
166
R
InstallZeroOffset
Zero offsets. ADC count
INT16U
2
087-0049 REV C
GasUnits
Sensor
Dates
SCOTT SAFETY
Using the MODBUS Registers
91
Table 44 MODBUS Registers — SensorX Data (continued)
BASE IN
DECIMAL
BASE
IN
ACC
HEX. ESS
40360
167
R
40361
168
40362
DESCRIPTION
#BYTES 7800
HART
WIRED
INT16U
2
R/W CalibrationPeriod
Number of days between calibrations
INT16U
2
Sensor
Setup
169
R/W InhibitTimer
This particular sensor inhibit timer. Used
during Span. In Seconds (Min. of 5 Mins.,
Max. of 10Mins)
INT16U
2
Sensor
Setup
40363
16A
R/W PurgeTimer
Time after span that output is inhibited for
this sensor. In Seconds (Min. of 5 Mins.,
Max. of 10Mins)
INT16U
2
Sensor
Setup
40376
177
R
GasRange0
lowest range. Range; lowest to highest
Note:The number of ranges vary based on
the sensor. The min and max. values vary
based on the sensor.
INT16U
2
Sensor
Setup
40377
178
R
GainEunits0
Gain 1,0 & Eunits
Split into 2 bytes:
High byte:Reserved.
The low byte is the Eunits.
Eunits:
01=ppm
02=ppb
03=%LEL
04=%V/V
bit7 indicates default range.
Example: 0x0A01
Eunits=ppm
INT16U
2
Sensor
Setup
40378
179
R
S1MaxCalFactor0
Minimum acceptable cal factor
INT16U
2
Sensor
Setup
40379
17A
R
GasRange1
INT16U
2
Sensor
Setup
40380
17B
R
GainEunits1
INT16U
2
Sensor
Setup
40381
17C
R
MaxCalFactor1
INT16U
2
Sensor
Setup
40382
17D
R
GasRange2
INT16U
2
Sensor
Setup
40383
17E
R
GainEunits2
INT16U
2
Sensor
Setup
40384
17F
R
MaxCalFactor2
INT16U
2
Sensor
Setup
SCOTT SAFETY
S1PriorZeroOffset
Zero offsets. ADC count
DATA
TYPE
HART
WIRELESS &
ISA 100.11A
087-0049 REV C
92
CHAPTER 4: CONFIGURATION AND SETUP
Table 44 MODBUS Registers — SensorX Data (continued)
BASE IN
DECIMAL
BASE
IN
ACC
HEX. ESS
40385
180
R
GasRange3
INT16U
2
Sensor
Setup
40386
181
R
GainEunits3
INT16U
2
Sensor
Setup
40387
182
R
MaxCalFactor3
INT16U
2
Sensor
Setup
40388
183
R
GasRange4
INT16U
2
Sensor
Setup
40389
184
R
GainEunits4
INT16U
2
Sensor
Setup
40390
185
R
MaxCalFactor4
INT16U
2
Sensor
Setup
40391
186
R
GasRange5
INT16U
2
Sensor
Setup
40392
187
R
GainEunits5
INT16U
2
Sensor
Setup
40393
188
R
MaxCalFactor5
INT16U
2
Sensor
Setup
40394
189
R
GasRange6
INT16U
2
Sensor
Setup
40395
18A
R
GainEunits6
INT16U
2
40396
18B
R
MaxCalFactor6
INT16U
2
40397
18C
R
GasRange7
Highest range
INT16U
2
40398
18D
R
GainEunits7
Gain 1,0 & Eunits
INT16U
2
40399
18E
R
MaxCalFactor7
Minimum acceptable cal factor
INT16U
2
40449
1C0
R
MfgCalDate
Calibration dates
00,yy,mm,dd (BCD format) (1st byte
always 0x00)
INT32U
4
Sensor
Dates
40451
1C2
R
InstallCalDate
Calibration dates
00,yy,mm,dd (BCD format) (1st byte
always 0x00)
INT32U
4
Sensor
Dates
40453
1C4
R
PriorCalDate
Calibration dates
00,yy,mm,dd (BCD format) (1st byte
always 0x00)
INT32U
4
Sensor
Dates
40455
1C6
R
CurrentCalDate
Calibration dates
00,yy,mm,dd (BCD format) (1st byte
always 0x00)
INT32U
4
Sensor
Dates
087-0049 REV C
DESCRIPTION
DATA
TYPE
#BYTES 7800
HART
WIRED
HART
WIRELESS &
ISA 100.11A
SCOTT SAFETY
Using the MODBUS Registers
93
Table 44 MODBUS Registers — SensorX Data (continued)
BASE IN
DECIMAL
BASE
IN
ACC
HEX. ESS
40529
210
R
KFactor
FP32
This is the ratio between the calgastype and
the gastype
4
40531
212
R
MfgCalFactor
Cal factors
FP32
4
40533
214
R
InstallCalFactor
Cal factors
FP32
4
40535
216
R
PriorCalFactor
Cal factors
FP32
4
40537
218
R
MfgCalTemperature
Cal temperatures
xx.x°C
FP32
4
40539
21A
R
InstallCalTemperature
Cal temperatures
xx.x°C
FP32
4
40541
21C
R
PriorCalTemperature
Cal temperatures
xx.x°C
FP32
4
40543
21E
R/W Alarm1Setpoint
Alarm set/reset points
xx.x (defaults to a 10% of FS)
FP32
4
Sensor
Setup
40545
220
R/W Alarm1ResetPoint
Alarm set/reset points
xx.x (defaults to a 9% of FS)
FP32
4
Sensor
Setup
40547
222
R/W Alarm2Setpoint
Alarm set/reset points
xx.x (defaults to a 25% of FS)
FP32
4
Sensor
Setup
40549
224
R/W Alarm2ResetPoint
Alarm set/reset points
xx.x (defaults to a 22% of FS)
FP32
4
Sensor
Setup
40551
226
R/W Alarm3Setpoint
Alarm set/reset points
xx.x (defaults to a 50% of FS)
FP32
4
Sensor
Setup
40553
228
R/W Alarm3ResetPoint
Alarm set/reset points
xx.x (defaults to a 45% of FS)
FP32
4
Sensor
Setup
40555
22A
R/W NegativeFaultSetpoint
x.x % (5% is max)
FP32
4
40557
22C
R/W Deadband
x.x % (5% is max)
FP32
4
Sensor
Setup
40657
290
R/W GasNameLine1
ASCII gas name
CHAR8
10
Sensor
Setup
SCOTT SAFETY
DESCRIPTION
DATA
TYPE
#BYTES 7800
HART
WIRED
HART
WIRELESS &
ISA 100.11A
087-0049 REV C
94
CHAPTER 4: CONFIGURATION AND SETUP
Table 44 MODBUS Registers — SensorX Data (continued)
BASE IN
DECIMAL
BASE
IN
ACC
HEX. ESS
40662
295
R/W GasNameLine2
ASCII gas name
CHAR8
10
Sensor
Setup
40667
29A
R/W SensorName
User defined name/location
CHAR16 18
Sensor
Setup
40676
2A3
R
SensorModelNumber
ASCII date. 2 bytes per register
CHAR8
10
Sensor
Gen
40681
2A8
R
SensorSerialNumber
sn: ex 115Ayywwnnnnnn.
115 is the company(Monroe)
A is assembly (s is subassy)
08 is the year of manufacture
16 is the week of manufacture
xxxxxx is the sequential number produced
within the week.
CHAR14 16
Sensor
Gen
40689
2B0
R
SensorCodeVersion
4 char string, ASCII
CHAR4
6
40692
2B3
R
SensorProperties
8 char string, ASCII
CHAR8
10
DESCRIPTION
MODBUS Message
Framing
DATA
TYPE
#BYTES 7800
HART
WIRED
HART
WIRELESS &
ISA 100.11A
This section provides an overview of the MODBUS Message Framing.
Standard MODBUS can be setup using either of three transmission modes: ASCII or
RTU, or TCP.
In RTU mode, messages start with a silent interval of at least 3.5 character times. This
is most easily implemented as a multiple of character times at the baud rate that is
being used on the network. The first field then transmitted is the device address.
The allowable characters transmitted for all fields are hexadecimal 0 ... 9, A ... F.
Networked devices monitor the network bus continuously, including during the silent
intervals. When the first field (the address field) is received, each device decodes it to
find out if it is the addressed device.
Following the last transmitted character, a similar interval of at least 3.5 character
times marks the end of the message. A new message can begin after this interval.
The entire message frame must be transmitted as a continuous stream. If a silent
interval of more than 1.5 character times occurs before completion of the frame, the
receiving device flushes the incomplete message and assumes that the next byte will
be the address field of a new message.
Similarly, if a new message begins earlier than 3.5 character times following a
previous message, the receiving device will consider it a continuation of the previous
message. This will set an error, as the value in the final CRC field will not be valid for
the combined messages. Table 45 shows a typical message frame.
087-0049 REV C
SCOTT SAFETY
Using the MODBUS Registers
95
Table 45 MODBUS RTU Framing
START
3.5 Char
time
ADDRESS
FUNCTION
DATA
CRC
END
8Bit
8Bit
N * 8Bit
16Bit
The Address field of a
message frame
contains two
characters (ASCII) or
eight bits (RTU). The
individual slave
devices are assigned
addresses in the range
of 1 ... 247.
The Function Code field tells
the addressed slave what
function to perform. The
following functions are
supported by Modbus poll:
01 Read Coil Status
02 Read Input Status
03 Read Holding Registers
04 Read Input Registers
05 Write Single Coil
06 Write Single Register
15 Write Multiple Coils
16 Write Multiple Registers
The Data field
contains the
requested or send
data.
Two kinds of error-checking
methods (ASCII or RTU) are
used for standard Modbus
networks. The error checking
field contents depend upon the
method that is being used.
When RTU mode is used for
character framing, the
error-checking field contains a
16-bit value implemented as
two eight-bit bytes. The error
check value is the result of a
Cyclical Redundancy Check
calculation performed on the
message contents.
The CRC field is appended to
the message as the last field in
the message. When this is
done, the low-order byte of the
field is appended first,
followed by the high-order
byte. The CRC high-order byte
is the last byte to be sent in the
message.
SCOTT SAFETY
3.5 Char
time
087-0049 REV C
96
CHAPTER 4: CONFIGURATION AND SETUP
Using the
TXCommands
This section describes how to configure the device by modifying the MODBUS
registers via the TXCommands.
Warning: Executing Write Register functions will alter external devices and thus their
behavior. You must not write to any PLC address unless you understand the device
performance or operation changes that will result and have determined that the
changes will not create an unsafe situation. The following guidelines should be
followed when changing MODBUS Registers: Only qualified personnel should make
changes to MODBUS registers. Always test your changes in a test lab environment.
Always verify your MODBUS Register changes prior to implementation in a
functional plant environment. For Remote locations, verify all MODBUS changes
function as intended prior to implementation in a functional plant environment.
Failure to do so may result in serious injury or death.
The TXCommand is used to execute a MODBUS function and to set configuration
parameters. The individual registers are readable at their address. To write a
command/parameter to the transmitter a write to the MODBUS TXCommand is
required. There are different write commands for the various data types. Some
commands require only the TXCommand register to be written while other commands
require addition parameters. They must be written to before the command is written
into the command register. Details about the TXCommand structure and individuals
TXCommands are provided in the following tables: Table 46 to Table 53. TX=0,
Sensor1=1, Sensor2=2, Sensor3=3.
Consult the technical documentation provided with the receiving equipment in
conjunction with the tables provided herein for configuration of MODBUS (WR and
RD). The MODBUS register mapping may vary.
Table 46 Structure of Configuration Registers for TxCommand
CONFIGURATION REGISTERS
TXCommand
TXCmdParameter1
TXCmdParameter2
TXCmdParameter3
TXCmdParameter4
TXCmdParameter5
TXCmdParameter6
TXCmdParameter7
TXCmdParameter8
TXCmdParameter9
TXCmdParameter10
087-0049 REV C
SCOTT SAFETY
Using the TXCommands
97
Table 46 Structure of Configuration Registers for TxCommand (continued)
CONFIGURATION REGISTERS
Note: Upper nibble defined.
Bits 15-12 selects the device:
0= TX
1= Sensor1
2= Sensor2
3= Sensor3
Goes into high nibble of command and param1, when required.
Table 47 TxCommand 0xXXXX with No Parameters
TXCOMMAND
0xX001
(The “X” refers to either sensor1, 2 or 3.
For example, 0x1001 is for sensor1,
0x2001 is for sensor2, 0x3001 is for
sensor3)
DESCRIPTION
Zero
Param1-10: N/A
Examples:
0x1001= Zero Sensor1
0x2001=Zero Sensor2
0xX002
Span
Param1-10: N/A
Examples:
0x1002 Span Sensor1
0xX003
Inhibit (System and Sensor)
Param1, bit15:
1=Inhibit, 0=Not inhibit
Inhibit timer set to 5 Mins
Examples:
0x1003 inhibit sensor1
0xX004
Reserved
0xX005
0xX006
0xX007
0xX008
0xX009
0xX00A
0xX00B
0xX00C
0xX00D
0xX00E
SCOTT SAFETY
0x0020
Reset Transmitter
0x0300
AlarmAcknowledge
0x012A
Enter
087-0049 REV C
98
CHAPTER 4: CONFIGURATION AND SETUP
Table 47 TxCommand 0xXXXX with No Parameters (continued)
TXCOMMAND
0x013B
DESCRIPTION
Escape
Table 48 TxWriteByte 0xX200 with Param1, Param2
TXCOMMAND
0xX200
DESCRIPTION
Write Byte
(Sensor)
PARAM1
0xX000+ConfigRegisterAddress
PARAM2
Byte Data
GasType (for IR Sensor only)
GasRangeIndex (for E-Chem
Sensor only)
CalGasType
DisplayNegative
0x0200
Write Byte
(Transmitter)
Regional
Byte Data
Alarm1Logic
Alarm2Logic
Alarm3Logic
SensorsEnabled
S1CurrentLoopOffset
S2CurrentLoopOffset
S3CurrentLoopOffset
S1CurrentLoop20mAOffset
S2CurrentLoop20mAOffset
S3CurrentLoop20mAOffset
Note:Parameter1= Configuration register address. Parameter2= Byte data to write.
Table 49 TxWriteUnit 0xX201 Upper Nibble with Param1, Param2
TXCOMMAND
0xX201
DESCRIPTION
Write Unit
(Sensor)
PARAM1
0xX000+ConfigRegisterAddress
PARAM2
Unit Data
CalibrationPeriod
PurgeTimer
0x0201
Write Unit
(Transmitter)
Alarm1OffTimeDelay
Unit DataS
Alarm2OffTimeDelay
Alarm3OffTimeDelay
OperatorPassword (Access)
SysMgrPassword (Access)
Note:Parameter1= Configuration register address. Parameter2= Unit data to write.
087-0049 REV C
SCOTT SAFETY
Using the TXCommands
99
Table 50 TxWriteLong 0xX202 with Param1, Param2, Param3
TXCOMMAND
DESCRIPTION
PARAM1
PARAM2
PARAM3
0xX202
Write Long
(Sensor)
0xX000+ConfigRegister Long Data
Address
Takes both Param2 & Param3.
Format:B,A,D,C
0x0202
Write Long
(Transmitter)
TXCurrentDate
BCD format:
00,year,month,day
TXCurrentTime
BCD format:
00,hour,min,secs
Note:Parameter1= Configuration register address. Parameter2= Long data to write.
Parameter3= Long data to write.
Table 51 TxWriteFloat 0xX203 Upper Nibble with Param1, Param2, Param3
TXCOMMAND
0xX203
DESCRIPTION
Write Float
(Sensor)
PARAM1
PARAM2
PARAM3
0xX000+ConfigRegister Float Data
Address
Takes both Param2 &
Param3. Format:
Alarm1Setpoint
B,A,D,C
Alarm1ResetPoint
Alarm2Setpoint
Alarm2ResetPoint
Alarm3Setpoint
Alarm3ResetPoint
NegativeFaultSetpoint
Deadband
0x0203
Write Float
(Transmitter)
Inhibit Current
Float Data
Takes both Param2 &
Param3. Format:
B,A,D,C
Note:Parameter1= Configuration register address. Parameter2= Float data to write.
Parameter3= Float data to write.
SCOTT SAFETY
087-0049 REV C
100
CHAPTER 4: CONFIGURATION AND SETUP
Table 52 TxWriteString 0xX204 Upper Nibble with Param1 ... Param10 (1 of 2)
TXCOMMAND
0xX204
0x0204
DESCRIPTION
Write String
(Sensor)
Write String
(Transmitter)
PARAM1
PARAM2
PARAM3
PARAM4
PARAM5
PARAM6
ConfigRegisterAddress
GasNameLine1
1st,2nd
3rd,4th
5th,6th
7th,8th
Null, Null
GasNameLine2
1st,2nd
3rd,4th
5th,6th
7th,8th
Null, Null
SensorName
1st,2nd
3rd,4th
5th,6th
7th,8th
9th,10th
TXName
1st,2nd
3rd,4th
5th,6th
7th,8th
9th,10th
TXLatitude
1st,2nd
3rd,4th
5th,6th
7th,8th
9th,10th
TXLongitude
1st,2nd
3rd,4th
5th,6th
7th,8th
9th,10th
Note:Parameter1= Configuration register address. Parameter2 ... Parameter10= String data to write (ASCII).
Table 53 TxWriteString 0xX204 Upper Nibble with Param1 ... Param10 (2 of 2)
TXCOMMAND
0xX204
DESCRIPTION
Write String
(Sensor)
PARAM1
PARAM7
PARAM8
PARAM9
PARAM10
ConfigRegisterAddress
GasNameLine1
GasNameLine2
0x0204
Write String
(Transmitter)
SensorName
11th,12th
13th,14th
15th,16th
Null, Null
TXName
11th,12th
13th,14th
15th,16th
Null, Null
TXLatitude
11th,12th
Null, Null
TXLongitude
11th,12th
Null, Null
Note:Parameter1= Configuration register address. Parameter2 ... Parameter10= String data to write (ASCII).
087-0049 REV C
SCOTT SAFETY
087-0049
Chapter 5
Rev C
OPERATION
Chapter Overview
This chapter covers the following topics:
•
•
•
SCOTT SAFETY
Operating the Device
Powering Up
Powering Down
087-0049 REV C
102
CHAPTER 5: OPERATION
Operating the Device
This section describes the operational modes of the device. Primary User Interface
(UI) of the device is via the LCD. During operation, the LCD displays continuous data
on gas concentrations and alarm conditions and access to the Main Menu. Optionally,
a device with no LCD is available for remote locations.
Warning: When settings are changed, ensure those changes are communicated to all
affected personnel.
The device defaults to the Text and Numerical Display upon power up. This display
shows real time data to you. Specifically, the current numerical value of gas
concentration shown in engineering units.
Navigation of the LCD displays are done by using the supplied magnetic tool with the
four (4) navigation keys (UP, ESCAPE, DOWN, and ENTER/MENU). You do not
need to remove the removable cover of the housing to activate these keys. The
magnetic tool works in close proximity to the four (4) keys. Additionally, the
magnetic tool must be removed and replaced to perform sequential key routines. Use
a sweeping motion rather than an hitting move to activate the keys.
Figure 34 shows the Text and Numerical Display, as well as the navigation keys and
the devices’ LEDs. Additionally, Table 54 lists these items along with their
descriptions. Figure 35 shows the Main Menu. Figure 36 Graphical Trending Display.
Figure 37 shows the Blind LCD.
See “Configuration and Setup” on page 53.
Figure 34 Text and Numerical Display
15
1
20
2
3
4
5
SENSOR NAME
1 2 3
CL 1
RS LRH
PPM
10
100
9
ERROR MESSAGE
6
13, 14
12
11
6
7
8
087-0049 REV C
SCOTT SAFETY
Operating the Device
103
Table 54 LCD Items and Descriptions
REFERENCE
NUMBER
1
2
ITEM
DESCRIPTION
ALARM1
Indicates an alarm condition when Red LED Flashes.
This LED functions in tandem with equipment configured
to Relay (K1).
To acknowledge this alarm, press any Key and this LED
changes from flashing to solid.
Note: This LED functions regardless of whether the
Relays are used externally or not.
ALARM2
Indicates an alarm condition when Red LED Flashes.
This LED functions in tandem with equipment configured
to Relay (K2).
To acknowledge this alarm, press any Key and this LED
changes from flashing to solid.
Note: This LED functions regardless of whether the
Relays are used externally or not.
ALARM3
Indicates an alarm condition when Red LED Flashes.
This LED functions in tandem with equipment configured
to Relay (K3).
To acknowledge this alarm, press any Key and this LED
changes from flashing to solid.
Note: This LED functions regardless of whether the
Relays are used externally or not.
FAULT
Indicates an fault condition when Amber LED Flashes.
Faults include: Under Range, Over Range, Sensor Offline,
and Sensor Faults.
This LED functions in tandem with equipment configured
to Relay (K4).
Note: This LED functions regardless of whether the
Relays are used externally or not.
ESCAPE
and Short Cut
Key used to navigate previous menus.
Key Short Cut – Sensor Calibration. Hold magnetic tool
over this key to activate for 5 Seconds. This parameter is Password protected.
SCOTT SAFETY
3
GAS CONCEN- Displays the concentration of the gas.
TRATION
4
SENSOR
NAME
Displays Sensor Name as entered. Displays the active
Sensor. Up to 18 characters maximum.
5
ALARM SETPOINTS
Displays Alarm Set Point value settings. These coincide
with ALARM1, ALARM2 and ALARM3 respectively.
087-0049 REV C
104
CHAPTER 5: OPERATION
Table 54 LCD Items and Descriptions (continued)
REFERENCE
NUMBER
6
ITEM
ERROR
MESSAGE &
ICON
DESCRIPTION
Typically displays fault message with Icon. Includes:
•
•
•
•
Under Range (-RNG) and FAULT LED
Over Range (+RNG) and FAULT LED
Cal Required
Sensor Faults and FAULT LED
See “Troubleshooting the Device” on page 126.
SENSOR
INHIBIT
Alarm Inhibit Icon. Applies to only a single Sensor. Displays during power up, during Zero and Span Calibration.
SYSTEM
INHIBIT
Alarm System Inhibit Icon (with “S”). Applies to all three
(3) Sensors. Displays after pressing the ESC key for 3 seconds.
S
087-0049 REV C
7
IR TX/RX Port
Used to upgrade the device’s firmware. (Future feature)
8
DOWN
and Short Cut
Key is used to navigate between Text and Numerical
Display and the Graphical Trending Display (2Minute,
60Minute, 1Day and 7Day) with the magnetic tool. And
also maneuvers between the four (4) Graphical Trending
Displays. See Figure 34 and Figure 36.
DOWN key maneuvers the Arrow/Cursor. Individual
items, such as a numerical value or ASCII characters are
changed using the DOWN key to change the character.
9
GAS RANGE
Displays the full scale range of the gas.
10
UNIT of
MEASURE
Displays the unit of measure of the gas.
11
ENTER/MENU
Key used to navigate from Gas Monitoring Screen to the
Main Menu Screen, among sub-menu screens and to
select an individual item from the Menu.
12
SENSOR
CHARTERISTICS
Displays additional sensor characteristics, if applicable.
For example, RS LRH means Rock Solid, Low Relative
Humidity.
13
GAS TYPE
Displays applicable gas type entered. Up to 8 characters
maximum per line. For example, CL2.
SCOTT SAFETY
Operating the Device
105
Table 54 LCD Items and Descriptions (continued)
REFERENCE
NUMBER
ITEM
DESCRIPTION
14
SENSOR
NUMBER
For multi-sensors, displays the applicable sensor number
(1, 2 or 3) that corresponds to the current information
shown. When a sensor faults, its corresponding number
flashes.
15
UP
and Short Cut
Key is used to navigate between LCD configuration
screens with the magnetic tool. For multi-sensors, maneuvers between the applicable sensor number (1, 2 or 3) for
both Text and Numerical Display and the Graphical
Trending Display. See Figure 34 and Figure 36.
UP key maneuvers among the individual items, such as a
numerical value or ASCII characters are changed using
the UP key to change the character.
Figure 35 Main Menu Display
MAIN MENU
INFORMATION
SETUP
CALIBRATION
85
DATALOG
DISPLAY
PASSWORDS
Figure 36 Graphical Trending Display
60MIN
METHANE 2
85
SCOTT SAFETY
087-0049 REV C
106
CHAPTER 5: OPERATION
Figure 37 Blind LCD
The device ships pre-configured for standard operation. However, if an Optional
Communication PCB is installed in the device, you may need to change some of the
configuration parameters. See “Configuration and Setup” on page 53.
Upon initial completion of the power up sequence, the device needs to be Calibrated
to ensure proper operation of the Sensor. See “Calibrating the Device” on page 108.
Powering Up
This section covers the power up sequence.
Once power is applied to the device, the four (4) LEDs emit solid, the LCD displays
SCOTT Safety logo, Unit Information screens displays briefly (System Name, Model,
Code, SN#), Waiting for System to Initialize screen displays with progress bar, then
the Text and Numerical Display appears. The boot up process takes about eight (8)
seconds to complete.
Caution: Calibrate the device prior to placing into operation. See “Calibrating the
Device” on page 108.
Warning: To avoid the possible need of re-calibrating a calibrated sensor, when
powering the device for the first time, do so with the sensor not installed. Verify device
date and time and correct if necessary. When installing sensor, again verify correct
date and time of device prior to accepting sensor.
Powering Down
This section covers the power down sequence.
Powering down the device is not required to perform routine operations.
087-0049 REV C
SCOTT SAFETY
087-0049
Chapter 6
Rev C
MAINTENANCE
Chapter Overview
This chapter covers the following topics:
•
•
•
SCOTT SAFETY
Calibrating the Device
Maintaining the Device
Troubleshooting the Device
087-0049 REV C
108
CHAPTER 6: MAINTENANCE
Calibrating the Device
This section covers calibration of the device.
Warning: All Sensors shipped with the device are calibrated at the factory. However,
verify that Spare Sensors are calibrated prior to use.
Warning: Operating the device that has exceeded its calibration date can cause false
readings of detected gases. Readings obtained while device is out of calibration are
invalid and could lead to death or injury.
Warning: During Calibration, the device is not detecting hazardous gases. Ensure
you notify affected personnel working in the area or otherwise depending on its
detection that it will be out of service and ensure other gas detection protection is in
place.
Warning: Before you begin, read and understand the MSDS and warning labels for
the calibration gases. Failure to do so may result in serious injury or death.
Warning: Local alarms are inhibited in the device while in Calibration Mode (that is,
a time delay set to prevent unwanted alarm trips). Verify the environment is clean and
free of hazardous gases and toxins or have monitoring performed by another device
prior to calibrating. Failure to do so could lead to injury or death. See “Configuring
the Setup Menu” on page 62.
Calibration Hookup
This section describes Calibration Hookup.
There are two (2) Hookup options for Calibrating the Sensors for both Zero
Calibration and Span Calibration. They are:
•
•
Using the 1/4 Turn Calibration Fitting
Using the Calibration Port on the Sensor Head with the Remote Calibration Quick
Disconnect Fitting
Figure 38 shows the required equipment for the Hookup options.
Various Calibration Kits are available to accommodate different applications. See
“Parts List” on page 160.
087-0049 REV C
SCOTT SAFETY
Calibrating the Device
109
Figure 38 Calibration Hookup Method - Both Hookup Options
4
3
5
3
2
1
Table 55 lists the required equipment for both Hookup options.
Table 55 Calibration Hookup Equipment
REFERENCE
NUMBER
ITEM
USING
CAL.
ADAPTER
USING CAL.
PORT ON
SENSOR
HEAD
1
Gas Cylinder
• For Zero Gas Calibration: Zero Gas
Cylinder
• For Span Gas Calibration*: Contact your
Scott sales representative or Scott Safety.
See “Technical Service” on page 158.
OR
• For Span Gas Calibration*:See “Sensor
Same
Same
2
Regulator (Male or Female)
See “Parts List” on page 160.
Same
Same
3
•
•
Tygon Tubing*, 3/16” ID Soft
Teflon Type Tubing*, Hard (For sticky
gases like HCl and NH3)
• Nafion Tubing (For MOS Sensors)
See “Parts List” on page 160.
Same
Same
4
1/4” Turn Calibration Fitting
Applicable
N/A
5
Sensor Head (Cal Port)
N/A
Applicable
Information” on page 139.
SCOTT SAFETY
087-0049 REV C
110
CHAPTER 6: MAINTENANCE
Table 55 Calibration Hookup Equipment (continued)
USING
CAL.
ADAPTER
REFERENCE
NUMBER
ITEM
USING CAL.
PORT ON
SENSOR
HEAD
* For Reactive Gases, use a Calibration Gas with a tolerance of + /- 2 % and a
Teflon Type Tubing. For Non-Reactive Gases, use a Calibration Gas with a
tolerance of +/- 5% and a Tygon Type Tubing.
Note: Various Calibration Kits are available. See “Parts List” on page 160.
Calibration Methods
This section describes the various calibration methods.
Scott Safety recognizes the potential of the device as a life saving device when
operated and maintained correctly. As such, verifying proper operation of the device
in the form of Span Calibration and Zero Calibration is essential to ensure the device
performs as intended in a potentially hazardous environment.
The frequency at which Span Calibration and Zero Calibration occur is best
determined based on local regulatory standards, company policies, and industry best
practices. Scott Safety is not responsible for setting policies or practices.
Table 57 provides typical recommended calibration frequency guidelines.
Table 56 Recommended Calibration Frequency Guidelines
SENSOR TYPE
FREQUENCY
CALIBRATION METHOD
Cat-Bead
Quarterly (3 months)
Zero and Span
IR
Twice per year (6 months)
E-Chem
Quarterly (3 months)
Oxygen
Every 30 days (1 month)
MOS
Quarterly (3 months)
Low and High Span
Calibration methods include the following:
•
Zero Calibration — Is performed to establish baseline readings of atmospheres
that are known to be free of toxic or combustible gases.
•
Span Calibration — Is performed to ensure the device detects target gases within
specified operating parameters. Span Calibration is the adjustment of the device’s
response to match a known concentration of gas. Sensors can lose sensitivity
through normal degradation, exposure to high gas concentrations, or sensor
poisoning. Accurate calibration can be achieved only if specific concentrations of
the correct gases are used. Span Calibration should be performed when a new
sensor is installed. Span Calibration must be performed anytime a Bump Test fails.
Typically, Zero Calibration is performed prior to a Span Calibration.
Warning: During Calibration, the device is not detecting hazardous gases. Thus, gas
monitoring and alarm processing are not performed. When the primary device is off
line, ensure you have another online device to actively detect hazardous gases.
Failure to do so could result in injury or death.
087-0049 REV C
SCOTT SAFETY
Calibrating the Device
111
If using the Relays, local Alarm Relays are Inhibited during the Calibration Mode.
Inhibit Time is an adjustable parameter. See “Configuring the Setup Menu” on
page 62.
Table 57 details the recommended calibration and test items for the device.
Table 57 Recommended Calibration Matrix
Zero Calibration
ITEM
FREQUENCY
DETAILS
Zero Calibration
•
See “Zero
Calibration” on
page 111.
Span Calibration
•
•
When baseline readings are incorrect or
suspect
Prior to a Span Calibration
After installing new sensors
See “Span
Calibration” on
page 112.
This section describes how to perform Zero Calibration.
Prior to starting the Zero Calibration procedure, you may need to adjust the Inhibit
Time on the device. This prevents unwanted alarm trips. Likewise remember to reset it
after calibration. See “Configuring the Setup Menu” on page 62.
A OPERATOR ACCESS or higher must be entered to perform a Zero Calibration.
1 To temporally change the access. From the Text and Numerical Display, enter the
Main Menu by pressing the ENT/MENU key using the supplied magnetic tool.
Press the DN key to USER ACCESS, press the ENT/MENU key, select
OPERATOR, press ENT/MENU key, press either UP or DN keys to enter 4-digit
access, press ENT/MENU key, until ACCEPTED displays.
2 Optionally, you could now proceed to permanently change the access to
OPERATOR or higher. From the Text and Numerical Display, enter the Main
Menu by pressing the ENT/MENU key, select SETUP, Select CHANGE ACCESS
CODE, enter 4-digit access, press ESC key until returns to the Text and Numerical
Display.
3 Apply calibration gas using the Calibration Adapter. The calibration gas and its
flow depends on the sensor. See Table 58.
Table 58 Gases and Flow Rates for Zero Calibration for Sensor Type
SENSOR TYPE
GAS
FLOW RATE (LPM)
Cat-Bead
Zero Air*
0.5**
IR
Zero Air, or Nitrogen
E-Chem
(Oxygen)
Nitrogen
0.5
E-Chem (Others) Zero Air
*Zero Air is 20.9% O2 and the balance Nitrogen.
**Standard recommended rate is 0.5. However, some applications, such as remote sensor,
may require 1.0, which is acceptable.
Note: A flow rate either above or below can result in a failed or inaccurate calibration.
SCOTT SAFETY
087-0049 REV C
112
CHAPTER 6: MAINTENANCE
4 Wait at least 3 to 5 minutes for stabilized readings.
5 To perform Zero Calibration, from the MAIN MENU, select CALIBRATION,
select ZERO CAL, press ENT/MENU key, APPLY ZERO GAS screen displays,
the 30 second timer starts.
6 After a successful Zero Cal, press ENT/MENU key to accept. ZERO SET, then
SENSOR X CALIBRATION displays. Press ESC key twice to return to Text
Numerical Display.
7 If the sensor’s output is higher than expected, ZERO ANYWAY? displays and
flashes, then press ENT/MENU key to ACCEPT, ZERO SET displays. If Zero
Calibration fails, repeat procedure until successful. Press ESC key twice to return
to Text and Numerical Display.
If 5 minutes elapses before Zeroing the device, the device times out and returns to the
Text and Numerical Display. If this happens just reselect CALIBRATION. To keep the
time out from occurring, press either the UP or DN keys. The 5 minute time out starts
over after a key is activated. If more time is required for specific gases, adjust the
Span Time parameter.
8 Remove Calibration Gas.
9 If Span calibration is desired, continue to See “Span Calibration” on page 112.
Span Calibration
This section describes how to perform Span Calibration.
Prior to starting the Span Calibration procedure, you may need to adjust the Inhibit
Time on the device. This prevents unwanted alarm trips. Likewise remember to reset it
after calibration. See “Configuring the Setup Menu” on page 62.
Verify concentration level matches detection set points of the device and the
expiration date of the cylinder has not passed.
If the target gas concentration is not available for an E-Chem sensor, the sensor range
may be changed. See “Changing the E-Chem Sensor’s Range” on page 116.
For the Combustible IR Sensor (096-3473-56), the target gas may be selected based
on your application. See “Selecting the Combustible IR Sensor’s Target Gas” on
page 116.
For the Combustible Cat-Bead Sensor (096-3473-55), the K-Factor field may be
changed to match the target gas based on your application. See “Combustible
Cat-Bead Sensor K-Factors” on page 143.
A USER ACCESS or higher must be entered to perform a Span Calibration.
1 To temporary change the access. From the Text and Numerical Display, enter the
Main Menu by pressing the ENT/MENU key using the supplied magnetic tool.
Press the DN key to USER ACCESS, press the ENT/MENU key, select
087-0049 REV C
SCOTT SAFETY
Calibrating the Device
113
OPERATOR, press ENT/MENU key, press either UP or DN keys to enter 4-digit
access, press ENT/MENU key, until ACCEPTED displays.
2 Optionally, you could now proceed to permanently change the access to
OPERATOR or higher. From the Text and Numerical Display, enter the Main
Menu by pressing the ENT/MENU key, select SETUP, Select CHANGE ACCESS
CODE, enter 4-digit access, press ESC key until returns to the Text and Numerical
Display.
3 Determine the target calibration gas based on Sensor type. Different Sensors target
different gases. Ensure the Span Gas being used is applicable to the Sensor
installed. See Table 59 and Table 60.
Table 59 Gases and Flow Rates for Span Calibration for Sensor Type
SENSOR TYPE
GAS
FLOW RATE (LPM)
Cat-Bead
See “Combustible Cat-Bead Sensor 0.5**
K-Factors” on page 143.
IR
Use target gas. See “Combustible
IR Sensor Surrogate Test Gas” on
page 148.
E-Chem (Oxygen) Use Zero Air.*
E-Chem (Others)
0.5
If available, use target gas.
*Zero Air is 20.9% O2 and the balance Nitrogen.
**Standard recommended rate is 0.5. However, some applications, such as remote
sensor, may require 1.0, which is acceptable.
Note: A flow rate either above or below can result in a failed or inaccurate
calibration.
Table 60 Gases and Flow Rates for Span Calibration for MOS Sensor
SENSOR TYPE
GAS
SPAN
FLOW RATE
MOS
10PPM H2S
Low
300CCM
50PPM H2S
High
Note: This is a two step operation; you can not do just low or
high span, must do both to complete calibration.
Note: We recommend using Nafion Tubing for best results with
MOS Sensors.
4 Attach the Calibration Adapter to the device and apply gas from the regulator.
5 Apply the applicable Calibration Gas.
6 Wait at least 3 to 5 minutes for stabilized readings.
7 To perform Span Calibration, from the MAIN MENU, select CALIBRATION,
select SPAN CAL, press ENT/MENU key, APPLY XX GAS screen displays, the
30 second timer starts as gas is applied.
SCOTT SAFETY
087-0049 REV C
114
CHAPTER 6: MAINTENANCE
8 After a successful SPAN CAL, press ENT/MENU key to ACCEPT. SPAN SET,
REMOVE GAS, then after gas is removed SENSOR X CALIBRATION displays.
Press ESC key twice to return to Text and Numerical Display.
If 5 minutes elapses before Spanning the device, the device times out and returns to
the Text and Numerical Display. If this happens just reselect CALIBRATION. To keep
the time out from occurring press either the UP or DN keys. The 5 minute time out
starts over after a key is activated. If more time is required for specific gases, adjust
the Span Time parameter.
087-0049 REV C
SCOTT SAFETY
Maintaining the Device
Maintaining the
Device
115
This section covers maintenance of the device.Table 61 details the recommend
maintenance item for the device.
Table 61 Recommended Maintenance Matrix
Replacing the Sensor
ITEM
ACTIVITY
FREQUENCY
DETAILS
Sensor
Replace
Periodic
E-Chem Sensor
Change
As needed
Combustible IR
Sensor
Change
As needed
Intrinsically Safe
(IS) Barrier PCB
Replace
As needed
Power Supply
PCB (3-4 Wire)
Replace
As needed
Power Supply
PCB (2 Wire)
Replace
As needed
4-20mA Loop
Trimming
Adjustment Initial
installation &
As needed
See “Replacing the Sensor” on
page 115.
See “Changing the E-Chem Sensor’s
Range” on page 116.
See “Selecting the Combustible IR
Sensor’s Target Gas” on page 116.
See “Replacing the Intrinsically Safe
(IS) Barrier PCB” on page 116.
See “Replacing the Power Supply
PCB (3-4 Wire)” on page 118.
See “Replacing the Power Supply
PCB (2 Wire)” on page 119.
See “Trimming the 4-20mA Loop”
on page 119.
Terminal/Relay/
MODBUS
RS-485 PCB
Replace
As needed
See “Replacing the
Terminal/Relay/MODBUS RS-485
PCB” on page 120.
LCD PCB/CPU
PCB
Replace
As needed
Meridian NPT Ex Replace
Seal
As needed
Meridian Detector Replace
Body Assembly
As needed
Sensor Mapping
As needed
As needed
Sensor Fault
As needed
As needed
See “Replacing the LCD PCB/CPU
PCB” on page 121.
See “Replacing the Meridian NPT Ex
Seal” on page 121.
See “Replacing the Meridian
Detector Body Assembly” on
page 123.
See “Re-Mapping the Sensors” on
page 124.
See “Clearing a Sensor Fault” on
page 125.
This section provides information on how to replace Sensors.
The device ships without the Sensor installed and must be installed prior to use. The
procedure to install your Sensor is the same to replace your Sensor.
1 To replace a Sensor, See “Installing/Replacing a Sensor” on page 50.
2 Perform Zero and Span Calibrations of the device. See “Zero Calibration” on
page 111. See “Span Calibration” on page 112.
SCOTT SAFETY
087-0049 REV C
116
CHAPTER 6: MAINTENANCE
Changing the E-Chem
Sensor’s Range
This section provides information on how to change the E-Chem sensor’s Range.
1 System Manager access level is required. The path is MAIN MENU/USER
ACCESSS/SYSTEM MANAGER. Enter the four digits and select ENT/MENU
key. See “Configuring the User Access Menu” on page 74.
2 Access the Setup Menu via the Main Menu. See “Configuring the Setup Menu” on
page 62. The path is MAIN MENU/SETUP/SENSOR X SETUP/GENERAL/GAS
RANGE. Select ENT/MENU and select desired range, then select ENT/MENU,
ESC, Save Changes and back out of menu. Gas Range varies based on installed
Sensor. For example, for a CO Sensor the Default range is 50, but you may select
either 100 or 1000 as its range.
Warning: Range should only be changed in clean air. Changing the Senor’s Gas
Range automatically changes its Set and Reset Alarm settings. Each Gas Range has
its own unique corresponding Set and Reset values. Therefore, ensure you verify these
settings after changing the sensor’s Gas Range.
Selecting the
Combustible IR
Sensor’s Target Gas
This section provides information on how to select the target gas when using the
Combustible IR Sensor’s Range (096-3473-56). This sensor allows the selection of
different target gases.
1 System Manager access level is required. The path is MAIN MENU/USER
ACCESSS/SYSTEM MANAGER. Enter the four digits and select ENT/MENU
key. See “Configuring the User Access Menu” on page 74.
2 Access the Setup Menu via the Main Menu. See “Configuring the Setup Menu” on
page 62. The path is MAIN MENU/SETUP/SENSOR X SETUP/GENERAL/GAS
RANGE. Select ENT/MENU and select desired target gas, then select
ENT/MENU, ESC, Save Changes and back out of menu, after selecting from the
different target gases selections.
3 The Cal Required message appears after detecting a new combustible gas being
loaded. Perform a Span Calibration at this point, since no changes can take effect
until this is done.
These selections only appear when the Combustible IR Sensor is present in the system.
Replacing the
Intrinsically Safe (IS)
Barrier PCB
This section provides information on how to replace Intrinsically Safe (IS) Barrier
PCB. There are two (2) Intrinsically Safe (IS) Barrier PCBs, one for 3-4 Wire and
another for 2 Wire transmitters.
Warning: Ensure Receivers and Power Supplies are not powered when installing
PCB into the device. Failure to do so could result in injury or death.
Warning: Ensure the atmosphere is free from combustible and/or toxic gases prior to
starting this procedure.
1 Ensure Receivers and Power Supplies are not powered when installing wire to the
device.
2 Unscrew the setscrew and the Housing Cover, then pull on the LCD PCB/CPU
PCB set, removing it from the four (4) standoffs.
087-0049 REV C
SCOTT SAFETY
Maintaining the Device
117
3 Remove the two (2) wires from TB1.
It is not necessary to remove the Wire Ribbon Cable from the upper and lower PCB
stack.
4 Disconnect the tops of the plugs for any other terminal blocks in use (MODBUS,
Alarms, Fault, and Remote Acknowledge).
5 Unscrew the four (4) standoffs and lift the entire PCB stack from the housing.
6 Unscrew the two (2) retention screws on the light blue IS TB on the IS PCB and
remove the top of the plug.
7 Unscrew the two (2) screws and remove the IS Terminal Block Cover.
8 Unscrew the two (2) remaining screws from the PCB stack.
For 3-4 Wire only, retain both the Aluminum Heat Sink Plate and the Thermal
Conductive Pad underneath it. Both are located between the IS PCB and the bottom of
the housing.
9 Pull the IS PCB from the Power Supply PCB while retaining the Thermal Isolation
Barrier Pad located between the IS PCB and the Power Supply PCB, to be
re-installed. The Thermal Isolation Barrier Pad is applicable for 3-4 Wire devices
only.
10 Push the new IS PCB into the Power Supply PCB.
11 Screw the two (2) top screws into the PCB stack.
12 Replace IS Terminal Block Cover with the two (2) screws, onto the bottom of the
PCB stack.
13 Screw the two (2) retention screws on the light blue IS TB on the IS PCB and
replace the top of the plug.
14 Replace the entire PCB stack into the housing and screw the four (4) standoffs into
place.
15 Reconnect the tops of the plugs for any other terminal blocks in use (MODBUS,
Alarms, Fault, and Remote Acknowledge).
16 Replace the two (2) wires into TB1.
17 Replace the LCD PCB/CPU PCB set.
18 Replace the Housing Cover, tighten and secure the setscrew.
SCOTT SAFETY
087-0049 REV C
118
CHAPTER 6: MAINTENANCE
Replacing the Power
Supply PCB (3-4 Wire)
This section provides information on how to replace Power Supply PCB (3-4 Wire).
Warning: Ensure Receivers and Power Supplies are not powered when installing
PCB into the device. Failure to do so could result in injury or death.
Warning: Ensure the atmosphere is free from combustible and/or toxic gases prior to
starting this procedure.
1 Ensure Receivers and Power Supplies are not powered when installing wire to the
device.
2 Unscrew the setscrew and Housing Cover, then pull on the LCD PCB/CPU PCB
set, removing it from the four (4) standoffs.
3 Remove the two (2) wires from TB1.
4 Disconnect the tops of the plugs for any other terminal blocks in use (MODBUS,
Alarms, Fault, and Remote Acknowledge).
5 Unscrew the four (4) standoffs and lift the entire PCB stack from the housing.
6 Unscrew the two (2) screws and remove the IS Terminal Block Cover.
7 Unscrew the two (2) remaining screws from the PCB stack.
8 Pull the Terminal/Relay/MODBUS RS-485 PCB from the Power Supply PCB.
For 3-4 Wire only, retain both the Aluminum Heat Sink Plate and the Thermal
Conductive Pad underneath it. Both are located between the IS PCB and the bottom of
the housing.
9 Pull the IS PCB from the Power Supply PCB while retaining the Thermal Isolation
Barrier Pad located between the IS PCB and the Power Supply PCB, to be
re-installed. The Thermal Isolation Barrier Pad is applicable for 3-4 Wire devices
only.
10 Remove the Wire Ribbon Cable from the Power Supply PCB.
11 Replace the Power Supply PCB and repeat the above steps in reverse.
12 Replace the Housing Cover, tighten and secure the setscrew.
087-0049 REV C
SCOTT SAFETY
Maintaining the Device
Replacing the Power
Supply PCB (2 Wire)
119
This section provides information on how to replace Power Supply PCB (2 Wire).
Warning: Ensure Receivers and Power Supplies are not powered when installing PCB
into the device. Failure to do so could result in injury or death.
Warning: Ensure the atmosphere is free from combustible and/or toxic gases prior to
starting this procedure.
1 Ensure Receivers and Power Supplies are not powered when installing wire to the
device.
2 Unscrew the setscrew and Housing Cover, then pull on the LCD PCB/CPU PCB
set, removing it from the four (4) standoffs.
3 Remove the two (2) wires from the TB1.
4 Unscrew the four (4) standoffs and lift the entire PCB stack from the housing.
5 Unscrew the two (2) screws and remove the IS Terminal Block Cover.
6 Unscrew the two (2) remaining screws from the PCB stack.
7 Pull the IS PCB from the Power Supply PCB.
8 Remove the Wire Ribbon Cable from the Power Supply PCB.
9 Replace the Power Supply PCB and repeat the above steps in reverse.
10 Replace the Housing Cover, tighten and secure the setscrew.
Trimming the 4-20mA
Loop
This section provides information on how to trim the 4-20mA loop.
Warning: Ensure the atmosphere is free from combustible and/or toxic gases prior to
starting this procedure.
1 System Manager access level is required. The path is MAIN MENU/USER
ACCESS/SYSTEM MANAGER. Enter the four digits and select ENT/MENU
key. See “Configuring the User Access Menu” on page 74.
2 From the Text and Numerical Display, enter the Main Menu by pressing the
ENT/MENU key, select SETUP, Select MERIDIAN SETUP, and select
CURRENT LOOPS.
One (1) is the default Sensor. To change: select ENTER/MENU key and use the Up or
Down key to select Sensor 2 (to adjust loop 2) or 3 (to adjust loop3), then select
ENTER/MENU.
3 Select 4MA OFFSET, then select ENTER/MENU key.
4 Connect a precision current measuring device to the corresponding loop being
trimmed.
Ensure current measurement device is properly calibrated.
SCOTT SAFETY
087-0049 REV C
120
CHAPTER 6: MAINTENANCE
5 Use the UP or DOWN keys to increase or decrease the current on the loop until
you have 4mA at your point of measurement.
6 Select ENTER/MENU key.
7 Select 20MA OFFSET, then select ENTER/MENU key.
8 Use the UP or DOWN keys to increase or decrease the current on the loop until
you have 20mA at your point of measurement.
9 Select ENTER/MENU key.
10 Press ESC key, SAVE CHANGES? displays, press ENT/MENU key, SAVING
displays and returns to MERIDIAN SETUP screen. Press ESC key three times to
return to MAIN MENU screen.
Replacing the Terminal/Relay/MODBUS
RS-485 PCB
This section provides information on how to replace Terminal/Relay/MODBUS
RS-485 PCB.
Warning: Ensure Receivers and Power Supplies are not powered when installing
PCB into the device. Failure to do so could result in injury or death.
Warning: Ensure the atmosphere is free from combustible and/or toxic gases prior to
starting this procedure.
1 Ensure Receivers and Power Supplies are not powered when installing wire to the
device.
2 Unscrew the setscrew and Housing Cover, then pull on the LCD PCB/CPU PCB
set, removing it from the four (4) standoffs.
3 Remove the two (2) wires from TB1.
4 Disconnect the tops of the plugs for any other terminal blocks in use (MODBUS,
Alarms, Fault, and Remote Acknowledge).
5 Unscrew the four (4) standoffs and lift the entire PCB stack from the housing.
6 Unscrew the two (2) screws and remove the IS Terminal Block Cover.
7 Unscrew the two (2) remaining screws from the PCB stack.
8 Pull the Terminal/Relay/MODBUS RS-485 PCB from the Power Supply PCB.
9 Replace the Terminal/Relay/MODBUS RS-485 PCB and repeat the above steps in
reverse.
10 Replace the Housing Cover, tighten and secure the setscrew.
087-0049 REV C
SCOTT SAFETY
Maintaining the Device
Replacing the LCD
PCB/CPU PCB
121
This section provides information on how to replace LCD PCB/CPU PCB.
Warning: Ensure Receivers and Power Supplies are not powered when installing PCB
into the device. Failure to do so could result in injury or death.
Warning: Ensure the atmosphere is free from combustible and/or toxic gases prior to
starting this procedure.
1 Unscrew the setscrew and Housing Cover, then pull on the LCD PCB/CPU PCB
set, removing it from the four (4) standoffs.
2 Remove the Wire Ribbon Cable from the LCD PCB/CPU PCB.
3 Replace the LCD PCB/CPU PCB and repeat the above steps in reverse.
4 Replace the Housing Cover, tighten and secure the setscrew.
Replacing the
Meridian NPT Ex Seal
This section provides information on how to replace Meridian NPT Ex Seal that is
located between the device and the Meridian Junction Box Assembly.
Warning: Ensure Receivers and Power Supplies are not powered when installing PCB
into the device. Failure to do so could result in injury or death.
Warning: Ensure the atmosphere is free from combustible and/or toxic gases prior to
starting this procedure.
1 Unscrew the setscrew and Housing Cover, then pull on the LCD PCB/CPU PCB
set, removing it from the four (4) standoffs.
2 Remove the two (2) wires from TB1.
Do not remove the Wire Ribbon Cable from the upper and lower PCB stack.
3 Disconnect the tops of the plugs for any other terminal blocks in use (MODBUS,
Alarms, Fault, and Remote Acknowledge).
4 Unscrew the four (4) standoffs and lift the entire PCB stack from the housing.
5 Unscrew the two (2) screws and remove the IS Terminal Block Cover.
6 Unscrew the six (6) screws on the light blue IS TB and remove the six (6) wires
from the TB.
7 Unscrew the Meridian NPT Ex Seal from the device.
8 Unscrew the Meridian Junction Box Assembly Cover.
9 Unscrew the six (6) screws on the light blue TB4 and remove the six (6) wires from
the TB4 inside the Meridian Junction Box Assembly.
10 Unscrew the Meridian NPT Ex Seal from the Meridian Junction Box Assembly.
11 Pull the six (6) wires on top of the Meridian NPT Ex Seal into the device’s 3/4”
NPT hole.
SCOTT SAFETY
087-0049 REV C
122
CHAPTER 6: MAINTENANCE
12 Screw the Meridian NPT Ex Seal into the device.
When installing the Meridian NPT Ex Seal, thread into the 3/4” NPT hole, hand
tighten, then tighten an additional 1/4 to 3/4 turns.
Warning: To maintain Explosion Proof/Flame Proof a minimum of 5 threads of
engagement is required. Failure to do so could result in injury or death.
13 Insert the six (6) wires into the light blue IS TB and screw them down. See
“Connecting the Sensor Head” on page 49.
14 Screw the two (2) retention screws on the light blue IS TB on the IS PCB and
replace the top of the plug.
15 Ensure the top of all your applicable plugs with feeding wires are easely accessible
prior to replacing the PCB stack to ease re-plugging.
16 Replace the PCB stack into the housing.
17 Replace the four (4) standoffs.
18 Replace the IS Terminal Block Cover and tighten the two (2) screws.
19 Re-connect the tops of the plugs for any other terminal blocks in use (VDC,
MODBUS, Alarms, Fault, and Remote Acknowledge).
20 Replace the two (2) wires to TB1.
21 Replace the LCD PCB/CPU PCB set into t he four (4) standoffs.
22 Replace the Housing Cover, tighten and secure the setscrew.
23 Unscrew the Meridian Junction Box Assembly Cover.
24 Pull the six (6) wires on bottom of the Proof/Flame Proof Seal into the Meridian
Junction Box Assembly’s 3/4” NPT hole.
25 Screw the Meridian Junction Box Assembly onto the Meridian NPT Ex Seal.
When installing the Meridian NPT Ex Seal, thread into the 3/4” NPT hole, hand
tighten, then tighten an additional 1/4 to 3/4 turns.
Warning: To maintain Explosion Proof/Flame Proof a minimum of 5 threads of
engagement is required. Failure to do so could result in injury or death.
26 Insert the six (6) wires into the light blue TB4 and screw them down. See
“Mounting and Wiring the Meridian Junction Box Assembly (Al or SS)” on
page 31.
27 Replace the Meridian Junction Box Assembly Cover and secure the setscrew.
087-0049 REV C
SCOTT SAFETY
Maintaining the Device
Replacing the
Meridian Detector
Body Assembly
123
This section provides information on how to replace Meridian Detector Body
Assembly.
Warning: Ensure Receivers and Power Supplies are not powered when installing PCB
into the device. Failure to do so could result in injury or death.
Warning: Ensure the atmosphere is free from combustible and/or toxic gases prior to
starting this procedure.
1 Ensure Receivers and Power Supplies are not powered when installing wire to the
device.
2 Unscrew the setscrew and Housing Cover, then pull on the LCD PCB/CPU PCB
set, removing it from the four (4) standoffs.
3 Remove the two (2) wires from TB1.
It is not necessary to remove the Wire Ribbon Cable from the upper and lower PCB
stack.
4 Disconnect the tops of the plugs for any other terminal blocks in use (MODBUS,
Alarms, Fault, and Remote Acknowledge).
5 Unscrew the four (4) standoffs and lift the entire PCB stack from the housing.
6 Unscrew the two (2) screws and remove the IS Terminal Block Cover.
7 Unscrew the six (6) screws on the light blue IS TB and remove the six (6) wires
from the TB.
8 Remove Meridian End Cap and Sensor.
9 Unscrew the Meridian Detector Body Assembly from the device.
10 Select the replacement Meridian Detector Body Assembly.
11 Pull the six (6) wires on top of the Meridian Detector Body Assembly into the
device’s 3/4”NPT hole.
12 Screw the Meridian Detector Body Assembly into the device.
When installing the Meridian Detector Body Assembly, thread into the 3/4” NPT hole,
hand tighten, then tighten an additional 1/4 to 3/4 turns.
Warning: To maintain Explosion Proof/Flame Proof a minimum of 5 threads of
engagement is required. Failure to do so could result in injury or death.
13 Insert the six (6) wires into the light blue IS TB and screw them down. See
“Connecting the Sensor Head” on page 49.
14 Replace the IS Terminal Block Cover and tighten the two (2) screws.
15 Ensure the top of all your applicable plugs with feeding wires are easily accessible
prior to replacing the PCB stack to ease re-plugging.
16 Replace the PCB stack into the housing.
SCOTT SAFETY
087-0049 REV C
124
CHAPTER 6: MAINTENANCE
17 Replace the four (4) standoffs.
18 Re-connect the tops of the plugs for any other terminal blocks in use (VDC,
MODBUS, Alarms, Fault, and Remote Acknowledge).
19 Replace the LCD PCB/CPU PCB set into t he four (4) standoffs.
20 Replace the Housing Cover, tighten and secure the setscrew.
21 Replace the Meridian End Cap and secure the setscrew.
Caution: Meridian End Cap must be attached to protect the device from ingress from
water or dust. Ensure all sensor(s) are installed prior to operation. Ensure Meridian
End Cap is installed prior to operation. Only use Meridian End Cap P/N 096-3437-1
or 096-3437-2.
Re-Mapping the
Sensors
This section describes how to Re-map the Sensors.
When the sensor mapping is changed from its initial mapping an error message on the
LCD displays and the Fault LED flashes. The sensors need to be changed back to their
initial mapping. For example, initially Sensor1 was a Cat-Bead, Sensor2 was a O2 and
Sensor3 was a E-Chem. Later the sensor were changed by mistake, and you want to
change them back. Sensor1 is a O2, Sensor2 is a E-Chem and Sensor3 is a Cat-Bead.
Removing power is not required when installing/replacing the Sensor. Follow local
procedures and safety regulations.
Warning: Alarm Settings are stored in the sensor. Changing sensor changes Alarm
Settings. Verify prior to proceeding.
Removing a Sensor creates a Fault condition (FLT LED blinks, error message
alternates between System Fault and Sensor Offline on the LCD). To avoid this fault
condition, using the Menu, enter access, take sensor offline and save the change, then
remove the sensor. This is temporary, as the device automatically converts to the
Sensor back to being online.
Some E-Chem Sensors ship equipped with a E-Chem Sensor Bias Assembly. This
keeps the E-Chem Sensor warm to reduce warm up time at installation. It is not
reusable.
Warning: To prevent risk of injury or death, do not take the E-Chem Sensor Bias
Module into a potentially explosive atmosphere.
1 Remove the E-Chem Sensor Bias Module from the E-Chem Sensor, if applicable.
Warning: The order that the sensors are installed is important. The order of
installation defines the corresponding loop. For example, the first Sensor installed is
assigned to Loop1, the second Sensor installed is assigned to Loop2, the third Sensor
installed is assigned to Loop3. You must conform to the sensor type rules per sensor
position in the system configuration as outlined in Table 17. When Illegal
Configuration occurs - Not Intrinsically Safe. Sensor configuration rules are violated
or are attempted, the device automatically goes into an immediate fault mode. Failure
to adhere to the correct sensor mapping could result in injury or death.
087-0049 REV C
SCOTT SAFETY
Maintaining the Device
125
2 Ensure the device has power.
3 Using the Menu, ensure System Manager access is set.
4 Set Sensors Enable to 0 and Save using the applicable keys.
5 Sensor Enable automatically resets to 1.
6 Set Sensor Enable to either 2 or 3 as applicable and Save.
7 Remove all three (3) Sensors.
8 Re-insert each Sensor in the proper order one (1) at a time and acknowledge via
LCD.
Clearing a Sensor
Fault
This section describes how to Clear a Sensor Fault.
A sensor fault message appears on the LCD and the FLT LED blinks, when the sensor
is exposed to a high concentration of the target gas.
The high concentration shortens the life of the sensor. This applies to E-Chem and
Cat-Bead sensors.
1 To clear the fault, activate the Enter/Menu key.
SCOTT SAFETY
087-0049 REV C
126
CHAPTER 6: MAINTENANCE
Troubleshooting the
Device
Refer to Table 62 for troubleshooting assistance.
Warning: If the device does not function properly, remove from service and mark for
maintenance. All PCBs are field replaceable. Only use Scott Safety replacement parts.
Table 62 Troubleshooting Matrix
SYMPTOM
CAUSE
SOLUTION
Sensor not Read 1 Intrinsically Safe 1 Replace Intrinsically Safe (IS) Barrier PCB. See
by Gas
(IS) Barrier PCB
“Replacing the Intrinsically Safe (IS) Barrier
Detector.
circuit is open.
PCB” on page 116.
Gas Detector
does not
operate.
1 No power
applied to Gas
Detector.
1 Verify proper VDC input is applied to Gas
Detector.
• If voltage is verified, then replace Power Supply
PCB. See “Replacing the Power Supply PCB
(3-4 Wire)” on page 118.
Loss of 4-20mA 1 Damaged to
signal.
4-20mA circuit.
1 Replace Power Supply PCB.See “Replacing the
Relay(s) do not 1 Alarm set points
function.
incorrect.
2 Low power to
transmitter.
3 Bad
Terminal/Relay/
MODBUS
RS-485 PCB
1 Verify alarm settings.
2 Verify transmitter supply voltage is within the
proper VDC range.
3 Replace Terminal/Relay/MODBUS RS-485 PCB.
See “Replacing the
Gas Detector
(CPU) appears
hung, or it
continues to
reboot.
1 Firmware
malfunction.
1 Remove power for 10 to 15seconds, then reapply
power.
• If no change, then replace CPU PCB. See
Device Zero
Drifts.
1 Needs
Calibration.
2 Interfering gas
present.
3 Rapid
temperature
changes.
Power Supply PCB (3-4 Wire)” on page 118.
Terminal/Relay/MODBUS RS-485 PCB” on
page 120.
“Replacing the LCD PCB/CPU PCB” on
page 121.
1 Zero Calibrate the device.
2 Place Zero Air on Sensor to determine if outside
gas is present.
3 If possible, shield Sensor from source of
temperature changes.
Device’s output 1 It was probably 1 Apply a source of clean air to Sensor and Zero
is continuously
Zero Calibrated
Calibrate.
negative.
with background
gas present.
087-0049 REV C
SCOTT SAFETY
Troubleshooting the Device
127
Table 62 Troubleshooting Matrix (continued)
SYMPTOM
CAUSE
Device does not 1 Bad or weak
respond to
Calibration Gas.
Calibration
2 Poor gas
Gas.
delivery.
3 Poor Calibration
technique.
4 Incorrect
Calibration Gas.
5 Incorrect
Calibration Gas
concentration.
6 Bad Sensor.
7 Open circuit on
the Intrinsically
Safe (IS) Barrier
PCB.
8 K-Factor not
applied.
SOLUTION
1 Test the device with the Sensor Simulator. Replace
Calibration Gas Source.
2 Verify proper Regulator, Tubing (Tygon, Teflon),
Calibration Fitting are used.
• Check Tubing for cuts.
• For Cl2 applications, confirm Regulator/Tubing
was not used with H2S. Also confirm that other
reducing gases were not used, like Ammonia,
Hydrides etc.
• For sticky gases (HF, HCl Cl2, SO2, BCl3 etc.),
confirm that Teflon Tubing is being used.
• Check Calibration Adapter is not plugged.
• Windy environment.
3 Follow proper Calibration procedure. See
“Calibration Methods” on page 110.
4 Replace Calibration Gas Source.
• Verify sensor range is = or > calibration gas
concentration.
5 Follow proper Calibration procedure. See
“Calibration Methods” on page 110.
6 Replace Sensor.See “Replacing the Sensor” on
page 115.
7 Replace the Intrinsically Safe (IS) Barrier PCB.
See “Replacing the Intrinsically Safe (IS)
Barrier PCB” on page 116.
8 Enter the K-Factor into its parameter field after
applicable calculations. See “Combustible
Cat-Bead Sensor K-Factors” on page 143.
LCD is blank
although the
device is
producing an
output signal.
1 LCD contrast too 1 Adjust LCD contrast.
low.
2 Ensure proper VDC power is supplied, or wires
2 24VDC power
properly landed.
not wired
correctly, or no
power supplied,
or <24VDC
applied.
Loss segments
in LCD.
1 Failed LCD
segments.
1 Replace LCD PCB. See “Replacing the LCD
LCD displays
Cal Required
1 Bad or weak
Calibration Gas.
2 Poor Calibration
technique.
1 Replace Gas Source.
2 Follow proper Calibration procedure. See
LCD displays
Under range
SCOTT SAFETY
PCB/CPU PCB” on page 121.
“Calibration Methods” on page 110.
1 Gas reading is
1 Re-zero in clean air.
below zero.
2 Check for possible interference gas.
2 Interference gas 3 Re-zero and calibrate.
present and gives
negative reading.
3 Sensor drifted.
087-0049 REV C
128
CHAPTER 6: MAINTENANCE
Table 62 Troubleshooting Matrix (continued)
087-0049 REV C
SYMPTOM
CAUSE
SOLUTION
LCD displays
Over Range
1 Exposed to gas
concentration
higher than its
range.
2 Sensor exposed
to interference
gas higher than
sensor range.
3 Sensor is not
settled yet, or
sensor is out of
balance.
1 Check test gas verses sensor range.
2 Apply clean air.
3 Wait for sensor to settle. Rebalance the sensor
(zero for IR and Cat Bead sensors).
LCD displays
Sensor X is
Offline and
Fault LED
Flashes
OR
LCD displays
System Fault
1 Sensor is
removed from
device.
2 Sensor
connection not
fully engaged.
1 Replace sensor. See “Replacing the Sensor” on
LCD displays
I.S. Violation
and Fault LED
Flashes
1 Sensor mapping
has changed
from initial
configuration.
1 Re-map the sensors. See “Re-Mapping the
LCD displays
Sensor Fault
1 Exposed to gas
concentration
higher than its
range.
1 Clear the Sensor Fault. See “Clearing a Sensor
page 115.
2 Verify Sensor is pushed firmly into detector head.
Sensors” on page 124.
Fault” on page 125.
SCOTT SAFETY
087-0049
Appendix A
Rev C
SPECIFICATIONS
Appendix Overview
This appendix covers the following topics:
•
•
•
SCOTT SAFETY
Device Specifications
Combustible (LEL), IR, Cat-bead and MOS Sensor Specifications
Toxic (E-Chem) Sensor Specifications
087-0049 REV C
130
APPENDIX A: SPECIFICATIONS
Device Specifications
Table 63 lists the device’s specifications.
Table 63 Device Specifications
DEVICE SPECIFICATIONS
Power
Requirements
Relays
3-4 Wire PCB (All Relays
energized, with LCD Heater,
and with one Optional
Communications PCB)
10 to 30VDC 8.5Watts
24VDC@355mA Max.
Note: Voltages as measured at the
device.
3-4 Wire PCB (All Relays
energized, without LCD Heater,
and with one Optional
Communications PCB)
10 to 30VDC 6.0Watts
24VDC@250mA Max.
Note: Voltages as measured at the
device.
2 Wire PCB
18 to 30VDC, 21.6mA Max.
Note: Voltages as measured at the
device.
4 Wire Loop Power Supply
10-30VDC, 24mA Max.
Note: Voltages as measured at the
device.
Four configurable form C (SPDT) relays rated for 5A @ 30VDC or
250VAC resistive
Relay1, Relay2 and Relay3 level alarms are configurable for High or
Low trip, for normally energized (Failsafe) or normally de-energized
and for latching or non-latching
Relay4 is always normally energized for failsafe operation so loss of
power to the device indicates a Fault condition.
Loop Load
Resistance at
nominal 24VDC
4 to 20mA
Current Loop
Communications
– Standard
087-0049 REV C
•
•
•
•
3 Wire Non-Isolated
(Source)
For HARTWired
•
•
840Ω Max.
230 to 600Ω
3 Wire Non-Isolated (Sink)
For HARTWired
•
•
680Ω Max.
230 to 600Ω
4 Wire Isolated (Sink and
Source)
680Ω Max.
•
•
•
•
•
•
•
•
•
•
1 Loop Per Sensor, Normal
Signaling
Connection Types
Inhibit Current
Fault Current
•
•
4 to 21.6mA
Sink, Source, Non-Isolated, &
Isolated
Configurable
3.6mA
MODBUS RTU (RS-485)
RTU legal address range is 1 to 247
Up to 32 RTUs per loop
1,200Meters Maximum distance @19.2Kbs using Belden 9841
twisted-pair cable
SCOTT SAFETY
Device Specifications
131
Table 63 Device Specifications (continued)
DEVICE SPECIFICATIONS
Communications
Expansion Cards
(CEC) – Optional
PCB
•
•
•
•
Memory
•
•
•
WiredHART PCB
HART Version 7.2 or higher
Interface – Emerson Model 375 or 475 Handheld Field
Communicator, AMS-HART Version 5-7, Custom HART AMS
(DCS, SCADA, PLC)
Rx (Controller) to Tx (Fixed Gas Device) Theoretical Maximum
Cable Distance is 10,000Ft (3,000meters). For details refer to the
HART Communication Application Guide.
Fault Loop Current – 3.2mA
Non-Volatile Memory (NV-EEPROM)
Ensures configuration parameters retained during power loss.
Number of
Sensors
3 Sensors Maximum
Duct Mount
Adapters
Flow Velocities
350 to 1000CFM
Compatibility
•
•
Calibration
Both Zero and Span supported
LED
3 Alarms and 1 Fault
Heater Actuation
(for LCD with
Heater only)
Heater ON: When <-10°C
Heater OFF: At 0°C
Parameter is not configurable.
Transmitter
Housing
Material
Aluminium or Stainless Steel with (2)
3/4”NPT conduit connections
Dimensions (Both Al and SS)
5.79Hx6.57Wx5.69”D
(147.07Hx166.88Wx144.53Dmm)
Flat
Round: for 6” to 8” Diameter Ducts
Mounting Flanges Holes (Both ID 0.30” on 5.85” centers
Al and SS)
(ID 7.62mm on 148.59mm centers)
SCOTT SAFETY
Weight (includes housing, PCB
stack, detector assembly, sensor
and Meridian End Cap)
•
Remote Sensor
Junction Housing
with (4) 3/4”NPT
conduit
connections –
Aluminium
Dimension
4.70Hx4.70Wx3.55”D
(119.38Hx119.38Wx190.17Dmm)
Mounting Flanges Holes
ID 0.30” on 4.41” centers
(ID 7.62mm on 112.01mm centers)
Weight
1.7Lbs. (0.77Kg)
Remote Sensor
Junction Housing
with (4) 3/4”NPT
conduit
connections –
Stainless Steel
Dimension
4.86Hx4.86Wx3.86”D
(123.5Hx123.5Wx98.0Dmm)
Mounting Flanges Holes
ID 0.33” on 5.59” centers
(ID 8.5mm on 142mm centers)
Weight
5.2Lbs. (2.35Kg)
•
6.52Lbs. (2.96Kg) Aluminium
Device
11.0Lbs. (4.98Kg) Stainless Steel
Device
087-0049 REV C
132
APPENDIX A: SPECIFICATIONS
Table 63 Device Specifications (continued)
DEVICE SPECIFICATIONS
Field Wiring
Remote
Intrinsically Safe
Cable
•
•
•
•
•
087-0049 REV C
Plug-In Connectors: 28AWG to 16AWG (0.14mm2 to 1.5mm2)
Input Power Connector: 18AWG to 10AWG (0.2mm2 to 4mm2)
Wiring Temperature: 105°C Minimum
The cable between Remote Sensor and Meridian Junction Box
Assembly must be a 6 conductor, 18AWG (approximately 0.82mm2)
minimum size, shielded, insulation thickness 0.4mm minimum
appropriate for Intrinsically Safe applications. It should meet IEC
60079-14 standard or its equivalent.
100 Ft. (30.48m) Maximum distance from a Transmitter to any
Sensor. Reference control drawings: 096-3506-B for 3-4 Wire and
096-3507-B for 2 Wire.
Operating
Temperature
-40.0 to +167°F (-40 to +75°C)
Storage
Temperature
-67.0 to +167°F (-55 to +75°C)
Operating
Humidity
5 to 95% RH, Non-Condensing
SCOTT SAFETY
Combustible (LEL), IR, Cat-bead and MOS Sensor Specifications
Combustible (LEL), IR,
Cat-bead and MOS
Sensor Specifications
133
Table 64 lists Combustible (LEL), IR, Cat-bead and MOS sensor specifications. See
“Parts List” on page 160.
Table 64 Combustible (LEL), IR, Cat-bead and MOS Sensors Specifications
COMBUSTIBLE (LEL), IR, CAT-BEAD AND MOS SENSOR SPECIFICATIONS
IR - Combustible (LEL) Sensor
Default Range
0 to 100% LEL
Accuracy
50%LEL and below:
+3%LEL
>50%LEL:
+5%LEL
Warm Up Time
5 Mins.
Response Time
T90 <20Sec
Operating Temp.
-40.0 to +167°F (-40 to +75°C)
Storage Temp.
-67.0 to +167°F (-55 to +75°C)
Humidity
0 to 95% RH, Non-Condensing
Default Cal Gas
CH4
IR - Carbon Dioxide (CO2) Sensor
Default Range
0-5% V/V
Accuracy
+ 0.25%V/V
Warm Up Time
5 Mins.
Response Time
T90 <30Sec
Operating Temp.
-40.0 to +167°F (-40 to +75°C)
Storage Temp.
-4.0 to +122°F (-55 to +75°C)
Humidity
0 to 95% RH, Non-Condensing
Default Cal Gas
CO2
Cat-Bead - Combustible (LEL) Sensor
Default Range
0-100%LEL
Accuracy
<50%LEL:
+3%LEL
>50%LEL:
+5%LEL
Warm Up Time
5 Mins.
Response Time
T90 <20Sec
Operating Temp.
-40 to +167°F (-40°C to +75°C)
Storage Temp.
-67 to +167°F (-55 to +75°C)
Humidity
0 to 95% RH, Non-Condensing
Default Cal Gas
CH4
MOS – Hydrogen Sulfide (H2S)
Default Range
SCOTT SAFETY
0-100PPM
087-0049 REV C
134
APPENDIX A: SPECIFICATIONS
Table 64 Combustible (LEL), IR, Cat-bead and MOS Sensors Specifications
COMBUSTIBLE (LEL), IR, CAT-BEAD AND MOS SENSOR SPECIFICATIONS
087-0049 REV C
Accuracy
+ 6PPM or 10% applied gas concentration, which ever is
greater
Warm Up Time
24 to 48Hours
(We recommend calibration or re-calibration after sensor
is powered for 24 to 48 hours)
Response Time
T50 <20Sec
Operating Temp.
-40 to +167°F (-40 to +75°C)
Storage Temp.
-67 to +167°F (-55 to +75°C)
Humidity
5 to 95% RH, Non-Condensing
Default Cal Gas
H2 S
SCOTT SAFETY
Toxic (E-Chem) Sensor Specifications
135
Table 65 lists some of the Toxic (E-Chem) sensor specifications.
Toxic (E-Chem)
Sensor Specifications
We offer two (2) types of E-Chem Sensors: Standard and Rock Solid.
•
The Standard E-Chem Sensors – Capable of detecting higher concentrations than
the Rock Solid E-Chem Sensors.
•
The Rock Solid E-Chem Sensors – Baseline is more stable and accurate. Allows
lower range and lower alarm settings. Less susceptible to interference gases. Faster
response and recovery time. Compared to the Standard E-Chem Sensors.
Table 65 Toxic (E-Chem) Sensors Specifications
096-3473
-XX
GAS
SYMBOL
TYPE**
RH
OPERATING DEFAULT
RATING
TEMP
RANGE
***
RANGE (°C) (PPM)****
RANGE (MIN. TO
MAX.) (PPM)*****
DEFAULT
CAL GAS
03
Ammonia
NH3
Std.
G
-5 to 50
(-40 to 50)#
100
50 to 500
NH3
07
Arsine
AsH3
Std.
G
-40 to 50
1000ppb
500ppb to 1000ppb
PH3
33
Boron
Trichloride
BCl3
RS
H
-25 to 50
10
10
SO2
34
Boron Trifluoride BF3
RS
H
-25 to 50
5
5 to 15
SO2
24
Bromine
Br2
RS
H
-40 to 50
10
1 to 10
Cl2
01
Carbon
Monoxide
CO
Std.
G
-40 to 50
100
50 to 1000
CO
20
Chlorine
Cl2
RS
H
-40 to 50
5
1 to 30
Cl2
21
Chlorine
Cl2
RS*
L
-40 to 50
5
1 to 30
Cl2
52
Chlorine
Cl2
Std.
G
-40 to 50
5
5 to 10
Cl2
37
Chlorine Dioxide ClO2
RS*
H
-40 to 50
5
1 to 5
Cl2
38
Chlorine Dioxide ClO2
RS
L
-40 to 50
5
1 to 5
Cl2
18
Diborane
B 2H 6
RS
H
-10 to 50
0.5
0.5 to 5
HCN
17
Diborane
B 2H 6
RS
L
-10 to 50
0.5
0.5 to 5
HCN
15
Ethylene Oxide
(ETO)
C2H4O
Std.
G
-20 to 50
10
10
ETO
22
Fluorine
F2
RS
H
-40 to 50
5
1 to 5
Cl2
23
Fluorine
F2
RS*
L
-40 to 50
1
1 to 5
Cl2
53
Fluorine
F2
Std.
G
-40 to 50
10
10 to 25
Cl2
10
Germane
GeH4
Std.
G
-40 to 50
1000ppb
1000ppb
PH3
12
Hydrogen
H2
Std.
H
-40 to 50
4%
1 to 4%
H2
13
Hydrogen
H2
Std.*
L
-40 to 50
4%
1 to 4%
H2
29
Hydrogen
Bromide
HBr
RS
H
-25 to 50
10
1 to 30
SO2
30
Hydrogen
Bromide
HBr
RS*
L
-25 to 50
5
1 to 30
SO2
25
Hydrogen
Chloride
HCl
RS*
H
-25 to 50
10
1 to 25
SO2
SCOTT SAFETY
087-0049 REV C
136
APPENDIX A: SPECIFICATIONS
Table 65 Toxic (E-Chem) Sensors Specifications (continued)
096-3473
-XX
GAS
SYMBOL
TYPE**
RH
OPERATING DEFAULT
RATING
TEMP
RANGE
***
RANGE (°C) (PPM)****
RANGE (MIN. TO
MAX.) (PPM)*****
DEFAULT
CAL GAS
26
Hydrogen
Chloride
HCl
RS
L
-25 to 50
10
1 to 25
SO2
46
Hydrogen
Chloride
HCl
Std.
H
-25 to 50
25
10 to 100
HCl
47
Hydrogen
Chloride
HCl
Std.
L
-25 to 50
25
10 to 100
HCl
16
Hydrogen
Cyanide
HCN
RS
H
-10 to 50
10
10 to 25
HCN
11
Hydrogen
Cyanide
HCN
Std.*
G
-20 to 50
25
25 to 100
HCN
27
Hydrogen
Fluoride
HF
RS*
H
-25 to 50
10
1 to 30
SO2
28
Hydrogen
Fluoride
HF
RS
L
-25 to 50
10
1 to 30
SO2
41
Hydrogen Sulfide H2S
Std.*
H
-40 to 50
50
25 to 200
H 2S
42
Hydrogen Sulfide H2S
Std.
L
-40 to 50
50
25 to 200
H 2S
02
Hydrogen Sulfide H2S
(Low Methanol
cross sensitivity)
Std.
G
-40 to 50
50
10 to 100
H 2S
50
Methanol
CH3OH
Std.
G
-40 to 50
500
500
CH3OH
43
Methyl Iodide
CH3I
Std.
L
-40 to 50
25
25
H 2S
48
Methyl
Mercaptan
CH3SH
Std.
G
-25 to 50
3
3 to 10
CH3SH
04
Monomethyl
Hydrazine
(MMH)
CH3(NH)NH2 Std.
G
-5 to 50
(-40 to 50)#
50
50
NH3
14
Nitric Oxide
NO
Std.
G
-40 to 50
50
50
NO
54
Nitrogen Dioxide NO2
Std.
G
-40 to 50
10
10 to 20
NO2
19
Oxygen
O2
Std.
G
-30 to 50
25%
10 to 25%
N2
39
Ozone
O3
RS*
H
-40 to 50
1
1 to 3
Cl2
40
Ozone
O3
RS
L
-40 to 50
1
1 to 3
Cl2
08
Phosphine
PH3
Std
G
-40 to 50
500ppb
500 to 1000ppb
PH3
09
Silane
SiH4
Std.
G
-40 to 50
10
1ppm, 10ppm
PH3
35
Silicon
Tetrafluoride
SiF4
RS
L
-25 to 50
5
5
SO2
31
Sulfur Dioxide
SO2
RS*
H
-25 to 50
10
1 to 25
SO2
32
Sulfur Dioxide
SO2
RS
L
-25 to 50
10
1 to 25
SO2
05
Sulfur Dioxide
SO2
Std.
H
-40 to 50
50
10 to 500
SO2
06
Sulfur Dioxide
SO2
Std.
L
-40 to 50
50
10 to 500
SO2
087-0049 REV C
SCOTT SAFETY
Toxic (E-Chem) Sensor Specifications
137
Table 65 Toxic (E-Chem) Sensors Specifications (continued)
096-3473
-XX
GAS
SYMBOL
TYPE**
RH
OPERATING DEFAULT
RATING
TEMP
RANGE
***
RANGE (°C) (PPM)****
RANGE (MIN. TO
MAX.) (PPM)*****
DEFAULT
CAL GAS
51
Tetraethyl
Orthosilicate
(TEOS)
Si(OC2H5)4
Std.
G
-40 to 50
50
50
CH3OH
36
Tungsten
Hexafluoride
WF6
RS
L
-25 to 50
1
1 to 3
SO2
* Denotes the most common sensor used to monitor the gas when several options are available.
**Sensor Type – Standard or Rock Solid. Sensor Type - Rock Solid sensors have extremely low noise allowing for lower alarm
set points with less false alarms.
*** The typical Humidity Range the sensor will be exposed to. (G) denotes General indoor or outdoor use, (H) denotes High
humidity (70%RH, +/-15%RH) areas or outdoor use, (L) Low humidity (50%RH, +/-15%RH) for indoor use.
**** Default Range – This is the most popular range for each Scott sensor.
***** Range – All are PPM except where denoted.
# NH3 and MMH sensors operate down to -40°C if the environment is kept frost-free. In these conditions, a sampling line with
gas dryer may be used. Please contact your Scott sales representative or Scott Safety. See “Technical Service” on page 158.
Note: Toxic (E-Chem) Sensor specifications vary from sensor to sensor. We provide a large number to select from. This list is
not all-inclusive. For specific Part Numbers, please contact your Scott sales representative or Scott Safety. See “Technical
Service” on page 158.
SCOTT SAFETY
087-0049 REV C
138
APPENDIX A: SPECIFICATIONS
087-0049 REV C
SCOTT SAFETY
087-0049
Appendix B
Rev C
SENSOR INFORMATION
Appendix Overview
This appendix covers the following topics:
•
•
•
•
•
•
SCOTT SAFETY
Sensor Technology Overview
Sensor Performance Factors
Combustible Cat-Bead Sensor K-Factors
Combustible IR Sensor Surrogate Test Gas
Toxic (E-Chem) Gas Interferences
MOS Sensor Interferences
087-0049 REV C
140
APPENDIX B: SENSOR INFORMATION
Sensor Technology
Overview
This section provides a basic introduction to Sensor Technology.
Table 66 provides an overview of the different types of Sensor technologies.
Table 66 Sensor Technology Comparison
TECHNOLOGY
Cat-Bead
Infrared (IR)
Electrical
Chemical
(E-Chem)
DESCRIPTION
ADVANTAGES
Beads consist of a wrapped coil of platinum wire covered with a
ceramic base and then coated with a precious metal to act as the
catalyst. The active, or sensing, bead is heated to temperatures up to
600°C to allow the oxidation of combustible gases to occur. The
reference, or nonsensitive, bead remains at a lower temperature and
is separated from the active bead by a thermal barrier. The
resistance of the two beads is measured and compared using a
Wheatstone bridge.
Wheatstone bridge circuit: When gas burns on the active bead
causing the temperature to increase, the resistance of the bead
changes. As the bridge becomes unbalanced, the offset voltage is
used to determine the measured value.
The combustion that occurs across the active bead leads to an
unbalanced output of the circuit. This value is then used to
determine the concentration of combustible gas present.
•
•
Infrared light is a part of the electromagnetic spectrum that is
comprised of invisible light that can be felt as heat. The wavelength
profile of infrared is expressed in microns between 0.7 µm and 300
µm. Hydrocarbon combustible gas molecules can absorb certain
wavelengths of IR called absorption bands and allow other
wavelengths to transmit through. Each gas has a specific set of IR
wavelengths that will absorb, called the absorption spectrum. This
provides a unique identifier to monitor and detect target gases.
Infrared sensors are designed to detect specific types of gases
utilizing filters that will only allow a narrow band of wavelengths to
pass through to a detector. This works on the same principle as a
pair of sunglasses that filter out some of the sun’s UV rays and
visible light from your eyes.
Electrochemical sensors provide monitoring for a wide variety of
toxic gases. An aqueous electrolyte solution provides a conductive
path for ions to travel between electrodes. Target gases are either
reduced or oxidized at the working electrode resulting in a current
flow between the working and the counter electrode. The reference
electrode provides a zero reference point from which the resulting
difference in potential between the counter and working electrodes
can be compared. Target gas levels can be measured in parts per
million (ppm).
Rule of thumb: If you can’t put your head into the environment
being monitored, don’t use an E-chem sensor to do the monitoring.
• No liquid environments
• No extreme temperatures or pressures
• No high velocity duct mounts
LIMITATIONS
Low cost
Can be used to
detect wide
range of
combustible
gases
Proven
technology for
the detection of
hydrogen
•
•
•
•
Long life
Resistant to
contamination
•
•
•
Low power
Wide range of
gases can be
detected
Low cost
•
•
•
•
•
•
•
High power
Susceptible to
poisoning from
chlorine,
silicones and
acid gases
Cannot be used
in an oxygen
deficient
atmosphere
Unable to
discriminate
between
different types
of combustible
gas
Unable to detect
hydrogen
Unable to
discriminate
between
different types
of hydrocarbons
Life span
shortened in
arid or high
humidity
conditions
Some require
oxygen
Note: We offer two types of E-Chem Sensors: Standard and
RockSolid. See “Toxic (E-Chem) Sensor Specifications” on
page 135.
087-0049 REV C
SCOTT SAFETY
Sensor Technology Overview
141
Table 66 Sensor Technology Comparison (continued)
TECHNOLOGY
Metal Oxide
Semiconductor
(MOS)
SCOTT SAFETY
DESCRIPTION
Metal oxide semiconductor gas sensors utilize thin films of metal
oxides placed upon a silica substrate. The substrate is heated around
200-600°C while the resistance of the metal oxide is continuously
monitored. The sensor responds to changes in the atmosphere as the
resistance value of the metal oxide changes when exposed to target
gases.
ADVANTAGES
•
•
•
Performs well in
high/low
humidity
Long life span
In general, can
detect both low
ppm of toxic
gases and higher
concentrations of
combustible
gases
LIMITATIONS
•
•
Nonlinear
response
Cannot be used
in an oxygen
deficient
atmosphere
087-0049 REV C
142
APPENDIX B: SENSOR INFORMATION
Sensor Performance
Factors
This section provides a basic introduction to Sensor Performance Factors.
Table 67 provides an overview of may factors in selecting the correct sensor type for
gas monitoring.
Table 67 Sensor Performance Comparison
FACTOR
Target Gas
DESCRIPTION
SENSOR TYPE
Identify the target gases that have a potential for Generally Toxic
providing a hazard in the process. Most sensors • Electrochemical
are applicable to mostly toxic or mostly
• MOS
combustible gas monitoring. However, some
sensor types are capable of monitoring for
Generally Combustible
either. Situations where several gases may pose
• Infrared
a threat may be monitored for a presence.
• Catalytic Bead
Sensor Placement Sensor effectiveness is directly impacted by
Application specific
sensor placement. Even the best sensor will not
be able to detect a hazard if placed too far from
release or receptor points. Consider zoned or
voting coverage areas where multiple sensor
points effectively provide a maximum,
redundant coverage area to minimize false
alarms and account for barriers and air currents,
and all potential gas release points.
087-0049 REV C
Temperature/Hu
midity
Monitoring processes in severe environments
Varies
can affect certain sensor types. All sensor types
are rated for use in a specific temperature range.
Some sensors can be affected in high humidity
environments where water vapors can interfere
with readings.
Oxygen Content
In applications where oxygen may be displaced Cat bead, MOS and
or not present in a gas sample, the sensor type
most E-Chem sensors
should be considered.
will not perform as
designed without
oxygen present.
Power
Consumption
Some sensor types consume much more power Varies
than others. This factor is important when
considering whether a technology is appropriate
for use in a fixed or portable detection device.
Fixed detection systems must have appropriate
power supplies to maintain the current
necessary for sensor operation.
Cross
Interference
Nearly all sensor types can be susceptible to
Varies
interferences from other than target gases.
Sensor manufacturers employ different methods
to counter the effects of this through the use of
filters, sensor construction materials, and
preprogrammed expected response functions
based on target gas characteristics. In some
technologies, a sensor can be calibrated with an
appropriate cross interference gas, if the target
gas is unobtainable or difficult to be applied in
field conditions. In this case, a K-factor should
be applied to the calibration values.
SCOTT SAFETY
Combustible Cat-Bead Sensor K-Factors
Combustible Cat-Bead
Sensor K-Factors
143
Cat-Bead Sensors can be used to accurately detect most combustible gases, especially
hydrocarbons. The default calibration gas for these sensors is mostly Methane, since
almost 90% of the combustible gas detection applications are for this gas. The other
most popular gas used is Propane. Cat-Bead sensors respond differently based on
different combustible gases. Thus, the following examples for each gas.
Although the target gas is always preferred in order to achieve maximum accuracy,
these gases may not always be available in a form convenient for use in the field.
Surrogate test gases are convenient substitutes, and have been selected for their
stability and availability.
Using Target Gas
Other than Methane
This section covers calibration to a target gas other than Methane, using that same
target gas. For example:
1 User desires to measure Propane (C3H8) using a Cat-Bead sensor.
2 User has a Propane bottle of gas and the label reads 50%LEL.
a Adjust K-FACTOR field in the sensor setup menu to match the value for the
target gas. In this example, Propane (C3H8) is 0.51. See “Configuring the Setup
Menu” on page 62.
3 Ensure the CALGASCONC value matches the gas label, in this example,
50%LEL.
4 After calibrated, the device should read 50%LEL in Propane scale when 50%LEL
Propane bottle gas is applied.
Using Methane as a
Surrogate Gas
This section covers the Methane Surrogate Gas.
Table 68 provides the K-Factors referenced to methane calibration. The factors are the
typical ratios of the response to the listed gases relative to the response to methane.
The values are typical, but will vary from sensor to sensor and over the lifetime of a
given sensor. When a gas other than the calibration gas is detected, divide the reading
by the corresponding factor to estimate the actual gas concentration. For example,
propane may be detected by the device calibrated with methane.
Note the concentration in %LEL on the label of the methane tank. Apply gas to the
device and span to value derived by dividing this number with the given K-Factor. For
example:
1 User desires to measure Isobutylene (C4H8) using a Cat-Bead sensor.
2 User has a Methane bottle of gas and the label reads 50%LEL.
a Adjust K-FACTOR field in the sensor setup menu to match the value for the
target gas. In this example, Isobutylene (C4H8) is 0.58. See “Configuring the
Setup Menu” on page 62.
3 User determines the CALGASCONC value.
a The K-Factor (Methane ratio) for Isobutylene (C4H8) is 0.58 (from Table 68
below).
SCOTT SAFETY
087-0049 REV C
144
APPENDIX B: SENSOR INFORMATION
b Divide 50%LEL by 0.58 K-Factor. This equals 86.2%LEL.
c Thus, the device’s CALGASCONC parameter should be set to 86%LEL when
exposed to 50%LEL Methane. See “Configuring the Setup Menu” on page 62.
4 After calibrated, the device should read 86%LEL in Isobutylene scale when
50%LEL Methane bottle gas is applied.
Table 68 K-Factors for Combustible Cat-bead Sensors - Methane
GAS/VAPOR*
087-0049 REV C
K-FACTOR
(PARAMETER
FIELD)
K-FACTOR
(METHANE
RATIO)
Acetaldehyde (C2H4O)
0.64
0.64
Acetone (C3H6O)
0.60
0.60
Acetylene (C2H2)
0.63
0.63
Ammonia (NH3)
1.43
1.43
Benzene (C6H6)
0.45
0.45
1,3-Butadiene (C4H6)
0.45
0.45
n-Butane (C4H10)
0.52
0.52
Isobutane (C4H10)
0.45
0.45
Isobutylene (C4H8)
0.58
0.58
Butyl Acetate (C6H12O2)
0.40
0.40
n-Butyl Alcohol (C4H10O)
0.45
0.45
Chlorobenzene (C6H5Cl)
0.38
0.38
Cyclohexane (C6H12)
0.46
0.46
Diethyl ether (C4H10O)
0.50
0.50
n-Decane (C10H22)
0.29
0.29
Ethane (C2H6)
0.68
0.68
Ethyl Acetate (C4H8O2)
0.46
0.46
Ethyl Alcohol (C2H6O)
0.63
0.63
Ethylbenzene (C8H10)
0.41
0.41
Ethylene (C2H4)
0.63
0.63
Ethylene Oxide (C2H4O)
0.49
0.49
Heptane (C7H16)
0.42
0.42
n-Hexane (C6H14)
0.40
0.40
Hydrogen (H2)
0.81
0.81
Isopropyl Alcohol (C3H8O)
0.44
0.44
Methane (CH4)
1.00
1.00
Methanol (CH4O)
0.78
0.78
Methylene Chloride (CH2Cl2)
1.11
1.11
Methyl Chloride (CH3Cl)
0.88
0.88
Methyl Ethyl Ketone (C4H8O)
0.43
0.43
SCOTT SAFETY
Combustible Cat-Bead Sensor K-Factors
145
Table 68 K-Factors for Combustible Cat-bead Sensors - Methane (continued)
GAS/VAPOR*
K-FACTOR
(PARAMETER
FIELD)
K-FACTOR
(METHANE
RATIO)
n-Otane (C8H18)
0.32
0.32
Pentane (C5H12)
0.51
0.51
Isopentane (C5H12)
0.46
0.46
Propane (C3H8)
0.51
0.51
Propylene (C3H6)
0.62
0.62
Propylene Oxide (C3H6O)
0.44
0.44
Styrene (C8H8)
0.43
0.43
Tetrahydrofuran (C4H8O)
0.47
0.47
Toluene (C7H8)
0.42
0.42
Vinyl Chloride (C2H3Cl)
0.56
0.56
O-Xylene (C8H10)
0.38
0.38
Note: K-Factors based on methane.
Using Propane as a
Surrogate Gas
This section covers the Propane Surrogate Gas.
Table 69 provides the K-Factors referenced to propane calibration. The factors are the
typical ratios of the response to the listed gases relative to the response to propane.
The values are typical, but will vary from sensor to sensor and over the lifetime of a
given sensor. When a gas other than the calibration gas is detected, divide the reading
by the corresponding factor to estimate the actual gas concentration. For example,
methane may be detected by the device calibrated with propane.
Note the concentration in %LEL on the label of the propane tank. Apply gas to the
device and span to value derived by dividing this number with the given K-Factor. For
example,
1 User desires to measure Isobutylene (C4H8) using a Cat-Bead sensor.
2 User has a Propane bottle of gas and the label reads 50%LEL.
a Adjust K-FACTOR (Propane ratio) field in the sensor setup menu to match the
value for the target gas. In this example, Isobutylene (C4H8) is 0.58. See
“Configuring the Setup Menu” on page 62.
3 User determines the CALGASCONC value.
a The K-Factor for Isobutylene (C4H8) is 1.14 (from Table 69 below).
b Divide 50%LEL by 1.14 K-Factor. This equals 43.8%LEL.
c Thus, the device’s CALGASCONC parameter should be set to 43.8%LEL
when exposed to 50%LEL Propane. See “Configuring the Setup Menu” on
page 62.
4 After calibrated, the device should read 44%LEL in Isobutylene scale when
50%LEL Propane bottle gas is applied.
SCOTT SAFETY
087-0049 REV C
146
APPENDIX B: SENSOR INFORMATION
Table 69 K-Factors for Combustible Cat-bead Sensors - Propane
GAS/VAPOR*
087-0049 REV C
K-FACTOR
(PARAMETER
FIELD)
K-FACTOR
(PROPANE
RATIO)
Acetaldehyde (C2H4O)
0.64
1.25
Acetone (C3H6O)
0.60
1.18
Acetylene (C2H2)
0.63
1.23
Ammonia (NH3)
1.43
2.80
Benzene (C6H6)
0.45
0.88
1,3-Butadiene (C4H6)
0.45
0.88
n-Butane (C4H10)
0.52
1.01
Isobutane (C4H10)
0.45
0.88
Isobutylene (C4H8)
0.58
1.13
Butyl Acetate (C6H12O2)
0.40
0.78
n-Butyl Alcohol (C4H10O)
0.45
0.88
Chlorobenzene (C6H5Cl)
0.38
0.74
Cyclohexane (C6H12)
0.46
0.90
Diethyl ether (C4H10O)
0.50
0.98
n-Decane (C10H22)
0.29
0.56
Ethane (C2H6)
0.68
1.33
Ethyl Acetate (C4H8O2)
0.46
0.90
Ethyl Alcohol (C2H6O)
0.63
1.23
Ethylbenzene (C8H10)
0.41
0.80
Ethylene (C2H4)
0.63
1.23
Ethylene Oxide (C2H4O)
0.49
0.96
Heptane (C7H16)
0.42
0.82
n-Hexane (C6H14)
0.40
0.78
Hydrogen (H2)
0.81
1.58
Isopropyl Alcohol (C3H8O)
0.44
0.86
Methane (CH4)
1.00
1.96
Methanol (CH4O)
0.78
1.52
Methylene Chloride (CH2Cl2)
1.11
2.17
Methyl Chloride (CH3Cl)
0.88
1.72
Methyl Ethyl Ketone (C4H8O)
0.43
0.84
n-Otane (C8H18)
0.32
0.62
Pentane (C5H12)
0.51
1.00
Isopentane (C5H12)
0.46
0.90
Propane (C3H8)
0.51
1.00
Propylene (C3H6)
0.62
1.21
Propylene Oxide (C3H6O)
0.44
0.86
SCOTT SAFETY
Combustible Cat-Bead Sensor K-Factors
147
Table 69 K-Factors for Combustible Cat-bead Sensors - Propane (continued)
GAS/VAPOR*
K-FACTOR
(PARAMETER
FIELD)
K-FACTOR
(PROPANE
RATIO)
Styrene (C8H8)
0.43
0.84
Tetrahydrofuran (C4H8O)
0.47
0.92
Toluene (C7H8)
0.42
0.82
Vinyl Chloride (C2H3Cl)
0.56
1.09
O-Xylene (C8H10)
0.38
0.74
Note: K-Factors based on propane.
SCOTT SAFETY
087-0049 REV C
148
APPENDIX B: SENSOR INFORMATION
Combustible IR
Sensor Surrogate Test
Gas
This section covers the Combustible IR Sensor (096-3473-56) with Custom
Calibration Gas Options.
Some gas types are available pre-calibrated by the factory. The Combustible IR
Sensors ship with an individual correction factor (to Propane or Propylene) on the
certificate. Ensure these values on the certificate are used.
Caution: The device prompts “Cal Required” when new IR gas curve is selected.
Ensure calibration is performed, otherwise device gas detection ability is
compromised.
Although the target gas is always preferred in order to achieve maximum accuracy,
these gases may not always be available in a form convenient for use in the field.
Surrogate test gases are convenient substitutes, and have been selected for their
stability and availability.
When using a surrogate gas to test the device’s combustible IR sensor (096-3473-56).
•
•
Find the target gas in the "selected curve/target gas" column.
•
For a bump test, apply the indicated surrogate test gas - the sensor should respond
with a reading as indicated in the "sensor reading" column, with a tolerance of
approximately ±2% LEL.
•
If calibrating, set the span gas concentration to the value shown in the "sensor
reading" column. Calibrate (zero and span) the sensor by following the instrument
prompts, per the User Guide.
Use only the test gas and concentration indicated. IR sensors do not have the same
ratio of response between two gases throughout the entire detection range. These
values are only valid for the indicated concentrations.
Example: to span for Toluene, apply 25%LEL propylene and span to 57% LEL
(Toluene).
Table 70 lists the readings for the Combustible IR Sensor.
Table 70 Surrogate Test Gas for Combustible IR Sensors
SELECTED CURVE (TARGET
GAS)
087-0049 REV C
SURROGATE TEST GAS &
CONCENTRATION
SENSOR
READING (%LEL
OF TARGET
GAS)
Acetone (C3H6O)
0.5% v/v propylene (25% LEL)
41
Butane (C4H10)
0.9% v/v propane (43% LEL)
44
Ethane (C2H6)
0.9% v/v propane (43% LEL)
34
Ethyl Alcohol (C2H5OH) (Ethanol) 0.9% v/v propane (43% LEL)
57
Ethylene (C2H4)
0.5% v/v propylene (25% LEL)
52
Hexane (C6H14)
0.55% v/v propane (26% LEL)
39
Isopropyl Alcohol (C3H7OH)
(Isopropanol, IPA)
0.55% v/v propane (26% LEL)
55
SCOTT SAFETY
Combustible IR Sensor Surrogate Test Gas
149
Table 70 Surrogate Test Gas for Combustible IR Sensors (continued)
SELECTED CURVE (TARGET
GAS)
SCOTT SAFETY
SURROGATE TEST GAS &
CONCENTRATION
SENSOR
READING (%LEL
OF TARGET
GAS)
Methyl Alcohol (CH3OH)
(Methanol)
0.9% v/v propane (43% LEL)
33
Octamethyltrisiloxane
C8H24O2Si3
0.5% v/v propylene (25% LEL)
25
Pentane (C5H12)
0.9% v/v propane (43% LEL)
52
Propane (C3H8)
0.9% v/v propane (43% LEL)
43
Propylene (C3H6) (Propene)
0.55% v/v propane (26% LEL)
55
Toluene (C7H8)
0.5% v/v propylene (25% LEL)
57
Xylenes (C3H10)
0.5% v/v propylene (25% LEL)
28
087-0049 REV C
150
APPENDIX B: SENSOR INFORMATION
Toxic (E-Chem) Gas
Interferences
There are known gas interferences to a limited number of chemical compounds. Scott
Safety attempts to identify possible gas interferences to which gas sensors may be
exposed. However, not all chemical compounds that presently exist have been tested.
The Toxic (E-Chem) Gas Interferences tables (062-0064) are included on the CD that
ships with the product. You can check our web site to compare your version to those
posted. Updates to the tables are typically posted to our web site.
These specific tables apply to the Meridian device only.
087-0049 REV C
SCOTT SAFETY
MOS Sensor Interferences
MOS Sensor
Interferences
151
Table 71 lists the readings for the MOS sensor when responding to gases other than
H2S.
Table 71 Gas Interferences For MOS Sensor
INTERFERENCE
GAS
SCOTT SAFETY
APPLIED
CONCENTRATION
READINGS
Methane
3000PPM (6%LEL)
< 2PPM
Hydrogen
2500PPM (6%LEL)
< 5PPM
Carbon Monoxide 100PPM
< 2PPM
Ethanol
90PPM
< 7PPM
Sulfur Dioxide
15PPM
< 1PPM
Nitrogen Dioxide
10PPM
Negative
Response
087-0049 REV C
152
APPENDIX B: SENSOR INFORMATION
087-0049 REV C
SCOTT SAFETY
087-0049
Appendix C
Rev C
SAFETY INTEGRITY LEVEL
(SIL-2) INFORMATION
Appendix Overview
This appendix covers the following topics:
•
•
SCOTT SAFETY
SIL-2 Parameters
Proof Test Procedure
087-0049 REV C
154
APPENDIX C: SAFETY INTEGRITY LEVEL (SIL-2) INFORMATION
SIL-2 Parameters
Table 72 lists the device’s Safety Integrity Level (SIL) parameters.
Table 72 SIL Parameters
SIL PARAMETERS
Safe Failure Fraction (SFF)
90.45%
Average Probability of Failure on Demand (PFDavg)
8.81 x 10⁻⁴
Probability of Failure per Hour (PFH)
1.99 x 10⁻⁷
Process Time
24Hrs.
Proof Test Interval (PTI)
8760Hrs.
For the device’s installation, operation, configuration, maintenance and
specifications refer to the applicable sections of this guide.
087-0049 REV C
SCOTT SAFETY
Proof Test Procedure
Proof Test Procedure
155
This section details the proof test procedure.
This section outlines the procedure for performing an annual safety proof test of the
transmitter. The SIL safety parameters presented in this manual assume an annual
safety function proof test of the device to detect failure modes not detectable by built in
diagnostic functions. Failure to perform an annual proof test invalidates the safety
performance parameters presented herein.
Warning: Hazardous condition monitoring is disabled for the duration of this test and
as such, should only be undertaken when conditions are known to be safe (i.e. unit
shutdown/turn around). Scott Safety recommends alternative monitoring for
hazardous conditions during the duration of this testing.
Verification of the safety function requires the fault current to be adjusted to
something other than 4mA for proper verification.
Tools Required:
•
•
•
•
•
3 mm (TBR) hex wrench
Standard calibration gas
Calibration gas (sufficient concentration to activate highest alarm level)
Calibration adaptor
DVM multi-meter
1 Bypass final element safety function to prevent inadvertent activation of safety
shutdown systems (i.e. deluge/suppression/evacuation systems).
2 Using the hex wrench, loosen the setscrew securing the Meridian End Cap
assembly to the sensor housing.
3 Remove the Meridian End Cap assembly.
4 Remove the sensor assembly from the sensor housing.
a Verify the fault relay (K4) de-activates (normally open)
b Verify the fault 4-20mA signal is transmitted to the receiving element of the
safety system.
5 Reinstall sensor, Meridian End Cap, and secure the setscrew.
Caution: Meridian End Cap must be attached to protect the device from ingress from
water or dust. Ensure all sensor(s) are installed prior to operation. Ensure Meridian
End Cap is installed prior to operation. Only use Meridian End Cap P/N 096-3437-1
or 096-3437-2.
6 Cycle power or perform power on reset of transmitter and wait for sensor warm up
time to expire
7 Perform zero & span calibration of sensor as described herein and wait for inhibit
time to expire
SCOTT SAFETY
087-0049 REV C
156
APPENDIX C: SAFETY INTEGRITY LEVEL (SIL-2) INFORMATION
8 Challenge the sensor with upscale calibration gas and ensure that
a Alarms activate (K1, K2, & K3)
b 4-20mA signal reflects proper gas concentration reading
9 Restore safety system by disabling safety bypass systems.
Table 73 shows the expected results.
Table 73 SIL Proof Test Results
SECTION TEST
087-0049 REV C
ELEMENT
CRITERIA
4.1
Fault - Sensor communication Relay
Impedance NO to Com
>1MOhm
4.2
Fault - 4-20mA Signal
Current loop Programmed fault current (<>
4mA)
8.1
Alarm activation
Relay
8.2
Gas reading
Current loop + .1mA
K1-K3 NC to Com >1MOhm
SCOTT SAFETY
087-0049
Appendix D
Rev C
SUPPORT
Appendix Overview
This appendix covers the following topics:
•
•
SCOTT SAFETY
Technical Service
Parts List
087-0049 REV C
158
APPENDIX D: SUPPORT
Technical Service
Congratulations on your purchase of a Scott Safety product. It is designed to provide
you with reliable trouble-free service.
Contact us, if you have technical questions, need support, or if you need to return a
product.
When returning a product, contact Technical Support to obtain a Return Material
Authorization (RMA) number prior to shipping for service repairs.
North America
Scott Safety
Houston Service Center
1455 East Sam Houston Parkway South
Suite 190
Pasadena, TX 77503 USA
Technical Support Telephone: 1-800-247-7257
Technical Support FAX: 281-478-8772
E-Mail: [email protected]
Web Site: http://www.scottsafety.com/
United Kingdom
Scott Safety
Pimbo Road
Skelmersdale, Lancashire
WN8 9RA, UK
Telephone:+44 (0)1695 727 171
E-Mail:[email protected]
Web Site: http://www.scottsafety.com/
Australia / New Zealand
Scott Safety
Customer Service
137 McCredie Road
Guildford, NSW 2161, Australia
Telephone: 131 772
E-Mail: [email protected]
Russia
5 floor, 1 Timiriazevskaya str.
Moscow, 125422
Russia
Telephone: +7 (495) 661-14-29
E-Mail: [email protected]
Germany
Telephone: 0180 1111 136
Fax: 0180 111 135
E-Mail: [email protected]
087-0049 REV C
SCOTT SAFETY
Technical Service
159
France
Telephone: 08 21 23 02 38
Fax: 08 21 23 02 37
E-Mail: [email protected]
UAE
Telephone: +971 (02) 445 2793
Fax: +971 (02) 445 2794
E-Mail: [email protected]
China
China, Beijing, Technical Support Office
Beijing branch, Shanghai Eagle Safety Equipment Co. Ltd.
Suite 708, Scitech Tower, No.22 Jianguomenwai Avenue, Chaoyang District, Beijing,
100004, P.R.China
Telephone: +86-10-65150005
Asia
Scott Safety – Asia
Service Dept
2 Serangoon North Ave 5, #07-01
Singapore 554911
Telephone: +65. 6883 9671
Fax:+65. 6234 2691
E-Mail: [email protected]
SCOTT SAFETY
087-0049 REV C
160
APPENDIX D: SUPPORT
Parts List
Table 74 provides a parts list. Some of these items are orderable, others are not.
Table 74
Parts List – Device
CATEGORY
ITEM
DESCRIPTION
Accessories
PART NUMBER
Terminal/Relay/MODBUS RS-485 096-3404
PCB
ALARM1
NC
C
NO
ALARM3
NO
C
NC
FAULT
NO
C
NC
+V
GND
10-30VDC
ALARM2
NC
C
NO
LP1
11 + -
RS-485
LP2 LP3
+ - + - B A S B A 1
RMT
ACK
GND
TERM. NOT TERM.
087-0049 REV C
3-4 Wire Power Supply PCB
096-3401
2 Wire Power Supply PCB
096-3407
3-4 Wire Intrinsically Safe (IS)
Barrier PCB
096-3448
2 Wire Intrinsically Safe (IS)
Barrier PCB
096-3449
Optional Communication
Expansion Card (CEC) PCB
For Optional CEC
PCBs, contact your
Scott sales
representative.
LCD PCB and CPU PCB
096-3447-xx
01= includes LCD,
but no LCD Heater
02= includes LCD
and LCD Heater
03=No LCD (Blind)
Connector/Jumper Replacement
Kit
1-11Position Connector, 12Position Connector, 1- 3Position
Connector, 1-6Position Connector
and 1- 2Position Jumper
096-3495
SCOTT SAFETY
Parts List
Table 74
161
Parts List – Device (continued)
CATEGORY
Accessories
ITEM
DESCRIPTION
PART NUMBER
Screw Replacement Kit
4- 6-32 x 7-8 Phillips Pan Head
Screws
096-3496
Standoff Replacement Kit
4- M4 x 82 Standoffs
096-3497
Intrinsically Safe (IS) Terminal
Block Cover
Isolates the IS wires.
074-0528-01
Ribbon Cable (Between J2-A on
the Power Supply PCB (for 3-4
Wire Isolated) and J2-B on the
CPU PCB)
096-3456
Meridian Detector Body Assembly 096-3484-xx
01=3-4 Wire &
Plastic Meridian End
Cap
02=3-4 Wire & SS
Meridian End Cap
03= 2 Wire & Plastic
Meridian End Cap
04= 2 Wire & SS
Meridian End Cap
Meridian NPT Ex Seal
Provides explosive proof seal
between Transmitter and Remote
Junction Box.
096-3483
Sun Shield
073-0373
Deflects Sun off of the Device,
complete with mounting holes and
rain drip ridge.
SCOTT SAFETY
1/4 Turn Deluge-Wash Down
Fitting
Provides protection from wet
weather and hose-downs.
096-3441
Thermal Isolation Barrier Pad
Only applicable for 3-4 Wire
077-1418
Aluminum Heat Sink Plate
Only applicable for 3-4 Wire
073-0381
087-0049 REV C
162
APPENDIX D: SUPPORT
Table 74
Parts List – Device (continued)
CATEGORY
Accessories
ITEM
DESCRIPTION
Thermal Conductive Pad
Only applicable for 3-4 Wire
PART NUMBER
077-1419
1/4 Turn Calibration Fitting
096-3438
Delivers calibration gas directly to
the sensor face without dilution
from environmental interferences
such as wind. Barb fitting provided
for tube connection to the
calibration gas source (gas
cylinder, permeation device or
generator).
1/4 Turn Flow Cell Fitting
096-3439
Used in sample draw
configurations. The baffle prolongs
life by reducing air velocity past
the sensor face.
1/4 Turn Dust Filter Fitting
096-3537
Meridian End Cap Assembly
096-3437-x
1= Plastic
2= Stainless Steel
Detector Head Sump Value
096-3539
Used when mounting device in low
areas where water may accumulate
to protect sensor
1/4 Turn Flat/Round Duct Mount
096-3440
Fitting Kit
Used for either Flat or Round 6” to
8” Diameter Ventilation Ducts
without drying out the Sensor.
Aluminum 1/2” thick Retrofit
073-0374
Mounting Plate with hardware
Used to mount the Device where a
previously mounted Scott
transmitter was located and
provides clearance to access
Meridian End Cap.
087-0049 REV C
SCOTT SAFETY
Parts List
Table 74
Parts List – Device (continued)
CATEGORY
Accessories
SCOTT SAFETY
163
ITEM
DESCRIPTION
PART NUMBER
High Density Polyethylene
093-0607
(HDPE) 3/4” thick Retrofit
Mounting Plate with hardware
Used to mount the Device where a
previous mounted Scott transmitter
was located and provides clearance
to access Meridian End Cap.
High Density Polyethylene
(HDPE) Mounting Spacer Plate
Used to add additional space
between the device and the
mounting surface.
074-0584
Pipe Mounting Bracket for Gas
Detector (Al & SS)
073-0377
Pipe Mounting Bracket for
Meridian Junction Box Assembly
(Al)
073-0376
3/4” NPT to 20mm Metric Thread
Adapter
077-1402
Enclosure Stop Plug
Used to seal unused conduit
entries.
077-1404
Enclosure Replacement Cap
093-0603 (Al)
093-0604 (SS)
Magnet Tool
Used to access menus via the four
(4) navigation keys
096-3482
087-0049 REV C
164
APPENDIX D: SUPPORT
Table 74
Parts List – Device (continued)
CATEGORY
Accessories
ITEM
DESCRIPTION
PART NUMBER
O-Ring Replacement Kit
096-3498
1 – 4.53” Dia. Rubber O-Ring for
Enclosure Cap Seal and 1 – Rubber
O-Ring for Meridian Detector
Body Assembly
Meridian Junction Box Assembly
(Aluminum)
096-3475
Meridian Junction Box Assembly
(Stainless Steel)
096-3520
Meridian Junction Box PCB
096-3434
Meridian Junction Box Mounting
Spacer Kit
2- 5/8” OD x .250”space and 25/8” OD x .750”spacer
Recommended for integral
installation and in environments
with high vibration.
096-3532
90° Elbow male-female, 3/4” NPT 048-0089
threads (2.08”H x 2.23”W), Zinc
die cast
Used for multi-sensor integral
installations.
Remote Cable Gland Fitting
048-0091
Used in the Meridian Junction Box
Assembly and IS Cable.
Remote Intrinsically Safe (IS)
Cable
087-0049 REV C
069-0097-10 = 10’
069-0097-25 = 25’
069-0097-50 = 50’
069-0097-75 = 75’
069-0097-100 = 100’
SCOTT SAFETY
Parts List
Table 74
165
Parts List – Device (continued)
CATEGORY
Accessories
ITEM
DESCRIPTION
Sensor Simulator with Knob
PART NUMBER
096-3395
Note: Simulator is for temporary
use only.
SCOTT SAFETY
Manual
Meridian Transmitter CD
096-3487
Sensors –
Toxic
(E-Chem)
CO
H2S Low Methanol
096-3473-01
NH3
096-3473-03
MMH
096-3473-04
SO2 Hi RH
096-3473-05
SO2 Lo RH
096-3473-06
AsH3
096-3473-07
PH3
096-3473-08
SiH4
096-3473-09
GeH4
096-3473-10
HCN
096-3473-11
H2 Hi RH
H2 Lo RH
096-3473-12
NO
096-3473-14
EtO
096-3473-15
HCN Hi RH
096-3473-16
B2H6 RS Hi RH
096-3473-17
B2H6 RS Lo RH
096-3473-18
O2
096-3473-19
Cl2 RS Hi RH
096-3473-20
Cl2 RS Lo RH
096-3473-21
F2 RS Hi RH
096-3473-22
F2 RS Lo RH
096-3473-23
Br2 RS Hi RH
096-3473-24
HCl RS Hi RH
096-3473-25
HCl RS Lo RH
096-3473-26
HF RS Hi RH
096-3473-27
HF RS Lo RH
096-3473-28
096-3473-02
096-3473-13
087-0049 REV C
166
APPENDIX D: SUPPORT
Table 74
Parts List – Device (continued)
CATEGORY
Sensors –
Toxic
(E-Chem)
Sensors –
Other
Technology
Sensors Combustible
IR Sensor
with Custom
Calibration
Gas Options
087-0049 REV C
ITEM
DESCRIPTION
PART NUMBER
HBr RS Hi RH
096-3473-29
HBr RS Lo RH
096-3473-30
SO2 RS Hi RH
096-3473-31
SO2 RS Lo RH
096-3473-32
BCl3 RS Hi RH
096-3473-33
BF3 RS Hi RH
096-3473-34
SiF4 RS Lo RH
096-3473-35
WF6 RS Lo RH
096-3473-36
ClO2 RS Hi RH
096-3473-37
ClO2 RS Lo RH
096-3473-38
O3 RS Hi RH
096-3473-39
O3 RS Lo RH
096-3473-40
H2S Hi RH
096-3473-41
H2S Lo RH
096-3473-42
CH3 I
096-3473-43
HCl Hi RH
096-3473-46
HCl Lo RH
096-3473-47
CH3SH
096-3473-48
CH3OH
096-3473-50
TEOS
096-3473-51
Cl2
096-3473-52
F2
096-3473-53
NO2
096-3473-54
Combustible (LEL) Cat-Bead
Methane (CH4)
096-3473-55
Combustible (LEL) IR Methane 096-3473-56
(CH4)
H2S MOS
096-3473-57
CO2 IR
096-3473-58
C3H8 - Propane
096-3554-01
C8H24O2Si3 Octamethyltrisiloxane
096-3554-02
CH3OH - Methanol
096-3554-03
C4H10 - Butane
096-3554-04
C3H7OH - Isopropanol
096-3554-05
C7H8 - Toluene
096-3554-06
C5H12 - Pentane
096-3554-07
C6H14 - Hexane
096-3554-08
SCOTT SAFETY
Parts List
Table 74
167
Parts List – Device (continued)
CATEGORY
Accessories
Calibration
ITEM
DESCRIPTION
PART NUMBER
0.5LPM Regulator
1.0LPM High Flow Regulator
0.3LPM Low Flow Regulator
077-0018
077-0254
077-1416
Tygon Tubing, 3/16” ID, Soft (For
Non-Reactive gases)
Different lengths are
available.
Teflon PFA Special Tubing, Hard
(For sticky gases (Reactive gases)
like HCL and NH3)
Nafion Tubing, 1/4” Molded
Header, 18” Length (For MOS
sensors)
077-1422
Remote Calibration Fitting Plastic, with 1/8” ID Tubing
077-1385
Remote Calibration Fitting –
077-1386
Stainless Steel, with 1/4” OD Tube
Calibration
Kits* (The
specific
Calibration
Kit depends
on the
sensors in
your device)
Standard Calibration Kit
096-3500
For non-reactive gases, such as O2,
CO or CH4.
Includes Carrying Case, 0.5LPM
Male Regulator, and Tygon Tubing.
Reactive Calibration Kit
For Reactive gases, such as NH3,
Cl2 or HCl.
Includes Carrying Case, 0.5LPM
Male Regulator, and Teflon
Tubing.
096-3501
High Flow Calibration Kit
096-3502
For non-reactive, high-flow (or
remote) applications.
Includes Carrying Case, 1.0LPM
Male Regulator, and Tygon Tubing.
Low Flow Calibration Kit
096-3503
For use with MOS or other sensors
which require low flow.
Includes Carrying Case, 0.3LPM
Male Regulator, and Teflon Tubing
and Nafion Tubing.
* Calibration Kits do not include any Gas Cylinders. That must be determined at time of
order. Calibration Cap sold separately.
Note: For calibration equipment, contact your Scott sales representative.
Note: When placing an order for Toxic (E-Chem) Sensors, please specify Part Number to
ensure compatibility.
SCOTT SAFETY
087-0049 REV C
168
APPENDIX D: SUPPORT
087-0049 REV C
SCOTT SAFETY
087-0049
Rev C
INDEX
Symbols
2 Wire Connection
Power Supply and Receiver 40
2-Wire Detector Head
Certifications & Approvals xxiv
3 Wire Connection Sinking
Power Supply and Receiver 38
3 Wire Connection Sourcing
Power Supply and Receiver 37
3-4 Wire Detector Head
Certifications & Approvals xxi
4 Wire Connection Sinking with Isolated Loop Power Supply
Power Supply and Receiver 43
4 Wire Connection Sourcing with Isolated Loop Power Supply
Power Supply and Receiver 42
4-20mA Sourcing or Sinking
Non-Isolated (SW1) Settings 36,41
A
Aluminum Junction Box
Certifications & Approval xviii
Aluminum Transmitter
Certifications & Approvals xvi
B
Blind
LCD 106
C
Calibration Hookup
Equipment 109
Methods 109
Calibration Menu
Configuring 70
Cat-Bead
Sensor Technology Comparison 140
Cat-Bead & MOS Sensors
Certifications & Approvals xxvii
Certification & Approvals
Cat-Bead & MOS Sensors xxvii
Stainless Steel Transmitter xvii
Certifications & Approval
Aluminum Junction Box xviii
SCOTT SAFETY
Certifications & Approvals
2-Wire Detector Head xxiv
3-4 Wire Detector Head xxi
Aluminum Transmitter xvi
Cat-Bead & MOS Sensors xxvii
E-Chem Sensors xxvii
IR Sensors xxviii
Stainless Steel Junction Box xix
Stainless Steel Transmitter xvii
Checklist
Installation 25
Combustible (LEL)
Gas Density Relative to Air 15
Combustible (LEL) Sensor
Configuration Defaults 81
Combustible (LEL), IR, Cat-bead and MOS Sensors
Specifications 133
Combustible Cat-bead Sensors
K-Factors
Methane 144
Propane 146
Configurating
Information Menu 58
Configuration Defaults
Combustible (LEL) Sensor 81
Configuration Menu
Information Menu 58
Configuration Menu Structure
Combustible (LEL) Sensor Head 58
Configuring
Calibration Menu 70
Datalog Menu 71
Display Menu 73
Setup Menu 62
User Access Menu 74
Contact Information
Technical Support 158
D
Datalog Menu
Configuring 71
Device
Firmware Version 54
Jumper (J1) Settings 46
Major Parts 10
Parts List 160,160
Specifications 130
087-0049 REV C
170
INDEX
Device Aluminum & Stainless
Mounting Dimensions 26
Device Use and Care
Warnings and Cautions xxx
Display Menu
Configuration 73
E
E-Chem Sensors
Certifications & Approvals xxvii
Electrical Chemical (E-Chem)
Sensor Technology Comparison 140
Equipment
Calibration Hookup 109
F
Firmware Version
Device 54
Formula
Maximum Wire Length 21
G
Gas Density Relative to Air
Combustible (LEL) 15
Toxic (E-Chem) 16
Gases and Flow Rates for Sensor Type
Span Calibration 113
Zero Calibration 111
General Safety Information xxix
Graphical Trending Display
LCD 105
Guide Conventions xii
Guide Overview xi
Guidelines
Recommended Calibration Frequency 110
I
Information Menu
Configurating 58
Configuration Menu 58
Infrared (IR)
Sensor Technology Comparison 140
Installation
Checklist 25
IR Sensors
Certifications & Approvals xxviii
Items and Descriptions
LCD 103
WiredHART 41
Jumper (J1) Settings
Device 46
K
K-Factors
Combustible Cat-bead Sensors
Methane 144
Propane 146
L
LCD
Blind 106
Graphical Trending Display 105
Items and Descriptions 103
Main Menu 105
Text and Numerical Display 102
M
Main Menu
LCD 105
Major Parts
Device 10
Maximum Wire Length
Formula 21
Meridian Junction Box Assembly
Wiring and Mounting for Aluminum 31
Metal Oxide Semiconductor (MOS)
Sensor Technology Comparison 141
Methods
Calibration Hookup 109
MODBUS Connections
Terminal/Relay/MODBUS RS-485 PCB 47
MODBUS Registers
SensorX Data 89
Transmitter Configuration Parameters 86
Transmitter Dynamic 82
Mounting Dimensions
Device Aluminum & Stainless 26
Mounting Dimensions (HDPE)
Retrofit Mounting Plate 27
Mounting Dimensions Al
Retrofit Mounting Plate 27
N
Non-Isolated (SW1) Settings
4-20mA Sourcing or Sinking 36,41
P
J
J3 Settings
087-0049 REV C
Parts List
Device 160
SCOTT SAFETY
INDEX
Power Supply and Receiver
2 Wire Connection 40
3 Wire Connection Sinking 38
3 Wire Connection Sourcing 37
4 Wire Connection Sinking with Isolated Loop Power
Supply 43
4 Wire Connection Sourcing with Isolated Loop Power
Supply 42
Gas Density Relative to Air 16
Toxic (E-Chem) Sensors
Specifications 135
Transmitter Configuration Parameters
MODBUS Registers 86
Transmitter Dynamic
MODBUS Registers 82
Troubleshooting 126
R
U
Recommended Calibration Frequency
Guidelines 110
Related Product Documentation xiii
Relays/Remote Alarm Reset Connections
Terminal/Relay/MODBUS RS-485 PCB 45
Retrofit Mounting Plate (HDPE)
Mounting Dimensions 27
Retrofit Mounting Plate Al
Mounting Dimensions 27
Revision history, for this guide xiv
User Access Menu
Configuring 74
S
Sensor Technology Comparison
Cat-Bead 140
Electrical Chemical (E-Chem) 140
Infrared (IR) 140
Metal Oxide Semiconductor (MOS) 141
Sensor Use and Care
Warnings and Cautions xxxi
SensorX Data
MODBUS Registers 89
Setup Menu
Configuring 62
Span Calibration
Gases and Flow Rates for Sensor Type 113
Specifications
Combustible (LEL), IR, Cat-bead and MOS Sensors 133
Device 130
Toxic (E-Chem) Sensors 135
Stainless Steel Junction Box
Certifications & Approvals xix
Stainless Steel Transmitter
Certifications & Approvals xvii
171
W
Warnings and Cautions
Device Use and Care xxx
Sensor Use and Care xxxi
WiredHART
J3 Settings 41
WiredHART (J3) Settings 37
WiredHART (J3) Settings
WiredHART 37
Wiring and Mounting for Aluminum
Meridian Junction Box Assembly 31
Wiring and Mounting for Stainless Steel
Meridian Junction Box Assembly 32
Z
Zero Calibration
Gases and Flow Rates for Sensor Type 111
T
Technical Support
Contact Information 158
Terminal/Relay/MODBUS RS-485 PCB
MODBUS Connections 47
Relays/Remote Alarm Reset Connections 45
Text and Numerical Display
LCD 102
Toxic (E-Chem)
SCOTT SAFETY
087-0049 REV C
172
INDEX
087-0049 REV C
SCOTT SAFETY
Monroe Corporate Center
P.O. Box 569
Monroe, NC 28111
Telephone: 800-247-7257
FAX: (704) 291-8330
Web: www.scottsafety.com