1
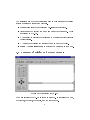
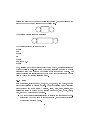
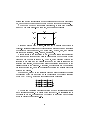
WD-Pic
User's Manual
Jing Dong
Department of Computer Science
University of Waterloo
[email protected]
Contents
1 Introduction
1.1
1.2
1.3
1.4
Product Overview and Rationale . . . . .
Terminology and Basic Features . . . . . .
Summary of Display and Report Formats .
Outline of the Manual . . . . . . . . . . .
.
.
.
.
.
.
.
.
.
.
.
.
.
.
.
.
.
.
.
.
.
.
.
.
.
.
.
.
.
.
.
.
.
.
.
.
.
.
.
.
.
.
.
.
2 Getting Started
3
3
4
7
9
9
2.1 Sign-on . . . . . . . . . . . . . . . . . . . . . . . . . . . . . . . 9
2.2 Help Mode . . . . . . . . . . . . . . . . . . . . . . . . . . . . . 9
2.3 Sample Run . . . . . . . . . . . . . . . . . . . . . . . . . . . . 10
3 Modes of Operation
3.1 Object Operations
3.1.1 Insert . . .
3.1.2 Delete . . .
3.1.3 Move . . . .
3.1.4 Resize . . .
3.1.5 Edit . . . .
3.2 Toolbar . . . . . .
3.3 File Operations . .
3.3.1 New . . . .
3.3.2 Open . . . .
3.3.3 Save . . . .
3.3.4 Save As . .
3.3.5 Close . . . .
3.3.6 Insert File .
3.3.7 Append File
3.3.8 Print . . . .
3.3.9 Convert . .
3.3.10 Exit . . . .
.
.
.
.
.
.
.
.
.
.
.
.
.
.
.
.
.
.
.
.
.
.
.
.
.
.
.
.
.
.
.
.
.
.
.
.
.
.
.
.
.
.
.
.
.
.
.
.
.
.
.
.
.
.
.
.
.
.
.
.
.
.
.
.
.
.
.
.
.
.
.
.
.
.
.
.
.
.
.
.
.
.
.
.
.
.
.
.
.
.
.
.
.
.
.
.
.
.
.
.
.
.
.
.
.
.
.
.
4 Advanced Features
.
.
.
.
.
.
.
.
.
.
.
.
.
.
.
.
.
.
.
.
.
.
.
.
.
.
.
.
.
.
.
.
.
.
.
.
.
.
.
.
.
.
.
.
.
.
.
.
.
.
.
.
.
.
.
.
.
.
.
.
.
.
.
.
.
.
.
.
.
.
.
.
.
.
.
.
.
.
.
.
.
.
.
.
.
.
.
.
.
.
.
.
.
.
.
.
.
.
.
.
.
.
.
.
.
.
.
.
.
.
.
.
.
.
.
.
.
.
.
.
.
.
.
.
.
.
.
.
.
.
.
.
.
.
.
.
.
.
.
.
.
.
.
.
.
.
.
.
.
.
.
.
.
.
.
.
.
.
.
.
.
.
.
.
.
.
.
.
.
.
.
.
.
.
.
.
.
.
.
.
.
.
.
.
.
.
.
.
.
.
.
.
.
.
.
.
.
.
.
.
.
.
.
.
.
.
.
.
.
.
.
.
.
.
.
.
.
.
.
.
.
.
.
.
.
.
.
.
.
.
.
.
.
.
.
.
.
.
.
.
.
.
.
.
.
.
.
.
.
.
.
.
.
.
.
.
.
.
.
.
.
.
.
.
.
.
.
.
.
.
.
.
.
.
.
.
.
.
.
.
.
.
.
.
.
.
.
.
.
.
.
.
.
.
.
.
.
.
.
.
.
.
.
.
.
.
.
.
.
.
.
.
.
.
.
.
.
.
.
.
.
.
.
.
10
11
11
11
11
11
12
13
14
14
14
15
15
15
15
15
15
16
16
16
4.1 Grid and Gravity . . . . . . . . . . . . . . . . . . . . . . . . . 16
4.2 Pic Structures . . . . . . . . . . . . . . . . . . . . . . . . . . . 18
4.3 Macros . . . . . . . . . . . . . . . . . . . . . . . . . . . . . . . 19
1
4.4 Fonts . . . . . . .
4.5 Pic Settings . . .
4.6 WD-Pic Settings
4.6.1 Toolbar .
4.6.2 Grid . . .
4.6.3 Fonts . . .
4.7 Grouping . . . .
.
.
.
.
.
.
.
.
.
.
.
.
.
.
.
.
.
.
.
.
.
.
.
.
.
.
.
.
.
.
.
.
.
.
.
.
.
.
.
.
.
.
.
.
.
.
.
.
.
.
.
.
.
.
.
.
.
.
.
.
.
.
.
.
.
.
.
.
.
.
.
.
.
.
.
.
.
.
.
.
.
.
.
.
5 Command Syntax and System Options
5.1 Menu . . . . . . . . . . .
5.1.1 File . . . . . . . .
5.1.2 Edit . . . . . . .
5.1.3 Elements . . . . .
5.1.4 Attributes . . . .
5.1.5 Options . . . . .
5.1.6 Pic Settings . . .
5.1.7 WD-Pic Settings
5.1.8 Help . . . . . . .
5.2 Toolbar . . . . . . . . .
.
.
.
.
.
.
.
.
.
.
.
.
.
.
.
.
.
.
.
.
.
.
.
.
.
.
.
.
.
.
2
.
.
.
.
.
.
.
.
.
.
.
.
.
.
.
.
.
.
.
.
.
.
.
.
.
.
.
.
.
.
.
.
.
.
.
.
.
.
.
.
.
.
.
.
.
.
.
.
.
.
.
.
.
.
.
.
.
.
.
.
.
.
.
.
.
.
.
.
.
.
.
.
.
.
.
.
.
.
.
.
.
.
.
.
.
.
.
.
.
.
.
.
.
.
.
.
.
.
.
.
.
.
.
.
.
.
.
.
.
.
.
.
.
.
.
.
.
.
.
.
.
.
.
.
.
.
.
.
.
.
.
.
.
.
.
.
.
.
.
.
.
.
.
.
.
.
.
.
.
.
.
.
.
.
.
.
.
.
.
.
.
.
.
.
.
.
.
.
.
.
.
.
.
.
.
.
.
.
.
.
.
.
.
.
.
.
.
.
.
.
.
.
.
.
.
.
.
.
.
.
.
.
.
.
.
.
.
.
.
.
.
.
.
.
.
.
.
.
.
.
.
.
.
.
.
.
.
.
.
.
.
.
.
.
.
.
.
.
.
.
.
.
.
.
.
.
.
.
.
.
.
.
.
.
.
.
.
.
.
.
.
.
.
.
.
.
.
.
.
.
.
20
20
21
21
22
23
24
24
24
24
25
25
26
27
28
28
28
29
1 Introduction
1.1 Product Overview and Rationale
This document is the user's manual for a graphic user interface (GUI) tool
to draw pictures using the Pic language [1]. Pic is a language for drawing
simple gures on a typesetter. It is a tro preprocessor. A picture is drawn
by specifying the motions that one goes through to draw it. The specication
describes the drawing process instead of the static picture. This descriptive
language allows frequent users to draw simple picture very fast. However,
the drawback of Pic is that the user does not know the resulted picture
until he or she uses the Pic compiler and troff to draw the picture. This
batch application is not convenient for beginners. Even expert Pic users may
write an erroneous specication and draw an unexpected picture. Moreover,
text editing may be slower than direct manipulation on pictures in some
situations, and users may feel bored while editing text. Therefore, a graphical
user interface tool for drawing pictures using Pic can overcome the problems
of batch drawing and provide a what-you-see-is-what-you-get (WYSIWYG)
capability. The goal of this GUI tool, WD-Pic, is to provide both text and
graphical manipulation capabilities on the same picture so that users can
choose which of text editing or direct manipulating that will best promote
their drawing speed. Although knowledge of Pic is not necessary, it may
allow more exibility when drawing picture using WD-Pic. Since WD-Pic
is built on top of Pic and does not provide all features in Pic, it is not as
exible and powerful as the Pic language specication. Thus, beginners who
have little knowledge about Pic may not be able to fully utilize the power
provided by Pic, although they can use WD-Pic as any other WYSIWYG
graphical drawing tool.
The followings are the goals of WD-Pic. Some of these goals indicate the
special characteristics of this tool, which is that WD-Pic is built to facilitate
the use of the Pic language to draw pictures.
1. At any time, the picture on the canvas is same as printed on paper when
the accumulated internal representation is submitted to Picjtroff .
2. At any time, clicking on X box is the same as entering the spelling of
the word X on the keyboard, for any Pic element X.
3
3. Avoid dialogue boxes and conrmation buttons.
4. Cut, copy, paste, and other direct manipulation are available at the
graphic level.
5. The internal representation of a picture should be what a human being
would type, making use of defaults, and not showing full parameters
with 8 digit oating point numbers as parameter values.
6. The user can request on the canvas a grid of symbolic distances with
origins in symbolically identiable place, e.g. a movewid * moveht grid
centered at some box.ne.
7. The user can point to a grid point in order to, e.g., put things there by
direct manipulation.
8. The user can, at any time, edit the internal representation with the
text editor associated with $EDITOR.
1.2 Terminology and Basic Features
WD-Pic provides the following basic graphic elements: box, circle, ellipse,
arrow, line, spline, arc, and text. The text element may either associated
with another element or standalone. WD-Pic provides one basic operation
move. All basic graphic elements, like box, are treated rather like basic operations, like move. Therefore, we do not distinguish basic graphic elements
and basic operations, and treat them uniformly as basic elements as in Pic.
All basic elements have attributes which can be specied with the elements. Default attributes are applied to an element if no attribute is specied with the element. These default attributes can be changed globally or
locally by various ways which will be described in the rest of this document.
In addition, WD-Pic provides two correlated windows: a text window
and a picture window for text editing and direct manipulation respectively.
The picture window is also called the canvas. The text window contains the
internal representation of the picture drawn on the canvas.
We will use the following terms throughout this manual:
Closed Shape: box, circle, or ellipse.
4
Linear Shape: line, spline, or arrow.
Shape: all closed and linear shapes and arc.
Element: all shapes and text and move. (Note: all elements on the
canvas are selectable by mouse except move).
Pic File: the le contains the internal representation corresponding to
the picture drawn on the canvas.
Click: a left mouse click unless otherwise specied.
Double Click: two consequent left mouse click in a short time period.
Shift-click: holding the < SHIFT > key while clicking on the left
mouse key.
Control-click: holding the < CTRL > key while clicking on the left
mouse key.
IR: internal representation.
The followings are the elements constituted the current drawing environment:
Current Direction: the current drawing direction is the same as the
current drawing direction in the IR. This direction is displayed by highlighting the corresponding direction button in Figure 1. Pic language
has four drawing directions: up, down, left, and right. The initial drawing direction is right. The direction can be changed at any
time by clicking on the direction buttons or typing up, down, left,
or right into the text window. Objects are joined in the direction determined by the last up, down, left, or right in IR with the entry
point of the second object attached to the exit point of the rst, which
is xed at the time of entry. Entry and exit points for boxes, circles,
ellipses, lines, arrows, and moves are on the opposite sides. This automatic connection and direction selection works well if the direction
does not change but it may occasionally surprise you as, for example,
arrow; circle; down; circle will draw the following diagram:
5
x
The last circle connects to the right side of the rst circle, not the
bottom, as might be expected.
Current Insertion Point: the place in which the next object will be
inserted. This point corresponds to the current insertion point in the
IR. The current insertion point is displayed as a cross sign (x) on the
canvas. It is displayed as the cursor of the corresponding text editor in
the text window. Initially, the current insertion point is in the center
of the canvas. The current insertion point can be changed by double
clicking on any place on the canvas. If the user double clicks on a point
where there is no object, a move element with the corresponding values
of its width and height is inserted in the IR at the current insertion
point in the text window, and the cross sign (x) is moved to the desired
place. If the user double clicks on an object on the canvas, the current
insertion point is moved to the exit point of that object according to the
IR. The part of the IR displayed in the text window is also synchronized
to have the cursor (current insertion point) always visible in the text
window. Therefore, the user can choose to either move back to any
point in the IR or move to any point on the canvas to insert a new
element. Note, changing the current insertion point by double clicking
is to avoid the coniction with selecting and resizing objects by single
clicking.
Selected Object(s): one object or a group of objects selected by a user.
The selection is done by clicking on a point on the canvas where there
are no objects and dragging the mouse. A dashed bounding box is
displayed while the mouse is dragging. When the mouse button is released, all objects that completely inside the bounding box are selected.
Multiple sections are achieved by holding the < SHIFT > key while
clicking on an object which is added to the set of selected objects or
removed from the set if it is already in the set. All selected objects are
highlighted on the canvas. Their corresponding IR is also highlighted.
6
The followings are the font conventions used in this manual to highlight
specic meanings or goals of the contents.
Typewritter is used to represented Pic-related specication.
Italics is used to specify command names and button names. These
are related to WD-Pic.
Caps is used to highlight the reasons why to include specic features
for traceability.
<> is used to represent the control key names on the keyboard.
Menu ! Menu Item is used to specify the menu items in the menu.
1.3 Summary of Display and Report Formats
Figure 1: The Interface of WD-Pic
The main interface of WD-Pic is shown in Figure 1. It contains the menu,
the toolbar, the panel, the canvas, and the text window.
7
The menu bar: located at the top of the window screen and provides
all major system functions.
The tool bar: located below the menu bar and provides direct access
to some menu commands.
The panel: located on the left-hand side of the window and includes
the element buttons, the direction buttons, the Zoom In button, the
Zoom Out button, the Grid On choice, and the Toolbar On choice:
{ Element buttons: all basic Pic element operations.
{ Direction buttons: all four directions, up, down, left, right.
{ Zoom in: zooming in the picture on the canvas.
{ Zoom out: zooming out the picture on the canvas.
{ Grid On: turning on the grid when it is checked and turning o
the grid when it is unchecked.
{ Toolbar On: displaying the toolbar when it is checked and making
the toolbar invisible when it is unchecked.
The canvas: located on the upper right-hand side in Figure 1. All pictures are drawn on the canvas. The current insertion point is displayed
as the cross sign (x). All selected objects are highlighted.
The text window: located on the lower right-hand side in Figure 1. This
window contains the IR of the picture drawn on the canvas. One Pic
command is displayed per line. The current insertion point is shown
as the cursor of the corresponding text editor. All Pic commands
corresponding to the selected objects are highlighted in the text window
as well.
Pop-up menu can be opened on the canvas. A pop-up menu includes the
attributes of the currently selected element (if there is a selected element)
and the basic editing commands.
8
1.4 Outline of the Manual
This section gives an overview of WD-Pic. The next section guides you
through your rst steps in using WD-Pic and shows how to use help. It also
gives a very simple example of using WD-Pic. The second section is especially
important for beginners. Section 3 introduces all basic but important features
in WD-Pic which are useful for both beginners and expert users. Section 4
discusses some advanced features provided by WD-Pic for more powerful and
exible application. Section 5 contains a specication of all system functions.
2 Getting Started
2.1 Sign-on
The command line for running WD-Pic is:
wdpic [pic le]
pic le is optional. If it species an existing Pic le, the picture corresponding
to the IR in the le will be drawn on the canvas. If it species an unexisting
le name, a le with this name is created to receive the Pic specication of
the picture drawn on the canvas. If it species no le, a default le name
\untitle.pic" is used as the le name.
2.2 Help Mode
Figure 2: Help Menu
There are two dierent types of help: Help menu and context-sensitive help.
The Help menu contains comprehensive help information of all provided
features. A user can choose the Help menu to either read through the
contents of help or to search through keywords. The Help menu is shown in
9
Figure 2. There, the Index contains a list of all features provided in WDPic. The Tutorial presents a tutorial on how to use WD-Pic. The About
gives the version and copyright information.
WD-Pic also provides context-sensitive help; that is, help on the current
operation. This can be achieved either by pressing < F 1 >, by clicking right
mouse key on an element and choosing help, or by clicking on the Help
button in any dialog box.
2.3 Sample Run
Now it is time to create your rst picture using WD-Pic. The picture is very
simple, which is shown as following:
x
To create the above picture, the user clicks on the arrow button, the circle
button, the arrow button, the box button, the arrow button, and the circle
button sequentially. The above picture will be shown on the canvas. The
following Pic commands are displayed in the text window:
arrow
circle
arrow
box
arrow
circle
Note, the cross sign (x) denotes the current insertion point.
3 Modes of Operation
This section describes the basic operations, the toolbar, and the File Operations provided by WD-Pic. These features are essential for drawing pictures.
Advanced features are introduced in the next section for more exible and
powerful uses of WD-Pic to draw pictures.
10
3.1 Object Operations
Object operations are the most fundamental, yet most frequently used, operations for drawing pictures. They include insertion, deletion, move and
resizing of an object. Changing an object can be achieved by deleting it and
then inserting a new object.
3.1.1 Insert
Any element can be inserted at the current insertion point either by clicking
on the corresponding button on the panel or by choosing the Element menu.
The user can also choose to type the corresponding Pic commands into the
text window.
3.1.2 Delete
The deletion operation is only applicable to the selected objects. If there are
no objects selected, no action will be taken. To delete the selected objects,
the user clicks on the delete button on the toolbar or chooses the menu Edit
! delete. The Pic commands corresponding to the selected objects in the
text window are deleted too.
3.1.3 Move
The Move operation in WD-Pic is dierent from the move element in Pic.
The user can click on any selected object and drag the set of all selected
objects to wherever he or she wants on the canvas. Because Pic heavily uses
relative positioning instead of absolute positioning of objects, the user must
be careful when using the Move operation. If there are some objects which
are drawn relative to one of the moved objects, the Move operation may
cause all these objects to be moved as well. The Move operation is only
applicable to the selected objects.
3.1.4 Resize
The size of an object can be changed by clicking on the edge of an object
and drag it to the size that the user wants. For example, if a user wants to
11
enlarge the width of the box in the following diagram, he or she clicks on the
right edge of the box and drags it to the desired size.
x
The resulted picture is shown as follow:
x
The corresponding IR is changed from:
circle
box
circle
to:
circle
box width 1.5
circle
Note, resizing an object requires to click on an object, whereas selecting an
object requires to shift-click on an object and selecting a region of objects
requires to click on a point on the canvas where there are no objects. All
these operations are single click in order to avoid the confusion with double
click to change the current insertion point.
3.1.5 Edit
Edit operations, including undo, redo, cut, copy, paste, and delete, provide
direct manipulation of graphic objects. These operations can be accessed
either through the menu Edit ! (undo; redo; cut; copy; paste, and
delete) as shown in Figure 3 or by clicking on the cut; copy; paste; delete;
redo, and undo buttons on the toolbar.
The cut operation erases all selected objects on the canvas and the corresponding Pic commands in the text window, and puts these selected
objects into a system buer.
12
Figure 3: The Edit Menu
The copy operation puts all selected objects into a system buer.
The paste operation inserts all objects from the system buer at the
current insertion point.
The delete operation deletes all selected objects on the canvas and the
corresponding Pic commands in the text window.
All operations discussed in this section can be undone or redone by choosing the undo or redo operation, respectively.
3.2 Toolbar
The toolbar provides fast access to some frequently used system functions.
The toolbar consists of a list of buttons each of which represents one system
operation. All system functions provided by the toolbar can be accessed
through the menu as well; that is, the system functions provided by the
toolbar is a subset of the system functions provided by the menu.
The contents of the toolbar can be changed by the user. The user can
select the buttons that he or she uses frequently to be included in the toolbar
because dierent user may have dierent set of frequently used functions.
WD-Pic provides several groups of buttons to constitute the default toolbar, which includes the le operations, New, Open, Save, and Prints, the edit
operations, cut, copy, paste, delete, undo and redo, the element attributes,
solid, dashed, dotted, ll and invisible, the Show Grid button, and the help
button.
13
3.3 File Operations
Figure 4: The File Menu
The File operations are the operations applied to Pic les, which include
new, open, save, save as, close, insert le, append le, print, convert, and
exit. These operations can be found in the File menu shown in Figure 4.
3.3.1 New
The New operation opens a new Pic le with the name specied by the user.
The system clears both the canvas and the text window.
3.3.2 Open
The Open operation opens an existing Pic le. When the user selects the
Open operation from the menu File ! Open or click on the Open button
on the toolbar, a le dialog window is displayed with all Pic les in current
directory. The user can choose one of the Pic les or change to other directory
to select other Pic le. Once the user clicks on the OK button in the le
dialog, the IR in the selected Pic le will be displayed in the text window.
Meanwhile, the picture corresponding to the IR is drawn on the canvas.
14
3.3.3 Save
The Save operation saves the IR into the current open Pic le. It overwrites
the contents of the le. All changes are made permanently.
3.3.4 Save As
The Save As operation opens a le dialog asking the user the name of the
saving le. It then saves the IR into the named le.
3.3.5 Close
The Close operation rst checks if there are any changes to the current open
le after the last save. If so, it asks the user whether to save the changes or
not. Then, the program clears both the text window and the canvas.
3.3.6 Insert File
The Insert File operation inserts the contents (IR) of the named le at the
current insertion point in the text window. The picture on the canvas is
redrawn to display the change. Any .PS or .PE lines within the inserted le
are ignored, so previously prepared pictures can be used as parts of larger
ones without editing.
3.3.7 Append File
The Append File operation appends the contents (IR) of the named le at
the end of current open Pic le. The picture on the canvas is redrawn to
display the change. Any .PS or .PE lines within the appended le are ignored,
so previously prepared pictures can be used as parts of larger ones without
editing.
3.3.8 Print
The Print operation provides an option for the user to choose to print either
the picture displayed on the canvas or the IR displayed in the text window.
15
3.3.9 Convert
Dierent users may choose to include the pictures generated by WD-Pic into
dierent kinds of documentation. In order to facilitate the user's embedding the pictures in different documents, WD-Pic provides
picture format converter which can convert the picture from
Pic format to other picture formats, such as PS, GIF, JPG,
troff, and TEX.
3.3.10 Exit
The Exit operation rst checks if there are any changes to the current open
le after last save. If so, it asks the user whether to save the changes or not.
Then, the program exits.
4 Advanced Features
The previous section introduces the primary functions provided by WD-Pic.
The present section introduces some advanced features to facilitate more
powerful and exible operations by uent users.
4.1 Grid and Gravity
In order to assure that the code generated by WD-Pic will
appear to have been written by a human, WD-Pic provides grids
and gravity.
A grid is a collection of n evenly spaced horizontal lines and m evenly
spaced vertical lines which partition the canvas into (n , 1) (m , 1) equal
rectangles. The width and height of these small rectangles can be changed
by users. The grid can also be turned on or o by checking the box of grid
on the lower left-hand corner on the screen (see Figure 1). When the grid
is turned on, any mouse clicking on the canvas will be moved to the closest
cross point on the grid. If the grid spacing is small enough, the user will not
notice any changes.
A grid is normally invisible when it is initially turned on, but it can be
shown by clicking on the Show Grid button on the toolbar so that the user
can choose to see the grid. Clicking on the Show Grid button on the toolbar
16
again will make the grid invisible when the user wants to have the grid turned
on, but he or she does not want the grid to mix with his or her pictures.
To cut down the need for explicit coordinates, objects have \corners"
named by compass points. For example, a box has nine corners:
B.n
B.nw
B.ne
B.w
B.c
B.e
B.sw
B.se
B.s
Lines and arrows have a start, an end and a center in addition to
corners. Circles and ellipses have corners too; an arc has the same corners as
the circle of which it is a part. The words left, right, top, and bottom
are synonyms for west, east, north, and south.
Gravity refers to the capability of WD-Pic that a click will be attracted
to a corner of an element if the click is close enough to the corner of that
element when the grid is turned on. That is, if the distance between the
location of the click and the closest element to the click is less than the
specied grid spacing, then the click will be gravitated towards one of the
closest corners of the element. Otherwise, the click will not be gravitated
towards that element, but will be gravitated towards the nearest grid cross
point on the canvas.
For example, point A in the following diagram will be gravitated towards
the east side of the box and point B will be gravitated to the south east side
of the box + gridwid, which is a grid cross point in this case:
A
B
gridwid
The grid is a Cartesian coordinate system whose x increases rightwards
and y increases upwards. The origin of the grid in WD-Pic is initially set to
the origin in the IR. The origin can be changed to any point on the canvas
which is described in Section 4.6.2.
17
4.2 Pic Structures
Pic provides loop and conditional statements. The syntax of loop statement
is:
for variable = expression to expression by expression do fbodyg.
The syntax of conditional statement is:
if expression then fanythingg else fanythingg
Since loop and conditional statements are complex language features,
WD-Pic provide little extra support to use them. Users can write their loop
and conditional code in the text window to achieve greater exibility and
power.
Nevertheless, WD-Pic does provide some extra features in some simple
situations, especially when it relates to a group of selected objects. These
features include the Time button and menu items corresponding to loop and
conditional statements.
Time. WD-Pic provides the mechanism to draw a group of selected
objects by a user specied number of times. A user can select an object or a
group of objects and then click on the Time button on the panel (see Figure
1). A dialog box is displayed to request the user to give a number. After
the user types a number, the system will redraw the group of objects by that
number of times.
For example, assume a user chooses the following group of objects:
The corresponding IR is arrow; box. If the user enters 4 as the number
of times to be looped, the system will display the following picture:
The corresponding IR is changed to be for i=1 to 4 do farrow; boxg.
This allows the user to draw duplicate objects faster when the number of
times is large. The user can modify the loop to achieve more exibility. For
example, the user can change the above IR to for i=1 to 4 do farrow;
box width boxwid/ig. The followings are the resulted change:
18
WD-Pic also provides menu commands that will output the skeletons of
the statements to be lled out by the user. The user can select a group of
objects to ll out the body of the statements, and then modify the statements
to t his or her needs.
To use the loop statement, the user selects the menu Option ! Loop.
A dialog containing the loop skeleton with an empty text area for the body
of the loop statement is displayed. The user can use the Copy and Paste
operations to ll the loop body. He or she can also modify the loop conditions.
Once the user clicks on the OK button in the dialog, the loop statement will
be inserted at the current insertion point.
To use the conditional statement, the user selects the menu Option !
Condition. A dialog containing the condition skeleton with two empty text
areas for the two conditions of the conditional statement is displayed. The
user can use the Copy and Paste operations to ll the skeleton. He or she
can also modify the expressions of the conditional statement. Once the user
clicks on the OK button in the dialog, the conditional statement will be
inserted at the current insertion point.
4.3 Macros
Pic provides a basic macro facility. In the simplest form:
dene name f replacement text g
denes name to be the replacement text. Any subsequent occurrence of name
will be replaced by replacement text.
Macros may have arguments. If the replacement text of a macro definition contains occurrences of $1, $2, etc., these will be replaced by the
corresponding actual arguments when the macro is invoked. The invocation
for a macro with arguments is:
name(arg1, arg2, ...)
Non-existent arguments are replaced by null strings. Macro denitions last
from picture to picture.
In order to save time on using a group of reappearing objects, WD-Pic provides the mechanism to define and use macros.
19
To dene a macro, a user can select or shift-select an object or a group of
objects, and then select the menu Option ! Dene Macro. A dialog box
is displayed to ask the user for the name of this macro, and the number of
parameters this macro has. The dialog box also contains the IR corresponding to the group of objects chosen by the user. A user can modify this IR to
suit his or her requirements. If the user does not select any objects on the
canvas before he or she selects menu Option ! Dene Macro, an empty
text eld is provided on the dialog box for the user to write the macro code.
To use a macro, a user can choose the menu Option ! Use Macro.
The system will display a list of predened macro names with empty boxes
for the inputs of their parameter values. Upon selecting one macro name and
entering all required parameter values, the group of objects represented by
the macro name is inserted at the current insertion point on the canvas. The
corresponding macro name and parameters are written into the text window.
If the user can remember the exact macro name and the required parameters,
he or she can type them directly into the text window.
4.4 Fonts
Pic does not provide any font operations. It passes any font operations
to tro as simple text, e.g. \nfI", \ns2". A user normally needs to
change fonts and font sizes to make his or her picture look
better. WD-Pic provides the capability to change fonts and font sizes by
putting the font choice bar and font size choice bar just beside the system
toolbar so that the user can easily make the choice while drawing. Each time
a user chooses a new font, the system inserts a text \nfFONT" in the text
window, where FONT refers to the new font with tro format, e.g. FONT
Italics is represented as \nfI".
Changing font sizes is achieved the same way as changing fonts by making
the choice on the font size choice bar.
All text is displayed as the selected font and font size on the canvas; that
is, it is the same as printed on paper.
4.5 Pic Settings
All elements have their default sizes set by Pic language. The original values
of these default sizes are:
20
boxwid = 0.75;
linewid = 0.75;
circlerad = 0.25;
ellipsewid = 0.75;
movewid = 0.75;
textwid = 0;
arrowwid = 0.05;
dashwid = 0.05;
maxpsht = 8.5;
fillval = 0.3;
boxht = 0.5
lineht = 0.5
arcrad = 0.25
ellipseht = 0.5
moveht = 0.5
textht = 0
arrowht = 0.1
arrowhead = 2
maxpswid = 11
scale = 1
To change these default values, the user chooses the menu Pic Settings.
The system displays a dialog containing all above items which can be changed
by the user. These changes will aect all elements drawn on the canvas. For
example, changing boxwid to 0:5 will change all rectangles to squares in the
picture.
4.6 WD-Pic Settings
Figure 5: The WD-Pic Settings Menu
In this section, we will discuss how to change the settings of WD-Pic, such as
the toolbar, the grid and the font. All these system defaults can be changed
from menu shown in Figure 5.
4.6.1 Toolbar
The purpose of the toolbar is to provide a way to directly
access some system functions without going through a series
of steps to find the operation on the menu. The contents of
the toolbar can be customized by the user so that he or she
can include his or her favorite operations in the toolbar. To
21
customize the toolbar, the user can select WD-Pic Settings ! Toolbar.
The system displays a dialog with all available system functions so that the
user can select from them.
The toolbar can be turned on or o by the user; that is, the user can
choose to display the toolbar or not. To turn on or o the toolbar, the user
selects the same menu WD-Pic Settings ! Toolbar. In the displayed
dialog, there is a check box for turning on or o toolbar. Another way to
turn on or o the toolbar is to check the check box for turning on or o toolbar
on the lower left-hand corner on the system interface shown in Figure 1.
4.6.2 Grid
Figure 6: The Grid Setting Dialog
As discussed in Section 4.1, a grid is used for better readable IR. There are
two kinds of grids: absolute grid and relative grid. If the origin of the grid is
an absolute point on the canvas, the grid is called absolute grid. If the grid
origin is a corner of an element on the canvas, the grid is a relative grid. To
change grid settings, a user selects the menu WD-Pic Setting ! Grid. A
dialog shown in Figure 6 is displayed.
Initially, the grid is set to be absolute grid with grid origin at the corresponding origin position in the IR. (The origin of the IR is at the entry point
of the rst element in the IR.) The grid origin can be set anywhere on the
canvas. The user can enter any x coordinator and y coordinator as the origin
22
in the dialog shown in Figure 6. In addition, the origin can be selected by
holding < CTRL > key when clicking on a point on the canvas. This point
will be the future origin if the grid is turned on later. The coordinators of
the origin are displayed in the dialog.
To change to a relative grid, the user selects the choice of relative grid in
the dialog. Then the user needs to choose the origin of the grid by controlclicking on a corner of an element on the canvas. When the user turns on the
grid, the grid origin will be set to that corner of the element. Internally, a
label is added at the beginning of the element in the IR. For the example in
Figure 6, the element is given a lable A, and the origin is at the east corner
of that element. Note, a relative grid only diers from a absolute grid in the
representation of their origins.
Grid spacing can be changed by modifying the values of gridwid and
gridht in the dialog. The initial values are: gridwid = 0.5, gridht = 0.25.
The values of gridwid and gridht can be assigned to any values of the default
sizes of Pic settings too. For example, gridwid = movewid is equivalent to
set gridwid = 0.75 if movewid is 0.75.
The grid can be turned on or o. The user can also choose to display
the grid on the canvas if he or she wants to have an idea of the eects of the
grid, or make the grid invisible if he or she does not want the grid to mix
with his or her pictures which may contain small dotted rectangles with the
same size as the grid. When the grid is displayed, the origin of the grid is
represented by a small circle sign (o) shown as following:
o
4.6.3 Fonts
Choosing the menu WD-Pic Settings ! Fonts displays a dialog for users
to change the default font and font size. The dialog contains all fonts and
font sizes that mounted on the user's machine. Another way to change fonts
or font sizes is to use the font choice and font size choice located just beside
23
the toolbar as shown in Figure 1.
4.7 Grouping
WD-Pic provides the mechanism to select a group of objects and then operate
on them. We summarize some of the group operations that can facilitate the
user to draw the pictures.
After the user selects a group of objects, he or she can move all selected
objects as discussed in Section 3.1.3. The user can also change the sizes of
the same kind of objects in one group. For example, the user can enlarge the
radii of all circles by clicking and dragging on one of them in the group. In
addition, he or she can change the font and font size of all text in the selected
group of objects. That is, when there are selected objects, the changing font
or font size operation will apply to all text in the selected objects.
Grouping objects facilitates the uses of Pic structures and macros too,
which are discussed in Section 4.2 and Section 4.3 respectively.
5 Command Syntax and System Options
5.1 Menu
All system functions can be found on the menu so that we give a complete
specication of all menu items as the glossary of WD-Pic. There are eight
menu items: File, Edit, Elements, Attributes, Options, Pic Settings, WD-Pic
Settings, and Help.
5.1.1 File
As shown in Figure 4, the File menu contains the following items:
New: start a new le and clear both the canvas and the text window.
Open: open an existing le and draw the corresponding picture on the
canvas.
Close: close the current Pic le and clear both the canvas and the text
windows.
24
Save: save the IR into the current Pic le.
Save As: save the IR into the current Pic le with user specied name.
Insert File: insert the IR of a Pic le at the current insertion point.
Append File: append the IR of a Pic le at the end of the current open
Pic le.
Print: print the current picture or the corresponding IR depending on
the choice in the print dialog made by a user.
Convert: convert the picture to other formats, such as PS, GIF, TEX,
and troff .
Exit: exit the system.
5.1.2 Edit
As shown in Figure 3, the Edit menu contains:
Undo: undo the last edit operation.
Redo: redo the last edit operation.
Cut: delete the group of selected objects and put them into a system
buer.
Copy: put the group of selected objects into a system buer.
Paste: put the group of objects from the system buer at the current
insertion point.
Delete: delete the group of selected objects.
5.1.3 Elements
As shown in Figure 7, the Element menu contains:
Box: draw a box.
Circle: draw a circle.
25
Figure 7: The Elements Menu
Ellipse: draw an ellipse.
Arrow: draw an arrow.
Line: draw a line.
Spline: draw a spline.
Arc: draw an arc.
Text: input the text.
Move: move the current insertion point.
5.1.4 Attributes
As shown in Figure 8, the Attributes menu contains:
Width: the width of the selected element.
Height: the height of the selected element.
Solid: the line style of the selected element is solid.
Dashed: the line style of the selected element is dashed.
Dotted: the line style of the selected element is dotted.
26
Figure 8: The Attributes Menu
Invisible: make the selected element invisible.
Fill: ll the selected element if it is a closed shape element.
Fonts: change the font of the text associated with the selected objects.
Font Sizes: change the font size of the text associated with the selected
objects.
5.1.5 Options
Figure 9: The Options Menu
As shown in Figure 9, the Options menu contains:
Dene Macro: provide an interface for dening a macro.
Use Macro: provide an interface for using a macro.
27
Loop: provide a dialog for using loop.
Condition: provide a dialog for using condition.
Show Grid: display grid on the canvas.
5.1.6 Pic Settings
It provides a dialog to change all kinds of object default sizes (see Section
4.5).
5.1.7 WD-Pic Settings
Figure 10: The Settings Menu
As shown in Figure 10, the WD-Pic Settings menu contains:
Toolbar: provide a dialog to customize the system tool bar, or turn on
or o the tool bar.
Grid: provide a dialog to change the default grid settings.
Fonts: provide a dialog to change the default font and font size.
5.1.8 Help
As shown in Figure 2, the Help menu contains:
Index: provide an index of help information.
Tutorial: provide a tutorial of using the system.
About: provide version and copyright information.
28
5.2 Toolbar
The system tool bar contains the following items:
New: start a new le. The button is shown as following:
Open: open an existing Pic le. The button is shown as following:
Save: save the IR into the current open Pic le. The button is shown
as following:
Print: print the current picture or the corresponding IR. The button
is shown as following:
Cut: delete a group of selected objects and put them into a system
buer. The button is shown as following:
Copy: put a group of selected objects into a system buer. The button
is shown as following:
Paste: copy the group of selected objects at the current insertion point.
The button is shown as following:
Delete: delete the group of selected objects. The button is shown as
following:
29
Undo: undo the last edit operation. The button is shown as following:
Redo: redo the last edit operation. The button is shown as following:
Fill: set ll mode for elements. The button is shown as following:
Solid: set line style to solid. The button is shown as following:
Dashed: set line style to dashed. The button is shown as following:
Dotted: set line style to dotted. The button is shown as following:
Invisible: set line style to invisible. The button is shown as following:
Grid: show grid if the grid is turned on. The button is shown as
following:
Help: show help. The button is shown as following:
Fonts: change fonts. The choices include all fonts that are mounted
on the user's machine. The following picture shows an example font
choice.
30
Font Sizes: change font sizes. The choices are shown as following:
References
[1] Brian W. Kernighan. PIC { A Graphics Language for Typesetting User
Manual. Computing Science Technical Report No. 116, AT&T Bell Laboratories, Murray Hill, New Jersey, USA, May 1991.
31