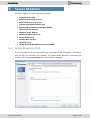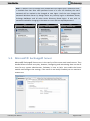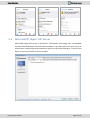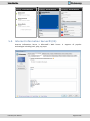
1
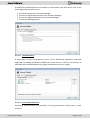
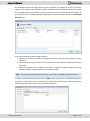
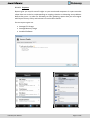
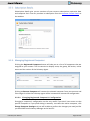
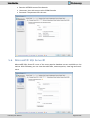
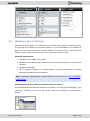
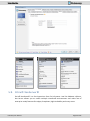
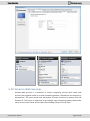
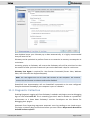
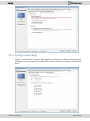
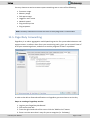
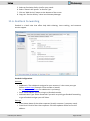
Pulseway User Manual ver. 4.4 – © 2014 MMSOFT Design Ltd. www.pulseway.com Table of Contents 1. Description ................................................................................................................................... 5 2. Installation ................................................................................................................................... 6 2.1. 2.2. 2.3. 2.4. 2.5. 2.6. 2.7. 2.8. 2.9. 2.10. Installing Pre-requirements ..................................................................................................................................... 6 Installing on Microsoft© Windows© OS's .............................................................................................................. 6 Installing on Apple© Mac OS's ................................................................................................................................ 7 Installing on Red Hat Enterprise Linux based OS's .................................................................................................. 7 Installing on Debian Linux based OS's ..................................................................................................................... 8 Installing on RaspberryPi (Raspbian) ....................................................................................................................... 8 Installing on Apple© Mobile Devices ...................................................................................................................... 8 Installing on Google© Android© based Mobile Devices ........................................................................................ 9 Installing on Microsoft© Windows Phone© based Mobile Devices ....................................................................... 9 Installing on Microsoft© Windows © 8 .................................................................................................................. 9 3. Account Configuration ................................................................................................................ 11 3.1. Account Details ...................................................................................................................................................... 11 3.1.1. Creating a new account ........................................................................................................................... 11 3.1.2. Validating Account .................................................................................................................................. 11 3.1.3. Recovering Account’s Username .......................................................................................................... 12 3.1.4. Recovering Account’s Password ........................................................................................................... 12 3.3. 3.4. 3.1.5. Changing Account’s Password .............................................................................................................. 13 Account Management ........................................................................................................................................... 14 3.2.1. Account Details........................................................................................................................................ 14 3.2.2. Subscription Details ................................................................................................................................. 18 3.2.3. Managing Registered Computers ............................................................................................................ 18 3.2.4. Managing Registered Devices ................................................................................................................. 21 Computer Information .......................................................................................................................................... 22 Dedicated Server ................................................................................................................................................... 22 4. System Configuration ................................................................................................................. 24 4.1. General Settings .................................................................................................................................................... 24 4.1.1. Allowed System Commands .................................................................................................................... 25 4.1.2. System Command Force Attribute .......................................................................................................... 25 4.1.3. Process Browsing ..................................................................................................................................... 26 4.1.4. Event Log Browsing ................................................................................................................................. 26 4.1.5. Hardware Sensor Settings ....................................................................................................................... 27 4.1.6. Wake on WAN ......................................................................................................................................... 27 4.1.7. Screen View ............................................................................................................................................. 28 4.1.8. Webcam View.......................................................................................................................................... 29 4.1.9. User Chat ................................................................................................................................................. 29 4.1.10. User Support Request ................................................................................................................................ 30 Service Monitoring ................................................................................................................................................ 30 Network Monitoring .............................................................................................................................................. 31 4.3.1. Network Interface Monitoring ................................................................................................................ 31 4.3.2. Port Monitoring ....................................................................................................................................... 32 3.2. 4.2. 4.3. Pulseway User Manual Page 2 of 85 4.8. 4.3.3. Performance Monitoring ......................................................................................................................... 34 Scheduled Task Monitoring ................................................................................................................................... 35 Performance Counter Monitoring ......................................................................................................................... 36 Web Configuration ................................................................................................................................................ 37 4.6.1. SSL Certificate Monitoring ....................................................................................................................... 37 4.6.2. Web Sites Monitoring .............................................................................................................................. 37 File Browser Configuration .................................................................................................................................... 38 4.7.1. Email Configuration ................................................................................................................................. 39 Maintenance Schedule .......................................................................................................................................... 39 5. Server Modules .......................................................................................................................... 41 5.1. 5.2. 5.3. 5.4. 5.5. 5.6. 5.7. 5.8. 5.9. 5.10. 5.11. 5.12. Active Directory (AD) ............................................................................................................................................. 41 Microsoft© Exchange© Server ............................................................................................................................. 42 Microsoft© Hyper-V© Server ............................................................................................................................... 43 Internet Information Server© (IIS) ........................................................................................................................ 44 System Center Operations Manager ..................................................................................................................... 45 Microsoft© SQL Server© ...................................................................................................................................... 46 Windows Server Backup ........................................................................................................................................ 47 VMware© vSphere© Server ................................................................................................................................. 48 Citrix© XenServer© .............................................................................................................................................. 49 Amazon Web Services ........................................................................................................................................... 50 Windows Azure...................................................................................................................................................... 51 Simple Network Management Protocol (SNMP) ................................................................................................... 53 6. Notification Settings ................................................................................................................... 56 4.4. 4.5. 4.6. 4.7. 6.1. 6.2. 6.3. 6.4. 6.5. 6.6. Status Notifications ............................................................................................................................................... 56 Performance Notifications .................................................................................................................................... 57 Service Notifications .............................................................................................................................................. 57 Process Notifications ............................................................................................................................................. 58 Ping Notifications .................................................................................................................................................. 58 Storage Notifications ............................................................................................................................................. 58 6.6.1. Low Disk Space Notifications ................................................................................................................... 59 6.6.2. File Change Notifications ......................................................................................................................... 59 6.7. Event Log Notifications .......................................................................................................................................... 60 6.7.1. Exporting Event Log Notification’s Configuration ................................................................................ 60 6.7.2. Importing Event Log’s Notification’s Configuration .......................................................................... 60 6.8. Hardware Sensor Notifications .............................................................................................................................. 61 6.9. Performance Counter Notifications ...................................................................................................................... 61 6.9.1. Exporting Performance Counter Notification’s Settings ...................................................................... 62 6.9.2. Importing Performance Counter Notification’s Settings ...................................................................... 62 6.10. Web Notifications .................................................................................................................................................. 62 6.11. Server Module Notifications .................................................................................................................................. 63 6.11.1. Active Directory ....................................................................................................................................... 63 6.11.2. Microsoft Exchange Server ...................................................................................................................... 63 6.11.3. IIS ............................................................................................................................................................. 64 6.11.4. SCOM ....................................................................................................................................................... 64 6.11.5. Windows Backup ..................................................................................................................................... 64 6.11.6. VMware ................................................................................................................................................... 64 6.11.7. Amazon .................................................................................................................................................... 65 6.11.8. SNMP ....................................................................................................................................................... 65 7. Rule Configuration ...................................................................................................................... 67 Pulseway User Manual Page 3 of 85 7.1. 7.2. 7.3. Adding Rules .......................................................................................................................................................... 67 Exporting Rules ...................................................................................................................................................... 67 Importing Rules ..................................................................................................................................................... 68 8. Plugin Configuration ................................................................................................................... 69 8.1. 8.2. 8.3. Installing Plugins .................................................................................................................................................... 69 Configuring Plugins ................................................................................................................................................ 70 Creating Plugins ..................................................................................................................................................... 71 9. Display Settings .......................................................................................................................... 72 10. Device Settings ........................................................................................................................... 73 11. Settings ...................................................................................................................................... 74 11.1. 11.2. 11.3. 11.4. 11.5. 11.6. Proxy Configuration ............................................................................................................................................... 74 Runtime Configuration .......................................................................................................................................... 74 Diagnostic Collection ............................................................................................................................................. 75 Syslog Forwarding ................................................................................................................................................. 76 PagerDuty Forwarding ........................................................................................................................................... 77 ZenDesk Forwarding .............................................................................................................................................. 78 12. Manager Security Lock ................................................................................................................ 80 13. Exporting Configuration .............................................................................................................. 81 14. Importing Configuration ............................................................................................................. 82 15. Maintenance Mode .................................................................................................................... 83 16. Unattended Installation .............................................................................................................. 84 17. Support ...................................................................................................................................... 85 Pulseway User Manual Page 4 of 85 Description 1. Description Pulseway provides an innovative solution for monitoring and managing your computers using a securely encrypted mobile app that gives you total control of your systems from anywhere, anytime. This manual is made to guide the reader through the installation, configuration and use process without the need for any background experience in the domain. Pulseway User Manual Page 5 of 85 Installation 2. Installation Pulseway requires an agent to be installed on each monitored PC and will communicate using a secured connection with a remote server from where the information will be passed on to the mobile client. Pulseway Agent supports the following operating systems: Microsoft© Windows© XP or newer. Apple© Mac OS X Snow Leopard or newer. Almost all Linux distributions. Supported Mobile Devices: Apple© iOS based Mobile Devices Google© Android based Mobile Devices Microsoft© Windows Phone© based Mobile Devices Blackberry© based Mobile Devices Windows 8 Devices 2.1. Installing Pre-requirements Microsoft© Windows© Operating Systems Pre-requirements: Microsoft .NET Framework 4.0: http://www.microsoft.com/en-us/download/details.aspx?id=17718 2.2. Installing on Microsoft© Windows© OS's Before you start downloading Pulseway you need to know what your windows architecture is. To find out whether you’re running a 64bit or a 32bit operating system you need to go to Control Panel and go to System. There you will need to look for your System Type as shown in the picture bellow. Pulseway User Manual Page 6 of 85 Installation After you find your system architecture go to http://www.pulseway.com/downloads and download the appropriate version for your system: Pulseway for Windows x64 (64 bit) or the x86 (32 bit). After you downloaded the installer follow the instructions in the setup screen and a Pulseway icon will be automatically created on your Desktop. 2.3. Installing on Apple© Mac OS's To install Pulseway on a Mac operating system all you need is to download the appropriate version http://www.pulseway.com/downloads, Pulseway for Mac. After you have the *.dmg file in your computer double click on it and a license agreement will show up. After you have read the license agreement and if you agree with it click on the Agree button and a window like this will show up. Now you need to select the Pulseway icon from the left and drag it into the Applications folder (the icon on the right). Note: You will be prompted to insert your password to authorize the installation. 2.4. Installing on Red Hat Enterprise Linux based OS's Open up your terminal (a ssh connection will work too) and run the linux installer. rpm -Ivh http://www.pulseway.com/download/pulseway_x64.rpm Pulseway User Manual Page 7 of 85 Installation Or if your operating system is working on 32 bit architecture: rpm -Ivh http://www.pulseway.com/download/pulseway_x86.rpm Follow the instruction process (where you don’t know what to type just leave the default value). 2.5. Installing on Debian Linux based OS's Open up your terminal (a ssh connection will work too) and run the linux installer. wget http://www.pulseway.com/download/pulseway_x64.deb Or if your operating system is working on 32 bit architecture: wget http://www.pulseway.com/download/pulseway_x86.deb Then start the installation process: dpkg -i pulseway_x64.deb or dpkg -i pulseway_x86.deb Follow the instruction process (where you don’t know what to type just leave the default value). 2.6. Installing on RaspberryPi (Raspbian) Open up your terminal (a ssh connection will work too) and run the linux installer. wget http://www.pulseway.com/download/pulseway_armhf.deb Then start the installation process: dpkg -i pulseway_armhf.deb Follow the instruction process (where you don’t know what to type just leave the default value). 2.7. Installing on Apple© Mobile Devices Pulseway User Manual Page 8 of 85 Installation In order to install Pulseway on Apple© based mobile devices you will need an apple account. To create an Apple Account you need to download and install iTunes from: here. After you have an Apple account just open App Store from your mobile device: Then go the Search tab and search for Pulseway. Then you will need to tab on the Free icon to reveal the install button, tab the install button and you will be prompted for your Apple password then the application will install. 2.8. Installing on Google© Android© based Mobile Devices To install Pulseway on your Android device open up the Market application and search for Pulseway. The application is free of charge so you will be able to download it without having to pay for anything at all. After the application description page opens tap to install it. After a few seconds, depending on your connection speed you will find Pulseway in your application list. 2.9. Installing on Microsoft© Windows Phone© based Mobile Devices On your Windows Phone© device open up marketplace application and search for Pulseway. Pulseway app should be among the first applications in the search results. Tap on install and after a few seconds you will find Pulseway in your application list. 2.10. Installing on Microsoft© Windows © 8 Pulseway User Manual Page 9 of 85 Installation Bring up the start menu (with the Metro UI) and click on the “Microsoft Store” icon then search for Pulseway. Pulseway app should be among the first applications in the search results. Once it’s installed you will find Pulseway in your applications list. Pulseway User Manual Page 10 of 85 Account Configuration 3. Account Configuration The first part of the configuration (and the most important one) represents your account information. Without correct configuration your computer will not show up on mobile devices and will not be monitored. Account configuration is split into four categories: 1. 2. 3. 4. Account Details Account Management Computer Information Dedicated Server 3.1. Account Details In order to configure your Account you need to have one created. If you already have an account you may skip to 3.1.2. Validating Account. Pulseway Manager will not allow you to configure or start the service until you provide a valid account. 3.1.1. Creating a new account In order to create a new account Pulseway requires you to input some personal information such as Name, Company, Country, Email Address and Username. This information is only used to identify you as the owner of your account and for billing purposes. Read our Privacy Policy to learn more about your privacy. Once the code has been inserted and it was confirmed your account is activated and ready to use. 3.1.2. Validating Account Validating your account is important because it will help you understand why your computer is not showing up on the mobile devices. If you click it you will know if your account is valid and no problems were detected. Pulseway User Manual Page 11 of 85 Account Configuration If any error is printed out when you click Validate Account please post the error in our forums in order to investigate the problem. 3.1.3. Recovering Account’s Username If by any chance you forgot your username click the Recover Username link on the right of the username field and you will be prompted for your email address that is associated with your account. Your email address is requested to confirm account ownership. After 5 minutes (usually instantly) you will receive an email containing your username. 3.1.4. Recovering Account’s Password If by any chance you forgot your password click the Reset Password link on the right of the password field and you will be prompted for your username and email address that is associated with your account. Pulseway User Manual Page 12 of 85 Account Configuration Enter the reset code you from your mailbox then input a new password and confirm it to complete the process. Optionally you can choose a custom password propagation time that will permit computers that are configured with the old password to automatically update it to the new one. After 5 minutes (usually instantly) you will receive an email containing your new password reset code that will be used to change your password and propagate the changes to your computers. Note: Password propagation system is using secure socket layer (SSL) connection. 3.1.5. Changing Account’s Password If you would like to change your password click the Change Password button under the password field and the following window will show up. Pulseway User Manual Page 13 of 85 Account Configuration The Password Propagation Time represents the time while both old and new passwords are accepted, also during this time all computers that have the old password will automatically switch to the new password without any user action at all. Note: The computers have to be online at least once during the password propagation period in order to automatically change the password. 3.2. Account Management Account Management panel holds your account control panel. From here you can change your account details, activate security features, manage your subscription, manage your registered computers and control registered devices and their policies. All Account Management functions are protected with your account’s password to prevent unauthorized changes. 3.2.1. Account Details From Account Details Management you can change your account information you inserted when you created your account and changing your notification settings. Please note that the notification settings are global. This means that if you disable push notifications all mobile devices will stop receiving push notifications. 3.2.1.1. Modifying Account Details If you would like to change your account details just modify the field you would like to change and press the Save button. 3.2.1.2. Two Step Authentication Two-Step Authentication adds another layer of security to your account that will prevent unauthorized changes to your account. Pulseway User Manual Page 14 of 85 Account Configuration If enabled the following actions will require a confirmation code that will be sent to the email registered on your account: Password change from Pulseway Manager Access the registered computers from Pulseway Manager Access the registered devices from Pulseway Manager Access the Web Application 3.2.1.3. IP Restrictions IP Restrictions prevent unauthorized access to the Dashboard application and Web Application by adding authorized IP addresses to your account. You can mix accesses to web application and dashboard using single IP addresses or even IP ranges. 3.2.1.4. Associated Accounts Associating accounts gives the possibility of sharing computers among two or more accounts. Pulseway User Manual Page 15 of 85 Account Configuration An associated account will gain access to the computer you choose to share in read-only mode or full control and if allowed, receive notifications from selected computers. To add an Associated Account you need to know the other person’s usernames and link them to your account from Pulseway Manager application in Account Details screen at Associated Accounts tab. Common Scenarios for associating accounts: Monitor and control a machine and give your client access to see the status of their machine. Share access to servers with all your technicians so that when a problem arises they will know. Share a computer with a support technician in read only mode to look at the logs without actually having access to the computer itself. Note: You can only use Associated Account if you have a Pulseway Enterprise Server. To add an associated account just click on Add, enter the person’s username at Account Username, set the access level, choose if you would like the associated account to receive notifications and allow access to the selected computers. Pulseway User Manual Page 16 of 85 Account Configuration 3.2.1.5. Reports Reports give you a quick overall insight on your monitored computers. A report contains values that are critical on understanding an ongoing situation or detecting new problems before they occur. In order for Pulseway to start gathering report data you must agree with Report Privacy Policy and activate it from Account Details. Current report types are: Average CPU Usage Average Memory Usage Installed Software Pulseway User Manual Page 17 of 85 Account Configuration 3.2.2. Subscription Details Subscription details give you an overview of your current subscriptions expiration date and computer limit. You can purchase a subscription from the Account Control Panel on the website. 3.2.3. Managing Registered Computers Clicking the Registered Computers button will take you to a list of all computers that are assigned to your account. The list contains its display name, the group, OS version, online status and the version of the Pulseway Agent. Clicking on Remove Computer will remove the selected computer from your account and if the target is online the Pulseway agent will be instructed to remove the configuration. 3.2.3.1. Changing Registered Computer’s Configuration Changing a computer’s configuration can be very useful if you don’t have access to that specific computer or if you prefer doing it remotely. Just select the online computer, click Change Computer Settings and you will be able to perform the changes you need just like you would do from Pulseway Manager at the local PC. Pulseway User Manual Page 18 of 85 Account Configuration Note: Both agents must have the same version in order to perform remote configuration changes. 3.2.3.2. Manage Group Policies Group Policies provides the centralized management and configuration of Pulseway configuration. Group Policies work on computer groups and they overwrite the configuration of all computers in the group. Group Policies is commonly used in enterprise environments to quickly configure new computers and to ease the configuration update process. Once a Group Policy has been created all computers will automatically update their configuration based on the policy. Also computers that are added in a group that has a policy will change its configuration according to the policy. Pulseway User Manual Page 19 of 85 Account Configuration There are two types of group policies: Default policies will affect all monitored computers, changing all settings that are configured in the policy that don’t conflict with other policy. Explicit policies only affects computers that are part of the group. Explicit policies have priority over the default so that if an explicit policy has a setting configured the default policy will not be checked for that setting. Adding a Group Policy In order to add a Group Policy you must decide if you would like to affect all computers or only a specific group. After you select the group from the Manage Group Policies window you can choose to create a policy or to update if it already exists. A policy setting has three states: Checked Unchecked Undecided Note: Group policy changes are not reflected in the Pulseway Manager. The Manager only allows you to edit the local configuration; at runtime, in the Pulseway service, group policy settings will take priority over local configuration. If a setting is Checked or Unchecked will be propagated to computers thus overwriting its value. Leaving a setting as Undecided will not propagate any changes to the computer and the existing value on computers will remain untouched. Pulseway User Manual Page 20 of 85 Account Configuration Removing a Group Policy If you would like to remove a Group Policy select it from Manage Group Policies window and then click on Remove Policy. Removing a Group Policy will stop propagating configuration changes to monitored and new computers. Note: Removing a Group Policy is permanent and cannot be undone. If you would like to preserve your configured policy you can export it into a file. Exporting a Group Policy After you have configured your policy you can export it into a file for backup purposes. You can do so by selecting the policy from Manage Group Policies window and then clicking on the Export Policy button. This will open a save dialog asking you where to save the file on your computer. An exported Group Policy can be used to import it on other accounts, to copy a policy to a different group and to restore a backup copy of a policy. Importing a Group Policy If you would like to import an exported Group Policy you need to have the exported *.pcmgp file on your local computer or in a network path. You can start the import process from Manage Group Policies window by clicking the Import Policy button after you have selected an existing group. An open dialog will show asking you to where is the exported file located. Note: If you import a Group Policy over an existing one the policy will be overwritten. 3.2.4. Managing Registered Devices The Registered Devices form lets you control the mobile devices that use your account. You will get a list with all the devices that are registered on your account, their installation ID’s, PUSH notification status and the overall status (Active or Blocked). Blocking a device will disable the application’s functionality on your account until you unblock it. Deleting a device will remove it from the list, however if the device will use your Pulseway under your account it will show up again. This is useful when you would like to remove a device from receiving PUSH notifications without actually performing any changes on the mobile device itself. Pulseway User Manual Page 21 of 85 Account Configuration 3.2.4.1. Creating Device Access Policies Creating Device Access Policies help you control the computers that a specific device has access to. There are two types of Device Access Policies: Explicit Policy (for a specific device) Default Policy (for all devices that don’t have an explicit policy) To create an explicit policy you need to click a device from the Registered Devices form and click the Device Access Policy button, or if you would like to change the default policy you need to click the Default Access Policy button. On the form that opens you will see a list of all the computers that are registered on your account. From here you can set the Access for each computer and default access for new computers. 3.3. Computer Information Computer Information keeps the identification settings for the specific computer. Computer Name Group Name These settings will not affect your existing computer name and workgroup and will only be used to keep an order in your computer list. You can use Group Name field for the Branch Office Location, Datacenter Rack Coordinates or whatever fits best for your case. Computer Name can be its user’s First Name, Asset number or anything you want. 3.4. Dedicated Server The dedicated server setting is reserved for the customers that own a Pulseway Enterprise Server. Pulseway User Manual Page 22 of 85 Account Configuration This field will represent the hostname of your server; however, incorrectly changing this setting will result in loss of communication with the cloud servers and loss of the ability to view the device on mobile clients. Pulseway User Manual Page 23 of 85 System Configuration 4. System Configuration System Configuration settings represent configuration of Pulseway features that are used for the local machine. The supported system features are: System Commands Process Commands Event Log Browsing Hardware Sensors Wake on WAN Commands Screen View Webcam View Service Commands Network Monitoring Scheduled Task Commands Performance Counter Browsing File Browser 4.1. General Settings General System Settings controls which features will be available to the mobile device and their configuration. Pulseway User Manual Page 24 of 85 System Configuration 4.1.1. Allowed System Commands Some system administrators would like to prevent hardware damage to the computers the operator share access to and disable the Power Off command which is a hard shutdown that can cause data loss. By default all System Commands are enabled, however, you get the option to customize their availability. For example if you would like to allow only restart commands to be sent, just uncheck all boxes except restart. 4.1.2. System Command Force Attribute The force attribute forces the application to close so that you will know for sure that the system will execute your command. This can cause loss of data if any opened application contains unsaved data. Pulseway User Manual Page 25 of 85 System Configuration 4.1.3. Process Browsing Process Browsing has only one setting which is used to hide know processes like (system, idle, pulseway). 4.1.4. Event Log Browsing Browsing through the event logs of an operating system is crucial to understand the current status of the hardware and software components. Pulseway offers the ability to limits the amount of log entries per page in order to increase browsing speed and reduce bandwidth usage. Pulseway User Manual Page 26 of 85 System Configuration Note: Tapping on the pen icon on the upper right corner will create a Draft email with the contents of the log entry. 4.1.5. Hardware Sensor Settings It’s always a good idea to monitor your hardware’s sensor and temperatures and Pulseway helps you keep a close eye on them. You can configure your temperature unit of measure from the Agent: 4.1.6. Wake on WAN Wake On WAN requires: A motherboard that supports Wake on Lan A wired network adapter that supports Wake on Lan Wake on Lan activate on BIOS Proper port forwarding if computer is behind a router/firewall By default Wake on Lan is using UDP port 9, so if your computer is behind a router or a firewall you will need to forward that port. More information can be found at www.portforward.com . Pulseway User Manual Page 27 of 85 System Configuration 4.1.7. Screen View Live view or Screen view allows its user to view the screen of any user session, extremely useful for terminal servers where multiple user sessions are used. This feature requires an active subscription to be activated (Trial users cannot use Screen View). Note: You need to have Pulseway User Agent (Chapter 11.2) enabled in order to use User Chat! Pulseway User Manual Page 28 of 85 System Configuration 4.1.8. Webcam View Webcam View is also useful to see if you forgot the rack door open or to see if someone is using the computer. This feature requires an active subscription (Trial users cannot use Webcam View). Note: You need to have Pulseway User Agent (Chapter 11.2) enabled in order to use Webcam View! 4.1.9. User Chat User Chat empowers system administrators to engage on a live chat with any user session on the monitored computer. One or more administrators starts the chat session from the mobile client and then the user will notice a chat window on their desktop. During the chat session the administrator has the option to close the chat thus disabling user’s message sending ability. Note: More than one administrator can engage on a User Chat at the same time. Pulseway User Manual Page 29 of 85 System Configuration Note: You need to have Pulseway User Agent (Chapter 11.2) enabled in order to use User Chat! 4.1.10. User Support Request User Support Request permits users to request support from system administrator with just one click. Pulseway administrators will receive a notification and will have the ability of a live chat with the user. Using Pulseway’s management tools an administrator can quickly identify and resolve even complex problems with ease while on the go using just the mobile clients. Note: You need to have Pulseway User Agent (Chapter 11.2) enabled in order to use User Chat! 4.2. Service Monitoring Service Monitoring gives you the ability of viewing the status of monitored services, getting notified when a service is stopped and the ability to start/stop monitored services. Pulseway User Manual Page 30 of 85 System Configuration 4.3. Network Monitoring Network monitor consists in three important parts: Network Interface Monitoring Port Monitoring Performance Monitoring 4.3.1. Network Interface Monitoring Network interface monitoring gives you details about current traffic and its configuration. Pulseway User Manual Page 31 of 85 System Configuration 4.3.2. Port Monitoring Keeping under control your opened ports can indicate a lot of problems, such as network overflow, service failure or even server downtime. Pulseway User Manual Page 32 of 85 System Configuration Port Monitoring supports: Local and Remote TCP ports Local UDP ports Pulseway User Manual Page 33 of 85 System Configuration 4.3.3. Performance Monitoring Performance Monitoring gives you a hint on the ping of your monitored IP. This can help you understand if your network is being overloaded at that moment. Pulseway User Manual Page 34 of 85 System Configuration 4.4. Scheduled Task Monitoring Scheduled Tasks are crucial for a stable backup system for most scenarios, having the ability to monitor and fire them from a mobile client just makes them even more useful. Pulseway User Manual Page 35 of 85 System Configuration 4.5. Performance Counter Monitoring Counters are used to provide information as to how well the operating system or an application, service, or driver is performing. The counter data can help determine system bottlenecks and fine-tune system and application performance. Pulseway User Manual Page 36 of 85 System Configuration 4.6. Web Configuration From the Web tab you can configure: SSL Certificate Monitoring Web Sites Monitoring 4.6.1. SSL Certificate Monitoring Using SSL Certificate Monitoring you can keep track of your certificates on local and remote hosts in one two easy steps. You can monitor any server that you can connect to and uses SSL connection. To monitor a SSL certificate click on Add button and fill in the following fields: Server Name (Hostname of the server) Port (Port of the service you wish to monitor) You will be informed when: A certificate has expired, is no longer trusted (revoked) or has become invalid. A certificate will expire soon. The certificate is valid however does not secure the identify of specified host. 4.6.2. Web Sites Monitoring Sometimes port and service monitoring is not enough to monitor a website. Maybe the content got moves and the web server is returning a 404 error code or the service is down due to invalid configuration and returns 503 error code. With web site monitoring you can monitor your web sites by testing the return codes. Pulseway User Manual Page 37 of 85 System Configuration To monitor a web site click on Add button and fill in the following fields: Name (A friendly name for the website that will be displayed on the device) URL (Target URL that will be tested. URL must contain the protocol) Method (HEAD or GET) 4.7. File Browser Configuration File Browser allows you to view the directory/file structure of the target computer, preview files and if configured email them. Pulseway User Manual Page 38 of 85 System Configuration 4.7.1. Email Configuration Pulseway Agent requires a valid email configuration in order to properly send files to your mailbox. 4.8. Maintenance Schedule If you have Scheduled Maintenance on your servers you can use this feature enabled Maintenance Mode (Chapter 15). To schedule maintenance for a specific Monday at 10PM you need to click on the white block on the “Monday” row and the “20” column. If your Maintenance happens Saturday and Sunday from 10PM to 3AM your schedule should look like this: Pulseway User Manual Page 39 of 85 System Configuration Legend: A filled block means that Maintenance Schedule is active during select hour. An empty block means that Maintenance Schedule is inactive during select hour. Pulseway User Manual Page 40 of 85 Server Modules 5. Server Modules Pulseway supports the following server modules: Active Directory (AD) Microsoft© Exchange© Server Microsoft© Hyper-V© Server Internet Information Server© (IIS) System Center Operations Manager (SCOM) Microsoft© SQL Server© Windows Server Backup VMware© vSphere© Server Citrix© XenServer© Amazon Web Services Windows Azure Simple Network Management Protocol (SNMP) 5.1. Active Directory (AD) A lot of companies that use Active Directory are having trouble managing it. Pulseway is here to help you overcome the problem. To enable Active Directory monitoring just enable it from the Server Modules tab in the Pulseway Manager. Pulseway User Manual Page 41 of 85 Server Modules Note: If “Require users to change their password at next logon after a password reset” is checked note that after each password reset of a user via Pulseway the user’s password will be marked to be changed at next logon. Until the user changes the password Windows Server by design denies any security logins to Windows Shares, Exchange Mailboxes and all other Active Directory Based logins. A user with its password marked for changing is the same as a user with an expired password. 5.2. Microsoft© Exchange© Server Microsoft© Exchange© Servers are in the top list of the most used email servers. They handle billions of email every day, however, configuring and maintaining them can be an issue for any system administrator. Pulseway is here to help. Just enable the Server module and configure the settings, if the server is not locally installed you can monitor a remote one. Pulseway User Manual Page 42 of 85 Server Modules 5.3. Microsoft© Hyper-V© Server Microsoft© Hyper-V© Server is Microsoft’s virtualization technology that is embedded into Microsoft© Windows Server© 2008 and above. It provides quick and easy access to virtualization configuration and parameters right from the Server Manager. To control the Hyper-V server just enable its server module. Pulseway User Manual Page 43 of 85 Server Modules 5.4. Internet Information Server© (IIS) Internet Information Server is Microsoft’s Web Server. It supports all popular technologies including html, php, asp, aspx. Pulseway User Manual Page 44 of 85 Server Modules 5.5. System Center Operations Manager System Center Operations Manager (SCOM) is a cross-platform management system for operating systems and hypervisors. It uses a single interface that shows state, health and performance information of computer systems. SCOM provides alerts generated according to some availability, performance, configuration or identifying security situations. It works with Microsoft Windows Server and Unix-based hosts. SDK Installation: Before you can start monitoring your SCOM deployment you need to copy the SDK (Software Development Kit) from the Management Group Server to your Pulseway installation directory. You can find the SDK assemblies at %ProgramFiles%\System Center 2012\Operations Manager\Server\SDK Binaries. Required assemblies: Microsoft.EnterpriseManagement.Core.dll Microsoft.EnterpriseManagement.Runtime.dll Microsoft.EnterpriseManagement.OperationsManager.dll Note: Pulseway Service and Manager must be restarted for the SCOM SDK installation to be detected. Connection Settings: In order to connect you must fill in the configuration details in Pulseway Manager. Server Name: FQDN or IP address of the management group server Use Windows Authentication: If checked Pulseway will connect to SCOM using the LocalSystem account. Pulseway User Manual Page 45 of 85 Server Modules Domain: NETBIOS name of the domain Username: User with access to the SCOM Console Password: The password for the user 5.6. Microsoft© SQL Server© Microsoft© SQL Server© is one of the most popular database servers available on the market. With Pulseway you can view the table data, execute queries, view logs and much more. Pulseway User Manual Page 46 of 85 Server Modules 5.7. Windows Server Backup Windows Server Backup is a set of tools from Microsoft that provide a complete solution for your day-to-day backup and recovery needs. You can use Windows Server Backup to back up a full server (all volumes), selected volumes, the system state, or specific files or folders - and to create a backup that you can use for bare metal recovery. Minimum Requirements Windows Server 2008 R2 (or newer) Windows Server Backup and Windows Server Backup Command Line Tools features installed. Windows PowerShell User in “Backup Operators” or “Administrators” user group configured in Pulseway Manager at PowerShell impersonation. Note: PowerShell Impersonation Setup Instructions are covered at: 11.2. Runtime Configuration Installing Windows Server Backup Command Line Tools Feature Install Windows Server Backup Command Line Tools by starting up ServerManager, right clicking on “Features” on the left side of the screen then clicking on “Add Features” button. Pulseway User Manual Page 47 of 85 Server Modules Locate and expand “Windows Server Backup Features” node then make sure “Commandline Tools” is checked then click on “Install” button (if necessary). After everything is installed and configure you can test Windows Server Backup configuration by clicking on the “Validate Requirements and Settings” button. 5.8. VMware© vSphere© Server Pulseway supports VMware ESXi and vCenter. To enable the server module just type in your server IP, username and password. Pulseway User Manual Page 48 of 85 Server Modules 5.9. Citrix© XenServer© Citrix© XenServer© is a free hypervisor from Citrix Systems. Just like VMware vSphere, Xen Server allows you to create multiple virtualized environments and make use of enterprise ready features like vApps, Snapshots, High Availability and many more. Pulseway User Manual Page 49 of 85 Server Modules 5.10. Amazon Web Services Amazon Web Services is a collection of remote computing services (also called web services) that together make up a cloud computing platform, offered over the Internet by Amazon.com. The most central and well-known of these services are Amazon EC2 and Amazon S3. The service is advertised as providing a large computing capacity (potentially many servers) much faster and cheaper than building a physical server farm. Pulseway User Manual Page 50 of 85 Server Modules Locating your AWS Account’s Access Key: Go to: https://portal.aws.amazon.com/gp/aws/securityCredentials Sign in using your account credentials In the body of the page you will be presented with a section called Access Credentials Copy your Access Key ID (or create a new one) into the Pulseway Manager application Click the “Show” link in the right of the Access Key Field to show the Secret Access Key Copy your Secret Access Key into Pulseway Manager and click on Test Connection to verify it 5.11. Windows Azure Windows Azure is a cloud computing platform and infrastructure, created by Microsoft, for building, deploying and managing applications and services through a global network of Microsoft-managed datacenters. It provides both platform as a service (PaaS) and infrastructure as a service (IaaS) services and supports many different programming languages, tools and frameworks, including both Microsoft-specific and third-party software and systems. Pulseway User Manual Page 51 of 85 Server Modules Configuring Pulseway to monitor a Windows Azure subscription: Click on “Add” button and you will be presented with an “Add Azure Subscription” window Choose a name for the subscription. (The name is a friendly label to help you identify monitored subscriptions) Type or paste your Windows Azure Subscription ID Generate or Load an existing Management Certificate Locating your Windows Azure Subscription ID: Go to: https://manage.windowsazure.com/#Workspace/AdminTasks/ListUsers Login using your Administrator’s (or delegated Administrator) live account Copy Subscription ID that’s associated with your user into Pulseway Manager Pulseway User Manual Page 52 of 85 Server Modules Manually Generating a Management Certificate: Go to: http://slproweb.com/products/Win32OpenSSL.html Download and install Win32 OpenSSL v1.0.1e Light (or newer), do not change installation path Open command prompt (cmd) and browse “C:\OpenSSL-Win32\bin” - Command: “cd C:\OpenSSL-Win32\bin” Execute command: “set OPENSSL_CONF=C:\OpenSSL-Win32\bin\openssl.cfg” Execute command: “openssl genrsa –out pulseway.key 2048” Execute command: “openssl req –new –x509 –key pulseway.key –out pulseway.cer –days 3650 –subj /CN=pulseway” Copy pulseway.cer from “C:\OpenSSL-Win32\bin” directory to a safe location Upload the certificate to Windows Azure Management Portal Uploading a Management Certificate to Windows Azure Management Portal: Go to: Management Portal Login using your Windows Azure Administrator’s (or delegated Administrator) live account Click on the “Upload” button Click on the “Browse for file” button and select your management certificate file Click on “OK” Note: You may monitor more than one Windows Azure subscription on the same computer. 5.12. Simple Network Management Protocol (SNMP) Simple Network Management Protocol (SNMP) is an "Internet-standard protocol for managing devices on IP networks". Devices that typically support SNMP include routers, switches, servers, workstations, printers, modem racks, and more. It is used mostly in network management systems to monitor network-attached devices for conditions that warrant administrative attention. SNMP is a component of the Internet Protocol Suite as defined by the Internet Engineering Task Force (IETF). It consists of a set of standards for network management, including an application layer protocol, a database schema, and a set of data objects. SNMP Agents expose ‘MIB Objects’ expressed as Variables. SNMP Server module allows SNMP agent exploring, crawling for exposed variables, displaying real-time values on the mobile clients and monitoring variables for changes using configured rules. Using Pulseway Manager you start by discovering your network for SNMP agents or you can manually add them by providing the connection details. Pulseway User Manual Page 53 of 85 Server Modules After the SNMP agent configuration is complete you need to add the variables you wish to monitor. You can add variables from the Edit Agent dialog inside the Variables tab. In order to correctly identify each of the variable's type and usage you need to consult the “SNMP MIB Reference Guide” released by the vendor of the agent. The MIB Document contains information regarding each variable exposed by the SNMP agent. It is possible to manually write the variable Oid (Object identifier) or using the crawl (“...” button in the Add Variable dialog) feature. Pulseway User Manual Page 54 of 85 Server Modules After you configured the variables you would like to monitor you can select which variables you would like to be displayed on the mobile devices. Note: Choosing not to display a variable does not affect the ability to get notifications for that variable. Inside the Notifications tab in Pulseway Manager, Server Modules sub tab in SNMP sub tab you can configure notifications for monitored SNMP variables. Pulseway User Manual Page 55 of 85 Notification Settings 6. Notification Settings Notification settings are divided into ten categories: Status Notifications Performance Notifications Process Notifications Ping Notifications Storage Notifications Event Log Notifications Hardware Sensor Notifications Performance Counter Notifications Server Module Notifications Service Notifications Notifications will be delivered using PUSH or email messages depending on the configuration on your account. To change the notification delivery method go to Account tab, and click the Account Details button. You can use the Send a test notification to all devices button to test your notification delivery method and the end devices. 6.1. Status Notifications Status notifications are: Offline notification Online notification Shutting down notification Entering a suspended state notification Resumed a suspended state notification Battery low notification User logged in notification User logged out notification Updates available notification Application installed notification Application uninstalled notification Removable disk removed notification Removable disk inserted notification Public IP changed notification S.M.A.R.T. disk error notification Firewall is disabled notification Antivirus is disabled notification Antivirus is outdated notification Pulseway User Manual Page 56 of 85 Notification Settings To enable a notification just enable the box before its label and save your settings, the changes will be applied in real time, no computer or service restart is required. 6.2. Performance Notifications Performance notifications represent your current service performance: service downtime, free memory bellow required threshold, processor usage below or above normal values or port is detected as closed. Note: You will be notified if a monitored service is has “Automatic” startup type and is not started when Pulseway Service starts. 6.3. Service Notifications Service notifications can be configured to only notify a specific service out of the full monitored services list. The notification timer is defaulted to send notifications after one minute of the service status change. Pulseway User Manual Page 57 of 85 Notification Settings 6.4. Process Notifications Process monitoring supports four conditions: The process has started The process has stopped The process is not responding The process takes over (configurable) % for (configurable) minute(s). Note: All process notifications have customizable notification level. 6.5. Ping Notifications Monitoring ping replies is very useful to know when your network becomes unresponsive or overloaded. The first field represents the IP address (or hostname [FQDN]) of the target computer/device. The Alias (short part of hostname) of the computer/device. 6.6. Storage Notifications Pulseway supports: • Low Disk Space Notifications Pulseway User Manual Page 58 of 85 Notification Settings • File Change Notifications 6.6.1. Low Disk Space Notifications Low disk space notifications are critical notifications that nobody wants to see but wishes to receive at the same time. They can help you identify filled storage devices and avoid future problems. Monitoring low disk space is possible using a percentile value or a fixed amount of megabytes (1 gigabyte is 1024 megabytes). Priority field controls the priority of the low disk space notification. Note: Disk Drive represents the partition not the actual disk. Free Space Limit represents the threshold for the notification. 6.6.2. File Change Notifications File notifications allows monitoring a file or folder for changes. When configured you may receive a notification for the following file changes: • • • • • • • Last Write Date Last Access Date File Security File Size File Name File Creation File Deletion Pulseway User Manual Page 59 of 85 Notification Settings 6.7. Event Log Notifications Monitoring event logs for problems is an easy way to identify a problem before turns into something irreversible. Here is an example of a disk event monitoring: Event Log, Level, Keywords, Event IDs, Sources are all filters that can be used all at the same time. 6.7.1. Exporting Event Log Notification’s Configuration If you would like to use the same configuration for your event log monitoring you can export only the event log monitoring configuration to a file and import it back to all your computers. 6.7.2. Importing Event Log’s Notification’s Configuration Importing Event Log notification’s configuration requires the exported file to be located on an accessible path and the local user to have read permissions on the file. Pulseway User Manual Page 60 of 85 Notification Settings You will get a chance to choose which event logs you would like to import from the file. 6.8. Hardware Sensor Notifications In order to monitor your hardware sensors your devices must be supported by Pulseway. If you don’t see any devices it means that you either are running Pulseway inside a virtualized environment or your hardware is not yet supported. We are constantly upgrading our supported hardware so check frequently for upgrades or ask on our forums to see if anyone else is having a similar problem with their hardware. 6.9. Performance Counter Notifications Performances counters provide you an easy access to complex parameters of your system’s components. Monitoring these will keep you updated if something goes out of normal parameters. Pulseway User Manual Page 61 of 85 Notification Settings The picture is for demonstration purposes only and does not represent a real monitoring setting. 6.9.1. Exporting Performance Counter Notification’s Settings Exporting your performance counter notification’s settings can be useful if you would like to apply the same configuration to multiple devices. Just export your settings in files and import them into as many computers as you need. 6.9.2. Importing Performance Counter Notifica tion’s Settings To import performance counter notification’s settings you will need to provide a valid path and to make sure that the local user has read access to the file. 6.10. Web Notifications Pulseway User Manual Page 62 of 85 Notification Settings If you opted to monitor a website or a SSL Certificate you can enable the following notifications: Notification if a monitored SSL Certificate has expired or the expiration date is less than a configured amount of days. Notification if a website becomes unavailable after a configured amount of minutes. 6.11. Server Module Notifications Server module notifications hold all notification preferences regarding active server modules. 6.11.1. Active Directory Also in the Active Directory tab you can choose to be notified whenever an active directory user gets locked out. 6.11.2. Microsoft Exchange Server Exchange server module can send notifications for the following conditions: Database gets Mounted / Dismounted Message Queue exceeds preconfigured limit Mailbox size exceeds preconfigured limit To add a monitored mailbox you need to execute a script in the Exchange Management Shell that gives you the information Pulseway needs: Mailbox Identifier Display Name (you can change this field) User Principal Name (email address) Size Threshold (GB) (Notification threshold) Notification Priority Pulseway User Manual Page 63 of 85 Notification Settings Note: When possible, Pulseway will automatically fill in the required values. 6.11.3. IIS From this screen you can choose to receive a notification if a website or an application pool is stopped for more than five minutes. 6.11.4. SCOM SCOM module can notify whenever an alert triggers or reaches warning state. 6.11.5. Windows Backup Windows Server Backup module can notify whenever a backup operation has failed or completed successfully. 6.11.6. VMware Pulseway User Manual Page 64 of 85 Notification Settings You can monitor VMware vSphere alarms only if you connect to VMware vCenter. Use the check boxes to filter out notifications that get sent by their state: Warning or Alert. Note: The check for triggered alarms is performed every 5 minutes. 6.11.7. Amazon Inside the “Amazon” tab you may opt in to receive a notification when alarms get triggered. Note: The check for triggered alarms is performed every 15 minutes. 6.11.8. SNMP “SNMP” tab contains a list of notification rules for monitored SNMP Variables. To configure SNMP notifications you must first add a SNMP agent and the variables that you are interested in. Consult the MIB Document released by the device’s or software’s vendor to get an accurate information of each variable’s purpose. Pulseway User Manual Page 65 of 85 Notification Settings To add a SNMP click on “Add” button, select a variable from the monitored variables list by pressing the “…” button and double clicking (or selecting a variable and pressing “OK”), input variable’s type and choose a notification condition. Note: You may have more than one notification rule for one SNMP variable. Pulseway User Manual Page 66 of 85 Rule Configuration 7. Rule Configuration Rules represent an automated disaster recovery that can make you trust your servers even more. If your service crashes you can configure Pulseway to automatically restart it and run a scheduled task. 7.1. Adding Rules Rules require two things: Conditions and Actions. There can be multiple kinds of conditions such as Day of Week, Performance Counter value, Service status and Time of day and the only action supported is starting scheduled tasks. So let’s create a rule that will run FixDNSClient Scheduled task if my DNSClientservice is stopped. You can add any Logical condition if you only add one value for it. And for actions we instructed Pulseway to fire our scheduled task. 7.2. Exporting Rules Rules can become troublesome configuring on a lot of machines. In order to avoid that situation you can export your rules into a file so that you can import it later on other machines. To export rules just click on Export in the Rules tab: Pulseway User Manual Page 67 of 85 Rule Configuration 7.3. Importing Rules After you have exported your rules into a file, copy it at some accessible path, make sure your user has read permissions on the file and click Import from the Rules tab on the Pulseway Manager. You will be prompted to choose which rules you would like to import: Pulseway User Manual Page 68 of 85 Plugin Configuration 8. Plugin Configuration Pulseway exposes an Application Programming Interface (API) which can be used to add new features that meet your business needs. Just as every company likes to manage their industry their own way, Pulseway was designed to adapt to the requirements of the clients without any changes to its current infrastructure. Let’s consider you want to manage and monitor some data from your current accounting application from your mobile device. 8.1. Installing Plugins To install plugins you must first have them in your computer. Our community is a great place to start looking for them. After you have downloaded a plugin, extract it and read its installation notes. Most plugins only require you to “install” them; however, some require extra configuration. For this example we chose “Power of the Shell” plugin released by Cptrico. Extract the contents of the downloaded archive, and copy the PowerOfTheShell.dll and config.xml files to any folder you wish, just make sure you don’t delete it after that. Open config.xml with your favorite text editor and change the path of the built in script or add Pulseway User Manual Page 69 of 85 Plugin Configuration your own entries. Just make sure that the path is valid and that the local user account has access to it. Open up Pulseway Manager, click on the Plugins tab and click on Add. Point to the PowerOfTheShell.dll file and click Ok. On the next window make sure that PowerOfTheShell is selected and click Ok. 8.2. Configuring Plugins After you have installed your plugin click on it from the Pulseway’s Manager Plugins tab and then select Configure from the right. Then configure the plugin with your Impersonation details. Pulseway User Manual Page 70 of 85 Plugin Configuration 8.3. Creating Plugins If you are interested in creating your own plugins we have some tutorials for each type of implementation needs. Click here to visit our API page. Please note that we do not offer API level support. If you require API level support feel free to ask at our community here. Pulseway User Manual Page 71 of 85 Display Settings 9. Display Settings Using display settings (or Available features) you can restrict some fields to be shown on mobile clients. By default, all configured modules will automatically show up on your device, however, there are situations when you would like to prevent this without changing any configuration such as maintenance. Pulseway User Manual Page 72 of 85 Device Settings 10. Device Settings In addition to the Device Access Policies you can set another layer of security by specifically allowing only a list of pre-approved devices to control your computer regardless of any policies set for the computer or device. Click on Authorize New Device to add devices the authorized devices list. Pulseway User Manual Page 73 of 85 Settings 11. Settings These settings represent global connection, performance and logging switches. Please only change these settings if you are instructed to do so by your network administrator or support agent. 11.1. Proxy Configuration A proxy server is a server (a computer system or an application) that acts as an intermediary for requests from clients seeking resources from other servers. If your internet connection relies on such connection then you must configure it here. If you are unsure what to do, contact your network administrator. 11.2. Runtime Configuration Runtime configuration covers settings for Pulseway’s core modules: Auto Updater Performance Manager Pulseway User Agent PowerShell User Impersonation Pulseway User Manual Page 74 of 85 Settings Auto Updater keeps your Pulseway up to date automatically. It is highly recommended that you leave this on. Pulseway can be optimized to perform faster or to constrain its memory consumption to a minimum. Increasing priority to Pulseway will ensure that Pulseway calls will be prioritized so that the amount of time you have to wait until you receive data back is kept to a minimum. Pulseway User Agent is required for User Session Commands (Screen View, Webcam View, User Chat and User Support Request). Note: The User Agent will run on each user session on the computer. On terminal servers this can become a nuisance and can be disabled. PowerShell User Impersonation will run PowerShell commands as the user configured. Compile the domain box only if your computer is part of a domain. 11.3. Diagnostic Collection Enabling Diagnostic Logging will force Pulseway’s modules and plugins to write debugging logs to a file called trace.txt. This is something you don’t want to enable on a production environment as it slows down Pulseway’s services. Developers use this feature for debugging their plugins. Automatic Error Reporting represents automatic error log sending to our cloud servers. This helps us identify bugs and fix them before you even notice. No personal data will be included in these reports! Pulseway User Manual Page 75 of 85 Settings 11.4. Syslog Forwarding Syslog is a standard for computer data logging. It separates the software that generates messages from the system that stores them and the software that reports and analyzes them. Pulseway User Manual Page 76 of 85 Settings You may choose to receive a status report containing one or more of the following: Processor usage Memory usage Disk space usage Logged in users count Network speed Ping round trip time Ping responses Note: Pulseway notifications will be sent even if the Syslog server is inaccessible. 11.5. PagerDuty Forwarding PagerDuty is an alarm aggregation and dispatching service for system administrators and support teams. It collects alerts from your monitoring tools, gives you an overall view of all of your monitoring alarms, and alerts an on duty engineer if there's a problem. In order to be able to forward notifications to PagerDuty you must have a service key. Steps on creating a PagerDuty service: 1. 2. 3. 4. Log into your PagerDuty dashboard. Click on Services tab. From the right hand side of the screen click the “Add Service” button. Enter a service name that is easy for you to recognize (I.e. Pulseway). Pulseway User Manual Page 77 of 85 Settings 5. 6. 7. 8. Select an Escalation Policy that fits your needs. Select “Generic API system” as Service Type. Click on “Add Service” button at the bottom of the screen. Copy the “Service API Key” value into Pulseway Manager. 11.6. ZenDesk Forwarding Zendesk is a SaaS suite that offers help desk ticketing, issue tracking, and customer service support. Zendesk Configuration: Account: Subdomain: The subdomain assigned to your account. It's the name you type before zendesk.com (Example: If the console url would be pulseway.zendesk.com the subdomain is: pulseway). Email: Email address you use to login to Zendesk console. Authentication Type: Select Password if you wish to quickly get Zendesk forwarding or go to Zendesk and get your API Token. Settings: From Name: Name of the ticket requester (Usually customer / company name). From Email: Email of the ticket requester. All ticket updates will be sent to this address. Pulseway User Manual Page 78 of 85 Settings Notification Filter: You can select which notification priorities will be sent to Zendesk (Critical, Elevated, Normal or Low). Getting a ZenDesk API Token: 1. 2. 3. 4. Login to Zendesk console (usually companyname.zendesk.com). Go to Settings (click the gear icon). Look for Channels section and click on API. Make sure that Token Access is enabled and copy your API Token then paste it into Pulseway Manager. Pulseway User Manual Page 79 of 85 Manager Security Lock 12. Manager Security Lock Pulseway Agent comes with a built in security lock that will prevent unauthorized changes to the settings. To enable it click the lock in the lower left corner of the Pulseway Manager icon. After the lock is activated every time you start Pulseway the entire configuration will be locked for changes. To temporary or permanently disable the security lock just click the lock icon again, insert the password and everything will unlock. Pulseway User Manual Page 80 of 85 Exporting Configuration 13. Exporting Configuration Exporting the configuration is very useful if you plan to reinstall the computer. It’s a safe and easy process that can help you save time. Start by fully configuring the current Pulseway installation. After you are ready, click on Export Settings link in the bottom on the screen: You get to choose if you would like to include account details, authorized mobile devices and proxy settings. Also for security reasons you can encrypt the configuration file with a password that will be asked when you try to restore the configuration. Pulseway User Manual Page 81 of 85 Importing Configuration 14. Importing Configuration In order to restore the configuration you must have the exported configuration file in your computer or at an accessible path, with read rights on the file and if you used one the encryption password at the export process. Click on Import Settings from the lower side of the Pulseway Manager application to start the import process. Pulseway User Manual Page 82 of 85 Maintenance Mode 15. Maintenance Mode Maintenance Mode is an overall switch for notifications. When Maintenance Mode is enabled all notifications modules are disabled thus decreasing the load Pulseway inflicts on the computer so that the maintenance process will be a smooth one. Note: During Maintenance Mode’s Activity no notifications (email or push) will be delivered! Pulseway User Manual Page 83 of 85 Unattended Installation 16. Unattended Installation An Unattended Installation is an automated installation technology that you can use to install with no user intervention. Unattended installation is typically used during large-scale rollouts when it would be too slow and costly to have administrators or technicians interactively install the operating system on individual computers. To perform an unattended installation you need to have an installation kit of Pulseway in your computer. You can download it for free from here: https://www.pulseway.com/downloads. After you have the installation kit you must place it in a folder where it will be accessible by all the computers you wish to install it. Now you must instruct all computers that you want to install the computer to run one of the following commands: UNC_PATH\Pulseway_xNN.msi /qn config=FFF configpassword=PPP Replace the following placeholders: NN -> Architecture of the Operating System (86 or 64) FFF -> The UNC path for the configuration file to be imported PPP -> The password for the configuration file Or: UNC_PATH\Pulseway_xNN.msi /qn username=UUU password=PPP group=GGG server=SSS Replace the following placeholders: NN -> Architecture of the Operating System (86 or 64) UUU -> Your Pulseway username PPP -> Your Pulseway password (in clear text) GGG -> The group you wish your computer to join SSS -> The Dedicated Server URL (if assigned to your account) Pulseway User Manual Page 84 of 85 Support 17. Support Pulseway support is divided into two types: Community Support – is offered by the community at the Pulseway’s forums. Technical Support – is handled by our support agents and consists of remote support for installation, configuration and troubleshooting during normal office hours 9am-5pm BST Monday to Friday excluding public holidays. Technical support requires the purchase of technical support incidents (TSIs). Enterprise servers have bundled TSIs. Please contact your reseller for more information. Support Email (TS only): [email protected] Support Phone (TS only): +353 (1) 6190234 Sales Email: [email protected] Pulseway User Manual Page 85 of 85