1
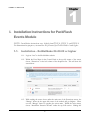
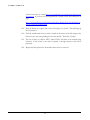
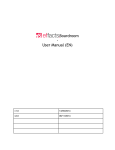
Version 3.0 Change the Way You DNN. Events Module User Manual PACKFLASH.COM Events Module User Manual PackFlash.com 415 N. Lasalle Street • Suite 205 Chicago, IL 60654 Phone 888.433.2260 • Fax 773.787.1787 Thank you for purchasing our PackFlash Events Module, and make sure to check out all of PackFlash’s other premium modules for your future projects. Our goal at PackFlash is to give administrators the tools they need to create truly professional websites. Let us know if there is anything we can do better. The following instructions will lead you, step by step, through the installation of the module(s), We strongly recommend that you back-up your website and database prior to doing any module installations. PackFlash has performed rigorous testing on all of our products, but it is impossible to account for every scenario. It is best practice and, again, strongly recommend that you back-up your website and database prior to any module uploads to your DNN website. ii Table of Contents I. Installation Instructions for PackFlash Events Module ...................... 1 1.1. Installation - DotNetNuke 06.00.00 or higher ............................................. 1 1.2. Using Licensing to Activate Module(s) ....................................................... 2 II. Getting Started with the Events Module............................................ 4 2.1. 2.2. 2.3. 2.4. 2.5. System at a Glance .................................................................................... 4 DNN Pages Created .................................................................................. 6 Default System Settings ............................................................................. 6 General Content Organization.................................................................... 7 Where to Begin – Hierarchy Management, etc......................................... 10 III. PackFlash Events Dashboard ........................................................ 12 3.1. 3.2. 3.3. 3.4. 3.5. 3.6. 3.7. 3.8. 3.9. 3.10. Add Item ................................................................................................... 12 Find/Edit ................................................................................................... 28 Workflow .................................................................................................. 29 Hierarchy Management ............................................................................ 31 Issues or Groups ...................................................................................... 34 Global Settings ......................................................................................... 36 Import/Export............................................................................................ 39 Templates ................................................................................................ 42 Licensing .................................................................................................. 43 Not Found Message ................................................................................. 44 IV. List Module ..................................................................................... 45 4.1. Single List................................................................................................. 46 4.2. Multiple Lists in AJAX tabs ....................................................................... 51 4.3. List for Navigation .................................................................................... 53 V. Details Module ............................................................................... 57 5.1. Default Data Criteria ................................................................................. 57 5.2. Tag Options.............................................................................................. 60 5.3. Information Not Found Message .............................................................. 60 VI. Groups Module............................................................................... 67 6.1. Table of Contents ..................................................................................... 67 6.2. Grid Display.............................................................................................. 68 VII. Groups-Teaser Module .................................................................. 69 7.1. Display Options ........................................................................................ 69 7.2. Global Display Options ............................................................................. 69 VIII. Search Module.............................................................................. 71 8.1. Display Options ........................................................................................ 71 8.2. Tuning ...................................................................................................... 74 IX. Tag Cloud Module .......................................................................... 76 9.1. Tag Cloud Settings................................................................................... 76 9.2. Related Content Settings ......................................................................... 77 X. Multi-Lingual Functionality .............................................................. 78 10.1. Turning On Multi-Lingual (Localization) .................................................... 78 10.2. Basic Functionality of Localization ........................................................... 79 XI. Supplemental Information Directory ............................................... 81 11.1. List Templates Available .......................................................................... 81 11.2. Details Templates Available ..................................................................... 81 11.3. Video Tutorials ......................................................................................... 81 E V E N T S 1 Chapter M O D U L E I. Installation Instructions for PackFlash Events Module NOTE: Installation instructions vary slightly from DNN 4, DNN 5, and DNN 6. For demonstration purposes, instructions are presented for DotNetNuke 6 and higher. 1.1. Installation - DotNetNuke 06.00.00 or higher 1.1.1. Login as “host” to the DotNetNuke website. 1.1.2. Within the Host Menu in the Control Panel at the top-left corner of the screen, choose “Extensions” in the left column of the dropdown list. This will show the screen below. 1.1.3. While making the mouse hover under the main area of the Extensions screen, the “Manage” button in the upper left corner of the module will get brighter. Hover over the “Manage” button to produce the action menu. Within the action menu, choose “Installation Extension Wizard” under the top Edit section. Making this 1 E V E N T S M O D U L E selection will produce a modal (popup) window for the installation process represented in the screen below. 1.1.4. Use the “Browse” button of the popup window to choose the most recent installation file for the module in question that was downloaded from packflash.com. Then click the “Next” button. This will produce a screen like below. 1.1.5. Click the “Next” button on the Package Information screen. 1.1.6. Click the “Next” button on the Release Notes screen. This screen may have important information on the latest release of the module(s). 1.1.7. Check the box to accept the license and click the “Next” button on the Review License screen. NOTE: Accepting the license is accepting the terms of the license agreement, so please read the license agreement carefully before proceeding. 1.1.8. The next screen will show all of the events of the installation process in order that the occurred. Scroll through the entire list making sure that there are no red errors or warnings. If there are any errors, please report them immediately to [email protected] with the error message. 1.2. Using Licensing to Activate Module(s) 1.2.1. After installation, a page named “Constellation” will be added to the Admin menu of the Control Panel in the upper left corner with the Constellation module will be of the screen. Click the Constellation page to view the Constellation options like below. 1.2.2. With a new installation, no modules will be activated and all module icons in the top section will be greyed out. Access to the module and functionality will not be provided before activating the module through licensing. Without an active license, the module will automatically re-direct the user to the licensing screen and will not provide the ability to administer the module. Any modules previously installed and activated via licensing will be retained on an upgrade. To activate a module, first 2 E V E N T S M O D U L E obtain a license key by visiting http://www.packflash.com/packflash-module-licensekey-retrieval. If you have not already purchased a module, follow the instructions on page: http://www.packflash.com/DotNetNukeModules/ModuleTrials/ModuleTrialInstr uctions/tabid/261/Default.aspx. 1.2.3. With the license key copied, click on the “Licensing” icon or link. This will bring up the screen below. 1.2.4. Click the module name that you wish to install on the menu on the left and paste the license key into the corresponding box for that module. Then click “Update”. 1.2.5. The text “License is Valid for XXX” where XXX is the name of the module being activated. If the license is not valid or expired, a message related to this will be presented. 1.2.6. Repeat this same process for all modules that need to be activated. 3 E V E N T S M O D U L E 2 Chapter II. Getting Started with the Events Module The PackFlash Events module in its most simple terms is a group of website applications designed to display lists of content items (webinars, tradeshow sessions, parties, corporate retreats, movie listings, etc.) so that website visitors can click the individual items and see the details. It provides a variety of display formats and options around when one link would show up compared to another based on how the administrator sets up the system. The basic blocks to making this work are 3 fundamental ideas – a dashboard module for entering the data centrally, a list module for displaying the links of different kinds (and visually different ways), and a details module for showing the full results after the user clicks a link. Other modules that are included are search input, groups, and tag cloud, etc. During activation and licensing, some default decisions are put in place, pages created, and modules created to make a base system work as intended. This makes it possible to start adding content and view the results with as little configuration as possible. All of these default choices can be modified based on the needs of the system. For the most part, this document is designed to provide HOW to perform a function, rather than WHY to perform a function or what best practices should be used. In some cases, context and detail is provided to cover the basic ideas. 2.1. System at a Glance The PackFlash Events Module is made up of a group of sub-modules. These modules include the following: PackFlash EventsDashboard – Central Dashboard for content entry and control. Also provides the search, workflow, publication, and hierarchy/organizational settings. PF Calendar – Provides the ability to display items in a calendar view (month, week, day) 4 E V E N T S M O D U L E PF Details – Provides the ability to display the details of content items. PF List – Provides the ability to display a single list of content items, a tabbed list of content items, or navigation for categories/people/dates PF Search – Provides the ability to specify what content to search and what options to display to the website visitor PF TagCloud – Provides the ability to display tag cloud functionality or related content PF Groups – Provides the ability to display groups of items such as an issue in grid format or table of contents PF GroupTeaser – Provides the ability to display a “quick view” of a group and a dropdown selector for groups 5 E V E N T S M O D U L E 2.2. DNN Pages Created 2.2.1. A page for the dashboard of the module (e.g. “PF Events Dashboard”) was created. This page and module are only visible by administrators, by default. This page and module serve as a central location for adding, deleting, and modifying content and settings for the data in the system. 2.2.1.1. This page can be accessed through the Admin dropdown menu in the Control Panel, by visiting the Constellation page, or by editing an item directly on the detail/list page(s). 2.2.1.2. Any other page can be used as another dashboard page by adding the PFEvents Dashboard module to it. This provides a way to allow users with any DNN role access to the Dashboard. 2.2.2. A page called “Landing Page” was added. This page was created to be initially viewable by administrators. This page is designed to be moved and renamed if needed. 2.2.2.1. A list module was placed on the page to serve as a default location for any list for the system. If a website visitor clicks on a category name, they will be taken to the landing page and the list of items in that category will be displayed on that page. 2.2.2.2. A search input module was placed on the page to serve as a example search functionality. 2.2.2.3. A list module set to navigation was placed on the page to show how navigation would work. This will also serve to allow RSS feed functionality with another module. 2.2.3. A page called “Details Page” was added. This page was created to be initially viewed by administrators. This page is designed to be moved and renamed if needed. 2.2.3.1. A details module was placed on the page to serve as a default location for the details for any item of the system. If a website visitor clicks on a link for a press release from anywhere in the system, by default they will be taken to this page and the full details will be displayed. 2.2.3.2. A tag cloud module was placed on the page to show how this functionality works. 2.3. Default System Settings Default choices were made for locations of pages and templates (look and feel) at the time of licensing validation. This is the first section of the “Global Settings” page of the 6 E V E N T S M O D U L E Dashboard. These defaults ensure that a website visitor can click links anywhere on the site and get a response that would be expected. They can be left with the default choices, particularly for very simple website solutions, or they can be modified to meet any needs. 2.4. General Content Organization The organization of the content added to the module is based on a hierarchical system. As mentioned throughout this document, when the module is installed and licensing is activated, some default choices are made. These are pages and modules that are created and made as “global defaults”. Unless these defaults are changed on the “Global Settings” page of the Dashboard or overwritten by choices made at a more specific level, all content entered will follow these patterns. This allows for administrators to provide consistency to their websites with the location and the look and feel while still providing the power to modify as the need arises. 7 E V E N T S M O D U L E While these ideas are beyond this document, the hierarchy for how the system decides where to display the details of a particular content item – a random press release within a list, for instance, is determined by the flowchart in the image below: 8 E V E N T S M O D U L E Similarly, the look and feel for any particular item is determined by the template that is used for display of that item. The system determines which template is used according to the rules that are presented in the flowchart below: 9 E V E N T S M O D U L E 2.5. Where to Begin – Hierarchy Management, etc. 2.2.4. Create Content Types – The administrator has the ability to create their own content types that will later be assigned when creating individual items. Typical content types for the Events Module would be webinar, tradeshow session, training, corporate retreat, etc. Only one content type can be assigned to each item. The content type is a way of describing the item…as in “this item is a xxx” where xxx is the content type. For instance, “this item is a blog post”. 2.2.5. Create Categories – Categories are used for organizing content, not describing it. Items can have many or as few categories assigned to it as the administrator chooses. As opposed to content types, categories do not describe the actual content. Categories create organization for similar content items. The exact same category structure(s) will be used across all of the PackFlash modules. Adding/Changing/Deleting categories will change categories for all modules. This will allow for combined lists from Video, Gallery, News, Events, etc. Navigation that does not have items in it will not display. This means that if a category is not used, the website visitor will not see it and get blank results. Categories can be added/managed at any time. 2.2.6. Add Speakers/Organizers – Speakers and Organizers (generically, people) represent the people that are directly associated with the content item. Items can have as many or as few people assigned to it as the administrator chooses. People can be set to “Universal” or “Archive” as well. The “Universal” option makes the name of the person available to any choice for people in any module – Events, Video, Gallery, News, etc. Unchecking “Universal” will mean that the person can only be assigned to the specific group that is being added (Organizer in the Events module, for instance). “Archive” will remove the name from being selected, but will leave any previously assignments left in place. This allows for an individual to leave the organization, for instance, but their items are still visible to the website visitor, but not available for additional assignments. Names of people are NOT tied to the current DNN user in the system. They are independent and need to be managed independent of the DNN user. 2.2.7. Global Settings – It is recommended to ensure that the global settings for templates and pages are set correctly. More sophisticated structures can be implemented later, but these are the basic building blocks. 2.2.8. Groups / Issues – Groups and Issues are a way to provide a means of delivering content items at the same time. A simple example is a magazine issue where all of the articles in the issue are published at the same time rather than individually allowing for a different grouping and delivery method than normal categorization. Another example in Events would be the sessions of a tradeshow where all sessions would be published at the same time and be expired at the same time instead of individually. 10 E V E N T S M O D U L E 2.2.9. Social Sharing – Provided for the purpose of setting up a central “share this” code that can be used within the template system. There are additional social sharing options with the articles that can be implemented at the article level itself as well. 11 E V E N T S M O D U L E 3 Chapter III. PackFlash Events Dashboard The PackFlash Events Dashboard is the central location for administrators and anyone that might enter content of any type to get access and modify data. It also provides the ability to make decisions that would be considered standards for consistency on the website through the use of templates, locations, image sizing, etc. The Events Dashboard is designed to fit in a pane with a MINIMUM of 920 pixels wide. 3.1. Add Item 3.1.1. Content – Adding items can be as simple as adding a title, main content, and deciding the method for publication (publish right away, with a date/time, assign to someone else to do more work, or have it published with an issue or group when that issue/group gets published). There are also options for specifying a file (such as a PDF), a page on the website, and external URL, or video embed as the main content of the article giving a great amount of power and flexibility to the system Fill in the appropriate fields: 3.1.1.1. Title of the item. When saved, this will be used for the default search engine title and friendly URL. This can be modified later. 12 E V E N T S M O D U L E 13 E V E N T S M O D U L E 3.1.1.2. Subtitle of the item (optional) 3.1.1.3. Event Begin and Event End Date/Times 3.1.1.4. Event Registration Begin and End Date/Times 3.1.1.5. Event Email 3.1.1.6. Event Location – Events can be added “on the fly” by clicking the “Add Location” link bring up the screen below. 14 E V E N T S M O D U L E 3.1.1.7. Summary/Abstract using Basic Text or Rich Text Editor (default). When saved, this will be used for the default search engine description. 15 E V E N T S M O D U L E 3.1.1.8. Main Content of the item. With this area, the Media Type can be chosen (HTML Text, File, Site Page, External URL, or Video/Audio Embed). If both HTML text and additional files or videos are needed, then select “HTML” and assign files through the “Related Content” tab (described later). Another option is to embed links to additional files or video directly within the HTML detail * If the item contains several pages of content, use the [PAGE BREAK] feature. To do this, copy and paste the token [PAGE BREAK] into the main content text/HTML of the item at the location where the page break is needed. The system will automatically generate a page break in this location when the website visitor views this item. * Additional tokens are available to place within the main content of the item that provides tools for sharing on social networks and external functions. To see the list of available tokens, click the link “Click here for tokens”. This will show a list of tokens available. Copy and paste the exact code of the desired token and paste into the content text at the location that you want the item to appear. 16 E V E N T S M O D U L E 3.1.1.9. Search Keywords (Optional). These keywords will be used by the internal search module if specified. For best performance, the search tool is configured to search the item’s title, summary, and keywords. The search keywords are also used as the default search engine keywords (meta tags). 3.1.1.10. Publication. The options for publishing an item are the following: Publish individually by date-time specified. Publish with an issue/group. Dates/times can be in the future to schedule when an item will be published. The date/time must meet the appropriate date format as shown on the screen. Take care when setting the date/time. The default is the current local time. The default setting for the list is ordered by date/time descending which will show the most recent item at the top of the list. This means that if you enter the items in the order in which you would like them published, then they will have date/times that are relative to each other and show in the proper order. If date sorting is not producing the desired effect, please check the time of the articles to make sure that they are in the proper order. NOTE: “Assign or reassign this item” option is not available if the item has not been saved OR has been published. 17 E V E N T S M O D U L E 3.1.1.11. Social Networking. If social networking has been enabled in the “Global Settings”, there will be additional options on the “Content” page. These options allow for publishing information to the social networks. Choose the appropriate settings and messages/text. The messages will be delivered at the time of publication to the appropriate social networks. 3.1.2. Authors/Contributors – This functionality provides the ability to assign authors and contributors to the items. Authors and contributors can also be added to the database from this page. Multiple names can be selected from the list. A search is provided to find names easier. The default list is “all”. 3.1.2.1. Authors. There are 3 options for assigning authors: * Select Names from Database – select the name from the list and it will refresh on the left side of the selection box. * Create a new author – add a name to the database using the built-in functionality and then select the name as appropriate. * Create a Customize Byline – This is also known as a credit line or writer’s credit 3.1.2.2. Contributors. There are 3 options for assigning contributors: * Select Names from Database – select the name from the list and it will refresh on the left side of the selection box. * Create a new contributor – add a name to the database using the built-in functionality and then select the name as appropriate. 18 E V E N T S M O D U L E * Create a contributor label – This allows some control of the label, such as “Photographer” or “Illustrator” 3.1.3. Categorization – This screen provides the ability to assign categories, Issues/Groups, and tags. More than one of each of these can be selected and assigned. Categories have hierarchy, so the hierarchy will be maintained by default – in other words, selecting a leaf node will also assign the parents. This screen also provides the ability to add categories, issues, and tags within the page. 19 E V E N T S M O D U L E 3.1.4. Related Content – This screen allows for searching the entire database (all PackFlash content modules). After the list is provided, select an item that is related to the item that is being managed. The selected item will refresh in a list on the left side of the selection box. 3.1.4.1. Items that are tagged as related will show up automatically in the Tag Cloud Module (renamed from Related Content) OR the List Module in the related content section according to the module settings – A separate module needs to be added to provide this functionality. 3.1.4.2. Any file, item, or embed code can be related to each other and grouped accordingly. 3.1.4.3. By default, all 3 checkboxes will be checked indicating that all 3 relationships will show up in the Tag Cloud Module (renamed from Related Content Module). If you want to exclude any of these from the Tag Cloud Module, then uncheck the appropriate box and remember to save it. 3.1.4.4. Three different types of relationships are possible: * One Way Relationships – only the item managed will know about its related item and show up in the related list(s). The related item is not aware of the relationship. * Two-Way Relationships – both the item managed and the related item are aware of the relationship. Related lists will show both relationships. 20 E V E N T S M O D U L E * Ad-Hoc Groups – ad hoc groups allow every item that is in the list to know about and be related to every other item without actually manually selecting each of those relationships. 3.1.4.5. Add New Item – this functionality provides a “quick add” feature so that it is not necessary to go to another module to add an item. This is only for file/embeds. Documents will be available in the Events module to edit, Video and Audio items will be available in the Video module later to edit. 21 E V E N T S M O D U L E 3.1.5. Inserts – This screen provides the administrator the ability to add information into the body of the item that is being managed rather than having related information located outside of the article itself. This is done by creating an embed tag on the fly for each insert needed. Each insert can be defined with the following types of content – free form text/html (such as a pull quote or testimonial), an image, related item, or related files (such as PDF or video, for instance). This functionality provides a great amount of flexibility to create dynamic web solutions. 3.1.5.1. Choose an existing insert to edit the insert or choose “Add New”. 22 E V E N T S M O D U L E 3.1.5.2. Provide a Headline/Title for easy reference later, choose a type, and supply the appropriate information where necessary (text, choose an image, type of related items, etc.). 3.1.5.3. Choose a style or specify a custom style. 3.1.5.4. Choose to enable or disable the insert. 3.1.5.5. Save the Insert. 3.1.5.6. Copy the Embed Tag code from the top of the section and paste the code into the location within the item that you would like the Insert to be displayed. 23 E V E N T S M O D U L E 3.1.6. Images – An unlimited number of images can be associated with an article. These images will show up on the article detail page dynamically within an image rotator at the specified size. These values can be modified in the template(s) or removed entirely. The image at the top of the list will be used as the default thumbnail image on any appropriate lists that have thumbnails (according to the template chosen and re-sized to the module settings). 3.1.6.1. Clicking “Select Image” will produce a popup to allow for browsing to existing images on the server or upload a new image from a local directory. 3.1.6.2. Selecting the thumbnail will select the image and give a preview on the “Images” tab of the Dashboard. 3.1.6.3. Add a caption as appropriate for the needs of the website. By default, the text “No Caption Provided” is inserted. Highlight and type over the text to replace it with a more specific message. The default is provided for the consistency of spacing below the image. It is recommended that the caption or the default text is included. 3.1.6.4. If you do not wish to put a caption under the text, then delete the default text. This will leave a blank space under the image where the caption would otherwise have been displayed. 3.1.6.5. If you have already added an image to an item and you would like to change the caption, then click “edit caption”, modify the text and click “save”. 3.1.6.6. Click the “up” and/or “down” arrows as needed to re-order the items in the list from top to bottom 24 E V E N T S M O D U L E 3.1.7. SEO (Search Engine Optimization) – This area is to provide the ability to adjust the search engine components of the item being managed. 3.1.7.1. When saving the item, the system will use the title of the item to create a friendly URL and a search engine page title that will be in the title tag on the page where the item is displayed. 3.1.7.2. The system will also copy the summary/abstract as the default search engine description meta tag. 3.1.7.3. The search keywords will be copied as the default search engine keywords meta tag. 3.1.7.4. The administrator can over-ride these initial/default settings by clicking the checkbox. Any changes made on the SEO page will not affect the actual content of the item. Any additional changes made to the title, summary, or keywords on the “Content” tab after checking this box will NOT change the SEO parameters. 3.1.7.5. All of the detail templates provided with the system by default include the title as an H1 tag (header 1) for importance on the detail page. 25 E V E N T S M O D U L E 3.1.8. Publication – This area is to provide administrators with the ability to modify how the content is to be viewed and published. These decisions will over-ride any other decisions allowing for control to be enforced if needed. 3.1.8.1. The item can be published or unpublished with the click of a button on this page if the user is within a DNN role with publish privileges. 3.1.8.2. The item can be set as only visible by particular DNN roles. There are 2 options available for viewing: * Users that do not have the correct permission cannot see the item in lists at all and therefore never have the chance to click and get to the details page. * All users can see the item in the list(s), but when they click on the item they will view an “unauthorized” template instead of the details if they don’t have the correct role permissions to see the full details. This provides a way to show a preview or “teaser” view of the article and request the user to login or register to get access to the full details of the item. 26 E V E N T S M O D U L E 3.1.8.3. Statistics for the article are provided so that it is clear how successful the item is and how popular the item is. 27 E V E N T S M O D U L E 3.2. Find/Edit 3.2.1. There are many ways to search for items. They include filtering by date range, date type, people/names, categories, content types, and issues/groups. 3.2.2. If multi-lingual capabilities are turned on, the language selector will allow for searching within a language as well. 3.2.3. A wildcard or * character can be used at any time and in combination with the filter dropdowns to search “all”. 3.2.4. A blank keyword field acts as a wildcard or * character and will search “all”. 3.2.5. The search results will be color coded with a key for the status of the items at the bottom. 28 E V E N T S M O D U L E 3.3. Workflow 3.3.1. Your Queue – This screen will show all of the items assigned to the user that is logged into the system. Appropriate information will be provided such as the date/time, who assigned it to them, a summary of what is requested, and the expected publish date. 3.3.2. Items Awaiting Publication – This screen will show all of the items that other users have requested to be published by the logged in user. 29 E V E N T S M O D U L E 3.3.3. Staff Workload – This screen will show the items assigned to each user in the system. It also provides functionality for re-assigning and/or making comments as well. 3.3.4. Clicking on the title of the link will produce screens for the history of the item. 30 E V E N T S M O D U L E 3.3.5. Reassigning with additional instructions is possible at any time with the proper permissions. 3.4. Hierarchy Management Hierarchy Management provides the ability to manage multiple structures in advance. Hierarchies include content types, people, categories, etc. A location , so that it is not necessary to do so when creating an item in line. With the appropriate permissions, both methods are available, however. Categories are shared across PackFlash modules and are available to all content items. 31 E V E N T S M O D U L E People can be made available across PackFlash Modules by checking the “Universal” checkbox (this is by default). If this is unchecked, the person’s name will only appear in the type that it was entered in (“author”, for instance). If universal is checked, the name will appear in all people selection areas – contributors, speakers (in Events), organizers (in Events), etc. 32 E V E N T S M O D U L E 3.4.1. The module provides the ability to customize the homepage, header template, list template, details page, and details template for any hierarchy item. This would allow for the website to provide a unique look and feel for the blog section of the site (both landing page and detail page) and have the press release section of the site look completely different, if necessary. This is located within the “Advanced” link section of each hierarchy item. 33 E V E N T S M O D U L E 3.5. Issues or Groups The Issues and Groups section provides functionality to arrange items together that are typically time-based, but not in the same categorization or structure. Examples include a magazine issue, sessions of a tradeshow, or a video playlist. The modules “Groups” and “Groups-Teaser” as well as the list module provide ways of displaying the content from these groups. 3.5.1. A new issue or group can be added at any time. The homepage determines were a website visitor gets taken to view the issue/group when clicking a link on the site. A “Group” module must be present on the page selected. 3.5.2. At any time, you can make any of the issues/groups the “current” one. This makes it display as the default in the “Group-Teaser” module. 34 E V E N T S M O D U L E 3.5.3. Clicking the title of the issue will provide the ability to edit the issue/group and specify the cover story. The cover story is highlighted as special in the “Table of Contents (TOC)” view of the “Groups” module. Items marked as “featured” also show up first in the list on the TOC page. 35 E V E N T S M O D U L E 3.6. Global Settings The “Global Settings” options serve as a default choice if no other is chosen. This can be seen in the charts provided in section 2.4. The system will create pages and modules for the user at the time of licensing activation. These pages and modules serve as the global defaults until they are changed or over-ridden. Users can then start adding content and the system “just works”. 3.6.1. Default Pages and Templates – these are decisions for default location(s) and appearance for list and detail pages of all types. These choices are COMMON between PackFlash modules. 36 E V E N T S M O D U L E 3.6.2. Social Sharing – This provides the custom “sharethis” code (found at sharethis.com) that will be applied with the appropriate token on the list and details templates. This is one option for providing social networking options to the website visitors. 3.6.3. Featured Global Data – This option is the global way to represent “featured” items in lists and details views. The text can be changed to anything needed, such as “new” or “spotlight”. An option for the featured icon is presented. 3.6.4. Images – resizing dimensions and techniques for thumbnail views of content items such as blog posts and press releases. “Resize and crop” provides more consistency in lists, since it forces a specific size. This option may however significantly chop part of the image off. “Resize by keeping aspect ratio” will be less consistent, but none of the detail of the image will be removed when resizing. 37 E V E N T S M O D U L E 3.6.5. Icon Images - resizing dimensions and techniques for icon views of hierarchy items such as categories and content types. “Resize and crop” provides more consistency in lists, since it forces a specific size. This option may however significantly chop part of the image off. “Resize by keeping aspect ratio” will be less consistent, but none of the detail of the image will be removed when resizing. 3.6.6. Caching – Setting that dictates how long the settings stay in memory. 3.6.7. Information Not Found – Global decision for whether to display the “Information Not found” message or not show the message. 3.6.8. Permissions – Settings for determining which DNN roles have which privileges on the system. 38 E V E N T S M O D U L E 3.6.9. Social Networking – Settings for authorizing the social networks to interact with the website. 3.7. Import/Export The Import/Export section provides the ability to export the base content of the module that is held centrally. This includes individual content item data such as each press release or blog post as well as data associated with categories, content types, and people. NOTE: This will not export module setting information. That needs to happen using the import/export processes of core DotNetNuke at the module level. 39 E V E N T S M O D U L E 3.7.1. Import – Choose a file on the server or upload a new file and choose it to import the data. A success message should be provided at the end of the import process. 40 E V E N T S M O D U L E 3.7.2. Export – Choose all the options that apply and filter the data as necessary, selection a location for where you would like the file to be created, provide a name, and click “Export Content”. 41 E V E N T S M O D U L E 3.7.3. Delete all Data – Use this option to remove all the data in the system. This is useful after using the module for test purposes. 3.8. Templates Templates provide the means to control the way that items look on the page to a website visitor. The template editor functionality allows an administrator to modify an existing template or create a new template. 3.8.1. Data elements that are stored in the database are represented in a template using a token. For example, the token for the publish time of an item is represented as [!PublishTime!]. Using this token within a template for the details of blog post will result in showing the time during the day that the blog post was published. 3.8.2. There are multiple types of templates within the system. They are represented by the following: 3.8.2.1. Details Templates. 3.8.2.2. List Templates. 3.8.2.3. Category Templates. 3.8.2.4. Author/Contributor Templates. 3.8.2.5. ContentTypes Templates. 3.8.3. Additional template types will be added in the future. 3.8.4. A list of tokens can be found on the left side of the “Templates” page after choosing the type of template. Different tokens are used with different types of templates. For instance, [!Subtitle!] does not apply to categories. 42 E V E N T S M O D U L E 3.9. Licensing A valid/active license is required for the module to work correctly. This can be a 30-day trial license. If a license expires or becomes invalid for any reason, Licenses can be managed by logging into packflash.com http://www.packflash.com/packflash-module-license-key-retrieval . and visiting: The steps to follow are below: 3.9.1. Install the package on the website. 3.9.2. Log into packflash.com. 3.9.3. Visit the link above to “manage licenses”. 3.9.4. Enter domains for the products of interest. If no production licenses have been purchased, the section at the bottom provides the ability to create trial license keys good for 30 days from the time of entry. 3.9.5. Copy the presented license key. 3.9.6. Go to Constellation screen. 3.9.7. Click “Licensing” icon. 3.9.8. On the left navigation, click the module that needs to be activated. 3.9.9. Paste the license key into the box presented and click “Update/Activate”. 3.9.10. A success message should be presented that the license key is valid for the domain. 3.9.11. If a message isn’t provided, re-check the steps. Contact [email protected] with problems. 43 E V E N T S M O D U L E 3.10. Not Found Message The “Not Found Message” area provides the ability to create a message that will be displayed when data is not available. This is primarily used for multi-lingual sites, but could be used for other purposes such as search results with no response. 3.10.1. “Information Not Found” messages can be customized by language using the dropdowns provided after turning localization on within DNN. 44 E V E N T S M O D U L E 4 Chapter IV. List Module The List Module has many uses. It is designed to provide the ability to distribute links to different kinds of content across the entire website. The module allows for customizing the data that will be presented (data criteria), the way the links will look (based on templates), and behavior such as pagination, page to display item details, and RS S options. NOTE: Many options and data choices will not be available unless the appropriate PackFlash module(s) have been activated with a valid and up-to-date license. Licenses that expire will also result in a loss of options. For instance, if the Events Module is not activated or the license expires on it, the options for choosing events content types will no longer be available until the license validation is resolved. There are 3 different main display options for the list module that will be discus sed in detail individually below: Single List – Used for displaying a single list of items Multiple Lists in AJAX tabs – Used for displaying multiple lists each with different data criteria in AJAX tabs Navigation – Used for displaying a list of navigation items 45 E V E N T S M O D U L E 4.1. Single List 4.1.1. Global Display Options – This section of the module provides the ability to set highlevel options for the module. These include the following: 4.1.1.1. Type of content to display. Options include content items (such as news, events, videos, and galleries), categories, and issues/groups. Depending on the choice of the option, different choices will be available. 4.1.1.2. Template to use. The default is to inherit the template from the “Global Settings” page on the Dashboard. 4.1.1.3. Choices for thumbnail sizing. The default is to inherit the settings from the “Global Settings” page on the Dashboard. This allows for changing the width and height of the thumbnail images represented within the list(s). 46 E V E N T S M O D U L E 4.1.2. Specify Content – This section allows for creating the data criteria for basing the list upon. The options included are the following: 4.1.2.1. Apply Filters. This functionality provides the ability to limit the data that will be available in the list for the module. Data can be filtered by any or all these options – Featured Items, Content Types, Categories, Issues or Groups, or People. 47 E V E N T S M O D U L E 4.1.2.2. Select Specific Item. This functionality provides the ability to search for and assign specific items from the list of search results. 4.1.2.3. Related Content. This functionality provides the ability to set the module to show the associated related content. This functionality should be used on a page that has a query key that can be read and apply the related content. 48 E V E N T S M O D U L E 4.1.2.4. Number of Items to Retrieve. This setting determines the maximum number of items that will show up in the list. 4.1.2.5. Display Order. The criteria for the order that the list will be generated. The default is to order the items by publish date in descending order, resulting in a list with the most recent items first. 4.1.2.6. Start Position. This setting determines the ordinal position for the list to begin. If the list is to produce items number 3, 4, and 5 of the specified criteria, then the setting would be to start at position “3” (in this example, the number of items to retrieve should be set to “3” as well). 4.1.2.7. Ignore Query String Key. This setting allows the criteria of the module to always run whether there is a query string key present or not. This allows for the administrator to better control what is shown in the module. 4.1.3. Display Options – This section provides the ability to set the auxiliary options for the module. These settings include the following: 4.1.3.1. The ability to turn paging (pagination) on. If paging is turned on, then choosing the type and how many items per page. 4.1.3.2. The ability to include a “read more” link and what text that link might read. 4.1.3.3. The ability to specify the location (page) that items presented in the list will display and the template that is used on that page. The default is to inherit and will use the decision tree established in section 2.4. 4.1.3.4. The ability to specify the location (page) that videos presented in the list will display and the video player module that is on that page. The default is to inherit. This option will not be presented unless the Video Module is activated and has a valid license. 4.1.3.5. The ability to specify the location (page) that gallery items presented in the list will display. The default is to inherit. This option will not be presented unless the Gallery Module is activated and has a valid license. 4.1.3.6. The ability to use a “read more items” link, where the link will be presented, and the text to be used for the link. 4.1.3.7. The ability to specify the RSS page. A list module needs to be on the page selected. 4.1.3.8. The ability to specify the search results page for when a user clicks a tag link. 49 E V E N T S M O D U L E 50 E V E N T S M O D U L E 4.1.4. Information Not Found – This sections provides the ability to set the message that will display when data is not found by the system with the criteria given. The “Information Not Found” message can be set in the Dashboard (under the “More” dropdown). The options at the module include the following: 4.1.4.1. Inherit Value from Global Settings. 4.1.4.2. Always Show the Information Not Found Message for this Module 4.1.4.3. Never Show the Information Not Found Message for this Module 4.2. Multiple Lists in AJAX tabs Multiple Lists in AJAX tabs offers a way to provide the same functionality as the single list, but allows for multiple lists to be displayed at the same time. 4.2.1. List / Grid Options – This section provides the ability to customize the look and feel of the list area. Options include the active and inactive tab CSS classes, the display box CSS classes, Theme, and the width of the list(s). 51 E V E N T S M O D U L E 4.2.2. Manage Tab Data – This section provides the ability to specify 10 different tabs, each with their own name and individual data criteria. 52 E V E N T S M O D U L E 4.3. List for Navigation This option provides a list of items that are specified for the purpose of navigation rather than within the page as information, which is what a typical list is used for. 4.3.1. Specify Content for Navigation – This section provides the ability to filter the entire navigation by the type of content requested. If no filtering is done, then all data will qualify for the navigation. 53 E V E N T S M O D U L E 4.3.2. Category Navigation – This section provides the ability to customize the category section of the navigation. 4.3.2.1. By default, the category section will be shown. To not have the category section show, uncheck the box at the top of this section. 4.3.2.2. The ability to modify the header of the category section is provided. To remove the header, delete the word “Categories”. 4.3.3. People Navigation – This section provides the ability to customize the people section of the navigation. 4.3.3.1. By default, the people section will be shown. uncheck the box at the top of this section. To hide the people section, 4.3.3.2. The ability to modify the header of the people section is provided. To remove the header, delete the word “People”. 54 E V E N T S M O D U L E 4.3.4. Dates Navigation – This section provides the ability to customize the dates section of the navigation. 4.3.4.1. By default, the date section will be shown. To hide the date section of the navigation, uncheck the box at the top of this section. 4.3.4.2. The ability to modify the header of the date section is provided. To remove the header, delete the word “Archives”. 4.3.4.3. The dates target page is the page that will display the list when the user clicks on the date. This can be the same page as the other list(s) and even be the same page as the navigation. The page needs to have a List Module included on the page. 4.3.5. Visual / Appearance Options – This section provides the ability to customize the way that the navigation looks. Navigation themes can be found at the following location in the file system: ~ /DesktopModules/PackFlashPublish/ArticleList/ Templates/ListNavigationThemes. It is HIGHLY recommended to make a copy of one of the samples and rename in the same location so that the file is not over-written upgrade. 55 E V E N T S M O D U L E 4.3.6. RSS Delivery Options – This section provides the ability to manage the RSS feeds that are optional within the module. There is no reason to worry about these settings if RSS options are not turned on within one of the other sections. 4.3.6.1. Lists can have multiple types of content, so it is necessary to ask where to display the details of the content items. 4.3.6.2. An option is provided for specifying the number of items to include in the RSS feed. 56 E V E N T S M O D U L E 5 Chapter V. Details Module The Details module is designed to display the details of an item (such as a webinar or training class item) after a website user clicks a link for that item. 5.1. Default Data Criteria 5.1.1. Specify Content – This section allows for creating the data criteria for the default item that will show on the page. The options included are the following: 57 E V E N T S M O D U L E 5.1.1.1. Apply Filters. This functionality provides the ability to limit the data that will be available as the default item for the module. Data can be filtered by any or all these options – Featured Items, Content Types, Categories, Issues or Groups, or People. 5.1.1.2. Select Specific Item. This functionality provides the ability to search for and assign a specific item from the list of search results as the default item. 58 E V E N T S M O D U L E 5.1.1.3. Related Content. This functionality provides the ability to set the module to show the associated related content. This functionality should be used on a page that has a query key that can be read and apply the related content. 5.1.1.4. Display Order. The criteria for the order that the list will be generated. The default is to order the items by publish date in descending order, resulting in a list with the most recent items first. 5.1.1.5. Start Position. This setting determines the ordinal position for the list to begin. If the list is to produce items number 3, 4, and 5 of the specified criteria, then the setting would be to start at position “3” (in this example, the number of items to retrieve should be set to “3” as well). 5.1.1.6. Ignore Query String Key. This setting allows the criteria of the module to always run whether there is a query string key present or not. This allows for the administrator to better control what is shown in the module. 5.1.1.7. Over-ride the page SEO meta data with the default item’s SEO meta data. This functionality will make the module use the SEO meta data of the item rather than the page itself. 59 E V E N T S M O D U L E 5.2. Tag Options 5.1.2. Search Results Page. This setting dictates where the website visitor will be directed to when the tags on the page are clicked. 5.3. Information Not Found Message 5.3.1. Information Not Found – This sections provides the ability to set the message that will display when data is not found by the system with the criteria given. The “Information Not Found” message can be set in the Dashboard (under the “More” dropdown). The options at the module include the following: 5.3.1.1. Inherit Value from Global Settings. 5.3.1.2. Always Show the Information Not Found Message for this Module 5.3.1.3. Never Show the Information Not Found Message for this Module 60 E V E N T S M O D U L E 6 Chapter VI. Calendar Module The Calendar module is designed to display content items in a calendar format. The options are to show in month, week, or day mode (a list option is provi ded to the user). The user is provided the ability to filter the type of content and the category at their preference. 61 E V E N T S M O D U L E 6.1. Calendar Options 6.1.1. Default Calendar Display – The view that website visitors will see when they first arrive on the page. The options are MonthlyView, WeeklyView, DayView, and ListView. 6.1.2. Calendar Theme CSS – File for the CSS classes for the look and feel of the calendar. 6.1.3. Tooltip Template – File used for the tooltip popup (when someone clicks on an item in the calendar). 6.2. Specify Content 6.2.1. This section allows for creating the data criteria for the default item that will show on the page. The options included are the following: 6.2.1.1. Apply Filters. This functionality provides the ability to limit the data that will be available in the list for the module. Data can be filtered by any or all these 62 E V E N T S M O D U L E options – Featured Items, Content Types, Categories, Issues or Groups, or People. 6.2.1.2. Select Specific Item. This functionality provides the ability to search for and assign specific items from the list of search results. 63 E V E N T S M O D U L E 6.2.1.3. Related Content. This functionality provides the ability to set the module to show the associated related content. This functionality should be used on a page that has a query key that can be read and apply the related content. 64 E V E N T S M O D U L E 6.3. Global Display Options 6.3.1. This section of the module provides the ability to set high-level options for the module. These include the following: 6.3.1.1. Template to use. The default is to inherit the template from the “Global Settings” page on the Dashboard. 6.3.1.2. Choices for thumbnail sizing. The default is to inherit the settings from the “Global Settings” page on the Dashboard. This allows for changing the width and height of the thumbnail images represented within the list(s).. . 6.4. Display Options 6.5.1. This section provides the ability to set the auxiliary options for the module. These settings include the following: 6.4.1.1. The ability to turn paging (pagination) on. If paging is turned on, then choosing the type and how many items per page. 6.4.1.2. The ability to include a “read more” link and what text that link might read. 6.4.1.3. The ability to specify the location (page) that items presented in the list will display and the template that is used on that page. The default is to inherit and will use the decision tree established in section 2.4. 6.4.1.4. The ability to specify the location (page) that videos presented in the list will display and the video player module that is on that page. The default is to 65 E V E N T S M O D U L E inherit. This option will not be presented unless the Video Module is activated and has a valid license. 6.4.1.5. The ability to specify the location (page) that gallery items presented in the list will display. The default is to inherit. This option will not be presented unless the Gallery Module is activated and has a valid license. 6.4.1.6. The ability to use a “read more items” link, where the link will be presented, and the text to be used for the link. 6.4.1.7. The ability to specify the RSS page. A list module needs to be on the page selected. 6.4.1.8. The ability to specify the search results page for when a user clicks a tag link. 66 E V E N T S M O D U L E 7 Chapter VII. Groups Module The Groups Module is designed to provide a view of all of the groups in the system. There are 2 different main display modes for the groups module that will be discussed in more detail individually below: Table of Contents (TOC) – Used for displaying the items within a particular group. The default group will be the group assigned as the “current” in the group screen of the Dashboard. A dropdown selector will be provided to choose the other groups in the system and refresh the TOC on the page. Grid Display – Used for displaying all of the groups in a grid for mat. This functionality has been moved to the list module by choosing the content type option “Group/Issue”. 7.1. Table of Contents 8.1.1. Issue List Settings – Select the appropriate settings to make sure that the Table of Content show correctly on the page. 8.1.1.1. Cover story article template. This setting provides the appearance of the cover story of the group. The cover story is set on the “Issue/Group” page of the Dashboard by clicking on the group name link. 8.1.1.2. List article template. This setting provides the appearance of normal items within the group. 8.1.1.3. Number of items to list. This setting (under the List article template) determines how many normal items will be shown. 8.1.1.4. List featured article template. This setting provides the appearance of the featured items within the group. Featured items are set on the “Issue/Group” page of the Dashboard by clicking on the group name link. 67 E V E N T S M O D U L E 8.1.1.5. Number of articles to list. This setting (under the List featured article template) determines how many featured items will be shown in the TOC. 8.1.1.6. Choose an “Article Details” page. This setting determines where to display the details of the items in the list. By default, this setting will be to “inherit” which will use the Global Setting for the individual items. 7.2. Grid Display 8.2.1. This functionality has been moved to the list module by choosing the content type option “Issue/Group”. 68 E V E N T S M O D U L E 8 Chapter VIII. Groups-Teaser Module The Groups-Teaser Module is designed to provide a display for the current group/issue that is determined on the “Issues/Groups” area of the Dashboard. 8.1. Display Options 9.1.1. Select issue grid page. This setting determines where a website visitor will get sent to display the group grid. 9.1.2. Select issue TOC page. This setting determines where a website visitor will get sent to view the Table of Contents of a particular group selected. 8.2. Global Display Options 9.2.1. Over-ride global settings? This setting allows the administrator to use a different template (appearance) from the global setting (determined on the “Global Setting” page of the Dashboard). The dropdown below “Article list template” will be inactive if this is set to “Use Global Settings”. 9.2.2. Article list template. This setting will become available if the administrator chooses “Override”. The selection in the dropdown then determines the appearance of the article list on the group. 69 E V E N T S M O D U L E 70 E V E N T S M O D U L E 9 Chapter IX. Search Module The Search Module provides the ability to search any content item. It can be configured to show very little control to the website visitor. It can also be set to show a great deal of functionality to the website visitor. It can be configured to search within a small sub -set of the data or the entire database. 9.1. Display Options 10.1.1. Show keyword field only – Sets the module to only show the keyword text field. 10.1.2. Show category filter only – Sets the module to only show the category dropdown box. 10.1.3. Show both keyword and category options – Sets the module to display the text field and the category dropdown. 10.1.4. Category Header – Allows for customization of the header (above the dropdown) for categories. Delete text provided to remove header entirely. 10.1.5. Category Dropdown Header – Allows for customization of the default choice within the dropdown itself. 10.1.6. Filter Content Type Available to User – This setting will limit the data set provided to the user. If filtering is chosen, the section “Allow User to Filter Content Type” will be affected by this decision if that choice is checked. 71 E V E N T S M O D U L E 72 E V E N T S M O D U L E 10.1.7. Allow user to Filter Content Type – This setting allows the administrator to decide how much control the website visitor has on search. The website visitor’s choices will be limited to decisions made by “Filter Content Type Available to User”. 10.1.8. Content Type Header – Allows for customization of the header (above the dropdown) for content type. Delete text provided to remove header entirely. 10.1.9. Content Type DropDown Header – Allows for customization of the default choice within the dropdown itself. 10.1.10. Allow User to Choose Date Range – This setting provides the website visitor with begin and end date fields to use for searching. 10.1.11. Allow User to Filter by Group – This setting provides the website visitor with a dropdown box to filter data based on the groups. 10.1.12. Group Header – Allows for customization of the header (above the dropdown) for group. Delete text provided to remove header entirely. 10.1.13. Group DropDown Header – Allows for customization of the default choice within the dropdown itself. 10.1.14. Allow User to Filter People – This setting provides the website visitor with a dropdown box to filter data based on people. 10.1.15. People Header – Allows for customization of the header (above the dropdown) for people. Delete text provided to remove header entirely. 10.1.16. People DropDown Header – Allows for customization of the default choice within the dropdown itself. 73 E V E N T S M O D U L E 10.1.17. Search Form Template - . 10.1.18. Select Parent Category for Search – This selection provides the ability to limit the categories available to the website visitor. If a node is chosen, the system will provide the ability to hide the parent category (checkbox under the dropdown). 10.1.19. Results Page – This setting dictates where the website visitor will be directed after clicking “search” within the module. It is required that the page selected has a list module present on the page. The current page can be used for this function (it can redirect to itself). 9.2. Tuning Tuning is used to determine what database elements will be used during the search process. The more database fields search, the higher number of potential results are available. Conversely, with a large database, this could mean that the system is slower to perform the search and display the results. 74 E V E N T S M O D U L E The default is to search the item title and keywords, but several additional database fields are options to search: 10.2.1. Also search the subtitle – Provides the ability to search within the subtitle field. 10.2.2. Also search the summary/abstract – Provides the ability to search within the summary field (also known as the description). 10.2.3. Also search the main content (article text) – Provides the ability to search within the main content field. This content has the possibility of being large and could cause performance degradation 10.2.4. Track common searches – Checking the “Enable Tracking” box establishes a table of all of the searches performed on the system. There currently is no display for this information, but is available for independent discovery. 75 E V E N T S M O D U L E Chapter 10 X. Tag Cloud Module The Tag Cloud Module is designed to show a list of tags that have been assigned to the item. This module is meant to be used on a “detail” page in combination with a “details” module. The frequency of use of the tags (how often the administrator chooses a particular tag) dictates the look of the tags. The file location for modifying the styles of the links of the CSS file is: ~/DesktopModules/PackFlashPublish/resources/styles/styles.css. This module has been renamed from “Related Content” in previous versions to “Tag Cloud”. Due to backwards compatibility, the functionality for rel ated content has been retained. 10.1. Tag Cloud Settings 11.1.1. Search results page – This setting dictates where the website visitor will be directed to when the tags on the page are clicked. 76 E V E N T S M O D U L E 10.2. Related Content Settings 11.2.1. Section Display Order – These settings determine whether a group will be displayed by checking the boxes on the left of the item. It also allows for deciding the order in which to display them with the radio buttons on the right side of each option. 11.2.2. Related Content Display Order – These options determine the order that related content will be displayed in the module. This is only applicable if “Show Related Content” option in the “Section Display Order” is checked. NOTE: More control is possible by using the list module for displaying related content. This allows for decisions of content type and template choices. In many cases, it may be a more appropriate solution for providing related content. 77 E V E N T S M O D U L E Chapter 11 XI. Multi-Lingual Functionality Multi-Lingual (localized) options will be made available after the website has been localized according to the rules set up for managing DotNetNuke base localization. NOTE: It is critical that there is a THOROUGH understanding of how DotNetNuke localization works to make localized content work with PackFlash. It is assumed that the administrators have intimate knowledge and are using the “out-of-the-box” DotNetNuke localization features. 11.1. Turning On Multi-Lingual (Localization) After taking the steps on the DotNetNuke website to turn localization on, localization will be automatically enabled in PackFlash; there are no additional steps that need to be taken within PackFlash to enable localization. The first time that the administrator visits one of the PackFlash Dashboards after DNN localized content is turned on, the system will recognize that the website has been localized. It will then make appropriate modifications to the system. These changes include the following: 12.1.1. All hierarchy items (categories, content types, people, etc.) will be copied from the default language into all of the languages that have been added to the system. 12.1.2. All groups/issues will be copied from the default language into all of the languages that have been added to the system. 12.1.3. A language switching dropdown box will be present in the upper right corner of all screens of the administration screens of the Dashboard(s). 12.1.4. The individual content items will NOT be copied to every language. The system does NOT assume that every piece of content will exist in every language. It is up to the users of the system to add new content for each language. 78 E V E N T S M O D U L E 11.2. Basic Functionality of Localization 12.2.1. The PackFlash system attempts to make it easy for administrators to manage content across different languages by automatically synchronizing content hierarchies. It is assumed that most sites will want to have the same categorization across languages most of the time. However, the system does support the ability to have different classifications from language to language. 12.2.2. The term “sibling” is used to describe the relationship between the different localized versions of any entity (category, content type, content item, author, etc.). The terms, “original item,” or “default item,” are used interchangeably and refer to the first item that was entered into the system which acts as the basis for creating the sibling relationships in the different locales. 12.2.3. The language switching dropdown allows for filtering data on hierarchy items such as a category and content type. 12.2.4. The language switching dropdown allows for switching between different languages of an individual content item when editing a particular item such as a blog post or webinar. If a record for that item does not exist in the language chosen, then it will assume that a new item is to be created as a sibling of the original item. For example: if three languages are enabled in the system, and a content item only exists in one of the languages, then a sibling item will be created at the moment that an administrator uses the language switcher to select one of the other 2 languages. 12.2.5. Changing a category’s hierarchy (parent category) will copy that change to all its siblings. The position for all categories will remain the same for all languages. 12.2.6. If a category is not used (an item is not assigned to it), then it will not show to the website visitor. The category will always be available to be chosen by the administrator and show up in all appropriate administrative areas. This allows for a category to be culture-specific, but not cause problems by displaying to website visitors in all cultures. 12.2.7. The iPortable interface allows the modules and settings to be copied at the time that the DotNetNuke site localization process is completed. All settings on the new pages will understand how to display the appropriate siblings for all of the PackFlash entities. 12.2.8. Multi-lingual functionality and settings on the modules other than the dashboards are always done using the default language version of the parameters – for instance, if English-US (en-us) is the default culture…and if a List module is set to show the most recent 5 items from the sports category in the en-us…during the DNN localization process, the pages and modules were copied with the appropriate settings. Looking in the module on the French (fr-fr) page will show the us-en 79 E V E N T S M O D U L E version of the sports category, but the website visitor will see the most recent 5 items assigned to the French sibling of the en-us category “sports”. 12.2.9. Locale-specific hierarchies are supported by not using the siblings. For instance, creating a category called “Boxing Day” will create siblings in all locales represented in the DNN website. “Boxing Day” is not recognized in the US, however. By not assigning items to the category, it will not be shown to the website visitor, but can be used for any locales that do recognize the holiday. All siblings will be visible to administrators in all locales to prevent potential confusion where they could be perceived as randomly disappearing. 80 E V E N T S M O D U L E Chapter 12 XII. Supplemental Information Directory This section is included as a directory to areas that are constantly evolving and changing that are not suited to be in static documentation form. 12.1. List Templates Available http://www.packflash.com/list-template-gallery 12.2. Details Templates Available http://www.packflash.com/details-template-gallery 12.3. Video Tutorials http://www.packflash.com/video-tutorials 81