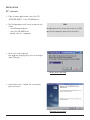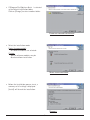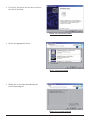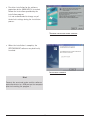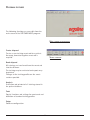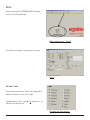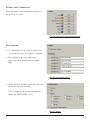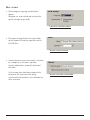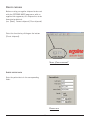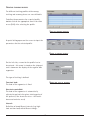
1
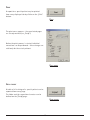
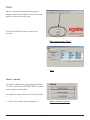
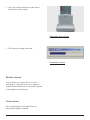
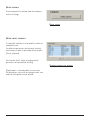
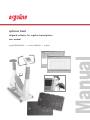
opticare basic
chipcard software for ergoline training bikes
user manual
erg 2010000105000 • version 06/2009 • english
This manual was written with the utmost care. Should you still find details that do not correspond
with the system, please let us know and we will correct the issue as soon as possible.
We reserve the right to modify the design and technical features of the device and are not bound by
the information and illustrations provided in this manual.
All trademarks appearing in this document are trademarks of their respective owners. Their protection
is acknowledged.
No part of this manual may be reprinted, translated or reproduced without the manufacturer's written
permission.
This manual is not subject to any change order service. Please contact the manufacturer for the latest
document revision.
ergoline GmbH
Lindenstraße 5
72475 Bitz
Germany
Tel.: +49-(0) 7431 98 94 - 0
Fax: +49-(0) 7431 98 94 - 128
e-mail:[email protected]
http: www.ergoline.com
Printed in Germany
-3-
-4-
Contents
Installation
PC software
7
7
Program features
11
Setup
Settings Table
Settings grafic trenddisplay
Setup printing
Misc. settings
12
12
13
13
14
Create chipcard
Insert patient data
Creating training profiles
Assigning a preset training profile
Writing on chipcard
16
16
17
19
20
Read chipcard
21
Analysis
Selecting a patient
Overview
Table
Diagram
Grafic single training
Print
Data export
23
23
24
25
26
27
28
28
Tools
Format chipcard
Recreate chipcard
Clear chipcard
29
29
30
30
Technical data
33
-5-
-6-
Installation
PC
software
• Close all open applications. Insert the CD „OPTICARE BASIC“ in the CD-ROM drive.
• The Setup program will launch automatically
if not:
- start Windows Explorer
- select the CD-ROM drive
- double-click on setup.exe
Hint
Do not connect the smartcard reader to a USB
port on the computer prior to installation !.
• Select the setup language
(the program language may later be changed
under [Setup] ).
Select setup language
• Installation starts - follow the instructions
given on screen.
Software installation
-7-
• C:\Program Files\Opticare Basic is selected
as the default installation folder.
Click on [Change] to select another folder..
Folder for program installation
• Select the installation mode:
Typical (recommended):
All software modules are selected..
Custom:
Special software modules may be deselected from installation.
Select installation mode
• Before the installation process starts, a
summary of all settings is displayed.
[Install] will launch the installation.
Summary
-8-
• First of all, the driver for the smart card reader will be installed.
Driver for smartcard reader
• Select the appropriate device
Select smartcard reader
• Follow the instructions provided by the
installation program.
Driver installation complete
-9-
• The driver installation for the software
protection device (WIBU KEY) is launched.
Follow the instructions provided by the
installation program It is not recommended to change any of
the default settings during the installation
process.
Software protection driver complete
• When the installation is complete, the
OPTICARE BASIC software may be directly
launched.
Installation complete
Hint
Connect the smartcard reader and the software
protection device to a USB port on the computer
prior to launching the program !
- 10 -
Program features
The following functions are accessible from the
main screen of the OPTICARE BASIC program:
Main screen opticare basic
Create chipcard
Creates a new training smartcard for a patient.
An empty, formatted ergoline smartcard is
required.
Select function
Read chipcard
All trainings are transferred from the smartcard
into the database.
The trainings may be evaluated and reports may
be printed.
Changes to the training profiles on the smartcartd are possible.
Analysis
Evaluation and printout of all trainings stored in
the patient database.
Tools
Special functions and settings for smartcards and
definition of standard training profiles.
Setup
Software configuration.
- 11 -
Setup
After launching the OPTCARE BAISC software,
click on the [Setup] button.
Main screen button „Setup“
The different settings are grouped in sections.
Setup
Settings Table
Select those parameters, which are displayed as
different columns in the result table.
(Independent of these settings all parameters are
stored in the database!)
Columns for table display
- 12 -
Settings grafic trenddisplay
Select the colours for the different trendlines in
the grafic result screen.
Colours for grafic trend representation
Setup printing
• If a colour printer (e.g. inkjet or colour laser)
is used, deselect the „black/white“ checkbox
• The headlines (e.g. name, address of
physician) will be printed on every report
page.
Header for printed reports
• Define the default report pages and select the
parameters for table printout.
These settings can be changed individually
before the report printout starts.
Default report
- 13 -
Misc. settings
• Select program language and date/time
format.
(Program has to be closed and restarted for
special settings to get valid)
Language, date/time format
• The export settings define the target folder
for the export file and the separator used in
the CSV-files.
Settings for data export
• If more then one smart card reader is installed
on a computer, a selection is possible.
In most applications „automatic detection“
will work.
If all training data should be automatically
deleted on the smartcard after being
transferred to the database, this checkbox has
to be activated.
- 14 -
Settings for smart card reader
- 15 -
Create chipcard
Before creating an ergoline chipcard to be used
with the OPTICARE BASIC program or with an
ergoline bike ergometer, this chipcard has to be
formatted or deleted..
(see [Tools] Format chipcard / Clear chipcard)
Select the function by clicking on the button
[Create chipcard].
Select „Create chipcard“
Insert patient data
Enter the patient data in the corresponding
fields.
Patient data
- 16 -
Creating training profiles
Ten different training profiles with warmup,
training and recovery phases are user definable.
To define the parameters for a special profile,
double click on the appropriate row in the table
or use [Edit] after selecting the profile.
Table of training profiles
A special dialog opens on the screen to input the
parameters for the selected profile.
Define a training profile
On the left side, a name for the profile has to
be entered - this name is stored on the chipcard
and is shown on the display of the ergoline bike
ergometer.
The type of training is defined:
Name and type of training
Constant load:
The load of the ergometer is fixed.
Heartrate controlled:
The load of the ergometer is automatically
adjusted to maintain the given training pulse of
the patient (if the heartrate raises - the load is
decreased and vice versa)
Interval:
Definition of two different intervals (e.g. high
load and low load) with different timings.
- 17 -
Warmup
To define a warmup phase at the beginning of a
training period enter the duration in minutes and
the load in watt..
The parameter „load increase“ is required for
heartrate controlled training and sets the „speed“
for the load increase until the patient has
reached the training pulse.
Warmup phase
Training phase
Different paramters have to be entered
depending of the selected type of training:
Constant load training:
• duration of training in minutes
• ergometer load in watt
Training constant load
Heartrate controlled training:
• duration of training in minutes
• training heartrate in beats per minute
• maximum load in watt
(the load will never exceed this value, even
if the patient does not reach the defined
training pulse)
• control type (flat / medium / steep)
Training heartrate controlled
Intervall training:
• duration (complete) in minutes
• duration intervall 1 in 10 s steps
• load intervall 1 in watt
• duration intervall 2 in 10 s steps
• load intervall 2 in watt
Training Interval
- 18 -
Recovery phase (cool down)
To define a recovery phase at the end of a
training period enter the duration in minutes and
the load in watt..
Recovery phase
Assigning a preset training profile
To assign an already defined profile to the actual
patient, click on the button [Preset trainings] and
select one of those trainings in the next dialog
window.
The Preset trainings may be defined and changed
under [Tools].
Preset training profiles
Select a training and confirm by [Select] or
double click on a row.
The parameters of an assigned preset ptraining
may be adjusted to the individual needs.
Table of Preset trainings
By clicking [ok] the training profile is assigned to
the profile table of the patient.
Assigning a profile
- 19 -
Change the sequence of profiles
By clicking on [up] and [down] the position of a
selected training profile can easily be changed.
Change sequence
Writing on chipcard
After entering all patient data and profile/
training parameters the button [Save] starts
writing onto the chipcard.
In addtion, all data are stored in the PC database.
If a chipcard is lost or distroyed, it is possible to
create a copy of the card.
(see [Tools] [Recreate chipcard] )
Writing on chipcard
- 20 -
Read chipcard
On the main screen click on the button [Read
chipcard] to activate this function.
Insert the chipcard (with data) into the card
reader device (chip shows to front).
All data are transferred from the chipcard to the
appropriate patient in the database.
Main screen „Read chipcard“
If the patient from the chipcard is not existing in
the database (e.g. the chipcard has been created
on another PC), this patient is automatically
inserted in the database.
It is possible to set the system for automatical
deletion of trainings (to empty the chipcard)
which have been read.
See [Setup] for this function.
After reading the data, it is possible to change
patient data (e.g. weight) and/or adopt the
profiles to the actual performance capacity of
the patient.
- 21 -
The database statistics summarizes the actually
stored evaluations for that patient in the
database separated into the different types of
training.
Database statistics
The chipcard statistics shows the actually stored
trainings on that card, the free space and the
information by which ergoline program this card
has been created.
Chipcard statistics
All other functions to evaluate the training
results are described in detail in the following
chapter [Analysis].
- 22 -
Analysis
Different functions are available in the OPTICARE
BASIC software to analyse the data stored in the
patient database:
•
•
•
•
•
•
Summary
Summary table with all values/parameters
Grafic summary
Grafic represantation of single trainings
Reporting (printout)
Data export
Click on the button [Analysis].
.
Main screen „Analysis“
Selecting a patient
If no chipcard is inserted and has just been
read, it is necessary to select a patient from the
database.
Select a patient
- 23 -
The different analysis functions are located on
different „tabs“:
•
•
•
•
Overview
Table
Diagram
Single training
Analysis Tabs
If a chipcard has been read (function [Read
chipcard] ) these tabs are also presented for
analysis.
Overview
Display of all patient data, the list of training
profiles stored on the chipcard (copy is in
database on PC) and a statistics of the stored
trainings.
If a chipcard is inserted, the chipcard statistics is
displayed in addtion.
Analysis overview
Hint
Changing patient data or training profiles is
possible only with inserted chipcard
(via function „Read chipcard“).
- 24 -
Table
All trainings stored in the internal database are
displayed in a table overview with all relevant
values and parameters.
The selection of the displayed parameters
(columns) is defined in [Setup].
By a single click on a special training this
training is highlighted and the appropriate
training profile parameters are shown in the
lower part of the screen.
Analysis table
It is possible to mark different trainings for
printout by clicking on the rows with CTRL key
pressed.
[Delete]
Deletes a selected training from the database
- the remaining trainings are sorted due to date / time.
Double clicking on a single training shows the
grafic trend display of this training.
- 25 -
Diagram
The most important values are displayed as
grafical trends for evaluation of the training
success.
Analysis diagram
The displayed period is adjustable:
• All
The grafic shows all evaluations stored in the
database.
The display starts with the first training end
ends with the date of the last one.
• Monthly
The grafic displays all trainings for a special
month.
The time axis shows the complete month,
independent if trainings are stored or not.
The arrow buttons allow fast change of the
month displayed.
Select time period for grafic display
• Period
The grafic is shown for a user definable time,
independent if trainings are stored or not.
- 26 -
The displayed trends can be selected by use of
checkboxes below the grafical representation. The colours for the trendcurves are defined under
[Setup].
Selection of Trendlines
Grafic single training
Every single training with load and heartrate
trend may be displayed on the appropriate tab.
The axes (Watt and Beat per min) are shown on
both sides of the trend.
The parameters of the profile are displayed at the
bottom of the screen.
Grafic single training
By using the arrow keys it is possible to select
the next / previous training for display.
Selection next/previous training
- 27 -
Print
A report for a special patient may be printed
from every displayed tab by clickin on the „Print“
button.
Print
The print menu appears - the preselected pages
are already marked (see „Setup“).
Before the print process is started, individual
corrections can be performed - these changes are
valid only for the actaul printout.
Print menu
Data export
A table of all trainings of a special patient can be
exported from every page.
The folder and the separation character can be
defined on the [Setup] page.
- 28 -
Data export
Tools
Special functions for chipcard management,
database and the definition of standard training
profiles are located on this page.
Click on the [Tools] button to activate this
function.
Main screen button „Tools“
Tools
Format chipcard
An ergoline chipcard has to be formatted before
it can be used with the OPTICARE BASIC software
or any ergoline training bike.
The complete information on the card is deleted!
Special functions chipcard
• Click on the button „Format chipcard“
- 29 -
• Insert the chipcard into the reader device
(chip shows to the front).
Cardreader with chipcard
• The chipcard is being formatted.
Formatting chipcard
Recreate chipcard
In case of loss of a chipcard or if a card is
destroyed, it is possible to create a copy of a
chipcard (the information of a patients chipcard
is backuped in the database).
Clear chipcard
This function deletes all information on a
(formatted) ergoline chipcard.
- 30 -
Delete patients
A selected patient is deleted from the database
with all trainings.
Delete patient
Define preset trainings
It is possible to define a set of profiles, which are
commonly used.
The different parameters for warmup, training
and recovery is done as described in the chapter
[Create chipcard].
The function „Edit“ allows changing special
parameters of a predefined training.
Standard profiles for training
[Copy] copies a selected profile to a new one.
The parameters can easily be changed and a new
name for that profile can be defined.
- 31 -
- 32 -
Technical data
PC requirements
Operating system
Windows 2000, XP, Vista
Screen resolution
1024 x 768 (min.)
Hard disc ressources
program:
per patient:
per training:
Interface
USB: 1 x chipcard readerr
1 x software protection device
approx. 20 MByte
approx. 1 kByte
approx. 1 kByte
Chipcards
Reader device
recomm.:
CHIPDRIVE ® desktop pro (USB)
CHIPDRIVE ® micro (USB)
type:
capacity:
I2C memory cards (ergoline)
32 kByte (approx. 60 trainings)
Chipcards
- 33 -
- 34 -
ergoline GmbH
Lindenstraße 5
72475 Bitz
Germany
Tel.:
Fax:
e-mail:
http:
+49-(0) 7431 98 94 - 0
+49-(0) 7431 98 94 - 128
[email protected]
www.ergoline.com