1
,
'~
.
',,'~'
. _ _ ,~!t-~
I ' y'."",,"
. v\ ~
-
PALEO DATABASEMANUAL FOR DATA ENTRY,
MODIFICATION AND DISPLAY
By D.L STRUSZ & S.L LENZ
RECORD
1995/16
)
,
•
"
lItO·
,.
,"
4; ,:
,f"
I
l
"
f _
1
'
<
,
I
AUSTRALIAN
,
GEOLOGICAL SURVEY ",
ORGANISATION
PALE° DATABASE
MANUAL FOR DATA ENTRY, MODIFICATION AND DISPLAY
Record 1995/16
D.L. Strusz and S.L. Lenz
AUSTRALIAN GEOLOGICAL SURVEY ORGANISATION
I
9501601*
•
•
•
DEPARTMENT OF PRIMARY INDUSTRIES AND ENERGY ^•
Minister for Resources: Hon. David Beddall, MP
Secretary: Greg Taylor
AUSTRALIAN GEOLOGICAL SURVEY ORGANISATION
Executive Director: Harvey Jacka
© Commonwealth of Australia 1994
^
ISSN: 1039-0073
ISBN: 0 642 22328 9
This work is copyright. Apart from any fair dealings for the purposes of study,
research, criticism or review, as permitted under the Copyright Act 1968, no part may
be reproduced by any process without written permission. Copyright is the
responsibility of the Executive Director, Australian Geological Survey Organisation.
Requests and inquiries concerning reproduction and rights should be directed to the
Principal Information Officer, Australian Geological Survey Organisation, GPO
Box 378, Canberra City, ACT, 2601.
•
•
•
•
•
•
•
••
•
•
•
•
•
•
•
•
•
•
•
•
•
•
•
•
•
•
•
•
•
^
CONTENTS
Introduction
1
2
Login Procedures ^
Logout Procedures ^
3
•
4
IIIII^Oracle menu system ^
Main Menu ^
4
^
5
Forms Menu for data entry and retrieval
•
5
Catalogue Reports Menu ^
6
Curatorial Reports Menu ^
•
SQL*Plus ^
6
•
Forms for individual tables ^
6
Using the Forms ^
8
•
^
8
INITENTRY & PALENTRY (Forms Menu Options 2, 3):
12
•
INITENTRY (Forms Menu Option 2): ^
14
PALENTRY (Forms Menu Option 3): ^
•
Forms Menu Option 8: Access to individual tables 17
ACQUISITION (Tables Menu Option 2): 17
•
17
AGE (Tables Menu Option 3):
•
FORMATION (= Stratigraphy) (Tables Menu Option 4): ^ 18
IDENTIFICATION (Tables Menu Option 5): 18
e
18
LOCATION (Tables Menu Option 6):
19
MAPS (Tables Menu Option 7):
•
19
PUBLICATION (Tables Menu Option 8): ^
•
PUBLISHEDIN (= Citation details) (Tables Menu Option 9): ^ 20
20
SPECIES (Tables Menu Option 10):
STORAGE (Tables Menu Option 11): 21
S
SPECIMEN (Tables Menu Option 12): 22
•
22
FIELDNOTES (access from PALEN TRY, SPECIMEN) ^
ECOLOGY (access from DIITENTRY, PALENTRY, SPECIMEN) ^ 22
•
23
CPC ALLOCATION (Forms Menu Options 4,5): ^
•
FORAMINIFERIDA (Forms Menu Option 6): 24
CONODONTS (Forms Menu Option 7): 25
•
PALYNOLOGICAL PROCESSING (Forms Menu Option 9): ^ 26
FIND LOCATION OF SPECIFIED HOLDINGS (Forms Menu Option 10): 27
•
Reports
28
34
Using SQL*Plus ^
•
39
Transferring Files ^
O
Appendices
40
1 Passwords ^
•
2 Oracle Commands, Procedures & Keystrokes ^ 41
3 List of PALE° tables and fields ^ 47
•
•
•
4111
.
0
0
0
•
O Australian Geological Survey Organisation 1995^i^PALED DATABASE — USER'S MANUAL
•
INTRODUCTION
•
The PALE° database is a sample-oriented palaeontological database which is capable of
storing data covering a wide variety of taxonomic, biostratigraphic, curatorial and technical
requirements. The database is relational, operating on the AGSO's computer network under the
ORACLE Database Management System. Because of its wide scope it is a powerful tool for both
research and curation, but pays an inevitable price in associated complexity. And like most actively
used databases it is always being improved! PALE° originated over 20 years ago as an
HP/"Image" database, and has seen not only migration to a different database system but to
different computer systems. As a result of this history, and of developments in the types of data
recorded, as well as inconsistencies in data entry over the years, many early records are incomplete,
some have been corrupted, and some tables contain significant redundant material. As work
continues, particularly on cataloguing the Commonwealth Palaeontological Collection, detected
shortcomings are being fixed, but it is the responsibility of the individual staff who use the system
to bring data within the scope of their professional interests up to date. In this way the usefulness
•
•
•
•
•
•
•
•
•
•
•
•
and reliability of the database will continue to increase.
This manual is designed as a day-to-day guide to all aspects of data handling within PALE°
in its current state of development. For a more detailed discussion of the database itself, a separate
AGSO Record is being prepared, while a broader discussion of Oracle can be found in AGSO
Record 1993/81 (Users' guide to AGSO's Oracle database system). The following instructions
are for PCs, and assume the user has logged on to the MPSR (formerly OS&PG) LAN. Where
appropriate, instructions for the Windows environment are appended to those for DOS.
•
After an outline of manual conventions and login procedures, the Oracle menu system and
modes of operation are discussed, and the various menu options, and how they are used, are
presented. There follows a section on the available Report programs, and a very basic guide to
the use of SQL*Plus. Finally, an account is given of the current nrthod for transferring files from
the AViiON to LAN directories or one's own PC. An Appendix gives details of the general
methods used in data entry, modification ("updating") and retrieval ("querying").
•
CONVENTIONS
•
•
•
•
•
•
•
•
Several conventions are used throughout this manual in describing keyboard procedures:
Special keys to be pressed are shown as <key name>. Two to be pressed simultaneously are
shown as <key name + key name>, keys to be pressed in sequence as <key name, key name,
key name>.
2. Characters or text strings to be entered are shown in boldface.
3. Where key combinations performing Oracle functions are specified, the Oracle name for the
combination or function may also be shown, as [function], if that makes the explanation clearer.
4. The term "enter" followed by a string of text implies typing the text, then pressing <Enter>.
It can also mean, more generally, that some data are to be added to a database.
5. The term "select" means indicating a chosen item on a menu (by highlighting using the cursor
1.
keys or mouse, or by typing the item number), and implementing that selection with <Enter> or
other appropriate means.
6. The term "see" refers to what should appear on the screen following a command.
•
7. Commands or specific actions are indicated by the symbol
8. The term "record" is used rather broadly, to imply the sum of all available data for a single
sample or specimen, be that confmed to one table or spread over many.
•
@
•
•
•
Australian Geological Survey Organisation 1995 ^1^PALEO DATABASE — USERS MANUAL
LOGIN PROCEDURES
Logging into PALE° involves saying who you are (username) and that you are entitled
to enter the system (password). There are separate passwords for the AViiON and Oracle. The
AViiON password is case-sensitive, and cannot be simply alphabetic, the Oracle password is not
case-sensitive, and may be purely alphabetic or include other characters, the only proviso being
that the first character must be alphabetic. The AViiON password also has to be changed
periodically.
In the following guide to login and logout procedures, we will use as an example the identity
of Dr Joseph Bloggs, a temporary member of staff. His username is jbloggs, and he has set his
passwords to dumbl for the AVii0N, dumb for Oracle (how to do this is shown in Appendix 1).
1) Log in to AViiON
DOS (from the LAN prompt, e.g. M:>):
• enter menu
see Main LAN menu
• select B: Onshore network services
see^Netware utilities menu
• press f or g (selects Login Avion for Oracle (Ian workplace ...) according to whether the
program is loaded on your C: drive or the network server).
WINDOWS:
select
the AViiON Oracle icon in the LAN WorkPlace window
•
see^DG/UX Release 5.4.1 (av) (or whatever the current version is)
login:^• enter jbloggs
Password:^• enter dumbl
If Dr Bloggs' AViiON password has expired - "aged" - he will be asked to enter old
and new passwords at this stage.
see^Copyright messages
Statement of your default terminal type
If this is pc-vt, press <Enter>
•
If something else is specified, enter pc-vt
•
see^Advice on network news and mail (normally none).
see^av:/home3/jbloggs $ -- i.e. Dr Bloggs' AViiON home directory prompt.
At this point, Dr Bloggs has successfully logged into the AVii0N, and is about to run
PALEO under Oracle.
2) Log in to PALE0
• enter paleo
see the Oracle login screen, asking for entry of username and password.
• enter jbloggs
• enter dumb
see the PALE° Main Menu. Dr Bloggs is now ready to use PALEO. From this point on
he must use Oracle keystrokes (see Appendix 2), since Unix commands no longer apply.
0 Australian Geological Survey Organisation 1995 ^2^PALEO DATABASE — USER'S MANUAL
•
•
111^
III
•
•
LOGOUT PROCEDURES
1) Exit PALEO ---
If Dr Bloggs has opened a Form he should --
•
press <Alt + FlO> [exit]
If he is within a Menu, then he should -select Option 1 OR press <Alt + F10>
.
He repeats this as often as necessary until -see: av:/home3/jbloggs $
•
2) Exit AViiON ---
•
.^Enter exit
•
•
•
•
•
•
•
•
•
•
•
•
•
•
.
Dr Bloggs will now find himself back at his starting point either in the LAN Netware
utilities menu, or in the Windows Program Manager screen.
0
•
•
•
•
•
•
0
0
S
•
0 Australian Geological Survey Organisation 1995^3^PALE° DATABASE — USERS MANUAL
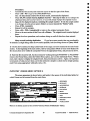
ORACLE MENU SYSTEM
MAIN MENU
CATALOGUE REPORTS^FORMS MENU^CURATORIAL REPORTS
FORMS FOR INDIVIDUAL TABLES
Access to the many PALEO systems, reports, etc. is by way of a series of menus, which
you will automatically enter once you have logged into the database. The Main Menu gives access
to nested menus for using Oracle forms, two Report menus, and the SQL*Plus program. For all
menus, you select an option either by using the cursor keys to highlight it, or by typing its number.
In each Menu, the invariable first option, the default selection on opening the menu, is to exit that
menu.
•
•
•
Possible actions are:
Activate the selection with <Enter>.
Return to a previous menu (or, in the Main Menu, to the operating system) by selecting
Option 1.
Leave PALE° directly with <Alt + FlO>.
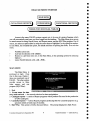
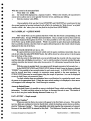
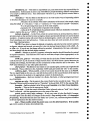
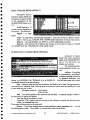
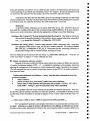
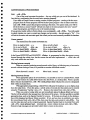
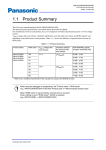
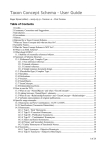
MAIN MENU
The Main Menu is
portrayed at right. Note
that in this case, Option 1
takes you completely out of
PALEO. The other options
provide access to three
other menus, and one
program (SQL*Plus):
AGS0 PALAEONTOLOGICAL COLLECTIONS
HAIN MENU
1. Exit to o el - atm^system.
3. Catalogue reports.
4. Curatorial reports.
S. Use SQL.q1us.
Enter your choice: MENEM
PALE() database
1. Exit.
Menu: PALMENU
lication: PALMENU
2. Forms menu for data
entry and retrieval --- the normal selection for data manipulation.
3. Catalogue reports --- a series of Report programs which produce files used in the production
of CPC catalogues.
4. Curatorial reports --- various Report programs producing files for curatorial purposes (e.g.
specimen labels or hard copy of records).
5. SQL*Plus This option is briefly discussed below. The prompt displayed is SQL-Prod>.
0 Australian Geological Survey Organisation 1995 ^4^PALED DATABASE — USERS MANUAL
•
•
•
•
•
•
•
•
•
•
••
••
••
•
•
•
•
•
•
•
•
•
•
•
•
•
•
•
•
•
•
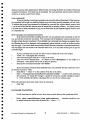
FORMS MENU FOR DATA ENTRY AND RETRIEVAL
This menu, more succinctly referred to as the Fonns Menu, gives access to a variety of
Fonns, several of which are composite views of several tables. Some are of general use, some
are specific to certain aspects of Palaeontology within AGSO. The overall appearance and
methods of selection are the same as for the Main Menu, the options being ---
1. Exit to previous menu.
2. Initial data entry and display. The single-screen Fonn lNITENTRY, useful for entry and
display of field and sample data -- see pp. 8-14.
3. Full data entry and display. The double-screen Form PALENTRY, useful for entty and
display of data for published specimens -- see pp. 8-12, 14-16.
4. CPC allocation. This is a very specific program, rather than simply a Fonn. It is designed
to attach previously-entered field data to the CPC numbers of published (or about-to-bepublished) specimens -- see pp. 23-24.
5. After using item 4 run this report. An essential but quick reporting program which
automatically alerts the palaeontological curator of execution of Option 4 -- see p. 24.
6. Foraminiferida. A Fonn for constructing faunal lists of forams -- see pp. 24-25.
7. Conodonts. As Option 6, but designed for conodonts -- see p. 25.
8. Access to individual tables. This gives access to the Tables Menu (see pp. 17-22), from
which Fonns can be run for most of the individual tables.
9. Palynological processing. A Form used for keeping track of processing and location of
palynological samples -- see p. 26.
10. Find location of specified holdings. This View is designed for searching for the location
of samples according to a variety of selection criteria -- see p. 27.
CATALOGUE REPORTS MENU
The various report programs run under this menu are specifically designed to provide the
raw data, as appropriately fonnatted ASCII fIles, for the assembly of taxonomically-based CPC
catalogues. They are menu-driven, and require no further comment in this manual. The
Palaeontological Curator holds a short manual on the procedures involved in producing a
catalogue.
1. Exit to previous menu.
2. Selected recorded species --- a list of all species in the database within a selected higher
taxonomic category.
3. Selected recorded specimens --- a list of CPC specimens and the taxonomic names
attached to each, selected the same way.
4. Selected references --- all the references for the selected taxonomic group.
5. Catalogue --- the report program which assembles in an ASCII rue the records for a
selected taxonomic group, ready for editing into a publishable catalogue.
6. Go temporarily into Unix. After running a report program, one can use this option to execute
a variety of Unix connnands, e.g. after running a report program to rena.tre the file produced
prior to running the same report again for a different batch of data. Return to the
Catalogue Reports Menu by entering exit.
© Australian Geological SUlVey Organisation 1995
5
PALEO DATABASE -
USER'S MANUAL
CURATORIAL REPORTS MENU
This menu permits a variety of report programs, having to do with specimen handling,
documentation and control, to be run. Their use will be explained on pp. 28-33.
1. Exit to previous menu.
2. Ordered list of all recorded specimens. Simply a list of CPC specimens which have been
entered into PALE° -- see p. 28.
3. Full data records for selected registered specimens. This is designed to provide hard copy
of the data for selected sets of registered (CPC, F, etc.) specimens -- see pp. 28-30.
4. Production of specimen labels. A report program designed to produce labels for registered
specimens in formal collections (CPC, F, etc.) -- see pp. 30-31.
5. Palynological register for specified 1VLFP numbers. This is designed to provide hard copy
of the processing form for palynology (Forms Menu, Option 9) -- see pp. 31-32.
Selected
data for specified MFP numbers. This produces a set of locality and processing
6.
data formatted for insertion in an Excel© spreadsheet -- see pp. 31-32.
7. Conodont labels for CPC specimens. A file is produced which, suitably processed, will
produce a master for making conodont slide labels (specifically for CPC specimens) -- see
pp. 32-33.
8. Foram labels. As for Option 7, but designed for unpublished forarniniferan slides -- see p. 33.
9. Foram labels for CPC specimens. As for Option 8, but specifically for CPC specimens -see pp. 32-33.
10.Go temporarily into Unix. The same option as in the Catalogue Reports Menu, see above.
Return to the Curatorial Reports Menu by entering exit.
SQL*Plus
Option 5 runs the command-driven system for accessing information in databases. It can
be used for any AGSO "public" database, not just PALE° -- e.g. it can be used to obtain latitude
and longitude for wells registered in PEDIN. For examples on how SQL*Plus can be used see
chapter 8 in AGSO Record 1993/81 (referred to above). For further discussion see pp. 34-38.
FORMS FOR INDIVIDUAL TABLES
This menu, entered from Option 8 in the Forms Menu, is designed to give direct access
to tables, including lookup tables, most of which are otherwise accessed from other Forms, such
as PALENTRY (see the Forms Menu, above). It actually has 14 options, although only 10 can be
displayed at once. Use the up or down cursor keys to see the rest (yes, you can go backwards
through the menu: it acts as a continuous loop). The various options, and the pages on which they
are detailed, are:
1.Exit to previous menu.
2. Run the acquisition form -- (p. 17). A view of all fields in the ACQUISTHON table, recording
when and by whom samples were collected &/or donated.
3. Run the age form -- (p. 17). All fields in the AGE table.
0 Australian Geological Survey Organisation 1995 ^6^PALE° DATABASE — USERS MANUAL
•
•
•
•
•
•
•
•
•
•
•
•
•
•
•
4. Run the formation form -- (p. 18). All fields in the FORMATION table -- i.e. geological
provenance.
5. Run the identification form -- (p. 18). All fields in the IDENTIFICATION table, in which
faunal lists can be assembled with the assistance of the SPECIES table.
6. Run the location form -- (p. 18). All fields in the LOCATION table -- i.e. geographic
provenance.
7. Run the map form -- (p. 19). All fields in the MAP table -- map name, code, scale, etc.
8. Run the publication form -- (p. 19). All fields in the PUBLICATION table -- i.e. bibliographic
data for any publication in which a registered sample is cited.
9. Run the publishedin form -- (p. 20). All fields in the PUBLISHEDIN table -- i.e. details of
where in a publication a sample or specimen is cited &/or illustrated.
10. Run the species form -- (pp. 20-21). All fields in the SPECIES table -- i.e. the name and
authorship of a taxon, plus its systematic position and any comments on synonymy etc.
11. Run the storage form -- (pp. 20-21). All fields in the STORE table -- i.e. where a sample
or specimen is normally kept.
12. Run the specimen form -- (p. 22). All fields in the SPECIMEN table -- i.e. sample/specimenspecific data -- e.g. preservation, data reliability and history, taxonomic status.
The key form in registering a sample or specimen, this also gives access to several tables: FIELDNOTES
(p. 22), ACQUISITION, and ECOLOGY (pp. 22-23). It is also designed to give access to the RADIOMETRY
table, yet to be set up, dealing with radiometric age determinations.
13. Run the corlo form. This is essentially of curatorial interest, holding information requiring
"cleaning" because it was not cleanly transferred from an earlier version of PALE()
operating under the "Image" system on an HP1100 computer. Explanation is unnecessary.
14. Run the ocnlo form. As for Option 13.
•
•
•
•
•
•
•
•
•
•
•
•
•
•
•
Australian Geological Survey Organisation 1995^7^PALEO DATABASE — USER'S MANUAL
USING THE FORMS
In this section the use of the various Forms available for data entry and retrieval will be
described. Access to these Forms is from Option 2 of the Main Menu, and from Option 8 of the
Forms Menu (see pp. 5-6). Keystrokes and commands (other than very special ones) will not be
explained here, but in Appendix 2, Oracle Commands, Procedures & Keystrokes (pp. 41-46).
Help line, error messages.
A general aspect of Forms, applicable in nearly all of the PALEO ones, is that, for each field
on the Form, a brief message is displayed in the "help line" at the bottom of the screen as the cursor
alights in that field. This may be instructions on what data should go into that field, or on what
table is linked through that field. Should an error occur, the normal message line will be replaced
by a brief error message. Press <Alt Fl> [display error] to try and find out what has gone wrong.
More generally, <Esc + h> will display a help screen where one is available.
INITENTRY & PALENTRY (FORMS MENU OPTIONS 2,3)
Field, sample and specimen data
The Forms 1NITEIVTRY (for initial sample data entry) and PALE1VTRY (for full specimen
data entry) are composites of selected fields from several tables, all fitted respectively on one or
two screens. The Form IN/TEIVT'RY is designed for the entry and display of sample and laboratory
data of relatively limited scope, while PALENTRY is designed for the entry of more extensive data,
especially for published specimens.
As the procedures for using the two Forms are essentially the same, those will be dealt
with for both, before discussing aspects of the individual Forms.
In both, only a single record can be entered while staying within the Form, but access to
appropriate individual Forms is easy, and enables entry of series of records. Similarly, only one
record can be displayed at a time, but multiple records retrieved following a query can be easily
and quickly examined by using the up and down cursor arrows while the cursor is within the first
part of the Form.
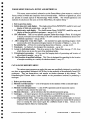
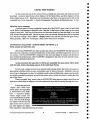
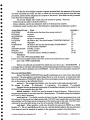
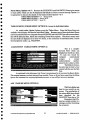
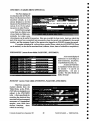
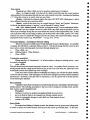
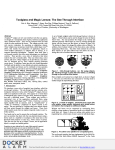
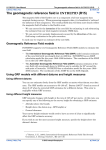
There is an initial "help" screen, that for INITENTRY being shown at right, which lists the
tables from which fields are displayed, and also explains the keys used in moving through the form.
In both, there are sone
PALE° Database — Initial entry form
"display only" fields from
This initial data entry form is a multi—block entry form.
linked tables, and especially
Information entered goes into the following tables:
in IN TTENTRY some fields
specimen
location
acquisition
have a truncated display
formation
age
(which simply means you
identification
publishedin
cannot imtnediately see all the
Access the underlying table from any field by pressing <NEXT PRIMARY HEY>.
text). One can scroll through
To navigate forwards through the form, just press the <NEXT FIELD> key.
To go right back through the form, use <PREUIOUS FIELD> or <PREUIOUS BLOCH>.
the display with the left and
To exit this help screen, press <ENTER> I
right cursor arrows, but one
-11M1127
can also display the whole ^
field separately, using the following procedure.
© Australian Geological Survey Organisation 1995 ^8
PALEO DATABASE — USER'S MANUAL
•^
di
•
•
•
•
•
•
•
•
•
•
•
•
•
•
•
•
•
•
•
•
•
•
With the cursor in the truncated field:
•
Press <Esc + e> [edit].
see: the whole field displayed in a separate window. While in the window, the up and down
cursor arrows allow one to move quickly from line to line, speeding any editing.
Exit the window with <F10>.
One peculiarity of the way the Forms INITENTRY and PALE1VTRY are constructed is that
the normal method of moving backward with <Ctrl + h> includes the "Help Screen" as afield!
Another <Ctrl + h> takes you to the last field in the first block (SPECIMEN).
DATA DISPLAY -- QUERY MODE
The whole Form can be queried only from within the first block (corresponding to the
SPECIMEN table). See pp. 44-46 for query procedures. Once a sample record has been retrieved,
its data are displayed throughout the Form. It is then possible to move the cursor to other parts
of the Form (seep. 43 for cursor control). While it is possible to query those parts individually,
that is a pointless exercise, since the result of a query still corresponds to the record which remains
displayed in the rest of the form.
Multiple records retrieved (see also p. 46)
If a query retrieves several records which meet the query conditions (remember, they can
only be set within the initial SPECIMEN block), this will be shown by a down arrow (v) in the status
line at the base of the screen.
With the cursor in the initial block, you can scroll through the records with the cursor keys
(and the status line will display two arrows, "and v, and the number of records scrolled through,
until you reach the last record, when only the one arrow (A) will remain; beyond that the form is
empty!).
With the cursor in another block, you cannot scroll through successive full records, but --In the IDENTIFICATION and PUBLICATION blocks (in both Forms the former is headed
"FOSSIL") it is possible to have several entries for each main record. In IDENTIFICATION this
may be several taxa from a sample, or successive names applied to the same specimen. In
PUBLICATION there may be several papers citing the sample or specimen (two can be displayed
at once in both Forms, on successive lines).
To check whether there are undisplayed taxa or publications for a particular record, move
the cursor to the appropriate block If there are more records waiting to be displayed, a down arrow
will reappear in the message line. Scroll through to examine.
•
•
•
•
•
•
•
•
•
•
Access to linked Forms
From both Forms it is possible to move to individual Forms which can display additional
information. To which, and from where in the Form, is discussed for each in turn. The details of
how to do it are given under Moving between Forms on p. 43.
DATA ENTRY -- Single sample
"Reference Number"
When you enter the Form, the cursor will appear in the first field, acronym. This and the
next two fields are combined to form the fourth field, which the database system knows as Refno,
short for "Reference Number". This is akey field, which holds together the components of a record.
Because of this, data MUST be entered in this field. This Reference Number may be a field or
0 Australian Geological Survey Organisation 1995 ^9^PALED DATABASE — USERS MANUAL
sample number, or the number under which a specimen is registered in one of several specific
collections. In the latter case, the collection is referred to by its acronym - e.g. MFP, CPC, F, V.
Procedure:
If there is an acronym, type it in the first field; if not, press <Enter>
•
If an acronym has been entered, enter the specimen number in the second field, which is
•
strictly a numeric field (the database mar for it is num). Simple numeric sample numbers
(e.g. eight-digit field numbers like 74284301) should be entered here.
If there is a suffix (e.g. a part letter or number), enter it in the third field (suffix).
•
If using a number, start it with a dash or slash— i.e. - or 1 — so that it is recognisably
separate from the main number; there is room for up to two digits.
•
If there are entries in the previous fields, they will automatically be combined in the fourth
field (Refno).
If not, a number must be entered here.
Composite sample numbers such as "20NG7251", which do not readily lend themselves
to subdivision into acronym + number, can be successfully entered only here.
Field Number
If the Reference Number is a field or locality number (or alphanumeric code, such as
20NG3124 or GE0367) then repeat it in the Field No. field, so that the record will be retrieved
if a query is done on that field (this is also important later if there are published specimens registered
with their own numbers, but from that locality, since the connection between the two numbers will
not be lost).
Other data
Having entered the number, work through the Form adding data, remembering that some
fields (e.g. general remarks in INITENTRY) may be longer than they look.
Truncated fields.^In such a truncated field, be a bit careful: the program is normally
set to Replace characters, so when you reach the last space in the field, each character you type
will replace the one you typed previously. If you know what you have to type in is going to be
longer than the display, you can work in the field in a separate window, accessed with <Esc + e>
and left with <F10>. See p.44 for details.
Correcting errors. To correct errors, or modify text which will not fit in a field, use the
left and right cursor keys to move through the field, and toggle between Insert and Replace Text
modes with <Insert>.
Accessing other Forms. You will also come to fields which require that you access a
separate single-table Form which is linked to the main one by a common field (often some sort of
record number).
An example, common to both Forms, of how to do this is to enter the Maprefno (i.e. map
reference number):
From the Maprefno field, access MAPS with <Alt + F3> [next primary key].
•
In this case, as the help message will show, you are already in Query Mode. Follow instructions
to establish the reference number for the map.
If your query retrieves a map reference number, return with it to the original Form with
•
<Alt + F3>.
•
If your query retrieves no data, it is because the map has not yet been entered in the database.
•
press <Alt + FlO> to [cancel] Query Mode,
•
enter the map data,
press <F10> [commit],
•
return the new map reference number to the original Form with <Alt + F3>.
•
0 Australian Geological Survey Organisation 1995 ^10^PALEO DATABASE — USER'S MANUAL
•
•
•
•
•
•
•
•
•
•
•
•
•
•
•
•
•
•
•
•
•
•
•
•
•
•
•
•
•
•
•
•
•
•
Multiple entries in FOSSIL, PUBLICATION.
As already mentioned, it is possible
for a sample or specimen to have more than one entry in these blocks.
Procedure:
..
Place cursor on the already-displayed species number or publication number;
..
press <F6> [insert record]; the field (and associated "display only" fields) will be cleared~
..
enter the new number (type it in if you already know it, otherwise go to the appropriate
individual Fonn in the way described under Accessing other Fonns, above, establish the
correct number, and return with it to the main form);
..
press <FlO> [commit].
Repeat as necessary.
Committing record. For more detail, see p. 44.
..
When the record is complete, press <FlO> [commit].
Error message on committal -- Oracle unable to insert data.
If, when you corrnnit the record, you get an error tressage that the record cannot be corrnnitted
because of a duplicate value, this nonnally treans that the sample or specimen number you entered
in the Refno :field is already in the database. When you are not sure that a sample or specimen number
is new, it pays to check before starting data entry: query under Refno (see p. 9).
Escape from the error is possible, but will probably waste the effort you have put into typing
all the data unless you are prepared to put a bit more effort into correcting its cause:
Procedure:
..
Press <AIt + FI> [display error] to see if the full error message is enlightening - it is
conceivable there is a different cause, which can be easily rectified without loss of data.
..
If the cause is an existing duplicate record, then go to the Refno field with <End>.
..
If you have been entering a set of records, scroll back to see if the one you have just tried
to conunit is already there (you may just have forgotten to change the Reference Number).
..
If you ~ forgotten to change the number, do so and press <FlO>.
..
If the second record is strictly a duplicate (perhaps you lost track of what you had
already done?), then make sure it is the one displayed, press <Alt + F4> [clear
record], and <FlO> to make sure everything is fixed. If that doesn't work, try <Alt
+ F6> [delete record] in place of <Alt + F4> (and don't forget the <FlO».
..
If you cannot find a duplicate record this way, then press <F7> [enter query]; you will
be asked if you want "to commit the changes you have made".
..
Press <n> for "no".
..
Type the sample or specimen number in the appropriate place, and press <F8>.
..
Check the result of your query. You may fmd the displayed data show some differences,
although this may only be a matter of wording. Make any necessary corrections or additions
(don't assume the data you originally tried to enter is better!), and press <FlO>.
If it is a case of identical numbers for different samples or specimens, then the answer to
your problem lies outside the database!
DATA ENTRY -. multiple samples
If you have a series of samples to enter which share common data (e.g. they come from
closely spaced intervals on a measured section, have the same age, etc.). then the first record can
act as a template for the others, using Record duplication (see p. 46). However, you cannot do
this within the confines of the single composite Fonn, but one way or another must go to the linked
individual Forms.
© Australian Geological SOlVey Organisation 1995
11
PALEO DATABASE -
USER'S MANUAL
Procedure:
Commit the first record, and return the cursor to the first part of the Form.
Press <Alt + F3> to go to the SPECIMEN Form.
See: the data already entered for the first record, automatically displayed.
Press <F6, F4> [create record, duplicate record] --- this step is vital; do not change the
displayed data until you have done it, or you will simply change the original record.
Now edit the displayed duplicate, including the sample number. If only the sample number
is to change, then be sure to press <Enter> to move beyond the "Refno" field.
Press <F10> [commit].
Repeat for all the samples.
Press <Alt + FlO> [cancel/exit] to return to the original composite Form.
Move to the next section of that Form with <Home>. The original record remains displayed
there.
Repeat the above procedure, and continue doing so until all data have been entered.
Many records involving duplication.^If you have more records than can comfortably
be entered at a single sitting, there are two tactics possible, both involving the use of Query Mode.
1) Use the above method, but keep careful track of the stage you have reached at the end of each
session. At the beginning of the next session, start by using Query Mode to once more display the
first record, then move within the composite Form to the appropriate block, and proceed as above.
2) Enter the first record in full, but then instead of working through INI7rEIVTRY or PALEIVTRY
return to the Forms Menu, select the Tables Menu option, and use the individual Forms. Within
each, enter a Query to display the original record, then proceed just as above. Again, it is important
to keep track of what you have done, and in this nrthod it is simpler to check that by simply querying
each Form using appropriate wildcards (see p. 45).
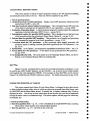
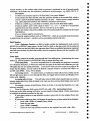
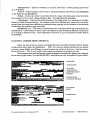
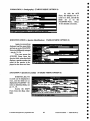
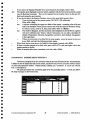
INITE1VTRY (FORMS MENU OPTION 2)
The screen appearance is shown below, and beside it the names of the individual tables for
which Forms can be accessed from the main Form.
-- SPECIMEN
-- ECOLOGY
hO
-- ACQUISITION
date^998
Lockle^
colldnrno^.98^collector
-- STORAGE
access to stora e data
ens an. Plateau
COUNTRY/OCEAN ;ra^ state. county,^...^
E/U^metric^ridref
latitude
121131111E911^
-- LOCATION
de,th^to
uell
descri )tion^. tern tip of Lihou Reef, 8^end of Queensland Plateau.
-- MAPS
Maprefno
MO
NZ=
BASIN/PROU
=MEI
-- FORMATION
rock ty e
to ^aternar^enter range if appropriate
PERIOD^ertiar
--AGE
FOSSIL: group/s
s)ecies number
NIEMBIUMZECksimosierc.
IDENTIFICATION
9
PUBLICATIONS:
-- SPECIES
P. MIT, for formal registration.
e.'
ter the aspen
'ount:
"1192111111^-- PUBLICATION
on^PW98^Record No. .9256
Data entry by H^RCEPIIL
Field No. .
Sample No. acronym
environ't II <see dis^la ed ke )^san led for radiometry?^a e
from core.
eneral remarks - tbansect
.^
There is no direct access to the
CITA770N DETAILS
Form CPublishedin' Table).
O Australian Geological Survey Organisation 1995^12^PALEO DATABASE — USERS MANUAL
The first line of the display comprises computer-generated data: the username of the person
who first committed the record, the date on which that was done (both derived from the login
procedure), and the number assigned by the computer to that record. These fields can only be entered
when the Form is being queried.
The several "display only" fields cannot be entered or queried. These are:
-- Collector and date (tied to the field colldnrno).
-- Genus, subgenus, species and subspecies (tied to the field species number).
-- Publication author and date (tied to the field pubno, displaying the 'publication number').
see pages -Access linked Forms -- from --^
^
all fields on the first three lines except environ't.^22
SPECIMEN
^
22-23
environ't.^
ECOLOGY
^
17
colldnrno.^
ACQUISITION
^
21
access to storage data.^
STORAGE
^
all
fields
in
the
5-line
block
headed
"COUNTRY/OCEAN".
18
LOCATION
^
19
Maprefno.^
MAPS
^
^
18
all fields in the two-line block headed "BASlN/PROV".
FORMATION
^
17
the line headed "PERIOD". ^
AGE
^
18
IDENTIFICATION FOSSIL: group/s.
^
^
20-21
SPECIES
^species number.
the section headed "PUBLICATIONS:". ^19-20
PUBLICATION
Procedure:
press <Alt + F3> [next primary key]
Unless on-screen messages instruct otherwise, return to the main Form as easily:
press <Alt + FlO> [cancel/exit]
There is one table and associated Form which has yet to be set up -- RADIOMETRY. It
is envisaged that it will relate radiometrically and biostratigraphically determined ages for samples,
and will also be a link to databases such as OZCHRON. Access will be from sampledfor radiometry?
Notes on individual fields:
Some of the fields in IN/TE1VTRY have specific requirements as to what or how data should
be entered. The sane applies to individual linked Forms as well, of course; to check those refer
first to the discussion of PALE1VTRY below (that Form encompasses many of the individual ones),
then to the sections on the individual Forms.
environ't -- The message line displays a key for entries in this single-character field:
M = marine S = saline F = freshwater L = lacustrine E = estuarine T = terrestrial
Statistical data for environmental assessment of foraminiferal samples can be entered in the
ECOLOGY Form accessible from this field.
latitude, longitude -- In this Form, must be entered as decimal degrees. Unless you know
they are more accurate, do not enter more than 4 decimal places. The default settings for hemisphere
are 'E' and 'S'; alter if necessary.
metric grid ref-- Two fields, actually: the first is for the 2-letter international zone code
(if you know it), the second is a 6 digit numeric field. DO NOT insert a period between the castings
and northings, but DO make sure the components of the reference are in that order. DO NOT enter
references to any other grid system (e.g. the old Australian 10,000 yd grid) here.
well, depth -- Where possible, a well name should be the same as in PEDIN (e.g. "BMR
Huckitta 6"). The two depth fields are for core, etc., and refer (in that order) to the top and bottom
of the interval; enter the numbers (in metres) to the appropriate number of decimal places.
-
Australian Geological Survey Organisation 1995
^
13^PALE° DATABASE — USERS MANUAL
basin/province -- Spell out whether it is a Basin, Sub-basin, or other geological province
(e.g. Fold Belt).
Form'n -- Abbreviatedfonnof Formation. Spell out whetheritis the Woop-woop Fonnation
or the Black Stump Sandstone.
Period -- If only one, enter it in the fIrst fIeld; if a range, the oldest goes in the fIrst fIeld,
the youngest in the second. Keep strictly to this -- it's important/or querying.
Fossil group -- Type here the infonnal na.rre of the major group (e.g. brachiopod, trilobite,
foram) to which the taxon belongs. For samples with many different taxa, enter here a list of the
groups (that does mean that wildcards are essential during querying, but the solution to that problem
would make the database quite unwieldy).
identified by, on -- This refers to unpublished taxa, and sheets home the responsibility for
identifications. Unfortunately it cannot cope with clifferent people identifying different components
of a sample at different times. Such information will have to go in the general remarks field in
SPECIMEN.
PALENTRY (FORMS MENU OPTION 3)
Below are shown the t\yo screens, and beside them the accessible individual Forms; details
on that access follow below the illustrations.
Tip: You can move quickly between the two display
screens by using <End> and <Home> to move between the top block of Screen 1 and the bottom
block of Screen 2. This is very useful when examining displays of multiple records.
The userna.rre, entry date and record number assigned on connnittal are displayed in a separate
box in the top right comer - as with INITENTRY, these fIelds are only accessible in Query Mode.
--SPECIMEN
-- FIEWNOTES
--ECOLOGY
-- ACQUISITION
-- IDENTIFICATION
--SPECIES
-- PUBliCATION
-- CITATION DETAILS
--LOCATION
--MAPS
-- FORMATION
--AGE
© Australian Geological SUlVey Organisation 1995
14
PALEO DATABASE -
USER'S MANUAL
•
•
•
•
•
•
•
•
•
•
•
•
•
•
•
•
•
•
•
•
•
•
•
•
•
•
•
••
•
•
•
•
•
Access linked Forms --
from--
SPECIMEN
any field in the block labelled SPECIMEN except field refno,
environment and collector/donor No. -- see p. 22.
field refno -- see p. 22.
environment -- see pp. 22-23.
collector/donor No. -- see p. 17.
any field in the block FOSSIL except species and Conodont
element. Note that the fields in which a species name is displayed
are "display only" -- see p. 18.
species (which displays the Species Number) --- or indirectly from
the IDENTIFICATION Form -- see pp. 20-21.
No. in the block labelled PUBLICATION -- see pp. 19-20.
anywhere in the block labelled PUBLICATION except No., which
displays the Publication Number.
The Form displays the
PUBUSHEDIN table -- see p. 20.
anywhere in the block labelled COUNTRY/OCEAN except map
refno -- see p. 18.
map refno -- see p. 19.
anywhere in the block labelled BASIN/PROVINCE -- see p. 18.
anywhere in the block so labelled -- see p. 17.
FIEWNOTES
ECOLOGY
ACQUISITION
IDENTIFICATION
SPECIES
PUBLICATION
CITATION DETAILS
LOCATION
MAPS
FORMATION
AGE
Procedure:
press <A1t + F3> [next primary key]
Unless on-screen messages instruct otherwise, return to the main Form as easily:
~
press <A1t + FlO> [cancel/exit]
~
Notes on individual fields:
As with INITENTRY, some of the fields in PALENTRY have specific requirements as to
what or how data should be entered. The same applies to individual linked Forms as well, of course,
but most of them are actually incorporated in this present Fonn For many fields the help line provides
all the infonnation you need (so do please look at itt), otherwise, see below or in a few cases under
the descriptions of the individual Forms.
old reg'd No. -- For recording a previous collection number. An example would be a speciIren
from the F collection which is renumbered in the CPC collection for publication. The F number
becorres the o1d registered number, the CPC number the new one. For correctly entered records,
this is done automatically under Fonns Menu Option 4 (see pp. 23-24).
type status -- For published speciIrens, to specify whether they are Irerely cited, or figured,
or some sort of Type. Follow the format in the help line.
configuration -- What the speciIren looks like, as an aid to finding it in our vast collections.
maturity -- Enter here the degree of maturity of the sample in terms as brief as possible without
being cryptic.
Amoco TAI -- Thenna1 Alteration Index number or range, according to the Amoco scheme.
CAl -- Conodont Alteration Index number or range.
Group -- Typehere the infonnal name ofthe major taxonomic group (e.g. brachiopod, trilobite,
foram) to which the taxon belongs. For samples. with many different taxa, enter here a list of the
groups (that does Irean wildcards must be used during querying, but the solution to that problem
would make the database quite unwieldy).
© Australian Geological SUlVey Organisation 1995
15
PALEO DATABASE -
USER'S MANUAL
identified by, on -- This refers to unpublished taxa, and sheets home the responsibility for
identifications. Unfortunately it cannot cope with different people identifying different components
of a sample at different times. Such information will have to go in the general remarks field in
SPECIMEN.
Abundance The four fields on this line have to do with various ways of expressing relative
or absolute abundance of a taxon in a sample:
Abundance is an estimate of the relative abundance of the taxon in the sample, simply
using the initials vr = 'very rare', r = 'rare', c = 'common', vc = 'very common' and ab = 'abundant';
% is the percentage that taxon is of the total sample;
population No. is the number of species in the sample;
coiling is the % of individuals of a particular taxon which are sinistrally or dextrally
coiled - express this as, e.g. "10%S" or "45%D".
latitude, longitude -- In this Form, while the correct format is decimal degrees, there is
provision made on the next line for entry as degrees, minutes and seconds (the last two can be decimal
numbers). A resident routine will convert them to decimal degrees, which is the only way AGSO's
Oracle databases store that information. Unless you know they are more accurate, do not enter
more than 4 decimal places.
NOTE: If you have to change the latitude or longitude, and only have the correct numbers
as degrees, minutes and seconds, you must first clear the decimal degree figures with <Ctrl + f>
or <Esc + t>. If you do not, the change will not be recorded. Alternatively, first use a calculator,
and then simply edit the decimal degree numbers!
altitude -- Relative to sea level, in metres; submarine samples should therefore be entered
as negative numbers. This field does NOT refer to well data, except (where appropriate) to the
collar altitude.
UTM zone, grid ref-- Two fields, of which the first is for the 2-letter international zone
code (if you know it), the second is a 6-digit numeric field. DO NOT insert a period between the
eastings and northings, but DO make sure the components of the reference are in that order. DO
NOT enter references to any other grid system here.
other grid ref-- This field is for non-metric or non-standard grids, and the type of grid should
be indicated. Thus a reference to the Australian 10,000 yard grid could add "yds" to the number.
well/bore, depth -- Where possible, a well or bore name should be the same as in PEDIN.
The two depth fields are for core, etc., and refer (in that order) to the top and bottom of the interval;
enter the numbers (in metres) to the appropriate number of decimal places.
basin/province -- Spell out whether it is a Basin, Sub-basin, or other geological province
(e.g. Fold Belt).
supergp, gp, subg -- Put the mire in the correct field, but do not add the rank. Thus, the
Catombal Group would be entered just as "Catombal" in the gp field, NOT in the supergp field.
formation — Spell out whether it is the Woop-woop Formation or the Black Stump Sandstone.
member -- Treat as for the supergp etc. fields.
bed or beds -- Under the current Australian Guide, informal units are "beds", but a foi;mal
"Bed" is allowed. Add the appropriate one to the name of the unit.
period, epoch, series, stage, substage -- If only one, enter it in the first field; if a range,
the oldest goes in the first field, the youngest in the second. Keep strictly to this -- it's important
for querying. Remember that time terms use "Early" not "Lower", etc., and that using these modifiers
at all has implications for data retrieval tactics.
zone -- Where possible, include the generic name, even if in abbreviated form. If the possible
age covers a series of zones, then indicate that.
@ Australian Geological Survey Organisation 1995
^
16^PALE° DATABASE — USERS MANUAL
Forms Menu, Options 4 to 7: Because the INITENTRY and PALENTRY Forms give access
to many tables which can also be displayed individually as Forms accessed through Option 8, it
is appropriate to discuss the details of that Option before Options 4 to 7.
FORMS MENU OPTIONS 4 + 5: See pp. 23-24.
FORMS MENU OPTION 6: See pp. 24-25.
FORMS MENU OPTION 7: See p. 25.
TABLES MENU (FORMS MENU OPTION 8): Access to individual tables
As noted earlier, Option 8 places you in the Tables Menu. From this Menu Forms are
available which display full data for individual Tables. Because most of these individual Forms
can be accessed from the two composite Forms INITEATIRY and PALE1VTRY (as well as some others),
they will be discussed here, before the remaining Forms Menu options. Note that in many cases
the same fields are displayed as in those two forms, so for comments on individual fields, consult
the descriptions under, e.g., PALE1VTRY.
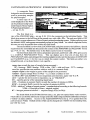
ACQUISITION (TABLES MENU OPTION 2)
This is a straightforward Form which can
ACQUISITION
display four records at a time.
Number AMIE. Collector ialgeliMMINIIIIIII Collected
Acquired
To each new record the
Number MINNUMM Collector ailiaibilall.111111111 Collected 11111iiiii
Acquired
computer automatically
Collected
Number MINIUM Collector
assigns a unique
Acquired ^
Number MIIIIMM Collector r'
collector/donor number,
Ac mired 1 /S /1985
_Armor
placed in the colldnrno field.
You .are starting in QUERY node.
- Query on collector, donor or date. Scroll to the required entry Cif found>.
The fields are obvious,
- To carry the required info across, exit this form with <NEXT PRIMARY HEY>.
- To add a new record, use <EXIT>, <INSERT RECORD> and finally <COMMIT>.
but note that the date is best
Press <EXIT><EXII> to quit this form.
entered with the year (in full)
<Re,lace>
:ount: 4
first.
As explained in the help panel, the Form is programmed to be accessed in Query Mode.
The message assumes you have entered from another Form, so if you have come from the Menu
ignore the comments on carrying information across, or you will get an error message.
maw!
AGE (TABLES MENU OPTION 3)
Reg'd No,
Period
Epoch .
Series
Stage
Substage
Zone/s
Remarks:
r end of range)
or end of range)
-
ount: 2
<Re )Iace>
This Form displays age
data for two records on one
screen. The peculiarities of
the various fields have already
been described for the
PALENTRYForrn (see p. 16).
Remember, Reg'dNo.
may be a sample number or a
catalogue number (including
the acronym).
@ Australian Geological Survey Organisation 1995^17^PALEO DATABASE — USER'S MANUAL
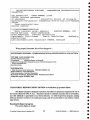
FORMATION (= Stratigraphy) (TABLES MENU OPTION 4)
As with the AGE
Form, this displays two records at a time, and all the
fields are as on the
PALENTRY Form. See p.
16 for detailed comments.
STRATI GRAPH
Registered No.
3
Basin or Province
at Australian^in
Supergp
Moiling Downs
Formation • ckunda Formation
Beds
Lithology iltstone. some nudstone sandstone
Remarks
Subgp
Member
Registered No.
Basin or Province
at Rustra Ian s
Supergp
=Rolling Downs
Subgp
Formation orikiana Sandstone
Member
Beds
Litho logy andstone, some siltstone & nu tone
Remarks it ma d and lo d in far west of basin on
Press <EAU> to quit.
'ount: 39
ransaction co
^t — ^
ords sted an committed.
<Re Ilace>
IDENTIFICATION (= Species Identification) (TABLES MENU OPTION 5)
Again, two records are
displayed, and the same fields
are here as on the PALENTRY
Form, just differently arranged
- see pp. 14-16.
You can access the
SPECIES Form from the
Species field; when that field
displays a species number, the
name of the species is displayed on the next two lines.
SPECIES IDENTIFICATION
Registered No.
Species
Identified by
Date
Form
Taxon •
Ahundancy
Population Nos.
Registered No.
Species
LOCATION (= Specimen Locality) (TABLES MENU OPTION 6)
In this Form, also, two
records can be displayed at
once, and the fields are as
displayed in PALE1VTRY for
notes on individual fields, see
pp. 13, 16.
Access the MAPS
Form from the Map refno
field.
—
SPECIMEN LOCALITY
Registered number : ..ses7
Countrv/Ocean r
Area <state, territory, etc.) anua Levu
Latitude • - 'i
Longitude 79.6967
0 Altitude
79 leg.-^"^Field No.
teg.'
T Zn^Ref
Grid refs, UM
Well/Bore
Details
Other
ref no
n.-SE
51.3km
De th
MEM
road from Mamas East to Mbangasau; cutting on north side of nain so
Registered number^ke651
Conntru/Ocean • ustralia
Area <state, territory, etc.)^w Bout Wa s
MA) refnn
Latitude^'1c8611 3 Longitude .48.82345 5 Altitude
c5 eg.'^.48 eg. 9 ' , 3 "^Field No. I..,
Grid refs: 11Th 7n ^Ref^Other
Well/Bore^
Be th
IMMO
9
66
0.-S
stern shore of Burrinjuck Reservo^low old road at "Sleeps y s Wa
paper ; Portion 65. Parish of lemmas. Co. Cowley
Details
..nter the re istrat ion or sem le numb°
'ount: 9
Australian Geological Survey Organisation 1995
^
<Re,lace>
18^PALEO DATABASE — USER'S MANUAL
MAPS (TABLES MENU OPTION 7)
The MAPS Form is
MAPS
entered in Query Mode (see Ma ID^Name^
Scale^Ma^No^Remarks
71^BUDDa LAKES
:100,008
51
comments on aspects of this
2^LICE SPRINGS
:100,008
650
4^LICE SPRINGS
• :250,008
P53-14
in the description of the
03^UGATHELLA
• :250,880
G55-6
4
IRNSDALE
• :108.088
1.1976
1.
5
AIRNSDALE
1,1976
:258,888
ACQUISITION Form on p.
85
ARALADA
:258,008
G55
23
ATEMANS BAY
:188,008
17).
ATHURST
:258,090
9
88
EMIA
:100,888
t Ramsay SE 52/9
9
LIA
:258,808
In this Form up to 13
14
ULIA
:100,800
852
ulia SP54 —10 part
:250.800
records can be displayed on You are starting in QUERY mode. ^Press
<EXII><EXIT> to quit this form- Query on at least the map name. Scroll to the required entry (if found).
— To carry the required Map ID across, exit the form with <NEXT PRIMARY HEY>.
the screen. The fields are:
— To add a neu record, use <EXIT>, <INSERT RECORD> and finally <COMMIT>.
MapID - i.e. Map FRM —40400: Transaction complete -- 1 records posted and committed.
Refno.
Name - the map name, automatically capitalised. Spell such words as "Mount" in full.
Scale — enter as, e.g., 1:250,000, NOT 1:250000 (this avoids =ors over how many zeros).
Map No. -- the map identifier, e.g. SF53-14, or 6551 (depending on scale).
Remarks-- here can be noted the edition, date of map, or in the case of a map to 1:50,000
or 1:100,000 scale the 1:250,000 map within which it falls.
PUBLICATION (TABLES MENU OPTION 8)
Accessed in Query
Mode (the same comments
Publications
^
Date 9 , May
Pubno
apply as for ACQUISITION,
Authorsn ICRINS. .M.
Title ermian pelecypods from the Carnarvon Basin, Western Australia
see p. 17), this Form can
S o urce': au of Mineral Resources, Australia, Bulletin 29; 42 pp, 6 pie
display two records.
Date 965, December
Pubno 7
The individual fields,
Authorsn ICXINS, J.M., & SHAH, S.C.
Title he pelecypods Undulomya„ Cosmomya and Palaeocosmomya in the Permian of
India and Western Australia
and peculiarities of their use,
Source ournal of the Geological Society of Australia, vol. 12, pt 2, pp 253-2
0, is 17-17
are:
You are starting in QUERY mode.
— Query on authors, publication, date. Scroll to the correct entry (if found>.
— To carry the required data across, exit this form with <NEXT PRIMARY REY>.
Authors-- Everything
— To add a neu record, use <EXIT>, <INSERT RECORD>, and finally <COMMIT>.
Press <EXIT><EXIT> to quit this form.
is automatically capitalised;
<Re lace>
'ount: 9
multiple authorship should be
in standard Reference List
format - e.g. DICKINS, THOMAS, G.A. & JONES, P.J. Use full first names only where
considered essential to avoid ambiguity.
Date -- Because only the year may be known, this field is not a "date" field governed by
strict rules, but a "character" field. Enter as much as is known, but for ease of searching it is best
to start with the year, in full.
Examples would be: 1879, March
1979, 23 Nov.
Title -- You will be startled the first time you enter this field! A separate enlarged "window"
for data entry or update will appear.
Type the title of the article or book.
•
•
To exit the "Title" window and save new text or any changes to existing text therein, press
<F10> to [commit] the data.
The cursor will then move to the next field.
Source -- Type in the Journal name or book publisher's name, pagination, etc. -- i.e. the
full bibliographic works. Then <F10> to commit all the data for the Form.
0 Australian Geological Survey Organisation 1995 ^19^PALE° DATABASE — USER'S MANUAL
PUBUSHEDIN (= Citation Details) (TABLES MENU OPTION 9)
Again, two records can
be displayed; for each, the
central part comprises truncated "display only" fields
from the PUBUCATION
table, displaying the author,
date, title and source of the
reference.
Help messages show how illustration and citation data should be typed - please follow them!
. SPECIES (TABLES MENU OPTION 10)
A single-record Form
entered in Query Mode (see
previous comments ), the
cursor alighting in the Genus
field.
Most of the fields
should be obvious, and have
been chosen after consultation
to reflect the most widely used
suprageneric categories.
It is important that the
classification be recorded (ifnecessary with comments on whose classification is beingfol/owed,
although normally the Treatise on Invertebrate Paleontology is the standard). That way,
taxonomic research can be assisted by being able to determine what related material for
a particular taxon we have in our collections.
Other category is for entering taxonomic categories not specifically catered for -- spell out
what the category is!
.Species author -- For reasons given below, it is important that a standard fonnat be followed:
-- Capitalisation is automatic, so need not be of concern -- it helps for reliable searching.
-- The author's l1aIIW! is followed by a comma and a space, thus: BLOW, 1959. This follows ICZN
Recommendation 22A.
-- For junior synonyms, enclose both author and date in brackets, thus: (BLOW,1959). This
follows ICZN Recommendation 22B.
-- "cf." and "aff." should NOT be preceded by "sp."
-- A query is placed after the item it refers to. If the whole identification is uncertain, this is
conventionally printed as "?A-us b-us"~ but in the database enter it as "A-us? b-us?".
-- The format for un-named species is "sp.", "sp. indet.", or "sp. A"; do not use "sp. ind.", and
restrict "sp. undet." to material which you are confident will be identified in the not too
distant future, or for quoting from publications.
© Australian Geological SUlVey Organisation 1995
20
PALEO DATABASE -
USER'S MANUAL
-- In the case of "gen. indet", ambiguity (or problems if there are several such in the same paper)
can only be avoided by specifying in the "genus" field the formal name of the next higher
definite taxonomic category, be that Family or even Phylum, thus:
"Cyrtinidae gen. indet.", "Agnostina gen. indet", etc.
-- Authorship of un-named species is the authorship (and date) of the paper in which they first
appear. This is very important, to avoid possible ambiguities.
-- Should a published un-nand species be referred to subsequently but placed in a different genus,
it helps to append the name of the second authority after a semi-colon, thus: "... sp.
JONES, 1969; HINZ, 1994". The different generic name will make it a new taxon anyway,
but this sets out the history of authorship clearly and succinctly. Of course, a note under
"remarks" for both taxa would be even more helpful.
-- Abbreviate the authorship only if absolutely necessary. Start by judicious deletion of spaces,
then use very well known standard abbreviations (e.g. "Linn."); as a last resort, use "et al."
-
Unique index: The Species Number is applied to a unique combination of data in the fields
"Genus", "Subgenus", "Species", "Subspecies", "Species author" and "Conodont element". A single
character difference in any one of these fields is enough for a new record. This makes careful spelling,
and the positioning of commas and spaces in the "Author" field, very important.
STORAGE (TABLES MENU OPTION 11)
Designed to record where a specirren or sample is stored, the Form will display three records
at once. For consistency, fields should be filled in as follows:
Building -- Repository' and 'AGSa (old records will show BMR) are the normal entries.
Room -- 'Vault',
SPECIMEN STORAGE
'Room nnne are the norm.
Building
Registered No --A"-ir•^-^
Cabinet/Drawer— For
Cabinet/Drawer^Micropal. Box
Room^
Date seen
Other area^
the present Repository com- Remarks
Collector/Donor No.
pactus, enter in the form, e.g., Registered No WV. •^
Building
Cabinet/Drawer IT^Micropal. Box
Room 1F1^
Date seen
area^
131L4' (i.e. run B, compactus Other
Remarks
Collector/Donor No.
1, left side, 4th drawer down).
Micropal. Box-- The
number of the box in which
micropalaeontological resi<Re,lace>
dues are stored (mostly ,:ount:^28
forams).
Other area -- Unusual storage situations, e.g. for very large specimens.
Date seen -- For control purposes, note here the date of the most recent stocktake, or the
date when a sample had to be searched for because it was not where expected, and was successfully
found (make sure you also record where you found it -- in Remarks if that was a temporary location).
Remarks -- Anything not covered in the other fields, which is relevant to the storage and
recognition of the sample.
0 Australian Geological Survey Organisation 1995
^
21^PALE° DATABASE — USERS MANUAL
SPECIMEN (TABLES MENU OPTION 12)
This Form displays the
key database table in PALEO.
SPECIMEN
Most of its features have been Registered number 'A" 1103
prefix/acronym
number 1183 suffix
rid No 81/2
reg'd No
described already, as it is old
fie] refno
type status
No.
ec inert,
d specimen
configuration eriall sectioned shell
almost identical to the first other fossil
.esent
remarks
cality g wen as 181/2 in text, 181/17 in caption to illustration.
block in the PALEIVTRYForm
Amoco al
to^CAI
(see pp. 8-10, 15-16), includ- environment^maturity
radiometric samples Y/N
collector/donor number
collector
collected on
ing access to other Forms.
donor
acquired on
In the Form's top right
Press <EXIT> to quit.
corner there is a distinct area
ter the complete sample or specimen number (refno).
whose fields are filled autoWM=
matically, but under some
circumstances can be useful for querying. Here are recorded the date (entry _date) on which this
part of the record was committed (not necessarily when the record was completed!), the record
number, and the username (login) of the person who logged in to PALEO to enter the record.
If a number is displayed in collector/donor number (from which the ACQUISITION Form
can be reached), so also are the associated data (collector, donor, dates of collection or acquisition).
,
'Oil
FIELDNOTES (access from within PALENTRY, SPECIMEN)
Reference
Field refno
Reference
Field refno
Reference
Field refno
,,
91
Map ref
Reference Mip.,,rj:1515:
11riliECIFfiaMI
a
Map^F
Field refno r
. Year
ref^Collector/Donor No.
Reference
Field refno
Reference
Field refno
..;ount:^63
<Re ilace>
A six-record displayof
references to such things as
field notebooks, air-photos,
unpublished Records, etc.
An entry in Fieldrefno
is mandatory before data can
be entered -- it can be an
alphanumeric, not just a
number. The other fields are
fairly obvious!
ECOLOGY (access from within INITENTRY, PALENTRY , SPECIMEN)
This Form cannot be
reached directly from the
Tables Menu, as the ECOLOGY table was designed as an
adjunct to the SPECIMEN
table. A Form specifically for
recording the statistical data
associated with environmental
assessment of foraminiferal
samples, some fields have
obvious functions, those
which do not being:
ECOLOGY
Registered number
foram types (>: in sample) I
P •
number of forams in the sample, all taxa
marine grab-sample: number of live forams
salinity < m)
comments
Registered number 411i-7,16r.a:MI
foram types Cx in sample) I
P
number of forams in the sample, all taxa
marine grab-sample: number of live forams
salinity < 1m>
comments
Press <EXIT> to quit.
Enter t complete sample or specimen number
@AustralianGeologicalSurveyOrganisation 1995^22
^
number of taxa 411
-- and dead forams
sieve fraction
1111111
number of taxa
-- and dead forams
sieve fraction
pp
^MEM
PALEO DATABASE — USERS MANUAL
•
•
T^% of textulariine foraminiferans.
M^% of mffioline foraminiferans.
R^% of rotaline foraminiferans.
P^% of planktic foraminiferans.
B^% of benthic foraminiferans.
number of taxa -- number of foraminiferan taxa in the sample.
sieve fraction -- the sieve size (e.g. "+125") which retained the sample.
The Form is entered in Query Mode, and automatically queries on the Refno entry that was
displayed in the main Form from which it was accessed. If no data can be retrieved for that entry,
then it must be separately entered in ECOLOGY before new data can be recorded against it.
CPC ALLOCATION (FORMS MENU OPTIONS 4 & 5)
As an increasing
This form is for registering new CPC numbers and
amount of sample data are
duplicating existing data for them.
entered when first obtained,
acronym . number part —> new
ONG359
ONG359
it will become feasible, when
ONG359
specimens from those samples
are published, to attach
already-entered data to new
CPC numbers. It is feasible
Check the old and new numbers. If everything is ok. press the <COMMIT> hey...
to do this for one specimen at
After duplication of data, press <CLEAR FORM> for a new run, <EXIT> to quit.
a time using Query Mode and Number
of new CPC numbers: 3
ount: .0
MIMEO
either the PALENTRY Form,
or the individual Forms (Forms Menu, Option 8), but that method becomes totally inefficient when
a sample or field locality has yielded a number of published specimens. Option 4 provides a simple
alternative, specifically for the "marrying" of recorded field data with CPC numbers.
•
•
•
Procedure:
Select Forms Menu Option 4.
Enter in the first field the original sample or field number from which the specimens came.
Enter in the third field the number part of the first CPC numbers to be allocated (the acronym
field automatically displays 'CPC'). The cursor should move to the fourth field.
see: the complete CPC number (except that any suffixes cannot be entered in this form).
After the first CPC number is typed, use the down cursor key, in this or the next single-character
•
field, to add consecutive numbers until you have as many as are needed for that sample or
locality. It is possible to start a different block of numbers for the same locality simply by
moving the cursor back to the number part field, and entering a new number before resuming
scrolling.
Check that you've got it right - you can use the up cursor key if necessary.
•
Move the cursor to the final single-character column (if not already there) at the last entry.
•
•
Press <F10> to commit the program to its next phase (copying the data).
You will now be taken in turn to the Form for each of the four basic tables: SPECIMEN, LOCATION,
FORMATION and AGE. For each, the original sample data will be displayed for you to check:
•
Any errors or omissions can be corrected (and committed with <F10>) in that table for the
original record.
@AusaralimlOwlogicalSurreyOrganisaticni1995^23^PALEO DATABASE — USERS MANUAL
Once you are satisfied, press <F4> [duplicate record].
•
see: each of the CPC numbers with the data attached, as a succession of records, for that table.
Scroll through the records, and make any additions or alterations to the data for individual
•
CPC specimens (e.g. type status in Specimen).
Commit for that table with <F10>.
•
Press <Alt + FlO>.
•
You will then be taken to the next table, where the sane procedure can be followed. After
the fourth table, you are returned to the initial screen. Follow the instructions to either do another
set, or finish the program and return to the Forms Menu.
At this point, it is important that you select Forms Menu Option 5- which is all you
have to do! This is a reporting program (it was not possible to tag it on to the end of the program
in Option 4). It advises the Database Owner (currently the Palaeontological Curator), through ccMail,
which CPC numbers have been allocated, by whom, and when.
When data on taxonomy and publication beconr available, they are best added in the individual
tables -- rerrember, these data will be specific to the individual CPC specimens, not to the original
samples. For each table, you will have to start by entering the CPC number anew. An alternative
is to use PALENTRY (Forms Menu, Option 3), display the initial record, then access the two individual
Forms from appropriate blocks, as has already been described on p. 11.
FORAMINIFERIDA (FORMS MENU OPTION 6)
This Form is designed for compiling foraminiferal faunal lists, and is entered in Query Mode.
It is assumed that the basic sample data have already been entered (e.g. in INHEIV7RY). A scroll-bar
at the bottom of the Form indicates that it is wider than can be displayed on the screen -- how to
cope with this is explained below. As usual, each field has its own help message.
Entry of Foraminiferida
No and press <EXECUTE QUERY> --date 6—DEC-91
entered hp LEADS
1094
Enter the reference
specinen No.
,
ount: 1
fore/identified by
mailer benthie
<Re lace>
The sample number is the basis of the query, which must be made before the rest of the Form
is accessible.
Once a record is displayed (the first two lines of the Form), move the cursor to the first field
in the No. column -- this is for entering or displaying species numbers.
Australian Geological Survey Organisation 1995
24^PALED DATABASE — USER'S MANUAL
•
•
•
•
•
•
•
•
••
•
•
•
•
••
•
•
•
•
•
•
•
•
•
•
•
•
•
•
•
•
•
•
I>
see:
•
•
o
If you know the Species Number for a taxon found in the sample, enter it here.
The species ruure disp1ayed across the screen, together with the fonn and taxonomic group
(see the illustrated example). This can be repeated by moving the cursor to the next No.
field, and typing the new number.
If you do not know the Species Number, move to the next field (genus), then -..
Type the first part of the generic name (DO NOT USE wildcards).
..
Press <F9> [list].
see: A window over1aying the upper two-thirds of the screen, containing a list of all taxa
he1d in the database whose generic names start with the typed-in character string.
..
To select a taxon, scroll to it, then press either <F2> or <Enter>.
see: The window disappear, and the taxonomic narre disp1ayed in the full Form, together
withform (default entry 'foram', which if necessary you can edit), identified by
(default 'Chaproniere', likewise changeable), and ident. date (default, changeable,
is the login date).
..
If there are more taxa to be added for the sarre sample, move the cursor to the next
genus field, and start the listing procedure again.
When there are no more taxa to be listed for that sample, commit with <FlO>.
If there is another sample to be dealt with, press <Alt + F7>, and start again with a new
sample number in Refno.
When all samples have been committed, exit with <Alt + FlO>.
CONODONTS (FORMS MENU OPTION 7)
This Form is designed to do for conodonts what the previous Fonn did for the Foraminiferida
It differs in that the display fits fully on the screen, and shows not form but conodont element (name
or code) and population munber. Default entries, editable, are 'conodont' in taxon and 'Nicoll,
R.S.' in identified by.
The smre procedures and corrnrents apply as for the preceding option -- in both, just follow
the help messages on the bottom line.
•••
••
© Australian Geological SUlVey Organisation 1995
25
PALEO DATABASE -
USER'SMANUAL
PALYNOWGICAL PROCESSING (FORMS MENU OPTION 9)
A composite Fonn
designed to record treatments
used in processing samples
for palynomorphs.
A hard copy of records displayed in this Fonn
can be produced using Curatorial Reports Menu Option
5 (palynological Register .....)
-- see pp. 31-32.
The fIrst block is a
view of the SPECIMEN table -- see pp. 8-10, 15-16 for comments on the individual fields. This
block gives access to the full Fonn in the normal way, with <AIt + F3>. The only new field is CBF
No., which is a cross-reference to Clinton Foster's personal numbering system Under prefLX/acronym
the default is 'MFP', and appears automatically except in Query Mode. As with all composite Forms,
this one can only be queried from within this first block.
The second block is a view of the LOCATION table, and gives access to the full Form Special
requrrements for some fields are discussed in the context of the INITENTRY and PALENTRY Forms
(pp. 9-10, 13-16). The default entry in the field country/ocean is 'Australia'.
The third block deals with various preparation processes, and from it <AIt + F3> gives access
to a SAMPLE PREPARATION Fonn. This can display up to four sets of data from the
PREPARATION table, and is designed for entering multiple records (see the discussion of INITENTRY
and PALENTRY on p. 11 for the way in which this system works). The fields are either very
s~aightforward, or (as listed below) very specific --
samp. type records the type of sample being processed -OC = outcrop DRE = dredge COR = core SWC = side-wall core CUT = cuttings
core No. specifies the core number within a well (it is a numeric field).
sample weight is the weight in grams of the sample to be processed.
residue? requires simply Y(es) or N(o) -- i.e. is there a residue or not?
1st BCI?, BF? and 2nd BCI? record sequential acid treatment, again with Y or N.
sieve -- specify the sieves used in separation, e.g. as "38&20&10".
SG -- specific gravity of the separating liquid used.
OXY -- Oxidation (a numeric field): records the number of minutes in HN03•
KOB -- (a numeric field): records the number of minutes in KOH.
V0 M -- initials of "volume of organic matter", a number derived according to the following fonnula:
YOM = lO(weight of float + original weight).
K? -- kerogen present or absent? -- requires simply Y(es) or N(o).
The fourth block is the STORAGE Fonn (see p. 21), plus one special field: wallet number,
which refers to an old (but still extant) storage system for slides using numbered subdivided envelopes
("wallets") in index cabinets. Access to the ACQUISITION Fonn (see p. 17) is gained from the
collector/donor # field. Default entries (which can be changed) are 'AGSO' for the building field,
and '166' for room.
© Australian Geological Survey Organisation 1995
26
PALEO DATABASE -
USER'S MANUAL
FIND LOCATION OF SPECIFIED HOLDINGS (FORMS MENU OPTION 10)
This Form, although displaying data from several tables, works as though it were a single-table
Form. It is designed to display information on the location of specimens, selected either on number,
or a combination of basic taxonomic, geological and age data (i.e., informal taxonomic name or
a specific species number, geological basin or province; period). There are two "display only" fields,
Genus and species. The Form can also be used to find out what is in a specific storage location.
5650 PALEO DATABASE - STORAGE QUERY UIEU ^
^
Form for query only.
1.21
ailgia
Genus
Specimen No. "43,31^Major Taxon
Species No.
00111.
Ras in/Prouince
Species
===11=INMEMME
to
Period(s)^
STORAGE DETAILS ^
in
•
sitor
Building
Cahinet/drauer
Other Area
Date Last
Checked
^
roken^
4
Remarks
MicronAl
Room
Box No_
. Din slay fields only - cannot he rneried.
-
<Re )Iace>
mint: 8
The Form is in Query Mode when accessed (for procedures see pp. 44-45), and because
of its underlying construction cannot be used for data entry or updating. Moreover, because it acts
as though it were displaying only one table, movarrnt is only with either <Enter> or <Ctrl + h>.
It is possible to retrieve on any except the "display only" fields, but retrieval except by specimen
number can be rather slow. So if at all appropriate put at least part of a specimen or sample number
in Refno (remember the Wildcard!) as a query condition. Unfortunately, a simple "%" by itself
will not help.
Australian Geological Sutvey Organisation 1995
^
27^PALED DATABASE — USERS MANUAL
REPORTS
Two Menus opened from the Main Menu give access to a variety of Report programs. Of
these, the first Menu (Option 3- Catalogue Reports) has to do with the production of catalogues
for selected parts of the Commonwealth Palaeontological Collection. A separate short manual
is available from the Curator for these programs. As they will only be of use to sorrcone producing
a catalogue they will not be dealt with in this more general manual. A list of the Reports to be found
under this Menu is given on p. 6. The second Reports Menu (Main Menu Option 4) is for Curatorial
Reports -- "curatorial" being taken quite broadly. The full list is found on p. 6.
PLEASE NOTE: If you are running a Report program several times in succession for different
sets of specinrns, it is imperative that as each file is generated (under the general name of the Report
program, plus the extension ./is) it is renamed.
Each new file overwrites the previous file of the same name.
Renaming Report files
Choose Catalogue Reports Menu Option 6 or Curatorial Reports Menu Option 10. This
takes you to your working (usually home) directory, operating under Unix.
see^$ (i.e. not the full AViiON prompt)
To check the contents of your directory, you can enter Is.
•
To rename a file, e.g. the file cperecs.lis generated under Option 3, enter my cperecslis
•
newfilename -- where "newfilename" is the new unique name of your choice.
To return to the Reports Menu, enter exit.
•
CURATORIAL REPORTS MENU OPTION 2: Ordered list of all recorded specimens.
This runs completely automatically, and produces a complete list of all CPC numbers held
in the database. The ASCII file palrefno.lis is written to your AViiON home directory, ready for
transfer and printing (after appropriate formatting).
CURATORIAL REPORTS MENU OPTION 3: Full data records for selected specimens
This is designed to provide all the data that normally appear on a CPC registration sheet,
in an ASCII file cperecs.lis written to your AViiON home directory. It is intended particularly
to provide hard copy (for semi-archival storage) for CPC registrations done directly into the computer
without use of registration forms, or for records which have been considerably updated. If you
register CPC specimens directly (perhaps using Forms Menu Option 4), it is very important that
this Report Program be run, and the resulting properly formatted and printed hard copy be handed
to the Palaeontological Curator.
Running the Report program.
When you access this Option, you will be offered three choices:
— select records by user name and entry date
— select records by a range of CPC numbers
-- exit
© Australian Geological Survey Organisation 1995
^
28^PALEO DATABASE — USER'S MANUAL
•
If you choose selection by user name + entry date, you will be asked to enter them both.
If you do not know them, exit and move to the Forms Menu, PALENTRY option, and retrieve them -they are the fields username and entrydate in the box at the top right corner of the Form, and are
fields in the SPECIMEN table. Then start again!
username is the PALEO login name -- e.g. jbloggs
entry_date is the date on which the data in the SPECIMEN table were committed, and
should take the standard form, for example: 20-MAR-93
If you choose selection by number, you will be asked to enter the lowest and highest CPC
number, omitting the "CPC" acronym (since the program is designed specifically for CPC specitnens).
In either case, once the second item is entered you are returned to the program menu. You
must enter "X", as the program only writes the output to the file cperecs.lis when this is done.
Don't forget to rename that file before you run the program again (see above).
Transferring and editing the Report.
The Report file may now be transferred from the AViiON (see p. 39), and formatted for
printing within a word-processing package. To aid in this formatting, several character-groups
have been inserted in the text, to act as flags for "find" procedures. These, which should enable
appropriate macros to work no matter what the word-processing program used, are explained on
the first page of the file, as follows:
For editing purposes the flags listed below have been inserted where appropriate
Macros to change the text so flagged must be run in the order of this list
1 - italics: ital1 = start, ital0 = end; WordPerfect macro: italics
2- boldface: bfl = start, bf0 = end; WordPerfect macro: boldface
3 - large font size: lgfl = start, lgf0 = end; WordPerfect macro: large
As of May 1992, under WordPerfect insert the following printing codes, which will fit the
text onto an A4 page
Format: top margin 2 cm, left margin 1.8 cm, right margin 1.2 cm
Base Font: Palatino 9 pt
Use this printed report to check for AND CORRECT any errors in data entry.
When all corrections have been made, it is your responsibility promptly to prepare a fresh set
of registration sheets, and hand them to the palaeontological curator.
DELETE THESE INSTRUCTIONS AFTER EDITING AND BEFORE PRINTING
Experience has shown that for Palatino 9pt it is not necessazy to have a left margin narrower than
2 cm. However, if lOpt must be chosen then the heading will not fit unless the margins are narrow.
Each record is a separate page. Prior to formatting, the upper portion of one such record
looks like this:
0 Australian Geological Surrey Organisation 1995
^
29^PALEO DATABASE — USER'S MANUAL
19f1bflREGISTERED SPECIMEN - COMMONWEALTH PALAEONTOLOGICAL
COLLECTION
CPC 2698bfOlgfO
INDEX NUMBER: 27249
STATUS: Referred specimens
22 specimens
entered by: Strusz on 09-aug-94
Appearance/configuration: fragmentary more-or-less fire-damaged
conchs
Known associated taxa:
General remarks:
19f1bf1SYSTEMATICSbfOlgfO
Major taxonomic group: ammonoid
SPECIES NUMBER: 1167
Phylum Mollusca
Class Cephalopoda
Order Ammonoidea
Suborder Lytoceratina
Superfamily Turrilitacea
Family Baculitidae
Subfamily
Eubaculitinae
19f1ita11Eubaculites vaginaitalO FORBES, 1846lgfO
When properly fonnatted, this will be changed to -REGISTERED SPECIMEN - COM:MONWEALTH PALAEONTOLOGICAL COLLECTION
CPC 2698 INDEX NUMBER: 27249
STATUS: Referred specimens
22 specimens
entered by: Strusz on 09-aug-94
Appearance/ configuration: fragmentary more-or-Iess fire-damaged conchs
Known associated taxa:
General remarks:
SYSTEMATICS
Major taxonomic group: ammonoid SPECIES NUMBER: 1167
Phylum Mollusca Class Cephalopoda
Order Ammonoidea Suborder Lytoceratina
Superfamily Turrilitacea Family Baculitidae Subfamily Eubaculitinae
Eubaculites vagina FORBES, 1846
CURATORIAL REPORTS MENU OPTION 4: Production of specimen labels
This Report program is designed to produce tray labels for specimens registered in one of
the fonnal coIIections (CPC, F, etc.). Selection is purely on co11ection acronym and set of numbers,
and a file labels. lis is generated in your home directory. As with the previous program, editing
labels are inserted, but there is no explanatory page, and the records follow one another without
page breaks.
Running the Report program.
The screen display is simple:
© Australian Geological Survey Organisation 1995
30
PALEO DATABASE -
USER'S MANUAL
•
••
•
•
•
•
•
•
•
•
•
•
•
•
•
•
•
•
•
•
•
•
•
•
•
•
•
•
•
•
•
•
•
•
•
•
SQR: Structured Query Report Writer V2.27c
Copyright <C> 1986-89 SQ Software All Rights Reserved
Enter the acronym -- e.g. CPC, F
Enter the lowest fossil number
Enter the highest fossil number
Enter each item in turn - e.g. "CPC", "539", "545" - and when the last is entered the program
will run, and you will be returned to the Curatorial Reports Menu.
The same comacnts on file renaming and transfer apply as applied to the previous Report
(see pp. 28, 39).
Editing the Report.
To fit relevant data on a label which will fit in a standard 5x7 cm tray, more extensive formatting
is required than for the previous Report, but the principle is the same.
The base font is Helvetica 1Opt. The flag pairs for font changes, to be attended to in this
order, are:
^
rjl - rj0
right-justify the type status of the specimen
^
ffl - ff0
put into fine font size (Helvetica 5.8pt under WordPerfect 6)
^
sfl - sf0
put into small font size (Helvetica 7.7pt)
^
put into large font size (Helvetica 11.8)
lfl - 1f0
^
bfl - bf0
put in bold face.
Following that, put the text in Newspaper Column format, 3 columns per page, adjusting margins
and column separation to give a 60 mm text width, and print. A single label cut from a resulting
A4 sheet will then look like this:
CPC 1011^Paratype
Taeniothaerus teicherti COLEMAN, 1957
BracNopoda
COLEMAN, P.J., 31/8/1957,104, P1.17, fig. 1.
Camarvon Basin
Wandagee Formation
Permian, Artinskian
Commonwealth Palaeontological Collection
Australian Geological Survey Organisation
CURATORIAL REPORTS MENU OPTIONS 5 & 6:
Palynological register I Selected data for specified MFP numbers
Designed specifically for palynomorphs, these two Report programs do not require further
formatting. The first will provided a record of location, preparation history, and storage location
for MFP-registered samples, the second is an abbreviated list of source and remarks on processing,
designed for easy loading into an Excel@ spreadsheet. The files generated are respectivelypdynrep.lis
and palrep.lis, and should be transferred &/or renamed in the usual way (see pp. 27, 39).
@ Australian Geological Survey Organisation 1995
^
31^PALEO DATABASE — USER'S MANUAL
In both cases, you will be asked to enter first and last numbers (refno), which should include
the acronym "MFP". That done, the program runs and you are returned to the Curatorial Reports
Menu.
The output from palynrep.lis appears thus (single record) -REGISTRATION: No.: MFP10001 entered by: CTHUN on: 16-JUN-93
field No.: 56-DR/014 A(4)^CBF No.: 841
remarks:
LOCATION: country/ocean: Australia ^area:
well/bore:^depth:^to:
details: Dredge samples, Wombat Plateau.
PREPARATION: date: 16-JUN-93 by: CTHUN core No.:
sample weight: 18.841 residue? N processes: 1st HC1? Y HF? Y 2nd HC1?
sieve:^SG: OXY: KOH: VOM: No. of slides: K?
description: BARREN
STORAGE: building: AGSO^room: 166
wallet No.:^cabinet/drawer:^check: 16-JUN-93
other area:^ micropal box #:
collector/donor:
remarks:
The output from palrep.lis is one record per line, with commas inserted as spreadsheet cell
delimiters; a selection of records appears thus -MFP10001,56-DR/014 A(4),„,„,BARREN,
MFP10005,Ashmore Reef #1,2833.22,2833.32„20,10&20,3„
MFP10018,Ashmore Reef #1,3678.78,3678.94„26,10,3,BARREN,
MFP10032,DM Brigalow DDH2,552.1,„,20,3„
MFP10044,'WMC Oil A„„,20„Sample weight is in Litres; Oil dissolved in Dichloromethane,
CONODONT I FORAM LABELS FOR CPC SPECIMENS
(CURATORIAL REPORTS MENU OPTIONS 7, 9)
These two Report programs are designed to produce the formatted text from which slide
labels can be made for conodonts and foraminiferans. There are differences in what is retrieved,
but the basic structure of the output is identical. Input is the first and last numbers of a block of
CPC numbers (the acronym is set at 'CPC' already).
O Australian Geological Survey Organisation 1995
^
32^PALE° DATABASE — USERS MANUAL
The files produced are conods.lis andfommsl.lis, and they should be handled as are those
from the previous report programs (see pp. 28, 39).
Base font is Times Roman 8 pt.
Formatting flags are:
lfl - if 0^large font size (9.6pt)
bfl - bf0^boldface
Set up for newspaper-style columns, about 2.5 mm separation, 24 mm text width, 5 columns
across an A4 page. The labels for each slide are arranged as a pair, to be placed either side of the
specimen well or thin section.
When copied, either copy onto self-adhesive sheets or use some other form of adhesive,
guillotine to size, and apply. The formatted pairs of labels under the two programs will appear
thus --
Operculina
complanata
(DEFRANCE, 1822)
133-826A-2W-CC
Paltodus sp. a
Ct 69
CPC10146
CPC23256
DRUCE, E.C., 1970D
BMR Journal
P1.7, fig. 3
Lachlan Fold Belt
Devonian
CHAPRONIERE,
G.C.H. BETZLER,
C., 1993
BMR Journal
Pl. 1, fig. 1
FORAM LABELS (CURATORIAL REPORTS MENU OPTION 8)
Designed to produce labels for unpublished foraminiferan slides, this differs from Option
8 only in the style of the sample or specimen number (no acronym is specified). This, however,
does impose limits on the way in which numbers are entered, because of the way in which the computer
"orders" alpha-nurreric fields. Remember, the computer first converts letters into numbers, and
then orders the numbers so produced. The only safe way is to group number sets so that any alphabetic
parts do not change within each set.
The output is a file forams2.lis.
@ Australian Geological Sunrey Organisation 1995
^
33^PALED DATABASE — USER'S MANUAL
USING SQL*PLUS
Complex Operations generally cannot be perfonned with the database in Fonns Mode, but
must rather be done, either directly or indirectly, using the SQL*Plus language. This is very useful
in gathering together data from a number of tables, generating reports, and carrying out some fonns
of updating. The full gamut will not be discussed here --look ~o the manuals on SQL*Plus, or
see the SOtrewhat briefer discussion in AGSO Record 1993/81. However, some relatively simple
procedures which are most likely to be used are explained below.
Start SQL*Plus
..
Select Main Menu Option 5.
see: SQL-Prod >
Leave SQL*Plus
~
Enter exit
ESSENTIAL POINTS TO NOTE
--- DO NOT USE <Delete> to correct errors; use <Backspace> or simply go back to the
error with the left cursor key and retype (the keyboard is locked in "replace" mode).
--- Use table and field names as shown in Appendix 3 (p. 47), not those heading the various
fonns, where space sometimes allows the use of less cryptic names, sometimes forces
abbreviations.
--- When referring to a table, always combine it with the database name, in this manner:
..... paleo.identification ...
--- When typing a command, do not insert the final semi-colon until you have checked for
errors, and have made sure you have so phrased the command that it will work ~
on the particular records you want affected. Be especially careful if using wildcards.
--- A command must end with that semi-colon, and is executed with <Enter>.
--- Before you insert the fmal semicolon in a command, you can abandon the command with
<Enter, Enter>.
--- You cannot easily abort a command once it has started, but if you realise that you have
run a bad corrnnand, iInrrediately enter roUback; -- this will undo the command, provided
you have not left SQL*Plus.
--- Remember, you do not see displayed the results of many commands, unless you enter
specific preliminary commands - which may include writing the result to a fIle.
--- Leave SQL*Plus by entering the command exit.
In the examples that are given in this section, the following conventions are used:
tablename = the formal database name of the table to be used in executing the command
specified (see the comment above).
.
fieldname = the formal database name of a single fIeld in a table.
{command} = an optional command or word to be inserted at that point when required.
This is used to indicate alternative command phrases.
[comment] = an explanatory comment, not to be incorporated in an actual command.
nnn = a number (mayor may not be decimal).
string = a series of characters &/or numbers to be inserted in the database (or which a query is
required to match).
© Australian Geological SOIVey Organisation 1995
34
PALEO DATABASE -
USER'S MANUAL
•
•
•
•
•
•
•
•
•
•
•
•
•
•
•
•
•
•
•
•
•
•
•
•
•
•
•
•
•
•
•
•
•
•
•
•
•
•
•
•
•
•
•
•
•
•
•
•
•
•
•
•
•
•
•
•
•
•
•
•
•
•
•
•
•
Commands should be entered with spaces only where shown (a space can be more than
one character long without affecting a command).
Avoid long command lines, as "wrapping" them can be tricky . It is better to break a corrunand
up into short segments, placed on separate lines (see below). Make sure each line is correct before
moving on to the next with <Enter>. Each new line will commence with a line number, which
can be used to modify previous commands - consult the SQL*Plus manual.
A semicolon should not be used except at the end of the complete command, unless within
a character string defined by single quotation marks.
If a character string necessarily includes an apostrophe, that MUST be typed as two successive
single quotation marks ('), NOT one double quotation mark ("), otherwise it will be taken as the
end of the string, and you will end up with an error message.
For example, a locality description such as "Beside entry gate to Smith's home paddock"
would be typed as "Beside entry gate to Smith"s home paddock".
UPDATING EXISTING RECORDS
It is possible to update several records at once, but only in one table at a time. However,
the criteria for selecting which records are to be updated can involve other tables.
When updating, you see only a staterrrnt, after it has been done, of how many records were
affected. If you are uncertain which records will be affected by your command, try it first as a
"select", after arranging to have the result written to a file (see below).
If you are performing a long series of updates, it is wise to commit what has already been
done every now and again, to guard against system failures etc.
enter commit;
All transactions will be committed automatically when you leave SQL*Plus -- that should suffice
for short sessions.
Two examples of updating commands are given below, the second specific to CPC (or similarly
constructed) numbers.
0 Update, selecting records which match field(s) in the same table:
Update paleo.tablename
2^set fieldname = 'string' {, fieklname = stringl {fieldname [numerical field] = nnn}
[a comma must separate successive clauses]
3^where fieldname = {' string'}{nnn} {or} {and} {fieldname = {'string'}{nnn};
This will put into the specified fields the words or numbers specified, for all records with
field contents matching precisely those specified by the "where" clause.
Note the use of single quotation marks to define text to be inserted or matched, but not numbers.
Note that all sets of brackets must close -- so a complex command may finish with several
u m ,, 1
Because the command is long, it has been divided into sections, each on a single line (fmish
each line with <Enter>); the line numbers are added automatically, and do not form part of the
command itself.
If you do not want to replace any existing data, then as part of the "where" clause include
a selection criterion that restricts selection to those records where the specified field is empty, in
the form:
{and fieldname is null}
0 Australian Geological Survey Organisation 1995 ^35^PALEO DATABASE — USER'S MANUAL
If you are uncertain, it would be wise to check that the records to be retrieved are just those you
want by querying as you intend, but substituting "select" for "update". If only the desired records
are retrieved, then proceed with the update; otherwise rethink the selection criteria.
It should be clear from this that SQL*Plus cannot be used simply to add text to a field which
already contains soar. That has to be done either under Forms Mode or, if the existing text is common
to several records, by replacing the former text with the fish [old + new] text.
Wildcards:
As in Forms Mode, wildcards can be used in SQL*Plus (see p. 45). However, their use
does make the wording of that part of the command string slightly different: If, in your selection
criteria, you wish to introduce wildcards the appropriate wording is one of the following:
{fieldname like {'string%'}{ 1 %string'}{string%string}{%string%}} [for fields in which the
data contain the specified sting(s) in the positions shown amongst otherwise unspecified
text -- e.g. genus like 'Reticul % ' or Refno like 'CPC%221.
{fleldname like 'string string'} [where a single character within a string may vary - more than
one underline symbol may be used, one for each variable character. For example: Refno
like 'CPC22 ' or Refno like 'CPC 22 1'. Remember that the remaining characters in
the specified strings will be matched exactly, including by case].
The two wildcards can be mixed in the one string - e.g. Refno like 'CPC22_%'. Note the use
of the word "like" to replace "=" when wildcards are used.
OD Update, selecting by reference number:
Because of the way in which the Oracle system orders the contents of fields, the selection
of a series of catalogue numbers, (CPC F ..., or similar) for updating is a bit complex, involving
selecting the components of the number to avoid changing data where it should not be changed.
The full command for one or a series of specimen numbers in the CPC, F, or similar collections
thus takes the form:
Update pal eo.tablename set fieldname = 'string' [and the other alternatives as in the
previous example]
2^where refno in
3^(select acronym I to_char(num) If suffix from paleo.specimen
4^where num {= nnn} {between nnn and nnn} and acronym = {'CPC'} {'F'} {'E'}
{and suffix = 'string'}); [use the last phrase only where essential]
Note carefully where the round brackets start and finish the selection sub-clause. Note also
that the first and last specimen numbers in a series are specified. It is possible to specify several
numbers 8r./or series of numbers by joining the phrases of the "where" clause with the word "or"
- e.g.:
.... where num = 2786 or num = 2880 or num between 2901 and 2925 ....
For "unregistered" specirrens and samples where there is no acronym this command does
not apply. Selecting on a range of numbers will therefore be very difficult, as ORACLE and similar
database systems order alphanumeric fields by first converting the letters to numbers (following
Australian Geological Survey Organisation 1995
^
36^PALEO DATABASE — USERS MANUAL
•
••
•
•
•
•
•
•
•
•
•
•
•
•
•
•
•
•
•
•
•
•
•
•
•
•
•
•
•
•
•
•
•
•
database systems order alphanumeric fields by first converting the letters to numbers (following
an agreed convention). The results can be surprising! For such specimens, choose another selection
criterion, or update under Forms Mode.
Long commands:
Ifyou put together a very long cotmnand it may exceed the allowed line length. Ifthat happens,
the command will be split in a relatively illogical way, and without special treatment will not work.
To indicate that a very long command is continued on a second line, without break, insert a dash
(-) at the end of the first line, and then start the second line by pressing <Enter>. As already noted,
it is better not to make corrnnands so long, but to divide them up into separate logical clauses, each
on a separate line.
Error messages and command correction:
If the system doesn't like sorrething about the way you phrased your command, it will tell
you, and will not execute the command. The command will be displayed, with an asterisk below
the place where the error was found. If you divided your command into clauses on separate lines,
the offending line will be displayed with appropriately placed asterisk, as well as the line nwnber
and error type. If you have made several errors, Oracle (because it examines a command backwards)
will only display the one closest to the executive semi-colon, so it may take several goes to get the
command right
~
~
~
~
If your command was on only one line, it can be edited and re-run very simply:
<Ctrl + A> will display the command;
move back through it with the <-> key to the error;
type over what is already there. It is better to avoid <Backspace> in the middle of a
corrunand - extra spaces can be left, as they are ignored.
Execute the corrected command with <Enter>
If your connnand covered several numbered lines, note carefully the line number(s) where
the error(s) oC,curred. Then:
~
Enter list n -- where "n" is the number of the line to be edited.
~
Enter c !wrong part ofcommand/correct command wording! -- in other words, following
the command ("c" stands for "change"), specify the wrong text, and the wording to replace
it Note carefully the slashes separating the two sets of text without gaps!
When all corrections have been made, rerun the command:
enter run
DATABASE STATISTICS
It will sometimes be useful to know how many records there are for a particular field.
Enter select count(fieldname) from paleo.tablename; -- selection conditions can
be added before the semi-colon if desired (i.e., "where ..... ").
© Australian Geological SUlVey Organisation 1995
37
PALEO DATABASE -
USER'S MANUAL
SELECTING RECORDS
Just as command strings are used to update records, so also they can be used to query the
database. The conventions are the same. A typical simple command string would take the following
form:
select fieldname {fieldname} from paleo.tablename where [add selection criteria just
as in updating];
Queries become complex only where several tables are involved, as the way in which data from
those tables are "joined" must be specified. Consult the SQL*Plus manuals.
If you just want to look at the result of your query on screen the above will suffice; the data
will scroll past, and the scrolling can be stopped and resumed with <Scroll Lock>.
GENERATING REPORTS
If you want a printed record, then in the way of all computer systems you must first tell
the system what it is to do. Specifically, it must be instructed to save the result of a retrieval to
a named file for subsequent handling.
Before entering and executing each query -•
Enter spool filename -- quoting the name of the file you wish to hold the result of the
query.
When the query has been run -•
Enter spool off -- the file filenamelst will be generated in your home directory.
Repeat this procedure for each query, using a different filename each time. If you want
to send the report to the Line Printer on the ground floor, the alternative last command is spool
out. Otherwise the file can be transferred to your PC as an ASCII file (see p. 39), for examination
at your convenience.
If you want to check that the files have been generated, or what size they are, you can use
Unix commands, but you must tell SQL*Plus that you are referring to your working (normally
home) directory. Thus:
•
Enter host Is to obtain an abbreviated directory listing.
•
Enter host Is -1 to obtain an extended listing.
•
Enter host pg filename to display the file filename a screen at a time (scroll through it
with <Page Down>, quit with q).
© Australian Geological Surrey Organisation 1995 ^38^PALE° DATABASE — USER'S MANUAL
•
•
•
•
•
•
•
•
•
•
•
•
•
•
•
•
•
•
•
•
•
•
•
•
•
•
•
•
•
•
•
•
•
•
TRANSFERRING FILES
To transfer any files you have generated in your AViiON hOIre directory, either by running
Report programs or from SQL*Plus, you must frrst quit both PALEO and the AViiON, then log
in again either through the LAN Workplace window or from DOS.
Windows--~
see:
~
~
~
~
see:
~
~
~
~
~
~
Double-click the "Rapid Filer" icon.
"Open a Remote System" dialogue box.
Click on "Remote Host Name" box, type av
Click on the "User Name" box, type your AViiON username
Click on the "Password" box, type your A ViiON password
press <Enter> or click on "Open
a split window, with the initial directory (i) above, your AViiON home directory below.
Click on the upper window, then bring down the File menu.
Select "change directory", then follow the menu to set up the directory to which you want
to transfer any files; execute by selecting "Change".
Highlight the file to be copied.
Click on the Copy button.
Repeat if desired.
If desired, while connected you can clean up your AViiON directory - select files, then select
appropriate buttons (e.g. Rename, Delete).
Exit by selecting "exit" from the "File" menu.
II.
MS-DOS --~
~
~
see:
~
~
see:
~
go to the network prompt (e.g. M:» and enter ftp-av.
When asked for the name of the host, enter avo
Enter your AViiON usemame and password when asked.
your home directory prompt, i.e. av/home3/.....
Enter Is to see a listing of the fIles therein.
Enter get filename.ext pathname -- where llfilename .ext" is the full name of the file
you want to transfer, and ''pathname'' is thefull pathnarre -- drive, directories, and file ruure -for the file when it is transferred. The new file name does not have to be the same as the
AViiONone.
A statement on how many bytes were transferred, at what speed, and how long it took.
Repeat as necessary.
When you have finished transferring files, you can if you wish clean up your hOlre directory.
For each me to be deleted:
~
enter rmfilename.ext
When you have finished, leave the AViiDN with the usual Unix command exit.
© Australian Geological SUIVey Organisation 1995
39
PALEO DATABASE -
USER'S MANUAL
APPENDIX 1--- PASSWORDS
When you first log in to most networked systems, you will be confronted with the need to
change from a specific initial password to one that is unique to you. Each system has a distinct
way of achieving this, and each system administrator has his or her own carefully guarded initial
password. Some systems also require that passwords be changed periodically, but then provide
prompts on how to do this, so need not concern you unduly. In this Appendix will be explained
how to change your AViiON and Oracle passwords (for the initial password, ask the appropriate
system administrator).
AViiON:
~
Log in using your existing password (or the system's initial password).
see:
avlhome3/username $ -- i.e. your home directory prompt;
~
enter passwd
~
when asked, enter the password you used to log in;
~
when asked, enter your chosen new password, twice.
You will then be returned to your home directory prompt.
ORACLE:
~
see:
~
~
Log in to PALEO using your existing/"mitial password.
Main menu.
Select Option 5 (use SQL*Plus).
Carefully enter the following command line, where the appropriate words are substituted
for "your username" and "new password". DO NOT type the semi-colon or press <Enter>
until you are sure you have the command right -- go to errors with the cursor keys (and
<Backspace> if necessary), then overtype the text with the correct words; DO NOT USE
<Delete>.
grant connect to your username identified by new password;
see:
~
see:
Grant succeeded
Enter exit
Main menu.
If, having established a password, it happens that you forget it, ask the system administrator
(AViiON or Oracle as appropriate) for help. The administrator will reset your password to the
initial password, and you start again. It pays to have a password which, while not easy for someone
else to guess, is nevertheless one you can easily remember! Random character groups may be
difficult to guess, but are just as difficult to remember.
@
Australian Geological Survey Organisation 1995
40
PALEO DATABASE -
USER'SMANUAL
•
•
•
•
•
•
•
•
•
•
•
•
•
•
•
•
•
•
•
•
•
•
•
•
•
•
•
•
•
•
•
•
•
•
•
•
•
•
•
•
•
•
•
•
•
•
•
•
•
•
•
•
•
•
•
•
•
•
•
•
•
•
•
•
•
•
•
•
APPENDIX 2 ••• ORACLE COMMANDS, PROCEDURES
& KEYSTROKES
In a relational database, the data are held in a nwnber of tables, each item being stored in
a cell or field at the intersection of a row and a column. Tables are linked by connnon or key fields.
A sample or specimen record comprises the data held in one or several tables.
There are two ways to work with the data. One is by using Oracle's command language,
called SQL*Plus, the other is through a system of data entry and display Fonns, each of which displays
selected parts of the database, and through which the user can move using specific keystrokes.
The fonrer is powerful, can refer to any combination of tables, and can retrieve multiple records
which can be stored in an ASCn file for later manipulation or printing. Its disadvantage is that
the language is complex. precise, and must be used with care. The latter is simpler to use but less
:flexible (because all the conunands for using the actual database must be built in), and cannot store
retrieved records. Fonns work by setting up one or more vieWoS' ofthe database, which may incorporate
fields from one or several linked tables; each table fonns a block. A Fonn can only display one
speciIren or sample record at a time. Nevertheless, the Forms system (or "Fonns Mode") is the
nonnal means of access to the database for data entry, updating and correction, and for one-off
queries.
Details of all available ORACLE Fonns functions can be found in Lenz et al. 1993 (AGSO
Record 1993/81). A reference list of those nonna1ly used is given below, cross-referenced where
appropriate to the following discussion of the various procedures and keystrokes, set out in the
order in which they are likely to be rret with. A PC keyboard template for the pc-vt emulation (that
favoured under LAN WorkPlace) is available from the Database Owner.
Remember at all times that you are working directly with the database -- be sure of
your keystrokes (especially special keys). Errors must be detected to be corrected, and the
database is only as accurate as the data it holds, so check for and correct all errors!
CONTENTS:
KEYBOARD MAP, pc-vt emulation
--------------KEYSTROKES & PROCEDURES
--------------Exit -------------------------------------------------Cursor control
-------------------------------------------------------Moving between blocks
Moving between records
-----------------------Moving between forms
-----------------------Text control (insert/replace, deletion) ----------Truncated displays - examining in full and editing Transactions committal
------------------------Data updating
---------------------------------------------------------------Query mode
Wildcards in queries --------------------------------Multiple records retrieved by query ---------------Record duplication ---------------------------------
© Australian Geological Survey Organisation 1995
41
42
43
43
43
43
43
43
44
44
44
44
44
45
46
46
PALEO DATABASE -
USER'S MANUAL
KEYBOARD MAP: pc-vt emulation
-- Alphabetic keys working as part of commands are case-insensitive.
-- The fonowing list omits those commands involved only in fonns and menu designing.
<Fl>
<F2>
<F3>
<F4>
<F6>
<F7>
<F8>
<F9>
<FlO>
<Alt+ Fl>
<Alt+ F2>
show keys - i.e. list available key definitions and functions.
select.
duplicate field.
duplicate record.
insert record.
enter query.
execute query.
list.
commit transaction; also accept.
display error - displays the program command which caused the error, with some indication of just
what the error was.
count query hits - i.e. how many records will be retrieved by a query you are about to execute. This
gives }'OU the chance to decide whether to add to the selection criteria so as to restrict the nmnber retrieved.
Run before pressing the [execute query] key.
<Alt+ F3>
<Alt + F4>
<Alt+F6>
<Alt+ F7>
<A1t+ F8>
<AJt + F9>
<Alt+FlO>
<Tab>
<Enter>
<Backspace>
<0->& <__ >
<1> & <t>
<Home>
<Insert>
<End>
<Page Up>
<Page DOWD>
<Ctrl + A>
<Ctrl + B>
<Ctrl+ F>
<Ctrl + II>
<Esc+E>
<Esc+G>
<Esc + II>
<Esc +1>
<Esc+T>
next primary key.
clear record - i.e. remove the displayed data for that record only, in the Form. in use. The display is
cleared, but the data are not destroyed.
delete record - the record will be destroyed once the transaction is committed.
clear form and rollback.
- the former option clears all displayed data from a form (not just one record);
-- the second option, if used before logging out, will reverse an unwanted committal - even the
deletion of a record.
print - necessary connections, etc., have to be made first, so this is not very useful.
refresh - iffor some reason while in PALEO your screen gets covered with garbage, this will redisplay
a pristine screen or form.
exit - you will be queried if there are any uncommitted transactions.
cursor to next field.
cursor to next field.
cursor to previous field - it's less confusing to use <Ctrl + II>!
work as always - cursor left and right.
scroll forwards and backwards through multiple records, and also through menu options.
go to next block.
insert/replace toggle (i.e. change modes).
go to previous block.
go to the previous record - it's less confusing to use the cursor key, because <Page Up> always takes
the cursor to the beginning of the first field in the Form.
go to the next record - again, and for the same reason, it is simpler to use the cursor key.
clear block - in a composite Form., this is quite different from <Alt + F4> and <Alt + F7>.
block menu - displays a list of the blocks to which you can gain direct access, choosing with the
cursor keys and then either <F2> or <Enter>.
clear field.
go to the previous field.
edit - useful when fields to be edited are long &lor tnmcated, because the field is displayed in an editing
window, within which all cursor arrow keys work as expected.
cursor move to end of field - i.e. to just behind the last character in the field.
HELP! Used once, gives a brief help message at the bottom of the screen; used a second time,
displays full details for the field containing the cursor.
cursor move to beginning of field.
clear text to end of line, i.e. from the cursor to the end of the field.
© Australian Geological SUlVey Organisation 1995
42
PALEO DATABASE -
USER'S MANUAL
•
••
•
•
•
•
•
•
•
•
•
•
•
•
•
•
•
•
•
•
•
•
•
•
•
•
•
•
•
•
•
•
•
•
•
•
•
•
•
•
•
•
•
•
•
•
•
•
•
•
•
•
•
•
•
•
•
•
•
•
••
•
•
•
•
•
KEYSTROKES & PROCEDURES
Exit
<Alt + FlO>
One of the most important keystrokes -- the one which gets you out of the database! In
fact this key combination has the more basic meaning [cancel].
If you think of Oracle Forms as running a series of nested programs - starting with the menu
program, then the Forms program, followed by the Query program - then it makes sense that
each <.AIt + FlO> cancels the program running at that time. If in query mode, you will be
left in the fonn; a second "cancel" will take you back to the rrenu program; the next "cancel"
stops that program, and returns you to the system prompt.
Jfyou get into trouble while in Fonns Mode, you can [cancel]. <AIt + FlO>. You will usually
be asked whether you want to connnit any changes you have made -- the safe answer is "No". You
will exit to the rrenu, and must start again, but at least you have not incorrectly modified the database.
Cursor control
The nonna! keys for cursor movement are:
Move to right in field:
Go to end of field:
Move to [next field]:
Move to [next block]:
<-+ >
<Esc + g>
<Enter>
<Home>
Move to left in field:
<+->
Go to start of field:
<Esc + i>
Move to [previous field]: <Ctrl + h>
Move to [previous block]: <End>
In the Forms INlTENI'RY and PALENI'RY, <Enter> is prograrrnred to allow the cursor to move
forward through the whole view, but the reverse has not been implemented -- <Ctrl + h> will
only work within the one block.
Moving between records
Either as a result of retrieving several records with a Query, or following entry of successive
records without closing a Fonn, it is possible to examine individual records:
Move forward 1 record:
< 1>
Move back 1 record:
< 1>
Moving between Forms
From appropriate places in several Fonns, it is possible to move to a linked Form, which
may be a full version of a table abbreviated in the first Fonn, or a lookup table. From a specific
field or block in the initial Form, <Alt + F3> [next primary key] will place the cursor in a designated
field within the linked fonn.
With appropriate programming, a linked Fonn will query the database so as to display data
from the initial fonn. From this point, a whole series of records (for that table) can be entered
using the "Duplication" facility (see p. 47). Return to the initial Fonn with <Alt + FlO>.
When you enter a lookup table you are immediately placed in Query Mode (see below).
This fact will be advised in the rressage line at the bottom of the screen. It is then possible to establish
appropriate data, such as the Species Number for a taxon. If the data are already in the database,
they will be displayed and Query Mode cancelled. If not, and you have to establish a new entry,
first cancel Query Mode with <AIt + FlO>, then enter the data, and commit it with <FlO>. You
can then take data (such as the computer-generated Species Number) back to the initial Fonn with
<Alt + F3> [next primary key]. Alternatively, return without the data with <Alt + FlO>.
Extensive help messages are provided where there is room on the screen.
© Australian Geological Survey Organisation 1995
43
PALEODATABASE -
USER'SMANUAL
Text control
Changing text within a field can be by insertion, replacement, or deletion.
<Esc + t> [clear to end] will clear all of a field at and following the cursor position;
unfortunately it is my experience that this does not work properly every time, sorretimes just inserting
a "t" where the cursor is, so watch what you are doing.
<Delete> will delete the character before the cursor (DO NOT USE <Backspace>, which
has a different function: go to previous field).
<Insert> works in the usual way, as a toggle between "insert" and· "replace" characters.
In Oracle, the default setting is "replace", not the normal PC setting "insert".
<AIt + F6> [delete record] will delete a displayed record, but not undisplayed tables.
TIlls treanS that if you try to delete a record in a table with a key field, such as Specimen, you are
likely to get a message saying that you must delete the record in other linked tables first In that
case, note down what you are trying to delete, exit the Form with <Alt + FlO>, answer "No" when
asked if you want to commit the changes (see the next item), then search and delete, using an
appropriate Forms option (e.g. PALENTRY -- see pp. 8-12, 14-16).
Truncated displays - examining in full and editing
Where the contents of a field cannot be fully displayed because oflimited space, it is possible
to display the full field in a separate editing window, with the advantage that the cursor up and
down arrows work, allowing quick movement through lengthy text:
~
Press <Esc + e>.
see: Editing window. When finished -~
Press <FlO>.
Transaction committal
Please note that all "transactions" - ie. all new entries or changes to existing entries - must
be actively committed.
..
press <FlO>.
TIlls can often be done for several successive records at a time. In complex Forms, however, one
should connnit data for a single record before trying to move on to the next one, otherwise it can
be difficult to track what caused any error messages.
If you try to leave a Fonn without conunitting any changes, you will first be asked whether
or not you wish to connnit. This will happen even if you have changed your mind, and have reinstated
previous text! Of course, if you just want to experiment, it can be a good way to do that and yet
avoid affecting the database.
Data updating
"Updating" rreans both correcting errors made during data entry, and adding to the information
already entered. The unifying assumption is that you want to change an existing record, and the
basic system is quite straightforward
Procedure:
~
Display a record to be updated using Query Mode (see next item)
~
go to the field or fields to be changed (see Cursor control, above)
~
make the appropriate changes to each field (see Text control, above)
~
commit with <FlO>.
Query Mode
For retrieval and display of existing records, the database must be given some information
on which to select the wanted records, and must be then told to go and fmd them. To this end,
© Australian Geological SUlVey Organisation 1995
44
PALEO DATABASE -
USER'S MANUAL
•
•
•
•
•
•
•
•
•
•
•
•
•
•
•
•
•
•
•
•
•
•
•
•
•
•
•
•
•
•
•
•
•
•
•
•
•
•
•
•
•
•
•
•
•
•
•
•
•
•
•
•
•
•
•
•
•
•
•
•
•
•
•
•
•
•
•
•
the "Query" program is run. The program stops only when it retrieves one or more records, or
is cancelled.
~
~
~
~
~
Procedure: Within the table to be queried:
press <F7> [enter query]
move the cursor to the field in which you wish to type the data on which the computer
will make its selection
type in the data, using wildcards (see below) if appropriate
repeat for other fields if appropriate
press <FS> [execute query].
Ifno records are retrieved the system stays in Query Mode, and you will be asked to Re-enter.
Either try again with a modified query, or press <A1t + FlO> [cancel] -- do not try to enter a new
record until that is done, or you will receive a message "Function not available" when you try to
commit the record, and you will have to start again.
In multi-block Fonns, there are often restrictions on what information can be retrieved in
various parts of the Form. This has been discussed in the context of those Forms.
Wildcards in Queries
When a query is executed the system, unless told otherwise, looks for a precise match for
the total contents of each :fieJd in which you have typed text. Queries are therefore case-sensitive
(rerrember that fact when you are entering new data!), and if the field contains additional text it
will not be retrieved.
To avoid this problem, to save time typing a long string of text to be found, and in many
cases to limit the number of records retrieved to a manageable number, two specific "wildcards"
can be used, either separately or in combination:
""
-- the underline key on the keyboard -- will retrieve records which have any character (or
digit) in that specific position. It can be used in multiple, but rerrember, if there is nothing
in a particular position (other than a space between two words) the record will not be
retrieved.
"%" -- the percent key on the keyboard -- is more general, standing for any combination
of letters or digits. It tells the database that it wants any record with a specified
string of text within the :fie1d, no matter what else is there. This wildcard can be anywhere
relative to the specified string, including separating strings, and more than one can be used
within a:fie1d. It can be used without a string, as a way of retrieving all records with data
in a particular field; except in this case, it will also retrieve records with no text where the
% is placed. Thus:
% in a field will retrieve all records with data in that field
%text string will retrieve only records in which the typed text is at the end of the field.
Note that putting a wildcard at the start makes retrieval noticeably slower!
text string% will retrieve only records in which the typed text starts the field.
text string l%text string 2% will retrieve records starting with text string 1 and
subsequently containing text string 2.
%text string% will retrieve all records containing the typed text, and so is the more
reliable form of query when you aren't sure how data have been entered, except that
the typed text will still be sought as an exact match, case and all. Again, the initial
% makes retrieval slower.
© Australian Geological Survey Organisation 1995
45
PALEO DATABASE -
USER'S MANUAL
^
Examples: I)^%Permian will retrieve "Early Permian", but not "Permian, Early"
%Penn% will retrieve both.
^2)^CPC 12 % (two underlined spaces) in the Refno field will retrieve all
records of CPC specimens in the twelve hundreds, plus all those in the twelve
thousands, and so on. More usefully it will retrieve specimen numbers which
include a suffix, such as CPC 1201a c, which the query for CPC12_ would
not.
-
Multiple records retrieved by Query
When a query retrieves more than one record, this is indicated by the insertion in the message
line at the screen bottom of a down-arrow or "v".
Scroll forward through the records with d> or <Page Down> [next record].
Scroll backward through the records with <T> or <Page Up> [previous record].
While you are in the midst of the stack of records, the message line will display the two symbols
A v"; when you have reached the last record only "A" is displayed. If you persist, the form is cleared
until you scroll back. When you scroll back to the beginning the display reverts to "v". If you
try to keep going, you will here a 'beep', and a message will remind you that you are at the first
record.
In multi-block Forms, indication of multiple records is specific to where the cursor rests:
If it is in that part of the Form which queries for complete records, the arrows apply to complete
records. If it is in a part of the Form which allows for multiple data attached to the one record
(e.g. taxonomic lists, publications), the arrows apply to that block within the displayed single record.
Anywhere else in the Form, no arrows are displayed.
"
Record duplication
It will often be the case that there will be data common to many records. Fortunately these
common data usually do not have to be retyped for each sample or specimen, since there is a
straight-forwardprocedure in Forms Mode for displaying a "duplicate" ofthe previous record containing
that information, editing the duplicate for any differences, and entering it as the new record.
In this context, it is worth remembering that when a series of records is being entered in
a Form, the data in those records already entered is accessible by scrolling at any time until a query
is made.
•
•
•
•
•
Procedure:
Display the record holding the data to be repeated by querying or scrolling if it is not the
record you have just entered.
Check for and correct any errors.
• If any changes are made, commit with <F10>.
Press <F6, F4> [create record, duplicate record].
Edit the displayed record (changes or additions) to align it with the proposed new one.
Press <F10> [commit].
Australian Geological Survey Organisation 1995 ^46^PALED DATABASE — USER'S MANUAL
APPENDIX 3: List of PALEO tables & fields
·*speciesno
phylum
elass
subclass
superorder
ordername
suborder
superfamily
family
subfamily
othercategory
-genus
subgenus
·species
subspecies
speciesauth
conodontel
remarks
...-
·*refno
speciesno
identdate
identby
taxon
abundpct
abund
populJitionno
coiling
-..
ECOLOGY
·*refno
tpct
AGE
SPECIMEN
IDENTIFICATION
SPECIES
·*refno
era
periodl
peri0d2
epochl
epochZ
seriesl
seriesZ
stagel
stageZ
substagel
substageZ
zone
datum
letter_stage
remarks
·*refno
acronym
num
suffix
·specimenno
·usernante
-
,-..
mpct
rpct
ppct
bpct
no_individuals
no_species
livesp
deadsp
oenlTy_date
fieldno
type_status
no_specimens
taxa_studied
configuration
fieldrefno
coUdnrno
oldrefno
cbfno
ecology
maturity
tail
tai2
cHiI
002
radiom
remarks
~
FORMATION
I-- ·*refno
salinity
basin
supergroup
groupname
subgroup
formation
member
beds
lithology
remarks
fraction
remarks
FIELDNOTES
PUBUCATION
·*pubno
authors
year
title
source
.
PUBUSHEDIN
14-
·*refno
·pubno
illustration
pageno
LOCATION
·*refno
counlTy_ocean
..
f--
·*fieldrefno
year
reference
map_ref
coUdnrno
I--
ACQUISmON
I-- ·*coUdnrno
collector
collyear
donor
accnyear
~
area
altitude
depth
welLbore
dlat
MAP
·*maprefno
-name
·scale
mapno
remarks
~
..
ns
dlong
ew
utmzone
gridref
oldgridref
details
maprefno
lowdepth
STORE
4
·*refno
coUdnrno
building
room
cabineCdrawer
area
last_checked
remarks
micropaLbox
walletno
-
PREPARATION
i-- ·*refno
oprepdate
oprepby
coreno
weight
residue
hcll
hf
helZ
sg
oxy
koh
sieve
yom
slides
code
description
samptype
fieldname --- numeric field
• --- NOT NULL field
* --- primary key field
continuous lines show links between tables; arrow-head indicates a one-to-many relationship
(i.e. one record in one table links to many records in another)
PALTABL2.WPD
© Australian Geological SUlVey Organisation 1995
47
PALEO DATABASE -
USER'SMANUAL