1
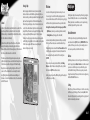
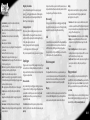
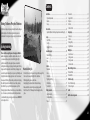
Contents
Installation . . . . . . . . . . . . . . . . . . . . . . . . . . . . . . . . . . . . . . . . . . . . . . . .4
System Requirements . . . . . . . . . . . . . . . . . . . . . . . . . . . . . . . . . . . . . . . . . .4
Autorun . . . . . . . . . . . . . . . . . . . . . . . . . . . . . . . . . . . . . . . . . . . . . . . . . . . . . . .4
Setup . . . . . . . . . . . . . . . . . . . . . . . . . . . . . . . . . . . . . . . . . . . . . . . . . . . . . . . . .4
Warning: To Owners of Projection Televisions
Introduction . . . . . . . . . . . . . . . . . . . . . . . . . . . . . . . . . . . . . . . . . . . . . . .5
Quickstart (default control layout & quick menu run-through) . . . . .6
Still pictures or images may cause permanent picture-tube damage or
mark the phosphor of the cathode ray tube. Avoid repeated or
extended use of video games on large-screen projection televisions.
Setup . . . . . . . . . . . . . . . . . . . . . . . . . . . . . . . . . . . . . . . . . . . . . . . . . . . . .8
User Profiles . . . . . . . . . . . . . . . . . . . . . . . . . . . . . . . . . . . . . . . . . . . . . . . . . . .8
Controls . . . . . . . . . . . . . . . . . . . . . . . . . . . . . . . . . . . . . . . . . . . . . . . . . . . . . . .8
Settings/Options . . . . . . . . . . . . . . . . . . . . . . . . . . . . . . . . . . . . . . . . . . . . . .11
Epilepsy warning
Please read before using this game or allowing your children to
use it. Some people are susceptible to epileptic seizures or loss of
consciousness when exposed to certain flashing lights or light
patterns in everyday life. Such people may have a seizure while
watching television images or playing certain video games. This may
happen even if the person has no medical history of epilepsy or has
never had an epileptic seizure. If you or anyone in your family has ever
had symptoms related to epilepsy (seizures or loss of consciousness)
when exposed to flashing lights, consult your doctor prior to playing.
We advise that parents should monitor the use of video games by
their children. If you or your child should experience any of the
following symptoms: dizziness, blurred vision, eye or muscle twitches,
loss of consciousness, disorientation, any involuntary movement or
convulsion while playing a video game, discontinue use IMMEDIATELY
and consult your doctor.
General Gameplay . . . . . . . . . . . . . . . . . . . . . . . . . . . . . . . . . . . . . . . .13
Mission Briefing . . . . . . . . . . . . . . . . . . . . . . . . . . . . . . . . . . . . . . . . . . . . . .13
Gear . . . . . . . . . . . . . . . . . . . . . . . . . . . . . . . . . . . . . . . . . . . . . . . . . . . . . . . . .13
Map . . . . . . . . . . . . . . . . . . . . . . . . . . . . . . . . . . . . . . . . . . . . . . . . . . . . . . . . .13
Precautions During Use
• Do not stand too close to the screen. Sit a good distance away from
the screen, as far away as the length of the cable allows.
• Preferably play the game on a small screen.
• Avoid playing if you are tired or have not had much sleep.
• Make sure that the room in which you are playing is well lit.
• Rest for at least 10 to 15 minutes per hour while playing a video
game.
Combat . . . . . . . . . . . . . . . . . . . . . . . . . . . . . . . . . . . . . . . . . . . . . . . . . .14
Movement . . . . . . . . . . . . . . . . . . . . . . . . . . . . . . . . . . . . . . . . . . . . . . . . . . .14
Views . . . . . . . . . . . . . . . . . . . . . . . . . . . . . . . . . . . . . . . . . . . . . . . . . . . . . . . .15
Orientation . . . . . . . . . . . . . . . . . . . . . . . . . . . . . . . . . . . . . . . . . . . . . . . . . . .15
Targeting and Firing . . . . . . . . . . . . . . . . . . . . . . . . . . . . . . . . . . . . . . . . . .16
Action Menu . . . . . . . . . . . . . . . . . . . . . . . . . . . . . . . . . . . . . . . . . . . . . . . . .16
Team Switch . . . . . . . . . . . . . . . . . . . . . . . . . . . . . . . . . . . . . . . . . . . . . . . . . .17
Taking Command . . . . . . . . . . . . . . . . . . . . . . . . . . . . . . . . . . . . . . . . .17
Quick Command . . . . . . . . . . . . . . . . . . . . . . . . . . . . . . . . . . . . . . . . . . . . . .17
Command Menu . . . . . . . . . . . . . . . . . . . . . . . . . . . . . . . . . . . . . . . . . . . . . .18
Teams . . . . . . . . . . . . . . . . . . . . . . . . . . . . . . . . . . . . . . . . . . . . . . . . . . . . . . . .18
Movement . . . . . . . . . . . . . . . . . . . . . . . . . . . . . . . . . . . . . . . . . . . . . . . . . . .19
Support Units . . . . . . . . . . . . . . . . . . . . . . . . . . . . . . . . . . . . . . . . . . . . . . . .20
Weapons . . . . . . . . . . . . . . . . . . . . . . . . . . . . . . . . . . . . . . . . . . . . . . . . . . . . .21
Vehicles . . . . . . . . . . . . . . . . . . . . . . . . . . . . . . . . . . . . . . . . . . . . . . . . . . . . . .22
Combat Tactics . . . . . . . . . . . . . . . . . . . . . . . . . . . . . . . . . . . . . . . . . . . . . . .24
Singleplayer . . . . . . . . . . . . . . . . . . . . . . . . . . . . . . . . . . . . . . . . . . . . . .25
Campaign . . . . . . . . . . . . . . . . . . . . . . . . . . . . . . . . . . . . . . . . . . . . . . . . . . . .25
Sahrani . . . . . . . . . . . . . . . . . . . . . . . . . . . . . . . . . . . . . . . . . . . . . . . . . . . . . .26
Strategic Map . . . . . . . . . . . . . . . . . . . . . . . . . . . . . . . . . . . . . . . . . . . . . . . .26
Single Missions . . . . . . . . . . . . . . . . . . . . . . . . . . . . . . . . . . . . . . . . . . . . . . .27
Multiplayer . . . . . . . . . . . . . . . . . . . . . . . . . . . . . . . . . . . . . . . . . . . . . . .27
Session browser . . . . . . . . . . . . . . . . . . . . . . . . . . . . . . . . . . . . . . . . . . . . . .27
Joining a Game . . . . . . . . . . . . . . . . . . . . . . . . . . . . . . . . . . . . . . . . . . . . . . .28
Hosting a Game . . . . . . . . . . . . . . . . . . . . . . . . . . . . . . . . . . . . . . . . . . . . . .29
Communication . . . . . . . . . . . . . . . . . . . . . . . . . . . . . . . . . . . . . . . . . . . . . .30
Mission Editing/Creation . . . . . . . . . . . . . . . . . . . . . . . . . . . . . . . . . . .31
Mission Wizard . . . . . . . . . . . . . . . . . . . . . . . . . . . . . . . . . . . . . . . . . . . . . . .31
Mission Editor . . . . . . . . . . . . . . . . . . . . . . . . . . . . . . . . . . . . . . . . . . . . . . . .32
Troubleshooting . . . . . . . . . . . . . . . . . . . . . . . . . . . . . . . . . . . . . . . . . .36
Basic Troubleshooting . . . . . . . . . . . . . . . . . . . . . . . . . . . . . . . . . . . . . . . . .36
Technical Support . . . . . . . . . . . . . . . . . . . . . . . . . . . . . . . . . . . . . . . . . . . .36
Credits . . . . . . . . . . . . . . . . . . . . . . . . . . . . . . . . . . . . . . . . . . . . . . . . . . .37
End-User License Agreement . . . . . . . . . . . . . . . . . . . . . . . . . . . . . . .38
2-3
Installation
System Requirements:
Minimum
• CPU: 2 Ghz
• RAM: 512 MB
• Video Card: Nvidia Geforce FX with 128 MB RAM, Ati Radeon 9500
with 128 MB of RAM
• Free HD Space: 3 GB
• Software: Windows XP or Windows 2000 and DirectX 9
Recommended
• CPU: 3 Ghz
• RAM: 1 GB
• Video Card: Nvidia 6800 and above or Ati x800 and above with at
least 256 MB RAM
• Free HD Space: 3 GB (or more as needed for downloadable
addons)
• Software: Windows XP and DirectX 9
Autorun
Introduction
When you place the ArmA DVD in your
PC’s disk tray and close it, the Autorun
application should start. If it does not,
you can find it on your DVD drive’s root
folder (Autorun.exe). The Autorun menu
gives you several options, such as
viewing the readme file, visiting the
Bohemia Interactive Studio website and
of course installing the game.
ArmA: Armed Assault brings you the most realistic warfare experience
ever seen on a computer. Offering unprecedented freedom of
movement, actions, and tactics; integrating command of squads, and
use of vehicles and weapons with total immersion.
Setup
To install the game, please follow the instructions provided in the
setup process.
DirectX
For ArmA to run DirectX 9.1 must be installed on your computer, during
setup DirectX 9.1 will be installed or updated as necessary automatically.
For more information please visit:
http://www.microsoft.com/windows/directx/
OpenAL
OpenAL is a cross-platform 3D audio API appropriate for use with
gaming applications and many other types of audio applications.
OpenAL drivers are installed as part of ArmA’s installation and greatly
enhance the audio experience.
For more information please visit:
http://www.openal.org/
• ArmA simulates a large selection of modern day military equipment
- infantry, mobile, armored and aircraft – in a fictional flashpoint
conflict between US forces and a renegade Communist Army
faction on a fictional island Sahrani.
• ArmA is powered by a second generation version of engine
technology that powered the international best-seller Operation
Flashpoint*, which previously won universal acclaim for its realistic
simulation of military conflict on personal computers. Such was the
acclaim and respect for the technology that it has been adapted by
the United States Marine Corps, United States National Guard,
Australian Defense Forces and many other military organizations
around the world to use as a special combat training application
called VBS.
• ArmA will bring you closer to an intense military conflict than you
could ever imagine. It’s a large virtual world with endless
opportunities and ever-changing environments. You can fight,
evade, steal enemy vehicles, attack enemy bases, escape from
enemy prisons, or create and play any imaginable scenario in your
very own missions. If you still want even more action then you can
go online and play one of the many multiplayer modes with up to
a 100 other human players.
• ArmA is waiting for you, if you think you’re ready to face the
challenge...
*OPERATION FLASHPOINT IS THE REGISTERED TRADEMARK OF
CODEMASTER SOFTWARE COMPANY LTD.
4-5
Game Screen
Keyboard
Quick Start
Basic Infantry Controls
Keyboard
Key
AWSD
W (double tap)
Action
left/front/back/right
forward sprint
Mouse
Button/Wheel/Movement Action
(LMB)
fire
(RMB - hold)
zoom / hold breath / lock target
(RMB - double tap)
optics (toggle)
(MMB)
action
(wheel up/down)
weapon selection / previous/next menu item
Key
R
left s (hold)
left s (double tap)
F
Q
E
Z
X
C
V
left c (double tap)
left a (hold)
left a (double tap)
l
t
z (hold)
T
G
O
K
Action
reload
walk/run (temporary)
walk/run (toggle)
change weapon mode
lean left
lean right
prone
crouch
stand up
optics (toggle)
raise/lower weapon (toggle)
free look (temporary)
free look (toggle)
voice over net
next target
quick commmand
team switch
gear screen
watch
compass
You can view and change your current control preferences by going
to Options, and then Controls.
Quick Start
The quickest way to learn the ropes is to work your way through the
training missions.
7
3
Before that however you may want to configure the basic controls to
suit, in the "Main menu" click "Options", then "Controls", see the
controls and configure them to your suiting then click "OK".
4
Once the controls are configured return to "Main menu", from there
select "Missions" and then "Training missions".
2
1
5
8
6
The training missions essentially offer a complete package of tutorials
for the key aspects of ArmA, movement, shooting, leadership, armour,
flying, combat flying, trying and mastering these key components of
ArmA's gameplay will help you to achieve your objectives on the
battlefield, remember there is no substitute for good training and
rigorous practice.
For more information on how to survive in the heat of combat see
page 24.
1. Command Menu - Press 1
2. Vehicle Indicator
3. Vehicle Weapon
4. Personal Weapon
5. Rounds/Magazines Remaining
6. Command Bar
7. Radar
8. Radio Texts
6-7
Controls
Controls Overview
Setup
User Profiles
User Profiles are very useful as
a means to personalize the
character you’re playing as well as
retaining your unique user information and settings, this is especially
important if more than one person share the same PC to play ArmA.
Each user profile can have unique control schemes, game options and
saved games.
When first entering the user profile menu, you are given the option to
select a different profile, edit an existing profile (EDIT), delete an
existing profile (DELETE) or create a completely new one (NEW).
Please be aware that when you delete a profile, you may lose all
associated saved games and custom created missions.
In the EDIT PLAYER screen you can pick another face for your avatar.
Next to this it is possible to select another voice and pitch level for
this voice. Finally, if you have a squad URL which points to a valid
squad document, it can be entered here.
ArmA features an extensive list of available controls to enable
the player to control all of the different facets of the
game’s operation such as on foot, in the air or when driving
a vehicle.
Whilst it is possible to play the game using only the most basic
controls, the player is recommended to familiarize themselves
with all of the controls available, as well as redefining them as
necessary, doing so will open up far greater depths and scopes
of ArmA’s gameplay.
Character Controls
As an infantry soldier it’s possible to navigate the terrain in different
stances or at different speeds, appropriate to the events as they
happen. If the player faces imminent danger then they’re able to
move around in a stealthy crouch, going from cover to cover and
utilizing the leaning function to engage the enemy whilst trying to
minimize the chances of being spotted or fired upon themselves.
Keyboard
Key
W
W (Double Tap)
A
D
S
Left s
Left s (Double Tap)
d
j
Z
C
X
R
V
Left c (Double Tap)
F
;
Q
Q (Double Tap)
E
E (Double Tap)
r
Left a (hold)
Left a (double tap)
l
t
z (hold)
T
G
Action
Forward
Sprint
Strafe Left
Strafe Right
Back
Walk/Run
Walk/Run Toggle
Turn Left
Turn Right
Prone
Stand Up
Crouch
Reload Weapon
Weapon Sights (toggle)
Raise/Lower Weapon (toggle)
Change Weapon/Weapon Mode
Main Weapon/Handgun Switch
Lean Left
Lock Lean Left
Lean Right
Lock Lean Right
Show Action Menu
Free Look (temporary)
Free Look (toggle)
Voice Over Net
Next Target
Quick Command
Team Switch
Gear Screen
Key
B
O
K
+ (Numberpad)
- (Numberpad)
Action
Binoculars
Watch
Compass
Zoom In
Zoom Out
Mouse
Button/Wheel/Movement
Move Mouse Left/Right
Move Mouse Up/Down
Left Mouse Button
Left Mouse Button (Double Tap)
Right Mouse Button (Hold)
Right Mouse Button
Middle Mouse Button
Mouse Wheel Up/Down
Action
Turn Left/Right
Look Up/Down
Fire
Fire Twice
Lock Target/Zoom
Optics Toggle
Action Menu/Perform Action
Previous/Next
Additional Control Peripherals
Joystick/Driving Wheel
Compatible Joysticks and/or driving wheels can be used with ArmA
for optimum control and enjoyment.
Head Tracking Devices
ArmA is one of the premier first-person shooters to fully support head
tracking thanks to built in support for TrackIR.
8-9
Settings/Options
Aircraft Controls
Keyboard
Ground Vehicle Controls
Keyboard
Key
W
s+W
A
D
S
F
0 (Numberpad)
t
L
e (Numberpad)
X
Z
Action
Forward
Fast Forward
Turn Left
Turn Right
Brake/Reverse
Change Weapon/Weapon Mode
Weapon Sights (toggle)
Cycle through targets
Vehicle Lights On/Off
Toggle 1st/3rd Person View
Turn In
Turn Out
Mouse
Button/Wheel/Movement
Move Mouse Left/Right
Move Mouse Up/Down
Left Mouse Button
Left Mouse Button (Double Tap)
Right Mouse Button
Right Mouse Button (Double Tap)
Middle Mouse Button
Mouse Wheel Up/Down
Action
Aim Left/Right
Aim Up/Down
Fire
Fire Twice
Lock Target/Zoom
Optics Toggle
Action Menu/Perform Action
Previous/Next
Key
Q
s+W
Z
A
D
X
C
W
S
e (Numberpad)
Action
Helicopter Increase Height
Fast Forward
Helicopter Decrease Height
Helicopter Cyclic Left
Helicopter Cyclic Right
Rudder Left
Rudder Right
Forward
Back
Toggle 1st/3rd Person View
Mouse
Button/Wheel/Movement
Move Mouse Left/Right
Move Mouse Up/Down
Left Mouse Button
Left Mouse Button (Double Tap)
Right Mouse Button
Right Mouse Button (Double Tap)
Middle Mouse Button
Mouse Wheel Up/Down
Action
Yaw Left/Right
Nose Up/Down
Fire
Fire Twice
Lock Target/Zoom
Optics Toggle
Action Menu/Perform Action
Previous/Next
In the options menus you can configure all areas of the game to your
liking. Find the best video and audio settings for your hardware, tweak
the difficulty options and personalize your control schemes.
Video Options
• Quality preference - select of of preset default options for balanced
performance depending on your system's capabilities.
(Note: this influence all other settings that you can adjust
individually and vice versa).
• Resolution - select the optimal screen resolution for your system.
Generally a higher resolutions means you will see a sharper image,
but it can negatively affect your framerate.
• Aspect ratio - toggle between normal (4:3) and widescreen (16:9)
aspect ratios.
• Refresh - choose the best refresh rate for your screen.
• Brightness - use the slider to vary the overall brightness.
• Gamma correction - controls the overall brightness of the image
you see.
• Visibility - this is the visible distance in meters.
• Terrain Detail - the higher the terrain detail, the more subdivisions
each square can have. This results in smoother and more natural
terrain.
• Objects detail - sets the overall quality of object models, so with
a lower setting you may see lower Levels of Detail for objects.
• Texture detail - the overall quality of textures in the game. A lower
setting may cause more blurry textures.
• Shading detail - affects all of the special shading techniques used
in the game. One example is the Depth of Field effect.
• Shadow detail - detailed shadows can make a scene come alive,
but also demand a lot from your hardware. If you experience
performance issues, try lowering this option.
• HDR quality - High Dynamic Range lighting in ArmA works with
lights in real world range to simulate various lighting conditions.
It's not recommended to manually change this option.
• Anisotropic filtering - a method of enhancing the quality of
textures on surfaces that are far away and on a small angle to the
camera.
• Reflections quality - alters the overall quality of reflections in the
game world.
• Antialiasing - this technique tries to minimize aliasing (jagged
edges) caused by showing high-resolution content at lower
resolutions.
• Blood - turn in-game blood on or off.
• Postprocess effects - allows to turn on/off depth of field blur.
Audio Options
• Effects - the volume of general sound effects, like weapon reports,
explosions and engine noises.
• Radio - the volume of radio chatter.
• Music - the volume of the in-game music.
• Hardware Acceleration - toggle hardware accelerated sounds on
and off (disabled acceleration is the most compatible setting here
but may mean lower performance and quality of sound).
• EAX - enable or disable advanced spatial audio effects.
10 - 11
General Gameplay
Mission Briefing
Difficulty
Two difficulty modes are
available within ArmA, namely
Cadet and Veteran. The
difficulty menu allows you to
finetune most of their settings.
In the list of settings there are three columns: the setting
description, toggle for Cadet and toggle for Veteran. If a setting is red
and Disabled, you cannot change it. All the other settings can be
enabled or disabled to match your personal preferences.
The briefing screen is displayed before the start of most missions and
it contains important information regarding the objectives of your
mission. Some locations in the briefing text have been underlined and
clicking these will take you to the corresponding location on the map.
The map notepad has several other tabs next to the main briefing text:
• Notes - extended background notes and information for the
mission.
• Group - a list of all members of your squad. As the squad leader
you can also access each member’s Gear section from here.
• Playable - a list of all playable positions available by using Team
Switch option.
Below the settings list you are able to set the difficulty of the AI units,
both on your side and the enemy's side.
Gear
Finally it is possible to toggle subtitles for general voice acting and
radio messages on or off.
The gear screen lets you organise your gear and the gear of your
subordinates. It is how you pick up items you find in the environment
or drop items onto the ground.
Note: that in a multiplayer game, the difficulty settings of the host
apply to all players in that session.
In the top-left corner of the gear screen there is a list of all available
items you can take at the moment. Any item can be placed to your
inventory by double clicking on it, dragging it to your gear area or
selecting it and pressing Take. You can also press Rearm to let the
game choose most suitable items to take these automatically.
You can get more information on a certain item by clicking on its picture.
With an item selected you are also able to Drop it to the ground.
Did you know...
...that when you drop a weapon, you will automatically drop all
associated ammunition?
Map
In the Cadet difficulty mode, your position will be displayed on the
map. A higher difficulty setting will require you to scan your
environment for landmarks such as buildings, trees, and landscape
contours, in order to determine your location on the map.
Note: you should use the map to read the terrain around you,
enabling you to use it to your advantage when engaging or evading
the enemy. Very often you will have a tactical advantage when you
attack an enemy force from an elevated position, such as a hill.
The map is divided into grid sectors, with latitude (vertical lines)
indicated alphabetically and longitude (horizontal lines) numerically.
Zooming in on the map will increase the accuracy scale by dividing the
map into smaller sub-grids. Mission briefings and radio
communications often refer to certain grid coordinates, so it's a good
idea to train using this tool. Some missions also provide you with a GPS
indicator, which allows you to read out your grid position on the map.
Did you know...
...you can move around map elements such as the watch or
compass can be moved around by holding the left mouse button
and moving the mouse?
12 - 13
armed grenade. This is when you can use sprinting. Be aware though
that sprinting a long distance tires you very easily, which in turn
affects your aim.
Raising and lowering weapons
Combat
Instead of always walking around with your
weapon raised, you may choose to lower it.
Movement
Combat postures
ArmA features three distinct combat postures, each with its own
strengths and weaknesses. It’s up to you to determine the most
suitable one for each situation. Going prone on the ground will give
the enemy only a very small target to fire at and your aim will be
much steadier, but you will be significantly slower when moving.
Standing allows you to run and sprint from cover to cover, but you
expose your full body to the enemy and your aim will be less steady.
Crouching takes a little bit of both.
Leaning
Close combat is often the most dangerous
part of an infantryman’s fighting career and
he’ll want to use every tool at his disposal to
accomplish his mission and survive it. Leaning
is one such tool. By leaving around a corner of
an object you can peak around it, fire your
weapon and still keep most of your body
covered.
Movement speed
Another choice you have whilst moving is how fast you want to go.
Sometimes it may be prudent to very carefully patrol an area and you
will want to walk slowly. Not only does this give you time to scan the
environment for enemies, but you also avoid tiring which affects your
aim amongst other things. Running is faster than walking and it is the
game’s default movement speed. It nicely balances speed and the
impact on your stamina. There are situations where even running is
not speedy enough, such as when you’re running away from an
Swimming
As a soldier you have been trained to swim in
order to save yourself from drowning. You
may not be fast and it's possible you will lose
some of your equipment, but at least you can
handle getting back to shore after you've
parachuted into the ocean.
Views
Orientation
ArmA allows you to view your controlled character or vehicle in
the following ways:
To make sure you have full situational
awareness at all times, the following
options are available to you:
1st Person View
This is the default view mode, which lets you
view the game from your
character’s perspective. It is the most realistic
and immersive mode, and is ideal for
controlling characters on foot.
3rd Person View
Gives a greater view of your surroundings, and
is particularly useful when controlling vehicles.
Using the Veteran difficulty setting, 3rd person
view is disabled. Cadet mode does allow you to
toggle between 1st and 3rd person view by
pressing Numpad e.
Weapon View
All weapons in ArmA have realistic scope and
iron-sight views, which can be used to
accurately engage targets at a range of
distances. The default method of switching to
this view is to the right mouse button.
Compass and clock direction
indicators
When communicating in a squad, two different methods are used to
indicate direction. The first method is based on a standard compass
and uses a 360 degree system to indicate direction; 000 = North, 090 =
East, 180 = South, and 270 = West. Use the numbers on the outer ring
of your compass to get an exact reading. This method is often used
when issuing a movement order. The second format is based on the
clock system, where 12 O'clock is directly in front of someone, and 6
O'clock is behind them. Keep in mind that these directions are relative
to the person reporting them. In Cadet mode, a small clock is
displayed as soon as someone indicates a relative direction. This clock
indicates the path that is being followed, making it easier for you to
find their proposed direction. This method is most commonly used to
indicate the direction of a target or object.
Used to indicate your current direction or the direction of an object or
enemy contact. It is especially effective if used in combination with
the map view. Vehicles with a target radar on board display your
compass heading at the top of the screen.
Note: the Cadet mode will also display a yellow line on your compass,
indicating the direction of your current waypoint.
14 - 15
Peripheral vision
To support your orientation
and situational awareness,
ArmA features peripheral
vision indicators. These are
small dots indicating the
direction of known enemies,
as well as friendly or neutral
objects. These dots appear to
the edge of your screen,
indicating the general
direction of objects in-range, outside of your current view angle.
GPS
Some missions provide you with a GPS device in your map view. This
device displays the exact grid reference of your current position, so
you can cross-reference it with your map.
Targeting and Firing
Team Switch
Taking Command
As in real life, your weapon is never fully stabilised. The amount of
motion depends on your stamina and posture. Going prone allows
you to shoot more accurately, and also limits your weapon’s recoil
effects. Your character’s stamina is reflected by the intensity of his
breathing. ArmA simulates weapon ballistics, which means bullets will
take time to reach their target, and are also affected by gravity.
Remember this when firing at targets over a long range, and in
particular when firing at moving targets.
In order to experience all facets of the modern-day battlefield and
make the most of the equipment at your disposal, you can use the
team switch feature. Team switch is mapped to the T key by default.
You can also use a new option Continue when you die and another
playable unit is still alive in the mission.
There are multiple methods of commanding troops at your disposal.
Every of them can be handy in certain situations and may well suit
different playing styles.
If you want to get the most out of your aiming, try concentration
mode. In this mode you hold your breath and focus your attention on
one particular area for an accurate hit.
Action Menu
An icon of an action apears in the center of screen if a new action is
available. You can activate this action by pressing the mouse wheel.
You can also see all currently available action by rotating the mouse
wheel at any time during the game and activate the highlighted
action by pressing the mouse wheel. Actions are used for many
different activities in the game including switching of weapons,
reloading, entering vehicles or using ladders.
Note: Some Action Menu functions have a shortcut button, which you
can use at any time without having to open the action menu.
In the team switch menu you are able to select any one of the
available roles in the active scenario, view their position and switch to
them. Having switched, you are in full control of this particular role.
A sample scenario could see you softening up the enemy’s defences
as a helicopter gunship pilot and then switching to an infantry squad
commander to finish them off on the ground.
See one battle through different eyes.
Quick Command
Hold z to activate the Quick Command system.
Your cursor will now change to command mode and is context
sensitive, which means its functionality and appearance changes
depending on what you point at with the cursor.
You select any particular unit by clicking the left mouse button on it
(hold s and click if you want to select the entire team this unit
belongs to). You can also use the mouse wheel to select a unit in the
Unit select menu that's displayed in the top left corner of the screen.
By default you will have everybody selected. Simply scroll in the unit
selection menu to select a particular unit (or units part of team or in
a vehicle) or click by mouse wheel on more positions in the list to
have them all selected.
You can also order your subordinates using the command cursor
(unless it is pointing on your squad member):
• To move somewhere by clicking on any position on the terrain
• To engage a target by clicking on the target
• To mount a vehicle by clicking on the vehicle
• To watch in a direction or on a unit, vehicle or object if you click
while holding left a
After you release z, all units are deselected and you
return to normal mode.
16 - 17
When operating in an AI controlled squad, there's often no need to
use these report functions all the time. However, when playing
multiplayer with people who might speak different languages or if
you can not use microphone, these simple commands can be used as
an effective form of communication during a mission.
Command Menu
There are multiple options to switch to command mode:
Whenever you switch to a command mode
• Hold z
• Press any F key
• Switch to Tactical view (see below)
Communications in ArmA are done through the Command Menu. This
menu can be accessed by any time by pressing a number for
a command on the main level of the Command Menu.
Note: You may have some communications options available in the
commanding menu even as a single or subordinate unit.
You navigate in the Command Menu by scrolling by mouse wheel up
and down and select an item by pressing it.
Alternatively, you can also use keyboard shortcuts (numbers for
commands and F keys for unit selection) to quickly navigate.
Example: If you have a subordinated unit 2, pressing 2 1 1 will
issue command "Return to Formation".
• “Where Are You?” - Requests the current position of your team
leader.
• “Done” - Confirms you understood the last order.
• “Fail” - Informs your team leader you are unable to execute the last
order.
• “Repeat” - Requests your team leader to repeat the last order.
• “Radio” - Some missions allow you to send specific messages to
other squads using the radio.
Teams
There are different color groups, to which you can assign your units
for quick selection.
In some missions units can be already preassigned to teams, but as
a commander you can also assign units at any point while already
playing.
• Select the units that should become a team and select ''Assign'' (“9”)
from the commanding menu. Now assign the units to a particular
team color (the white team is used for any unassigned units).
To select the entire team (plus you can deselect the entire team
using exactly the same controls if you already have the entire
team selected):
• Hold s and click by mouse using Commanding Cursor on any
team member.
• Hold s and press F key of any team member.
• In Quick Command menu scroll by mouse wheel on team and click
by mouse wheel on the team you want to command.
Experience will teach the commander which formation is best for
which circumstance, but a couple of things to remember are;
• When travelling quickly on foot from one location to another
a staggered column can result in soldiers to the rear losing sight
with the rest of the squad.
• A squad using a tightly packed formation can be decimated if an
enemy grenade lands in their midst.
As a rule you should spread out when at risk of enemy contact and
stay fairly close together when quickly travelling on foot.
Movement
Attacking
Formations
When a number of troops are moving there are standard formations
they will follow as instructed by the commanding officer, the
formations vary both in how far apart the soldiers are spread as well
as in the manner that the soldiers are aligned.
The formations possible are:
• “Column”
• “Staggered Column”
• “Wedge”
• “Echelon Left”
• “Echelon Right”
• “Vee”
• “Line”
There is a range of command menu options which give you control
over the Rules of Engagement of your subordinates.
• ''Open fire'' - by default your squad members are using this mode
and it means that if they have a target, they are allowed to fire their
weapon at it.
• ''Hold fire'' - when ordered to hold fire, a subordinate may target
something, but not fire at it.
• ''Fire'' - this command will specifically tell the subordinate to fire its
weapon.
• ''Engage at will'' - when units have been set to engage at will, they
will not only target enemies, but also engage them. They may move
away from the formation and go to a better vantage point.
• ''Disengage'' - the subordinate is told to no longer engage its
target and move back to the formation.
18 - 19
Ammo Resupply
Tactical View
Numpad . or double tap on z switches between normal
view and tactical view. In tactical view you see your nearby area from
above and you can use all commanding techniques available in
normal commanding view to command troops. The tactical view
allows the commander to zoom the camera out to show a greater
detail of the world around them, this allows for a more strategic real
time commanding of troops.
Note: In order to be able to switch to tactical view, 3rd person view
should not be disabled in your difficulty settings.
Support Units
Support can be divided into three categories:
Medical Support
When injured, you can inform the rest of your team using the
Command Menu option ''Status'' > ''Injured''. To receive treatment you
can walk over to a medic, ambulance or field hospital, and select ''Heal
at ...'' from the Action Menu. If you are unable to move, or can’t find
a medic, you can call out for one using the Command Menu option
''Call support'' > ''Medic!''. If you are the subordinate in a squad, your
commander can also send a medic to your position.
High-tech weaponry is worthless
without the proper ammunition, and
an extended firefight can drain your
ammo in seconds. Tanks and helicopter
gunships can head back to base to
replenish their ordinance, but an
infantry squad has to be much more
cautious about their rate of ammo
consumption. Getting bogged down in
stalemate engagements, and overextending a mission’s duration, should
be prevented at all costs. If absolutely
necessary, it is possible to pick up
weapons and magazines from fallen friendly or enemy troops. You can
do this by walking up to a corpse, and using the action menu to pick
up any of the weapons or magazines.
Vehicle Support
Due to their size and tactical importance, vehicles are far from immune
on the battlefield. As well as damage sustained vehicle crews also have
to monitor their fuel consumption, and should therefore refuel where
possible. However, their ability to quickly break away from enemy
contact often allows vehicles to receive support out of range of direct
enemy fire. The ammo, repair, and fuel trucks that provide this support,
are vital to the success of any combined arms operation. Move your
vehicle close to any of these support units, and select the appropriate
action, to either repair, rearm, or refuel your vehicle.
Weapons
Machine Guns
US Forces:
Assault Rifles
M249, M240
US Forces:
Royal Army Corps Sahrani (RACS):
M4, M4 ACOG, M4 M203, M4 M203 + CompM2,
M4A1 ACOG, M4A1 M203 + ACOG, M4A1, QDS
CompM2
M240
Sahrani Liberation Army (SLA):
PK
Royal Army Corps Sahrani (RACS):
M16A2, M16A2 + M203, G36, G36K, G36C
Sahrani Liberation Army (SLA):
AK74, AK74 + GP-25, AKS74U, AKS74UN
Sniper Rifles
US Forces:
M24, SPR
Submachine Guns
Royal Army Corps Sahrani (RACS):
US Forces:
M24
MP5SD6, MP5A5
Sahrani Liberation Army (SLA):
Royal Army Corps Sahrani (RACS):
SVD Dragunov
MP5SD6, MP5A5
20 - 21
Vehicles
Aircraft
Land Vehicles
US Forces:
Sidearms
US Forces:
M9, M9 Silenced
Royal Army Corps Sahrani (RACS):
M9, M9 Silenced
Sahrani Liberation Army (SLA):
Makarov PM, Makarov PM Silenced
Mobile Launchers
Water Vehicles
US Forces:
US Forces:
AH-1Z, AH-6, AV-8B, MH-6, UH-60L M134, UH60L FFAR
RHIB, CRRC
Royal Army Corps Sahrani (RACS):
M1A1, M113A3 APC, M163 Vulcan, M1126
STRYKER ICV M2, M1126 STRYKER ICV MK19,
M1134 STRYKER ATGM, HMMWV, HMMWV M2,
HMMWV Mk19, HMMWV TOW, 5T Truck,
5T Truck Open, 5T Truck + M2 Machinegun
Royal Army Corps Sahrani (RACS):
Sahrani Liberation Army (SLA):
Sahrani Liberation Army (SLA):
Royal Army Corps Sahrani (RACS):
M113A3 APC, M113 Ambulance, M163 Vulcan,
5T Truck, 5T Truck M2, Army 4x4 Closed, Army
4x4 Open, Army 4x4 M2
Did you know...
Support
US Forces:
Sahrani Liberation Army (SLA):
D-30 Howitzer, AGS30, DShKM
FIM92F Stinger (AA), M136 AT4 (AT)
Sahrani Liberation Army (SLA):
Civilian:
RPG-7V (AT), 9K32 Strela (AA)
Hatchback, Sedan, Ural Civil, City bus, Tractor,
Pick-Up, Offroad
Royal Army Corps Sahrani (RACS):
...completing all single missions unlocks library mode which is a great
way to explore in detail all of the weapons and vehicles in the game?
M119 Howitzer, M2 Static MG
BMP-2, BMP-2 Ambulance, T-72, ZSU-23-4
Shilka, BRDM2, BRDM2, ATGM, UAZ, UAZ-469
DSHK, UAZ-469 RECOILLESS RIFLE, UAZ-469
AGS-30, Ural, Ural Open, Ural Ammo, Ural
Refuel, Ural Repair
FIM92F Stinger (AA), M136 AT4 (AT)
PBX boat
Mi-17 (rockets), Mi-17 (machinegun), Ka-50
Sahrani Liberation Army (SLA):
US Forces:
CRRC
AH6, MH6
22 - 23
• A bush is concealment, not cover, since bullets can and will go
through bushes. The same can apply for certain other materials and
for example a wooden wall really is not good cover either.
Combat Movement
Combat Tactics
When on a battlefield, one of the most important aspects isn’t simply
the thought of killing the enemy, but rather preventing the enemy
from killing you. Think before you act. Here’s a list of some good
tactics that could you help survive on the battlefield, and beat your
enemy.
Get Down
• Lie prone whenever possible. It reduces your silhouette and the
target it represents, plus it steadies your aim.
• If you can’t lie down, try to crouch.
• Don’t get caught with the horizon or open sky behind you; it makes
your silhouette easy to recognize and target.
Stop to Fire
• You cannot fire while sprinting in the game at all. You may do so
while walking but for higher accuracy it’s always better to stop and
even better to crouch or go prone.
• Your aim is less accurate if you are breathing heavily after running.
Wait to calm down first for more accurate aim and note that you
may also want to hold your breath for a few seconds.
Look Around
• Scan the area to your front as well as sides, rear and above - avoid
tunnel vision. The main reason flanking is so effective is because of
tunnel vision.
• Due to HDR simulation the sun and other bright lights can
adversely affect your eyesight, so avoid attacking enemies with the
sun behind them else you will be at a significant disadvantage.
Note: You can look around while moving by holding “Alt” and moving
the mouse simultaneously. Also, in some difficulty settings in ArmA
there are subtle color dots at the edges of your screen indicating
there is something nearby. This simulates your real world situational
awareness.
Take Cover
• Reload only behind full cover.
• Don’t get so suppressed you can’t peek out of cover. The enemy
might walk up and shoot you.
• Use cover and concealment whenever possible, when running or
taking cover. The enemy can’t see you coming if there is a tree
between the two of you.
Singleplayer
Campaign
• When moving under fire, zig-zag randomly. This gives the enemy
less opportunity to target you.
• Don’t stray in front of a buddy or you might get shot in the back.
• Keep moving. It forces the enemy to look for you and try to predict
what you are up to.
• When stopping, do so behind partial or full cover.
• If you stay stationary too long, the enemy is going to send
someone to flank you.
Are you ready to get immersed in ArmA’s intense storyline and take
on the armed forces of the Democratic Republic of Sahrani?
Confuse the Enemy
Campaign Background
• Try not to be predictable when moving from cover to cover - all the
enemy has to do is aim and wait for you to run into his sights.
• When firing from behind cover, change firing positions/places to
keep the enemy from predicting where you will appear next.
A small US Army contingent has been sent to the Atlantic island of
Sahrani with the purpose of helping to train the army of the local proAmerican monarchy. The Kingdom of South Sahrani, rich in natural
resources, has always been at odds with its Northern neighbor, the
Democratic Republic of Sahrani. In recent years however, the situation
has settled into an uneasy yet peaceful coexistence.
Did you know...
...there are many more hints and tips, including full walkthroughs
on the community WiKi at http://community.bistudio.com
In the campaign menu you can start a new singleplayer campaign
game or continue where you left of. It is also possible to replay
a mission or cutscene by selecting it in the mission list. Please note
that if you choose to use Revert to go back to a certain point in the
campaign, you will lose all your progress up to that point.
But the Democratic Republic of Sahrani sees the training of Southern
troops by the US as a threat. When they learn that the US troops have
finished their deployment and are in the process of shipping out, the
North prepares to strike while a false sense of security still occupies
the minds of their Southern neighbors.
24 - 25
Strategic Map
Sahrani
Sahrani is a fictional island located in the Atlantic Ocean, which is the
base of two very different countries to the North and South, the
Northern country is a Communist Dictatorship whilst the country to
the South is a Democratic Monarchy.
Southern Sahrani profits fairly well from the sale of oil and other
exports, so the buildings and surrounding display a little more
affluence than those of the Northern neighbours, it’s a little warmer in
the South so architecture tends to also reflect that.
The landscape and terrain the player will experience varies quite
significantly as the story moves around the island. Obviously all areas
of the island are accessible so the player can find himself wading
through water on a beach, pushing through trees in the forest. Of
course a lot of the combat will also involve moving from town to
town, fighting inside and around the numerous buildings and
structures as is normal in modern urban combat, so the surroundings
will reflect that as well.
ArmA’s campaign is divided into main story missions and mini
missions and cutscenes which link these together. Going from one
mission to another, you will be presented with the strategic map. This
map shows the strategic division of Sahrani island between the
factions. It also gives the player a choice of various missions to take
on. One of these will be the next story mission and is necessary to
progress further. Other missions can be played first though and their
outcome may significantly influence aspects of the story mission.
Should you choose to take on a mission where you sabotage an antiaircraft facility, you may be able to call in an airstrike later. It is possible
for this to have a negative effect however as well, perhaps the
element of surprise was removed.
Missions
A selection of action-packed single missions await you. You can
choose any type of scenario from stealthy sniping operations to
massive combined arms assaults. This is the ideal place to get to grips
with the controls and game features and hone your combat skills.
Entering this section when you first run the game, you will find:
• My Missions... (missions you created using the mission wizard)
• Training Missions... (training specific combat skills)
and several already available single missions. After you successfully
finish some of these missions, new ones will be unlocked for you.
Double-clicking a mission name with the left mouse button will start
it and if you have a saved game in this mission, it will resume from
that saved game. Should you want to start from scratch, press
RESTART.
Missions can also have been placed in subfolders, like Training
Missions.... All such folders are indicated by three dots (...) behind
their name. Press OPEN to view their contents.
Before you begin, check out the difficulty setting and, if needed, pick
a different one to your liking.
Multiplayer
Nothing beats taking on the enemy with your friends or going headto-head with them, both online or on a Local Area Network. Many
different game modes are available here, such as cooperative play,
deathmatch, capture the flag and sector control.
Session browser
Your first stop on the way to play ArmA’s multiplayer modes is the
session browser. Pressing PLAY, followed by MULTIPLAYER will take
you there. From here you can choose to join an existing session or
host a new one yourself, on either LAN or the Internet.
Address
By default your browser is set to look for games on the Internet. If you
want to change this, press Address: Internet once. You will now search
your sessions on the LAN and you can press this button again to
switch back. When looking for LAN sessions, you may also need to
change the network port that is used, which can be done by pressing
the default Port: 2303 button once.
Sorting
Filters at the top of the session list allow you to sort the sessions using
a different property. Clicking any of these, for example Host, will sort
the sessions by this property in ascending order. Pressing it again will
sort them in descending order instead.
26 - 27
a password here and then start a new hosting session, the session will
be protected by this password. A player wishing to join a protected
session needs to enter the correct password before joining.
confirm they are ready and players who ready to start are green.
Pressing OK launches the session.
Dividing roles
From left to right, the columns show:
• Whether the session is password protected or not
• Host name
• Amount of players currently in the session / maximum amount of
players for this session
• Quality of your connection to this host
Filtering
Sometimes you can be overwhelmed by the long list of sessions
available and it may be hard picking a good one. This is where you
can use the Filter settings to ease your search. In this menu there is
a list of properties to filter by:
•
•
•
•
•
•
Host - description of the host
Max. ping - maximum ping (ms) to hosts
Min. players - minimum amount of players already in this session
Max. players - maximum amount of players in the session
Full servers - toggle to show or hide sessions that are full
Passworded servers - toggle to show or hide password protected
servers
Refreshing
The Refresh button empties your session list and starts gathering
new information about available sessions.
Passwords
To the lower-left of the browser the game displays the password you
are using (no password is entered by default). If you do enter
Joining a Game
Entering the lobby, you will have been automatically placed in an
available role of the mission. You can very easily change this by dragging
your name from the player pool to another role with the left mouse
button. You can also just left-click the role you want to switch to.
There are two ways of joining an existing session; you can pick
a session listed in the browser or you can manually enter
a host’s address.
The host of a session has the power to impose roles on players. You
assign these roles by dragging players from the player pool. This
player cannot change his or her role any longer.
To join a session from the browser, double-click your left mouse on
a session or press JOIN with a session selected.
If you would like to join a specific host, press Remote and enter the
host’s address plus port number.
If the host has password protected the session, you need to enter this
password in the main session browser before you join.
Did you know...
...ArmA supports Join In Progress (JIP), so you can join an unlocked
session in which a mission has already started and you don’t need
to wait in a lobby?
Choosing a role
After you have joined, you will enter the Multiplayer setup lobby. This
screen shows mission details, available roles for all sides and a player
pool. Upon joining, the game automatically selects an available role
for you. If you would rather choose another role, do so by dragging
your name from the player pool to a different role with the left
mouse button. Alternatively you can left-click the role you want to
switch to.
Did you know ...
Note: sometimes the host of the session will choose a role for you. If
this has been done, you can no longer change your role yourself. Your
best bet is to ask the host nicely.
... you can disable the AI taking over from a player who
disconnects, by clicking the AI icon next to this player’s role?
When you are ready to go, press OK and the rest of the players will be
notified.
Kicking a player
Hosting a Game
A situation could arise where you need to kick a certain player. You do
this by clicking on the player in the player pool once and pressing
Kick Off.
To host a new session you can press NEW or double-click Host
session from the session browser. You will now be asked to select an
already created mission on any of the islands or to create a new one
with the editor or wizard.
Mission settings
Having done this, you find yourself in the Multiplayer setup lobby,
where you can assign player roles and change host settings.
Players showing up red in the player pool have not yet been assigned
a role. Those with a yellow name have picked a role, but did not yet
Some missions allow the host to alter the mission settings. Examples
are the amount of kills that are needed to win the scenario, or the
maximum amount of time the mission will last. Mission designers are
free to create new mission settings and they will all be displayed
under the player roles.
28 - 29
Host settings
• Disable/Enable all AI players - toggling this setting will empty all
roles on all sides that are currently filled by AI players, or it will fill
all empty roles with AI players.
• Lock/Unlock server - by locking the session, you can prevent any
more players from joining the game.
Communication
A multiplayer game can get a lot more fun and tactical when you can
communicate with the other players. ArmA offers players several tools
to do this without needing to use external applications.
Channels
The game uses several different communication channels to make
sure you don’t get overwhelmed.
• Global channel - every single player in a session can hear each
other using the global channel.
• Side channel - only players on the same side can hear you in this
channel.
• Group channel - all members of your squad are on this channel.
• Vehicle channel - everyone on your vehicle’s intercom can use this
channel.
• Direct communication - no radio is used here, so only players
within voice range will receive these messages.
To switch to another channel press either . (colon) or , (comma).
Text chat
Mission Editing/Creation
One method of communicating is sending and receiving text
messages. To start typing a message, press / (forward slash). Now
you will see the message box in which you can type you message and
send it by hitting e.
Mission Wizard
While typing a message you need to use Up and Down to change
channels, instead of the normal , (comma) and . (full stop).
Voice chat
Another method is voice chat and this is generally much faster,
because you can keep playing while you are talking to other players.
With your microphone connected and on, press and hold
l to commence broadcasting.
Did you know...
...the game has a voice communication system build right into the
game?
Map markers
Pointing out enemy forces, plotting routes or assigning artillery
targets are a couple of the things you can do with map markers. By
double-clicking anywhere on the map you start placing a map marker
on that location. This marker is visible to everyone in the selected chat
channel.
While placing a map marker you can enter text to go with your
marker. The W and Z arrow keys will select another type of marker
and the A and S keys change its color. e finalizes the marker
and places it on the map. A marker can be deleted by hovering your
mouse cursor over it and pressing d.
If you played through all the missions ArmA has to offer out of the
box, there are several ways for you to expand this collection of
scenarios for you and your friends. A good first step into mission
design is the in-game mission wizard. This visual design tool lets you
quickly move around starting points, objectives and other key mission
elements, and export the results as a brand-new mission.
Single mission wizard
You access the single mission wizard by pressing PLAY, followed by
MISSIONS. Now open the My Missions... folder and double-click <
New mission > with your left mouse button.
First you will be asked to select one of three available mission
templates. These are the basic outlines of your scenario and
determine things like how many enemy bases and patrols will be
generated. The available templates are:
• Basic - reach the destination point, alive.
• Target - your objective is to destroy the main target, but you can
change both you and its starting and destination points.
• Defender - make sure the enemy does not overrun your base.
Did you know...
...that advanced mission designers can create completely new
templates?
When you are satisfied
by your choice of
template, press LOAD.
The menu will now
show you for which
sides this template is
available and you can
choose any of them.
Pressing LOAD once
more takes you to
a screen where you can
tune the mission
settings.
•
•
•
•
Units - pick the type and amount of units your squad will have.
Island - choose any of the islands available to you.
Name - enter a name for your mission.
Map - in a 2D map view you can change the position of various
mission elements here. You do this by pressing and holding the left
mouse button over any of the named markers and moving them
to a new location. Double click Left Mouse button to insert unit or
edit a waypoint or a unit if your cursor is pointing at it. Click by
Right Mouse to add a waypoint to currently selected unit. Press
Delete to delete a unit or a waypoint.
• Time&Date - prefer to play during a cold winter evening? Pick your
time and date settings here.
• Weather - both forecast and fog settings can be altered for your
mission.
When you are happy with these settings, press Preview and select
a difficulty in the next screen. Pressing Preview again will
30 - 31
Mission Editor
Giving units waypoints
Units are the primary elements of most missions and you can insert
them by pressing 1 and double-clicking Left Mouse somewhere
on the map. In the pop-up window that appears, you can set a large
number of properties for the unit you are about to insert, such as its
side, type, health status and azimuth.
The in-game mission editor is an extremely powerful tool, allowing
you to create your own scenarios for both singleplayer and
multiplayer.
launch your very own mission. This will also automatically export the
mission to the Single Mission screen, where you can enjoy the fruits
of your labor again later.
Multiplayer mission wizard
The multiplayer mission wizard is essentially the same as the single
mission wizard. The difference is how it is launched. You can use this
wizard when you are setting up a new hosting session. In the Create
game screen you will see available missions, listed per island, on the
right side of the screen. The top two options can be chosen to start
making your own multiplayer missions.
• << New - Editor >> - starts the fully-featured mission editor, giving
you full control on your mission’s design.
• << New - Wizard >> - go to the multiplayer mission wizard for
rapid mission creation.
The wizard functions in the same way as the single mission wizard.
ArmA comes with six templates pre-installed:
• Capture the Flag - two teams fight over each other’s flag.
• Dog Fight - duke it out in the skies.
• Flag Fight - free for all with flags for extra points.
• Sector Control - a tactical battle over five territories.
• Seize The Area - attacking an enemy base cooperatively.
• Survivor - last man standing.
Select an island
You can move units by pressing and holding on them with the Left
Mouse and then dragging them to the desired location. Rotating is
done by holding Left s and moving the mouse until you reach
the correct angle.
When you select Editor from the Play menu, you will first be asked for
the island you would like to set your mission on. Simply select the
island you want to use and hit OK. This will take you to the editor
interface.
There are several modes, all accessed by the function keys or
using the toolbox in the menu on the right side of the screen:
• 1 : Units
• 2 : Groups
• 3 : Triggers
• 4 : Waypoints
• 5 : Synchronize
• 6 : Markers
Placing units and groups
Units are the primary elements of most missions and you can insert
them by pressing 1 and double-clicking Left Mouse somewhere
on the map. In the pop-up window that appears, you can set a large
number of properties for the unit you are about to insert, such as its
side, type, health status and azimuth.
You can move units by pressing and holding on them with the Left
Mouse and then dragging them to the desired location. Rotating is
done by holding Left s and moving the mouse until you reach
the correct angle.
If you need to place a number of units, typically belonging together,
at the same time, you can press 2 and insert a group in much the
same way as you used for units. After you place a group, notice that
you in fact placed a collection of individual units which are linked
together by blue links. You can manually create and remove such links
in Group mode as well.
Did you know...
...that when you place a unit as Playable, you can switch to it using
Team Switch?
If you need to place a number of units, typically belonging together,
at the same time, you can press 2 and insert a group in much the
same way as you used for units. After you place a group, notice that
you in fact placed a collection of individual units which are linked
together by blue links. You can manually create and remove such links
in Group mode as well.
Giving units waypoints
Your unit will be a completely sentient AI being within the game
world and it will react to nearby events. Most likely however, you will
want the units to move about. This can be achieved with waypoints.
The different types of waypoints are:
• Move - move to this location.
• Destroy - move to the target location and destroy whatever the
waypoint is placed on.
• Get in - try to board the vehicle this waypoint is attached to or,
if synchronized with a vehicle’s waypoint, the vehicle will
stop and wait to be boarded.
32 - 33
Waypoint synchronization
• Seek and destroy - move to this location and start actively
searching for enemies.
• Join - synchronize this waypoint with another group's waypoint to
join the two.
• Join and lead - as above, but now become the resulting
group's leader.
• Get out - get out of the vehicle.
• Cycle - used to create a loop of waypoints. This is explained in the
section below.
• Load - wait for others to board as cargo.
• Unload - wait for everyone in the vehicle to get out.
• Transport unload - wait for passengers of the vehicle who are not
in the same group to get out.
• Hold - unit or group will stay at this position. Only a 'switch' trigger
or scripting can move the group from this point.
• Sentry - hold position until an enemy is detected.
• Guard - find a Guarded by ... trigger and protect this location. Any
of units with Guard waypoint will also intelligently engage enemies
anywhere on the entire game map.
• Talk - speak a sentence from the Effects section of the waypoint.
• Scripted - executes the script file in the Script text field of the
waypoint.
• Support - wait until another unit calls for support (only works for
support units).
• Get in nearest - bord in the vehicle nearest to this waypoint
• Dismissed - units are freely roaming around this waypoint until an
enemy is detected.
You can synchronize the waypoints of two separate groups by
pressing 5 and dragging a link between two of their waypoints.
Neither group will proceed to the next waypoint until they both
finished the synchronized waypoints.
Creating a cycled patrol
Patrols are very common in military scenarios and you can create
them in ArmA with the Cycle waypoint. To make a unit move to
position A, back to the original position and then repeat this cycle:
1. Place a Move waypoint at position A.
2. Place a Cycle waypoint at the unit's original position
(a unit's original position is its first real waypoint).
This cycle can be expanded by as many other waypoints as you like.
Simple triggers
Triggers are used to set up a lot of the gameplay in a mission. Triggers
can be used to detect a virtually unlimited amount of conditions in
the game world and they can then react on those. The simpler forms
of triggers are explained below.
Presence detection
A very common thing to do with triggers is detecting the presence
(or absence) of units. To do this, place a trigger at the position where
you would like to detect this presence and scale it using the Axis
a and Axis b properties. The area you encompass is where your
trigger will look for units.
The Activation combobox will let you select a particular unit side to
listen for. If you don’t need to make a distinction between sides, pick
Anybody.
Next you choose whether you want to check for presence, absence or
maybe whether the units have been detected by another side. This is
done by selecting one of the options in the toolbox.
Mission ending
Any trigger can be classified to be an ending trigger using the Type
property. In the combobox you can select on of 7 endings (including
Lose), which correspond to endings in the mission briefing.
Intel
To tweak the mission name, description, time of day and weather, you
can click on the Intel button in the top-left corner of the editor. You
will find four sliders, controlling your starting weather, weather
forecast, starting fog and fog forecast. Finally you can choose which
side the Resistance faction allies with in this mission.
Mission management
Loading
Pressing Load from the editor shows a pop-up window where you
can select any missions previously saved for the loaded island. If you
want to look for a mission on a different, you can do so with the
Island combobox. The island will be loaded after pressing OK.
Merging
Sometimes it is beneficial to merge two separate mission files. This can
be achieved with the Merge button. If you save the merged mission
under a new name, the original two missions will be unaffected.
Saving
Having worked on a new mission for a long time, you will want to
save your work somewhere. Do this by pressing Save. Several
exporting options can be opted for:
• User mission - the mission is saved as an editable mission, which
can later be re-opened in the editor. This is the default option and it
is always recommended to save your latest version this way before
using any of the other export options.
• Export to single missions - the mission is exported to the Single
Missions screen as a published mission. All mission content is
compressed into a single file, which makes it easy to share with
friends.
• Export to multiplayer missions - the mission is exported as
a multiplayer mission in a single and compressed file. You can now
select the mission when you a hosting a session.
• Send by email - the mission will be compressed as a single file and
passed to your e-mail client, so that you may send it to your
contacts.
Playing your missions!
There is no better way to see if your mission works than to try it for
yourself. Do this by simply pressing Preview. When you are back in the
editor, you can make changes and use Continue to play on. Note that
the changes you made will not be processed until the next time you
press Preview.
For further information on how to use the editor, including its advanced
features and ArmA’s proprietary scripting language, we refer you to our
community WiKi page at http://community.bistudio.com
34 - 35
Technical Support
Local technical support contact info should be added here.
Credits
Developed by Bohemia
Interactive
Troubleshooting
Project Leader
Marek ·panûl
Basic Troubleshooting
Lead Programmer
Ondfiej ·panûl
Useful Links
Lead Artist
Petr Ví‰ek
http://community.bistudio.com - The Community Wiki is an
excellent source of information and troubleshooting guidance for all
aspects of the game, it also contains a large amount of information
and guidance for anyone wishing to explore enhanced mission
creation or addon/mod creation.
Programmers
Jifií Martinek
Vladimír Nejedl˘
Jakub ·imek
http://www.armedassault.com/Forums/2006 - Bohemia
Interactive’s ArmA forums are an excellent place to seek out
information on all aspects of the game, as well as a means to become
involved with the very active and productive ArmA community.
Design - Campaign
Viktor Bocan
·tefan ëurmek
Bart van Paassen
Design - Scripting and
Configuration
Markus Kurzawa
Joris-Jan van ‘t Land
Design - Multiplayer Missions
TomበPulkrábek
Design - Training Missions
Jan Svoboda
Environment design
Adam Bílek
Ivan Buchta
Jan PraÏák
Robert ·típek
Enrico Turri
Artists
Roman Zawada
Michal Vondráãek
Petr Pechar
Earl Laamanen
Pavel Guglava
“Linda” Tree System Design
Jan Hovora
Complementary Artists
Vojtûch Buday
·tepán Konãelík
Mario Kurty
Václav Mazan˘
Krist˘na PrÛchová
Mariusz Adam Zelmaƒski
Art Producer
LukበSoukenka
Particle Effects
TomበPavlis
User Interface
Andrej Boleslavsk˘
Vojtûch Novák
External Artists
David Cupan
Fanatic Games
Marian Maar
Pavel Drozhzhin
Animators
Nataska Bugay
Michaela Prokopová
Petr Rak
Eduardo Simioni
Tools Programmers
Peter Feher
Ondfiej Novák
Motion Capture Lead Engineer
·tûpán Kment
Motion Capture Talents
Franti‰ek, Martin, Richard
(Czech Armed Forces Special
Operations Group)
Alexandra Lánská
Original Music Score
and Sound Effects
Ondfiej Matûjka
Voice Actors
Matthew Blood-Smyth
Daniel Brown
Brian Caspe
Russel Estman
Du‰an Fäger
Amy Huck
Howard Lotker
Robert Orr
Robert Polo
James Ryan
Jeffrey Smith
Public Relations
Paul R. Statham
Idea Games
Martin Klíma
Jifií Jakubec
Slavomír Pavlíãek
Jifií R˘dl
IT Support
Jan Hlavat˘
Special Thanks
Kamila Clarová
Jan Klíma
Jan Konopásek
Gottfried Pohr
William Richardson
TomበWaldauf
Jan Zameãník
DTP
Pavel Mázl
36 - 37
End-User License Agreement
IMPORTANT - READ CAREFULLY: YOU SHOULD CAREFULLY READ THE
FOLLOWING END-USER LICENSE AGREEMENT BEFORE INSTALLING THIS
SOFTWARE PROGRAM.
This computer software program, any printed materials, any on-line or
electronic documentation, and any and all copies and derivative works of such
software program and materials (the “Program”) are the copyrighted work. All
use of the Program is governed by the copyright law and by the terms of the
End-User License Agreement, which is provided below (“License”). By using the
Program you agree to be legally bound by the terms of this license agreement.
Any use, reproduction or redistribution of the Program not in accordance with
the terms of the License is expressly prohibited. If you do not agree to the terms
of this Agreement, do not install or use the Program. You may, however, return it
to your place of purchase for a full refund.
End-User License Agreement
1. Ownership: All title, ownership rights and intellectual property rights in and
to the Program and any and all copies thereof (including but not limited to any
titles, computer code, themes, objects, characters, character names, stories,
narrative, locations, artwork, animations, sounds, musical compositions, audiovisual effects, methods of operation, any related documentation, and addons
incorporated into the Program) are owned by Bohemia Interactive a.s. (the
Licensor) or its licensors. The Program is protected by the Czech copyright laws,
international copyright treaties and conventions and any other applicable laws.
All rights are reserved.
2. Limited Use of License.: the Licensor hereby grants, and by installing the
Program you thereby accept, a restricted, non-exclusive license and right to
install and use one (1) copy of the Program for your personal use. You may not
network the Program or otherwise install it or use it on more than one
computer at a time, except if expressly authorized otherwise in the applicable
documentation. The Program is licensed, not sold. Your license confers no title or
ownership in the Program.
3. End User's Obligations:
A. As a Subject to the Grant of License herein above, you may not, in whole or in
part, copy, duplicate, reproduce, translate, reverse-engineer, modify, disassemble,
decompile, derive source code, create derivative works based on the Program,
remove any proprietary notices or labels from the Program or otherwise modify
the Program without the prior written consent of the Licensor.
B. You are entitled to use the Program for your own use, but you are not
entitled to:
(i) Sell or transfer reproductions of the Program to other parties in any way,
nor to rent, lease or license the Program to others
(ii) Publish and/or distribute the computer Program or any of its parts
(iii) Exploit the Program or any of its parts for any commercial purpose
including, but not limited to, use at a cybercafé, computer gaming
center, computer aided training center or any other location-based site
where multiple users may access the Program;
4. License Transfer. You may permanently transfer all of your rights under this
License to the recipient, provided that the recipient agrees to the terms of this
License and you remove the Program from your computer.
6. Limited Warranty. THE LICENSOR EXPRESSLY DISCLAIMS ANY WARRANTY
FOR THE PROGRAM. THE PROGRAM IS PROVIDED “AS IS”WITHOUT WARRANTY
OF ANY KIND, EITHER EXPRESS OR IMPLIED, INCLUDING,WITHOUT
LIMITATION,THE IMPLIED WARRANTIES OF MERCHANTABILITY, FITNESS FOR A
PARTICULAR PURPOSE OR NON-INFRINGEMENT.
The entire risk arising out of use or performance of the Program remains with
you. However it is warranted that the media containing the Program shall be
free from defects in material and workmanship under normal use and services
and the Program will perform substantially in accordance with the
accompanying written materials, for a period of 90 (ninety) days from the date
of your purchase of the Program.
7. Limitation of Liability. NEITHER THE LICENSOR, ITS PARENT, SUBSIDIARIES,
AFFILIATES OR LICENSORS SHALL BE LIABLE IN ANY WAY FOR LOSS OR DAMAGE
OF ANY KIND RESULTING FROM THE USE OF THE PROGRAM, INCLUDING BUT
NOT LIMITED TO LOSS OF GOODWILL,WORK STOPPAGE, COMPUTER FAILURE OR
MALFUNCTION, OR ANY AND ALL OTHER COMMERCIAL DAMAGE OR LOSSES.
8. Miscellaneous. The License shall be deemed to have been made and
executed in the Czech Republic, and any dispute arising hereunder shall be
resolved in accordance with the Czech law. You hereby acknowledge that you
have read and understand the foregoing License and agree that the action of
installing the Program is an acknowledgment of your agreement to be bound
by the terms and conditions of the License contained herein. You also
acknowledge and agree that this License is the complete and exclusive
statement of the agreement between the Licensor and you.
Copyright © 2006 Bohemia Interactive. All rights reserved.
GameSpy Networking SDK Copyright © 1999-2006 GameSpy Industries, Inc
Open AL Copyright © 1999-2006 Creative Technology Ltd.
Vorbis Sound Compression Codec Copyright © 2001 Xiphophorus
Speex Codec Copyright © 2002 Jean-Marc Valin
http://www.armedassault.com
5. Termination. This License is effective until terminated. You may terminate the
License at any time by destroying the Program and any New Material. The
Licensor may, at its discretion, terminate this License in the event that you fail to
comply with the terms and conditions contained herein. In such event, you
must immediately destroy the Program and any New Material.
38 - 39