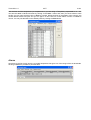
1
MTT 3 User's Manual Version date 16/12/2008 Management Software for TempStick® ,TempStick® Probe, TempStick®2, TSHT and Starter&Reader Interface Software version 3.3 2/44 MTT TecnoStick and TempStick are registered marks of Tecnosoft srl Tecnosoft s.r.l. Via delle Regioni, 34, 20090 Segrate (Milano) telephone +39 02 26922888 - fax +39 02 26922875 e-mail: [email protected] - web: www.tecnosoft.net TecnoSoft s.r.l. TecnoSoft s.r.l. MTT 3/44 INDEX LICENSE AGREEMENT............................................................................................6 INTRODUCTION...................................................................................................7 NOTE ON MTT 3.X...............................................................................................7 NEW FEATURES SINCE VERSION 2.4 (MTT2-SRI)..................................................................................7 NEW FEATURES SINCE VERSION 2.2................................................................................................7 NEW FEATURES SINCE VERSION 1.0................................................................................................7 COMPATIBILITY WITH THE OLD VERSION.............................................................................................7 SYSTEM REQUIREMENTS........................................................................................9 HARDWARE.......................................................................................................9 SOFTWARE........................................................................................................9 INSTALLATION..................................................................................................10 MAIN OPERATIONS.............................................................................................12 LAUNCHING THE PROGRAM........................................................................................12 THE MAIN WINDOW..............................................................................................12 CONFIGURATION...............................................................................................13 SETTINGS........................................................................................................13 TEMPERATURE THRESHOLDS AND VALIDATION CRITERIA.............................................................................13 ACQUISITION DELAY............................................................................................................14 ACQUISITION INTERVAL..........................................................................................................14 SENDER, RECEIVER AND OPERATOR...............................................................................................14 OPTIONS......................................................................................................................14 LANGUAGE......................................................................................................14 ADVANCED OPTIONS..............................................................................................15 RESET DATABASE...............................................................................................................15 RECYCLE BIN..................................................................................................................15 PDOXUSERS.NET OPTION..................................................................................................15 USER CODE...................................................................................................................16 START A NEW MISSION (TECNOSTICK INTERFACE)......................................................17 SETTING THE PARAMETERS.........................................................................................17 ACQUISITION DELAY............................................................................................................17 ACQUISITION INTERVAL..........................................................................................................17 THRESHOLDS AND VALIDATION CRITERIA...........................................................................................17 DATE AND TIME................................................................................................................18 OTHER DATA..................................................................................................................18 IDENTIFICATION.................................................................................................................18 IDENTIFICATION OBJECTS/SITES LIST..............................................................................................18 NOTE.........................................................................................................................18 PROGRAMMING THE DATALOGGER...................................................................................18 READ THE ACQUIRED DATA (TECNOSTICK INTERFACE).................................................19 GENERAL........................................................................................................19 GRAPH..........................................................................................................20 TABLE GRAPH...................................................................................................20 ALARMS.........................................................................................................21 VALIDATION CRITERIA.............................................................................................22 THE OPERATIONS BUTTONS........................................................................................22 4/44 MTT TecnoSoft s.r.l. THE PRINT PREVIEW WINDOW....................................................................................23 SRI FUNCTIONS.................................................................................................24 THE PROFILES...................................................................................................24 CREATING A PROFILE...........................................................................................................25 EDITING A PROFILE.............................................................................................................25 DELETING A PROFILE...........................................................................................................25 CREATING A FOLDER............................................................................................................25 CREATING A SUBFOLDER.........................................................................................................26 CREATING A PROFILE IN A FOLDER OR SUBFOLDER...................................................................................26 CONFIGURING THE SRI...........................................................................................26 CHANGING THE SRI NAME AND ACCESS RIGHTS.....................................................................................27 SET DATE AND TIME...........................................................................................................27 DOWNLOADING DELETING LOADING DATA FROM THE DATA FROM THE SRI...............................................................................27 SRI..................................................................................................28 PROFILES ON THE SRI....................................................................................28 DATA ARCHIVE..................................................................................................29 ON-LINE HELP...................................................................................................30 INFORMATIONS.................................................................................................31 CLOSING THE PROGRAM......................................................................................32 INTERFACE AND DATALOGGERS MANUAL.................................................................33 DESCRIPTION OF THE SRI DEVICE AND THE DATALOGGERS.............................................................33 CONNECTING THE DEVICE..........................................................................................34 INSTALLING THE USB DRIVERS FOR THE SRI......................................................................................34 CONNECTING THE TECNOSTICK INTERFACE..........................................................................35 INSTALLING THE USB DRIVERS FOR THE TECNOSTICK INTERFACE.....................................................................35 CONNECTING THE DATALOGGER TO THE INTERFACE....................................................................35 REPLACING THE BATTERIES........................................................................................36 USING THE SRI..................................................................................................36 SETTING THE DATE AND TIME...................................................................................................37 STARTING A MISSION (ONLY FOR PROGRAMMER MODE)..............................................................................37 DOWNLOADING DATA FROM A TEMPSTICK (ONLY FOR READER MODE)................................................................38 STATISTICS WINDOW...........................................................................................................38 INFORMATION WINDOW.........................................................................................................39 GRAPH WINDOW...............................................................................................................39 TABLE WINDOW...............................................................................................................39 VIEWING DATA OFF SAVED MISSIONS...............................................................................................39 TURNING THE SRI OFF.........................................................................................................40 RESETTING THE DEVICE............................................................................................40 THE VALIDATION CRITERIA...................................................................................41 THE TEMPERATURE THRESHOLDS....................................................................................41 THE TRANSPORT GRAPH...........................................................................................41 THE ACTIVATION ENERGY..........................................................................................41 HOW TO SET THE OTHER MISSION PARAMETERS.......................................................................41 MEAN KINETIC TEMPERATURE...............................................................................42 TROUBLESHOOTING...........................................................................................43 WHEN I RUN MTT, THE MESSAGE “PRINTER SELECTED IS NOT VALID” APPEARS........................................43 WHEN I TRY TO LAUNCH A NEW MISSION OR DOWNLOAD DATA USING THE TECNOSTICK INTERFACE, I GET AN ERROR MESSAGE. 43 TecnoSoft s.r.l. MTT 5/44 6/44 MTT TecnoSoft s.r.l. License agreement Read this license agreement thoroughly before using the Software. Using and copying this Software is subject to the acceptance of this agreement. If you choose to refuse the following conditions, please return this Software to the point of purchase for a complete refund. This agreement involves Tecnosoft srl, Redecesio di Segrate, Milano, Italy (henceforth called Tecnosoft) and the User (be it a physical or juridical person) for the following software products (henceforth called Software): "MTT" and any software product accompanying it. Tecnosoft grants the user a non-exclusive right to use a copy of the software on a single computer provided that the user accepts the following conditions. 1. User license. The Software is property of Tecnosoft and cannot be copied nor sold without the prior written authorization of Tecnosoft. The Software is protected by Italian and European Laws and by International Treaties concerning intellectual properties. 2. Additional licenses. The purchase of additional licenses conveys the right to use the Software on a corresponding number of computers at the same time. 3. Exclusion of liabilities. Except for what stated by applicable laws, in no case can Tecnosoft be considered liable for damages or losses, direct or indirect, including, but not limited to, loss or missing income, suspension of activities, loss of information or any other monetary or economical damage, deriving from proper or improper use of the Software even if Tecnosoft has been advised of the possibility of such damages. In any case, the responsibility of Tecnosoft for such damages will be limited to the price paid for the Software. This clause is applied even if the User does not accept the Software. 4. Use of Software results. It is User's responsibility to check that results given by the Software are correct and appropriate. In no case the Software should be used if such use can be threatening to the health or life of human beings. This clause is applied even if the User does not accept the Software. 5. Updates. If the Software is an update of a previous version, the license is transferred from the old version to the update. Only the update can be used, unless the update is destroyed. 6. Separation of components. The Software is licensed as a single product. Components cannot be separated. 7. Limitations. The User cannot convert, decode, decompile or disassemble the Software, except for what is explicitly requested by applicable laws. TecnoSoft s.r.l. MTT 7/44 Introduction The TempStick system consists of a datalogger, a software package and two types of interface: the TecnoStick Interface is used to connect the datalogger directly to the PC whereas the Starter&Reader Interface is a portable device equipped with a display, which can directly program and read the dataloggers, after it has been correctly set up using the PC. Both interfaces may be used concurrently. The TempStick datalogger is a miniaturized temperature acquisition device: its dimensions are 50X22 mm and it's 10 mm high. It has several applications: temperature monitoring of transported and stored goods, monitoring of fridges and freezers and other temperature sensitive environments in conformity with ISO 9001 standards. Its reduced size together with the fact that they do not need an external power supply make the sensors an extremely versatile system for temperature measurement. Thousands of readings could be stored and then downloaded via the inteface and the application software. Using the software provided in the system, the user can view the acquired data in graphical and tabular format, with the option of exporting the data in Excel (.XLS) file format, as well as program the datalogger for future missions. Every datalogger has its own unique serial number; each datalogger is supplied with calibration certificate, which is valid for one year, in order to guarantee validity of acquired readings. Note on MTT 3.x New features since version 2.4 (MTT2-SRI) This new version of MTT changes the previous validation criteria especially used with the Starter&Reader Interface, to introduce the MKT, an international standard for the validation of the thermal history of a process. Moreover the TempStick2 are introduced: its a particular TempStick with two sensors, one internal and one external on the probe, which is food grade. Now you can control temperature at the core of the product and its environment of conservation. Finally, it has been introduced the French translation of the software. New features since version 2.2 This new version of MTT makes the use of the validation criteria more efficient by integrating the Starter&Reader Interface. This device enables you to read and program TempStick devices without requiring a PC. This manual details the various functions and operating modes of this interface, which makes use of the validation criteria parameters that may be saved in different setup profiles that are transferred to the datalogger when a mission is launched. In this manner one obtains an immediate result and a quick analysis of the acquisitions taken. The unit automatically carries out a series of computations based upon the temperature limits and other parameters you specify, which means that without having a PC at hand, you are immediately told whether the transport was carried out correctly or otherwise. New features since version 1.0 The version 2.0 of the MTT software has several new features that improve the quality of your acquisitions: above all, the acceptability criteria. These criteria, that can be set by the operator who starts the mission, allow to immediately analyse the acquisition course and to know if a transport satisfied the minimal conservation conditions for that product. More new features are represented by the internal grid of the graph, the possibility to toggle between °C and °F, and the fact that is for TempStick only. Lastly, some more fields are present when downloading a mission: their name can be set by the user and can be edited at the end of the mission by the operator who is analysing the acquisitions. Those fields are present in the Archive too and can be used as search parameters among the saved acquisitions. Compatibility with the old version If an older version of the MTT software is already installed on the computer on which you're about to install the present version, be warned that there might be some incompatibility problems between the two archives. First of all, the default installation folder of the new version is different from the older one: the past versions were installed in the folder C:\Program Files\Tecnosoft\MTT or \MTT2 or \MTT2-SRI, while MTT 3 is installed in C:\Program Files\Tecnosoft\MTT3. The versions can be installed on the same PC without any problem, 8/44 MTT TecnoSoft s.r.l. since even the desktop icons and the Start folders are different, so that users that have installed a previous version can keep using this one (and the saved data) while installing the new one too. It is possible, however, to change the installation of the new software and install it in the folder of the old version: in this way, the new version will be written on the old one and not only there is the serious risk to loose or not read properly your saved data, but the software might not work correctly. We suggest, if you really want to install it in the folder MTT or MTT2 or MTT2-SRI, to uninstall the older version from the Control Panel. Moreover, consider that if you have TecnoButton dataloggers too, with this new version you won't be able to use them again; so, again, we suggest you to keep the older version too. If you install the two versions in two different folders, you won't face any problem, unless you try to import the acquisitions saved with version 1.x with the MTT 2.0 or MTT 2 – SRI or MTT3, or to download data with version 2.0 from a logger programmed with the old version. For example, if you saved a mission started and downloaded with the old software and try to import it in the archive of the new version, you might face some problems while displaying the mission parameters. At the same time, there can be similar problems trying to read data from a device programmed with an older version than the 2.0. So, we suggest you to keep both versions installed on your computer separately and to eventually uninstall the older one when you think you won't need it any more. TecnoSoft s.r.l. MTT 9/44 System Requirements Hardware Description Minimum Recommended Microprocessor Celeron 300 Pentium III 400 Memory 64 MB 128 MB Video 800x600; 256 colours 1024x768; 16 Mil. colours Free serial port (RS232) or free USB port (TecnoStick Interface) Free USB port (for SRI) Software Description Operating system Supported Windows 2000/XP 10/44 MTT TecnoSoft s.r.l. Installation After having switched on the PC, insert the software CD in your CD-ROM reader; click on Start – Run and type “D:\setup.exe” (N.B.: your CD-ROM device could have a different name to “D”). When the installation program is running, carefully follow the instructions and select your preferred options when requested. Following the welcome window, you will be asked for your details; the Name and Company fields must be completed prior to clicking on the Next button. The program will then ask you to confirm the installation directory path; by clicking on the browse button one can select a different installation directory. We recommended installing the software in the default directory (C:\Program Files\Tecnosoft\MTT3). The installation program will then ask for the Start menu group in which you would like to install the link from which you can run the MTT program. Click on Next to proceed: the last installation window with allow you to confirm and verify all settings prior to proceeding with the installation. TecnoSoft s.r.l. MTT 11/44 Click again on Next and program files will be copied to the hard disk. Once the installation is complete, click on Finish to proceed. 12/44 MTT TecnoSoft s.r.l. Main Operations Launching the Program After the installation is completed, double click on the MTT3 icon on the desktop to start the program, or select the Start – Program Files (or All the Programs, if you're using Windows XP) – Tecnosoft – MTT3 – MTT3. After the program has been started, it may open a window called Create DataBase (see chapter Configuration at page 15): click twice (not double click) on the Create button to proceed. The Main Window The Main Window of the program will open; it is presented as a bar that will remain positioned at the top of the screen, entitled MTT (Temperature Monitor). The top right corner holds the standard windows buttons (Minimize, Enlarge, Close), and a series of buttons enabling access to the different program functions. TecnoSoft s.r.l. MTT 13/44 Configuration Click on the Configuration button to open a window holding three labels: Settings, Language and Advanced. Settings Here you can change several program settings so that it can be personalized for your requirements. Temperature Thresholds and Validation Criteria Before entering the values, you need to set whether the entries you are applying are expressed in °C or °F; this is done by selecting the required option on the bottom right of the area labeled Temperature Thresholds and Validation Criteria. Here you can set the standard Minimum and Maximum Temperature Thresholds (Tm and TM) and the parameters for the Validation Criteria, with which you want to program your datalogger. If the Set default Thresholds and Criteria option is enabled, these values will appear each time you launch a new mission (you may still edit them in the New Mission window). If the option is disabled, the most recent values used to program the device will be displayed in the New Mission window. The following parameters can be set for the Validation Criteria and the Thresholds and are used to calculate the MKT (p.41): • Absolute Min and Max: the minimum and maximum temperature that the mission must not exceed in order to consider the transport acceptable; • Activation Energy: an important parameter used when calculating the MKT. Each product has its own value: if you need to control different subtances, use the worst valure (the lowest); if you don't know which value to use, leave 83,6; • Time to discard from Start/End Mission (min.): a typical mission will have initial and final transitory parts where the data is considered not representative, in that they may refer to periods of time when the datalogger was not actually monitoring transport. To have a precise score, you would therefore set the time (in minutes) representing these two parts of the mission. An example would be the time from when the mission is programmed to when the logger begins reading the temperature in the truck/store/refrigerator, and also the time from when the logger is removed from the truck to the moment the acquisition is saved. Note: for more information on the use of the validation criteria, the MKT and details on the above parameters, please refer to the chapter The Validation Criteria at p.41. 14/44 MTT TecnoSoft s.r.l. Acquisition Delay In this field you may set the time (expressed in days, hours and minutes) from the time you have programmed a new mission to when it will effectively start. Set all these to 0 for the mission to start immediately. (Maximum delay: 45 days, 12 hours and 15 minutes). Acquisition Interval The acquisition interval is the period of time that elapses between two successive readings. This parameter must be chosen such that the memory of the device is not filled up within the duration of the mission. For example, since the logger can hold a maximum of 2730 readings, we cannot set this interval to 1 minute if the particular mission is going to last 5 days, since the logger will effectively stop taking readings after 45 hours. (minimum interval: 1 minute; maximum interval: 4 hours and 15 minutes). Sender, Receiver and Operator In this box you can set some parameters that are useful to track down the acquisition mission once it has been stored in the Archive. In the Sender field you can write the location of origin of the transport or the name of the person or company who started the mission. The other two fields can be completed by adding items to the list. To add an item just enter it in the appropriate field and click the button below it: Add to Receivers and/or Add to Operators; the entry you have typed in will appear in the list below the button. To delete a name from the list, simply select it by right clicking on it and then select the entry Delete (this will appear on a pop-up menu). Options The bottom-most box on this window holds some other options to personalize the program. In the Communication Port field you should set the PC COM or USB port to which the Tecnostick Interface is connected. The second field lets you set the number of decimal digits you want to display throughout this program: use the up and down arrows on the right of the field to select a number between 0 and 2. The third option allows the software to automatically interrupt a mission when data is downloaded. Note: this option must be used with care, since if this option is enabled, and you program a delayed start mission and decide to check that the mission has started by downloading the data, you will effectively stop the mission; Even if it has not already started (still waiting for delay to elapse) it will not start at the programmed time, since it has been aborted. To enable this option select the checkbox labelled Stop acquisitions after download. The last three fields in this page are open titles for three fields that will be available in the database of acquisitions. These field titles are specific to the computer, and are not stored on the device. This means that the person downloading the data may name these fields in a different way to the person launching the mission. This feature has been introduced since in many situations, the person downloading the data may want to add information that might not have been available at the time the mission was launched. An example could be naming one of the fields "Delivery", where the recipient (person downloading the data) may want to add a note such as "on time" or "late". This type of information could not have been predicted when the mission was launched. These fields will be also displayed in the Archive and can be used as search parameters. Language Here you can select the language of the program either Italian, English or French. Each time you change it, you'll have to click on the OK button and wait for the program to restart automatically. TecnoSoft s.r.l. MTT 15/44 Advanced Options In the advanced settings page we find two important buttons and two useful options. Reset Database Clicking on Reset Database, a message will appear and will ask you to reset the Database Archive of the readings. In this way the tables of Archive will be recreated and emptied (page 29): the saved acquisitions files won't be lost, but you'll have to import them again. Click on Create to proceed or Exit to cancel. Recycle bin When you delete an item from the Data Archive, this will not be displayed anymore, but it is not physically deleted: the acquisition file is transferred to the Data/Del folder, in the main folder of the program (by default C:\Program Files\Tecnosoft\MTT2-SRI). To delete the files permanently you must click on the recycle bin button: a Report will be displayed showing the recycle bin status. Click OK to continue. PDOXUSERS.NET Option In order to function properly, MTT requires a specific file, named PDOXUSERS.NET. By default, the installation procedure places this file in the main directory of the PC (c:\). In many companies, computers on a network may not have sufficient access rights to have this file installed in the main directory, since they may only save files to specific folders. By enabling this option, the file in question will be saved to the directory to which the program has been installed (by default C:\Program Files\Tecnosoft\MTT3). 16/44 MTT TecnoSoft s.r.l. In this manner you may continue to use the program without having to enable full access rights to the main folder of the computer. User Code The User Code is a specific code used to identify which protected Tempstick devices can be read. If you have been supplied with protected devices, your distributor would have supplied this code to you. The code 0 permits all unprotected devices to be read. Protected devices can only be read by means of the corresponding user code. TecnoSoft s.r.l. MTT 17/44 Start a New Mission (TecnoStick interface) Before clicking on this button, please ensure that the interface is connected to the PC port, that the corresponding port is the one selected in the configuration page and that a datalogger is inserted in the interface. Clicking on this button in the Main Window; will start communication with the datalogger, and after a while the Settings window will appear (if the data in the memory of the logger are not in the Archive, you will be asked if you want to save them or discard them): it is divided into different sections. If the device is not connected properly the message Download Error will appear in the status bar at the bottom of the main window. Setting the parameters Acquisition Delay This setting is used to program a mission that must start after a defined time interval. This is useful if it is preferred that a mission be physically programmed on a particular day, knowing that the datalogger should effectively start acquiring after a number of minutes, hours or days. The total delay is set by programming the days (dd), hours (hh) and minutes (mm) after which you want the device to start make and store readings. The maximum delay is 45 days, 12 hours and 15 minutes. Acquisition Interval The acquisition interval is defined as the time between successive acquisitions. You can set this parameter using the hours (hh) and minutes (mm) field. The acquisition interval may be set from a minimum of 1 minute to a maximum of 255 minutes (4 hours and 15 minutes). This field should be selected carefully such that the memory capacity is not exceeded for the useful length of time of the mission. The device can store a maximum of 2730 readings. The actual number of readings will depend upon the length of the notes field (see Notes section below) and may be less than 2730. The appropriate acquisition interval should be selected by computing the formula Acquisition Interval = Mission Duration (Time) / 2730 readings. Thresholds and Validation Criteria By setting the the Temperature Thresholds (Maximum and Minimum) according to your particular mission 18/44 MTT TecnoSoft s.r.l. requirements, you will be able to quickly check whether the temperature has exceeded these limits since the program will display them on the graph after readings have been downloaded. The program will also use them to calculate when and how many times the temperature has gone out of range of these limits. Note that you cannot set the same value for both maximum and minimum. If you have set, in the Configuration (page 13), the option that enables the default thresholds, those values will appear here as default values. Otherwise, there the last thresholds you have programmed will be displayed for that specific datalogger. If you set thresholds out of the device's temperature range, the thresholds will be automatically corrected to sit at the temperature range limits of the device. Note: to learn more regarding the use of the validation criteria, the MKT and the meaning of all other parameters, please refer to the chapter The Validation Criteria at p.41. Date and Time In this field, the date and time of the PC is displayed. The Tempstick system uses the PC date and time to synchronize time values on the datalogger. Please check that these are correct before launching the mission, since once this has been launched, the device will hold the PC time and date as the actual time and date used to time-stamp the readings. If you note a discrepancy between the actual time and date and that on the PC running the software, you may correct this by double clicking on the time display in the right bottom corner of the Windows taskbar, normally located at the bottom of your screen. Other Data In the Other Data box you can type in names used to identify the mission you're about to start. In the first field, Sender, you will see the same default name typed in the similar field in the Configuration window. This item may be changed by deleting its content and typing it a new name. In the other two fields you can directly type in a name or else select a name from the drop down list. Note that new names not present in the drop down list will not be added to the list. To add a name to the list please follow the instructions in the Configuration chapter. Identification Here you can see the datalogger's unique serial number. You cannot edit this field. Identification Objects/Sites list In the upper field of this box you can type in one or more names of items that may help identify the transported objects or the site you're monitoring. Each time you type in a value, click on Add or press Enter to add it to the list below the field. Select an item and click on Delete to delete it. Note In the Notes box you can type additional notes that may be useful for the operator downloading the mission. Note: each time you add values to the fields described above, the blue progress bar at the bottom of the window will move towards the right hand side. This is an indication of the maximum amount of memory that may be reserved for these parameters. When you reach the maximum limit, the program will inform you that you cannot add any more information, unless you delete some you already added. Nevertheless, above a certain number of characters within the limit mentioned above, the device will begin storing the additional notes in memory that could have been used for a mission. This results in a reduction in the maximum number of acquisitions that will be stored. Under normal conditions, that is if you input Sender, receiver and operator information and add a few brief notes, the number of acquisitions will not be less than 2730. If you add many notes or many identification objects in the list, you may end up with less available acquisition space. Programming the datalogger After filling in all the necessary fields with your particular settings, click on the Start Mission button to instruct the datalogger connected to the interface to start acquiring data with the settings you have selected. If the delay field has been set to zero, the first acquisition will be made immediately after the software has programmed the device. If the delay is set the first acquisition will be made after the start delay has elapsed. If you decide not to start the mission, click on the Cancel button. TecnoSoft s.r.l. MTT 19/44 Read the Acquired Data (TecnoStick Interface) When you want to download the readings from a datalogger, ensure that the interface is connected correctly to the PC and insert the datalogger you wish to read in the serial interface slot. Click on the Download Data button and wait until the blue progress bar (located beneath the buttons in the Main Window) has reached the right hand side of the progress bar space (this operation might take a while depending on the number of acquisitions stored in the device). If you selected the option "Stop Acquisitions after download" in the Configuration window, the Acquisition Data window will come up. If the option had not been selected, a message will ask you if you want to stop the acquisitions: answer Yes or No to proceed. The Acquisition Data window will open. This window has five tabs at the top in which the information stored in the device is sectioned and displayed. General This tab shows all the programming parameters set by the operator who started the mission, subdivided into sections: • • Acquisition Settings: • Acquisition Interval: acquisition interval between two acquisitions. • Delay: the delay time between programming and start of the mission. In the first field there are the days (dd), while in the second there are the hours and minutes (hh/mm). Acquisition Status: 20/44 MTT TecnoSoft s.r.l. • • • • • • • Acquisition Number: shows the number of acquisitions recorded. Acquisition Start/End: the date and time of the first and final acquisition of the mission you've downloaded. Mission with Validation Criteria: if this option is checked, the Validation Criteria have been applied to this mission and her there will be displayed the result of the analysis and the quality index for the mission itself. Other Informations: • Device Status: informations about the status of the device; it shows if the system is acquiring or in standby. If the mission is not ended you'll see the message SYSTEM IS ACQUIRING, otherwise there will be written SYSTEM IN STANDBY. • Serial Number: the serial number of the datalogger. • Date and Time: date and time of the internal clock of the device. • Calibration Date: the month and year of calibration of the device. Other Data: • Sender: the company or the person who sent the datalogger. • Receiver: the company or the person to whom the device is destined. • Operator: it shows the code or the name of the operator who programmed the mission. Objects/Sites: here you'll find the list of objects and sites monitored plus the notes typed in by the operator who started the mission. Mission notes: here, the operator who download the acquisitions can write his own notes, without changing the mission data. There are three more fields that can be set in Configuration (p.18) too. Graph Here you'll see the Graph of the acquisition. The Graph can display all the acquisitions recorded by the datalogger. There are three or four lines: • red line: the maximum threshold set during programming; • blue line: the minimum threshold set during programming; • black line: the acquisitions recorded (in the TempStick2 is the temperature of the internal Probe, marked as External-Environment in the legend); • dark red line (only for the TempStick2): line of the external probe, marked as Internal – Product in the legend. You can copy the graph to the clipboard and then paste it in a different program (MS Word, MS Excel, Paint, etc.). Click on Copy and then , after you opened the program you wish to copy the graph to, click on Paste (or on Edit – Paste). It i s possible to display a grid in the graph by selecting vertical and/or horizontal lines on the right part of the window. You cans et the frequency of the grid: for the vertical lines you can set the minutes, for the horizontal the degrees. Table Graph These are the data that you saw in graph format in the previous label: there is the Date Acquisitions, along TecnoSoft s.r.l. MTT 21/44 with the time and the temperature (or temperatures, if you are using a TempStick2), expressed in °C. You can save this table in MS Excel format by clicking on the Save... button and, after you chose where to save the file, give it a name and then click on Save to proceed. Double clicking on the header of the columns, the Header Name window will open and you can type in a new name for it. Click OK to confirm or Cancel to cancel. You can print the table on the default printer by clicking the Print button. Alarms Here there is the list of each time the recorded temperature has gone out of the range of the set thresholds. Clicking on Print it is possible to print this table. 22/44 MTT TecnoSoft s.r.l. Validation Criteria In the last tab you'll find all the set Validation Criteria and the result of the transport quality. The criteria are calculated on the external probe in the TempStick2. • Thresholds and Validation Criteria: • Minimum Threshold (Tm): the set minimum temperature threshold. • Maximum Threshold (TM): the set maximum temperature threshold. • Minimum Absolute Threshold: the set minimum temperature limit below which the transport is refused. • Maximum Absolute Threshold: the set maximum temperature limit above which the transport is refused. • Activation Energy:: the activation energy of the transported product. • Time to discard from Start/End Mission (min.): the initial/final transitory that have to be discarded. At the end there is the algorithm to calculate the mission score. • Temperature and Score: • Temperature Min Value: the lowest temperature registered by the datalogger. • Temperature Max Value: the highest temperature registered by the datalogger. • MKT: the MKT value of the current mission. Note: to know more regarding the use of the validation criteria, the MKT and the meaning of all other parameters, please refer to the chapter The Validation Criteria at p.41. The operations buttons Common to all the above tabs is an area with a few buttons that allows you to act upon the acquisitions. On the left there is the Acquisition Interval box, divided in two parts, each consisting of two fields: in the upper part, labeled Acquisition Start Date and Time you may set the date and time that are used as the starting point for displaying the graph and table. The next field, labeled Acquisition End Date and Time (page 18) work in the same way, but this value determines the end point of the graph/table display. Note that the changes do not affect the actual readings, but simply those being displayed. Incorrect intervals might result in no data being displayed, although the data is still available in the device. TecnoSoft s.r.l. MTT 23/44 After applying the changes necessary click on the Refresh button in the right part of the box. On the right side of this area we find four buttons. The Print button will print a report of the acquisition with all the parameters and the graph. If the Preview (see page 23) option is selected, the Print Preview window will open, where you may select the Print Graph Table option, in which case the table will also be included in the report. The second button, Save, allows you to save the acquisition in the Archive (see page 29). Before being able to save an acquisition, the archive must have been initialized. To do this go to initialize the archive (see page 15). The third button, e-Mail, allows you to send the acquisition to a remote user by e-mail. The file can only be opened with MTT2 software, and therefore the receiver must have a copy of the program. After clicking this button, the Send acquisition by e-mail window will open. MTT software uses Outlook Express as the source for e-mail settings, and therefore this program must be configured properly for MTT E-mail client to work. The New message window will open before the acquisition file is sent. Setting up an account on Outlook Express is very easy, since the software will guide you through all the parameters you have to set. If you don't have an Internet connection or an e-mail account, you won't be able to use this option. In the first field, Account, select with which address you want to send the file. If you have more than one account set up in Outlook Express, the list will hold all the possible addresses. In the next field, To, type in the receiver's address: clicking on To will open the Outlook address book. The attached file is the acquisition file you have just saved; the subject is the title of the mail and the text is the text message: both these fields can be edited. As soon as you select a receiver, click on Send and Outlook's new message window will open. Click on Clear All to empty all the fields (you will have to type in new values) or choose Exit to cancel the operation. The Print Preview Window When you click on Print with the Print Preview option enabled, it will be opened a window with the same name (Print Preview), where you can see the acquisition report that you're about to print. In the main part of the window there is the document, while in the upper bar there are some functions buttons. The first one, Zoom to fit, display the document so that it is visible completely on the screen. The second one, 100%, zoom the document to its real dimensions, while Zoom to width zoom the document so that it's large as much as the window is. The next four buttons allows you to switch between pages: The first and last arrow bring you to the first and last page, the central ones can scroll one page after another. The Printer Setup button allows you to select the printer on which you wish to print the report; the Print button send the document to the printer. Save Report and Load Report allows you to save and load the report file, while Close closes and cancel the print operation. 24/44 MTT TecnoSoft s.r.l. SRI Functions The main new feature in this version of MTT is the new SRI function by which you may communicate with an SRI unit. The software automatically detects connected SRI units after clicking the SRI button. If there are no units connected you will be presented with a window holding three buttons. Apart from closing the window by means of the Exit button, you may connect an SRI to the PC and then proceed with configuring the unit or downloading the data, by means of the Connect an SRI button. Alternatively you may create new profiles for data logging missions that may be programmed into the SRI unit at a later date, using the Manage Profiles button. The Profiles If there is no SRI unit connected to the PC, click on the Manage Profiles button, alternatively click on the tabsheet labelled Manage Profiles if a unit is connected to the PC. Using this window you may create and manage profiles for data logging missions. Initially you will not have any profiles saved and therefore the central part of the screen will be blank. Below this you will find buttons that are used to manage the profiles as well as the button Program all profiles which becomes active only if an SRI is connected. To close the window use the Exit button. The profiles are managed in a hierarchical manner with three levels, similar to a directory with subdirectories. The first level holds those profiles that do not belong to a particular category, and appear as the root elements of the tree-view list. The second level holds a series of folders that may be used to group related profiles (for example relating to a specific product type or transport conditions). The third level offers a further subdivision for more specific sorting of the profiles. TecnoSoft s.r.l. MTT 25/44 Creating a Profile There are two possible operations at this stage: creating a folder or a profile. To create a new profile click on the button New Profile to open the related window, Settings, that is similar to the window used to launch new missions (see page 17). The main differences with respect to the new mission window are that the field holding the serial number of the device is not present, and the button previously labelled Start Mission has been replaced by Save Mission. Once you have completed the fields for your profile, click on the Save Mission button to create the profile, the program will now ask you to assign a name to this profile. In the next window (ignore the two upper fields for now), type the name for this profile in the third field. We suggest that you give the profile a name that will be representative of the profile contents, such that the operator selecting the profile will be able to identify it easily when programming a mission using the SRI). Click OK to proceed. Your profile is not visible in the tree-view and is located at the first level. Editing a Profile If you would like to change parameters within a profile, click on the Edit Profile button. The same Settings window will appear: make the changes as desired and then click on Save Mission. Deleting a Profile To delete a profile select it from the list and then click on Delete Profile. The profile will be immediately removed from the list. Creating a folder Click on the New Folder button. The field labelled Position cannot be changed, since it is created on the 26/44 MTT TecnoSoft s.r.l. second level and is therefore added to the folder in the first level. Type the name you wish to assign to this folder in the Name field and click OK. The folder will be added to the list. Creating a subfolder To create a subfolder, select the folder within which you want to create the new folder, and then click on the New Folder button. The field labelled Position now holds the name of the parent directory. Type the name for the new subfolder in the Name field and click OK. Creating a profile in a folder or subfolder After creating the folder and subfolder that will contain the profile, click on the New Profile button. There is no need to select the folder. After entering the desired parameters for the profile, click on Save Mission, you must now assign a name to the profile: in the first two fields select the folder and subfolder respectively in which you want the profile to be placed. If you do not specify any folders the profile will be created in the first level. Configuring the SRI Ensure that the SRI is connected to the PC using the USB lead (see page 34) and click on the SRI button in the main window. The program will automatically recognize a connected SRI and the corresponding window will open with all the three tabsheets available: SRI Connection, Download Acquisitions and Profile management. Click on the SRI Connection tab. This page holds information related to the connected SRI. • • • • Firmware: the firmware version Name: the name assigned to this SRI Date and Time: use this field to check whether the device is synchronized properly Update: if you have changed any of the parameters for the unit, click on this button to refresh the TecnoSoft s.r.l. MTT 27/44 display If you disconnect the device from the PC, and then re-connect it and try to perform any operation that communicates with the unit, you will receive an error message. To reconnect you must close the window and then reconnect using the SRI button on the main window. Changing the SRI name and access rights Click on the Set Name button to open the SRI Settings page. • • • • Name: type the name for the SRI unit Start TempStick: select this option if you would like the SRI to start missions Read TempStick: select this option if you would like the SRI to download data View Data: select this option if you would like to be able to view mission data on the SRI (graph/table of readings) • Set Date: select this option if you would like to be able to set the date and time directly on the SRI Click on Set Unit to confirm the changes or on Read to read the current settings held by the unit. Click on the Exit button to close the window. In the SRI window, SRI Connection sheet, you may click on Refresh to view the changes you have made. Set Date and Time Click on the Date and Time button to send the time settings of the PC to the SRI. Ensure the PC holds the correct date and time. To view the changes click on the Update button. Downloading data from the SRI An SRI unit may contain hundreds of TempStick missions; this data can be saved and archived in the MTT software. Ensure the unit is connected to the PC and click on the SRI button and then choose the tab Download Data. The program will start downloading data from the SRI, and you will note that the table will start to fill up with downloaded missions. Click on the Select All button and then on the Save Selected Acquisitions button 28/44 MTT TecnoSoft s.r.l. (you may also select one or more missions independently). The column labelled Saved will be countersigned with an OK sign indicating the particular mission is already saved in the database. Deleting data from the SRI Click on the button labelled Delete all Acquisitions from the SRI to remove all acquisition related data from the unit. Loading profiles on the SRI Connect the SRI to the PC and click on the SRI button, then select the tab Profile Management. The button labelled Program all profiles is now available, and therefore you may load the profiles on the unit: note that existing profiles on the SRI will be deleted or updated if they are different to those being programmed. TecnoSoft s.r.l. MTT 29/44 Data Archive When an acquisition is saved, after the data is downloaded off the datalogger, the saved files are stored in the Data Archive. Before you can start saving data in the archive you must reset the archive (see page 15). Clicking on the Archive Data button will open a new window. This window displays a list of acquisitions that have been saved. Search facilities are provided in the top-left area of this window. These functions enable you to quickly locate and view a particular acquisition. You can perform a search based upon the name (or code) you had added to the list Object/Site Identification in the New Mission window. This is done by entering that particular entry in the Object/Site Identification field (see page 18). You may also search for a particular acquisition by the Mission Start Date. To do this you must select the checkbox next to the Mission Start Date From label. If you do know the exact date you may fill in the Mission Start Date From / To fields with the same date. If you do not remember the exact date you may narrow the range by means of the same fields. Only those acquisitions whose start date falls within the specified range will be displayed. You may also perform searches by means of the various fields that are used to identify a mission. To this this select a field name by using the Field Name drop down list, and then select an entry for that particular field name in the drop down list labelled Field Value. This list will only display values saved in at least one acquisition, which means that if you have not assigned a value to the particular field the list will be empty. For example, if you select in the field name SENDER from the first list, the list Field Value will display all the values listed in that column of the database. After you have set your search parameters, click on the Search button to start the search. If the database list appears empty, it means that none of the saved acquisitions match the parameters you have set. If you receive an acquisition file by email or on a diskette, you can add it to your database by clicking on Import Acquisition from File. The next window will allow you to choose the path from which to import the file. If, on the other hand, you would like to save a particular acquisition on diskette, you must locate the Data/ Files folder, in the main program folder, and copy the required file manually. The field File in the database list holds the file name for the acquisitions, an you may therefore locate the correct file by means of this parameter (see page 19). To view the details of an acquisition you simply double click on the entry in the database list. A window identical to the Acquisition Data window will appear holding the details for that acquisition. The other buttons present on this window are: Move the Acquisition in the Recycle bin which deletes the selected acquisitions from the list. The files are not permanently removed, and may be imported again by clicking on the Import Acquisition from File button and searching for the file in the Data\Del folder, in the main directory of the program (which by default is C:\Program Files\Tecnosoft\MTT3). The Send Acquisition by E-mail will create a new message window and attach the selected acquisition (see page 23). To close the Archive window click on Exit. 30/44 MTT TecnoSoft s.r.l. On-line Help Click on the Help button to open the On-line Help window. Browse through the various items to get to know the program in detail and learn about the available functions. The On-line Help pages are similar to web site pages, with hyperlinks that jump from one page to another. TecnoSoft s.r.l. MTT 31/44 Informations Clicking on Info from the Main Window will open a dialog displaying program version details and the End User License Agreement. 32/44 MTT TecnoSoft s.r.l. Closing the program To close the program just click on Exit, or on the X in the Main Window. TecnoSoft s.r.l. MTT 33/44 Interface and dataloggers manual Description of the SRI device and the dataloggers An SRI unit (Starter&Reader Interface) may be configured in one of three modes: Programmer/Reader, Programmer or Reader. The SRI is equipped with a display and, depending on whether it is configured as Programmer, Reader or both, may start new missions whose parameters may be selected from a list of profiles, and download the data from the TempStick devices. Display ESC Alarm and status LEDs OK Directional Keys Connections The system is completed by means of the TempStick miniature temperature dataloggers. Flat end to be inserted in the SRI unit. 34/44 MTT TecnoSoft s.r.l. The technical characteristics of TempStick are: Size Temperature Range Resolution Accuracy N° of acquisitions Acquisition rate Battery Autonomy Mission Duration Protection Grade 50 X 22 X10 mm -30 °C ÷ +65 °C 0,03 °C +/- 0,25 °C with calibration certificate +/- 1 °C without calibration certificate* 2730 From 1 reading per minute to once every 255 minutes 10 years or 3.000.000 acquisitions From 1 day, 21 hours (acq. Rate 1 minute) to 483 days with acq. rate 255 minutes IP67 * post production data without calibration Connecting the device The SRI, as well as the Mission Starter unit, connects to the PC by means of a USB cable, and therefore the PC must have at least one USB port free. The cable supplied has two different extremities: one connector is larger and flat whilst the other is smaller. The first should be inserted in the USB slot of the PC whereas the second is to be inserted in the unit. Once connected the PC recognizes the SRI unit and communication may begin. To SRI To PC TempStick connector USB Port Installing the USB drivers for the SRI To install the drivers, connect the cable to the SRI unit, and then to the PC. Windows will detect the presence of a new device and will ask you to install the driver. Proceed as follows depending on whether your PC uses Windows 2000 or XP as an operating system: • Windows XP: • A window entitled New Hardware Wizard will open; select No, not now and click on Next • If it is the very first time you are installing an SRI on this PC, select the second option, Install driver from a list or known location (advanced users) and click on Next; if you have already installed the SRI driver but you have connected the cable to a different USB port, select the first option and click Next • Select Search for the best driver and enable both of the next options that appear; click on TecnoSoft s.r.l. MTT 35/44 Browse and select the folder SRI drivers in the CD ROM supplied. Click on Next Click on Next to start installing the driver Click on Finish to complete the installation Windows 2000: • The New Hardware Wizard will appear, click on Next • Select the first option, Search for a suitable driver (recommended) and click on Next • Select Specify a path and click on Next • Select the folder SRI drivers from the installation CD ROM and open the folder in the field that appears; click OK to proceed • Click on Next to start the installation process • Click on Finish to complete the installation • • • Connecting the TecnoStick Interface In the TempStick package there is an interface able to read and transmit to the PC the acquisition data from the datalogger. There is a serial or USB cable to connect it to the computer to connect to a free serial or USB port on your PC. To read the datalogger's data you have to insert the flat end of the device in the interface. You can insert the logger from both sides. Installing the USB drivers for the TecnoStick Interface To install the drivers, connect the cable to the TecnoStick Interface, and then to the PC. Windows will detect the presence of a new device and will ask you to install the driver. Proceed as follows depending on whether your PC uses Windows 2000 or XP as an operating system: • Windows XP: • A window entitled New Hardware Wizard will open; select No, not now and click on Next • If it is the very first time you are installing an TecnoStick Interface on this PC, select the second option, Install driver from a list or known location (advanced users) and click on Next; if you have already installed the TecnoStick Interface driver but you have connected the cable to a different USB port, select the first option and click Next • Select Search for the best driver and enable both of the next options that appear; click on Browse and select the folder TecnoStick drivers in the CD ROM supplied. Click on Next • Click on Next to start installing the driver • Click on Finish to complete the installation • Windows 2000: • The New Hardware Wizard will appear, click on Next • Select the first option, Search for a suitable driver (recommended) and click on Next • Select Specify a path and click on Next • Select the folder TecnoStick drivers from the installation CD ROM and open the folder in the field that appears; click OK to proceed • Click on Next to start the installation process • Click on Finish to complete the installation Connecting the datalogger to the interface To connect a TempStick datalogger to an SRI or Mission Starter interface, simply insert the flat end of the datalogger in the appropriate slot (next to the USB connector) on the interface. The direction in which you insert the datalogger is irrelevant. Once you have completed the setup or download operations, remove the datalogger from the slot. 36/44 MTT TecnoSoft s.r.l. Replacing the batteries To replace the batteries, open the battery cover at the back of the interface by pressing on the arrow and sliding the door in the direction indicated by the arrow. Remove the existing batteries and replace them, taking care to use the correct polarity. Replace the cover. You will have to set the date and time on the unit again (for SRI). The reset button is located underneath this slot Using the SRI The Starter&Reader Interface is equipped with a display, three LEDs and 6 keys. The display shows information upon the device status or that of the mission being analysed, the graph or table of readings and the menu's for the unit functions. The green LED is activated, along with the buzzer, when a device has been correctly programmed. The red LED becomes active if a communication error occurs of if the batteries are low. In the latter case replace the batteries immediately. The keys are used to browse the menu's (four direction keys), to select menu entries (OK button) or to abort operations or exit screens (ESC button). Below is a detailed explanation of the various SRI functions. The images shown are for an SRI configured in the Programmer/Reader mode. If your SRI is not in this mode some features shown will not be available. TecnoSoft s.r.l. MTT 37/44 Setting the Date and Time After replacing the batteries, you must set the time on the unit. The following window will appear: Click OK to open the next window where the date and time are to be set. To change the date and time at any stage, with the display off click OK and in the following window select Clock and click OK. In the Date and Time window, use the left and right keys to select the different parts of the date and time, the up and down keys to change the selected numbers and the OK button to enter the changes. Click OK to confirm the change. Press ESC to exit the screen. Starting a Mission (only for Programmer mode) Insert the TempStick in the unit: the unit will detect this action and bring up the programming window. If this does not appear, remove and re-insert the datalogger. N.B: if the SRI is programmed as a simple Programmer, once the TempStick is inserted, the window where you may select the profile to be used will appear first. The Start entry is already selected, however if this is not the case use the directional arrows to select it (see picture) and then press OK. A list of available profiles will appear and you may select one of these to be used to program the datalogger. If there are no profiles available the No Programs message will appear. Use the directional arrows to select the profile and press OK. The programming procedure will begin, this takes a few seconds after which a program success message will appear, along with the green LED and the beeper. 38/44 MTT TecnoSoft s.r.l. You may now remove the datalogger and program another one. Downloading data from a TempStick (Only for Reader mode) Insert the TempStick in the unit and select the entry Read. The SRI will start downloading data from the device. N.B: if the SRI is configured as a simple Reader only, once the TempStick is inserted the download of data will automatically begin. Once the data is downloaded, a window that evaluates the transport will appear. The centre of the screen will show the message BAD if the transport conditions where not optimal, alternatively OK will appear. In the former case the reason for the rejected transport will appear below the message (If there is more than one reason, the most significant reason will be shown) The data downloaded is automatically saved in the unit memory. Click on OK to view some information relating to the mission, as well as the data that has been downloaded. There are four menu items: Statistics, Information, Graph, Table. Statistics Window This window will show the most important parameters of the profile with which the device has been programmed. You may scroll the window up and down using the directional keys. The parameters show are: • Quality: Quality index for the mission TecnoSoft s.r.l. MTT 39/44 • • • • • • • • • • Score: score for this mission, to be deducted from the score assigned at the start of the mission Maximum Score: Score assigned at the start of the mission Maximum Threshold: Maximum limit for correct conservation Minimum Threshold: minimum limit for correct conservation Abs. Max Threshold: Absolute maximum limit that cannot be surpassed Abs. Min Threshold: Absolute minimum limit that cannot be surpassed Discard Start: minutes to be excluded from the start of the mission for score calculation Discard End: minutes to be excluded from the end of the mission for score calculation Exponent k: Exponent for quality calculation (see page) Maximum Duration: The maximum duration allowed for this transport To exit the window press ESC. Information Window These entries are used to identify the mission being shown, based upon the data inserted when the mission was started. The information shown is: • Sender: the firm that sends the items being monitored • Address: the receiver of the goods • Operator: the operator that started the mission • Notes: additional information • Objects: objects or sites monitored To exit the window press ESC. Graph Window This windows holds a simple but effective graphical representation of the data downloaded. The temperature thresholds are also shown to aid the analysis. You may zoom into the graph using the up and down buttons. Once the zoom is set, you may scroll left and right using the directional keys. To exit the window press ESC. Table Window This window holds a table of all the data points taken by the datalogger. The table holds the date and time and the corresponding temperature value. Use the up and down keys to scroll within the table. The black lines indicate a new day has started and the date is shown within the line. To exit the window press ESC. Viewing data off saved missions In order to view the data stored in the SRI, you must first ensure that there is no datalogger connected to the 40/44 MTT TecnoSoft s.r.l. unit. Select the Review entry (press ESC to exit windows if you are not in the main menu; if the SRI is off, press OK and then select Review). A window will appear holding a list of saved missions identified by means of the date, time, serial number and other entries (Sender, etc...). To view all the parameters, select the required entry and use the left and right keys to scroll. Once you choose the mission, press OK to open the viewing page. Turning the SRI off To switch off the SRI, press ESC until you have exited all the menus, and then press ESC again to turn the unit off. Resetting the device The reset button is located at the back of the unit, and is only accessible once the battery cover is removed. Using a thin object (such as a paperclip) press the button that is located underneath the slot in the battery compartment. The device will be reset, however the items in memory are not deleted. TecnoSoft s.r.l. MTT 41/44 The Validation Criteria The Validation Criteria have been developed to provide the quality manager with a versatile tool that will automatically determine whether a specific product, that requires constant temperature control, has been shipped or stored correctly. The Validation Criteria provide for specific parameters and a simple algorithm (the MKT formula) that MTT software will use to determine whether a shipment or storage was detrimental to the product quality. These parameters are derived from international reference standards: NCCLS H18-A3 Vo. 24 No. 38 “PROCEDURE FOR THE HANDLING AND PROCESSING OF BLOOD SPECIMENS”; Approved Guideline 3rd Edition” and NCCLS GP16-A2 Vol. 21 No. 19 “URINALYSIS AND COLLECTION TRANSPORTATION, AND PRSERVATION OF URINE SPECIMENS”; Approved Guideline - 2nd Edition. These parameters would then be set by the user according to the product being monitored. The temperature thresholds MTT3 and above allows for four different temperature limits. The first two are the correct conservation temperature limits (max. and min.). Normally, these thresholds are very rigid, even if the product exhibits a degree of tolerance to higher or lower temperatures. The absolute min. and max. thresholds, on the other hand, are limits to which a product should never be subjected, otherwise the transport and the product itself will be refused since its integrity cannot be guaranteed. These latter limits normally cover a wider range than the first two, which allows for a tolerance margin. The transport graph A typical product conservation graph is divided in three parts: • Initial transitory: the time from when the mission has started to when it is actually monitoring a transport or storage of the product • Transport or storage • Final transitory, from the end of the mission to the moment data is downloaded When analysing the graph we can nearly always discard the first and final part and use the central part of the mission to evaluate the transport. For automatic analysis of the acquisitions it is necessary to exclude the two transitory periods. Knowledge of the process and procedures relating to the use of Tempstick within the company, it is usually quite easy to predict the duration of these transitory periods. For example, if we do not set a delay when programming a new mission, and we know that after a device is programmed it takes around 20 minutes until it is placed in the area to be monitored (for example the TempStick is put in the product's box, the box is put on the truck, etc.), the initial transitory can be set to 30-40 minutes. In this way we can be almost sure that all those acquisitions that are not related to the actual monitoring of the products will be excluded. The final transitory duration can be determined in a similar manner. The activation energy Activation energy of a given substance or product is a value that, when is reached, starts a given process. Usually it is a value between 60 and 100: it is recommended a standard value of 83. How to set the other mission parameters The only other parameters related to the validation criteria are the delay and the acquisition interval. The program calculates the scores starting from the first acquisition, and not from the time the device has been programmed. The delay period is therefore automatically ignored. Since the datalogger takes readings depending upon the value of the acquisition interval, it assumes a worst case condition and extends the duration of a recorded temperature for the duration of the whole interval until the next sample is taken. If, for example, we consider the product used in the examples above, if a sample taken at a certain time read 28 degrees, and the next sample, taken after 20 minutes, reads 4 degrees Celsius, the program will assume that the product was at 28 degrees for 20 minutes. It is most probable that it wasn't, however it has no means of knowing the value of samples in between readings and will therefore assume the worst case scenario. 42/44 MTT TecnoSoft s.r.l. MEAN KINETIC TEMPERATURE Mean kinetic temperature (MKT) is defined by the ICH as “A single derived temperature that, if maintained over a defined period of time, affords the same thermal challenge to a drug substance or drug product as would be experienced over a range of both higher and lower temperatures for an equivalent defined period. The mean kinetic temperature is higher than the arithmetic mean temperature and takes into account the Arrhenius equation.” Hence, the mean kinetic temperature may be considered as an isothermal storage temperature that simulates the non-isothermal effects of storage temperature variation. It is not a simple arithmetic mean but involves exponential and logarithmic relationships. The Haynes formula can be used to calculate the MKT. It is higher than the arithmetic mean and takes into account the Arrhenius equation from which Haynes derived his formula. Thus, MKT is the single calculated temperature that stimulates the non-isothermal effects of storage temperature variations. H/R Tk= −ln e − H RT 1 e − H RT 2 e − H RT n n Tk = MKT in ºK ΔH = Heat of activation / activation energy R = Universal gas constant (8.3144 ּ10-3 kJ.Mole-1 ּºK-1) Ti = temperature in ºK n = Total number of equal time periods over which data are collected Mean kinetic temperature refers to a reference point, which can be calculated from a series of temperatures. It differs from other means in that higher temperatures are given greater weight in computing the average. This weighting is determined by a geometric transformation, the natural logarithm of the temperature number. Disproportionate weighting of higher temperatures in a temperature series according to the MKT recognises the accelerated rate of thermal degradation of materials at these higher temperatures. MKT accommodates this non-linear effect of temperature. It is calculated from the average storage temperatures recorded over a time period and a running average calculated from the average of weekly high and low temperatures. In order for MKT to be meaningful in anyway, an appropriate number of temperature / time sampling points should be used. MKT may only be applied in situations where temperature control of the storage area is good, but where occasional excursions do occur due to seasonal variation. MKT may only be applied in cases where the scientific data regarding the thermal stability of the product in question, used to establish the original labelled storage conditions, permits limited excursions between 25ºC to 30ºC. The MA holder should be consulted as to whether these excursions affect the thermal stability of the products in question and hence whether or not the use of MKT is applicable. Strict conditions should be applied to the use of MKT i.e.: ● It is only applicable to storage of products under controlled room temperature conditions (e.g. Those labelled “Do not store above 25ºC”) ● MKT is not appropriate for use for products requiring controlled low temperature storage. ● MKT cannot be used to compensate for poor temperature control of storage facilities due to e.g. poor design ● Excursions outside labelled storage requirements for products should be documented and investigated and reported to the MA holder ● Actual storage temperatures should not exceed 30ºC at any point if MKT is to be applied. i.e. for an MKT of 25ºC excursions between 15ºC and 30ºC are permitted. TecnoSoft s.r.l. MTT 43/44 Troubleshooting When I run MTT, the message “Printer selected is not valid” appears When MTT software starts it immediately checks for the default printer, since in parts of the program one may send output to a printer. If the following message appears as soon as the program is started: “Exception Eprinter in module Tmtt.exe at 00023CF2. Printer selected is not valid”, the program is signalling that there is no local printer specified or that the printers defined on the particular PC are not currently connected. The most common situation that generates this error message is if there are only network printers defined on a particular PC, and the computer is currently disconnected from the network. The error message also arises if a local printer is defined, however this is not configured as the default printer or if there is no local printer installed. You must click on the OK button to close the program. After this you must either connect the PC to the network such that the program may find the printers, or else add a local printer (even if this does not actually exist, that is it is not connected to the computer) and set it as the default printer. To create a default local printer (there is no need to actually have the printer) open the windows Control Panel (Start – Settings – Control Panel on Windows 2000 or Start – Control Panel on windows XP). Select the icon Printers and Fax (if you run Windows XP, change to the classic view mode by clicking on the command on the top left of the current window); if a local printer already exists, however this is not the default printer, set it as the default printer by right clicking on it and selecting Set as Default from the drop down menu. If there is no local printer, click on the Add Printer icon, click on Next and select Local Printer connected to the PC (for Windows XP) or Local Printer (for Windows 2000). There is no need to actually posess or connect the printer). Uncheck the option Automatically install plug and play printers; click on Next. In the field labelled Use the following Port select LPT1 and click on Next. Select a printer manufacturer, in this case we suggest you select a renowned manufacturer to ensure windows already has the necessary drivers. Click on Next and select Yes when you are asked whether the printer should be set as the default printer. Choose the option Do not share this printer click Next and replay with No when asked to print a test page. Click Next again and the Finish. Wait for windows to complete the installation of the printer and then launch MTT again. When I try to launch a new mission or download data using the TecnoStick Interface, I get an error message There may be more than one cause to this problem. First of all you must ensure that the interface cable is firmly connected to the PC, that the interface is firmly connected to the interface and that the datalogger is inserted in the interface slot. If this does not solve the problem, make sure you have selected the correct COM port in the configuration page of MTT. If you are not sure which port is the correct one, follow the instructions given above under the heading How to identify which COM port has been assigned to the interface. If the problem persists, try changing the serial port to which you are connecting, if you have another available. You may also want to ensure that the port has not been damaged by trying to connect another serial device, if available. Another cause could be that the serial port you have chosen is currently in use by another program, even though nothing is connected to it. This could happen if another program has been launched, possibly automatically on startup and which operates in the background. A typical program of this type could be synchronisation software between the PC and a PDA, in which case the software loads up on startup and locks the COM port in order to detect when a PDA has been connected. This type of program runs in the windows taskbar, close to the time display. Close the programs you suspect could be using the COM port and try running MTT again. If you are using a USB to Serial adaptor, make sure you have installed the drivers correctly and that you have checked which port has been assigned to the adaptor. If none of these solve the problem, please contact Tecnosoft technical support or your reseller for advice. 44/44 MTT Company ISO 9001:2000 certified for firmware and software development TecnoSoft s.r.l.