1
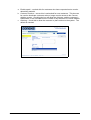
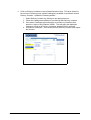
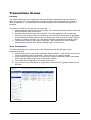
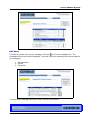
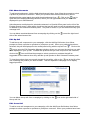
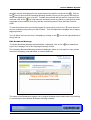
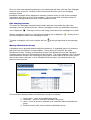
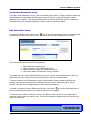
Conexa eNabler System
Conexa eNabler
Administration Manual
Version 1.1
November 2007
Level 2, 75 Queen St,
PO Box 7170, Wellesley St,
Auckland, New Zealand.
Conexa eNabler Administration
1 of 28
Version 1.1
Table Of Contents
Background................................................................................................... ..............................3
Supplier Support Scope.................................................................................................. .............3
Purpose...............................................................................................................................................................................................4
Customer Setup screen............................................................................................ ...................5
Purpose...............................................................................................................................................................................................5
Set-up a new customer.......................................................................................................................................................................5
Deactivate or Delete an Admin User...................................................................................................................................................9
Reset an Administrator Password.......................................................................................................................................................9
Change Administrator Access Privileges............................................................................................................................................9
Add a New Customer Administrator....................................................................................................................................................9
Transactions Screen.................................................................................................. ................10
Purpose.............................................................................................................................................................................................10
View Transactions.............................................................................................................................................................................10
Communications Screen............................................................................................ ................11
Purpose.............................................................................................................................................................................................11
View Communications.......................................................................................................................................................................12
Emulate Customer Screen................................................................................................ .........13
Purpose.............................................................................................................................................................................................13
Emulating a Customer.......................................................................................................................................................................14
Reset Password for Customer User.................................................................................................................................................14
Purpose.............................................................................................................................................................................................15
Create a New Campaign .................................................................................................................................................................16
Edit Campaign...................................................................................................................................................................................16
Edit Users..........................................................................................................................................................................................16
Edit Rules..........................................................................................................................................................................................17
Edit Advertisements..........................................................................................................................................................................18
Edit Up-Sell.......................................................................................................................................................................................18
Edit Cross-Sell...................................................................................................................................................................................18
Edit Broadcast Message...................................................................................................................................................................19
Edit Campaign Status.......................................................................................................................................................................20
Manage Distribution Groups.............................................................................................................................................................20
Create New Distribution Group.........................................................................................................................................................21
Edit Distribution Group......................................................................................................................................................................21
Clone Distribution Group...................................................................................................................................................................22
Delete Distribution Group..................................................................................................................................................................22
Search for Distribution Group............................................................................................................................................................22
Admin Screen......................................................................................................... ...................23
Purpose.............................................................................................................................................................................................23
Create New User...............................................................................................................................................................................23
Edit Existing User..............................................................................................................................................................................25
Conexa eNabler Administration Manual
2 of 28
Version 1.1
Conexa eNabler System
Background
The Conexa eNabler system is a customer facing Order and Invoice management system. It
supports multiple branded supplier organisations offering products for online purchase via the
Conexa eNabler web site.
The system supports the following activities: 1. Product search
2. Product ordering and delivery notifications
3. Invoice presentation
4. Account payment
5. Account summary
6. Tank dips
7. Customer Reporting
8. Customer Administration
9. Management Screens
10. Reporting
The Conexa eNabler system is a hosted service, rented from Conexa. Conexa owns and
operate the system on behalf of the Suppliers. The system is linked to a Suppliers order system
either via an electronic feed or an email feed. When the transaction enters the Suppliers
system all existing transaction controls / rules are applied as if this transaction was entered
directly into the Suppliers system.
All orders placed via the e-Commerce site will have a CExxxxx Customer Reference number.
Supplier Support Scope
Supplier teams will provide the following support to the Conexa eNabler System.
1. Customer Service teams will take calls from customers and provide basic ‘how-to’
support. Support issues will fall into three categories: a. How to use the system
b. The system is not working or the results are not as we expect - these issues will
be passed to the Conexa Help Desk.
c. I wish to do something the system doesn’t allow – proceed with existing manual
(non e-Commerce) process.
Level 2, 75 Queen St,
PO Box 7170, Wellesley St,
Auckland, New Zealand.
Conexa eNabler Administration
3 of 28
Version 1.1
Administration Module
Purpose
Support personnel will actively support the use of the Conexa eNabler system. To assist them
with this a series of Administration screens have been designed. These screens offer the
following functionality: 1. Customer set-up for the overall customer and the Customers Administrator person.
2. Emulating a customer via the Customer Setup Screen
3. Searching for Order transactions
4. Monitoring and managing Customer Communications
5. Campaign and broadcast messaging management
6. User profile maintenance
Conexa eNabler Administration Manual
4 of 28
Version 1.1
Conexa eNabler System
Customer Setup screen
Purpose
The Customer Setup screen is designed to allow the configuration and set up of customer data
within the Conexa eNabler system. It allows the ability to grant access to particular screens in
the Conexa eNabler Customer Module, as well as providing access to particular delivery
locations and customer accounts. This screen is also used to create and maintain details of the
customer administrator.
This screen is made up of 4 active areas, these are: 1. Header area is located at the top of the page. This area provides quick links to other web
sites and details of the current user.
2. Selection Area located on the left hand side. This area allows the Support user to select
different areas of customer set-up. As each area is selected the central panel changes
to show the relevant options available.
3. Central panel located in the centre of the page. This area shows details of the currently
selected Area, allowing the user to modify those details and manage the access and setup items.
4. Quick Keys, Valid Customer Accounts and Valid Locations are located on the right hand
side of the page. This area allows quick access to a number of functions and displays a
list of Customer Accounts and Locations you can choose to give the Customer access
too.
Add New Customer
Set-up a new customer
To set-up a customer in Conexa eNabler the following actions need to occur.
1. Agreements and other documentation need to complete. As per the Suppliers existing
standards.
2. Customer set-up in Suppliers ordering system.
3. In the Conexa eNabler system select the Customer Set-up tab, then press ‘Add New
Customer’ Button. This will allow you to enter new customer details.
4. Click on General in the left hand Selection Area. This area allows for general set-up of
screen access and customer functionality. Update the following details:
Level 2, 75 Queen St,
PO Box 7170, Wellesley St,
Auckland, New Zealand.
Conexa eNabler Administration
5 of 28
Version 1.1
a. Enable upsell - uncheck this for customers who have requested not to receive
advertising material.
b. Customer Inactive – ensure this is unchecked for new customers. This box can
be used to deactivate customers who no longer require access to the Conexa
eNabler system. Checking the box will allow the customer, and the customer’s
transactions, to be excluded from the results of any searches in Conexa eNabler.
c. Ordering – check this to allow the customer to place orders on the system. The
default is checked.
Conexa eNabler Administration Manual
6 of 28
Version 1.1
Conexa eNabler System
d. Click on Administration Set-up in the left hand Selection Area. This area allows
for the set-up of the customers administrator. Update the following details: i. Click on the ‘New Admin’ button. This will generate a new Admin ID for
the selected customer.
ii. Enter the Administrator details into the appropriate areas.
Note: The Admin ID must NOT contain any spaces.
If an administrator is saved with any spaces in the
Admin ID field, the user will not be able to access the
Conexa eNabler system. If this occurs, create a new
administrator with a valid Admin ID (ie: without
spaces) then delete the previously created
administrator
iii. Check that the list of Accounts and Delivery Locations are correct /
complete. Ensure the check box is ticked for all accounts and locations
the customer has requested to be available for use in Conexa eNabler.
iv. When you are happy the data is correct – press the ‘Activate Admin’
button. This will generate two emails to the address specified in the
Email Address field – one email containing the Admin ID and a link to the
customer facing Conexa eNabler Web Site, the other containing a
randomly generated password (which must be changed the first time that
the user accesses the site)
Level 2, 75 Queen St,
PO Box 7170, Wellesley St,
Auckland, New Zealand.
Conexa eNabler Administration
7 of 28
Version 1.1
e. Click on Delivery Locations in the left hand Selection Area. This area allows for
the set-up of Product groups (called Catalogues) available for purchase at each
Delivery Location. Update the following details: i. Select Delivery Location by clicking on the appropriate one.
ii. Check the catalogues available for purchase at that Delivery Location. .
iii. If the same Catalogue approvals apply to all Delivery Locations then
press the ‘Apply to All Locations’ button. This will apply the displayed
catalogue set-up to all Delivery Locations attached to this customer.
iv. If each one is different – then select the next Delivery Location and repeat
the process.
Conexa eNabler Administration Manual
8 of 28
Version 1.1
Conexa eNabler System
Deactivate or Delete an Admin User
In the Conexa eNabler system select the Customer Setup; select the Customer the
administrator belongs to, then click on Administration Setup in the left hand selection area.
Select the Administrator name you wish to Deactivate or Delete and press the Delete Admin
button. NB. The Administration User will now be deleted and is not recoverable. There should
always be a minimum of one Administration User set-up for every customer.
Reset an Administrator Password
In the Conexa eNabler system navigate to the Customer Setup, select the Customer the
administrator belongs to, then click on Administration Setup in the left hand selection area.
Select the Administrator name whose password you wish to reset and click the Reset Password
button. An email will be sent to the email address of the selected administrator with a new,
randomly generated password.
Change Administrator Access Privileges
In the Conexa eNabler system select the Customer Setup; select the Customer the
administrator belongs to; then click on Administration Setup in the left hand selection area.
Select the Administrator name you wish to modify. In the Central panel you will see all options
available, make your changes and press the Save User button.
Add a New Customer Administrator
See section on new Customer Set-up
Level 2, 75 Queen St,
PO Box 7170, Wellesley St,
Auckland, New Zealand.
Conexa eNabler Administration
9 of 28
Version 1.1
Transactions Screen
Purpose
This screen allows the user to search for and view details of transaction types by customer,
date, document id etc. The transactions returned are able to be constrained by a number of
fields or data items. The filters that can be used change as different transaction types are
selected.
This screen is made up of 3 active areas, these are: 1. Header area is located at the top of the page. This area provides quick links to other web
sites and details of the current user.
2. Selection Area located on the left hand side. This area allows the user to select the
collectors to be used as a filter on customers, enter other filter information as applicable
to the transactions being searched for (eg. date range, order or invoice number, delivery
location or customer account etc), and specify how the transactions should be sorted
3. Central panel located in the centre of the page. This area lists the Conexa eNabler
transactions that match all of the filter settings, after a search is run.
View Transactions
To select transactions for viewing, click on the Transactions tab, this will open up the
transactions screen.
1. Confirm that you have the correct Collectors areas selected – if not click on ‘more’ and a
full list of Collectors will be presented – check the ones you wish to include.
2. In the Search Criteria box enter in your choice of search constraints. NB the constraints
will change dependant on the type of transaction chosen.
3. The results will be displayed in the cental results area.
4. If you wish to see the full details of a particular record press the
and a details screen
will open.
Conexa eNabler Administration Manual
10 of 28
Version 1.1
Conexa eNabler System
Communications Screen
Purpose
This screen allows the user to monitor communications from customers who are using the
Conexa eNabler system. NB. This screen uses your default Collector and Communication
Types to filter the results.
Front line teams will by default see all Order, special requests and general enquiry messages,
while Accounts teams will see Invoice dispute messages.
This screen is made up of 3 active areas, these are: 1. Header area is located at the top of the page. This area provides quick links to other web
sites and details of the current user.
2. Selection Area located on the left hand side of the screen. This area allows the Elite
user to select the collectors to be used as a filter on customers, filter communications by
date range, customer and/or communication type, select whether or not to display Read
or Closed communications, and specify how the communications should be sorted
3. Central panel located in the centre of the page. This area lists the communications that
match all of the filter settings, after a search is run.
Level 2, 75 Queen St,
PO Box 7170, Wellesley St,
Auckland, New Zealand.
Conexa eNabler Administration
11 of 28
Version 1.1
View Communications
To view Communications details, first verify that the collectors selected in the Collectors panel at
the left of the screen are correct for the customers that you wish to monitor.
Select how you would like the Communications to be sorted by using the drop down menus in
the Order By panel at the left of the screen.
Select whether or not you wish to view “Read” and “Closed” Communications (ie: those that
someone has indicated that they are already following up with the customer, or have resolved).
Once you have made your selections, click the Search button to run the query.
You can re-sort the list by clicking on the column headings in the central results panel.
To view the details of each communication click on the
box for you to view the customers message details:
, this will open the communications
NB. This system does not replace your existing Customer Management system –
therefore messages here need to be copied out into you usual customer management
system.
When you have read the message and entered it into you customer management system check
the box in the ‘Read’ column to indicate that this has been received and is being investigated.
Once the issue has been resolved, tick the Closed check box by clicking on it – this will let
others know that the issue has been resolved and requires no further action.
You can view past communications (read and closed messages) by searching for them using
the selections available in the Search Criteria box.
You can change the selection of messages viewed by changing Collectors, or any of the
Communication types listed in the boxes on the left hand side of the screen.
Conexa eNabler Administration Manual
12 of 28
Version 1.1
Conexa eNabler System
Emulate Customer Screen
Purpose
The Emulate Customer screen provides users with the ability to “emulate” a particular user
belonging to a selected customer. This is particularly helpful for trouble shooting queries or
problems, as it allows the user to see exactly what the customer user sees when they are
logged in. All functionality available to the customer user is also available to the user when
emulating, with the exception of the ability to make payments, which can only be performed by
the customer themselves.
The Emulate Customer screen can also be used to generate to reset the password of any
customer user.
***Important Note: When a customer user is emulated, the user is logged into the live
Customer Module of Conexa eNabler as if they are a real customer user.
Any activity performed when emulating a customer is real. If an order is
submitted whilst emulating a customer, that order will flow to NSW Transit
as a real order, and the customer will receive the product.
The screen is made up of 4 key areas, these are: 1. Header area is located at the top of the page. This area provides quick links to other web
sites, and details of the current user.
2. Selection panel located on the left hand side of the page. This area shows a list of users
belonging to the currently selected customer.
3. Emulate Customer panel located in the centre of the page. This area shows details of
the user that has been selected in the Users panel.
4. Quick Keys located on the right hand side of the page. This area allows quick access to
a number of functions.
Level 2, 75 Queen St,
PO Box 7170, Wellesley St,
Auckland, New Zealand.
Conexa eNabler Administration
13 of 28
Version 1.1
Emulating a Customer
Select the customer to which the user you wish to emulate belongs, either by entering the
customer code in the “Account code” field, or by clicking on the Select Customer button and
completing the search prompts.
Once your customer is selected, a list of all users belonging to the customer appears in the
Users panel. Click on the name of the user you wish to emulate, and their details will appear in
the central panel of the screen. Details displayed include:
1.
2.
3.
4.
5.
6.
User Name (or login name)
Contact Name (or display name)
Email Address
Business Phone Number
Mobile Phone Number
User Status (Active or Inactive) – Note that if a customer user reports that they are
unable to log in to Conexa eNabler, check their status to make sure it is Active
Having selected a user, click on the Emulate User button. This will open a new browser window
displaying the Customer Module of Conexa eNabler, with you logged as the selected user. You
can now view all information on any of the screens to which the customer user has access, and
make updates to any screen, as per the permissions of the user you are emulating.
Some of the activities that you can perform whilst emulating a user include:
1. Maintenance of product favourites in the Product Search screen;
2. Creating new orders, submitting Unsubmitted Orders, marking Unfulfilled Orders as
“delivery complete”;
3. Create new, or close existing disputes;
4. Maintenance of reports on the Reports page;
5. Customer user profile maintenance;
6. Customer user creation, deletion or maintenance (when emulating a customer user with
Administrator privileges);
7. Plus many others.
Reset Password for Customer User
To reset a customer user’s password, first locate the customer as above, and click on the name
of the user to display their details in the central panel of the screen. Firstly, check that the user
has a status of Active – if not, you should Emulate the Customer Administrator, navigate to the
Admin page, bring up the details of the Inactive user, and click the Activate button.
Once the details of the user are displayed, click the reset password button. This will prompt
Conexa eNabler to randomly generate a new password for the user, and send it to the email
address displayed.
Conexa eNabler Administration Manual
14 of 28
Version 1.1
Conexa eNabler System
Campaigns Screen
Purpose
The Campaigns screen provides a method for managing advertising, promotions and sales
campaigns via the Conexa eNabler system. The features supported include broadcast
messaging, cross-selling, up-selling, advertisements and management of campaign distribution
groups.
The screen is made up of 4 key areas, these are: 1. Header area is located at the top of the page. This area provides quick links to other web
sites, and details of the current user.
2. Selection panel located on the left hand side of the page. This area shows two options
for maintenance of campaign information – Campaign Administration & Distribution
Groups
3. Details panel located in the centre of the page. This area shows details of the campaign
information being viewed or edited.
4. Quick Keys located on the right hand side of the page. This area allows quick access to
a number of functions.
Level 2, 75 Queen St,
PO Box 7170, Wellesley St,
Auckland, New Zealand.
Conexa eNabler Administration
15 of 28
Version 1.1
Create a New Campaign
To create a new campaign, first click on Campaign Administration in the menu at the left of the
Campaign Summary screen, then click the New Campaign button. A new row will be added to
the list of existing campaigns, with an entry reading “New Campaign” in the Campaign Name
column. The campaign is configured by clicking on the icons to the right of the end date. To
configure your campaign you must complete the following steps, described in detail below:
1. Edit Campaign - Choose a campaign name, and select the start and end dates
2. Edit users - Select a set of customers or customer groups that the campaign will
target
3. Edit rules - Set up the rules of the campaign
4. Edit broadcast message - Enter a broadcast message (if required)
5. Enable campaign - Activate the campaign
Edit Campaign
To edit the campaign high level information, click on the
icon on the campaign line. The
Campaign Details screen will be displayed. In this screen you can assign a name to the
campaign, and select a campaign start and end date by using the calendar icons.
Once you have given your campaign a name, a start date and an end date click the Save
Changes button to store your amendments. Click the Close button to return to the Campaign
Summary screen.
Edit Users
To add or edit the customers who you wish to include in the campaign, click the
campaign line. The Campaign Users screen will be displayed.
icon on the
From this screen you can add individual customers to the campaign distribution list by clicking
the Add Customer button and following the search prompts, or add a pre-existing customer
group to the campaign by clicking the Add Group button and following the prompts.
Note that management of customer groups is described in detail in the Distribution List section.
As customers or groups are added to the campaign, the customer details are displayed in the
central panel of the screen (name and number of users). To see details of the users within a
customer, click on the
icon at the left of the table. Once you have completed adding
customers and / or customer groups to your campaign, click the Close button to return to the
Campaign Summary screen.
Conexa eNabler Administration Manual
16 of 28
Version 1.1
Conexa eNabler System
Edit Rules
To create or edit the rules for your campaign, click the
icon on the campaign line. The
Campaign Rules screen will be displayed. From this screen the following items can be added to
your campaign:
1. Advertisement
2. Up-Sell
3. Cross-Sell
To return to the Campaign Summary screen, click the Close button.
Level 2, 75 Queen St,
PO Box 7170, Wellesley St,
Auckland, New Zealand.
Conexa eNabler Administration
17 of 28
Version 1.1
Edit Advertisements
To add an advertisement, click the Add Advertisement button, then follow the prompts to select
a product or products to advertise. When your products have been selected, they will be
displayed in the central panel along with the advertisement icon:
. Click on the
icon to
open the Edit Campaign Message window, where you can type the text that you wish to be
displayed in your advertisement.
Advertisements are displayed to selected customers in a Special Offers panel on the left of the
Product Search screen, along with a check box that can be used to mark the advertised product
for addition to the Selected Products panel. The panel is small, so you are advised to keep your
message brief.
You can delete an advertisement from a campaign by clicking on the
side of the advertisement line.
icon at the right hand
Edit Up-Sell
To add an up-sell component to your campaign, click the Add Up-Sell button, then follow
prompts to select a product or products to prompt an up-sell. When your products have been
selected, they will be displayed in the central panel along with the up-sell icon:
. Click on the
icon to open the Edit Campaign Message window, where you can type the text that you wish
to be displayed in your up-sell. To attach the products that you wish to up-sell to the customer,
click on the
icon and follow the prompts to select a product or products that will be
suggested to the customer when they add the up-sell product to their Selected Products panel.
To view the products that are currently tagged for up-selling, click on the
icon at the left of the
row containing the product you wish to check. This will expand the campaign line to display
tagged products:
You can delete an up-sell from a campaign by clicking on the
the up-sell line.
icon at the right hand side of
Edit Cross-Sell
To add a cross-sell component to your campaign, click the Add Cross-Sell button, then follow
prompts to select a product or products to prompt an cross-sell. When your products have been
Conexa eNabler Administration Manual
18 of 28
Version 1.1
Conexa eNabler System
selected, they will be displayed in the central panel along with the cross-sell icon:
. Click on
the
icon to open the Edit Campaign Message window, where you can type the text that you
wish to be displayed in your cross-sell. To attach the products that you wish to cross-sell to the
customer, click on the
icon and follow the prompts to select a product or products that will be
suggested to the customer when they add the cross-sell product to their Selected Products
panel.
To view the products that are currently tagged for cross-selling, click on the
icon at the left of
the row containing the product you wish to check. This will expand the campaign line to display
tagged products:
You can delete an cross-sell from a campaign by clicking on the
the up-sell line.
icon at the right hand side of
Edit Broadcast Message
To edit the Broadcast Message associated with a campaign, click on the
right of the campaign row in the Campaign Summary screen.
icon towards the
The Campaign Broadcast Message window is displayed, where you can type free text, perform
limited text formatting, and add tables or external web links:
The status of the Broadcast message can be toggled (between Active and Inactive) by checking
or unchecking the box labelled “Broadcast message enabled”.
Level 2, 75 Queen St,
PO Box 7170, Wellesley St,
Auckland, New Zealand.
Conexa eNabler Administration
19 of 28
Version 1.1
Once you have entered and formatted your text, tables and web links, click the Save Changes
button to store your work. Clicking on the Close button will return you to the campaign
summary screen.
Broadcast messages will be displayed to selected customer users as a full screen message
immediately after they log in to Conexa eNabler. The user must click a Continue button to
bypass the message and access their Conexa eNabler screens.
Edit Campaign Status
The status of a campaign is depicted by the status indicator icon toward the right of the
campaign row in the summary screen. When a campaign is active (or enabled) the following
icon is displayed:
. Clicking on the icon will change the status of the campaign to On Hold.
When a campaign is inactive (or On Hold) the following icon is displayed:
icon will change the status of the campaign to Active.
To delete a campaign, click on the rubbish bin icon
row.
. Clicking on the
at the right hand side of the campaign
Manage Distribution Groups
Campaigns can be targeted towards individual customers, or organised groups of customers
that have been configured in Conexa eNabler. These groups of customers are called
Distribution Groups. Clicking on Distribution Groups in the Selection area of the Campaign
Summary screen will open the Distribution Groups screen. The screen displays a list of recently
used Distribution Groups in the central panel, along with a search field at the top of the screen
that can be used to enter part or all of a Distribution Group name, if the desired one is not
shown in the current list.
The information displayed about the Distribution Groups is as follows:
1. Group name – name for the distribution group;
2. Customers – count of customers included in the group;
3. Users – count of all users, attached to all customers within the distribution
group;
4. Function icons to edit, clone or delete a distribution group
Conexa eNabler Administration Manual
20 of 28
Version 1.1
Conexa eNabler System
Create New Distribution Group
To create a new Distribution Group, click on the New Group button. A new row will be created in
the Distribution Groups table, which will have “New Group [xx]” in the Group Name column
(where [xx] is a counter). The new Distribution Group can now be edited, cloned or deleted in
the same way as the existing Distribution Groups, per the instructions below.
Edit Distribution Group
To edit a Distribution Group, click on the
icon at the right hand side of the row containing the
Distribution Group that you wish to edit. You will be taken to the Distribution List screen:
From this screen you have the following options:
1.
2.
3.
4.
Edit Distribution Group Name
Add Customers to the Distribution Group
Delete Customers from the Distribution Group
View users within a Distribution Group customer
To change the name of the Distribution Group you are viewing, simply edit the text in the List
Name text box, then click the Save Changes button to store your amendments.
To add a customer to the Distribution Group, click the Add Customer button and follow the
prompts to search for and select the customers that you wish to add to the group. When
finished, click the Save Changes button to store your amendments.
To delete a customer from the Distribution Group, click on the
icon at the right hand side of
the row containing the customer you wish to remove from the group.
To view the users within a customer, click on the
icon at the left of the row containing the
customer whose users you wish to view. The row will expand to display the list of users set up
within the customer:
Level 2, 75 Queen St,
PO Box 7170, Wellesley St,
Auckland, New Zealand.
Conexa eNabler Administration
21 of 28
Version 1.1
To collapse the user list and return to the previous view, click the
expanded row.
icon at the left of the
Once you have finished editing your Distribution Group, click the Close button to return to the
Distribution Group screen.
Clone Distribution Group
You can create a clone, or copy, of a pre-existing Distribution Group by clicking on the
icon
of the row containing the group you wish to replicate. A new row will be added to the
Distribution Group list, containing the cone of the original group, with”[Distribution Group] [xx] –
Cloned” in the name field (where [Distribution Group] = the name of the original group that was
cloned, and [xx] = group counter).
The cloned group will contain all of the customers, and all of the customer users, included in the
original Distribution Group.
Delete Distribution Group
To delete a Distribution Group, whilst in the Distribution Group screen click on the
right hand side of the table row containing the Group that you wish to delete.
icon at the
Search for Distribution Group
To locate a Distribution that is not displayed in the table in the Distribution Group screen, type all
or part of the Distribution Group name in the Search text box, then click the green Search
button.
Conexa eNabler Administration Manual
22 of 28
Version 1.1
Conexa eNabler System
Admin Screen
Purpose
The Elite Admin screen is designed to allow for the creation, configuration and deletion of users
of the Conexa eNabler Administration module. The screen is similar to the Admin screen in the
Conexa eNabler customer module, however contains a few different settings.
The screen is made up of 4 key areas, these are:
1. Header area is located at the top of the page. This area provides quick links to other
web sites and details of the current user
2. Selection Area located on the left hand side. This area contains a list of the users
that have been created in the Conexa eNabler Administration module
3. User Profile panel located in the centre of the page. This area shows the details of
the highlighted user from the Users selection panel
4. Quick Keys and Collectors list located on the right hand side of the page. This area
allows quick access to a number of functions, and displays the list of collectors
currently assigned to a user.
Create New User
To create a new user, click on the New User button in the Quick Keys section of the screen.
The User Profile panel will be displayed, with all fields clear or set to default values. Enter the
following mandatory pieces of information in the appropriate fields:
Level 2, 75 Queen St,
PO Box 7170, Wellesley St,
Auckland, New Zealand.
Conexa eNabler Administration
23 of 28
Version 1.1
1. User Name – the login id for the new user. As with the customer facing module, text in
this field must not contain spaces, otherwise the user will not be able to access the
Conexa eNabler Administration module. Enter the first name and surname of the user
you are setting up in this field, without any spaces;
2. Contact Name – the name of the user being created (can include spaces);
3. Email Address – email address of the user being created;
4. Business Phone – Business phone number of the user being created;
5. Mobile Phone – (Optional field) mobile phone number of the user being created.
Assign permissions (or access to functionality within the Conexa eNabler module) by clicking on
the appropriate check boxes in the Permissions panel.
Permissions grant access to various screens and functionality within the Conexa eNabler
Administration module in the following way:
1. Customer Setup – provides access to the Customer Setup screen;
2. Transactions – provides access to the Transactions screen, with the selected collectors
displayed by default in the Collectors panel;
3. Communications – provides access to the Communications screen, with the selected
collectors displayed by default in the Collectors panel and the checked communication
types selected by default in the Search Criteria panel;
4. Emulate Customer – provides access to the Emulate Customer screen. You can also
elect to grant “View Only” access to this functionality by clicking on the “View Only”
check box to mark it with a tick. This will allow the user to emulate a customer, and see
what they see when they are logged in, but without the ability to make data updates
whilst emulating (for example, creating or submitting orders, cancelling disputes etc);
5. Campaigns – provides access to the Campaigns screen;
6. Administration – provides access to the Admin screen. ***Note: This permission is
for designated Super Users only, and should not be provided to regular users.
Next, link default collectors (or customer groupings) to the user in one of the following ways:
1. Click on the Has All Collectors check box to mark it with a tick. This will link all collectors
to the user, including any new collectors that may be created subsequent to the user
being set up. Using this option provides default access to the transactions and
communications of all customers who are set up for the Conexa eNabler Customer
module.
2. Click on More… at the bottom of the Collectors panel. This will open a new window
containing a list of collectors that are available for selection. Mark the collectors that you
wish to assign to the user by clicking on the check box at the right hand side of the row
containing the collectors that you wish to link. Once you have marked all of the
collectors that you wish to link to the user, click on the Select button at the bottom of the
window. The collectors that you have selected will now appear in the Collectors panel.
To store the information that you have created about the user, click the Save button in the Quick
Keys area of the screen.
At this point, the user will have a status of Inactive and cannot be used to access the Conexa
eNabler Administration module. To activate the user, click on the Activate button in the Quick
Keys area of the screen. This will generate two emails to be sent to the email address entered
for the new user – one containing their User Name (or login id) and a link to the Conexa eNabler
Administration module web site, the other containing a randomly generated password for the
new user. Note that this password is required to be changed when the user first accesses the
Conexa eNabler Administration module.
Conexa eNabler Administration Manual
24 of 28
Version 1.1
Conexa eNabler System
The user is now active and available for use with the functionality assigned in the Permissions
panel.
Edit Existing User
To make changes to any details of an existing user (ie: name/contact details, collectors, or
permissions) select the user from the Users panel by clicking on the name. The name will
become highlighted yellow, and the details of the user will be displayed in the User Profile
section of the screen.
Make the updates that are required as per the instructions for setting up a new user, then when
you are finished click the Save User button to store your changes.
Clone User
It is possible to create clones, or copies, of existing users, with the clones having identical
permission and collector settings to the user that has been cloned. This is useful when setting
up a new user within a team – rather than starting from scratch, an existing user within the team
can be selected and cloned, and a new user will be created with the same access to
functionality and customers.
To create a clone of an existing user, select the user you wish to clone from the Users panel by
clicking on the name, then click the Clone button in the Quick Keys section. You will still need to
edit the name and contact details, ensure that the collector list is appropriate for the new user,
and Activate them, however all permission settings will carry through from the original user.
Delete User
To delete a user, select the user you wish to delete from the Users panel by clicking on the
name, then click the Delete User button in the Quick Keys section. A confirmation message will
be displayed - if you wish to continue with the deletion click the OK button. Note that the user is
permanently deleted from the Conexa eNabler database. If the user is deleted in error, a new
user will need to be created from scratch.
Reset / Resend a Users Password
Users of the Administration module can have their passwords reset or resent by Super Users
(or users with access to the Elite Admin screen). Select the user from the Users panel by
clicking on the name to bring up their details in the User Profile section of the screen.
To rest a User’s password, click the Reset Password button. This will prompt Conexa eNabler
to randomly generate a new password and email it directly to the email address that is loaded
for the user. The user will be required to change their password the next time that they log in to
the Administration module.
To resend a User’s details, click the Resend Details button. This will prompt Conexa eNabler to
send two emails to the user’s email address, one containing their user name (or login id) and a
link to the Conexa eNabler Administration module web site, the other containing their password.
Level 2, 75 Queen St,
PO Box 7170, Wellesley St,
Auckland, New Zealand.
Conexa eNabler Administration
25 of 28
Version 1.1
Conexa eNabler Administration Manual
26 of 28
Version 1.1
Conexa eNabler System
My Profile Screen
Purpose
The My Profile screen is a place for users of the Administration module to change their own
password. Access to this screen is provided to all users set up in the Administration module,
regardless of the permissions settings.
Change Your Own Password
To change your password, enter your current password in the Old Password field. In the New
Password field, enter the text that you would like to become your new password. Enter this text
again in the Repeat New Password field, then click the Change Password button.
If the existing password is entered incorrectly, or the new password texts do not match, an error
massage will be displayed advising of the issue, otherwise a confirmation message will be
displayed to indicate that the password has been successfully changed.
As an extra security measure, an automatic email will also be sent to the email address loaded
against the user in the Elite Admin screen. The email is to notify the user that the password for
their login account has been changed.
Level 2, 75 Queen St,
PO Box 7170, Wellesley St,
Auckland, New Zealand.
Conexa eNabler Administration
27 of 28
Version 1.1
Glossary of terms
or Flag
or rubbish bin
or Heart
or package
or more arrow
or magnifying glass
or binoculars
Archive
AUD
Order Reference
Complete Order
Contact Us
Customer Account
Customer Reference
Delivery Address
Delivery Instructions
Delivery Location
Download
Favourites
Help
Logoff
Lot
New Order
Order Date
Orders
Print
Product
Product Hierarchies
Product Search
Profile
Qty
Requested Delivery
Save
Selected Products
Special Request
Type
Unfulfilled Orders
Unsubmitted Orders
UOM
User
Conexa eNabler Administration Manual
Status flag – identifies the status of various transactions.
Icon to delete or remove an item from a list
Icon to add a product to a favourites list
Icon to add order receipting information
Icon to open up Order or Invoice line to display more information
Icon to open the related document
Icon to open a search list
Location of all closed transactions – Orders
Australian Dollars
A unique CE number that identifies the online order.
Saves the order and moves it to the Orders screen
Opens a message box for entry of a message to the Customer
Service Centre.
A unique account number for a customer
Customers own reference or purchase order number
NSW Transit’s record of the address an order will be delivered to
Free text field for instruction to the delivery person
Name of the location that the order will be delivered to.
Opens up a download instructions box for downloading data in
various file formats.
List of products a customer frequently uses
Opens up the online help facility
Logs the user off the Conexa eNabler system.
Units that the product must be purchased in. i.e. carton of 6 or
1000lt multiples.
Opens up a blank Product Search screen
Date the order was entered into the system
One or more products requested for delivery
Produces a printable document of the data currently being viewed.
Name of a BP product available for sale. When appropriate it
includes the Packaging size
Multi level list of products to assist a customer to locate a product.
Method of looking up products for information or ordering
User’s Conexa eNabler system set-up
Order quantity of product required or previously ordered
Date the customer has requested the delivery on.
Saves the current information entered so it may be continued at a
later session.
List of products the user has selected for ordering
Opens a message box for entry of a message to the Customer
Service Centre.
Type of transaction
Orders submitted but not yet delivered
Orders that have been compiled but not yet submitted
Unit of Measure the product is sold in
Name of the Conexa eNabler System user in the current session
28 of 28
Version 1.1