1
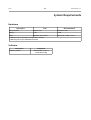
TSR
User's Manual
Version date 07/03/2011
Management Software for
TempStick Radio and
Intelligent Sensors + Radio Node
Temperature wireless sensors
Software version 1.1.2.0
2/17
Tecnosoft s.r.l.
Via Galvani, 4, 20068 Peschiera Borromeo (Milano)
phone +39 02 26922888 - fax +39 02 26922875
e-mail: [email protected] - web: www.tecnosoft.eu
TSR
TecnoSoft s.r.l.
TecnoSoft s.r.l.
TSR
3/17
Index
LICENSE AGREEMENT...................................................................................................................... 4
INTRODUCTION............................................................................................................................... 5
AVAILABLE DEVICES............................................................................................................................... 5
SYSTEM REQUIREMENTS.................................................................................................................. 6
HARDWARE......................................................................................................................................... 6
SOFTWARE.......................................................................................................................................... 6
INSTALLATION................................................................................................................................. 7
INSTRUMENTS AND ACCESSORIES................................................................................................. 8
CONNECTING THE DISKINTERFACE..............................................................................................................8
DEVICES CONNECTION............................................................................................................................ 8
CONNECTING THE USB RADIO RECEIVER.....................................................................................................8
BASIC OPERATIONS........................................................................................................................ 9
LAUNCHING THE PROGRAM......................................................................................................................9
THE MAIN WINDOW............................................................................................................................. 9
INFORMATION AND ONLINE HELP...............................................................................................................9
EXIT THE PROGRAM................................................................................................................................ 9
CONFIGURATION.......................................................................................................................... 10
TEMPERATURE MODE............................................................................................................................ 10
CONNECTION.................................................................................................................................... 10
LANGUAGE....................................................................................................................................... 10
EXPORT PATH.................................................................................................................................... 10
DATA PATH...................................................................................................................................... 10
ALARM PROFILES................................................................................................................................ 11
PRINTING OPTIONS............................................................................................................................. 11
AUTOSAVE....................................................................................................................................... 11
START A NEW MISSION................................................................................................................. 12
INFORMATION ON THE UNIT..................................................................................................................... 12
STARTING A MISSION............................................................................................................................ 12
RECEIVING THE TRANSMITTED DATA............................................................................................ 13
STATISTICS........................................................................................................................................ 13
EXPORT DATA.................................................................................................................................... 13
ALARMS SETTING................................................................................................................................. 14
MISSION REPORT PRINTING..................................................................................................................... 14
SAVE THE MISSION............................................................................................................................... 14
STOPPING A MISSION................................................................................................................... 15
DATA ARCHIVE............................................................................................................................. 16
OPEN A MISSION FROM THE ARCHIVE........................................................................................................16
REMOVE A MISSION FROM THE ARCHIVE.....................................................................................................16
RENAME A MISSION IN THE ARCHIVE.........................................................................................................16
IMPORT A MISSION FROM THE RADIO PRINTER...............................................................................................16
4/17
TSR
TecnoSoft s.r.l.
License agreement
Read this license agreement thoroughly before using the Software. Using and copying this Software is subject to the
acceptance of this agreement.
If you choose to refuse the following conditions, please return this Software to the point of purchase for a complete refund.
This agreement involves Tecnosoft srl, Redecesio di Segrate, Milano, Italy (henceforth called Tecnosoft) and the User (be it
a physical or juridical person) for the following software products (henceforth called Software): "TSR" and any software
product accompanying it.
Tecnosoft grants the user a non-exclusive right to use a copy of the software on a single computer provided that the user
accepts the following conditions.
1. User license. The Software is property of Tecnosoft and cannot be copied nor sold without the prior written
authorization of Tecnosoft. The Software is protected by Italian and European Laws and by International Treaties
concerning intellectual properties.
2. Additional licenses. The purchase of additional licenses conveys the right to use the Software on a corresponding
number of computers at the same time.
3. Exclusion of liabilities. Except for what stated by applicable laws, in no case can Tecnosoft be considered liable for
damages or losses, direct or indirect, including, but not limited to, loss or missing income, suspension of activities, loss of
information or any other monetary or economical damage, deriving from proper or improper use of the Software even
if Tecnosoft has been advised of the possibility of such damages. In any case, the responsibility of Tecnosoft for such
damages will be limited to the price paid for the Software. This clause is applied even if the User does not accept the
Software.
4. Use of Software results. It is User's responsibility to check that results given by the Software are correct and appropriate.
In no case the Software should be used if such use can be threatening to the health or life of human beings. This clause
is applied even if the User does not accept the Software.
5. Updates. If the Software is an update of a previous version, the license is transferred from the old version to the update.
Only the update can be used, unless the update is destroyed.
6. Separation of components. The Software is licensed as a single product. Components cannot be separated.
7. Limitations. The User cannot convert, decode, decompile or disassemble the Software, except for what is explicitly
requested by applicable laws.
TecnoSoft s.r.l.
TSR
5/17
Introduction
TSR is a software program that is used to configure and acquire data off TempStick Radio temperature
sensors and transmitters. Through a USB Radio Receiver it receives data from wireless sensors, the
TempStick Radio, and shows temperature values in table and graph, real time. All data can be saved and
printed in reports. The software allows also the setting of thresholds for alarms.
The sensors are supplied with a replaceable battery with high autonomy (based on the rate of transmission:
approximately, with a transmission each 5 minutes the battery can last up to 7 years).
The data may be exported in Excel (.SLK) file format. TSR is also used to program the rate of transmission
for the sensors, provided that you have the appropriate interface to do this.
Each sensor transmitter is identified by means of two unique serial numbers (one for the sensor itself and
one for the radio), and, if requested, may be supplied with a calibration certificate in order to guarantee the
validity of the acquired readings.
Available devices
Following the list of the devices currently supported by the SPD software, with the needed accessories (all
with their product code).
Interface
Radio Configuration Interface (ts04rci)
USB Radio Receiver (ts04rr)
Data logger
TempStick Radio (ts01tsrxxyy, ts01tsr200xxyy)
Temperature Intelligent Sensor (ts11istxxyy, ts11ist200xxyy, ts11ist-80xxyy) +
Radio Node (ts11rn)
6/17
TSR
TecnoSoft s.r.l.
System Requirements
Hardware
Description
mum
Recommended
Microprocessor
Celeron 300
Pentium III 400
Memory
1 GB
4 GB
Video
800x600; 256 colours
1024x768; 16 Mil. colours
1 USB free port for the Radio Configuration Interface
1 USB free port for the USB Radio Interface
Software
Description
Operating system
Supported
Windows XP / Vista / 7
(32 bit and 64 bit)
TecnoSoft s.r.l.
TSR
7/17
Installation
To install TSR simply insert the installation CD into your CD-ROM; click on Start – Run and type
“D:\setup.exe” (N.B. Your CD-ROM device could have a different name to “D”).
Select the installation menu language and click on Install, then select SPD and click Install again; from this
menu you can also open the PDF manual or the USB driver installation instructions.
Follow the instructions to complete the installation. You may be required to install Microsoft .NET before
installing the TSR: accept and proceed. We suggest to install TSR for all users (Everyone). At the end click
on Finish.
8/17
TSR
TecnoSoft s.r.l.
Instruments and accessories
All loggers currently managed by the TSR software are connected to the PC by means of a single interface,
the Radio Configuration Interface.
The first thing to do is connect the interface to a free USB port and install the drivers.
Connecting the DiskInterface
In the kit there is also a USB cable: connect the biggest flat end in the free USB port of your PC while the
other smaller end in the USB connector on the device.
As soon as the device is connected to the PC, Windows will detect its presence and will begin the driver
installation procedure. According to your operating system, proceed as follows.
USB driver installation under Windows XP
In the Add New Hardware window, select No, not now (last option) and click Next. Then, select always the
last option, which requires manual installation of the driver (for expert users) and click Next. Set in the path
field, the following path (make sure the CD is in drive): "D:\Drivers\XP_2000 (32 bit)" (your driver might not be
called “D") and click Next. If, during installation, Windows would give you a warning about the origin of the
unsigned drivers, click Continue, and after the procedure, click Finish.
If you change the connection port of the interface, you might be required to reinstall the drivers.
Note: the Radio Configuration Interface drivers is available on the Tecnosoft website and are also
found in the installation folder of the program, if you lose the installation CD.
USB driver installation under Windows Vista/7
Windows will install the driver, without success. When you will get the option, ask to specify a path to look for
the drivers. Set in the path field, the following path (make sure the CD is in drive): "D:\Drivers\Vista_7 (32 and
64 bit)" (your driver might not be called “D") and click Next. If, during installation, Windows would give you a
warning about the origin of the unsigned drivers, click Continue, and after the procedure, click Finish.
If you change the connection port of the interface, you might be required to reinstall the drivers.
Note: the Radio Configuration Interface drivers is available on the Tecnosoft website and are also
found in the installation folder of the program, if you lose the installation CD.
Unsuccessful installation
If, for various reasons, the installation fails, go to Control Panel - System - Device Manager (or Hardware Device Manager for Windows XP), select USB Ports and click the right button on RCI and select Update
Driver. Then, follow the instructions above.
Devices connection
The devices must be connected to the free end of the cable connected to the Radio Configuration Interface,
in the connection named “com”.
Connecting the USB Radio Receiver
An essential part of the data logging system is the USB Radio Receiver that receives all the data from the
different TempStick Radio and send them to the software. Just insert the USB B type connection (square
end) to the USB Radio Receiver and the USB A type connection (flat end) to your PC. No driver installation
nor configuration is needed.
TecnoSoft s.r.l.
TSR
9/17
Basic Operations
Launching the Program
Once the installation is complete, double click on the TSR icon on the desktop to start the program,
alternatively navigate to Start – Program Files (or All the Programs, if you're using Windows XP) –
Tecnosoft - TSR – TSR. For the use of the icon TSR – AutoSave, see p.11 .
The Main Window
The left part of Main Window holds the function buttons, whereas the central part of the window shows the
details of the connected TempStick Radio (when connection is established); on the right corner the question
mark (?) opens the Info window and the X closes the Main Window itself
If you need to move the window within your desktop, click on the dark green border at the top of the window
with the left mouse button and, keeping it pressed, move the window to the desired position.
Initially only the Connect, Archive and Setup buttons are be available; the others will be enabled once a
sensor is connected to the interface or when the USB Radio Receiver is connected.
Information and Online Help
Click on the question mark button in the Main Window; The Info window will open, displaying the software
version and the program licence agreement. Click on the question mark in this window to open the Online
Help and on the X to close it.
Exit the program
To exit the program just click on the Close the program button, i.e. the X on the top right of the Main
Window.
10/17
TSR
TecnoSoft s.r.l.
Configuration
Click on the Setup button to open the window where you may set the program parameters. To confirm
changes click Accept Data and to cancel them click on Close (bottom right corner).
The window is divided into several sections.
Temperature Mode
Select the desired units to be displayed for temperature degrees: Celsius or Fahrenheit.
Connection
Select whether you use a USB interface or a serial one (select from the list of available serial ports the port
that corresponds to the one where the reader interface has been connected) to connect the TempStick Radio
(not the USB Radio Receiver, which doesn't need any configuration at all).
Language
You may choose the preferred language used throughout the program; to effect changes close and start the
program again.
Export Path
The folder specified here is used as the default folder when you export data in Excel format (*.SLK). Click on
the folder button to navigate to the desired folder.
Data Path
The folder specified here is used to store the acquired data from the loggers. Click on the folder button to
navigate to the desired folder.
TecnoSoft s.r.l.
TSR
11/17
Alarm Profiles
Here you can create several profiles to set alarms to each radio sensor connected. To see the details for a
profile just place on it the cursor and wait for the tooltip to show.
Add a Profile
Just click on the plus (+) sign to open a new window where you can set the Name of the profile, the Max and
Min thresholds for the alarms, the Hysteresis (Hyst) for the two values and the Waiting Time, meaning for
how long the temperature must be out of threshold before actually giving the alarm.
Remove a Profile
To remove a Profile from your list, select it form the drop down list and click on the Remove Profile button
(the rubber button next to the plus sign).
Printing Options
Here you can set the headings for the report to be printed.
Heading 1
The title of the report.
Heading 2
The sub-title of the report.
Heading 3
Additional information text to be printed on the report.
AutoSave
Here you can enable the option for automatic save of the data; this function is particularly suggested for long
time processes or continuous monitoring, like for fridges. Set here every how many days or hours the
software must save the data and restart (the name of the file will be the standard one). It is suggested to set
a time no higher than 5 days.
After you have set this option, close the program and restart it using the TSR – AutoSave desktop icon. The
software will save the data at the set time and will close itself and start again. If you want to close it
permanently, close the DOS window first.
12/17
TSR
TecnoSoft s.r.l.
Start a New Mission
To start a new mission and program the unit, ensure the interface is connected to the PC and that the unit is
correctly connected to the interface.
Click on the Connect button in the Main Window; after a while the connection is established and TSR will
display some basic information about the data logger. Moreover, the Start button that were previously
disabled are now enabled.
Information on the unit
The central part of the window holds some information on the connected unit. On the right the current
temperature value read by the logger is shown. On the left there are the following indications:
– Started: date and time at which the current mission was started;
– Step: transmission rate of the current mission;
– Status: device status (Recording means the unit is acquiring data, Stopped indicates the mission has
ended, Stand-by implies that a mission is programmed and will start once the programmed start delay
time has elapsed);
– Serial: serial number of the TempStick Radio, followed by the number of the radio itself (this last number
is listed in the graph);
– Expiry: the calibration expiring date of the unit.
Starting a mission
Click on Start to open the programming window of the TempStick Radio.
In the Start Date Time box select the date and time at which you would like the mission to start. If it is the
current date and time, the mission will start immediately, otherwise you can set the mission to start in the
future.
In the Transmission Step box you must define the acquisition rate, expressed in days, hours, minutes and
seconds. You may leave unnecessary fields blank (you do not have to enter 0). You may also type a
Description for the unit, so to recognize it instead of using its serial number, and some additional Notes at the
end to help you identify the mission in the future.
Click on OK to start the mission.
Click on Unlink before removing the unit from the interface.
TecnoSoft s.r.l.
TSR
13/17
Receiving the transmitted data
To display real time the data transmitted from the TempSticks Radio you have, click on the Radio button (it is
enabled only if a USB Radio Receiver is connected): once the connection is established, a window displaying
a graph and table will appear. To maximize it, click on the magnifying glass in the bottom right corner of the
window (Maximize Window).
The right part of the window displays all the data from all the units, indicating the date and time, the name of
the unit (the Description you set when starting the mission or the serial number of it) as well as the
temperature values. You can scroll through the data using the right vertical bar.
On the left there is the graph, which is blank at the beginning, and under it there are four drop down list and a
list under each one of them. From the drop down list you can select one of the unit received and its graph will
be displayed. The borders and the drop down list will change colour and the lines in the graph will have the
same colour of them.
Statistics
On the right, under the list of data, there is a table that shows all the units received so far. If you select one of
them, you will see its statistics on the bottom right:
•
MIN: the minimum temperature transmitted;
•
AVG: the average temperature;
•
MAX: the maximum temperature transmitted.
You may select more than one unit from the list pressing the CTRL button (keep it pressed and select the
units you want to see the statistics of).
To see the statistics of all data received, look in the Global box below the list of transmitters.
Export data
To export the data for this mission click on the Export Data button (the disk) located at the bottom right of the
window: if you have not set the destination folder for the exported files ( Configuration chapter, p.10), the data
14/17
TSR
TecnoSoft s.r.l.
will be exported in the main folder of the program. The export file has a .SLK extension, and may be imported
in Excel.
Alarms setting
In the same way you select the units to see their statistics you can select them and assign an alarm profile to
each of them. Select one or more unit and then assign it or them a profile from the drop down list Alarm
Profile.
When an alarm occurs, according to the parameters set in the profiles, the unit that is in alarm will turn red
and a + sign will appear if the temperature is above the maximum threshold and blue with a - sign if the
temperature is below the minimum threshold (if you see only the signs, it means that there had been alarm in
the past for that sensor). Also, there will be a sound alarm. When all the alarmed units will return between the
thresholds, the alarms will cease.
You can turn off the sound alarm by checking the Stop Sound Alarm box: note that if another unit will go into
alarm after you checked this, the alarm will start again for this second unit. To disable the sound alarm, check
the Disable Sound box.
Mission report printing
It is possible to print a report of the mission currently displayed: click on the Print report button (the left most
button in the right corner of the window). It will open a dialogue window where you can type in some notes
regarding the current mission. Click on Report again to continue.
From the dialogue box that appears select the printer and click on Print. The Print Preview window will
appear where the report is shown: all the information regarding the mission, along with the graph, are there.
Click on Print to print or close the window to cancel.
Save the mission
To save the mission, click on Close. A window will open where you type in the name for the mission, or keep
the default name, identified by the date of the mission itself. Click on the disk to proceed or on the X to exit
without saving.
The data of each mission are automatically saved every 5 seconds in a file called LAST, in the archive. This
is done so that if a blackout occurs, you don't loose all the data. Remember to rename the LAST record in the
archive, otherwise it will be overwritten by the new mission you will start.
TecnoSoft s.r.l.
TSR
15/17
Stopping a mission
To stop a transmission in progress, connect the interface and the TempStick Radio and click on Connect.
When connection is established, click on the Stop sign in the right part of the window to stop the mission.
The unit will immediately stop transmitting.
16/17
TSR
TecnoSoft s.r.l.
Data Archive
When a transmission session is saved, TSR stores the data from that mission in the archive. Please
remember to setup the destination folder for the data files in the configuration window before saving data.
Click on Archive to display a list of missions that have been saved.
This window will display a list of missions that may be ordered in chronological order (based upon the mission
start date and time), by selecting the Date option, in the Sorted By box, or according to the their names, by
selecting the Mission option.
To close the window click on Close.
Open a mission from the Archive
To open a mission double click on the entry in the list or select it and click on the Accept Data button on the
bottom right.
Remove a mission from the Archive
To delete a saved mission, select it and click on Delete stored data.
Rename a mission in the Archive
You might want to rename a mission (especially the “Last” mission if this is a result of an accidentally
interrupted transmission). Select it and click on Rename (the disk icon) to change its name.
Import a mission from the Radio Printer
After having connected the USB pen-drive to the PC, enter the Archive of the TSR and press the + button
(Import from Radio Printer). Select the folder where the files you want to import are and press Open. Then,
choose a name for the file and confirm and your mission will be listed in the Archive.
TecnoSoft s.r.l.
TSR
Tecnosoft s.r.l.
Via Galvani, 4 - 20068 Peschiera Borromeo (Milano) - telephone +39 02 26922888 - fax +39 02 26922875
e-mail: [email protected] - web: www.tecnosoft.eu
Certified UNI EN ISO 9001:2008 fo Software development
17/17