1
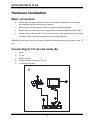
User Manual
Digital Terrestrial Television Receiver
OPTICUM 7003Te PLUS
English 3/2009 jp
OPTICUM 7003Te PLUS
Contents
Safety precautions ..................................................................................................................................... 3
Environment protection............................................................................................................................. 5
Introduction ............................................................................................................................................... 6
Switch Features ...................................................................................................................................................... 6
Package contents .................................................................................................................................................... 6
Front panel ............................................................................................................................................................. 7
Rear panel............................................................................................................................................................... 7
Remote Control ...................................................................................................................................................... 8
Hardware installation................................................................................................................................. 9
Basic connection ..................................................................................................................................................... 9
Connecting to TV set and aerial (A) ......................................................................................................................... 9
Connecting to computer for upgrade (B) .............................................................................................................. 10
Connecting to amplifier (C) ................................................................................................................................... 11
Operation ................................................................................................................................................. 12
Easy Installation .................................................................................................................................................... 12
Menu operation ....................................................................................................................................... 13
Channel .................................................................................................................................................... 14
TV Channel List ..................................................................................................................................................... 14
Radio channel list .................................................................................................................................................. 16
Delete all favorites ................................................................................................................................................ 16
Delete all............................................................................................................................................................... 17
Group rename ...................................................................................................................................................... 17
Installation ............................................................................................................................................... 18
Auto Scan.............................................................................................................................................................. 18
Channel Scan ........................................................................................................................................................ 18
Tuner Setting ........................................................................................................................................................ 19
System Setup............................................................................................................................................ 20
Language .............................................................................................................................................................. 20
TV System ............................................................................................................................................................. 20
Region and Time ................................................................................................................................................... 21
Timer Setting ........................................................................................................................................................ 21
OSD Setting ........................................................................................................................................................... 23
Parental Lock ........................................................................................................................................................ 23
Tools ......................................................................................................................................................... 24
Receiver Information ............................................................................................................................................ 24
Game .................................................................................................................................................................... 24
Load Factory Default ............................................................................................................................................. 24
Software Upgrade ................................................................................................................................................. 24
Media+ (optional) .................................................................................................................................... 26
Media Player ......................................................................................................................................................... 26
Storage Manager .................................................................................................................................................. 27
Safely Remove Storage Device .............................................................................................................................. 28
EPG application ........................................................................................................................................ 28
OSD Overview .......................................................................................................................................... 29
Specification ............................................................................................................................................. 32
Troubleshooting ....................................................................................................................................... 33
Declaration of conformity ........................................................................................................................ 34
2
OPTICUM 7003Te PLUS
Safety precautions
CAUTION:
The lightning flash with
arrowhead
symbol,
within an equilateral
triangle, is intended to
alert the
user to
"dangerous
voltage"
and to prevent from a
risk of electric shock.
Warning:
To reduce the risk of electric
shock, don't open the cabinet.
Refer servicing to qualified
personnel only.
The exclamation point within
an equilateral triangle is
intended to alert the user to
important operating and
maintenance (servicing).
WARNING: Do not use this device where contact with or immersion in water is a possibility.
Do not use near flower vase, washbowls, kitchen sinks, laundry tubs, swimming pools, etc.
WARNING: Do not put the candle or lamp stand on the cabinet; otherwise, there is the danger
of fire.
WARNING: The unit should be connected to a power supply only of the type described in the
operating instructions or as marked on the unit. If you are not sure of the type of power supply
(for example, 120 or 230 V) to your home, consult your local dealer or local power company.
WARNING: Do not open the cabinet or touch any parts in the inner mechanism. Consult your
local dealer for technical service if the opening is required.
Note: To ensure proper use of this product, please read this User manual carefully and
retain for further reference.
Note: Do not open the cabinet to avoid the unit direct exposure to radiation.
Unit Cleaning: After the unit power is turned off, you can clean the cabinet, panel and remote
control with a soft cloth lightly moistened with a mild detergent solution.
Attachments: Never add any attachments and/or equipment without the manufacturer
consent; as such additions may result in the risk of fire, electric shock, or other personal injury.
3
OPTICUM 7003Te PLUS
Locating: Slots and openings in the cabinet are provided for ventilation to protect it from
overheating. Do not block these openings or allow them to be blocked by placing device on a
bed, sofa, or other similar surface, nor should it be placed over a radiator or heat register.
Power-Cord Protection: Place the power-supply cord out of the way, where it will not be
walked on. Please take special attentions to cords at plugs, convenience receptacles, and the
point where they exit from the unit.
Object and Liquid Entry: Never put objects of any kind into this device through openings, as
they may touch dangerous voltage points or short-out parts that could result in a fire or electric
shock. Never spill any liquid on device.
Note: Moisture may be formed on the lens In the following conditions:
•
when the unit is suddenly moved from a cold environment or an air-condition room
to a warm place.
•
immediately after a heater has been turned on.
•
in a steamy or very humid room.
If the moisture forms inside the unit, it may not operate properly. To correct this problem, turn
on the power and wait about two hours for the moisture to evaporate.
Parts Replacement: When the unit parts need to be replaced, user should make sure the
service technician use the replacement parts specified by the manufacturer or having the
same characteristics as the original part. Unauthorized replacement may put the unit In the
risk of fire, electric shock or other hazards.
Safety Check: After all the maintenances and repairs are done, user is required to request
the service technician to conduct the overall safety check to ensure the machine is In the
proper condition.
4
OPTICUM 7003Te PLUS
Environment protection
Attention!
Your product Is marked with this symbol. It means that used electrical and electronic products
should not be mixed with general household waste. There is a separate collection system for
these products.
Information on Disposal for Users (private households) in the European Union
Used electrical and electronic equipment must be treated separately and In accordance with
legislation that requires proper treatment, recovery and recycling of used electrical and
electronic equipment.
Following the implementation by member states, private households within the EU states may
return their used electrical and electronic equipment to designated collection facilities free of
charge*. In some countries* your local retailer may also take back your old product free of
charge if you purchase a similar new one. *) Please contact your local authority for further
details.
If your used electrical or electronic equipment has batteries or accumulators, please dispose
of these separately beforehand according to local requirements.
By disposing of this product correctly you will help ensure that the waste undergoes the
necessary treatment, recovery and recycling and thus prevent potential negative effects on
the environment and human health which could otherwise arise due to inappropriate waste
handling.
Information on Disposal for Business Users
In the European Union
If the product is used for business purposes and you want to discard It:
Please contact your dealer who will inform you about the take-back of the product. You might
be charged for the costs arising from take-back and recycling Small products (and small
amounts) might be taken back by your local collection facilities,
In other Countries outside the EU
If you wish to discard of this product, please contact your local authorities and ask for the
correct method of disposal.
5
OPTICUM 7003Te PLUS
Introduction
Switch Features
•
MPEG-2 / DVB-T compatible
•
Bandwidth 7MHz or 8MHz optional
•
Power interruption memory, automatic resumption.
•
Multiple subtitles
•
Auto scan/ Channel Scan
•
Support OSD and teletext (VBI ) output
•
TV SCART jack
•
Digital audio coaxial output
•
Electronic Program Guide (EPG)
•
Active antenna with 5V DC output
•
Support LCN function.
•
Compliant with USB 1.1 standard
•
Capable of software upgrade via SCART jack or USB connector
Package contents
Please check the articles carefully after you open the packing as below:
•
One receiver
•
One remote control
•
One user manual
If any of the listed items are missing or damaged, please contact the reseller from whom you
purchased for replacement.
6
OPTICUM 7003Te PLUS
Front panel
1.
2.
3.
4.
5.
6.
7.
Power/Standby LED
CH-▼button
Standby button
CH+▲ button
SIGNAL LED
Remote Control Sensor
USB connector
Rear panel
1.
2.
3.
4.
5.
Aerial input jack(75Ω)
To TV Loop Out jack
Digital audio coaxial output jack
TV SCART jack
AC power cord cable
NOTE: Please unplug the power cord and keep it orderly when the unit will not be used for a
long time in case that the power cord may get scratched and thus lead to electric leak and
shock.
7
OPTICUM 7003Te PLUS
Remote Control
Key
1
2
3
4
5
6
7
8
9
10
11
12
13
14
15
16
17
18
19
20
21
22
23
24
25
26
27
28
29
30
31
32
8
Function
LAST button
STANDBY button
NUMERIC 1 button
NUMERIC 2 button
NUMERIC 4 button
NUMERIC 5 button
NUMERIC 7 button
NUMERIC 8 button
TV/R button
NUMERIC 0 button
INFO button
MODE button
MENU button
SUB-T button
▲UP/ CH + button
◄ LEFT/ VOL - button
▼ DOWN/ CH - button
RED button M/ P button
GREEN button
EPG button
BLUE button
TEXT button
YELLOW button
► RIGHT/ VOL + button
OK button
EXIT button
FAVOR button
AUDIO button
NUMERIC 9 button
NUMERIC 6 button
NUMERIC 3 button
MUTE button
OPTICUM 7003Te PLUS
Hardware installation
Basic connection
•
Ensure that the power switches of this unit and other equipment to be connected,
•
Read the instructions attentively before connecting other equipments
are turned off before commencing connection
•
Ensure that you observe the color-coding when connecting audio and video cords
•
Please connect the unit with TV by only one kind of video output format, and setup
a suitable output mode, otherwise there will be image distortion.
REMARKS: User can choose any proper connection format according to the jacks of the TV
set.
Connecting to TV set and aerial (A)
1.
Aerial
2.
TV set
3.
DVB-T receiver
4.
SCART cables connected to TV set
5.
AC power cord cable
1
2
4
3
5
230V 50H z
A E RIA L
TO TV
LOOP OUT
9
COAXIAL
OPTICUM 7003Te PLUS
Connecting to computer for upgrade (B)
1.
Desk computer
2.
Upgrade conversion board
3.
DVB-T receiver
4.
SCART Cable connecting the DVB-T and upgrade conversion board
5.
RS232 Cable connecting upgrade conversion board and personal computer
10
OPTICUM 7003Te PLUS
Connecting to amplifier (C)
11
OPTICUM 7003Te PLUS
Operation
Easy Installation
Connect the receiver and other equipments related according to “Basic connection”:
Generally, once the receiver is switched on, the Easy Install menu emerges:
•
Explore the menu with ▲/▼ button, and select the necessary setting options with
•
When the setting is over, move to Search with ▲/▼ button, then press OK button to
◄/► button: Region, and OSD Language;
shift to Auto Scan window and start searching for TV services and radio services.
•
When auto scan is finished, the receiver will play the first of all channels that have
been detected automatically.
•
Press OK button to pop up the Channel List and choose a preferred channel on the
list with ▲/▼ button and press OK to enjoy it.
If no Easy Install menu appears after the receiver is turned on:
•
Press MENU button to open the Main Menu, and use ▲/▼button to enter the
submenu Tools to conduct Load Factory Default. For this operation, the default
password “0000” is required and the change should be saved.
Note: User will have to perform this step when this unit is used for the first time or
the software has been updated.
•
Easy Install menu appears as soon as the factory default settings have been loaded
and saved. User can proceed to the operation as instructed above.
•
User can also open the Main Menu and submenu Installation sequentially to
perform auto scan directly. You can choose to scan all channels or just free
channels. When the scan process is finished, the first channel is visible
automatically.
Press OK button to open the TV channel list and select one with ▲/▼ button to enjoy.
However user can press EXIT button to quit or leave for upper level menu.
Read Menu operation instruction for more details.
12
OPTICUM 7003Te PLUS
Menu operation
Press MENU key to open the Main Menu which includes 5 sub-menus:
•
Channel
•
Installation
•
Setup
•
Tools
•
Media +
Use ▲/▼ button to select a submenu item, OK button to confirm, ◄/► button to choose a
setting option, or EXIT to return to the upper-level menu.
Note:
1.
Certain menu option should be operated according to the navigation guide
2.
Colored buttons refer to different function operations in different menus.
displayed on the screen;
Shortcut buttons:
STANDBY: Toggle between standby and working status.
MUTE: Enable or disable sound output.
TEXT: View text/MHEG 5 information of the current service
SUB-T: Enable or disable subtitle display on the screen (if available).
CH+/ CH-(▲/▼): Access next or preceding channels one by one.
VOL+/ VOL-(►/◄): Increase or decrease the volume output of a service.
OK : Confirm an operation or bring up the TV Channel List when no OSD remains on the
screen.
TV/R: Toggle between TV and Radio channels.
LAST: Shift to the previous one channel.
MODE: Preview up to nine channels each time.
INFO: View the information of the current channel.
AUDIO: Shift the audio output modes.
EPG: Check the EPG information of current channel (if available).
RED, GREEN, YELLOW, BLUE: Refer to different function operation according to the actual
navigation guide.
13
OPTICUM 7003Te PLUS
Channel
Move the cursor to Channel with
▲/▼button and press OK to open this
menu:
•
TV Channel List
•
Radio Channel List
•
Delete All Favorites
•
Delete All
•
Group Rename
TV Channel List
Open TV Channel List. On the left is the list of all TV channels or free channels, on the right is
a visible small window for viewing the selected channel, and at the bottom is the navigation
guide for all operations. For only the channels that support MHEG 5 output, there will be a
note telling “ MHEG 5 available” under the small visible window.
According to the navigation guide, user can conduct lots of operation on the TV channels as
follows:
•
Numeric 1 (Edit) button:
Select one channel with ▲/▼ button, press Numeric 1 button to edit it. At the moment the
navigation guide for editing the channel is displayed under the channel list, replacing the
previous guide at the upper level. This guide tells all the shortcut buttons valid for the purpose
of editing:
OK: Select. Press this button once to tick the selected channel to the end of its channel name,
and press it a second time to cancel the tick. Such operation allows selection of only one
channel each time.
Numeric 0: All. Use this button to select or to cancel the selection of all channels at one time.
Press it once, all channels will be ticked to the end of their names and press it a second time
to cancel all the ticks.
Numeric 1: Favor. Select one channel with OK button to confirm. Press Numeric 1 button pop
up Group menu including 8 groups, namely Group 1 to Group 8. Use ▲/▼ button to select a
group to seat the chosen TV channel with OK button pressed to confirm. The system will ask
“Are you sure to save?”. Click Yes to save and click No to cancel and exit. Once Yes is
clicked by pressing OK button, the selected channel is set as a favorite with a heart-shaped
14
OPTICUM 7003Te PLUS
icon appearing to the end of its channel name. To check the favorite groups, press ◄/►
button to open the favorite group list where user can cancel the Favor setting by deleting a
preset favorite channel from its group.
Numeric 2: Lock. Select one channel, and press Numeric 2 button. The system asks “Are you
sure to save?” Answer the question by clicking Yes or No. Once Yes is clicked, it means the
chosen channel is locked, a lock icon appearing to the end of the channel name. Click No to
cancel current operation and exit. To unlock a channel, repeat the process described above.
Numeric 3: Skip. Select one channel to be skipped over, then press Numeric 3 button and
reply to the question “Are you sure to save? “ Click Yes to confirm, or click No to cancel. Once
a channel is confirmed to be skipped over, an icon of bended arrowhead is shown to the end
of its channel name. Such setting will be valid only after you exit from TV Channel List and
scroll through the channels with ◄/► button, i.e. the target channel preset to be skipped over
will be ignored at present. To cancel skip operation, repeat the operation above once.
Numeric 4: Delete. To delete one channel from the channel list, press Numeric 4 button
followed by answering the question “Are you sure to save?” Choose Yes to delete the
highlighted TV channel, and choose No to cancel.
◄/►(Group): When there are favorite channels preset, press either button to open the
favorite channel list sorted into Group 1-8. Press ► button to shift to next group in an
ascending order, while press ◄ button to shift to a preceding group in a contrary order. When
it is the final favorite group in either order, one more press of ◄/► button will leave the
favorite channel list for ordinary TV channel list window. As for favorite TV channels, user can
edit them with Numeric 1 button, the same way as described above on editing a TV channel.
User can also find a favorite channel with Numeric 2 button (detailed instructions will follow
below); press ◄/► button to shift groups or return to ordinary TV channel list and Exit button
to exit.
EXIT: Exit. Press this button to cancel current menu operation any time and leave for the
upper-level menu or the Main Menu.
•
Numeric 2 (Find) button:
Search for a particular channel by inputting the correct channel name. Press Numeric 2 button
to pop up a small soft keyboard which is designed for entering the right channel name of the
target channel you want to search for. When the channel name is entered completely and
correctly, click OK key on the soft keyboard to confirm. In no time, the receive find the right
channel and play it.
15
OPTICUM 7003Te PLUS
•
Numeric 3 (Sort) button:
Sort the channel in five orders: Default, Name (A-Z), Name (Z-A), FTA and Lock. Press
Numeric 3 button to bring up the Sort menu after answering Yes to question “ Are you sure to
save?”. Use ▲/▼ button to select any order type among the five.
−
Name (A-Z): The TV channels will be sorted in the alphabetic order from A to Z
−
Name(Z-A): The TV channels will be sorted in the alphabetic order from Z to A
−
FTA: Sort the free channels together;
−
Lock: Sort the locked channel together at the end of the list.
according to their names;
according to their names;
Note: The order of channels relates to the LCN function of the receiver which will be explained
later.
•
Numeric 4 (Move) button:
Move a channel to an preferred position on the list. Select a channel on the list, and press
Numeric 4 button, then the target channel is marked with the “Move” symbol. Use ▲/▼ button
to move the channel up or down to any position. Finally press OK button to confirm the
movement and answer Yes to save the change.
•
◄/►(Group) button:
Access, shift or leave favorite groups or the favorite channel list if available at the moment.
Concerning the operation method, refer to related instruction above.
•
EXIT button:
Cancel current menu operation any time and leave for the upper-level menu or the Main
Menu.
Radio channel list
Open Radio Channel List if there is any radio channel that has been detected through auto
scan.
Refer to the operation of “TV channel list” for detailed instructions.
Delete all favorites
Press OK to get to this setup item, then delete all favorite TV channels and radio channels
that have been edited following the navigation guidance on the screen.
16
OPTICUM 7003Te PLUS
Delete all
Press OK to get to this setup item, then delete all stored TV channels and radio channels
according to the hints on the screen.
Group rename
Enter this menu, then use ▲/▼ button to select a group from the list, press OK button to bring
up a window of soft keyboard for renaming a group. Once the group is renamed, press EXIT
button to leave. User can also click ESC key on the soft keyboard to exit.
17
OPTICUM 7003Te PLUS
Installation
Select Installation in the Main Menu and press OK button to open it. It consists of four
submenus:
•
Auto Scan
•
Channel Scan
•
Tuner Setting
Use ▲/▼ button to select a submenu, OK button to enter the chosen submenu, ◄/► button
to shift the setting options available, EXIT button to quit.
Auto Scan
Select and enter submenu Auto Scan which contains the following information:
•
Scan Mode: Free (only free channels), All (both free and paid ones);
•
Search: Use ◄/► button to choose a preferred scan mode, either All or Free, then
move the cursor to Search and press OK button to confirm the operation of auto
scan. As auto scan is under way, all channels (TV channels and radio channels)
that have been detected will be listed respectively in the window. Under the window
are the constantly changing data concerning frequency band, frequency, channel
No. modulation type etc..
Once the scan is completed, the receiver will play the first TV channel automatically. User can
use CH+/ CH- button to shift channel as like or press OK button to pop up TV Channel List
and select a preferred channel to enjoy. Or press TV/ R button to toggle between TV channel
and radio channels.
Channel Scan
Select and enter submenu Channel Scan which contains the following contents:
•
Scan Mode: By Channel or By Frequency. Scan a particular channel by the exact
channel Number or frequency. For By Channel mode, user will have to set Scan
Band, Ch No. and Network Search in the meantime. For By Frequency mode, user
will have to set the correct Frequency and Bandwidth data together.
•
Scan Band: VHF or UHF. Scan channels within either VHF (Very High Frequency)
or UHF (Ultra High Frequency) or both bands. Such setting is active only in By
Channel mode.
•
Ch No.: Channel 5~12 ( VHF), or Channel 21~69(UHF) Choose the exact channel
number to search for a designated channel. Active only in By Channel mode.
18
OPTICUM 7003Te PLUS
•
Frequency: 174~230MHz (VHF) or 470~862MHz (UHF). Enter the correct
frequency parameter of certain channel for scan. Active only in By Frequency
mode.
•
Band Width: 6MHz, 7 MHz or 8 MHz. Set the right bandwidth of the region where
the receiver is in use. Active only in By Frequency mode.
•
Network Search: On or Off. Activate or deactivate network search. It works in both
By Channel Mode and By Frequency mode.
•
Search: Click Search with OK button to start scanning manually.
•
Signal Intensity and Signal Quality: The green Signal Intensity bar and yellow Signal
Quality bar indicate the real-time receiving condition of the signal.
Use ▲/▼ button to select a setting item, and ◄/► button to shift the options. Press EXIT
button to leave.
Note: The frequency system automatically depends on the region where the receiver is in
use, and the actual frequency setting should follow the practice strictly.
When channel scan is under way, user can check the relevant parameters concerning the
process and progress: Frequency band, Frequency, Modulation type, Guard Interval and FFT
mode namely.
Tuner Setting
Select Tuner Setting and open the menu:
Tuner Power: On/ Off
This setting is designed to enable or disable active antenna depending on user’s needs.
19
OPTICUM 7003Te PLUS
System Setup
Select Setup menu and press OK button to
enter the System Setup window which
consists of six submenus:
•
Language
•
TV System
•
Region and Time
•
Timer Setting
•
OSD Setting
•
Parental Lock
Use ▲/▼ button to select a submenu and press OK to enter it, and press EXIT button to
leave.
Language
Select Language and press OK to enter the setting menu:
OSD Language:, ten languages in total. English, French, Spanish etc.
First Audio: English, French, Spanish etc., totally 17 languages.
Second Audio: English, French, Spanish etc., totally 17 languages.
Use ◄/► button to change the language options if multiple languages are available. Press
EXIT to leave for the upper -level menu.
TV System
Select TV System with ▲/▼ button and press OK button to open the menu:
•
Display Mode: AUTO, PAL and NTSC. Use ◄/► button to change the options.
User can also press OK button to pop up the option list and use ▲/▼ button to
select one with OK button to confirm the change.
•
Aspect Ratio: 4: 3 LB (Letter Box)/4: 3 PS( Pan Scan/16: 9). Use ◄/► button to
change the options. User can also press OK button to pop up the option list and use
▲/▼ button to select one with OK button to confirm the change.
•
Video Output: CVBS+RGB. VBS+ RGB is the only option.
•
LCN mode: On/Off. Use ◄/► button to change the options. User can also press OK
button to pop up the option list and use ▲/▼ button to select one with OK button to
confirm the change. If On is chosen for setting LCN mode, the system will
automatically list the channels in the same order as in the signal stream; if Off is the
20
OPTICUM 7003Te PLUS
alternative, the system will list the channels in a ascending order according to the
channel numbers.
At any time user can press EXIT button to quit and get back to the upper-level menu, i.e.
System Setup menu.
Region and Time
Open the menu of Region and Time which consists of the following items:
•
Region: France, Germany, Greece, Iran, Italy, Poland, Portugal, Russia, Spain,
Sweden, United Kingdom, Vietnam, Argentina, Australia, Czech, Denmark, and
Finland. This setting makes it possible for users from different regions to utilize this
device. Use ▲/▼ button to select, ◄/► button to change, OK button to enter, EXIT
button to exit.
•
GMT Usage: User Define, By Region, or Off. This setting determines how GMT
(Greenwich Mean Time) will be used. Use ▲/▼ button to select, ◄/► button to
change, OK button to enter, EXIT button to exit
•
GMT Offset: Within the range of GMT+12:00~ GMT-11:30. User needs to set the
right value of GMT offset of the region where the receiver is in use. It can be set
only when GMT Usage is shifted to User Define. Use ▲/▼ button to select, ◄/►
button to change, OK button to enter, EXIT button to exit.
•
Date:
•
Time: Here user can enter the settings and change their values with numeric
buttons as needed. However, they are accessible for setting only when GMT Usage
is set to Off, i.e. GMT usage is disabled.
•
Summer Time: On/Off. This item is active only when GMT Usage is set to By
Region mode. Use ▲/▼ button to select, ◄/► button to change, OK button to
enter, EXIT button to exit.
•
Time Display: On/ Off. Enter this setting to enable or disable time display on the
screen during TV or radio broadcast. Use ▲/▼ button to select, ◄/► button to
change, OK button to enter, EXIT button to exit.
Timer Setting
Open Timer Setting menu which consists of the following submenus: Program Timer and
Sleep Timer.
Program Timer:
Use ▲/▼ button to select the menu, OK button to enter it or EXIT button to quit.
21
OPTICUM 7003Te PLUS
This menu contains the following contents:
•
Timer Number: 1, 2, 3, 4, 5~ 8. Use ▲/▼ button to select, ◄/► button to change,
OK button to enter, EXIT button to exit.
•
Timer Mode: Off, Once, Daily, Weekly, and Monthly. Use ▲/▼ button to select,
◄/► button to change, OK button to enter, EXIT button to exit.
•
Timer Service: TV Service or Radio service. User needs to determine for what
service a timer is set. Use ▲/▼ button to select, ◄/► button to change, OK button
to enter, EXIT button to exit. This setting is active only when Timer Mode is
enabled, e.g. in Once, Daily, Weekly or Monthly mode.
•
Wakeup Channel: If a timer is enabled and a wakeup channel is preset, the system
will start showing the preset channel as the program wakes up. Use ▲/▼ button to
select, ◄/► button to change, OK button to enter, EXIT button to exit.
Note: A receiver of which the standby consumption is less than 1 Watt dose not support such
function setting.
•
Month: 1, 2, 3, ~ 10, 11, 12. It can be set only when Timer Mode is set to Once, and
it means that in which month of the year the program will wakes up. Use ▲/▼
button to select, ◄/► button to change, OK button to enter, EXIT button to exit.
•
Date: 1, 2, 3, ~ 30, 31. It can be set with Timer Mode set to either Once or Monthly
and means on which date the program will wake up. Use ▲/▼ button to select,
◄/► button to change, OK button to enter, EXIT button to exit.
•
Day: Sunday, Monday, Tuesday, Wednesday, Thursday, Friday or Saturday. It can
only be set with Timer Mode set to Weekly and means on which day the program
will wake up. Use ▲/▼ button to select, ◄/► button to change, OK button to enter,
EXIT button to exit.
•
Start Time:
•
End Time: Set the exact start and end time when the preset program wakes up and
stops according to the clock system of the receiver. Use ▲/▼ button to select, OK
button to enter or confirm, ◄/► button to move the cursor, Numeric buttons to input
the reasonable time value and EXIT button to exit.
Sleep Timer:
Select and open the submenu Sleep Timer:
•
Sleep Timer: Off, 10 Min, 30 Min, 60 Min, 90 Min or 120 Min. Once a sleep timer is
enabled (at least 10 minutes), it implies that the receiver will go to sleep in certain
period of time. Use ▲/▼ button to select, ◄/► button to change, OK button to
enter, EXIT button to exit.
•
Remains: It indicates how much time is left before the receiver goes to sleep once a
sleep timer is enabled.
22
OPTICUM 7003Te PLUS
OSD Setting
Select and open this submenu:
•
Subtitle Display: Standard/ Teletext / Off. There are two types of subtitle display if it
is enabled. Use ▲/▼ button to select, ◄/► button to change, OK button to enter,
EXIT button to exit.
•
OSD Transparency: Off, 10%, 20%, 30%, 40% and 50%. User can choose any level
of OSD transparency as preferred to and such setting makes it possible to conduct
some setting operation without missing program. Use ▲/▼ button to select, ◄/►
button to change, OK button to enter, EXIT button to exit.
•
Load Default OSD Setting: User can select this submenu and press OK button to
cancel all changes to OSD parameters and load the default settings.
Parental Lock
Select this menu and press OK button, an information bar will come up requiring that the
password must be entered so as to open the menu. The password preset at the factory is
0000. The menu includes the following submenus:
•
Menu Lock: On/Off. Use ▲/▼ button to select, ◄/► button to change, OK button to
enter, EXIT button to exit. Once Menu Lock is set to On, it means that the menu
system is locked, and user will have to enter the password to unlock it prior to any
other menu operation. If Menu Lock is closed, i.e. is set to Off, no password is
required for performing menu operation.
•
Channel Lock: Off, Manual, Age 4~18 This function is designed to lock some
channels that are not appropriate for audiences of special groups, e.g. children
under 18 years old. Use ▲/▼ button to select, ◄/► button to change, OK button to
enter, EXIT button to exit. Once a channel is locked, you will have to enter the right
password to access it. The setting of age limits depends on the signal stream of the
region where the receiver is in use.
•
New Password:
•
Confirm Password: Here user can change the old password to any other he likes by
entering a new password that is valid and confirming it. Use ▲/▼ button to select,
OK button to enter, Numeric buttons to enter numbers as the password, EXIT
button to exit.
23
OPTICUM 7003Te PLUS
Tools
Highlight Tools and press OK to enter the menu which consists of four sub-items:
•
Receiver Information
•
Game
•
Load Factory Default
•
Software Upgrade
Receiver Information
Choose this item to press OK button to check the relevant information of the receiver, such as
Hardware version, Software version, Remote control etc..
Game
Select and open the menu that includes the following items:
•
Tetris:
•
Snake:
•
Othello:
Use ▲/▼ button to select, ◄/► button to change, OK button to enter, EXIT button to exit.
Load Factory Default
Select this menu, press OK and input the password as required, then choose Yes and press
OK again to load factory default settings.
Note: When this unit is used for the first time or has just been upgraded, be sure to perform
this setting operation.
The initial password preset at the factory is “0000”.
Software Upgrade
User can update the receiver’s software in three ways:
•
Upgrade by RS 232
Enter the password to open the menu.
Transfer Mode: P 2 P or P 2 M;
Upgrade Mode: ALL, CODE, LOGO, COUNTRYBAND, or DATA BASE
Use ▲/▼ button to select, ◄/► button to change, OK button to enter, EXIT button to exit.
If user selects Upgrade by RS-232, he will have to connect this receiver to PC via an upgrade
conversion board which is dedicated for upgrade operation.
24
OPTICUM 7003Te PLUS
Concerning the interconnection of the receiver and a PC as well as the conversion board
used in upgrade operation, refer to Basic Connection for detailed information.
•
Upgrade by Storage: USB
Use ▲/▼ button to select, ◄/► button to change, OK button to enter, EXIT button to exit.
If use mounts a USB storage device that contains the software for upgrade, onto this receiver,
he can choose Upgrade by Storage.
As for detailed instructions regarding software upgrade, see the navigation guide during such
operation.
25
OPTICUM 7003Te PLUS
Media+ (optional)
This receiver supports card-reader interface that can read data on a flash memory card (SD
card). When mounting a card onto the unit, close attention must be paid to the penetration
direction of the card—inserting it with the label’s side facing down, or connecting side facing
up. And the penetration activity should be gentle and even.
Select this menu and press OK button to open it. It contains three submenus:
•
Media Player
•
Storage Manager
•
Safely Remove Storage Device
Media Player
Select Media Player and press OK button to open the menu. The content of the menu
depends on what has been stored on the card. The card-reader on the receiver supports only
two file types: MP3, JPEG and BMP (another image file format).
On the left of the window is the file list, on the right is a small visible window under which is
the relevant data about the current highlighted file and four colored buttons, and at the bottom
are five function buttons:
•
Img (Image) List:
Click the button once directly to play the JPEG files one by one. If user select some JPEG
files with ▲/▼ button followed by pressing FAVOR button to tick them one by one as the
favorite, clicking Img List button at the moment will only play the ticked pictures.
During playback of image files, the following buttons are available for more precise operation:
−
Yellow button: Press it once to pause and a second time to resume to normal
playback;
OK button: Press it to zoom in the picture at various levels, and move the picture with
direction buttons;
−
◄/► button: Press them to change the view angle or camera angle of the shown
picture;
−
▲/▼ button: Press them to shift to next to preceding one picture.
Note: These four colored buttons under the small visible window are mainly used for playing
music files.
26
OPTICUM 7003Te PLUS
•
Music List:
Select this function button and press OK button to enter the menu of Music List which lists all
the favorite music (MP3) files. Use ▲/▼ button to select file, OK or Red button to play the file,
Yellow button to delete the highlighted music file from the favorite list; Blue button to delete all
music file at one time from the favorite list.
Note: The four colored buttons are active only when the Music List is closed: Red button is
used to shift to the previous song with one quick press, while it can also fast-rewind the
playback if it is long pressed; Green button is used to shift to next song with one quick press,
while it can fast-forward the playback if it is long pressed; Yellow button is pressed to make
pause to the music playback and the playback will go on again it the button is pressed for the
second time; Blue button is used to shift among the Repeat modes, like Repeat All, Random
Repeat, Repeat Single and Repeat 1,2,3.
•
Image List:
This refers to the Favorite Image List if available. For the files on the list, press Red button to
play, Yellow button to delete, and Blue button to delete all at once.
•
Setup: Use this button to setup the relevant parameters of the current image file.
Click Setup button to bring up the Setup menu which consists the following items:
−
Picture Size: Full or other size if available;
−
Slide Interval(Sec): Off, 4 Sec., 6 Sec., 8 Sec., and 10 Sec..
−
Slide Repeat: Off or On;
−
Fade Effect: Random, Shutter, Left/ Up Stretch, Left/ Up Insert, Chess board, and
Cross Fade
User can use ▲/▼ button to select, ◄/► button to shift function buttons, EXIT button to exit.
After setting the parameters, user needs to save the changes before he leave current
operation interface.
•
Sort: Use this button to sort the files in an order as preferred: Name (A-Z), Name
(Z-A), Image first and Music first.
Storage Manager
Select this menu and open it with OK button. The menu contains the following contents:
•
Device: USB storage. The external storage device that is supported by this receiver
•
Device ID: 1 (or more). The ID of external storage device means the number.
•
Partition: 1 (or more) The storage device that is connected may consist of multiple
is USB device.
partitions (depending on the device).
27
OPTICUM 7003Te PLUS
If user wants to exit and proceed to other operation, it is recommended that “Safely Remove
Storage Device” be conducted.
Safely Remove Storage Device
Select this item, press OK button to confirm. The system will response ”Unmount
successfully”, then the card can be removed safely by pushing the card forward slightly before
it is sprung out from the slot.
EPG application
EPG, standing for Electronic Program Guide, is a key feature of digital TV broadcast
application.
Press EPG button on the remote control to bring up the EPG menu.
Through the menu user can check the relevant information of all the channels, like the date
and time of the signal stream, Now information and Next information etc.. Under the menu is
the navigation guide:
•
Numeric 1: Booking List;
•
Numeric 2: Change
•
Numeric 3: Detail
•
OK: Play Booking.
Concerning the detailed operation description see the actual guide displayed on the screen.
28
OPTICUM 7003Te PLUS
OSD Overview
Main Menu
Submenu
Options
TV Channel List
Radio Channel List
Channel
Delete all favorites
Delete All
Group Rename
Free
Scan Mode
All
Auto Scan
Search
By Channel
Scan Mode
By Frequency
VHF
Scan Band
UHF
5-12,
Ch No.
Installation
21-69
Channel Scan
174-230MHz
Frequency
470-862MHz
6MHz
Main Menu
Band Width
7MHz
8MHz
Search
Tuner Setting
Tuner power
On/Off
English
French
OSD Language
German
Language
Greek
First Audio
Second Audio
English, French, Spanish, etc. 17
languages
AUTO
Display Mode
PAL
NTSC
Setup
4:3 LB
TV System
Aspect Ratio
4:3 PS
16:9
Video Output
CVBS+RGB
LCN Mode
On/ Off
France
Germany
Region and Time
Iran
Region
Italy
Poland
29
OPTICUM 7003Te PLUS
Russia
Portugal
Spain
Sweden
Greece
User Define,
GMT Usage
By Region
Off
GMT Offset
GMT+12:00~GMT-11:30
Date
Time
Summer Time
On /Off
Time Display
On/ Off
Timer number
1-8
Once
Daily
Timer Mode
Weekly
Monthly
Timer Service
Program Timer
Radio
Service
TV
service
Wakeup channel
Timer Setting
Month
1-12
Date
1-30/31
Day
Start time
End time
Off
Sleep Timer
10/30/60/90/120 min
Remains
Off
OSD Setting
Subtitle Display
Standard
Teletext
30
SundaySat.
OPTICUM 7003Te PLUS
Off,
OSD Transparency
10%-70%
Load Default OSD Setting
Menu Lock
On/ Off
Channel Lock
Off/ Manual, Age 4~18
Parental Lock
New Password
Confirm Password
Receiver
Information
Tetris
Game
Snake
Othello
Tools
Load Factory Default
Upgrade By RS-232
All Code, Countryband, Database
Software Upgrade
Upgrade By Storage
Media+
Media Player
Img List/ Music List/ Image List/ Setup/ Sort
Record Manage
Play/ Lock/ Delete/ Rename
Storage manage
Safely Remove Storage Device
31
OPTICUM 7003Te PLUS
Specification
High Frequency Tuner
Input Frequency Range
: 174~230, 470~862MHz (VHF&UHF)
Bandwidth
: 7 or 8MHz
Input Signal Level
: -75~-20dBm
RF Input Connector
: IEC169-2 type, Female
Input impedance
: 75Ω
Demodulation Mode
Waveform
: COFDM (Code Orthogonal Frequency Division
Multiplexing)
Demodulation
: QPSK,QAM16,QAM64
Transmission Rate
: 2K,8K
Guard interval
: 1/4,1/8,1/16,1/32
Code rate
: 1/2, 2/3, 3/4, 5/6, 7/8
Video, Audio Decoding
Video decoding
: ISO/IEC13818-2 MPEG2 (MP@ML) Compatible
Video resolution
: PAL 720x576/ NTSC 720x480
Video input code rate
: 15Mbit/s Max.
Teletext
: Support DVB-ETS300472
Audio decode
: ISO 11172-3
Audio Track
: Stereo, Left channel, Right channel.
Audio Sample rate
: 32,44.1, 48KHz
Power Specification
Input Power
: AC 230V,50Hz
Power consumption
: <8W
Environment Requirement
Working Temperature Range
: 0-40 ℃
Working Humidity Range
: <90%
Others
Net Weight
: < 1.5 Kg
Packed size
: 205mm × 197 mm × 54mm
Weight and dimensions are not absolutely exact values.
Specifications are subject to change (by manufacturer) without notice.
32
OPTICUM 7003Te PLUS
Troubleshooting
Look through the chart below listing some possible problems and the corresponding causes
you may confront in daily use of this unit before requesting service. Some simple checks or
minor adjustment of the unit on your part may help resolve the problems. If the problems
prove to be beyond your capability, you had better hand it over to a professional qualified
technician.
Troubles
Possible Causes
No power
The power cord has not been well
connected
The antenna is not adjusted well
Cannot
programs
scan
Use antenna incorrectly
Parameter input incorrectly
Output cord connect incorrectly
No picture
No color
Suggested Solutions (for
reference)
Plug the power cord into the
outlet tightly and turn on the
power; if no power still, turn off
the power again, and turn it on in
5-10 minutes.
Adjust the antenna or use an
outdoor antenna
Use an antenna with 75 Ω
impedance input
Input Frequency, Bandwidth
parameter correctly
Connect
the
output
cord
correctly
The video output mode of the unit
is different from the mode of
monitor
Reset the working mode
Output cord connect incorrectly
Connect
correctly
The video output system of the
unit is different from the mode of
monitor
Batteries incorrectly installed
the
output
cord
Reset the working system
Install the battery correctly
Batteries exhausted
Beyond the effective operation
range
The remote sensor is pointed to
by bright light
Place the unit elsewhere for a
change
Audio sound and
subtitle language
are
not
the
chosen items
Has not chosen the right sound
channel
Press the Audio button to shift
the channel
No sound at all
The unit is in a mute status
Volume set at a too low level
Cable connected incorrectly
Cancel the mute
Augment the volume
Connect the cable correctly
Correct
the
output-cable
connection, and restart the unit
Cancel the mute
Turn on the unit
The
control
work
remote
fails to
No sound
chance
by
There might be a short circuit
In mute state
It Stays asleep
33
Replace the battery
Operate within a normal range
OPTICUM 7003Te PLUS
Declaration of conformity
The manufacturer herewith declares the conformity of that product with the following
directives and standards:
Low Voltage Directive 2006/95/EG
EN 60065:2002+A1:2006
EMC Directive 2004/108/EG:
EN 55013:2001+A1:2003+A2:2006
EN 55020:2007
EN 61000-3-2:2006
EN 61000-3-3:1995+A1:2001+A2:2005
Model: Digital Terrestrial Receiver DVB-T
34