1
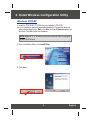
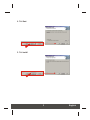
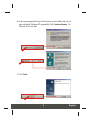
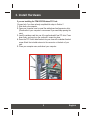
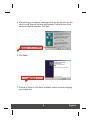
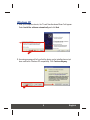
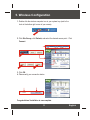
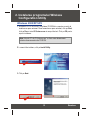
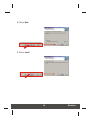
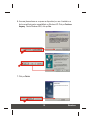
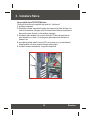
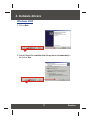
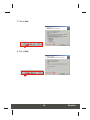
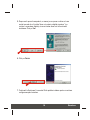
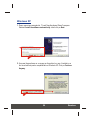
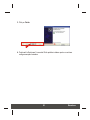
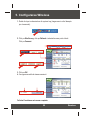
TEW-603PI
Quick Installation Guide
Version 09.15.2005
Copyright ©2005. All Rights Reserved. TRENDnet.
Table of Contents
English ................................................................................. 1
1. Prepare for Installation .................................................. 1
2. Install Wireless Configuration Utility ............................. 2
3. Install Hardware ............................................................ 5
4. Install Drivers ................................................................ 6
5. Wireless Configuration .................................................. 11
Româna ............................................................................... 12
1. Pregatiti-va de instalare ................................................ 12
2. Instalarea programului Wireless Configuration Utility ... 13
3. Instalare fizica ............................................................... 16
4. Instalare drivere ............................................................ 17
5. Configurarea Wireless .................................................. 22
Troubleshooting...................................................................... 23
English
1. Prepare for Installation
Thank you for purchasing the TEW-603PI. Your new wireless network adapter
will allow you to share the Internet, files, or other resources by connecting you
to an 802.11g or 802.11b wireless network. This guide will help you setup and
configure your wireless card. Following the installation instructions should be
quick and easy. If you run into problems, please refer to the Troubleshooting
section or the more detailed installation procedures on the User's Guide CDROM. If you need further technical support, please visit www.TRENDNET.com
or call by phone.
Verify Package Contents
Please make sure you have everything in the box:
TEW-603PI
Quick Installation Guide
Version 09.15.2005
Copyright ©2005. All Rights Reserved. TRENDnet.
TEW-603PI
User’s Guide CD-ROM
Quick Installation Guide
Verify Equipment
Before installing this PCI Adapter, you should have a:
1. Pentium class desktop computers with at least one available PCI slot
2. Microsoft Windows 2000 or XP
3. CD-ROM drive
Important! DO NOT install the PCI adapter in the computer until instructed to
do so. Please follow the instructions in Section 2 before installing the adapter
into your computer.
1
English
2. Install Wireless Configuration Utility
Windows 2000/XP
1. Insert the TEW-603PI CD-ROM into your computer's CD-ROM
drive; the installation menu will appear automatically. If the window does not
appear automatically, click Start, click Run, and type E:\Autorun.exe in the
text-field. Click OK to start the installation.
NOTE: Replace “E” in “E:\Autorun.exe” with whichever letter is assigned
to your CD-ROM drive.
2. On the Installation Menu, click Install Utility.
3. Click Next.
2
English
4. Click Next.
5. Click Install.
3
English
6. A warning message will tell you that the device you're installing has not yet
been certified for Windows XP compatibility. Click Continue Anyway. For
Windows 2000, click Yes.
7. Click Finish.
4
English
3. Install Hardware
If you are installing the TEW-603PI Wireless PCI Card:
Proceed only if you have already completed the steps in Section 2
1. Shut down your computer.
2. Open your computer case to reveal the motherboard and expansion slots.
(Please refer to your computer's user manual if you need help opening the
case)
3. Insert the wireless card into one of the motherboard's free PCI slots. Press
down firmly and evenly on the card until it snaps into place.
4. Screw the PCI Card's metal bracket into your case with a standard bracket
screw. Attach the included antenna to the connector on the back of your
card.
5. Close your computer case, and reboot your computer.
5
English
4. Install Drivers
Windows 2000
1. Click Next.
2. Select Search for a suitable driver for my device (recommended) and
click Next.
6
English
3. Click Next.
4. Click Next.
7
English
5. After rebooting your computer, a message will tell you that the driver you are
about to install “does not contain a digital signature” and will ask you if you
want to continue the installation. Click Yes.
6. Click Finish.
7. Continue to Section 5 of this Quick Installation Guide to continue configuring
your wireless card.
8
English
Windows XP
1. After your computer reboots, the “Found New Hardware Wizard” will appear.
Select Install the software automatically and click Next.
2. A warning message will tell you that the device you're installing has not yet
been certified for Windows XP compatibility. Click Continue Anyway.
9
English
3. Click Finish.
4. Continue to Section 5 of this Quick Installation Guide to continue configuring
your wireless card.
10
English
5. Wireless Configuration
1. Double-click the wireless computer icon in your system tray (next to the
clock in the bottom right corner of your screen).
2. Click Site Survey, click Refresh, and select the desired access point. Click
Connect.
3. Click OK.
4. Please verify your connection status.
Congratulations! Installation is now complete.
11
English
Româna
1. Pregatiti-va de instalare
Verificati continutul pachetului
Va rugam sa va asigurati ca aveti totul in cutie:
TEW-603PI
Quick Installation Guide
Version 09.15.2005
Copyright ©2005. All Rights Reserved. TRENDnet.
TEW-603PI
CD-ROM
Ghid de utilizare
Ghid rapid de instalare
Verificati echipamentul
Inaintea de a instala aceasta placa PCI, ar trebui sa aveti urmatoarele:
1. Computere de birou clasa Pentium cu cel putin un slot PCI liber
2. Microsoft Windows XP sau 2K
3. Unitate CD-ROM
Important! NU instalati placa PCI in computer pana cand nu vi se da
instructiunea de a face acest lucru. Va rugam sa urmati instructiunile din
Sectiunea 2 inaintea instalarii adaptorului in computerul dumneavoastra.
12
Româna
2. Instalarea programului Wireless
Configuration Utility
Windows 2000/XP SP2
1. Introduceti CD-ul TEW-603PI in unitatea CD-ROM din computer; meniul de
instalare va apare automat. Daca fereastra nu apare automat, click pe Start,
click pe Run si scrieti E:\Autorun.exe in campul de text. Click pe OK pentru
a porni instalarea.
Nota: Inlocuiti “E” din “E:\Autorun.exe” cu litera care desemneaza
unitatea dumneavoastra de CD-ROM.
2. La meniul de instalare, click pe Install Utility.
3. Click pe Next.
13
Româna
4. Click pe Next.
5. Click pe Install.
14
Româna
6. Un mesaj de avertizare va va spune ca dispozitivul pe care il instalati nu a
fost inca certificat pentru compatibilitate cu Windows XP. Click pe Continue
Anyway. Pentru Windows 2000, click pe Yes.
7. Click pe Finish.
15
Româna
3. Instalare fizica
Daca instalati placa PCI 603PI Wireless:
Continuati doar daca ati completat deja pasii din Sectiunea 2
1. Inchideti computerul.
2. Deschideti carcasa computerului pentru a avea acces la placa de baza si la
sloturile de extensie. (Varugam sa cititi manualul de utilizare al computerului
daca aveti nevoie de ajutor in deschiderea carcasei)
3. Introduceti placa wireless intr-unul din sloturile PCI libere de pe placa de
baza. Apasati in jos ferm si in mod egal pe placa pana cand aceasta se
fixeaza in loc.
4. Insurubati placheta metalica a placii PCI pe carcasa cu un surub standard.
Atasati antena inclusa la conectorul de pe spatele placii.
5. Inchideti carcasa computerului si reporniti computerul.
16
Româna
4. Instalare drivere
Windows 2000
1. Click pe Next.
2. Selectati Search for a suitable driver for my device (recommended) si
dati click pe Next.
17
Româna
3. Click pe Next.
4. Click pe Next.
18
Româna
5. Dupa ce ati repornit computerul, un mesaj va va spune ca driver-ul care
sunteti pe cale de a il instala “does not contain a digital signature” (nu
contine o semnatura digitala) si va va intreba daca vreti sa continuati
instalarea. Click pe Yes.
6. Click pe Finish.
7. Continuati la Sectiunea 5 a acestui Ghid rapid de instalare pentru a continua
configurarea placii wireless.
19
Româna
Windows XP
1. Dupa repornirea computerului, “Found New Hardware Wizard” va apare.
Selectati Install the software automatically si dati click pe Next.
2. Un mesaj de avertizare va va spune ca dispozitivul pe care il instalati nu a
fost inca certificat pentru compatibilitate cu Windows XP. Click pe Continue
Anyway.
20
Româna
3. Click pe Finish.
4. Continuati la Sectiunea 5 a acestui Ghid rapid de instalare pentru a continua
configurarea placii wireless.
21
Româna
5. Configurarea Wireless
1. Dublu-click pe iconita wireless din system tray (langa ceas in coltul dreapta
jos al ecranului).
2. Click pe Site Survey, click pe Refresh si selectati access point-ul dorit.
Click pe Connect.
3. Click pe OK.
4. Va rugam sa verificati starea conexiunii.
Felicitari! Instalarea este acum completa.
22
Româna
Troubleshooting
Q1: I completed all the steps in the quick installation guide, but my card isn't
connecting to my access point. What should I do?
A1: You should first verify that the Network card’s SSID matches your wireless
router or access point's SSID. If they already match, you should check your TCP/IP
properties to ensure that Obtain an IP address automatically is selected. Refer to
your Windows User's Manual if you are unable to locate your TCP/IP properties.
Q2: Windows is unable to recognize my hardware. What should I do?
A2: Make sure your computer meets the minimum requirements as specified in
Section 1 of this quick installation guide. Also, you must install the wireless
configuration utility (as described in Section 2) BEFORE you physically install your
network card. Lastly, you may consider moving the card to a different PCI/PC Card
Slot.
Q3: I cannot open the wireless configuration utility. What should I do?
A3: Go to your device manager (control panel > system) to make sure the adapter
is installed properly. If you see a networking device with a yellow question mark or
exclamation point, you will need to reinstall the device and/or the drivers.
If you still encounter problems, please refer to the User's Guide CD-ROM or contact
technical support.
Certifications
This equipment has been tested and found to comply with FCC and CE Rules.
Operation is subject to the following two conditions:
(1) This device may not cause harmful interference.
(2) This device must accept any interference received.
Including interference that may cause undesired operation.
Waste electrical and electronic products
must not be disposed of with household
waste. Please recycle where facilities
exist. Check with you Local Authority or
Retailer for recycling advice.
NOTE: THE MANUFACTURER IS NOT RESPONSIBLE FOR ANY RADIO OR TV
INTERFERENCE CAUSED BY UNAUTHORIZED MODIFICATIONS TO THIS
EQUIPMENT. SUCH MODIFICATIONS COULD VOID THE USER’S AUTHORITY TO
OPERATE THE EQUIPMENT.
23
@
Product Warranty Registration
Please take a moment to register your product online.
Go to TRENDnet’s website at http://www.TRENDNET.com
TRENDnet Technical Support
US/Canada Support Center
Contact
Telephone: 1(888) 777-1550
1(310) 626-6267
Fax:
Email: [email protected]
Tech Support Hours
7:30am - 6:00pm Pacific Standard Time
Monday - Friday
European Support Center
Contact
Telephone
Deutsch : +49 (0) 6331 / 268-460
Français : +49 (0) 6331 / 268-461
0800-907-161 (numéro vert)
Español : +49 (0) 6331 / 268-462
English : +49 (0) 6331 / 268-463
Italiano : +49 (0) 6331 / 268-464
Dutch : +49 (0) 6331 / 268-465
Eesti
: +372-6593613 (9.00AM to 5:00PM)
Fax: +49 (0) 6331 / 268-466
Tech Support Hours
8:00am - 6:00pm Middle European Time
Monday - Friday
TRENDnet
3135 Kashiwa Street. Torrance, CA 90505
http://www.TRENDNET.com
Copyright ©2005. All Rights Reserved. TRENDnet.


![Manual de utilizare[DOWNLOAD]](http://vs1.manualzilla.com/store/data/005723533_1-258331d4abba7698d1081b2119c4c2bf-150x150.png)