1
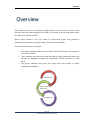
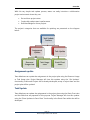
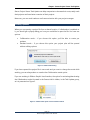
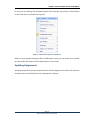
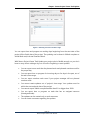
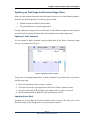
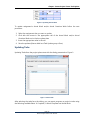
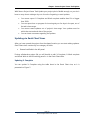
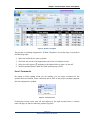
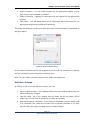
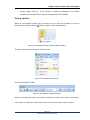
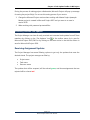
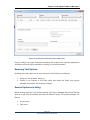
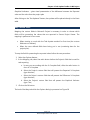
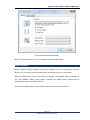
Contents INTRODUCTION 3 BENEFITS FROM TASK UPDATE 3 CREATING UPDATES 4 MAKE YOUR PROJECT COLLABORATIVE 13 PROCESSING RECEIVED TASK UPDATES 15 MAP CUSTOM FIELDS 18 IMPORT UPDATES 19 Overview Overview Team members who do not need to alter project plans use Seavus Project Viewer to view the tasks they have been assigned. But wouldn't it be better to know the progress status of each task in real time as well? Seavus Project Viewer is the only viewer for Microsoft® Project that provides a collaborative environment for project teams without server installation. The process of sharing is very simple: The project manager creates a project plan in Microsoft® Project and uploads it on a shared location Team members open the project plan with Seavus Project Viewer and report task progress or assignment progress (% Completed, % Work Complete or Actual Work). The project manager then opens the project plan and accepts or rejects submitted task updates. Create Project Update Task or Assignment Accept/Reject Page | 1 Seavus Project Viewer User Manual Overview With this very simple task update process, teams can easily introduce a collaborative project environment where they can: Get real-time project status Continually evaluate team's performance Build knowledge for future projects The project’s categories that are available for updating are presented on the diagram below: Task Update Feature Assignment Update Resource Usage view Task Update Task Usage view Gantt Chart views Assignment update Team Members can update the assignments in the project plan using the Resource Usage or Task Usage view. Project Manager will view this updates using the “Get Updates” functionality in Microsoft Project that is already developed, accept or reject them and the project plan will be updated. Task Update Team Members can update the assignments in the project plan using the Gantt Chart view and the fields that are prepared for this purpose. Project Manager will view this updates using the “Show Updates in Gantt Chart” functionality in the Gantt Chart tablet that will be developed. Page | 2 Seavus Project Viewer User Manual Chapter : Seavus Project Viewer Task Update Chapter 1.: Seavus Project Viewer Task Update In this section you will learn: Detailed features of the entire application Introduction With Task Update option in Seavus Project Viewer the users now have the ability to collaborate with project managers so they will have up-to-date information about the current status of the project tasks and track if all assignments in the project plan are finished on time. Team members that are using Seavus Project Viewer and Project Managers using Microsoft Project can collaborate with only shared location in their company’s network. In order to use task update you must have: Seavus Project Viewer with Task Update feature installed on your computer; Microsoft Project and Seavus Add-in for Microsoft Project installed on Manager’s Computer, file previously marked as collaborative by project manager, located on a shared location; Read/write permissions to the shared location. Benefits from Task Update Since collaboration between the Project Manager and his Team members is essential for successfully running projects, Seavus Project Viewer Task Update can be great tool for reaching this goal. Page | 3 Seavus Project Viewer User Manual Chapter : Seavus Project Viewer Task Update Seavus Project Viewer Task Update can help companies to decrease their costs, easily track their projects and have better overview of their projects. Moreover, you can avoid useless e-mail communication with your project manager. Creating Updates When you are opening a project file from a shared location, if collaboration is enabled on it, you should get a popup asking you how you would like to open the file. You have two options: Collaboration mode – if you choose this option you’ll be able to create you updates. Standard mode – if you choose this option your project plan will be opened without editing options. Figure 1. Collaboration dialog If you have opened the project file in one mode and you want to change the mode while working, you can always select or unselect the Collaboration mode option. If you are working in Ribbon Graphic User Interface, the option for activating/deactivating the Collaboration mode is located in the Seavus Add-in ribbon, in the Task Update group, as it is presented on Figure 3. Figure 2. Collaboration option in Seavus Add-in ribbon Page | 4 Seavus Project Viewer User Manual Chapter : Seavus Project Viewer Task Update In case you are working with Standard Graphic User Interface, the position of this feature in the Tools menu is presented on Figure 3. Figure 3. Collaboration option in Tools menu After you have opened the project file in Collaboration mode, you can create your updates by using either the Resource/Task Usage views or Gantt Chart. Updating Assignments Updating Assignments process is performed on those assignments for which the resources are selected from the dialog box that is presented on Figure 4. Page | 5 Seavus Project Viewer User Manual Chapter : Seavus Project Viewer Task Update Figure 4. Selecting resources and time range You can report time and progress on working days beginning from the start date of the project till the finish date of the project. The updating can be done in %Work complete or Actual Work and/or Actual Overtime Work. With Seavus Project Viewer Task Update your project plan is flexible enough, so you don’t have to worry about missing a day out of work or forgetting to send updates. You can report more work than the planned work and planned overtime work for the proper day. You can report time or progress for incoming days or for days in the past, out of the task’s time range. You can report overtime work even if your project manager did not planned overtime work. You cannot create updates out of project’s time range. Your updates must be within the start and end date of the project. You cannot report %Work complete smaller than 0% or bigger than 100%. You can report time or progress on tasks that has no assigned resource (Unassigned tasks) The updates can be created only on work resources. You can insert comments regarding the updates Page | 6 Seavus Project Viewer User Manual Chapter : Seavus Project Viewer Task Update Updating via Task Usage and Resource Usage Views After you have opened the project from the shared location you can start making updates. Resource and Task Usage views contain two types of fields: General assignment fields in the left panel Time phased fields in the right usage panel. If using collaborative project file you will be able to edit %Work complete in the left panel or Actual Work and Actual Overtime Work (time-phased) in the right usage panel. Updating % Work Complete You can update % Work Complete using the table sheet in the Task or Resource Usage view, as it is presented on Figure 5. Figure 5. Updating % Work Complete The process of updating assignment’s % Work Complete is more than easy. Just perform the following steps: 1. Select the assignment that you want to update 2. Click with the mouse in the appropriate cell of the % Work Complete column 3. Using the cell’s spinner ( ) navigate to the desired value or type it in the cell 4. Save the updates (Seavus Add-insTask Update groupSave) Updating Actual Work Updating the Actual Work and Actual Overtime work is done in the right part of the Resource Usage or Task Usage view, as it is presented on Figure 6. Page | 7 Seavus Project Viewer User Manual Chapter : Seavus Project Viewer Task Update Figure 6. Updating Actual Work To update assignment’s Actual Work and/or Actual Overtime Work follow the next procedure: 1. Select the assignment that you want to update 2. Click with the mouse in the appropriate cell of the Actual Work and/or Actual Overtime Work row in the time-phase data 3. Insert the appropriate value in the cell 4. Save the updates (Seavus Add-insTask Update groupSave) Updating Tasks Updating Tasks from the project plans starts with the dialog presented on Figure 1: Figure 7. Select tasks After selecting the tasks form the dialog, you can report progress on project’s tasks using the following available fields: % Complete, % Work Complete and Actual Work. Page | 8 Seavus Project Viewer User Manual Chapter : Seavus Project Viewer Task Update With Seavus Project Viewer Task Update your project plan is flexible enough, so you don’t have to worry about missing a day out of work or forgetting to send updates. You cannot report % Complete and Work complete smaller than 0% or bigger than 100%. You can report time or progress for incoming days or for days in the past, out of the task’s time range. You cannot create updates out of project’s time range. Your updates must be within the start and end date of the project. You can insert comments regarding the updates Updating via Gantt Chart Views After you have opened the project from the shared location you can start making updates. Gantt Chart views contain only one category of fields: General task fields in the left panel If using collaborative project file you will be able to edit % Complete, % Work complete and Actual Work in the left working panel i.e. in the Gantt Chart table. Updating % Complete You can update % Complete using the table sheet in the Gantt Chart view, as it is presented on Figure 5. Page | 9 Seavus Project Viewer User Manual Chapter : Seavus Project Viewer Task Update Figure 8. Update % Complete The process of updating assignment’s % Work Complete is more than easy. Just perform the following steps: 1. Select the task that you want to update 2. Click with the mouse in the appropriate cell of the % Complete column 3. Using the cell’s spinner ( ) navigate to the desired value or type it in the cell 4. Save the updates (Seavus Add-insTask Update groupSave) Insert Comments No matter in which update mode you are working, you can insert comments for the updates that are inserted. These comments will be sent to the project manager together with the assignment’s updates. Figure 9. Comment menu Pointing the mouse cursor over cell and clicking on the right mouse button, a context menu will pop-up with the following options (Figure 9): Page | 10 Seavus Project Viewer User Manual Chapter : Seavus Project Viewer Task Update Insert Comments – You can insert comment for the appropriate update, or give reply to the project manager’s comment Delete Comments – Deleting all comments that are inserted for the appropriate updates Clear Value – You will delete entire set of information that is connected for the appropriate assignment (updates and comments) The dialog that wills pop-up after you select the Insert Comments feature is presented on the figure below. Figure 10. Insert Comment dialog In case when comments exist for the assignment you can edit the comments by selecting the Edit comments from the Comment contextual menu. Note: You can’t insert comment until you don’t update the assignment. Indicators Column By clicking on the icon in the indicators column, you can: Reset to referent values – Your updates will be reset to the referent values they had before making any changes; Clear all values – All of you updates that you made, but did not saved, will be cleared and you will have the possibility to create new updates; Mark assignment as completed – If you finish you task earlier, you can always mark it as completed. This option will not add hours or percent complete to you task, but will notify your project manager that your task is finished. Page | 11 Seavus Project Viewer User Manual Chapter : Seavus Project Viewer Task Update Change update method – If you started to update an assignment with %Work complete, the editing fields in the right usage panel will be disabled. Saving updates When you are finished updating, all you have to do is to save your updates. You can do that by using the Save Updates feature inside the Task Update group. Figure 11. Save Updates functions in Seavus Add-ins ribbon The same functionality is located in the File menu: Figure 12. Save Updates in File menu and in the Standard Toolbar. Figure 13. Save Updates in Standard toolbar When your updates are saved, your project manager can review and accept or reject them. If this option is disabled, it means that you do not have any newly created updates. Page | 12 Seavus Project Viewer User Manual Chapter 2: Task Update Toolbar in MS Project Chapter 2: Task Update Toolbar in MS Project In this section you will learn: Make project collaborative Receive project’s updates In order to be able to use Task Update option in your Microsoft® Project, you need to have installed the Seavus Add-in for Microsoft® Project - Seavus Project Viewer Task Update options in the Seavus Add-in for Microsoft® Project toolbar is an option available to the Project Managers that enables them to: Enable collaboration on the Project file (.mpp) they have created To receive task updates from the Team members on their assigned tasks Accept, Reject the received task updates and update the .mpp file by applying the changes The .MPP file that will be collaborative must be saved on shared folder, accessible by both Project Manager and Team members. Both parties should have read/write privileges on the shared folder. Make your project Collaborative First step that you need to do is to enable collaboration on your project file stored in shared folder. To do that, open your file with Microsoft® Project that has previously installed Seavus Add-in for Microsoft® Project with Task Update options and simply click on the Enable Collaboration icon in the toolbar in case for Microsoft® Project 2007 or Make Page | 13 Seavus Project Viewer User Manual Chapter 2: Task Update Toolbar in MS Project Collaborative feature in the Add-Ins ribbon in case for Microsoft® Project 2010, as it is presented on Figure 14. Figure 14. Before making the project plan collaborative, project manager can select the updating method, i.e. which project categories will be updated: Tasks Assignments The updating method can be selected in the lower part of the “Make Project Collaborative” dialog, as it is presented on Figure 15 Figure 15. Make project collaborative By enabling collaboration on your project file, your Team members that have installed Seavus Project Viewer with Task Update feature will be able to send updates about actual work they spent on the specific tasks or %complete of the task. Constraints using the Make Project Collaborative feature Page | 14 Seavus Project Viewer User Manual Chapter 2: Task Update Toolbar in MS Project During the process of making project collaborative, Microsoft Project will pop-up message for saving the project file(s). Do not use this saving process if you want to: 1. Change the Microsoft Project version when working with Master Project (example: Master project is created in Microsoft Project 2007 and you want to re-save in version 2010 2. When working with password protected files. Processing received Task Updates The Project Manager can view all newly received and untreated task updates from all Team members by clicking on the “Get Updates” icon in the toolbar menu for in case for Microsoft® Project 2007/2003 or by clicking on the same action in the Add-Ins ribbon in case for Microsoft® Project 2010. Receiving Assignment Updates The Project Manager has several filtering options to get only the updates that meet the desired criteria. The project manager can filter by: Project name Task name Resource name The updates that will be accepted, will be colored green, and those assignments that are rejected will be colored red. Page | 15 Seavus Project Viewer User Manual Chapter 2: Task Update Toolbar in MS Project Figure 16. Get Assignment Updates window in MS Project Project manager can insert comments regarding the accepted and rejected assignments and these comments will be available for reading to the team members. Receiving Task Updates Updating the project plan can be done using one of the following techniques: Using the “Get Updated” dialog, or Directly to be inserted in the Gantt table, and inside the Gantt chart project manager will perform the necessary changes Receive Updates via dialog When working with the Task Update method, phe Project Manager has several filtering options to get only the updates that meet the desired criteria. The project manager can filter by: Project name Task name Page | 16 Seavus Project Viewer User Manual Chapter 2: Task Update Toolbar in MS Project The updates that will be accepted, will be colored green, and those assignments that are rejected will be colored red. The look of the Task Updating dialog is presented on Figure 17. Figure 17. Get Task Updates window in MS Project View Updates in Gantt table When working with the second technique, project manager will view 3 columns in the Entry table in the Gantt Chart: Reported field; Difference field; Graphical Indicators. Reported field – contains the values that are reported by the team members using the Task Update feature in Seavus Project Viewer Reported field Difference – gives numerical difference between the Reported value and the value from the project plan Page | 17 Seavus Project Viewer User Manual Chapter 2: Task Update Toolbar in MS Project Graphical Indicators – gives visual presentation of the difference between the Reported value and the value from the project plan After clicking on the “Get Updated” feature, the updates will be placed directly in the Gantt table. Map Custom fields Mapping the custom fields in Microsoft Project is necessary in order to choose which fields will be presenting the values that are reported in Seavus Project Viewer. The mapping is performed in two cases: When starting to work with the Task Update method for first time (the custom fields are not defined); When the once defined fields have being put in use (containing data for the project plan). To map the field for presenting the reported values follow the next procedure: 1. Select the Options feature; 2. In the Mapping tab, select the radio button before the Project’s field that is used for task reporting: a. In case you are working with the % Complete field, clicks the radio button in front of % Complete b. Select the Project’s custom field that will present the Reported % Complete (type: Number) c. Select the Project’s custom field that will present the Difference % Complete (type: Number) d. Select the Project’s custom field that will present the Graphical Indicator (type: Text) 3. Click on the Ok button The look of the Map tab within the Options dialog is presented on Figure 18 Page | 18 Seavus Project Viewer User Manual Chapter 2: Task Update Toolbar in MS Project Figure 18. Map tab in Options dialog Note: The same procedure is for % Complete and Actual Work fields Import Updates Import Updates feature, located in the Import Updated tab from the Options windows, allows you to buy-pass the Get Update dialog and directly import in Gantt table. When the check-box in front of the feature is selected, the updated will be presented in the “Get Updated” dialog, where project manager can decide which updates will be accepted and which one will be rejected. The look of the Map tab within the Options dialog is presented on Figure 19 Page | 19 Seavus Project Viewer User Manual Chapter 2: Task Update Toolbar in MS Project Figure 19. Import Updated tab Page | 20 Seavus Project Viewer User Manual