1
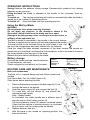
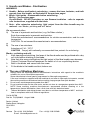
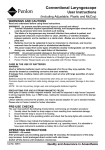
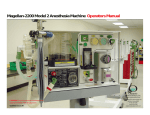
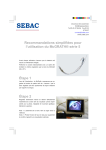
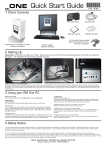
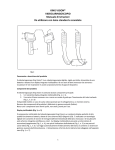
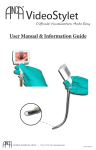
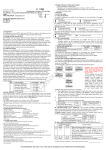
Diamond Range Fibrelight Laryngoscope
(Including Diamond Range McCoy)
User Instructions
INTRODUCTION
Penlon Diamond range blades and handles are compatible with other blades and handles that
conform to ISO Green System requirements (ISO 7376/3).
WARNINGS AND CAUTIONS
Read and understand before using these instructions.
WARNINGS (to prevent possible personal injury to yourself and others)
1.
Tracheal intubation requires specialised training and laryngoscopes should only be
used by personnel who have received such training.
2.
The blade of a laryngoscope may transmit infection from patient to patient, and
appropriate measures must be taken to clean, disinfect, or sterilise blades between
patients, and to maintain a sterile state. Blades are not sterile when supplied new.
3.
Batteries must not be subjected to heat or immersion in chemicals and must be
removed from handles prior to disinfection/sterilisation.
4.
The power output from some types of cells (mainly rechargeable types) can decrease
quickly during use, resulting in the rapid failure of illumination.
CAUTIONS (to prevent possible damage to the instrument or other property)
1.
USA/Canadian Federal Law restricts this device to sale by or on the order of the physician.
2.
Crystal Blade - refer to separate user instruction leaflet supplied with the blade.
CARE IN THE USE OF BATTERIES
WARNING
Used or defective batteries must not be disposed of in fire, as they may explode.
They should be treated as containing corrosive and toxic materials.
If leakage from a battery makes skin contact, wash at once with large quantities of water.
CAUTION
Batteries should be removed from instruments when they are not required for use.
Corrosive liquids can leak from cells during storage and cause permanent damage to the
instrument.
NOTE. Do not mix primary (single use) and rechargeable batteries.
PRECAUTIONS FOR USE IN STRONG MAGNETIC FIELDS
Most types of battery contain magnetic material and may be subjected to high forces if exposed to
strong magnetic fields, e.g. in NMR areas, making the necessary precise control of the
laryngoscope difficult.
Lithium batteries overcome the problem, but require special adaption for use in standard handles.
Please refer to Penlon Limited for further information.
PRE-USE CHECKS
The user must perform the following checks before commencing an intubation procedure.
1.
Visually check the blade for sharp edges or burrs resulting from mechanical damage.
2.
Move the blade to the operating position and check that the lamp lights with normal brilliance.
Low brilliance may indicate that batteries are nearing exhaustion.
In areas where intubation is routinely performed, e.g. operating rooms, it is advisable to have spare
instruments available as battery life is short and difficult to predict.
Cat No. 52758
Quality and Assurance in Anaesthesia
OPERATING INSTRUCTIONS
Storage Remove the batteries during storage. Decomposition products from leaking
batteries can be corrosive.
Fitting the blade The blade is attached to the handle in the customary 'hook-on'
manner.
To switch on
The Laryngoscope lamp will switch on automatically when the blade is
moved up to the 'locked on' operating position.
To switch off
Move the blade from the operating position.
Using the McCoy Blade
WARNING
Do not grip the lever when removing the blade.
Do not apply any pressure, in the directions shown in the
illustration, which could force the blade and lever apart.
Damage to the linkage may occur, resulting in incorrect action, or
stiffness of the adjustable tip.
The McCoy blade is assembled to the handle in the normal manner.
The lever to operate the tip section will then extend behind the handle.
The lever should not be touched during the initial stage of use, until
the tip of the laryngoscope has been inserted into the vallecula.
Once this stage has been reached, movement of the lever towards the handle will
elevate the tip of the blade, and therefore lift the epiglottis, without the need to increase
the force exerted by the main part of the blade.
Release the lever before withdrawing the blade.
Battery change
Unscrew the handle end cap, remove batteries.
Fit new batteries, see chart.
Check configuration and polarity as illustrated.
Handle
Standard
Penlight &
Stubby
Battery (2 per handle)
LR (U11 or C)
LR6
(MN1500 or AA)
Standard
and Penlight
ROUTINE CARE AND MAINTENANCE
Bulb unit replacement
The bulb unit is a special design and only Penlon spares are
suitable.
Use Penlon bulb, Part No. 50542 (pack of 5)
Clean hands before handling the bulb
1.
2.
3.
4.
5.
Remove the batteries and push the bulb capsule (1) out
through the base of the handle.
Undo the green shroud (2) and unscrew the bulb (3).
Fit a new bulb, refit the shroud (2), and reinsert the
capsule through handle.
Note - Stubby handle
As illustrated, the stubby handle has a different type of
capsule with an offset battery contact (4).
The second battery contact (5) remains inside the handle.
Check that the capsule is inserted correctly, as illustrated.
Both contacts must be visible inside the handle.
Replace batteries and test.
With the blade in the 'locked on' operating position, the
bulb should be lit.
2
3
1
Stubby
5
4
2
3
1
4
Descriptions and Markings
Stainless steel blades are marked on the heel of the hook-on block to identify the type
of blade and its size, the light guides are similarly identified as follows;
Macintosh
Robertshaw
MAC
RSHAW
Miller
Seward
MIL
SEW
The size is indicated by numbers from 0 (smallest blade) to 4 (largest blade).
CLEANING, DISINFECTION, AND STERILISATION
Always comply with local health and safety regulations during these operations.
When using disinfectant or sterilising solutions, the manufacturer’s
recommended concentrations and time periods must be observed.
1. Handles - Cleaning and Disinfection
WARNING Handle - before cleaning and disinfection,
remove the base, batteries, and bulb capsule from the
handle.
Do not autoclave the handle assembly - see 'Sterilisation'
below.
1. Remove the batteries and capsule (see previous page).
2. Scrub the handle externally, using a suitable detergent.
3. Immerse in a suitable disinfectant - follow the disinfectant manufacturer's
instructions.
4. Check that the handle is dry, inside and outside, before refitting the bulb capsule and
batteries, fit a blade to the handle and then test the laryngoscope before clinical use.
2. Blades - Cleaning and Disinfection
CAUTIONS
1. Crystal Blade - refer to separate user instruction leaflet
supplied with the blade.
2. The rigid fibre bundle light guide assembly (1) must not
be bent. This will damage many of the fibres and result
in a reduction of light transmission.
1.
2.
3.
Remove the screw (2) and detach the light guide
assembly from the blade.
Scrub the components after use, preferably under
running water. Rinse thoroughly. Do not use abrasive
materials, such as wire wool.
Clean the components again with a disinfectant
solution.
McCoy
To remove the light guide, first remove screw A, to allow
removal of lever B.
The McCoy blade levering mechanism may require
articulation, before the light guide can be detached from the
blade.
Removal of the light guide is described above.
1
2
B
A
3. Handle and Blades - Sterilisation
WARNINGS
1. Handle - Before sterilisation/ autoclaving - remove the base, batteries, and bulb
capsule from the handle, as illustrated in the previous pages.
2. Blade / light guide - Disassemble before autoclaving
McCoy - see previous page
Crystal Blade - DO NOT autoclave or use Gamma irradiation - refer to separate
user instructions, supplied with the blade.
3. Note - after extensive autoclaving, light output from the fibre bundle may be
reduced - see 'Blades, polishing and refit' below.
We recommend either,
A)
The use of a peracetic acid solution ( e.g. NuCidex solution ),
Soak the components in peracetic acid solution.
Follow the manufacturer's recommendations for solution concentration, and for soak
time period.
CAUTION: Do not exceed the manufacturer's recommendations.
or
B)
The use of an autoclave.
Autoclave at 134 - 137°C
CAUTION Comply with nationally recommended time periods for autoclaving
Blades - polishing and refit
1.
After cleaning and sterilising, the faces of the fibre bundle must be polished with a dry
soft cloth before attaching to the blade.
2.
Note that after many sterilisations the light output of the fibre bundle may decrease.
Contact Customer Service Department for details of of our re-polishing service.
3.
Refit to the blade, and secure with the screw.
4.
Fit the blade to the handle and test, before use.
4. The use of Washing Machines
1.
2.
3.
5.
Always follow the washing machine manufacturer's instructions with regard to the machine's
suitability for use on fibre-optic components.
Some manufacturer's have special programmes for fibre-optic components.
If the user instructions supplied with the machine do not refer to fibre-optic instruments, contact
the washing machine manufacturer before washing laryngoscope fibre-optic bundles.
Do not use a wash temperature greater than 60°C.
Do not use hard water for the rinse cycle, and do not rinse at a temperature greater than 60°C.
NOTE Some washing machine manufacturer's recommend alkaline cleaning at a low
temperature, thermal disinfection, then a final rinse with fully deionised water.
Thermal disinfection and drying phases must be at a minimum temperature of 85°C and hold
time in compliance with local/ national regulations.
Cat No 52758
Doc No FL(G)0200UI August 2000
Penlon Limited
Radley Road, Abingdon
OX14 3PH
UK
Service
Tel:+44 (0) 1235 547063
E-mail: [email protected]
Fax: +44 (0) 1235 547062