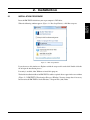
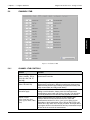
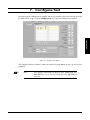
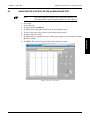
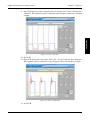
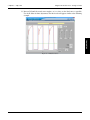
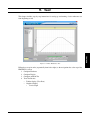
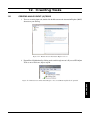
1
EM-TEST2.0
Endurance Motor Testing
Software
User’s Manual
Purchase Record
Please record all model numbers and serial numbers of your
Magtrol equipment, along with the general purchase information.
The model number and serial number can be found on either
a silver identification plate or white label affixed to each unit.
Refer to these numbers whenever you communicate with a
Magtrol representative about this equipment.
Model Number:
_____________________________
Serial Number:
_____________________________
Purchase Date:
_____________________________
Purchased From:
_____________________________
While every precaution has been exercised in the compilation of this document to
ensure the accuracy of its contents, Magtrol, Inc. assumes no responsibility for errors or
omissions. Additionally, no liability is assumed for any damages that may result from the
use of the information contained within this publication.
Copyright
Copyright ©2009 Magtrol, Inc. All rights reserved.
Copying or reproduction of all or any part of the contents of this manual without the
express permission of Magtrol is strictly prohibited.
Trademarks
National Instruments™, LabVIEW™ and NI-488.2™ are trademarks of National
Instruments Corporation.
Microsoft® and Windows® are registered trademarks of Microsoft Corporation.
Pentium® and Celeron® are registered trademarks of Intel Corporation.
1st. Edition revision A - March 2014
Safety Precautions
1. Make sure that all Magtrol dynamometers and electronic products are earth-grounded, to ensure
personal safety and proper operation.
2. Check line voltage before operating electronic equipment.
3. Make sure that dynamometers and motors under test are equipped with appropriate safety
guards.
i
Revisions To This Manual
The contents of this manual are subject to change without prior notice. Should revisions be necessary, updates to all
Magtrol User’s Manuals can be found at Magtrol’s web site at www.magtrol.com/support/manuals.htm.
Please compare the date of this manual with the revision date on the web site, then refer to the manual’s Table of
Revisions for any changes/updates that have been made since this edition.
Table of Revisions
1st. Edition revision A - March 2014
Date
Edition
03/20/14 1st Edition rev. A
Change
Add Micro Dyne as supported device
01/20/14 1st Edition
ii
Section(s)
1.3.2, 1.4, 5.2.1,
8.1
Table of Contents
Safety Precautions.......................................................................................................................... i
Revisions To This Manual................................................................................................................ ii
Table of Revisions....................................................................................................................................................... ii
Table of Contents........................................................................................................................... iii
Table of Figures........................................................................................................................................................... v
Preface................................................................................................................................................ vii
Purpose of This Manual.........................................................................................................................................vii
Who Should Use This Manual..............................................................................................................................vii
Manual Organization.............................................................................................................................................vii
Conventions Used in This Manual.....................................................................................................................ix
1. Introduction.................................................................................................................................. 1
1.1
1.3
1.4
About EM-TEST2.0................................................................................................................................................. 1
Software Features............................................................................................................................................ 2
1.3.1 New Features of EM-TEST2.0...................................................................................................................... 2
1.3.2Other Features............................................................................................................................................... 2
Data Sheet.............................................................................................................................................................. 3
2. Installation.................................................................................................................................... 7
2.1
Installation Procedure................................................................................................................................. 7
3. EM-TEST2.0 Interface.................................................................................................................. 10
3.1
3.2
Starting EM-TEST2.0......................................................................................................................................... 10
Navigating the EM-TEST2.0 interface..................................................................................................... 10
3.2.1TABS........................................................................................................................................................... 11
3.2.2 STRING CONTROLS................................................................................................................................. 11
3.2.3 NUMERIC CONTROLS............................................................................................................................. 11
3.2.4 ENUMERATED CONTROLS.................................................................................................................... 12
3.2.5 TABLE CONTROLS................................................................................................................................... 12
3.2.6 MENU RINGS............................................................................................................................................ 13
3.2.7 LIST BOXES............................................................................................................................................... 14
3.2.8BUTTONS................................................................................................................................................... 14
3.2.9SLIDERS..................................................................................................................................................... 15
3.2.10 CHECK BOXES.......................................................................................................................................... 15
3.2.11CLUSTERS................................................................................................................................................. 15
4. Start................................................................................................................................................ 16
4.1
Start Tab .............................................................................................................................................................. 16
4.1.1 START TAB CONTROLS........................................................................................................................... 16
5. Configure Hardware................................................................................................................ 17
5.1
5.2
5.3
5.4
Configure Hardware tab............................................................................................................................. 17
5.1.1 CONFIGURE HARDWARE TAB CONTROLS........................................................................................ 17
DYNAMOMETER CONTROLLER TAB................................................................................................................ 18
5.2.1 DYNAMOMETER CONTROLLER TAB CONTROLS............................................................................ 18
CHANNEL 1 tab..................................................................................................................................................... 19
5.3.1 CHANNEL 1 TAB CONTROLS................................................................................................................ 19
Channel 2 Tab..................................................................................................................................................... 22
iii
Table of Contents
5.5
5.6
5.7
5.8
Magtrol EM-TEST2.0 Motor Testing Software
5.4.1 CHANNEL 2 TAB CONTROLS................................................................................................................ 22
ANALOG I/O tab.................................................................................................................................................... 24
5.5.1 ANALOG INPUT 1..................................................................................................................................... 25
5.5.2 ANALOG OUTPUT 1................................................................................................................................. 25
5.5.3 ANALOG INPUT 2..................................................................................................................................... 25
5.5.4 ANALOG OUTPUT 2................................................................................................................................. 26
5.5.5 ACCESSORY ANALOG INPUT................................................................................................................ 26
5.5.6 ACCESSORY TEMPERATURE INPUT.................................................................................................... 27
DIGITAL I/O TAB..................................................................................................................................................... 28
5.6.1 DIGITAL INPUT 1..................................................................................................................................... 28
5.6.2 DIGITAL OUTPUT 1................................................................................................................................. 29
5.6.3 DIGITAL INPUT 2..................................................................................................................................... 29
5.6.4 DIGITAL OUTPUT 2................................................................................................................................. 30
5.6.5 ACCESSORY DIGITAL INPUT................................................................................................................ 30
5.6.6 ACCESSORY RELAY OUTPUT............................................................................................................... 31
POWER MEASUREMENT tab.............................................................................................................................. 31
5.7.1 POWER MEASUREMENT TAB CONTROLS......................................................................................... 32
POWER SOURCE tab............................................................................................................................................ 34
5.8.1 POWER SOURCE TAB CONTROLS........................................................................................................ 34
6. Display............................................................................................................................................ 36
6.1
Configure Display tab................................................................................................................................... 36
6.1.1AVAILABLE............................................................................................................................................... 36
6.1.2SELECTED................................................................................................................................................. 37
6.1.3 SAVE SETUP.............................................................................................................................................. 37
7. Configure Test............................................................................................................................ 38
7.1 Data Logging...................................................................................................................................................... 39
7.2endurance test parameters..................................................................................................................... 40
7.3temperature parameters............................................................................................................................ 41
8. Adjust PID...................................................................................................................................... 42
8.1
8.2
PID Parameters.................................................................................................................................................. 43
Adjusting the Controller for aN endurance Test...................................................................... 44
9. Test................................................................................................................................................... 47
9.1
9.2
9.3
9.4
9.5
9.6
Configure Hardware..................................................................................................................................... 48
Configure Display........................................................................................................................................... 48
Configure and Run Test............................................................................................................................... 48
Endurance Test Controls.......................................................................................................................... 49
Recovery function......................................................................................................................................... 49
DISPLAY SHOW DURING TEST........................................................................................................................... 50
10. View Data....................................................................................................................................... 51
11. 5-Axis Graph................................................................................................................................ 52
11.1 Select file........................................................................................................................................................... 52
11.2 Select Plotted Parameters....................................................................................................................... 52
iv
Table of Contents
Magtrol EM-TEST2.0 Motor Testing Software
11.3 Save Data.............................................................................................................................................................. 53
Service Information....................................................................................................................... 54
Returning Magtrol equipment for Repair and/or Calibration....................................................... 54
Returning Equipment to Magtrol, Inc. (United States).............................................................................................. 54
Returning Equipment to Magtrol SA (Switzerland).................................................................................................. 54
Table of Figures
2. Installation
Figure 2–1
Figure 2–2
Figure 2–3
Figure 2–4
Figure 2–5
Run Setup Window.....................................................................................................................................7
EM-TEST2.0 Destination Directory Window............................................................................................8
Start Installation Screen............................................................................................................................8
Installation Progress Window....................................................................................................................9
Installation Complete Window..................................................................................................................9
3. EM-TEST2.0 Interface
Figure 3–1 Start Window...........................................................................................................................................10
Figure 3–2 EM-TEST2.0 Tabs....................................................................................................................................11
Figure 3–3 String Controls........................................................................................................................................11
Figure 3–4 Numeric Controls....................................................................................................................................11
Figure 3–5 Enumerated Controls...............................................................................................................................12
Figure 3–6 Table Controls.........................................................................................................................................12
Figure 3–7 Show Selection.........................................................................................................................................12
Figure 3–8 Table with cells selected..........................................................................................................................13
Figure 3–9 Table with vertical scroll bar...................................................................................................................13
Figure 3–10 Menu Rings............................................................................................................................................13
Figure 3–11 List boxes...............................................................................................................................................14
Figure 3–12 Buttons...................................................................................................................................................14
Figure 3–13 Sliders....................................................................................................................................................15
Figure 3–14 Check boxes...........................................................................................................................................15
Figure 3–15 Clusters..................................................................................................................................................15
4. Start
Figure 4–1 Start Tab..................................................................................................................................................16
5. Configure Hardware
Figure 5–1
Figure 5–2
Figure 5–3
Figure 5–4
Figure 5–5
Figure 5–6
Figure 5–7
Figure 5–8
Configure Hardware Tab.........................................................................................................................17
Dynamometer Controller Tab..................................................................................................................18
Channel 1 Tab..........................................................................................................................................19
Channel 2 Tab..........................................................................................................................................22
Analog I/O Tab........................................................................................................................................24
Digital I/O Tab........................................................................................................................................28
Power Measurement Tab.........................................................................................................................31
Power Source Tab....................................................................................................................................34
v
Table of Contents
Magtrol EM-TEST2.0 Motor Testing Software
6. Display
Figure 6–1 Configure Display Tab.............................................................................................................................36
Figure 6–2 Available Parameters...............................................................................................................................36
Figure 6–3 Selected Parameters................................................................................................................................37
7. Configure Test
Figure 7–1 Configure Test Window............................................................................................................................38
Figure 7–2 Data Logging Window.............................................................................................................................39
Figure 7–3 Endurance Test Window..........................................................................................................................40
8. Adjust PID
Figure 8–1
Figure 8–2
Figure 8–3
Figure 8–4
Figure 8–5
Adjust PID Window.................................................................................................................................42
Curve (no I or D).....................................................................................................................................44
Curve (P at 25%).....................................................................................................................................45
Curve (with P and I)................................................................................................................................45
Matched Curve........................................................................................................................................46
9. Test
Figure 9–1
Figure 9–2
Figure 9–3
Figure 9–4
Figure 9–5
Basic Endurance Test..............................................................................................................................47
Crash Window.........................................................................................................................................49
Data Display...........................................................................................................................................50
Graph Display.........................................................................................................................................50
Set-Point Table Display...........................................................................................................................50
10. View Data
Figure 10–1 View Data Window.................................................................................................................................51
11. 5-Axis Graph
Figure 11–1 5-Axis Graph Window............................................................................................................................52
vi
Preface
Purpose of This Manual
This manual contains information required for installation and general use of Magtrol Custom 4Q
Dynamometer Software. To achieve maximum capability and ensure proper use, please read this
manual in its entirety before operating. Keep the manual in a safe place for quick reference whenever
a question should arise.
Who Should Use This Manual
This manual is intended for those operators in need of a software program to complement their
Magtrol test equipment setup. e setup may include any of the following Magtrol products:
• Hysterese, Eddy-Current or Powder Brake Dynamometer (HD, HDS, WB or PB)
• Micro Dyne Motor Testing System
• In-Line Torque Transducer (TM, TMB, TMHS or TF)
• Power Analyser (Model 6510, 6510e, 6530, 6550, 5100, 5300, 5330)
• Dynamometer Controller (Model DSP6000, DSP6001, DSP7000)
Manual Organization
This section gives an overview of the structure of the manual and the information contained within it.
Some information has been deliberately repeated in different sections of the document to minimize
cross-referencing and to facilitate understanding through reiteration.
The structure of the manual is as follows:
Chapter 1:
INTRODUCTION - Contains the technical data sheet for EM-TEST2.0
Chapter 2:
INSTALLATION - Provides general installation instructions for EM-TEST2.0
software; GPIB interface board; USB temperature measurement hardware; and
National Instrument relay actuator PCI and USB card.
Chapter 3:
EM-TEST2.0 INTERFACE - Provides instruction for EM-TEST2.0 startup and
navigation. Includes a brief overview of the software capabilities.
Chapter 4:
START - Provides instruction for logging in/out, selecting language and loading/
saving EM-TEST2.0 files.
Chapter 5:
CONFIGURE HARDWARE - Contains the information needed to set up EMTEST2.0 software with details pertaining to the testing instruments, controller, power
analyzer, power supply and temperature measurement hardware being utilized in
the test configuration.
Chapter 6:
DISPLAY - Provides instruction for selecting motor parameters to be tested.
Chapter 7:
CONFIGURE TEST - Provides information required to set up EM-TEST2.0 for
the type of test to be performed.
Chapter 8:
ADJUST PID - Contains instruction for adjusting proportional gain, integral and
vii
Preface
Magtrol EM-TEST2.0 Motor Testing Software
derivative (PID) values of the dynamometer controller for a ramp, curve or pass7fail
test.
Chapter 9:
TEST - Provides step-by-step instructions for setting up and running a basic curve,
ramp, manual and pass/fail test from beginning to end.
Chapter 10:
VIEW DATA - Provides instructions for viewing, saving and printing test data in
tabular format.
Chapter 11:
5-AXIS GRAPH - Contains general information for viewing test data in a multiplot
graph.
viii
Preface
Magtrol EM-TEST2.0 Motor Testing Software
Conventions Used in This Manual
The following symbols and type styles may be used in this manual to highlight certain parts of the
text:
Note:
This is intended to draw the operator’s attention to complementary
information or advice relating to the subject being treated. It
introduces information enabling the correct and optimal functioning
of the product to be obtained.
Caution:This
is used to draw the operator’s attention to information,
directives, procedures, etc. which, if ignored, may result in damage
being caused to the material being used.
The
associated text
describes the necessary precautions to take and the consequences
that may arise if the precautions are ignored.
WARNING! This introduces directives, procedures,
precautionary measures, etc. which must be
executed or followed with the utmost care
and attention, otherwise the personal safety
of the operator or third party may be put at
risk. The reader must absolutely take note
of the accompanying text, and act upon it,
before proceeding further.
ix
Preface
Magtrol EM-TEST2.0 Motor Testing Software
This page was intentionally left blank
x
1.1
About EM-TEST2.0
Magtrol’s EM-TEST2.0 is a state-of-the-art motor testing program designed for use with Windows®
XP/ 7 32 bit operating system for PC-based data acquisition. Used in conjunction with Magtrol’s
Motor Testing Equipment, EM-TEST2.0 is equipped with endurance testing capabilities to help
determine the performance characteristics of a motor under test. The data generated can be stored,
displayed and printed in tabular or graphic formats, and is easily imported into a spreadsheet. EMTEST2.0 is ideal for simulating loads for long term test. Magtrol can also make custom modifications
to the software to meet your specific motor testing needs.
EM-TEST2.0 is equipped to work in conjunction with any of the following Magtrol motor testing
instruments:
• Hysterese, Eddy-Current or Powder Brake Dynamometer (HD, HD5, WB or PB)
• In-Line Torque Transducer (TM, TMB, TMHS or TF)
• Power Analyser (Model 6510, 6510e, 6530, 6550, 5100, 5300, 5330)
• Dynamometer Controller (Model DSP6000, DSP6001, DSP7000)
Written in LabVIEW™, EM-TEST2.0 has the flexibility to test a variety of motors in a multitude
of configurations. If you have a specialized test that you wish to perform, contact Magtrol Technical
Assistance at +41 (0)26 407 3000.
1
GENERAL
INFORMATION
1. Introduction
Chapter 1 – Introduction
Software Features
1.3.1
New Features of EM-TEST2.0
Magtrol’s EM-TEST2.0 Software is an improved motor testing program that replaces
EM-TEST1.0. The program is comprised of many features that make it unique.
1.3.2
Other Features
• New Graphical User Interface has user friendly tabbed pages for quick navigation.
• Front panel Lock and Unlock function to prevent any modification by an unauthorized
operator.
• Global project management to see quickly all data under the project.
• Display the last cycle of the test.
• Continue current test after a crash machine.
• Temperature security function to prevent over-temp.
• Hysteresis temperature function with custom relay control can be set to break test when
high temp is reach and continue test when low temp is reach
• DSP7000 Programmable Controller Support.
• Micro Dyne Motor Testing System Support.
• Supports the optional Analog and Digital I/O Modules on the DSP7000 Programmable
Controller.
• Optional Analog and Digital I/O provides more device flexibility.
• Multiple Language Support: Switch to/from English, French, German at any point during
the program. Additional language dictionaries can be created/edited by the user.
• Expanded power analyzer and power supply selections.
• Programmable analog and digital outputs per step.
• Displays 63 Tested and Calculated Parameters
• Three-Phase Power Analyzer Data Acquisition
• IEEE-488, USB and RS-232 Interface
• PID Adjustment Routines
• Graphical Capabilities, Curve Fitting
• Save/Load Setup Function
• Temperature Measurement capabilities are included in standard program.
• Up to 6 Relays control are included in standard program.
• Rapid Graph Plotting: Change both the X- and Y-axis to display additional test curves,
without having to exit the graph.
• Multiplot Graphical Display.
• Displays Tested and Calculated Parameters.
2
GENERAL
INFORMATION
1.3
Magtrol EM-TEST2.0 Motor Testing Software
Chapter 1 – Introduction
Magtrol EM-TEST2.0 Motor Testing Software
MAGTROL
Data Sheet
EM-TEST2.0 Endurance
Motor Testing Software
SPECIFIC FEaturES
•
•
•
•
•
•
•
•
•
•
•
•
•
•
•
Graphical User Interface:Userfriendlytabbedpagesforquick
navigation.
Global Project :ManagementDataandSetupofcurrentproject.
Lock / Unlock function: FrontPanellockfunctionprevents
modificationbyanunauthorizedoperator.
Set-point table:Theset-pointcurveisdefinedinthedatatable.
Samplingrate,voltageandAnalogOutput,DigitalOuputand
Relaystatearealsodefinedinthistable.
Endurance Testing: Testsspeed,torque,amps,wattsinput,watts
outputandopenloopparameters.Capableofadjustingsampling
ratebystepandusingsteporrampfromoneloadpointtothenext.
DSP7000 / 6001 / 6000ProgrammableControllerSupport.
Micro DyneMotorTestingSystemSupport.
Supports the optional Analog and Digital I/O Modulesonthe
DSP7000ProgrammableController.
Expandedpoweranalyzerandpowersupplyselections.
OptionalAnalogandDigitalI/Oprovidesmoredeviceflexibility.
Temperature Security: Over-TemperaturecontrolandHysteresis
Temperaturefunction.
Three-Phase Power Meter Data Acquisition: Obtaindataon
eachindividualphaseand/orthesumusedinthechosenparameters
(amps,volts,inputwattsandpowerfactor).
Spanning file function: Auto-Incrementationoffilename
dependingoncycle,hours,daysorfilesize.
Graph and display during test: Displayspreviousfilesduringtest
intabularorgraphicview.
Recovery Function:Recoverstestifthecomputercrashes
(Windows®problem,poweroff).
EM-TEST2.0 Project Management
EM-TEST2.0 Graphical Data Output
DESCrIPtIon
bestsuitedtotheoverallefficiencyofthetestrig.Writtenin
LabVIEW™,EM-TEST2.0hastheflexibilitytotestavariety
ofmotorsinamultitudeofconfigurations.Thedatagenerated
fromthisuser-friendlyprogramcanbestored,displayedand
printedintabularorgraphicalformats,andiseasilyimported
intoaspreadsheet.
Magtrol’s EM-TEST2.0 is an endurance motor testing
software for PC (Windows®XP sp3/7/8) based data
acquisition. Combined with a Magtrol DSP7000 High
Speed Programmable Controller, EM-TEST2.0 works with
any Magtrol dynamometer or in-line torque transducer to
determinetheperformancecharacteristicsofamotorunder
test.Upto64parametersarecalculatedanddisplayedutilizing
EM-TEST2.0’suniquetestingandgraphingcapabilities.
Magtrolcanalsomakecustommodificationstothesoftware
tomeetadditionalmotortestingrequirements.
AnintegralcomponentofanyMagtrolEnduranceMotorTest
System, EM-TEST2.0 performs curve testing in a manner
www.magtrol.com
1
3
GENERAL
INFORMATION
1.4
EM-TEST2.0
Data Sheet
Chapter 1 – Introduction
Magtrol EM-TEST2.0 Motor Testing Software
aPPlICatIonS
analoG InPut
MEaSurEMEnt
EM-TEST2.0isdesignedforlong-termmotortestcycling.
Itisidealfordevelopmentalapplications.Ithastheability
toduplicatetestsandrunthemautomatically.Thisversatile
programisextremelyvaluabletoanyoneinvolvedinmotor
testing.EM-TEST2.0canbeusedasstandalonesoftware
orincombinationwithM-TEST7MotorTestingSoftware.
Upto128analogsensorscanbereadandmonitoredduring
a motor test. Heat rise curves on the bearings, windings
and housing of a motor can be performed and air flow/
exhaust efficiencies can be measured with an air tool or
internalcombustionengine.EM-TEST2.0,withitscomplete
dynamometercontrol,evenallowsforanalogmeasurement
while performing load simulation for duty cycle and life
testing.
StanDarD FEaturES
•
•
•
•
•
•
•
•
•
USB2.0: ComputerinterfaceforDSP7000
IEEE-488:ComputerinterfacewithNational
Instruments™PCI-GPIBorUSB-GPIB.
Multiple Language Support:Switchto/fromEnglish,
French,Germanatanypointduringtheprogram.
Additionallanguagedictionariescanbecreated/edited
bytheuser.
Automatic Load Defaults Option:Downloadstesting
instrumentparametersbasedonmodelnumber.
PID Adjustment Routines:Helpsadjustthesystem
forstepfunctions.
Rapid Graph Plotting:ChangeboththeX-andY-axis
todisplayadditionaltestcurves,withouthavingtoexit
thegraph.
Displays 63 Tested and Calculated Parameters:
Torque,speedandauxiliaryinputaredisplayedfrom
theDSP6000/6001/7000Controller;amps,voltsand
wattsfroman(optional)poweranalyzer.Calculated
valuesincludinghorsepower,efficiency,powerfactor,
outputwattsandtimecanalsobedisplayed.Optional
analoganddigitalinputscanalsobedisplayed.
Curve Fitting: Acurvefittingroutinecanbeapplied
tomostmotortestcurves.Rawdataandcurvefitdata
canalsobedisplayedsimultaneously.
Context Help: Hoveroveranyfieldorparameterwith
themousetodisplayacontexthelpbox.
tEMPEraturE SEnSor
MEaSurEMEnt
Up to 128 thermocouples can be read and monitored during
amotortest.Heatrisecurvesonthebearings,windingsand
housingofamotorcanbeperformed.
EM-TEST2.0,withitscompletedynamometercontrol,allows
forsensormeasurementwhileperformingloadsimulationfor
dutycycleandlifetesting.
Hysteresis function : If the temperature exceeds the high
threshold,thetestpassestoPausemodeandarelayisdisabled.
Whenthetemperaturepassesunderthelowthreshold,thetest
passestoRunmodeandarelayisenabled.
T °C
High
Low
t
TEST
Run
Run
Pause
RELAY
1
1
0
rElay Control
Upto6relayscanbecontrolledduringtest.Thestateofeach
relaycanbesetforeachstep.
4
2
MAGTROL
GENERAL
INFORMATION
EM-TEST2.0
Chapter 1 – Introduction
Magtrol EM-TEST2.0 Motor Testing Software
EM-TEST2.0
SyStEM ConFIGuratIon
EM-TEST2.0isequippedtoworkinconjunctionwithanyof
thefollowingMagtrolmotortestinginstruments:
• DynamometerController(DSP7000/6001/6000)
• Hysteresis,Eddy-CurrentorPowderDynamometer
(HD,HD5,WB,PB)
• MicroDyneMotorTestingSystem
• In-LineTorqueTransducer(TM,TF,TMB,TMHS)
• PowerAnalyzer(6530,6510e,6510,6550,5100,5300,
5310,5330)
AMagtrolDynamometerprovidesmotorloadingwithaMagtrol
ProgrammableControlleractingastheinterfacebetweenthe
PCrunningEM-TEST2.0andthedynamometer.Ifthemotors’
electricalparametersaretobemeasuredorusedtodetermine
loadpoints,aMagtrolPowerAnalyzerisalsorequired.The
computerandelectronicinstrumentationinterfacethroughthe
NationalInstruments™PCI-GPIBcardandUSB2.0.
Shaded area represents
USB (or optional)
additional components
GPIB/RS232
and setup required for
Temperature Testing
and Relay Control
EM-TEST
2.0
MODEL DSP6001
DYNAMOMETER CONTROLLER
MODEL 6510
POWER ANALYZER
DSP7000/6001/6000
Programmable Controller
Motor Power
Supply
6510e or 6530
Power Analyzer
(optional)
Hysteresis Dynamometer (HD)
GPIB
PC
USB
USB
NITM 9211
NITM 9213
CDAQ Chassis
NITM9481
4 or 16
Thermocouples
} to motor
Motor
under test
4 Relay channels
}
4 or 6 relays
depending on
PCI card
configuration choice 6-relay
Also works with Eddy-Current (WB) or
Powder Brake (PB) Dynamometer
SyStEM rEquIrEMEntS
•
•
•
•
•
•
• NationalInstruments™PCI-GPIBcardorUSB-GPIB
card(availablefromMagtrol)
• NationalInstruments™NI9211ANI9213hardware:
Requiredonlyiftemperaturesensorinputfunctionwill
beused
• NationalInstruments™NI9481/PCI-652xhardware:
requiredonlyifrelaycontrolfunctionwillbeused.
PersonalcomputerwithIntel®Pentium®Core™2Duo
processor(orequivalent)
Microsoft®Windows®XPsp3/7/8
2GBofRAM
2GBHDDofavailableharddrivespace.
VGAcolormonitorwithminimumscreenresolutionof
(1280×900)
USB2.0availableforDSP7000(AGPIBorRS-232
interfaceisrequiredfortheDSP6000andDSP6001)
5
3
MAGTROL
GENERAL
INFORMATION
Specifications
Chapter 1 – Introduction
Magtrol EM-TEST2.0 Motor Testing Software
GENERAL
INFORMATION
Ordering Information
EM-TEST2.0
SyStEM oPtIonS anD aCCESSorIES
CATEGORY
TEMPERATURE
TESTING HARDWARE
RELAYS CARDS
CONTROLLERS
MOTOR TEST
EQUIPMENT
POWER ANALYZERS
CARDS
CABLES
DESCRIPTION
USB 4-Channel Isolated Input Module and USB Cable (1 m)
USB 16-Channel Isolated Input Module and USB Cable (1 m)
PCI card 6 relays 150V AC/DC 2A max. 60 W
USB card 4 relays 30V DC 2A max. 60 W
High Speed Programmable Controller
Hysteresis Dynamometers
Eddy-Current Dynamometers
Powder Brake Dynamometers
In-Line Torque Transducers
Micro Dyne Motor Testing System
High Speed Single-Phase Power Analyzer
High Speed Three-Phase Power Analyzer
PCI-GPIB Interface Card
USB-GPIB Interface Card
GPIB Cable, 1 meter
GPIB Cable, 2 meters
Torque Transducer Connector Cable
MODEL / PART #
HW-TTEST-4
HW-TTEST-16
HW-RLTEST-PCI
HW-RLTEST-4
DSP7000
HD series
WB series
PB series
TM/TMHS/TMB series
006542
6510e
6530
88M047
88M048
ER 113/01
Forinformationonthemostcurrentsoftwarereleaseavailable,refertoMagtrol'sWebsiteat
www.magtrol.com/motortest/software.html
Due to the continual development of our products, we reserve the right to modify specifications without forewarning.
MaGtrol InC
70 Gardenville Parkway
Buffalo, New York 14224 USA
Phone: +1 716 668 5555
Fax: +1 716 668 8705
E-mail: [email protected]
MaGtrol Sa
Route de Montena, 77
1728 Rossens / Fribourg,
Switzerland
6
Phone: +41 (0)26 407 3000
Fax: +41 (0)26 407 3001
E-mail: [email protected]
Subsidiaries in:
Germany • France
China • India
Worldwide Network
of Sales Agents
EM-TEST2.0-US 03/14
www.magtrol.com
2. Installation
2.1
Installation Procedure
Insert the EM-TEST2.0 disk into your target computer’s DVD drive.
When the following window appears (Figure 2–1 Run Setup Window), click Run setup.exe.
Getting
Started
Figure 2–1 Run Setup Window
If you do not see this window, use Explorer to find the setup.exe file on the disk. Double-click this
file to begin the installation process.
If security is enabled, allow Windows to install this program.
The default installation folders for EM-TEST2.0 and the required drivers appear in the next window
(Figure 2–2 EM-TEST2.0 Destination Directory Window). You may change these if necessary
but do not install EM-TEST2.0 in the Windows 7 Program Files (x86) folder.
7
Chapter 2 – Installation
Magtrol EM-TEST2.0 Motor Testing Software
Getting
Started
Figure 2–2 EM-TEST2.0 Destination Directory Window
A list of programs to be installed will be shown in the next window (Figure 2–3 Start Installation
Window). Press Next>> to continue.
NOTE:
The example shown here does not contain the complete suite of
programs being installed.
Figure 2–3 Start Installation Screen
8
Chapter 2 – Installation
Magtrol EM-TEST2.0 Motor Testing Software
The program files will begin loading onto the computer. Progress will be shown on the following
window (Figure 2–4 Installation Progress Window).
NOTE:
This process can take several minutes to an hour depending upon
the computer being used. Please plan accordingly.
Getting
Started
Figure 2–4 Installation Progress Window
When all programs are installed, the following window (Figure 2–5 Installation Complete Window)
will appear. Click Finish to complete the installation.
Figure 2–5 Installation Complete Window
9
3. EM-TEST2.0 Interface
3.1
Starting EM-TEST2.0
From the taskbar, click Start, point to Programs >> MAGTROL >> EM-TEST2.0, then click
EM-TEST. From your desktop, double-click the desktop icon and the program will automatically
start. The Start window will appear.
Getting
Started
Figure 3–1 Start Window
3.2
Navigating the EM-TEST2.0 interface
EM-TEST2.0 uses several different types of user input controls. An explanation of each follows.
NOTE:By right-clicking any control, a description of that control’s function
can be read by selecting Description and Tip.
NOTE:
Any control or parameter that does not apply to the current instrument
in use or test selection will be grayed out. You may ignore all grayed
out controls for your current test.
10
Chapter 3 – EM-TEST2.0 Interface
Magtrol EM-TEST2.0 Motor Testing Software
3.2.1
TABS
Each tab has a title and contains specific controls or information pertaining to its function. The Start
tab is the default location and the remaining tabs follow a logical flow in the test setup and procedure.
To change to a different tab, left-click your mouse on the tab title. While running an actual test,
the tabs will disappear to prevent the user from interrupting a test in progress. Note: if the security
function is enabled, tabs that are inaccessible to the user are grayed out.
3.2.2
STRING CONTROLS
String controls are primarily for text entered by the user. Left-click your mouse in the field and type
in the information. If information is already in the field, you may left-click and hold the mouse while
highlighting the text to be deleted or over-written.
Figure 3–3 String Controls
3.2.3
NOTE:
After entering a value in the control, click your mouse elsewhere
on the screen or the value may not be retained.
NUMERIC CONTROLS
Numeric controls are used to enter instrument settings and test parameters. You may change the
value by clicking on the up/down arrows to the left of the control, or by double-clicking in the field
and entering the new value.
Figure 3–4 Numeric Controls
NOTE:
After entering a value in the control, click your mouse elsewhere
on the screen or the value may not be retained.
11
Getting
Started
Figure 3–2 EM-TEST2.0 Tabs
Chapter 3 – EM-TEST2.0 Interface
3.2.4
Magtrol EM-TEST2.0 Motor Testing Software
ENUMERATED CONTROLS
Enumerated controls are pre-filled with the available selections you may choose. You may change the
selection by clicking on the up/down arrows to the left of the control, or by clicking in the control
field and dragging to the desired item. If the available choices exceed the allotted space, a vertical
scroll bar will appear to the right of the selection list.
3.2.5
TABLE CONTROLS
Table controls are used to enter test sequences or specific data points. The most reliable method
of entering data is to click in the desired cell and type the value. As you begin entering data, the
current row will highlight a light yellow color. Unused rows are the default white background. Please
make certain that there are no extra highlighted rows than where you have entered data. This would
indicate extraneous characters somewhere in that row and may adversely affect program operation.
Figure 3–6 Table Controls
To delete a row, right-click somewhere in the row and select Delete Row from the menu.
You may also Cut and Paste single or multiple rows. Right-click in the table and select Show
Selection. A small caret will appear in the upper left corner of one of the cells (Figure 3–6 Show
Selection Table Control).
Figure 3–7 Show Selection
12
Getting
Started
Figure 3–5 Enumerated Controls
Chapter 3 – EM-TEST2.0 Interface
Magtrol EM-TEST2.0 Motor Testing Software
Click, hold and drag the mouse cursor on the desired cells to cut. Colored outlines will appear around
each of the selected cells (Figure 3–7 Table with cells selected).
Getting
Started
Figure 3–8 Table with cells selected
You may now right-click and cut data. The cut data may be pasted or inserted elsewhere in the table.
When the number of rows or columns exceeds the visible area, vertical and/or horizontal scroll bars
will appear (Figure 3–8 Table with vertical scroll bar). With these you can enter almost an unlimited
number of rows for more complicated test sequences.
Figure 3–9 Table with vertical scroll bar
3.2.6
NOTE:
After you are finished entering values in the table, click your mouse
elsewhere on the screen or the data may not be retained.
MENU RINGS
Menu rings are similar to enumerated controls; they allow selection of pre-determined parameters.
You may select the next item by clicking the down arrow to the right of the field, or the preferred
method of clicking and dragging to the desired selection.
Figure 3–10 Menu Rings
13
Chapter 3 – EM-TEST2.0 Interface
3.2.7
Magtrol EM-TEST2.0 Motor Testing Software
LIST BOXES
List boxes are multiple line text controls that are typically pre-filled with information that you may
re-order or move to another list box. Further information about the use of these is in Chapter 6
Configure Display. If the number of items exceeds the available space, there will be a vertical scroll
bar on the right side of the list box to allow access to many more selections.
Getting
Started
Figure 3–11 List boxes
3.2.8
BUTTONS
Buttons have the function name embedded on the button itself. Some buttons may have universal
icons on them to assist the user.
Figure 3–12 Buttons
14
Chapter 3 – EM-TEST2.0 Interface
Magtrol EM-TEST2.0 Motor Testing Software
3.2.9
SLIDERS
Sliders may be horizontal or vertical. There is a digital display associated with the slider that indicates
very accurately the current slider position. The slider value may be changed by clicking, holding
and dragging the slider control to the desired position, by clicking in the slider field at the desired
value, or by double-clicking in the digital display and typing a value.
Getting
Started
Figure 3–13 Sliders
3.2.10
CHECK BOXES
Check boxes have a Boolean function where checking the box is True, On, Enable or Logic 1. An
unchecked box is False, Off, Disabled or Logic 0.
Figure 3–14 Check boxes
3.2.11
CLUSTERS
Clusters are groupings of various types of controls that function in some related manner.
Figure 3–15 Clusters
15
4. Start
4.1
Start Tab
This is the default tab when starting the EM-TEST2.0 program. From here you may import previously
configured test setups, allow recall saved data.
Getting
Started
Figure 4–1 Start Tab
4.1.1
START TAB CONTROLS
Control
Function
Select Language
This control allows the user to select the language used throughout
the program. The captions of all controls will be converted to the
selected language for regional use. The contents of the control will
not change; they will always remain in English.
Current Root Folder
This indicates the path of the root folder
Root Folder
Press to specify the path of the Current Root Folder
Browser Project
This control allows the user to browse in folder and test file. To
load old test, select the right configuration (msf file). It’s also
possible to delete a folder or a file !
Select the Folder by serial number name. Expand by clicking on +
Load Project
This control allows the user to load the configuration file. This
button is visible only when a msf file is selected in Browser Project
field.
Create Project
This control must use to create new project (new serial number).
Enter the serial number of motor to create hierarchy under Current
Root Folder.
16
5. Configure Hardware
5.1
Configure Hardware tab
TEST SETUP
Figure 5–1 Configure Hardware Tab
5.1.1
CONFIGURE HARDWARE TAB CONTROLS
Control
Function
Device Listing
This indicates the address and device name of any GPIB, USB or
NI-DAQmx device connected to or installed in the host computer.
Devices that are not IEEE-488.2 compliant will show their address
but the device name will typically be incorrect. This should not
affect operation of these older, legacy devices. Each time you
return to the Configure Hardware tab, the software will update the
device listing.
Find Devices
Press to update the device listing.
Apply Settings
Press to immediately send configuration commands to the
instruments in the system. Normally, this is not necessary since
the commands are always sent at the beginning of each test.
The reason for applying settings prior to starting the test is to see
immediate changes in the instrument setup.
Save Setup
Press to save the setup to the path and filename that is currently in
use. If you wish to change it, go to the Start tab and press the Save
Setup button.
17
Chapter 5 – Configure Hardware
5.2
Magtrol EM-TEST2.0 Motor Testing Software
DYNAMOMETER CONTROLLER TAB
5.2.1
DYNAMOMETER CONTROLLER TAB CONTROLS
Control
Function
Device
(None, DSP6000,
DSP6001, DSP7001,
DSP7002, MicroDyne)
Selects the dynamometer controller, if any, being used in
this setup. While EM-TEST2.0 is specifically designed for the
DSP7000 series controllers, several legacy models are also
supported.
Interface (GPIB/COM)
Selects the GPIB, RS-232 or USB port that is used to
communicate with the dynamometer controller. In some cases you
may have two options for one instrument, e.g. a DSP7000 with
standard USB and optional GPIB. In that case, select either of the
two.
Active Channel (1/2)
In multiple channel dynamometer controllers such as the DSP6001
and DSP7002, this selects which channel is currently being
used as the control source for the dynamometer. EM-TEST0.2 is
designed to control one dynamometer at a time, so in the case
of having two dynamometers connected to a DSP7002 you must
select either channel 1 or 2 for the test.
Display
(Channel 1, Channel 2,
Channel 1 & 2)
Selects which channel of a DSP7002 is displayed on the front
panel of the instrument. You may select channel 1, 2 or 1 & 2.
FP Controls
(Enable/Disable)
Enables or disables the use of the front panel controls of the
dynamometer controller. Also known as front panel lockout.
18
TEST SETUP
Figure 5–2 Dynamometer Controller Tab
Chapter 5 – Configure Hardware
Magtrol EM-TEST2.0 Motor Testing Software
5.3
CHANNEL 1 tab
TEST SETUP
Figure 5–3 Channel 1 Tab
5.3.1
CHANNEL 1 TAB CONTROLS
Control
Function
Instrument Type
(None, Brake, FR-10,
FRS, HD, HD5, PB, TF,
TM, WB)
Selects the type of instrument connected to channel 1 of the
dynamometer controller.
Brake Type
(None, HB, WB, PB)
Selects the type of brake being used in a non-conventional
dynamometer configuration. Magtrol manufactures three types of
brakes that may be used in this setup; HB (hysteresis brake), WB
(eddy current brake) and PB (powder brake).
Model (depends on
instrument type)
Selects the model number of the instrument being used. After
making a model selection, always press the Load Instrument
Defaults button at the lower right corner of the tab. This will import
the critical parameters for that model and populate the controls.
Tandem (Enable/Disable) Enables or disables the tandem function in a WB/PB dynamometer
so that you may use each dynamometer type independently.
19
Chapter 5 – Configure Hardware
Magtrol EM-TEST2.0 Motor Testing Software
Control
Function
Display Torque
(oz.in, oz.ft, lb.in, lb.ft,
g.cm, kg.cm, mN.m,
cN.m, N.m)
Magtrol dynamometers are scaled in several different units
of torque. WB and PB dynamometers are N·m, while HD
dynamometers can be oz·in, lb·in, g·cm, kg·cm, mN·m or N·m.
Regardless of the dynamometer units of torque, M-TEST0.2 will
convert this to any other unit of torque you select. All torque data in
the program will be in the selected unit and any commanded torque
will also be in the new unit of measurement.
Scale Factor (0 - n)
The full scale torque value of the dynamometer selected. This is the
dynamometer torque units, not the display torque units.
Torque Filter
Selects the cutoff frequency for the low-pass filter in the torque
measurement circuit of the dynamometer controller.
(Off, 2Hz, 3Hz, 5Hz,
10Hz, 20Hz, 25Hz, 50Hz,
100Hz)
Torque Ratio (0 - n)
Torque ratio = gearbox output torque / motor torque
Encoder
(1-ppr, 2-ppr, 6-ppr, 20ppr, 30-ppr, 60-ppr, 600ppr, 6000-ppr, USER)
Selects the pulse count per revolution of the encoder being used.
This may be one of the standard values Magtrol uses on their
dynamometers or a user defined count.
Pulses Per Revolution
(0 - n)
The user defined pulse count per revolution for custom encoders.
Tachometer Source
(Tach A, Quadrature,
Analog Input 1 Ch. 1 )
Selects the source of the speed signal being used for measurement
and control. Normally, this would be Tach A which is the pulse
input on the dynamometer controller but can also be from two other
sources.
Number of Degrees
(0 - n)
The measurement angle for quadrature encoders.
NOTE: The minimum pulse count when using quadrature encoders
is 1000-ppr.
Counter Reset
(Never/1 Revolution)
Selects cumulative angle of rotation (Never) or resets the reading
when +/- 360° is reached (1 Revolution).
Rated Speed (0-199999)
The maximum speed at rated torque for WB and PB
dynamometers. Exceeding this will cause the dissipated power to
be greater than the dynamometer rating.
Speed Ratio (0 - n)
If a motor-gearbox combination is being used the gearbox ratio may
be entered so that the motor speed will be indicated in the program,
rather than the gearbox output speed. For example, if the gearbox
divides the motor speed by 13.5, enter that value. The program will
multiply the measured speed by 13.5 to obtain the motor speed.
Speed ratio = motor speed / gearbox output speed
20
TEST SETUP
If a motor-gearbox combination is being used the gearbox ratio may
be entered so that the motor torque will be indicated in the program,
rather than the gearbox output torque. For example, if the gearbox
multiplies the motor torque by 13.5, enter that value. The program
will divide the measured torque by 13.5 to obtain the motor torque.
There are losses associated with a gearbox that are not reflected
in this value. However, you may change the ratio slightly to account
for losses if they are known.
Chapter 5 – Configure Hardware
Magtrol EM-TEST2.0 Motor Testing Software
Function
Pre-Load Current
(0-99.99)
The amount of load constantly applied to the motor by the
dynamometer brake. This is an open loop function and the value
represents the % of controller brake current output.
Alarms (Enable/Disable)
Enables/disables all internal alarms configured for use in the
DSP6001/DSP7000.
Airflow Alarm (Enable
Disable)
Enables/disables the flow sensor on suitably equipped forced air
cooled dynamometers.
Waterflow Alarm
(Enable/Disable)
Enables/disables the flow sensor on suitably equipped liquid cooled
dynamometers.
External Alarm
(Enable/Disable)
Enables/disables the external alarm input on the DSP6001/
DSP7000. Please refer to the controller manual regarding usage of
this feature.
Power Alarm (0 - n)
The maximum power dissipation allowed for the dynamometer in
use.
Speed Alarm (0 - n)
The maximum speed allowed for the dynamometer in use. The
maximum torque allowed for the dynamometer in use.
Torque Alarm (0 - n)
The maximum torque allowed for the dynamometer in use.
Clutch Alarm
(Enable/Disable)
When enabled, this checks if the electromagnetic clutch on a WB/
PB tandem dynamometer is closed before starting the test. It will
attempt three reads and if still not closed, an alarm will be indicated
on the front panel display of the DSP7000.
Motor Direction View
(Shaft End/Lead End)
Selects the view for determining motor direction.
Load Instrument Defaults Press to load the default parameters for the model selected. This
should always be pressed after selecting a new model.
TM/TF Torque Invert
Inverts the polarity of the torque output so rotation direction produces
the same polarity between devices.
21
TEST SETUP
Control
Chapter 5 – Configure Hardware
5.4
Magtrol EM-TEST2.0 Motor Testing Software
Channel 2 Tab
TEST SETUP
Figure 5–4 Channel 2 Tab
5.4.1
CHANNEL 2 TAB CONTROLS
Control
Function
Instrument Type
(None, Auxiliary, FR-10,
FRS, HD, HD5, PB, TF,
TM, WB)
Selects the type of instrument connected to channel 2 of the
dynamometer controller.
Brake Type
(None, HB, WB, PB)
Selects the type of brake being used in a non-conventional
dynamometer configuration. Magtrol manufactures three types of
brakes that may be used in this setup; HB (hysteresis brake), WB
(eddy current brake) and PB (powder brake).
Model (depends on
instrument type)
Selects the model number of the instrument being used. After
making a model selection, always press the Load Instrument
Defaults button at the lower right corner of the tab. This will import
the critical parameters for that model and populate the controls.
Display Torque
(oz.in, oz.ft, lb.in, lb.ft,
g.cm, kg.cm, mN.m, cN.m,
N.m)
Magtrol dynamometers are scaled in several different units
of torque. WB and PB dynamometers are N·m, while HD
dynamometers can be oz·in, lb·in, g·cm, kg·cm, mN·m or N·m.
Regardless of the dynamometer units of torque, EM-TEST2.0 will
convert this to any other unit of torque you select. All torque data in
the program will be in the selected unit and any commanded torque
will also be in the new unit of measurement.
22
Chapter 5 – Configure Hardware
Magtrol EM-TEST2.0 Motor Testing Software
Control
Function
Scale Factor (0 - n)
The full scale torque value of the dynamometer selected. This is the
dynamometer torque units, not the display torque units.
Torque Filter
Selects the cutoff frequency for the low-pass filter in the torque
(Off, 2Hz, 3Hz, 5Hz, 10Hz, measurement circuit of the dynamometer controller.
20Hz, 25Hz, 50Hz, 100Hz)
Torque Ratio (0 - n)
If a motor-gearbox combination is being used the gearbox ratio may
be entered so that the motor torque will be indicated in the program,
rather than the gearbox output torque. For example, if the gearbox
multiplies the motor torque by 13.5, enter that value. The program
will divide the measured torque by 13.5 to obtain the motor torque.
There are losses associated with a gearbox that are not reflected
in this value. However, you may change the ratio slightly to account
for losses if they are known.
Encoder
(1-ppr, 2-ppr, 6-ppr, 20ppr, 30-ppr, 60-ppr, 600ppr, 6000-ppr, USER)
Selects the pulse count per revolution of the encoder being used.
This may be one of the standard values Magtrol uses on their
dynamometers or a user defined count.
Pulses Per Revolution
(0 - n)
The user defined pulse count per revolution for custom encoders.
Tachometer Source
(Tach A, Quadrature,
Analog Input 1 Ch. 1)
Selects the source of the speed signal being used for measurement
and control. Normally, this would be Tach A which is the pulse
input on the dynamometer controller but can also be from two other
sources.
Number of Degrees (0 - n)
The measurement angle for quadrature encoders.
NOTE: The minimum pulse count when using quadrature encoders
is 1000-ppr.
Counter Reset
(Never/1 Revolution
Selects cumulative angle of rotation (never) or resets the reading
when +/- 360° is reached (1 Revolution).
Rated Speed (0-199999)
The maximum speed at rated torque for WB and PB
dynamometers. Exceeding this will cause the dissipated power to
be greater than the dynamometer rating.
Clutch Present (Yes/No)
Customized tandem dynamometers may not be coupled with an
electro-magnetic clutch. If no clutch is present, select No.
Speed Ratio (0 - n)
If a motor-gearbox combination is being used the gearbox ratio may
be entered so that the motor speed will be indicated in the program,
rather than the gearbox output speed. For example, if the gearbox
divides the motor speed by 13.5, enter that value. The program will
multiply the measured speed by 13.5 to obtain the motor speed.
Speed ratio = motor speed / gearbox output speed
Clutch Disengage (0 - n)
The speed at which the clutch in a tandem dynamometer
disengages.
Pre-Load Current
(0-99.99)
The amount of load constantly applied to the motor by the
dynamometer brake. This is an open loop function and the value
represents the % of controller brake current output.
23
TEST SETUP
Torque ratio = gearbox output torque / motor torque
Chapter 5 – Configure Hardware
Control
Function
Alarms (Enable/Disable)
Enables/disables all internal alarms configured for use in the
DSP6001/DSP7000.
Airflow Alarm
(Enable/Disable)
Enables/disables the flow sensor on suitably equipped forced air
cooled dynamometers.
Waterflow Alarm
(Enable/Disable)
Enables/disables the flow sensor on suitably equipped liquid cooled
dynamometers.
External Alarm
(Enable/Disable)
Enables/disables the external alarm input on the DSP6001/
DSP7000. Please refer to the controller manual regarding usage of
this feature.
Power Alarm
(Enable/Disable)
The maximum power dissipation allowed for the dynamometer in
use.
Speed Alarm (0 - n)
The maximum speed allowed for the dynamometer in use.
Torque Alarm (0 - n)
The maximum torque allowed for the dynamometer in use.
Motor Direction View
(Shaft End/Lead End)
Selects the view for determining motor direction.
Load Instrument Defaults
Loads the default parameters for the model selected. This should
always be pressed after selecting a new model.
TM/TF Torque Invert
Inverts the polarity of the torque output so rotation direction produces
the same polarity between devices.
ANALOG I/O tab
Figure 5–5 Analog I/O Tab
24
TEST SETUP
5.5
Magtrol EM-TEST2.0 Motor Testing Software
Chapter 5 – Configure Hardware
Magtrol EM-TEST2.0 Motor Testing Software
5.5.1
ANALOG INPUT 1
DSP7000 only with optional I/O card. Two analog inputs are available on this card. Each has a +/10VDC range. Please refer to the DSP7000 manual for further details.
5.5.1.1
Control
Function
Channel 1
Check this box to enable data acquisition from channel 1 of the I/O
card.
Label 1
Enter a name for this analog input. This name will appear as one
of the selections in the Configure Display list boxes.
Channel 2
Check this box to enable data acquisition from channel 2 of the I/O
card.
Label 2
Enter a name for this analog input. This name will appear as one
of the selections in the Configure Display list boxes.
ANALOG OUTPUT 1
DSP7000 only with optional I/O card. Two analog outputs are available on this card. Each has a
+/-10VDC range. Please refer to the DSP7000 manual for further details.
5.5.2.1
5.5.3
Analog Output 1 Controls
Control
Function
Channel 1
Check this box to enable analog output for channel 1 of the I/O
card.
Label 1
Enter a name for this analog output. This name will appear in
the Curve and Pass/Fail test Control Data table for programming
output voltages in each step.
Channel 2
Check this box to enable analog output for channel 2 of the I/O
card.
Label 2
Enter a name for this analog output. This name will appear in
the Curve and Pass/Fail test Control Data table for programming
output voltages in each step.
ANALOG INPUT 2
DSP7000 only with optional I/O card. Two analog inputs are available on this card. Each has a +/10VDC range. Please refer to the DSP7000 manual for further details.
25
TEST SETUP
5.5.2
Analog Input 1 Controls
Chapter 5 – Configure Hardware
5.5.3.1
5.5.4
Magtrol EM-TEST2.0 Motor Testing Software
Analog Input 2 Controls
Control
Function
Channel 1
Check this box to enable data acquisition from channel 1 of the I/O
card.
Label 1
Enter a name for this analog input. This name will appear as one of
the selections in the Configure Display list boxes.
Channel 2
Check this box to enable data acquisition from channel 2 of the I/O
card.
Label 2
Enter a name for this analog input. This name will appear as one
of the selections in the Configure Display list boxes.
ANALOG OUTPUT 2
5.5.4.1
5.5.5
Analog Output 2 Controls
Control
Function
Channel 1
Check this box to enable analog output for channel 1 of the I/O
card.
Label 1
Enter a name for this analog output. This name will appear in
the Curve and Pass/Fail test Control Data table for programming
output voltages in each step.
Channel 2
Check this box to enable analog output for channel 2 of the I/O
card.
Label 2
Enter a name for this analog output. This name will appear in
the Curve and Pass/Fail test Control Data table for programming
output voltages in each step.
ACCESSORY ANALOG INPUT
The accessory analog input device. This requires a USB or PCI data acquisition device and an AI
Task configured in Measurement and Automation Explorer.
5.5.5.1
Accessory Analog Input Controls
Control
Function
Device Enable
Check this box to enable the accessory analog input device.
Channel (0 - n)
The channel number of the accessory analog input device.
Enable
Check this box to enable the accessory analog input channel.
Label
Enter a name for this analog input. This name will appear as one of
the selections in the Configure Display list boxes.
26
TEST SETUP
DSP7000 only with optional I/O card. Two analog outputs are available on this card. Each has a
+/-10VDC range. Please refer to the DSP7000 manual for further details.
Chapter 5 – Configure Hardware
Magtrol EM-TEST2.0 Motor Testing Software
5.5.6
ACCESSORY TEMPERATURE INPUT
The accessory temperature input device. This requires a USB or PCI data acquisition device and an
AI Task configured in Measurement and Automation Explorer.
5.5.6.1
Control
Function
Device Enable
Check this box to enable the accessory temperature input device.
Channel (0 - n)
The channel number of the accessory temperature input device.
Enable
Check this box to enable the accessory temperature input channel.
Label
Enter a name for this temperature input. This name will appear as
one of the selections in the Configure Display list boxes.
ACCESSORY ANALOG OUTPUT
The accessory analog output device. This requires a USB or PCI data acquisition device and an AO
Task configured in Measurement and Automation Explorer.
5.5.7.1
Accessory Analog Output Controls
Control
Function
Device Enable
Check this box to enable the accessory analog output device.
Channel (0 - n)
The channel number of the accessory analog output device.
Enable
Check this box to enable the accessory analog output channel.
Label
Enter a name for this analog output. This name will appear in the
Curve and Pass/Fail test Control Data table for programming output
voltages in each step.
27
TEST SETUP
5.5.7
Accessory Temperature Input Controls
Chapter 5 – Configure Hardware
5.6
Magtrol EM-TEST2.0 Motor Testing Software
DIGITAL I/O TAB
TEST SETUP
Figure 5–6 Digital I/O Tab
5.6.1
DIGITAL INPUT 1
DSP7000 only with optional I/O card. Three digital inputs are available on this card. Please refer to
the DSP7000 manual for further details.
28
Chapter 5 – Configure Hardware
Magtrol EM-TEST2.0 Motor Testing Software
5.6.1.1
Control
Function
Line 1
Check this box to enable data acquisition from line 1 of the I/O
card.
Label 1
Enter a name for this digital input. This name will appear as one of
the selections in the Configure Display list boxes.
Line 2
Check this box to enable data acquisition from line 2 of the I/O
card.
Label 2
Enter a name for this digital input. This name will appear as one of
the selections in the Configure Display listboxes.
Line 3
Check this box to enable data acquisition from line 3 of the I/O
card.
Label 3
Enter a name for this digital input. This name will appear as one of
the selections in the Configure Display listboxes.
DIGITAL OUTPUT 1
DSP7000 only with optional I/O card. Two digital outputs and two relays are available on this card.
Please refer to the DSP7000 manual for further details.
5.6.2.1
5.6.3
Digital Output 1 Controls
Control
Function
Line 1
Check this box to enable digital output for Line 1 of the I/O card.
Label 1
Enter a name for this digital output. This name will appear in the
test Control Data table for programming output state in each step.
Line 2
Check this box to enable digital output for Line 2 of the I/O card.
Label 2
Enter a name for this digital output. This name will appear in the
test Control Data table for programming output state in each step.
Relay 1
Check this box to enable relay 1 on the I/O card.
Label 3
Enter a name for this relay. This name will appear in the test
Control Data table for programming output state in each step.
Relay 2
Check this box to enable relay 2 on the I/O card.
Label 4
Enter a name for this relay. This name will appear in the test
Control Data table for programming output state in each step.
Relay 1 as Alarm
Enables use of relay 1 as an output when an alarm occurs.
DIGITAL INPUT 2
DSP7000 only with optional I/O card. Three digital inputs are available on this card. Please refer to
the DSP7000 manual for further details.
29
TEST SETUP
5.6.2
Digital Input 1 Controls
Chapter 5 – Configure Hardware
5.6.3.1
Digital Input 2 Controls
Control
Function
Line 1
Check this box to enable data acquisition from line 1 of the I/O
card.
Label 1
Enter a name for this digital input. This name will appear as one of
the selections in the Configure Display list boxes.
Line 2
Check this box to enable data acquisition from line 2 of the I/O
card.
Label 2
Enter a name for this digital input. This name will appear as one of
the selections in the Configure Display listboxes.
Line 3
Check this box to enable data acquisition from line 3 of the I/O
card.
Label 3
Check this box to enable data acquisition from line 3 of the I/O
card.
DIGITAL OUTPUT 2
DSP7000 only with optional I/O card. Two digital outputs and two relays are available on this card.
Please refer to the DSP7000 manual for further details.
5.6.4.1
5.6.5
Digital Output 2 Controls
Control
Function
Line 1
Check this box to enable digital output for Line 1 of the I/O card.
Label 1
Enter a name for this digital output. This name will appear in the
test Control Data table for programming output state in each step.
Line 2
Check this box to enable digital output for Line 2 of the I/O card.
Label 2
Enter a name for this digital output. This name will appear in the
test Control Data table for programming output state in each step.
Relay 1
Check this box to enable relay 1 on the I/O card.
Label 3
Enter a name for this digital output. This name will appear in the
test Control Data table for programming output state in each step.
Relay 2
Check this box to enable relay 2 on the I/O card.
Label 4
Enter a name for this digital output. This name will appear in the
test Control Data table for programming output state in each step.
Relay 1 as Alarm
Enables use of relay 1 as an output when an alarm occurs.
ACCESSORY DIGITAL INPUT
The accessory digital input device. This requires a USB or PCI data acquisition device and a DI
Task configured in Measurement and Automation Explorer.
30
TEST SETUP
5.6.4
Magtrol EM-TEST2.0 Motor Testing Software
Chapter 5 – Configure Hardware
Magtrol EM-TEST2.0 Motor Testing Software
5.6.6
ACCESSORY RELAY OUTPUT
The accessory relay output device. This requires a USB or PCI relay device and a DO Task configured
in Measurement and Automation Explorer.
5.6.6.1
Accessory Relay Output Controls
Control
Function
Device Enable
Check this box to enable the accessory relay output device.
Motor Power
This is relay 0 of the device being used and will close when a test
starts and open when the test finishes.
Relays
5.7
Check this field to enable accessory relays on NI card. The output
state can be set in each step.
POWER MEASUREMENT tab
Figure 5–7 Power Measurement Tab
31
TEST SETUP
When using a DC power source, this may be used in conjunction
with relay 1 to reverse polarity to the motor. To close relay 0, enter
a positive voltage setpoint. To close relay 1, enter a negative
voltage. These relays can be used to control a higher current set of
polarity reversing contactors.
Chapter 5 – Configure Hardware
5.7.1
Magtrol EM-TEST2.0 Motor Testing Software
POWER MEASUREMENT TAB CONTROLS
Control
Function
Interface (GPIB/COM)
This selects the GPIB, RS-232 or USB port of the power
measurement device to be used. In some cases you may have more
than one device connected and by selecting the unique address you
can choose which to use without changing interface cables.
Number of Elements
(1 - 6)
The number of input modules on the power analyzer in use.
Wiring (depends on
instrument type)
The wiring method being used with the power analyzer. The
available selections will be based upon the number of elements the
power analyzer has installed.
Volts (RMS/MEAN)
The voltage measurement method for analyzers that allow it. In
most cases the RMS mode will be used. When measuring certain
types of waveforms, such as PWM or BLDC, the mean mode should
be used.
Units (Watts/kW)
Selects watts or kilowatts displayed on the 5100.
Shunt 1 Scaling (0-99999) Enter the scaling constant for the external shunt on phase 1 using
this control. The constant is determined by dividing the full scale
current of the shunt by the full scale voltage in mV. The result
should be between 0.0001 and 99999.
A value of 0.0000 disables the external sensor input.
Shunt 2 Scaling (0-99999) Enter the scaling constant for the external shunt on phase 2 using
this control. The constant is determined by dividing the full scale
current of the shunt by the full scale voltage in mV. The result
should be between 0.0001 and 99999.
A value of 0.0000 disables the external sensor input.
32
TEST SETUP
Device
Selects the electrical power measurement device in use (if any).
(None, EMI, HP603xA,
When using a power measurement device not being controlled by
HP66xxA, Lambda
EM-TEST2.0, select None.
Genesys, Magna-Power
TS, Power Ten, Sorensen
DCS, Sorensen DHP,
Sorensen XG, Xantrex
XFR, Xantrex XDC,
Xantrex XMP, AMREL
SPS, 5100, 5300, 5310,
5330, 6510, 6510e, 6530,
6550, LMG310, N4L
PPA15xx, N4L PPA25xx,
N4L PPA55xx, WT210,
WT230, WT500, WT1030,
WT1600, WT1800,
WT2010, WT3000,
PZ4000, Micro Dyne)
Chapter 5 – Configure Hardware
Magtrol EM-TEST2.0 Motor Testing Software
Control
Function
Shunt 3 Scaling (0-99999) Enter the scaling constant for the external shunt on phase 3 using
this control. The constant is determined by dividing the full scale
current of the shunt by the full scale voltage in mV. The result
should be between 0.0001 and 99999.
A value of 0.0000 disables the external sensor input.
CT1 Ratio (0.01-10000)
The amps scaling constant for the current transformer on phase 1.
The constant is determined by dividing the primary current of the
transformer by the secondary current.
A value of 0.0000 disables the function.
CT2 Ratio (0.01-10000)
A value of 0.0000 disables the function.
CT3 Ratio (0.01-10000)
The amps scaling constant for the current transformer on phase 3.
The constant is determined by dividing the primary current of the
transformer by the secondary current.
A value of 0.0000 disables the function.
PT1 Ratio (0.01-10000)
The volts scaling constant for the potential transformer on phase 1.
The constant is determined by dividing the primary voltage of the
transformer by the secondary voltage.
A value of 0.0000 disables the function.
PT2 Ratio (0.01-10000)
The volts scaling constant for the potential transformer on phase 2.
The constant is determined by dividing the primary voltage of the
transformer by the secondary voltage.
A value of 0.0000 disables the function.
PT3 Ratio (0.01-10000)
The volts scaling constant for the potential transformer on phase 3.
The constant is determined by dividing the primary voltage of the
transformer by the secondary voltage.
A value of 0.0000 disables the function.
Frequency Source
The parameter and channel being used for frequency measurement.
(None, A1, V1, A2, V2,
A3, V3, A4, V4, A5, V5,
A6, V6)
Acquisition Speed
Selects the data acquisition speed for N4L power analyzers.
(Very Fast, Fast, Medium,
Slow, Very Slow)
33
TEST SETUP
The amps scaling constant for the current transformer on phase 2.
The constant is determined by dividing the primary current of the
transformer by the secondary current.
Chapter 5 – Configure Hardware
5.8
Magtrol EM-TEST2.0 Motor Testing Software
POWER SOURCE tab
TEST SETUP
Figure 5–8 Power Source Tab
5.8.1
POWER SOURCE TAB CONTROLS
Control
Function
Device
(None, Behlman BL3xxx,
Chroma 61700, PPS
UPC-32, Staco, AMREL
SPS, EMI, HP603xA,
HP66xxA, Lambda
Genesys, Magna-Power
TS, Power Ten, Sorensen
DCS, Sorensen DHP,
Sorensen XG, Xantrex
XFR, Xantrex XDC,
Xantrex XMP)
The motor power source being used (if any). When using a power
source not being controlled by EM-TEST2.0, select None.
Interface (GPIB)
This selects the GPIB port of the power source to be used. In some
cases you may have more than one device connected and by
selecting the unique address you can choose which to use without
changing interface cables.
Voltage Set (0 - n)
The desired test voltage.
Current Set (0 - n)
The current limit of the power supply.
34
Chapter 5 – Configure Hardware
Magtrol EM-TEST2.0 Motor Testing Software
Control
Function
Channel (0 - 16)
The Xantrex XMP can have several power supply modules in one
chassis. Use this control to select the module to use.
Frequency (45 - 500)
The output frequency of the programmable AC power supply.
Wiring (1-Phase/3-Phase)
The output wiring mode of the programmable AC power supply.
TEST SETUP
35
6. Display
6.1
Configure Display tab
TEST SETUP
Figure 6–1 Configure Display Tab
6.1.1
AVAILABLE
The available parameters that can be measured and displayed during a test. Select an item by doubleclicking on it. This will move it to the Selected parameters listbox.
Figure 6–2 Available Parameters
36
Chapter 6 – Display
Magtrol EM-TEST2.0 Motor Testing Software
6.1.2
SELECTED
The selected parameters that will be measured and recorded during the test. The order of parameters
in the selected panel may be changed by clicking on that parameter and dragging it to the desired
location. The order in which they appear in the panel is the same order they will appear in the data
table during a test. To remove a parameter, double-click on it.
TEST SETUP
Figure 6–3 Selected Parameters
6.1.3
Note:
To save current test configuration as a new setup file (project),
click Apply Settings then go to Configure Test. Change the serial
number and press Save Setup.
SAVE SETUP
This will save the setup to the filename that is currently in use. If you wish to change the filename,
go to the Start tab and press the Save Setup button.
37
7. Configure Test
Once the hardware configuration is complete and the test parameters have been selected, the actual
test must now be set up. Click the Configure Test tab to open the Configure Test window.
TEST SETUP
Figure 7–1 Configure Test Window
The Configure Software window is where the software is programmed for the type of test to be
performed.
Note:
For specific instructions on how to enter information into
EM‑TEST2.0, see Section 3.2–Navigating The EM-TEST2.0
Interface.
38
Chapter 7 – Configure Test
Magtrol EM-TEST2.0 Motor Testing Software
7.1
Data Logging
Data Logging allows EM-TEST2.0 to automatically store acquired data.
Control
Data Folder
Serial Number
Operator Code
Function
Data Folder is an indicator. The is path composed with Root Folder that is
selected on Start Tab with ROOT FOLDER button and the Serial Number
Indicator of the current serial number.
Operator Code The operator’s name or initials
39
TEST SETUP
Figure 7–2 Data Logging Window
Chapter 7 – Configure Test
7.2
Magtrol EM-TEST2.0 Motor Testing Software
endurance test parameters
Control
Control Data
Function
The sequence of load points to be run during the test. To quickly load to
a point and dwell there, enter the same load value in both the From and
To columns. Enter the Time to hold at that load. To ramp to a load point,
enter the starting load value in the From column and the final load value
in the To column. Enter the amount of time to perform the transition in
the Time column. Any number load points may be entered in order to
create a load profile for this test. If you are using a programmable power
supply, you must also enter the voltage for each step of the sequence.
This allows changing the voltage for each step if desired. If optional
analog and digital outputs, or accessory relays are being used, their
value or state may also be entered in the appropriate column.
Units (From, To) = control parameter units
Units (Time) = Timebase units
Units (samples/sec) = 0-100, 99999->1 acquisition at the end of step
Units (Analog Output) = volts
Units (Digital Output, Relay) = 0 for False, 1 for True
Control Parameter
This is the setpoint parameter used for this test. When controlling by
speed or torque, the internal circuitry of the controller closes the loop
(A1, A2, A3, A4,
on the desired setpoint. The PID controls are fully active for system
A5, A6, A SumA,
response tuning.
A SumB, A SumC,
When controlling by other parameters, EM-TEST2.0 uses a proportional
Win1, Win2, Win3,
Win4, Win5, Win6, W control loop in conjunction with the open loop mode of the controller.
SumA, W SumB, W
SumC, RPM, Torque,
Wout, KWout, Open
Loop, Hp)
Timebase (Seconds/ The time units of the values in the Control Data table.
Minutes)
Number of Cycle
The number of times to repeat the test sequence created in the Control
(1-n)
Data table.
40
TEST SETUP
Figure 7–3 Endurance Test Window
Chapter 7 – Configure Test
Magtrol EM-TEST2.0 Motor Testing Software
Control
Maximum Brake
Current (0-99.99)
Maximum Motor
Current (0-n)
Start Cycle (1-n)
Save Cycle (1-n)
Function
The percentage of controller current applied to the dynamometer
brake during a locked rotor instruction. This should be set to the lowest
value that will stall the motor in order to reduce the amount of residual
magnetism (cogging) on the brake.
The high current limit for the power measurement device. Any current
that exceeds this value will cause the test in progress to abort.
Sets the cycle number at which the test must begin.
NOTE: this option is use to continue a previous test.
Sets the number to save data each x Cycle.
Example: Enter 10 to save data each 10 cycles.
Indicator of complete test duration.
Import
7.3
You may import data for this table from an external tab-delimited text file.
Press this button to access the file dialog and choose the appropriate file.
Temperature parameters
Control
Function
Maximum Temperature The maximum temperature limit for the temperature measurement
(0-n)
device. Any temperature that exceeds this value will cause the test in
progress to abort.
Temp Security
Enable /Disable Temperature Security function.
Use this function to power off motor when the selected temperature is
high than High Temperature and power ON motor when temperature
is lower tha Low Temperature. Select a relay to switch power ON and
OFF the motor.
Temperature Channel Select the channel of temperature. It will be used to monitor and switch
(list of temp channel)
test in Pause mode if temp is higher as High Temperature value.
High Temperature
Sets the high threshold temperature.
(low temp – max.
temp)
Low Temperature
Sets the low threshold temperature
(0-High Temp.)
Relay Control (list of
Select the relay channel which is use to switch of when the test go to
Relay available.)
Pause mode
41
TEST SETUP
Test Time
(dayshhmmss)
Enable File Spanning The file spanning function allows the acquired data to be split into
separate files of a specified size. Decreasing the file size in turn reduces
the risk of a computer malfunction (crash). File size should be limited to
10 Mo.
Spanning Mode
The mode of spanning file indicates on which parameter split the file.
(Cycle, Hours, Days,
File size)
Spanning Size (1-n) Sets the size of the span the file
8. Adjust PID
The PID can be adjusted either prior to a test being run or afterwards if the test results are unacceptable.
Click the Adjust PID tab to open the Adjust PID window.
TEST SETUP
Figure 8–1 Adjust PID Window
The Adjust PID window is where PID setup routines are provided.
Note:
For specific instructions on how to enter information into
EM‑TEST2.0, see Section 3.2–Navigating The EM-TEST2.0
Interface.
A step function is sent to the controller and the system response is plotted against it. Adjust PID
values on the fly until desired response is obtained.
Adjustments made to the PID values during test are automatically transferred to the controller when
the test is executed.
42
Chapter 8 – Adjust PID
Magtrol EM-TEST2.0 Motor Testing Software
8.1
PID Parameters
The following parameters may be used when adjusting the DSP6001/7001/7002 Dynamometer
Controllers and the MicroDyne Motor Testing System.
Control
Actual
Ideal
Control
Low Value
(0 to High value)
Dwell
(0 to 12)
Motor voltage
(0 to 12)
Run
Save Setup
Adjusts the integral scaling on the DSP6001/7001/7002/Micro
Dyne.
Adjusts the derivative scaling on the DSP6001/7001/7002/Micro
Dyne.
Sets the maximum value for the desired system repsonse
adjustment. The program will cycle between the low value and this
value.
Sets the minimum value for the desired system repsonse
adjustment. The program will cycle between this value and the high
value.
When performing curve tests, this control sets the dwell time at
no-load and at load for the adjustment procedure. The time is in
seconds.
Sets the motor voltage if using a power supply controled by EMTEST2.0
When the controls are configured, click Run to begin the
adjustment procedure.
NOTE: Curve tests allow adjusment of the PID values on the fly.
After the ramp test has run once, the settings may be changed and
then the test may be repeated.
The current PID settings are saved, overriding the current setup file
that is loaded. If you do not wish to overide the current setup file
(after pressing Save Setup), click Cancel when prompted and read
the note below.
NOTE: To save current PID settings in a new setup file, first return
to the Start window. Create a new setup file by clicking Save Setup
under Current Setup Filename. See Section 6.1.3–Save Setup.
* A=0,001; B=0,005; C=0,01; D=0,05; E=0,1; F=0,5; G=1; H=5; I=10
43
TEST SETUP
P (Proportional Gain)
(0 to 99)
I (Integral)
(0 to 99)
D (Derivative)
(0 to 99)
PS (Proportional Gain
Scaling)
(0.001; 0.005; 0.01; 0.05;
0.1; 0.5; 1;5; 10(*))
IS (Integral Scaling)
(0.001; 0.005; 0.01; 0.05;
0.1; 0.5; 1;5; 10(*))
DS (Derivative Scaling)
(0.001; 0.005; 0.01; 0.05;
0.1; 0.5; 1;5; 10(*))
High Value
(0 to 12)
Function
Indicates the plot in the graph that displays the actual system
response to a test run.
Indicates the plot in the graph that displays the optimum result of a
test run.
NOTE: This plot is only displayed during a ramp test.
Indicates the plot in the graph that displays the value and dwell
settings.
NOTE: This plot is only displayed during a curve test.
Adjusts the proportional gain setting on the
DSP6000/6001/7001/7002/Micro Dyne.
Adjusts the integral setting on the DSP6000/6001/7001/7002/Micro
Dyne.
Adjusts the derivative setting on the DSP6000/6001/7001/7002/
Micro Dyne.
Adjusts the proportional gain scaling on the
DSP6000/6001/7001/7002/Micro Dyne.
Chapter 8 – Adjust PID
8.2
Magtrol EM-TEST2.0 Motor Testing Software
Adjusting the Controller for aN endurance Test
Note:
When amps, input watts, output watts or output kW endurance tests
are being performed, only the proportional gain (P) can be adjusted.
Set P to 35.
Set I and D to 0.
Set PS, IS and DS to 0,001 (A).
Set High Value to the highest load used on the motor during testing.
Set Low Value to the lowest load used on the motor during testing.
Set Dwell to 2 or 3 seconds.
Set Motor Voltage to appropriate value if a motor power supply was selected in the Configure
Hardware window.
8.Click Run. The result will appear similar to the following example.
1.
2.
3.
4.
5.
6.
7.
44
TEST SETUP
Figure 8–2 Curve (no I or D)
Chapter 8 – Adjust PID
Magtrol EM-TEST2.0 Motor Testing Software
9. Increase PS until actual value is approximately 25% of ideal value. Use the P slider for finer
adjustment. When optimal setting is reached, the result will appear similar to the following
example.
TEST SETUP
Figure 8–3 Curve (P at 25%)
10. Set I to 35.
11.Increase IS until actual value reaches ideal value. Use the I slider for finer adjustment.
When optimal setting is reached, the result will appear similar to the following example.
Figure 8–4 Curve (with P and I)
12. Set D to 35.
45
Chapter 8 – Adjust PID
Magtrol EM-TEST2.0 Motor Testing Software
13.Increase DS until the actual curve matches, or is as close to, the ideal curve as possible.
Use the D slider for finer adjustment. The final result will appear similar to the following
example.
TEST SETUP
Figure 8–5 Matched Curve
46
9. Test
This chapter includes step-by-step instructions for setting up and running a basic endurance test
from beginning to end.
Follow these steps in order (sequentially from left to right) as the navigation tabs at the top of the
EM-TEST2.0 screen.
1. Configure Hardware
2. Configure Display
3. Configure and Run Test
4. View Test Results
• Tabular display (View Data)
• Graphical display
• 5-Axis Graph
47
TEST Run
Figure 9–1 Basic Endurance Test
Chapter 9 – Test
9.1
Magtrol EM-TEST2.0 Motor Testing Software
Configure Hardware
The following hardware configuration is common for each test. For a detailed procedure, refer to
Chapter 5 – Configure Hardware.
1.Click Configure Hardware tab to open the Configure Hardware window.
2. Select Dynamometer Controller and corresponding settings.
3. Select Instrument Type and Model for Channel 1 (TSC1).
4. If applicable, select Instrument Type and Model for Channel 2 (TSC2).
5.Click Load Defaults.
6. Make any changes to default settings, if necessary.
7. Select Power Measurement device and corresponding settings.
8. Select Power Supply and corresponding settings.
9. Select temperature testing hardware and corresponding settings, if applicable.
10.Click Apply Settings.
9.2
Configure Display
9.3
Configure and Run Test
Endurance testing simulating real life usage or to check a few specific data points.
1. Click the Configure Test tab to open the Configure Test window.
2. Select Control Parameter.
3. Enter values in control data table.
4.Click Test tab to open Test window.
5. Select which parameters will be plotted from the X and Y-axis drop-down lists located in
the lower right corner of the Test window.
6.Click Start Test. The test data table to the left will appear based on the parameters selected
in the Display window. The test graph will display the plot for the selected X and Y
parameters.
7. Select Auto X/Y axis enable or disable.
8. During the test, click View DATA or View GRAPH to see data previously saved of the current
test.
Note:
Depending of the file size, this function can alterate the real-time
test!
9. Press Pause button to pause the current test. Release it to continue test. The DSP6001 is
resetted and Power relay is energized.
48
TEST Run
The following display configuration applies to curve, manual and ramp tests. For a detailed procedure,
refer to Chapter 6 – Display.
1.Click Display tab to open Display Setup window.
2. Select parameters to record and/or display during test.
Chapter 9 – Test
Magtrol EM-TEST2.0 Motor Testing Software
10. Press Set-Point table to see the Set-Point table red line indicate the current position of the
current cycle.
To display additional test curves, simply change the X and Y-axis parameters and click Start
Test again.
Note:
9.4
Endurance Test Controls
Function
Indicate which parameter is on control loop.
Data Table
Indicates selected parameter names and real-time data while the
test is running.
Plots the selected parameters in real-time. If auto-scaling of either
axis is disabled, the upper and lower scale limits may be manually
set by double-clicking either value and typing in a new one.
Enables auto-scaling of the Y-axis parameter.
Enables auto-scaling of the X-axis parameter.
The bar indicate the advanced time of test
Begins the test
Momentary suspend the test progress. When the Pause is
released, the set-point switches to the current value that should be
without pause.
Ends the test
Show in new window the tabular data acquisition
Show in new window the graph data acquisition
Show in new window the Endurance table with red actual line in
progress
This control can use to increase or decrease the set-point during
the test in progress.
Filename path of current data acquisition.
Auto Y Axis
Auto X Axis
Slide time
Start
Pause
Stop
View Data
View Graph
Set-Point Table
Set-point multiply
Data
Recovery function
Figure 9–2 Crash Window
During the test, the datas are saved each second. If windows problem occurs during the test and
EM-TEST2.0 is not closed properly, then at the next software START, the program ask to continue
the previous test or generate a new test. If the option to continue the previous test is selected, the test
will continue at the beginning of the current cycle. The datas will be saved at next increment file.
49
TEST Run
Control
Control Parameter
XY Graph
9.5
If results are unacceptable, see Section 8.1–Adjusting the Controller.
Chapter 9 – Test
9.6
Magtrol EM-TEST2.0 Motor Testing Software
DISPLAY SHOW DURING TEST
During the test process, it’s possible to see data’s, graph or set-point table too.
Press on the corresponding button to appears new windows and watch desired information. This
operation can be activate during the test process.
Figure 9–3 Data Display
TEST Run
Figure 9–4 Graph Display
Figure 9–5 Set-Point Table Display
50
10. View Data
After the test has been completed, click View Data to see test results in a tabular format.
Figure 10–1 View Data Window
Use the scroll bars to the right and at the bottom of the table to view all the data. Select the file which
will be displayed in the table. Press Ctrl and click on second file to add at displayed file.
Depending of the file size, it can be take few minute to display datas.
51
TEST Results
Note:
11. 5-Axis Graph
After the test has been completed, click 5-Axis Graph tab to view test results in a multiplot
graph.
Figure 11–1 5-Axis Graph Window
11.1
Note:
For detailed information on formatting and navigating graphs, refer
to Appendix A – Graph Tools.
Select file
Select the file which will be displayed in the table. Press Ctrl and click on second file to add at
displayed file.
11.2
Select Plotted Parameters
Up to 5 (Y-axis) test parameters are plotted against one common X-axis parameter.
1. Select each Y-axis parameter from the drop-down lists located to the left of the graph.
2. Select the X-axis parameter from the drop-down list located below the graph.
52
TEST Results
Chapter 11 – 5-Axis Graph
Magtrol EM-TEST2.0 Motor Testing Software
11.3
Save Data
If data logging is enabled, test data is automatically saved as a Microsoft® Excel file, using the
motor’s serial number as the file name. Refer to Section 7.1–Data Logging for more information.
To save test data as a file that can be recalled later by EM-TEST2.0, click Save Data. The Save As
dialog box will open to prompt for a file name (with an .mdf file extension). The data is then saved
as a tab-delimited file that can be imported into any spreadsheet program.
TEST Results
53
12. Creating Tasks
12.1
Creating Analog Input (AI) Tasks
1. To create an analog input task, double-click the Measurement & Automation Explorer (MAX)
shortcut on your desktop.
Figure 12–1 Measurement & Automation Explorer Screen
2. Expand Data Neighborhood by clicking on the small triangle next to it. If you see NI-DAQmx
Tasks as one of the items, skip to step #6.
Figure 12–2 Measurement & Automation Explorer Screen with Data Neighborhood expanded
MAINTENANCE
54
Chapter 12 – Creating Tasks
Magtrol EM-TEST2.0 Motor Testing Software
3. Right-click on Data Neighborhood and click Create New…
Figure 12–3 Create new Data Neighborhood
4. Click NI-DAQmx Task and then Next.
Figure 12–4 Select NI-DAQmx Task
5. Skip to step #7.
6. Right-click NI-DAQmx Tasks and click Create New NI-DAQmx Task…
MAINTENANCE
Figure 12–5 Create New NI-DAQmx Task
55
Chapter 12 – Creating Tasks
Magtrol EM-TEST2.0 Motor Testing Software
7. Expand Acquire Signals.
Figure 12–6 Acquire Signals Expanded
8. Expand Analog Input.
Figure 12–7 Analog Input Expanded
9. Click Voltage.
Figure 12–8 Voltage selected
10.The product being configured for voltage measurement is a USB-6009. This is an eight
channel device and the tree will show the available channels. Expand Dev# (USB-6009).
56
MAINTENANCE
Figure 12–9 Supported Physical Channels
Chapter 12 – Creating Tasks
Magtrol EM-TEST2.0 Motor Testing Software
11. Click on the device so that all channels are highlighted.
Figure 12–10 Highlighted channels
12. Click Next.
13. Type AI Task in the Enter Name: field. It is imperative that the name is entered exactly as
shown.
Figure 12–11 Enter AI Task in Enter Name Field
14. Click Finish.
15. AI Task will now appear in the Data Neighborhood tree.
Figure 12–12 AI Task in Data Neighborhood Tree
MAINTENANCE
57
Chapter 12 – Creating Tasks
Magtrol EM-TEST2.0 Motor Testing Software
16. The middle pane of MAX contains configuration settings for this analog input module.
Figure 12–13 Configuration Settings
17. To configure all channels the same, click the first channel, scroll down to the last channel,
then press the Shift key and click on the last item. Select the signal input range, scaled units
and terminal configuration. Select the acquisition mode (1 Sample [On Demand]).
18. Press the Save button.
19. Exit MAX by clicking the X in the upper right corner of the window.
58
MAINTENANCE
Figure 12–14 Configure All Channels the Same
Chapter 12 – Creating Tasks
Magtrol EM-TEST2.0 Motor Testing Software
20. This is all that is needed to enable the device for use in EM-TEST2.0. You are not limited to
voltage inputs; you may select any of the analog input options that the device is capable of
providing. You can change parameters for each individual channel of that device by selecting
the channel and setting its parameters. You may also test the analog inputs by clicking the
Run button. The acquired data will display in the table or you may select the graph from
the Display Type control.
12.2
creating Analog Output (AO) TASKs
1. To create an analog output task, double-click the Measurement & Automation Explorer
(MAX) shortcut on your desktop.
Figure 12–15 Measurement & Automation Explorer Screen
2. Expand Data Neighborhood by clicking on the small triangle next to it. If you see NI-DAQmx
Tasks as one of the items, skip to step #6.
59
MAINTENANCE
Figure 12–16 Measurement & Automation Explorer Screen with Data Neighborhood expanded
Chapter 12 – Creating Tasks
Magtrol EM-TEST2.0 Motor Testing Software
3. Right-click on Data Neighborhood and click Create New…
Figure 12–17 Create new Data Neighborhood
4. Click NI-DAQmx Task and then Next.
Figure 12–18 Select NI-DAQmx Task
5. Skip to step #7.
6. Right-click NI-DAQmx Tasks and click Create New NI-DAQmx Task…
MAINTENANCE
Figure 12–19 Create New NI-DAQmx Task
60
Chapter 12 – Creating Tasks
Magtrol EM-TEST2.0 Motor Testing Software
7. Expand Generate Signals.
Figure 12–20 Generate Signals Expanded
8. Expand Analog Output.
Figure 12–21 Analog Output Expanded
9. Click Voltage.
Figure 12–22 Voltage Selected
10. The product being configured for voltage output is a USB-6009. This is a two channel device
and the tree will show the available channels. Expand Dev# (USB-6009).
Figure 12–23 Supported Physical Channels
11. Click on the device so that all channels are highlighted.
12. Click Next.
13. Type AO Task in the Enter Name: field. It is imperative that the name is entered exactly as
shown.
Figure 12–25 Enter AO Task in Enter Name Field
61
MAINTENANCE
Figure 12–24 Highlighted Channels
Chapter 12 – Creating Tasks
Magtrol EM-TEST2.0 Motor Testing Software
14. Click Finish.
15. AO Task will now appear in the Data Neighborhood tree.
Figure 12–26 AO Task in Data Neighborhood Tree
16. The middle pane of MAX contains configuration settings for this analog output module.
Figure 12–27 Configuration Settings
MAINTENANCE
62
Chapter 12 – Creating Tasks
Magtrol EM-TEST2.0 Motor Testing Software
17. To configure all channels the same, click the first channel, scroll down to the last channel,
then press the Shift key and click on the last item. Select the signal input range, scaled units
and terminal configuration. Select the acquisition mode (1 Sample [On Demand]).
Figure 12–28 Configure all Channels the Same
18. Press the Save button.
19. Exit MAX by clicking the X in the upper right corner of the window.
20. This is all that is needed to enable the device for use in EM-TEST2.0. You are not limited to
voltage outputs; you may select any of the analog output options that the device is capable of
providing. You can change parameters for each individual channel of that device by selecting
the channel and setting its parameters. You may also test the analog outputs by clicking the
Run button. The acquired data will display in the table or you may select the graph from
the Display Type control.
MAINTENANCE
63
Chapter 12 – Creating Tasks
12.3
Magtrol EM-TEST2.0 Motor Testing Software
creating digital input (di) tasks
1. To create a digital input task, double-click the Measurement & Automation Explorer (MAX)
shortcut on your desktop.
Figure 12–29 Measurement & Automation Explorer Screen
2. Expand Data Neighborhood by clicking on the small triangle next to it. If you see NI-DAQmx
Tasks as one of the items, skip to step #6.
Figure 12–30 Measurement & Automation Explorer Screen with Data Neighborhood Expanded
3. Right-click on Data Neighborhood and click Create New…
64
MAINTENANCE
Figure 12–31 Create New Data Neighborhood
Chapter 12 – Creating Tasks
Magtrol EM-TEST2.0 Motor Testing Software
4. Click NI-DAQmx Task and then Next.
Figure 12–32 Select NI-DAQmx Task
5. Skip to step #7.
6. Right-click NI-DAQmx Tasks and click Create New NI-DAQmx Task…
Figure 12–33 Create New Ni-DAQmx Task
7. Expand Acquire Signals.
65
MAINTENANCE
Figure 12–34 Acquire Signals Expanded
Chapter 12 – Creating Tasks
Magtrol EM-TEST2.0 Motor Testing Software
8. Expand Digital Input.
Figure 12–35 Digital Input Expanded
9. Click Port Input.
Figure 12–36 Port Input Selected
10. The product being configured for digital input is a PCI-6521. This is an eight channel device
and the tree will show the available channels. Expand Dev# (PCI-6521).
Figure 12–37 Supported Physical Channels
11. Click on the 8 channel port so that it is highlighted.
12. Click Next.
66
MAINTENANCE
Figure 12–38 8 Channel Port Highlighted
Chapter 12 – Creating Tasks
Magtrol EM-TEST2.0 Motor Testing Software
13. Type DI Task in the Enter Name: field. It is imperative that the name is entered exactly as
shown.
Figure 12–39 Enter DI Task in Enter Name Field
14. Click Finish.
15. DI Task will now appear in the Data Neighborhood tree.
Figure 12–40 DI Task in Data Neighborhood
16. The middle pane of MAX contains configuration settings for this digital input device.
17.Select Invert All Lines in Port if desired and select the acquisition mode (1 Sample [On
Demand]).
18. Press the Save button.
19. Exit MAX by clicking the X in the upper right corner of the window.
20.This is all that is needed to enable the device for use in EM-TEST2.0. You may test the
digital inputs by clicking the Run button. The row of LEDs will indicate the current logic
state of each line in the port.
67
MAINTENANCE
Figure 12–41 Configuration Settings
Chapter 12 – Creating Tasks
12.4
Magtrol EM-TEST2.0 Motor Testing Software
creating Digital output (do) tasks
1. To create a digital output task, double-click the Measurement & Automation Explorer (MAX)
shortcut on your desktop.
Figure 12–42 Measurement & Automation Explorer Screen
2. Expand Data Neighborhood by clicking on the small triangle next to it. If you see NI-DAQmx
Tasks as one of the items, skip to step #6.
Figure 12–43 Measurement & Automation Explorer Screen with Data Neighborhood Expanded
3. Right-click on Data Neighborhood and click Create New…
68
MAINTENANCE
Figure 12–44 Create New Data Neighborhood
Chapter 12 – Creating Tasks
Magtrol EM-TEST2.0 Motor Testing Software
4. Click NI-DAQmx Task and then Next.
Figure 12–45 Select NI-DAQmx Task
5. Skip to step #7.
6. Right-click NI-DAQmx Tasks and click Create New NI-DAQmx Task…
Figure 12–46 Create New NI-DAQmx Task
7. Expand Generate Signals.
69
MAINTENANCE
Figure 12–47 Generate Signals Expanded
Chapter 12 – Creating Tasks
Magtrol EM-TEST2.0 Motor Testing Software
8. Expand Digital Output.
Figure 12–48 Digital Output Expanded
9. Click Port Output.
Figure 12–49 Port Output Selected
10.The product being configured for digital output is a PCI-6521. This is an eight channel
device and the tree will show the available channels. Expand Dev# (PCI-6521).
Figure 12–50 Dev# (PCI-6521) Expanded
11. Click on the 8 channel port so that it is highlighted.
12. Click Next.
13. Type DO Task in the Enter Name: field. It is imperative that the name is entered exactly as
shown.
Figure 12–52 Enter DO Task in Enter Name Field
14. Click Finish.
70
MAINTENANCE
Figure 12–51 8 Channel Port Highlighted
Chapter 12 – Creating Tasks
Magtrol EM-TEST2.0 Motor Testing Software
15. DO Task will now appear in the Data Neighborhood tree.
Figure 12–53 DO Task in Data Neighborhood
16. The middle pane of MAX contains configuration settings for this digital output device.
Figure 12–54 Configuration Settings
71
MAINTENANCE
17.Select Invert All Lines in Port if desired and select the acquisition mode (1 Sample [On
Demand]).
18. Press the Save button.
19. Exit MAX by clicking the X in the upper right corner of the window.
20.This is all that is needed to enable the device for use in EM-TEST2.0. You may test the
digital outputs by clicking the Run button. Click any of the LEDs to change the logic state
of that line in the port.
Chapter 12 – Creating Tasks
12.5
Magtrol EM-TEST2.0 Motor Testing Software
creating TEMPERATURE INPUT (TI) tasks
1. To create a temperature input task, double-click the Measurement & Automation Explorer
(MAX) shortcut on your desktop.
Figure 12–55 Measurement & Automation Explorer Screen
2. Expand Data Neighborhood by clicking on the small triangle next to it. If you see NI-DAQmx
Tasks as one of the items, skip to step #6.
Figure 12–56 Measurement & Automation Explorer Screen with Data Neighborhood Expanded
3. Right-click on Data Neighborhood and click Create New…
72
MAINTENANCE
Figure 12–57 Create New Data Neighborhood
Chapter 12 – Creating Tasks
Magtrol EM-TEST2.0 Motor Testing Software
4. Click NI-DAQmx Task and then Next.
Figure 12–58 Select NI-DAQmx Task
5. Skip to step #7.
6. Right-click NI-DAQmx Tasks and click Create New NI-DAQmx Task…
Figure 12–59 Create New NI-DAQmx Task
7. Expand Acquire Signals.
73
MAINTENANCE
Figure 12–60 Acquire Signals Expanded
Chapter 12 – Creating Tasks
Magtrol EM-TEST2.0 Motor Testing Software
8. Expand Analog Input.
Figure 12–61 Analog Input Expanded
9. Expand Temperature.
Figure 12–62 Temperature Expanded
10. Select the type of device used for measurement. In this example we will measure temperature
with thermocouples. Click Thermocouple.
Figure 12–63 Select Temperature Device
11. The product being configured for thermocouple temperature measurement is a NI 9211 in the
cDAQ chassis. This is a four channel device and the tree will show the available channels.
Expand cDAQ1Mod1 (NI 9211).
74
MAINTENANCE
Figure 12–64 Temperature Input Supported Channels
Chapter 12 – Creating Tasks
Magtrol EM-TEST2.0 Motor Testing Software
12. Click on the device so that all channels are highlighted.
Figure 12–65 Temperature Input Channels Highlighted
13. Click Next.
14. Type TI Task in the Enter Name: field. It is imperative that the name is entered exactly as
shown.
Figure 12–66 TI Task in Enter Name Field
15. Click Finish.
16. TI Task will now appear in the Data Neighborhood tree.
Figure 12–67 TI Task in Data Neighborhood
MAINTENANCE
75
Chapter 12 – Creating Tasks
Magtrol EM-TEST2.0 Motor Testing Software
17. The middle pane of MAX contains configuration settings for this thermocouple module.
Figure 12–68 Configuration Settings
18. To configure all channels the same, click the first channel, scroll down to the last channel,
then press the Shift key and click on the last item. Select the signal input range, scaled units
and thermocouple type. Select the built-in CJC source and the acquisition mode (1 Sample
[On Demand]).
19. Press the Save button.
20. Exit MAX by clicking the X in the upper right corner of the window.
21. This is all that is needed to enable the device for use in EM-TEST2.0. You are not limited to
thermocouple inputs; you may select any of the temperature input options that the device is
capable of providing. You can change parameters for each individual channel of that device
by selecting the channel and setting its parameters. You may also test the temperature inputs
by clicking the Run button. The acquired data will display in the table or you may select the
graph from the Display Type control.
76
MAINTENANCE
Figure 12–69 All Channels Configured the Same
Service Information
Returning Magtrol equipment for Repair and/or Calibration
Before returning equipment to Magtrol for repair and/or calibration, please visit Magtrol’s Web site at
http://www.magtrol.com/support/rma.htm to begin the Return Material Authorization (RMA) process. Depending on
where the equipment is located and which unit(s) will be returned, you will be directed to either ship your equipment
back to Magtrol, Inc. in the United States or Magtrol SA in Switzerland.
Returning Equipment to Magtrol, Inc. (United States)
When returning equipment to Magtrol, Inc.’s factory in the United States for repair and/or calibration, a completed
Return Material Authorization (RMA) form is required.
1.
Visit Magtrol’s Web site at http://www.magtrol.com/support/rma.htm to begin the RMA process.
2.
Complete the RMA form online and submit.
3.
An RMA number will be issued to you via e-mail. Include this number on all return documentation.
4.
Ship your equipment to:
Magtrol, Inc.
70 Gardenville Parkway
Buffalo, NY 14224
Attn: Repair Department
5.
After Magtrol’s Repair Department receives and analyzes your equipment, a quotation listing all the necessary
parts and labor costs, if any, will be faxed or e-mailed to you.
6.
After receiving your repair estimate, provide Magtrol with a P.O. number as soon as possible. A purchase
order confirming the cost quoted is required before your equipment can be returned.
Returning Equipment to Magtrol SA (Switzerland)
If you are directed to ship your equipment to Switzerland, no RMA form/number is required. Just send your equipment
directly to Magtrol SA in Switzerland and follow these shipment instructions:
1.
Ship your equipment to:
Magtrol SA
After Sales Service
Route de Montena 77
1728 Rossens / Fribourg
Switzerland
VAT No: 485 572
2.
Please use our forwarder : TNT • 1-800-558-5555 • Account No 154033
Only ship ECONOMIC way (3 days max. within Europe)
3.
Include the following documents with your equipment:
• Delivery note with Magtrol SA’s address (as listed above)
• Three pro forma invoices with:
• Your VAT number
• Value - for customs purposes only • Description of returned goods • Origin of the goods (in general, Switzerland)
• Noticed failures
4.
A cost estimate for repair will be sent to you as soon as the goods have been analyzed. If the repair charges
do not exceed 25% the price of a new unit, the repair or calibration will be completed without requiring prior
customer authorization.
77
Testing, Measurement and Control of Torque-Speed-Power • Load-Force-Weight • Tension • Displacement
Magtrol Inc
70 Gardenville Parkway
Buffalo, New York 14224 USA
Phone: +1 716 668 5555
Fax: +1 716 668 8705
E-mail: [email protected]
Magtrol SA
Route de Montena 77
1728 Rossens / Fribourg, Switzerland
Phone: +41 (0)26 407 3000
Fax: +41 (0)26 407 3001
E-mail: [email protected]
www.magtrol.com
Subsidiaries in:
Germany • France
China • India
Worldwide Network
of Sales Agents