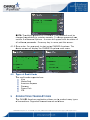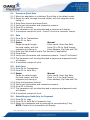
1
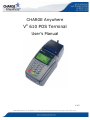
CHARGE Anywhere
VX 610 POS Terminal
User’s Manual
v1.0
©2008 CHARGE Anywhere, LLC. All trademarks, service marks, and trade names referenced in this material are the property of their respective owners.
Contents
1
PURPOSE ....................................................................................................... 4
2
SCOPE .......................................................................................................... 4
3
DEFINITIONS ................................................................................................. 4
3.1
Quick Sale .................................................................................................. 4
3.2
Sale ........................................................................................................... 4
3.3
Auth Only ................................................................................................... 4
3.4
Force ......................................................................................................... 4
3.5
Void ........................................................................................................... 4
3.6
Retry ......................................................................................................... 4
3.7
Return........................................................................................................ 5
3.8
Debit.......................................................................................................... 5
4
GETTING STARTED ......................................................................................... 5
4.1
Start Up ..................................................................................................... 5
4.2
Types of Credit Cards ................................................................................... 6
5
CONDUCTING TRANSACTIONS .......................................................................... 6
5.1
Process a Quick Sale .................................................................................... 7
5.2
Sale ........................................................................................................... 7
5.3
Auth Only ................................................................................................... 7
5.4
Submitting an Auth Only for Payment ............................................................. 7
5.5
Return........................................................................................................ 8
5.6
Retry ......................................................................................................... 8
5.7
Force ......................................................................................................... 8
5.8
Void ........................................................................................................... 9
5.9
Offline Transactions...................................................................................... 9
5.10
Debit........................................................................................................ 10
6
REPORTS ......................................................................................................10
6.1
Totals....................................................................................................... 10
6.2
Detail ....................................................................................................... 11
7
LOGS ...........................................................................................................11
7.1
Current Day Logs ....................................................................................... 11
7.2
Archives ................................................................................................... 11
7.3
Viewing Offline Transactions ........................................................................ 12
7.4
Sending an Offline Transaction ..................................................................... 12
©2008 CHARGE Anywhere, LLC. All trademarks, service marks, and trade names referenced in this material are the property of their respective owners.
7.5
Sending All Offline Transactions ................................................................... 12
7.6
Failed Offline Transactions........................................................................... 12
7.7
Auth Only Transactions ............................................................................... 12
8
SETUP ..........................................................................................................12
8.1
Industry Optional Prompts........................................................................... 12
8.2
Connect Options. ....................................................................................... 13
8.3
Network Settings ....................................................................................... 13
8.4
Phone Settings .......................................................................................... 13
8.5
Receipt ..................................................................................................... 14
8.6
Offline ...................................................................................................... 14
8.7
View All Settings ........................................................................................ 14
8.8
Demo Mode...................................................... Error! Bookmark not defined.
9
SECURITY .....................................................................................................14
9.1
Security Options ........................................................................................ 14
9.2
Fraud Control ............................................................................................ 15
9.3
Transaction Security ................................................................................... 15
9.4
Password Options ...................................................................................... 16
9.5
HALO ....................................................................................................... 16
10
SUPPORT ......................................................................................................17
10.1
Help Desk Info........................................................................................... 17
10.2
Card Type Info .......................................................................................... 17
10.3
FAQ ......................................................................................................... 17
11
MAINTENANCE ..............................................................................................18
11.1
Rotate Logs............................................................................................... 18
11.2 Rotate Keys ................................................................................................ 18
11.3
12
Unregister................................................................................................. 18
EXIT ............................................................................................................18
12.1 Power Off ................................................................................................... 18
©2008 CHARGE Anywhere, LLC. All trademarks, service marks, and trade names referenced in this material are the property of their respective owners.
1
PURPOSE
This User’s Guide describes the full functionality of CHARGE
Anywhere® on the VX 610 unit.
2
SCOPE
This guide applies to all customers of CHARGE Anywhere who need to
use the CHARGE Anywhere application on the VX 610 unit.
3
DEFINITIONS
3.1
Quick Sale
Quick Sale is the most common type of transaction. It is used to
transact a sale immediately upon swiping a card. Quick Sale is the
default mode when the device is powered on.
3.2
Sale
A Sale is transacted by swiping a card or by manually entering the
card information and submitting it for authorization.
3.3
Auth Only
An Auth Only is used to obtain pre authorization for a sale from the
credit card company. This type of transaction can only be done in the
online mode.
3.4
Force
A Force takes place when a transaction that has previously been
authorized is converted (forced) to an actual sale. If a force is done
while offline, it is stored in an offline log to be submitted at a later
time
3.5
Void
A transaction that has been submitted in error may be cancelled using
the Void function. A transaction may only be voided on the same day
that it was conducted.
3.6
Retry
A submitted transaction, that receives an invalid response, may be
retried from the transaction log.
©2008 CHARGE Anywhere, LLC. All trademarks, service marks, and trade names referenced in this material are the property of their respective owners.
3.7
Return
R
A Return may
m
be conducted when
w
a cus
stomer requests a refund
r
aftter
th
he date off purchase
e. It may be done while
w
onlin
ne or offlin
ne. When a
re
eturn is co
onducted offline, it is stored in an offline log to be submittted
at a later time.
t
3.8
Debit
D
A Debit tra
ansaction is perform
med when a card is swiped an
nd the
customer must
m
then
n enter in their
t
PIN in order fo
or the tran
nsaction to
b authoriz
be
zed.
NOTE: ALL
N
L IMAGES REPRESE
ENTED IN THIS DOC
CUMENT MAY
M
HAVE
C
CHANGED
SINCE TH
HIS DOCUMENT WA
AS RELEAS
SED. THE FUNCTION
F
N
O CHARGE ANYWHERE REMA
OF
AINS VERY
Y CLOSE TO
T THE ST
TEPS
D
DESCRIBE
D IN THIS
S USER GU
UIDE.
4
G
GETTING
G START
TED
In
n order to
o start usin
ng CHARG
GE Anywhe
ere, turn the
t
VX 610
0 on by
p
pressing
th
he green button.
b
Th
he CHARGE Anywhe
ere applica
ation mustt be
selected by
y pressing
g F3.
Start Up
4.1 S
To enterr letters, press
4.1.1 Enter
E
the Password.
P
p
the appropria
a
te number
k
key
then press
p
the Alpha
A
buttton above the numb
ber 2 to sc
croll throu
ugh
th
he availab
ble letters.
©2008 CHARGE
C
Anywhere, LLC. All trademarkks, service marks, andd trade names referennced in this material are the property of thheir respective owners.
NOTE: The
N
e default password
p
is 123456
678. This password must be
changed im
mmediatelly to main
ntain securrity. To ch
hange passwords se
ee
4 Password
d Options. A screen will appear with the
t
status of
section 9.4
e passworrds. Press
s any key to move past this screen.
s
all software
Press enter. You are
e ready to start usin
ng CHARGE Anywhe
ere. The
4.1.2 P
d
device
scre
een will display the CHARGE Anywhere
e main me
enu.
4.2
Types of Credit
T
C
Ca
ards
T
The
credit cards sup
pported arre:
Visa
MastterCard
American Exprress
Disco
over
Diners Club
JCB
5
C
CONDUC
CTING TRANSAC
T
CTIONS
S
The CHARG
T
GE Anywhere applic
cation allo
ows you to
o conduct many types
o transacttions. Supported tra
of
ansactions
s are as fo
ollows:
©2008 CHARGE
C
Anywhere, LLC. All trademarkks, service marks, andd trade names referennced in this material are the property of thheir respective owners.
5.1 Process a Quick Sale
5.1.1 When the application is initialized, Quick Sale is the default mode.
5.1.2 Swipe the card, through the card reader, with the magnetic stripe
facing in.
5.1.3 Enter Sale Amount and press Enter.
5.1.4 Verify card information and transaction amount.
5.1.5 Press F3 to Submit.
5.1.6 The transaction will be submitted and a response will display.
5.1.7 A merchant receipt will print. Press F3 to print a customer receipt.
5.2
5.2.1
5.2.2
5.2.3
5.2.4
5.2.5
5.2.6
5.2.6
5.2.7
5.3
5.3.1
5.3.2
5.3.3
5.3.4
5.3.5
5.3.6
5.3.7
5.3.8
5.4
5.4.1
5.4.2
5.4.3
Sale
Press F2 for Transactions.
Press F1 for Sale.
Swipe
Manual
Swipe the card through
Enter card#. Enter Exp Date.
the card reader, with the
Press F3 or F4 for Card Present.
magnetic strip facing in.
Enter Address, Zip Code and CVV.
Enter the Sale Amount and/or Tax Amount (if applicable).
Press Enter.
Verify card information and transaction amount. Press F3 to Submit.
The transaction will be submitted and a response and approval code
will display.
A merchant receipt will print.
Auth Only
Press F2 for Transactions.
Press F3 for Auth Only.
Swipe
Manual
Swipe the card through
Enter card#. Enter Exp Date.
the card reader, with the
Press 1 or 2 for Card Present.
magnetic strip facing in.
Enter Address, Zip Code and CVV.
Enter Authorization Amount.
Verify card information and transaction amount.
Press F3 to Submit.
The transaction will be submitted and a response and approval code
will display.
A merchant receipt will print.
Submitting an Auth Only for Payment
Press F4 for Logs.
Press F4 for Auth Only Transaction Log.
Select the transaction and by pressing the corresponding F key.
NOTE: Details of the transaction will display.
©2008 CHARGE Anywhere, LLC. All trademarks, service marks, and trade names referenced in this material are the property of their respective owners.
5.4.4 Press F4 to Capture Payment.
5.4.5 The transaction will be submitted and a response and approval code
will display.
5.4.6 A merchant receipt will print.
5.5 Return
5.5.1 Press F2 for Transactions.
5.5.2 Press down to view Return, then press F2.
5.5.3 Swipe
Manual
Swipe the card through
Enter card#. Enter Exp Date.
the card reader, with the
Press 1 or 2 for Card Present.
magnetic strip facing in.
Enter Address, Zip Code and CVV.
5.5.4 Enter Return Amount.
5.5.5 Press F3.
5.5.6 The transaction will be submitted and a response and approval code
will display.
5.5.7 The signature receipt will print automatically.
5.6
5.6.1
5.6.2
5.6.3
Retry
Press F4 for Logs.
Press F1 for Current Day Log.
Select the transaction.
NOTE: Details of the transaction will display
5.6.4 Press F5 for Menu.
5.6.5 Press F4 for Retry.
5.6.6 The signature receipt will print automatically.
5.7
5.7.1
5.7.2
5.7.3
5.7.4
5.7.5
5.7.6
5.7.7
5.7.8
Force
Press F2 for Transactions.
Press F4 for Force.
Swipe
Manual
Swipe the card through
Enter card#. Enter Exp Date.
the card reader, with the
Press 1 or 2 for Card Present.
magnetic strip facing in.
Enter Address, Zip Code and CVV.
Enter Approval Code.
Enter Force Amount.
Verify card information and transaction amount.
Press the F3 to Submit.
The signature receipt will print automatically.
©2008 CHARGE Anywhere, LLC. All trademarks, service marks, and trade names referenced in this material are the property of their respective owners.
5.8
5.8.1
5.8.2
5.8.3
5.8.4
5.8.5
5.8.6
Void
Voids can be conducted from the Transactions menu or from the Logs
menu.
Transactions
Press down and F1 for Void.
Enter Trans # and Press Enter.
Verify Card Information and
transaction amount.
Press F3 to Void.
The signature receipt will print.
Press F3 for a customer receipt.
Logs
Press F4 for Logs.
Press F1 for Current Day Log.
Select the desired transaction.
Details of the transaction will display.
Press F3 for Void.
Press F3 to Confirm.
5.9 Offline Transactions
5.9.1 Switch offline mode to on.
5.9.1.1
Go to Setup by pressing down and F1.
5.9.1.2
Press down, press F4 for offline.
5.9.1.3
Press F3 to turn on offline mode.
5.9.1.4
Press the Red button to return to the main menu.
5.9.2 Run an offline transaction.
5.9.2.1
Select transaction type and process transaction as
described in sections above.
5.9.2.2
Instead of receiving an approval code, the transaction will
be stored in the terminal to be sent when a wireless signal
is regained.
5.9.3 Turn off offline mode.
5.9.3.1
Go to Setup by pressing down and F1.
5.9.3.2
Press down, press F4 for offline.
5.9.3.3
Press F4 to turn off offline mode.
5.9.3.4
Press the Red button to return to the main menu.
5.9.4 Process a single offline transaction.
5.9.4.1
Press F4 for Logs.
5.9.4.2
Press F3 for Offline Transactions.
5.9.4.3
Press F1 to view transactions.
5.9.4.4
Select the desired transaction.
5.9.4.5
Press F3 to Send.
©2008 CHARGE Anywhere, LLC. All trademarks, service marks, and trade names referenced in this material are the property of their respective owners.
5.9.5 Process multiple offline transactions.
5.9.5.1
Press F4 for Logs.
5.9.5.2
Press F3 for Offline Transactions.
5.9.5.3
Press F2 to Send All Transactions.
5.9.6 Process failed offline transactions.
5.9.6.1
Press F4 for Logs.
5.9.6.2
Press F3 for Failed Offline Transactions.
5.9.6.3
Press F4 to Send All Transactions.
5.10 Debit
5.10.1 Press F2 for Transactions.
5.10.2 Press F2 for Debit.
5.10.3 Select if the transaction will be a return or sale.
5.10.4 Swipe the card.
5.10.5 Have the cardholder enter a PIN. Enter the sale amount.
5.10.6 Enter the sale amount.
5.10.7 Verify the transaction information and Press F3.
5.10.8 The transaction will be submitted and a response and approval code
will display.
5.10.9 A merchant receipt will print.
6
REPORTS
6.1 Totals
6.1.1 Card Type Totals
This shows the totals from selected card types. To view the Totals;
6.1.1.1
Press F3 for Reports.
6.1.1.2
Press F1 for Totals.
6.1.1.3
Press F1 for Card Type.
6.1.1.4
Select a card:
Visa
MasterCard
Amex
Discover
Diners Club
JCB
Totals of Transactions, Sales, Returns, Sale Total, Return Total and Net
Total will display for the selected card. These totals can be printed.
6.1.2 Grand Totals
©2008 CHARGE Anywhere, LLC. All trademarks, service marks, and trade names referenced in this material are the property of their respective owners.
The Grand Totals forr all card types
T
t
will display. This
T
report can be
p
printed.
6.1.3 C
Clerk Num
mber Totals
E
Enter
the Clerk
C
Num
mber in the
e window and press
s enter. Th
he details
associated with the specified clerk will display. This
T
reportt can be
p
printed.
6.2
Detail
D
F
Full
Details
s
T
The
full details of tra
ansactions
s will be printed
p
inc
cluding:
Transaction ID
D
Date
e and time
e of transa
action
Amount of Sale
Truncated Carrd Numberr and expiiration datte
7
L
LOGS
7.1
C
Current
Day
D
Logs
7.2
Archives
A
T
The
applica
ation conv
verts all trransaction
ns of a pre
evious day
y into an
archived lo
og. Logs fo
or all transactions are
a saved for a period of thre
ee
d
days.
To ac
ccess arch
hived Logs
s:
©2008 CHARGE
C
Anywhere, LLC. All trademarkks, service marks, andd trade names referennced in this material are the property of thheir respective owners.
7.2.1 Press F4 for Logs.
7.2.2 Press F2 for Archives.
7.2.3 For Archives 1, 2, or 3, press the corresponding F1, F2, or F3.
NOTE: The transactions from the previous day will be stored in the
Log Viewer. The viewer will display the Status, Transaction ID, Type of
Transaction and the Total Amount of the transaction.
7.2.4 To View a particular transaction, press the corresponding number. The
details of the transaction will display.
7.2.5 To Rotate Logs see section (11.1 Rotate Logs).
7.3
7.3.1
7.3.2
7.3.3
Viewing Offline Transactions
Press F4 for Logs.
Press F3 for Offline Transactions.
Press number to View Transaction.
7.4
7.4.1
7.4.2
7.4.3
Sending an Offline Transaction
Press F4 for Logs.
Press F3 for Offline Transactions.
Press F1 then the desired transaction number. The details of the
transaction will display.
7.4.4 Press F3 to Send.
7.5
7.5.1
7.5.2
7.5.3
Sending All Offline Transactions
Press F4 for Logs.
Press F3 for Offline Transactions.
Press F2 to Send All Transactions.
7.6
7.6.1
7.6.2
7.6.3
Failed Offline Transactions
Press F4 for Logs.
Press F3 for Failed Offline Transactions.
Press F4 to Send All Transactions.
7.7 Auth Only Transactions
7.7.1 Press F4 for Logs.
7.7.2 Press F4 for Auth Only Transactions.
8
SETUP
8.1
Industry Optional Prompts
Selecting the type of merchant industry will allow for different prompts
to be used. The prompts for Clerk, Invoice, Tax and Tip are optional.
©2008 CHARGE Anywhere, LLC. All trademarks, service marks, and trade names referenced in this material are the property of their respective owners.
This section also allo
T
ows you to
o select te
ext for the
e Clerk # and
a
Invoic
ce#
p
prompts.
8.1.1
8.1.2
8.1.3
8.1.4
8.1.5
8.1.6
8.1.7
8.1.8
Press down
P
n then F1 for Setup
p.
P
Press
F2 fo
or Optiona
al Prompts
s.
P
Press
the number
n
ne
ext to the Clerk # prompt
p
to enable th
his option.
P
Press
F2 to
o turn on and
a
F3 to select the
e text for Clerk #.
S
Select
the number next
n
to the
e Invoice # prompt to enable
e this optio
on.
P
Press
F2 to
o turn on and
a
F3 to select the
e text for Invoice #.
S
Select
the number next
n
to the
e Tax prom
mpt to ena
able this option.
o
P
Press
F2 to
o turn on and
a
F3 to enter the
e amount for
f tax percentage, if
applicable.
8.2
Connect Options.
C
O
U this se
Use
ection to adjust
a
how
w your terminal will connect to
t the
g
gateway.
You will be able to switch between wirreless/wire
ed only orr let
th
he terminal decide which the
e best is fo
or any given transaction.
8.3
Network Settings
N
S
T
The
host address forr your nettwork can be inserte
ed or edited using this
t
setting.
8.4
Phone Setttings
P
U this se
Use
ection to change
c
the
e dial out options. You will be
b able to set
th
he dial typ
pe, prefix,, and num
mber to dia
al.
©2008 CHARGE
C
Anywhere, LLC. All trademarkks, service marks, andd trade names referennced in this material are the property of thheir respective owners.
8.5
8.5.1
8.5.2
8.5.3
8.5.4
Receipt
R
T
The
header and the footer of the receip
pt may be customized.
P
Press
down
n then F1 for Setup
p.
P
Press
down
n then F2 for Receip
pt Options
s.
P
Press
Head
der or Trailer.
S
Select
the line using
g the F key
y and then
n press F3
3 to modiffy the line.
L
Line
1: Entter Line 1 as it shou
uld appearr on the re
eceipt E.g. Compan
ny
N
Name
Line 2: Enter Line2, as it should appear on
n the rece
eipt E.g.
C
Company
Address
A
Line 3: Entter Line 3 as it shou
uld appearr on the
re
eceipt E.g
g. Compan
ny City Lin
ne 4: Enter Line 4 as it should
d appear on
o
th
he receiptt E.g. Com
mpany Pho
one Number Line 5: Enter Lin
ne 5 as it
should app
pear on the receipt E.g. Welco
ome to Ou
ur Company.
8.6
Offline
O
U this se
Use
ection to switch
s
Offline mode on and offf. If Offliine mode is
set to off, then
t
the terminal
t
w be able
will
e to conne
ect live to the gatew
way.
Iff it is set to
t on, then the Offline mode will be ac
ctive.
8.7
View All Settings
V
S
T
This
featurre allows you
y
to prin
nt the setttings that the administrator has
h
set for the device. All
A Settings
s displays Device Settings, Optional
O
P
Prompt
Setttings, Fra
aud Control Settings, Security Settings
s, Receipt
S
Settings,
and
a
Netwo
ork Setting
gs.
9
S
SECURIT
TY
9.1 S
Security Options
O
9.1.1 Press
P
down
n then F2 for Security.
9.1.2 Enter
E
Mana
ager Passw
word.
T
The
Fields for Fraud Control, Transactio
T
on Securitty, Passwo
ord Option
ns,
and Halo will
w display
y.
©2008 CHARGE
C
Anywhere, LLC. All trademarkks, service marks, andd trade names referennced in this material are the property of thheir respective owners.
9.2
Fraud Con
F
ntrol
P
Press
F1 fo
or Fraud Control.
C
9.2.1 P
Press F1 fo
or Enter La
ast 4 Digitts. This will
w require
e you to enter the la
ast
4 digits of the card every
e
time
e it is swip
ped.
9.2.2 Press
P
F2 fo
or Disp. Na
ame/Card
d#. The default value is on. This will
d
display
the
e informattion from the
t
card swipe.
s
9.2.3 Press
P
F3 fo
or Card Present Opttion. Will ask if card
d is present for
trransaction
ns and allo
ow you to set optional security controls if card is
s
n present.
not
9.2.4 Press
P
F4 fo
or AVS Op
ptions. This setting will allow you to en
nter the
A
Address
an
nd Zip Cod
de of the customer.
c
9.2.5 Press
P
down
n then F1 for CVV Options.
O
T
This
will allow you to
t enter th
he
C
CVV/CVC
number
n
if the card # is enterred manua
ally.
9.2.6 Press
P
down
n then F2 for Truncation. The default value for truncation
n is
“A
All Copies
s”. Mercha
ant has the
e option to
o change to Custom
mer Copy
O
Only
in the
e event that he mus
st to retrie
eve full PA
AN. In this
s case,
M
Merchant
must
m
ensu
ure that he
e impleme
ents physical security measures
to
o protect the receip
pt on whic
ch full PAN
N is printed
d.
9.3 T
Transactio
on Securrity
9.3.1 Press
P
F2 fo
or Transac
ction Secu
urity. The device
d
scrreen will display:
d
Sa
ale,
A
Auth
Only, Force, Re
eturn, Void, and Retry.
9.3.2 Change
C
ite
em to On to
t enter password before
b
con
nducting a transaction.
©2008 CHARGE
C
Anywhere, LLC. All trademarkks, service marks, andd trade names referennced in this material are the property of thheir respective owners.
9.4
Password
P
d Options
s
P
Passwords
are imple
emented at
a various access lev
vels to ma
aintain the
e
security off the applic
cation. On
nly those who
w
have manager level
p
permission
ns may edit passwords.
The passwords will remain
T
r
the
e default until
u
perso
onalized. All
A defaultt
and expired passwords must be change
ed to main
ntain secu
urity. The
p
passwords
must adh
here to the
e passworrd policy. By selectting Sugge
est
P
Password,
the device will generate a ra
andom pas
ssword tha
at meets the
t
re
equiremen
nts. You must
m
then
n remember the pas
ssword to enter it in
nto
th
he change
e password screens. It is nott automattically done. (See FAQ:
F
P
Password
Policy)
P
9.4.1 To
T set the Applicatio
on Passwo
ord, press down the
en F2 for Security.
S
9.4.2 Press
P
F4 fo
or Password Options
s.
9.4.3 Press
P
Mana
ager Passw
word, Transaction Password,
P
or Application
P
Password.
9.4.4 P
Press F3 to
o enter the
e new Pas
ssword.
9.4.5 Confirm
C
the new Pas
ssword.
9.4.6 Press
P
Save
e to chang
ge the pas
ssword.
9.5
HALO
H
H
HALO
allow
ws you to enter an upper
u
dolllar amoun
nt beyond which a sale
s
and or a re
eturn may
y not be prrocessed.
9.5.1 Press
P
down
n then F2 for Security.
©2008 CHARGE
C
Anywhere, LLC. All trademarkks, service marks, andd trade names referennced in this material are the property of thheir respective owners.
9.5.2
9.5.3
9.5.4
9.5.5
Press
P
E
Enter
E
Enter
P
Press
F3 fo
or HALO.
Sale Amount.
Return Amoun
nt.
Enter.
NOTE: A password
N
p
i required
is
d to acces
ss or modiify any sec
curity
fe
eatures.
10
S
SUPPOR
RT
10.1 Help
H
Desk
k Info
10.1.1 Card Proc
cessing He
elp
Enter the
e Name an
nd Number that the user can call for Ca
ard
Processin
ng Help.
10.1.2 Terminal help
Enter the
e Name an
nd Number that the user can call for Te
erminal He
elp.
Card Type
e Info
10.2 C
The numb
bers for th
he supporrted card types
t
thatt the user may call for
f
Card Type Informa
ation.
10.2.1 Visa MastterCard – 800 944-1111
10.2.2 American – 800 52
28-2121
10.2.3 Discover – 800 347
7-1111
10.2.4 Diners Clu
ub – 800 525-9040
0
10.3 F
FAQ
At this tim
me the FA
AQ contain
ns several answers to
t FAQs.
©2008 CHARGE
C
Anywhere, LLC. All trademarkks, service marks, andd trade names referennced in this material are the property of thheir respective owners.
11
MAINTENANCE
11.1 Rotate Logs
Press to rotate logs. Logs are maintained for 3 calendar days. Logs
are rotated to Archive1, Archive2 or Archive3. NOTE: To purge, rotate
the logs several times.
11.2 Rotate Keys
Press to rotate keys.
NOTE: Rotate keys periodically to maintain security.
11.3 Unregister
Press to unregister the device. Device will automatically reboot.
NOTE: Once unregistered, a license number and phone number will be
needed to register the device.
12
EXIT
12.1 Power Off
To turn off the power, press and hold the red button. The power cord
must be fully removed in order to have a complete power off. The
battery power status is shown at the bottom of the opening screen
when the power cord is plugged in.
©2008 CHARGE Anywhere, LLC. All trademarks, service marks, and trade names referenced in this material are the property of their respective owners.