1
Low Vision
Resource
Packet
Low Vision
Resource Packet
Last Updated October 2, 2014
Introduction
This resource packet provides helpful resources
and tips for people with all types of vision ability:
from very minor vision loss to almost completely
blind.
This is intended for both people who are
experiencing low vision, as well as friends and
family members looking for ways to help.
TIP to magnify: An easy way to enlarge the font
on the computer is to hold down the control key
and use the scroll on the mouse to adjust size.
You can CLICK or TAP on underlined words, or
buttons to jump quickly to that section.
Underlined Words
BACK
Back to Table of Contents
2
3
Table of Contents
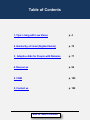
1. Tips: Living with Low Vision
p. 4
2. Guided by a Friend (Sighted Guide)
p. 70
3. Adaptive Aids for People with Diabetes
p. 77
4. Resources
p. 96
5. CNIB
p. 105
5. Contact us
p. 108
Back to Table of Contents
BACK
Tips: Living With Low Vision
When living with low vision, it is helpful to change your
surroundings or the way you do your usual activities to manage
daily life more easily and safely. Below are several helpful tips,
however, follow-up with a low vision professional is highly
recommended.
1. Change the surroundings
Changes to surroundings can assist with vision loss. Using
Velcro, tape, magnifiers and more, we can make our
surroundings easier to see and use by creating contrast, using
lighting and magnification, as well as organizing important
areas. Click below to find out more.
Contrast (p. 7)
Lighting (p. 13)
Magnification (p. 21)
Organization (p. 29)
Back to Table of Contents
4
5
2. Use helpful actions and techniques
If you have low vision, there are certain techniques that will
help keep you safer.
Trailing (p. 35)
Protective techniques (p. 36)
Use other senses (p. 37)
Eccentric Viewing (p. 39)
3. Marking Appliances
Use bright sticker bumps and Velcro to mark appliances to stay
independent in your home. Marking Appliances (p. 40)
4. Writing Legibly
Use techniques and tools to help your writing.
Writing Legibly (p. 43)
Back to Table of Contents
6
5. Advanced Tips
This is a big list of even more advanced tips and techniques for
improving quality of life with low vision. Advanced Tips (p. 45)
Back to Top
Back to Table of Contents
BACK
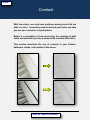
Contrast
With low vision, one may have problems seeing areas that are
alike in colour. Increasing contrast around your home can help
you use your vision for everyday tasks.
Below is a simulation of how increasing the contrast of both
stairs and handrail may help a person with contrast difficulties.
This section describes the use of contrast in your kitchen,
bathroom, inside, and outside of the house.
Back to Table of Contents
7
8
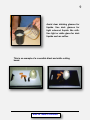
Kitchen
For meals, use a dark placemat or tablecloth for light coloured
plates.
Use light coloured dots or stickers to mark dark dials on ovens
or microwave and dark dots on light dials.
When measuring items like sugar use dark measuring
cups/spoons Use white cups/spoons for measuring coffee.
Back to Table of Contents
9
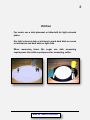
Avoid clear drinking glasses for
liquids. Use dark glasses for
light coloured liquids like milk.
Use light or white glass for dark
liquids such as coffee.
This is an example of a reversible black and white cutting
board.
Back to Table of Contents
10
Bathroom
If your bathroom is white lay a coloured towel over the edge of
your tub.
Use a dark coloured soap dish, toothbrush and cup on a light
coloured counter or use white soap dish, toothbrush and cup
on a dark counter.
Use a dark coloured toilet seat to add contrast to a toilet or add
coloured tape to outline the seat.
Use a light coloured bottle for shampoo and a dark coloured
bottle for conditioner.
Use coloured wash cloths or towels if your bathroom is light
coloured.
Back to Table of Contents
11
AT HOME (INSIDE)
Use contrast tape to mark the edge of stairs.
In a room that has dark furniture and dark floors, use light
coloured pillows or throw blankets.
Use dark tape to mark the outlines of outlets, light switches and
thermostat controls on light coloured walls.
For light coloured carpet in the bedroom use a dark bedspread.
Use telephones with lighted buttons or mark the #5 with a dot
to help with dialing.
Use dot marking for TV remote controls.
Back to Table of Contents
12
AT HOME (OUTSIDE)
Use dark tape or paint to mark thresholds and the edge of
outdoor steps
Use light landscape stones or fencing to outline between lawn
and landscape beds
Use lighted garage door controls
Back to Top
Back to Table of Contents
BACK
Lighting
With low vision, one will need brighter lighting, however, it is
also important to avoid shining direct light into the eye, which
may cause uncomfortable glare.
This section describes:
1. Room Lighting - this lights up the whole room
2. Task Lighting - this is used for an activity such as reading,
writing, or cooking
3. Additional house lighting
4. Avoiding glare
Back to Table of Contents
13
14
Room Lighting:
Try to keep all rooms evenly lit. It may be difficult for your eyes
to adjust from bright light to low light. Dimmer switches may
be helpful to adjust light. Use window shades and sheers to
control amount of sunlight coming in.
Types of lighting: There are different types of light. It is worth
trying different types to find which works best for you.
1. Incandescent - This is a common bulb type for many
types of fixtures. These light bulbs may cause glare and
create shadows.
2. Fluorescent – This type of light creates an even light. It
may cause less glare than incandescent bulbs. Some
find this light to cause a strobe effect that is not good
for them. This light is useful for overhead and task
lighting. It may be attached under cupboards.
3. Full Spectrum – This type of bulb is closest to sunlight.
It has a pure white light. These bulbs may cost more
and be hard to find in stores. They often work well for
those with low vision. You may want to talk to your Eye
Doctor about wearing “blue blockers” for sunlight and
full spectrum lighting. Some eye diseases can be
affected by the blue rays of light that come from these
sources.
Back to Table of Contents
15
4. Halogen – This light offers a bright even white light for
task and room lighting. Some torchiere lamps have
halogen light. Halogen light is very hot; use with
caution. Do not put close to skin or anything that may
burn.
5. LED (Light emitting diode) – These can be used for room
and task lighting with advantages over incandescent
including
longer
lifespan
and
lower
energy
consumption.
(More below re: lighting)
Back to Table of Contents
16
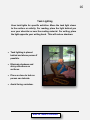
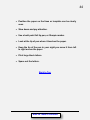
Task Lighting
Uses task lights for specific activities. Move the task light closer
to the surface or activity. For reading, place the light behind you
over your shoulder or near the reading material. For writing, place
the light opposite your writing hand. This will reduce shadows.
Task lighting is placed
behind and above person if
possible.
Eliminate shadows and
shiny reflections on
surfaces.
Place as close to task as
person can tolerate.
Avoid facing a window.
Back to Table of Contents
17
Examples of lights used for task lighting:
1. Halogen lamp
2. Gooseneck lamp
3. Big eye lamp magnifier
4. F
l
1
a
s
h
l
i
g
3
h
2
t
4
Back to Table of Contents
18
Additional Lighting
Add more lighting in the home:
overhead lighting
torchiere floor lamps
task lamps
under-cupboard lights
stick-on lights for closets or pantries
motion sensor or timer controlled yard lights
night lights
Back to Table of Contents
19
Glare
Glare is a common problem. It is often painful for persons with
vision loss.
To reduce glare:
1. Use shades on lamps.
2. Soften bright light from windows with blinds or sheer
curtains.
3. Arrange the chair and table so you don't have to look at the
light coming from the window.
4. Shiny paper may create glare. Use low gloss or matte
paper for reading and writing.
5. Counter or table surfaces may be shiny. They can be
covered with a non-shiny material to reduce glare.
6. Filters (like sunglasses) can help reduce glare. They can
be very helpful for some people. Lightly tinted filters can
be used indoors. Darker tinted filters can be used
outdoors.
7. Filters can be bought from stores where eyeglasses,
sunglasses or low vision equipment are sold.
Back to Table of Contents
20
8. When outdoors, wear a hat with a brim.
9. TV Screens and computer monitors should be
positioned at a right angle to windows. If they are
behind the monitor, curtains or shades will help control
the incoming light.
10. When reading, it is okay to move your reading light
further away or wear sunglasses indoors.
Back to Top
Back to Table of Contents
BACK
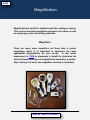
Magnification
Magnification is useful for detailed work like reading or sewing.
This section describes magnifiers and how to use them, as well
as using larger print, and writing materials.
Magnifiers
There are many more magnifiers out there than a typical
magnifying glass! It is important to determine the most
appropriate magnification for your needs.
A low vision
assessment at CNIB or elsewhere is helpful to determine the
correct strength and type of magnification needed for a person.
Also, training on how to use magnifiers correctly is important.
Back to Table of Contents
21
22
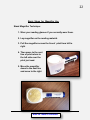
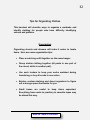
Basic Steps for Magnifier Use
Stand Magnifier Technique:
1. Wear your reading glasses if you normally wear them.
2. Lay magnifier on the reading material.
3. Pull the magnifier across the line of print from left to
right
4. Then move to the next
line of print return to
the left side over the
print just read.
5. Move the magnifier
down to the next line
and move to the right
Back to Table of Contents
23
Hand held magnifier technique:
1. Be sure you are wearing your reading glasses if you
normally wear them
2. Begin by laying down the magnifier on the page you are
going to read.
3. Next, pull away the magnifier until the print comes into
focus.
4. The distance between the magnifier to the printed page
must be kept constant.
5. Then simply follow the steps for reading using either
hold the text steady or hold the magnifier steady
techniques.
Back to Table of Contents
24
Two techniques are used for magnifier use:
Method A: Holding Text Steady
1.
2.
3.
4.
5.
Hold the reading material steady.
Move the magnifier across the page from left to right.
Return back to the left side of the page.
Then move the magnifier over the line just read.
Finally, move the magnifier down to the next line and
continue to read.
Method B: Holding the Magnifier
1.
2.
3.
4.
Hold the magnifier steady.
Move the reading material under the magnifier.
Read the line, return to the beginning of the line.
Move the reading material back under the magnifierover the line of print just read.
5. Finally, move the reading material to the next line of
print.
Lens Care Tips
Clean the lenses of low vision aids with a soft cloth or
lens cleaning solution and water.
Store lens in their cases or wrapped in a soft cloth.
Back to Table of Contents
25
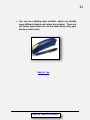
1
Here are some examples of
magnifying tools:
1. A Big Eye” combination
lamp/magnifier.
2. A magnifying mirror
3. A chest magnifier.
2
3
Back to Table of Contents
26
Large Print Items
Use larger print as another
means of magnification. Here are
examples of a phone, spice
labels, address book, and playing
cards.
Large print books are readily
available in a variety of formats,
magazines, etc.
Back to Table of Contents
27
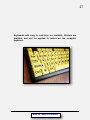
Keyboards with easy to read keys are available. Stickers are
available and can be applied to letters on the computer
keyboard.
Back to Table of Contents
28
Writing Tools
To make writing easier, improve visibility by maximizing
contrast, lighting, and size of print.
Useful items include: Bold line paper, black markers instead of
pens or pencils, adapted
cheques, and magnifiers.
Back to Top
Back to Table of Contents
BACK
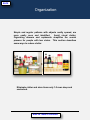
Organization
Simple and regular patterns with objects neatly spaced, are
more easily seen and identified.
Avoid visual clutter.
Organizing drawers and cupboards simplifies the search
process for people with low vision. This section describes
some ways to reduce clutter.
Eliminate clutter and store items only 1-2 rows deep and
unstacked.
Back to Table of Contents
29
30
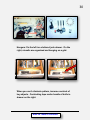
Hangers: On the left is a cluttered junk drawer. On the
right, utensils are organized and hanging on a grid.
When you can’t eliminate pattern, increase contrast of
key objects. Contrasting tape marks handle of knife in
drawer on the right.
Back to Table of Contents
31
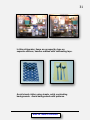
In this refrigerator, items are grouped by type on
separate shelves; handles marked with contrasting tape.
Avoid visual clutter using simple, solid, contrasting
backgrounds. Avoid backgrounds with patterns.
Back to Table of Contents
32
Tips for Organizing Clothes
This handout will describe ways to organize a wardrobe and
identify clothing for people who have difficulty identifying
colours and patterns.
Organization
Organizing closets and drawers will make it easier to locate
items. Here are some organization tips:
Place a matching outfit together on the same hanger.
Group similar clothing together (all pants in one part of
the closet, shirts in another part).
Use sock tuckers to keep your socks matched during
laundering, or buy all socks in one colour.
Explore custom shelving and closet organizers to figure
out a storage space that works for you.
Small boxes are useful to keep items separated.
Everything from socks to jewellery to cassette tapes may
be stored this way.
Back to Table of Contents
33
Labeling and identification
Using tactual cues, such as the texture, length of sleeves, and
button design can help you identify many clothing items. Here
are some suggestions that help to identify the color or pattern:
Make large print labels using unlined index cards and a
black wide-tip marker. Punch a hole in the card and
attach it to the hanger with a rubber band.
Small safety pins placed in specific places can identify
clothing. For example, one pin on the tag means the item
is blue, two pins means it is red.
Button markers are different shaped buttons that can be
sewn on the label of clothing. Each shape represents a
different color (see picture). Always create a master list
of your coding system in large print or audio.
Back to Table of Contents
34
You can use a talking color identifier, which can identify
many different shades and colors (see picture). There are
cell phone apps which can do the same thing using your
phone’s camera lens.
Back to Top
Back to Table of Contents
BACK
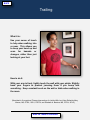
Trailing
What it is:
Use your sense of touch
to help when walking into
a room. This allows you
to keep your head up and
scan for hazards or
changes, rather than just
looking at your feet.
How to do it:
With your arm in front, lightly touch the wall with your pinkie. Slightly
bend your fingers to prevent jamming them if you bump into
something. Keep constant touch on the wall or table when walking in
the room.
(Described in Occupational Therapy Interventions for Adults With Low Vision Edited by Mary
Warren, MS, OTR/L, SCLV, FAOTA, and Elizabeth A. Barstow, MS, OTR/L, SCLV)
Back to Table of Contents
35
BACK
Protective Techniques
With low vision, injuries can
happen if you are unaware of an
object that is in the way as you
walk or bend forward. This can
happen when sitting, picking up
something from the floor,
approaching a table, or if a kitchen
cabinet is left open.
How to use protective techniques:
Hold one arm at your forehead
with your palm out, and the other
at your waist, palm down. Do this
when bending over, approaching
cupboards, or approaching
something that is waist high, like a table.
Sitting:
When sitting in a chair, use your top hand to hold onto
the chair back. Use your lower hand to make sure the
seat of the chair is clear of any objects.
(Described in Occupational Therapy Interventions for Adults With Low Vision Edited by Mary
Warren, MS, OTR/L, SCLV, FAOTA, and Elizabeth A. Barstow, MS, OTR/L, SCLV)
Back to Table of Contents
36
BACK
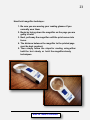
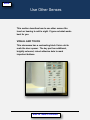
Use Other Senses
This section describes how to use other senses like
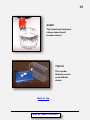
touch or hearing to add to sight. Figure out what works
best for you.
VISUAL AND TOUCH
This microwave has a contrasting black Velcro dot to
mark the door opener. The key pad has additional,
brightly coloured, raised adhesive dots to mark
important buttons.
Back to Table of Contents
37
38
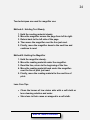
AUDIO
This liquid level indicator
chimes when liquid
reaches device.
TOUCH
This needle
threader can be
used without
vision.
Back to Top
Back to Table of Contents
BACK
Eccentric Viewing
What it is:
Eccentric viewing is an alternative viewing technique that may
be learned for tasks like reading or looking at objects and
faces. This allows the use of peripheral vision when the
obscured central vision does not work as well (such as with
macular degeneration).
How it works:
The person learns to look past the object (or word when
reading) slightly to the left, right, above or below. This
technique requires training especially for reading and may also
require use of a magnifier and extra lighting. It does not work
for everyone, and reading will be slower.
To find out if this may work for you, contact a low vision
rehabilitation professional. A good place to start is CNIB.
Back to Table of Contents
39
BACK
Marking Appliances
Marking Appliance Dials
Marking your appliance dials with a tactile marker or a high
contrast mark will make it easier to locate the temperatures or
settings you commonly use.
To do this, you will need a marking device. Locator dots, Bump
dots, Velcro and Hi Marks tactile pens and even nail polish are
some options. It will also be helpful to have someone assist
with marking the appliance.
Identify the commonly used settings on the appliance and
place a mark on the dial and on the setting(s) more commonly
used. Avoid placing too many marks as this will make the
system less helpful. Bump dots and locator dots can be placed
like stickers onto a clean appliance surface. Hi Marks or other
tactile marking pens require placing a drop on the area and
allowing it to dry.
When setting the appliance, align the dial with the desired
setting, using the tactual marking or the high contrast as a
guide. Below are examples of some appliances marked using
this technique.
Back to Table of Contents
40
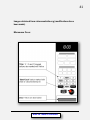
41
Images obtained from visionaustralia.org (modifications have
been made)
Microwave Oven:
Back to Table of Contents
42
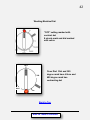
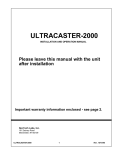
Washing Machine Dial:
“OFF” setting marked with
contrast dot
8 minute mark and dial marked
with velcro
200
Oven Dial: Dial and 350
degree mark have Velcro and
400 degree mark has
contrasting dot
Broil
375
Back to Top
Back to Table of Contents
BACK
Writing Legibly
Reading back what you have written will be easier if you
use the PBS method, print block letters (capital) with good
spacing.
Use bold lined paper, cheques and cheque registers.
If you prefer, templates are available for writing letters,
addressing envelopes, writing cheques and signing your
name.
Many banks also have large print checks. Check with your
bank to see what is available.
Large print materials, such as crossword puzzles,
calendars and address books will increase visibility and
allow more room for writing.
Set up one area for writing with all writing materials
organized and visible.
The writing surface should be smooth. Use a comfortable
chair with good support.
Good lighting is important. Place the light source close to
the paper and opposite of the writing hand to eliminate
shadows. Direct light away from eyes to reduce or
eliminate glare.
Back to Table of Contents
43
44
Position the paper so the lines or template can be clearly
seen.
Slow down and pay attention.
Use a bold point felt tip pen, or Sharpie marker.
Look at the tip of pen where it touches the paper.
Keep the tip of the pen in your sight you move it from left
to right across the paper
Print large block letters.
Space out the letters.
Back to Top
Back to Table of Contents
BACK
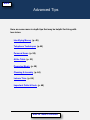
Advanced Tips
Tips
Additional
Here are some more in depth tips that may be helpful for living with
low vision.
Identifying Money (p. 46)
Telephone Techniques (p.48)
Personal Items (p. 50)
At the Table (p. 53)
Preparing Meals (p. 58)
Cleaning & Laundry (p. 64)
Leisure Time (p. 66)
Important Odds & Ends (p. 68)
Back to Table of Contents
45
46
Identifying Money
There are many different ways to identify bills and it really
doesn't matter how you do it as long as your method works for
you. Some individuals prefer to separate their bills by
denomination, then place the bills in different sections of their
purse or wallet. Many people prefer a special billfold which has
different sections for different bills. (These are available from
CNIB.) If you've decided to identify your bills by folding, try this
method:
Fold the Five Dollar Bills in half lengthwise.
Fold the Ten Dollar Bills in half, end to end.
Fold the Twenty Dollar Bills end to end, then
lengthwise.
Fold the Fifty Dollar Bills in half and in half again.
When you receive money from others, ask what each bill is and
fold it right away or put it in a special section of your wallet so
you will be able to recognize it later. Take your time, don't be
hurried.
Coins can be identified by touch. A special purse or coin
organizer with separate slots for pennies, nickels, dimes, and
quarters may also be a useful item. To identify coins by touch,
select one coin at a time and use a fingernail or fingertips to
feel the different sizes and edges of each coin:
Back to Table of Contents
47
A penny is larger than a dime. Many pennies in
circulation have a round smooth edge. Others have a
multi-sided smooth edge.
A nickel has a smooth edge and is larger and thicker
than a penny.
A dime has a rough grooved edge and is smaller than a
penny.
A quarter has a rough grooved edge and is larger and
thicker than a nickel.
A dollar coin (loonie) has an eleven sided smooth edge
and is larger and thicker than a quarter.
Practice identifying the coins by touch. Have a friend
pass you different coins to identify or put a pile of coins
on a table and sort out by yourself.
Back to Top
Back to Table of Contents
48
Telephone Techniques
Touch Tone Telephones: All push button telephones are
identical in the display of the numbered buttons, making it easy
to memorize the location of each number. The buttons may be
lightly skimmed with the fingertip when dialing. Numbers on
touch tone telephones are arranged in this way: top row from
left to right 1, 2, 3; second row from left to right 4, 5, 6; third
row from left to right 7,8,9. Zero is in the centre of the fourth
row. Use your index finger to skim the buttons and locate the
desired numbers. Or try the three finger method in which the
second row of buttons (4, 5, and 6) are referred to as the home
row: Put your index finger on 4, your middle finger on 5 and
your ring finger on 6. With your index finger on the 4, you can
easily reach up to I or down to 7. Likewise with your middle
finger on 5 it can reach up to 2, down to 8 and 0, and with your
ring finger on 6 you can move it up to 3 and down to 9. (For
faster location of the home row put a locator dot, a piece of
tape or other marking on the 5 button). With practice, it won't
be long before you will be able to dial as fast as someone
looking at the numbers. ("Lefties" will have to reverse this
process.)
Large Print Number Templates are available, for both dial and
push button telephones, from MTS or CNIB. Contact MTS to
find out about special equipment, that will make telephoning
easier, and discounts which you may receive on certain
equipment and services.
Telephone numbers can be written in Braille, recorded with a
cell phone or other device, or written in large print. It is a good
idea to keep telephone numbers together, whether in a writing
pad, notebook, recipe card box or on cassette. Whichever
Back to Table of Contents
49
method you use, be sure to keep your numbers in a handy
place near the telephone. If you are able to read large print, use
a wide tipped black marker on white paper. Depending on your
vision, you may choose to write one number on each page or
several numbers on a page.
Telephones equipped with a memory system, enabling a
person to dial a number by pressing only one button, may be
useful.
Back to Top
Back to Table of Contents
50
Personal Items
To identify keys, put a piece of brightly colored tape, which can
be easily seen or felt, around the key. Similarly, put a Locator
Dot (available from CNIB) on the key or a colored plastic hood
(available from hardware and department stores, and CNIB)
over the key top. Most places which copy keys have them
available in a wide variety of colors.
When signing your name, place a signature guide over the line
requiring your signature. (A variety of signature guides is
available from CNIB.) Another way to locate the proper place to
sign is to ask someone to make a fold, which you can feel,
along the line requiring your signature. (Make sure the ridge of
the fold is upward.) Or have someone place your index finger at
the beginning of the signature line and sign your name to the
right of your finger. People with low vision may find lines are
easier to locate if traced with a dark pen or marker. Continue to
sign your name. It is your personal mark of independence.
Searching by touch through an entire closet for a certain item
becomes very tedious. If you organize items, you can eliminate
endless searching. For example, garments may be separated
by color, or casual clothes may be placed at one end of your
closet and formal clothing placed at the opposite end.
Clothing in a closet is also easier to find when it is organized
into matching outfits; for example, a suit jacket, shirt, tie, and
slacks, all hung on one hanger or several hangers tied
together. A label in large print or braille, or a geometric shape
cut from cardboard or plastic (i.e. ice cream container top) may
be placed over the hanger to identify clothing color.
Back to Table of Contents
51
Use dividers in your cupboards and drawers. Drawers can be
divided into as many sections as you find necessary to keep
articles in their proper place. A variety of plastic trays and
adjustable drawer dividers is available in hardware or
department stores, or can be custom made.
If you have a white or light colored bathtub, buy dark colored
contrasting soaps. They will be easier to locate than white
soap, especially if they float.
Use soap on a rope or liquid soap dispensers. They are easy to
locate and you avoid the slippery soap problem.
A shower caddy (available in department stores) is useful to
hang over your shower head and hold personal care items such
as shampoo and soap.
Use your index finger to guide a small amount of toothpaste
onto your toothbrush. If you have your own personal tube of
toothpaste, squeeze a small amount directly into your mouth.
It's much easier and less messy.
If you are taking medication, you may wish to take advantage of
the many pill organizers available at drug stores. Some
organizers have one section for each day; other organizers are
larger and have two or more sections for each day. These are
especially useful for people who take several kinds of pills in
the morning, at lunch, at dinner, and at bedtime.
If you keep your medications in a bottle yet have trouble
remembering if you've taken the required daily amount, put the
same number of elastic bands as number of pills you must take
that day around the bottle. Remove an elastic band after taking
each pill or dose.
Back to Table of Contents
52
Organize medication in different ways on the shelf: according
to frequency of use, in alphabetical order, or in categories
used.
Large print or braille labels may be placed on medicine bottles
to easily identify them. Any personal marking (for example, a
piece of tape) will do the trick as long as it is understandable by
you. When refilling, simply transfer the new medicine to the old
bottle or ask your pharmacist to use the same container. If your
label will fit on the lid of the bottle, you only need to
interchange lids.
To easily identify baggage when travelling, place several large
strips of contrasting colored tape on your suitcase.
Back to Top
Back to Table of Contents
53
At The Table
To locate items at your place setting, start at the edge of the
table and with your fingers curled and arms flexed move gently
toward the centre of the table until you find your plate. With
fingers low to the table, extend arms and fingers gradually to
the right and left to find silverware, teacup, glass, salad bowl,
bread and butter plate, etc. Accidents can happen easily, so
remember to keep your hands on the surface of the table and
move slowly. If you cannot find the item you need, ask for it to
be passed to you.
To determine contents of the plate, use the tip of your knife or
fork to gently probe the food on the plate. As you move around
the plate, note the difference in textures, shapes, and smells,
and remember the location of these foods on the plate. Note
also whether or not the food is solid, such as mashed potatoes
or steak, or loose, such as french fries or peas. Try to
determine any special characteristics. Are there paper
containers of relish? Is the baked potato cut down the middle?
Does it contain any sour cream or is a separate container
provided? Is there finger picking food on the plate? Does the
meat have a "cooking directions" marker pierced into its
middle? Does the meat have a bone? Is the decorative salad
cut or are there large lettuce leaves? Is there a separate
container of gravy or sauce on the plate? Such questions are
endless, yet each is easily answered by thoroughly checking
out the contents with your utensils and determining the
characteristics of your food before you start to eat. As with
most people, you will make the occasional mistake or
misjudgment. Laugh it off, learn by it, and go on. If you are
Back to Table of Contents
54
doubtful or need affirmation of your plate's content, don't be
afraid to ask.
A sighted person may describe the location of the various
items on the plate. To make this description, the plate may be
imagined to be the face of a clock. For example, if peas are
located at the top of the plate, it is said that the peas are at 12
o'clock.
You may find it helpful to turn your plate so that any foods that
require cutting or special attention, such as meat or corn on the
cob, are brought to the bottom of the plate (6 o'clock position).
In this way they are easier to locate and deal with without
reaching over other foods.
"Loose" food such as peas or corn can be difficult to pick up.
Many people use a "pusher" such as a piece of bread, a roll, or
a knife to help guide food onto the fork. Another idea is to
gently move the "loose" food, i.e., peas, against a barrier of
"solid" food, i.e., mashed potatoes. This will give you the
advantage of being able to get under the "loose" food, as the
barrier prevents such food from moving around the plate.
When sprinkling salt from a shaker onto food, sprinkle first into
the palm of the hand to determine the amount and how fast the
salt is flowing. This will prevent a fast flowing shaker from
ruining your dish.
It's easier to put sticky jam, honey, etc., on your bread if you
use a teaspoon to scoop it on and then use the back of the
spoon or a knife to spread it.
While eating, it is wise to direct the motion of the fork or spoon
toward the centre of the plate. Food on the plate should be
Back to Table of Contents
55
pushed inward for it tends to move out to the edge of the plate
in the normal course of the meal.
As you eat, be aware of the weight of the food on your fork or
spoon. With practice and patience, you will soon be able to
gauge whether you are lifting an appropriate amount of food.
It is fine to make special requests (i.e., to have meat cut,
shellfish served out of the shell) when eating away from home.
Whether at home or eating out, don't hesitate to ask for
assistance in Organization & Labeling in the Kitchen.
Extra shelving just wide enough to accommodate one row of
canned, bottled, or packaged goods of various heights
eliminates searching and confusion when trying to locate items
in the back of deep wall cabinets. These shelves can be
installed on any convenient wall in the kitchen or basement, on
the back of a door, the wall of a stairway, in a closet or pantry.
Sectioning off certain areas on these shelves and attaching
labels to the shelf edge of these areas helps in identification of
items. (Labeling the shelf edge further reduces the need for
individual labeling.)
Use dividers in your cupboards and drawers. The shelves can
be effectively sectioned off with a plastic straw laid horizontally
and glued or taped into position. If you wish something more
permanent, strips of wood or dowels can be used. Use easily
recognized items such as ketchup or mayonnaise bottles as
dividers, to separate for instance canned fruit and canned
vegetables. Drawers can be divided into as many sections as
you find necessary to keep articles in their proper place. A
variety of plastic trays and adjustable drawer dividers is
Back to Table of Contents
56
available in hardware or department stores, or can be custom
made.
Canned goods, baking goods, etc., can be organized in
different ways according to frequency of use, in alphabetical
order, or into categories used. For example, spices may be
divided into two groups those used for baking (cinnamon,
nutmeg, etc.) and those used in main dishes (garlic, celery
seed, etc.).
To help you find what you are looking for in your freezer try
grouping foods of a similar type. Fish, vegetables, or meats
may be put into larger bags which you can take out while you
find the particular packet you want. If you have some color
perception, differently colored labels and tags or colored bags
may help.
A simple way to distinguish between a small number of
identical containers such as cans, bottles, or salt and pepper
shakers is to put an elastic band around one of them.
Alternately, select brands so that no two items are in identical
containers.
Use large print or braille to make labels for spices, etc. When a
bottle is empty, you simply transfer the new item to the old
bottle to avoid having to make new labels. If the name can be
shortened so that the label can be put on the lid of the
container, you need only interchange lids.
Use Labels, miniature plastic fruits, vegetables, nuts, meats,
fish etc., attached to an elastic band or magnetic strip. 'Labels'
can easily be put on canned goods, boxes, or frozen packages.
The various distinctive shapes, textures, and colors enable the
blind or visually impaired cook to quickly identify the food.
Back to Table of Contents
57
'Labels' are available from CNIB or by writing directly to Gladys
E. Loeb Foundation, Inc.2002 Forest Hill Drive Silver Spring,
Maryland, USA 20903
Do not be obsessed with labeling! Among your food items and
household supplies there are a number of items easily
recognized by the touch, shake, or smell method. These need
not be marked. Good organization in storing canned and
packaged goods, as well as personal items, and keeping
everything in its place will significantly cut down your need for
labeling. Label only those things that cannot be distinguished
by any other convenient means and keep any labels as short
and concise as possible.
A useful labeling device is called the Penfriend which creates
auditory labels that can be put on a wide variety of items. The
Penfriend can be purchased at the CNIB.
Back to Top
Back to Table of Contents
58
Preparing Meals
When pouring cold liquids, use your index finger to position
the spout over and in contact with the edge of the glass. Slowly
pour the liquid into the glass using your index finger to gauge
the liquid level. Listen to the change in sound as you pour the
liquid. Also, become familiar with the weight of the empty glass
and notice the change as the glass is filled with liquid.
When pouring hot liquids put your finger slightly over the edge
of the cup and stop pouring as soon as you feel the warmth of
the liquid. Be sure your finger is placed away from the direct
flow of liquid. When pouring hot liquids you may find it easier
to pour over the sink or a tray. A liquid level indicator is
another alternative when pouring hot liquids. It is a simple
battery operated device with two prongs which hang over the
edge of the cup and beeps when the liquid touches the prongs.
(Liquid level indicators are available from CNIB).
Measure water before boiling. A measuring cup with a spout
makes it easier to pour both hot and cold liquids into other
containers. For example, fill your teapot with cold water and
pour it into your kettle, so that you boil exactly the right
amount.
To find the proper place to open a milk carton, locate the seam
which runs along one corner edge of the carton from top to
bottom. Always open the carton on the side opposite the seam.
Don't use a knife to cut plastic milk bags, bread bags, frozen
vegetables, etc. It can be tricky. Use kitchen scissors or "Snip
Its" which can be found in almost any department store or
grocery store. "Snip Its" is a little device with a safe cutting
Back to Table of Contents
59
edge surrounded by plastic. It has a little magnet on the back
so it can always be found stuck to your refrigerator.
Always remove the eyes from potatoes with point of peeler or
knife before peeling.
It is easier to determine if the peel on vegetables has all been
removed when the vegetable is wet. The portion of the
vegetable that has the peel remaining on it will have a rough
texture, while the portion already peeled will have a smooth,
moist texture.
Always keep fingers curled in and downward while chopping
vegetables, etc. To gauge the thickness of a slice, put the blade
of a sharp pointed knife by the forefinger of the hand that is
holding the vegetable, then move knife and forefinger the
required distance before cutting. Some vegetables are best cut
in half first and placed flat side down on the chopping board
before cutting into slices. The Magna Wonder Knife (available
from CNIB) is a very popular and useful item. It has an
adjustable slicing guide that makes it easy and safe to cut
slices of bread, vegetables, and meat into different
thicknesses.
Toss a salad by shaking in a large covered bowl or container. It
gets well dressed and there is no mess!
Safety should never be overlooked, especially in the kitchen!
When working around the stove, avoid wearing anything that
might dangle over the burners, such as loose sleeves or ties.
Don't store flammables, especially oven mitts and dish towels,
near the stove. You can buy magnetized hooks that stick to
Back to Table of Contents
60
your fridge. It's a safe and convenient place to store these
items. Or store in a drawer close to your oven.
Familiarize yourself with your stove and oven before using.
Know which knobs control which burners. Explore your oven
when cold to ensure you are aware of the position of the
rack(s).
Always place your filled pot on the stove burner before turning
the burner on. If you have to place or replace a pot on a burner
that is already hot, use a long-handled wooden spoon (which
doesn't conduct heat) to feel around the edge of the pot,
ensuring the pot is centered on the burner.
Stove burner rings may be attached to burners to ensure a pot
will not slide off the burner. (These are available from CNIB).
Make sure pot handles do not extend over the front or sides of
the stove where they can be easily bumped or knocked over.
A colander, placed in a sink, provides an easy way to drain
water from vegetables, pasta, etc., without trying to hold the
cover on and keep the food in. Pot strainers which attach to the
rim of the pot are also excellent for draining water.
When frying eggs, use an egg ring (available from CNIB) or use
a tuna or salmon can cut open at both ends. Grease the ring
before placing in the frying pan and drop one egg into each
greased ring. A food turner may be slid under the ring to easily
remove the eggs from the pan.
When frying meat which has to be turned, use a two-sided
spatula (available from CNIB), which works like a pair of tongs.
Some people prefer oven baking or roasting meats because
they do not have to be turned over. Bacon, for example, which
Back to Table of Contents
61
is very difficult to turn, may be cooked in your oven or
microwave.
When reaching into the oven, prevent burns by wearing long
oven mitts which extend to your elbow (available at CNIB).
Before removing a casserole or baking dish from your oven,
make sure the oven door is completely open and the rack
pulled all the way out.
A wooden spoon or wooden rack puller (which doesn't conduct
heat) is helpful to locate a hot oven rack, to locate the dish on
the rack, and to pull out the rack.
If you suspect a casserole or baking dish may boil over or
splatter while in the oven, place a cookie sheet underneath to
catch the spills. It is easier to clean than the whole oven.
Use large print or raised dot (Braille) timers as a guide to know
when food is cooked. You can also judge the readiness of food
by using a combination of sensory clues such as touch, smell,
hearing, remaining vision and taste.
A muffin tin is great for baking potatoes, stuffed peppers, or
tomatoes. It is easier to locate and remove the muffin tin than
several items scattered on the oven rack.
To prepare smooth gravy, shake your mixture of water and
flour in a plastic container with a wide mouth.
For even proportions of mashed potatoes and turnip, use an ice
cream scoop. An ice cream scoop is also useful for making
muffins, cupcakes, etc., because it allows you to get equal
amounts of batter in each section and is easier than pouring
Back to Table of Contents
62
directly from a bowl or using a spoon. Use a small ice cream
scoop to make cookies.
If you are having trouble spreading peanut butter, or other hard
to spread foods, use a small narrow spatula.
Use a tray or cookie sheet to organize utensils and ingredients
when cooking. A tray catches any spills, making clean up
easier, and ensures small items are not misplaced.
Use measuring cups in graduated sizes (available in
department stores and from Tupperware), rather than a one cup
measure with small dividing lines marked in print.
To measure a portion of a block of butter or shortening, use a
stick or piece of plastic which has notches cut for cup, etc.
When measuring herbs and spices, sprinkle into the palm of
your hand first so you are able to determine how much you are
using. This will prevent accidentally adding too much to a dish.
Measuring small amounts of liquid such as 1 tsp. vanilla is
difficult. For such amounts, dipping is easier than pouring into
a spoon. You may find it beneficial to transfer liquids you use
often into wide mouth containers for easy dipping. Large eye
droppers or a small plastic syringe are also great for measuring
extracts, flavourings, and colorings.
To separate egg whites from yolks use an egg separator or
small funnel (both available in department stores). Or break the
egg into the palm of your hand. Let the egg white run through
your spread fingers. The yolk will remain in your hand.
Fill a large salt shaker full of flour for dusting baking pans,
making gravies, etc. It isn't messy and saves flour.
Back to Table of Contents
63
A canning funnel is helpful when pouring liquids into narrow
mouth containers. Square topped funnels are easier to use.
Place a jar lid, pebbles, or marbles in the bottom of your double
boiler or kettle. The rattling sound will signal if the water has
boiled away.
Prevent ants, flour beetles, or other pests from invading your
cupboards by leaving sage or bay leaves on food shelves.
Here is a website link to YouTube videos from the PBS program
called “Cooking without Looking” which features guests with
vision loss sharing their cooking strategies and recipes.
COOKING WITHOUT LOOKING VIDEOS
Back to Top
Back to Table of Contents
64
Cleaning & Laundry
Wear an apron with large pockets when dusting or
straightening. The pockets may be used to hold cleaning
materials such as a dust cloth and polish, or may be used to
hold small items you pick up along the way and plan to return
to their original storage places. Likewise, put cleaning
materials in a basket or bucket and carry it around the house
with you so all materials will be handy as needed.
Avoid spot cleaning! Clean the whole surface to ensure no
spots are missed. When cleaning counters, start at one end and
work to the other in overlapping strips. Use your free hand, not
holding the cloth, to check areas just cleaned for extra
stubborn spots. Also work in overlapping strips when dusting,
vacuuming, washing floors, etc. In large areas, you may find it
helpful to divide the surface into sections such as halves or
quarters, with overlapping boundaries. Use pieces of furniture
(for example, a chair in the middle of the kitchen floor), or use
permanent fixtures to mark the boundaries of each section you
are cleaning.
Transfer liquid cleaners into containers with pumps for easy
use. Containers can be filled with a funnel. Remember that flat
sided bottles upset easily.
To fill a steam iron, use a turkey baster, a funnel, or a squirt
bottle.
Safety pins or Sock Tuckers (available in department stores
and from CNIB) can be used to keep socks in pairs during
washing and drying. Some people find it helpful to buy socks in
different colors with slightly different patterns or textures for
sorting purposes.
Back to Table of Contents
65
Wash small items in a pillow case or small mesh laundry bag to
keep them from getting lost.
It is easier to measure laundry detergent by dipping into the
box or container it is stored in. Avoid pouring directly from the
box.
Back to Top
Back to Table of Contents
66
Leisure Time
When playing board games, visually impaired people may find
it helpful to use dice that will contrast with the color of the
board. Black dice are easier to locate on a white board and vice
versa. Also, don't be afraid to substitute larger or color
contrasted objects for game pieces that are difficult to locate.
For example, use a thread spool in a color that contrasts with
the board for a game piece.
A variety of adapted games like Monopoly and Scrabble,
playing cards, and Bingo cards are available from CNIB in both
large print and Braille. CNIB also has a variety of adapted tools
such as large print and raised line rulers. Call your local CNIB
Technical Aids Department for more information.
Public Libraries and the CNIB Library have a wide selection of
books and magazines on tape.
When hand sewing, use a small bowl to keep track of your
Needle, thread, thimble, etc.
Keep a few needles threaded for quick access or use Self
Threading Needles (available from CNIB and sewing shops).
You can buy a seam guide that will screw onto the flat bed of
your sewing machine. It is adjustable and can provide a tactile
guide with which to measure seams. Check with your sewing
machine dealer. People with low vision may find it useful to
place a brightly colored piece of tape on the seam guide.
Keep a magnet in your sewing basket to pick up pins and
needles.
Back to Table of Contents
67
Many people are not aware of all the recreational and leisure
resources available in their own community. Contact your
Recreation Department, YWCA, YMCA, Adult Education
Association, Church, Women's Club, Specialty Groups, and
Leagues in your area to find out about the programs and
activities they offer.
With any leisure time activity, from wood working to knitting,
begin with very basic techniques and continue to build on your
skills. People with low vision may find it helpful to use
contrasting color and/or larger materials, additional lighting
and/ or magnification. Take your time and remember, a little
patience goes a long way!
Back to Top
Back to Table of Contents
68
Important Odds & Ends
Each household item should have a specific place and should
be returned there immediately after use. Don't just drop
something! When the phone rings, take it with you and put it
away after the call. That way you won't have to spend a lot of
time looking for it when it is next needed. Encourage other
family members to return items to their proper place after
using. After all, organization makes it easier for everyone to
find things!
It is not necessary to rearrange furniture in a special way in
your home, but some changes may be helpful. For example,
potential obstacles such as a low coffee table With sharp edges
may be moved out of the main circulation area. (This will
prevent the BBB's ? black & blue bruises.) Also, remember to
keep the room doors, closet doors, and cupboard doors all the
way open or all the way shut.
Large print numbers, raised numbers, and/or Braille on
Elevator panels and outside the elevator doors (marking the
floor number) are helpful, especially in large buildings. If you
live in an apartment complex, place an identifiable marker such
as a decoration or door knocker on your apartment door. In a
hotel, place an elastic band or twist tie around your door
handle to ensure you are at the right room.
When you are grocery shopping with a sighted person, it's easy
to maneuver through the store if you stand behind the grocery
cart, holding the cart handle, and let the sighted person lead,
guiding the cart from the front. If you plan to shop alone, call
the grocery store in advance and request assistance. Most
grocery store managers are more than willing to arrange a
Back to Table of Contents
69
mutually convenient time for a clerk to help you find the items
you require. Some individuals prefer to have a volunteer do
their grocery shopping. Also many grocery stores (and drug
stores) deliver for a small fee.
Back to Top
Back to Table of Contents
BACK
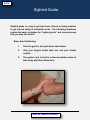
Sighted Guide
Sighted guide is a way to get help from a friend or family member
to get around safely in unfamiliar areas. The following directions
explain the basic technique for “sighted guide” and circumstances
that you may find useful.
Basic Arm Positioning:
1.
Take the guide’s arm just above their elbow.
2.
Grip your fingers inside their arm and your thumb
outside.
3.
The guide’s arm is held in a relaxed position close to
their body with their elbow bent.
Back to Table of Contents
70
71
*If you are shorter or taller than your guide, you may need to
change your grasp to a new place on their arm. For example,
you may need to grab the guide’s arm closer to their wrist if
you are significantly shorter. Or, you may need to move your
hold towards their shoulder if you are significantly taller.
Basic body position:
You will walk a half step behind and to the side of your guide
holding their arm firmly. For example, your left foot should be
in line with the guide’s right foot while your guide remains in
front.
Back to Table of Contents
72
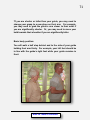
Narrow Passage:
1.
Your guide will tell you a narrow space is ahead.
2.
Your guide will stop and move their arm towards the
center of their back.
3.
Extend your arm that is holding onto your guide.
4.
Move directly behind your guide. (you should be one
full step behind)
Back to Table of Contents
73
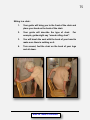
Stairs and Curbs:
1.
Your guide will tell you there will be stairs or a curb.
It is best for them to give short but important
information. For example, “Up 3 steps right rail.” If
there are a lot of steps, they can say, “down flight
right railing.”
2.
Your guide always approaches the stairs or curb
squarely. This is important for your guide to be
consistent and always approach level changes in this
way.
3.
If railing is there but
not where you can use
it, change sides. Your
guide will instruct you
to switch sides before
starting.
4.
You want to feel the
first step up or down
with your toe.
5.
Your guide will lead
you up or down and tell
you when you have
reached
the
flat
surface.
Back to Table of Contents
74
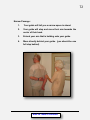
Car entry:
1.
Your guide tells you which way the car is facing.
2.
Your guide helps you place one hand on the door
handle and one on the top corner of the door.
3.
After opening the door, you will move your hand from
the top corner of the door to the roof.
4.
Now you are ready to enter the car.
Back to Table of Contents
75
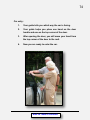
Sitting in a chair:
1.
Your guide will bring you to the front of the chair and
place your hand on the back of the chair.
2.
Your guide will describe the type of chair.
example, guide might say “armed rolling chair”.
3.
You will brush the seat with the back of your hand to
make sure there is nothing on it.
4.
Turn around, feel the chair on the back of your legs
and sit down.
Back to Table of Contents
For
76
In all of these circumstances, it is important for you and the
guide to be working as a team. It is up to you to know when
you need help and how to ask for it. If you feel that you would
like to become more independent and have more training, you
may consider seeing an orientation and mobility specialist. A
good place to start is by contacting CNIB.
Back to Top
Back to Table of Contents
BACK
Adaptive Aids for People with Diabetes
ADAPTIVE EQUIPMENT
For Blind/Visually Impaired Individuals with Diabetes
last revision: March 2013 (created and shared by Youville)
Contact information for suppliers of equipment listed in this
resource is located at the end. Mention of a product does not
constitute an endorsement by the organization that developed
this resource. Before committing to a purchase, individuals
should ensure that:
Instructions come with the item
They understand the warranty period and any ‘no return’ policy
Ideally, a health care professional with knowledge in adaptive
equipment should be present to assist the individual for firsttime use.
Back to Table of Contents
77
78
Jump to a section by clicking below
A. Blood Glucose Monitoring (p. 79)
B. Insulin Administration - Syringe Loading (p. 83)
C. Insulin Administration – Injection Aids (p. 87)
D. Suppliers (p. 90)
E. Desirable Features of a blood glucose meter for people
with low vision (p. 94)
Back to Table of Contents
79
A. SELF-BLOOD GLUCOSE MONITORING
1. Accu-Chek Mobile
2. Oracle Blood Glucose Monitoring System
3. Prodigy Meters (Autocode and Voice)- only available in the
US
1. Accu-Chek Mobile
The Accu-Chek Mobile from Roche has a 50test strip cassette
so the user never has to handle individual test strips. The
cassette is calibrated automatically (no manual coding
required) and the meter detects the expiry date of the strips.
The lancing device is attached to the meter, allowing users to
ready the lancet and test with one thumb movement. Results
available in 5 seconds. There is no option to re-dose the strip if
the blood sample is insufficient.
The Mobile can be used by individuals with manual dexterity
problems (arthritis, Parkinson’s):
No strip handling
The lancing device can remain attached to the meter, or can
be detached to accommodate user preference
In addition to a having a large display screen, the Mobile
features an acoustic mode that allows individuals with vision
problems to use it. To program it to the acoustic mode, a
sighted person must follow the instructions in Chapter 4 of the
Accu-Check Mobile User’s Manual. The interpretation of
Back to Table of Contents
80
glucose results must be taught by a sighted person following
the information laid out in Chapter 6 of the User’s Manual.
2. Oracle Talking Blood Glucose Monitor 1-866-829-7926
Talking Function - either English or French
No Coding
Alternate Site Testing
Tiny Blood Volume
Simple Single Button Operation
6 Second Results
450 Memory events; Keeps track of date and time with 7,14,
21, 30, 60, and 90 day averaging
Computer downloadable (Computer download cable is sold
separately)
Ketone Warning automatically comes on when your blood
glucose is above 13.3 mmol/L
Can be ordered at Wal-Mart, Safeway, London Drugs,
PharmaPlus, PharmaSave, Rexall etc (see website for
comprehensive list)
Covered by DVA and NIH (Nov 2009)
Strips are covered under Manitoba PharmaCare up to a max
of 4,000 strips/benefit year. Approx $90.00/box of 100.
Back to Table of Contents
81
3a. Prodigy Autocode Meter
These talking blood glucose meters are currently only available
from the U.S. Meters and supplies can be ordered online from
the company.
Prodigy Autocode- Meter costs approx $31.00US (strips
$21/bottle 50)
Capillary draw with a small sample size, 6 second test result
Meters ‘talk’ the user through the test procedure
No coding required
2-AAA batteries. Results can be programmed to read out in
mmol/l
Standard lancing device comes with the meter
3b. Prodigy Voice Meter 1-800-366-5901
$80.00US for the meter; $21.95/bottle of 50 test strips
(Shipping and handling apply)
3 minutes to apply sample once test strip is inserted into the
meter
No coding required
Can be programmed (date/time etc) without vision
400+ meter memory that can be reviewed acoustically
No handle strip ejection button
0.6ul sample and fast readout time
Buttons on meter are large with tactile icons on them
Noticeable larger notched area on meter for easy detection
of where strip is to be inserted
Back to Table of Contents
82
Meter will notify user if a used test strip has been inserted
Standard lancing device
User manual is available on CD
SunLife Insurance covers this meter. For those without
SunLife, MD endorsement for this meter will allow people to
reclaim some of the money at Income Tax time.
Website: http://www.prodigymeter.com/
Back to Top
Back to Table of Contents
83
A. INSULIN ADMINISTRATION: Insulin Syringe Loading-D
1. Center-Aid®
2. Count-a-Dose®
3. Safe Shot®
4. Insul-cap®
5. B-D Magni-Guide®
6. Insul-Eze®
7. VialDock®
8. Syringe Magnifier®
9. Syringe Support®
10. Injection Safety Guard®
1. Center-Aid®
This device centres the needle in the vial top to avoid bent and
blunted needles. Easy to slip on and off the vial top.
Lightweight, sturdy metal is easy to keep clean. Available from
LS&S and MaxiAids. Suggested retail price: (U.S.) $5.00 -$6.00.
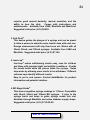
2. Count-a-Dose®
This tool enables a blind or partially-sighted person to fill
syringes and self-administer the proper insulin dose. The
device makes a distinctive click that can be heard and felt with
each increment of insulin. It uses the BD 50 unit (1/2 cc)
syringe only and allows someone to mix two kinds of insulin
(any brand). Fills in one-unit increments. Once a person knows
his or her unit dose of insulin, he/she simply turns the dial,
counts the clicks and self-injects the proper dose. Count-aDose® can be difficult to use with larger doses of insulin and
Back to Table of Contents
84
requires good manual dexterity, manual sensation, and the
ability to hear the click.
Comes with instructions and
audiocassette. Available from LS&S, MaxiAids and MediCool.
Suggested retail price: (U.S.) $68.95.
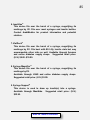
3. Safe Shot®
This device guides the plunger of a syringe and can be preset
to allow a person to draw the same insulin dose with each use.
Dosage measurement will stay fixed once set. Works with all
30unit, 50unit, and 100unit syringes. Available from LS&S and
MaxiAids. Suggested retail price: (U.S.) $11.95.
4. Insul-cap®
Insul-cap® makes withdrawing insulin easy, even for children
and those with impaired sight and arthritic conditions. It holds
the insulin bottle while the person holds the syringe. Helps
stop waste by allowing more insulin to be withdrawn. Different
coloured caps identify different insulin.
Easy to put in and remove. Contact AmbiMedInc for product
information and potential retailers.
5. BD Magni-Guide®
This device magnifies syringe readings to 1.7times. Compatible
with 30unit, 50unit and 100unit BD syringes. It clips to the
syringe barrel and helps to guide syringe needle into vial.
Available through MaxiAids and online diabetes supply shops.
Suggested retail price: (U.S.) $7.95-$9.95.
Back to Table of Contents
85
6. Insul-Eze®
This device fits over the barrel of a syringe, magnifying its
markings by 2X. Fits over most syringes and insulin bottles.
Contact AmbiMedInc for product information and potential
retailers.
7. VialDock®
This device fits over the barrel of a syringe, magnifying its
markings by 2X. Fits best with Eli Lilly insulin vials but may
accommodate other vials as well. Available through Amazon
and online diabetes supply shops. Suggested retail price:
(U.S.) $8.00- $10.00.
8. Syringe Magnifier®
This device fits over the barrel of a syringe, magnifying its
markings by 2X.
Available through LS&S and online diabetes supply shops.
Suggested retail price: (U.S.) $5.00.
9. Syringe Support®
This device is used to draw up insulin(s) into a syringe.
Available through MaxiAids. Suggested retail price: (U.S.)
$32.95.
Back to Table of Contents
86
10. Injection Safety Guard®
Similar versions of this device made both by Ezy-Dose as well
as Apothecary. This attachment fits over the cap of an insulin
vial, creating a barrier that protects the hand holding the vial
from accidental needle sticks.
Back to Top
Back to Table of Contents
87
B. INSULIN ADMINISTRATION: Injection Aids
1. Autoject 2®
2. Inject-Ease®
3. Novofine Remover®
4. Insulin pens (pre-filled disposable and reusable)
1. Autoject 2® and Autoject 2 EI®
This device automates insulin injection by delivering insulin
through loaded syringe at the push of a button. Safety
mechanism prevents accidental firing and has adjustable
needle depth penetration. Available from MaxiAids and some
online diabetes supply shops (ie. diabetic express). Suggested
retail price: (U.S.) $32.99- $43.00.
2. Inject-Ease®
Inject-Ease helps make injections easier and comfortable. It
can be used with most disposable insulin syringes. A noreturn policy ensures no prior exposure to blood. Available
online through Diabetes Express or contact AmbiMedInc for
product information and potential retailers. Suggested retail
price (CAD/U.S.): $31.99- $43.00.
Back to Table of Contents
88
3. Novofine Remover®
These devices ensure safe attachment and removal of needles
from insulin pen devices. Ask your pharmacist to call the local
Novo Nordisk representative or speak to your Diabetes
Education Centre. Free.
4a. Pre-filled, disposable insulin pens
Most insulin pen companies make pre-filled disposable insulin
pens that come at a similar cost to insulin pen-fill cartridges.
Although these pens are not specifically designed for
blind/visually impaired people, they can be used successfully
because of the click that is audible at each position on the dial.
For those with some vision, the dosage indicator window may
be viewable to confirm dosage. Pre-filled insulin pens must be
taught by a sighted person. The advantage of pre-filled insulin
pens is that there is no need to load the pen with new insulin
cartridges. The number of doses per pen must be counted out
in advance so that the person knows when to begin using a
new pen.
4b. Reusable insulin pens (Novolin-Pen®4, Luxura Pen,
SoloStar, ClickStar)
All insulin companies make reusable insulin pens. Although
these pens are not specifically designed for blind/visually
impaired people, they can be used successfully because of the
click that is audible at each position on the dial. For those with
Back to Table of Contents
89
some vision, the dosage indicator window may be viewable to
confirm dosage. These pens must be taught by a sighted
person. The number of doses per cartridge must be counted
out in advance so that the person knows when to insert a new
cartridge.
Back to Top
Back to Table of Contents
90
SUPPLIERS
AmbiMedInc.
908 Sir Francis Ave.
Capitola, CA 95010
1-831-475-1765
[email protected]
AutoControl Medical
6695 Millcreek Drive, Unit 5
Mississauga. ON, L5N 4R8
(905) 814-6350
1-800-472-3576 (Maritimes and Newfoundland)
1-800-461-0991 (Ontario and Manitoba)
1-800-808-3998 (Western Canada)
http://www.autocontrol.com
BD Consumer Healthcare
2771 Bristol Circle
Oakville, ON, L6H 6R5
1-800-267-5577
www.bd.com
Back to Table of Contents
91
Cleveland Sight Center
1909 E 101st Street
Cleveland, OH 44106
(216) 791-8118, ext 278
Eye-Dea Shop
www.clevelandsightcenter.org
LS&S
P.O. Box 673
Northbrook, IL 60065
(847) 498-9777
1-800-468-4789
TTY 1-866-317-8533
www.lssproducts.com
MaxiAids
42 Executive Blvd
Farmingdale, NY, 11735
1-800-522-6294
TTY 1-631-752-0738
For information: 1-631-752-0521
www.maxiaids.com
Back to Table of Contents
92
MediCool Inc.
20460 Gramercy Pl
Torrance, California, 90501
(310) 782-2200 (phone)
www.medicool.com
Novo Nordisk Canada Inc.
2700 Matheson Blvd. East
3rd Floor, West Tower
Mississauga, ON, L4W 4V9
1-800-465-4334
www.novonordisk.ca
Roche Diagnostics
2455 Meadowpine Blvd
Mississauga, ON L5N 6L7
(905) 542-5555
1-800-363-7949
http://www.accu-chek.ca/
Back to Table of Contents
93
Online Resource to check for market availability of products:
http://www.abledata.com
Other online diabetes supply shops:
Diabetes Express Pharmacy (Canadian):
http://www.diabetesexpress.ca
The Insulin Case Shop: http://www.insulincase.com
Diabetic Express: http://www.diabeticexpress.com
Back to Top
Back to Table of Contents
94
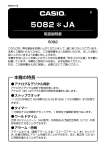
Desirable Features of a Blood Glucose Meter for People
with Diabetes who are Blind/Visually Impaired
The following list has been taken from an article entitled
“Product Evaluation: Managing Diabetes with a Visual
Impairment” by authors Mark Uslan, Caesar Eghtesadi, Angie
Spiker, Karla Schnell, and Darren Burton. It appeared in
AccessWorld®, Volume 3, #5, September 2002. (AccessWorld®
is a publication of the American Federation for the Blind.
Website: www.afb.org.) The authors evaluated several blood
glucose meters that were on the market in 2002 and rated them
according to features relevant to blind/visually impaired
individuals. The following is a list of some of those features
which this population might use as a guide when buying a
meter.
a) Ability to Apply More Blood After the Test Starts
If not enough blood is applied to the test strip, some meters
allow more blood to be applied after the initial application. This
feature reduces the need for re-testing and avoids wastage of a
strip.
b) Cleaning
Some meters require cleaning of residual blood that might be
on sensitive parts of the meter. Other designs are such that
these components are not exposed, eliminating the need for
cleaning.
Back to Table of Contents
95
c) Size/Portability
Most meters today are small and can be carried in a pocket or
purse. However, there may be a variance in screen readability.
Is there good contrast between the background and the
numbers? Can the numbers be viewed in all lighting?
d) Accuracy and Consistency
This feature is critical to anyone who has diabetes. The meter
should be able to give similar readings on successive tests of
the same blood sample (consistency) and those readings
should be similar to the readings of standard lab results
(accuracy).
e) Downloading Capability
Meters have the ability to keep test results in memory. How
easy is it to download the data to a computer and translate into
logs or charts, which can be a tool for people with diabetes and
their physicians.
Back to Top
Back to Table of Contents
BACK
Resources
This section gives various helpful web and
hardcopy resources for living with low vision.
Web Resources
Books
Back to Table of Contents
96
BACK
Web Resources
Here are some website resources related to low vision which
you may find helpful.
To change font size, hold down your control key while moving
the scroll dial on the computer mouse.
The CNIB website: When low vision interferes with everyday
activities, CNIB can help you adjust. They can also help you
prepare for future vision loss, and may be able to help prevent
future vision loss. http://www.cnib.ca
http://www.virn.ca/ This is the Visually Impaired Resource
Network website. This network offers a free phone-in news line
at 1-888-471-1919. They offer assistance to people for reading
their mail. They offer bowling, curling and other leisure
activities in Winnipeg for people with visual impairment.
Technology support, education and podcasts and other
services offered.
http://www.blindcanadians.ca/ The Alliance for Equality of Blind
Canadians runs a number of national programs and events
each year, in addition to offering online discussion tools,
chapters and affiliates, and direct support to those who are
blind, deaf-blind and partially sighted.
There is a local
Winnipeg chapter for this group.
Back to Table of Contents
97
98
http://lowvision.preventblindness.org/
vision website.
Living well with low
http://www.visionaware.org/ This is a self-help on-line support
for those with vision loss.
http://www.lighthouse.org/
Information and courses are
available from Lighthouse, which is an international
organization.
http://www.visionaidcanada.com This is a website which offers
various products for those with vision loss.
http://www.maxiaids.com This is another website which offers
various products for those with low vision, and other
limitations.
http://www.blindmicemart.com/ This online store has many
products available.
They also have descriptive movie
downloads and podcasts of “cooking in the dark” shows.
http://www.braillebookstore.com This is another website which
sells low vision products.
http://www.voiceprintcanada.com/ This is the national
broadcasting service for those needing audio version of the
news, etc.
http://www.oraclediabetes.com This is for a talking glucometer
that is available in Canada
Back to Table of Contents
99
http://elm.lib.overdrive.com/ED97F003-A16D-46AB-9E4D2BFCC483889B/10/406/en/Default.htm
eLibraries ManitobaThis is for electronic audio books that you can download using
your library card.
http://www.blindsport.mb.ca/ This is the Manitoba blind sports
association website.
http://www.blindcanadians.ca/ This is the website for the
Alliance for Equality of Blind Canadians.
http://www.noirmedical.com This is an American website where
you can purchase filters or tinted glasses to manage glare,
light.
http://www.yourtechvision.com/ Techvision is a company that
strives to give people with vision loss the technology skills and
knowledge be independent – there are lessons available to
achieve goals such as reading with technology. You may have
to copy this link to your browser to open it.
http://appadvice.com/applists/show/apps-for-the-visuallyimpaired Here is a list of apps for mobile devices for people
with vision loss.
http://www.preventfalls.ca/ Here is a link to a falls prevention
website that the Winnipeg Regional Health Authority has
produced.
Back to Table of Contents
100
Here are a few options for computer screen magnification:
http://www.aisquared.com Zoomtext which has a 60 day free
trial from
http://www.magnifier.sourceforge.net/ Virtual Magnifying Glass
3.5 A free, open source, screen magnifier, for Windows, Linux,
FreeBSD and Mac OS X.
Here are some links to free screen reading programs:
http://www.screenreader.net/
http://www.nvda-project.org/
http://www.satogo.com/en/ Follow the prompts to download
and run the screen reader program. SATOGO requires that it
not be disconnected from an Internet connection while it is
operating.
Back to Top
Back to Table of Contents
BACK
Books
Following is a list of books and resources that are available as part of
the Consumer Health collection at the Sister St. Odilon Library at the
Misericordia Health Center. Contact the library at (204)788-8109
I have glaucoma" [videorecording] : an educational DVD = "Je
fais du glaucome" : un DVD éducatif, 2009, Jewish General
Hospital = Hôpital général juif, Montreal.
All about your eyes, 2006, Duke University Press, Durham.
Adams, N.A. 2009, Nutrition for the eye: the top 50 nutrients to
know, from the basics to the details : the myths, the realities, &
the scientific evidence, Stanley Publishing Co., El Paso, TX.
Bergman, L., Miller, J.E., Chicago Lighthouse & American
Foundation for the Blind 2012, Out of sight, not out of mind:
personal and professional perspectives on age-related macular
degeneration, AFB Press, New York.
Boyer, D.S. 2012, Macular degeneration : a patient's guide to
treatment, Addicus Books, Omaha, NB.
Brady, F.B. 2006, A singular view : the art of seeing with one
eye, rev. 7th U.S edn, Michael O. Hughes, Vienna, VA.
Burn, H. 2003, The aging eye : preventing and treating eye
disease : a special health report from Harvard Medical School,
Harvard Medical School, Boston, MA.
Capogna, L. 2011, Eyefoods : a food plan for healthy eyes, LB
Media Concepts, Niagara-on-the-Lake, ON.
Back to Table of Contents
101
102
Chang, D.F. 2012, Cataracts : a patient's guide to treatment, 2nd
edn, Slack, Inc., Thorofare, NJ.
Cook, D.L. 2004, Visual fitness : 7 minutes to better eyesight
and beyond, Berkley Books, New York.
Duffy, M.A. 2002, Making life more livable : simple adaptations
for living at home after vision loss, Rev edn, AFB Press, New
York.
Flammer, J. 2006, Glaucoma : guide for patients, an
introduction for care-providers, a quick reference, 3rd rev edn,
Hogrefe, Seattle, WA.
Gilbert, P. 2006, Coping with macular degeneration, Sheldon
Press, London.
Hickman, L. 2010, Eyegames : easy and fun visual exercises, an
occupational therapist and optometrist offer activities to
improve vision! 3rd edn, Sensory World, Arlington, TX.
Kwitko, M.L. 1994, Eyes, Key Porter Books, Toronto.
Lam, A. 2013; 2013, Saving sight: an eye surgeon's look at life
behind the mask and the heroes who changed the way we see,
Fir edn,.
Langdell, C.C. 2011, Coping with vision loss : understanding
the psychological, social, and spiritual effects, Praeger, Santa
Barbara, Calif.
Ledford, J.K. 2009, The little eye book : a pupil's guide to
understanding ophthalmology, 2nd edn, SLACK, Thorofare, NJ.
Orr, A.L. 2006, Aging and vision loss : a handbook for families,
AFB Press, New York, NY.
Back to Table of Contents
103
Ringgold, N.P. 2007, Out of the corner of my eye : living with
macular degeneration, AFB Press, New York.
Roberts, D.L. 2006, The first year : age-related macular
degeneration : an essential guide for the newly diagnosed,
Marlowe & Co., New York.
Samuel, M.A. 2008, Macular degeneration : a complete guide for
patients and their families, Basic Health, Laguna Beach, CA.
Schneider, M. 2012, Vision for life: ten steps to natural eyesight
improvement, North Atlantic Books, Berkeley, Calif.
Trope, G.E. 2011, Glaucoma : a patient's guide to the disease,
4th edn, University of Toronto Press, Toronto.
Watts, M.T. 2005, Cataract : what you need to know, Sheldon
Press, London.
(More below)
Back to Table of Contents
104
“A Guide To Independence For The Visually Impaired and Their
Families” by Vivian Younger
(This is available in talking book only - 5 cassettes)
Available at:
Amazon.ca
or
Centennial Library (Winnipeg Public Library)
251 Donald Street
Call No: (Talking book) 362.41
“Out of the Corner of My Eye” by Nicollette Pernot Riggold
(for those with Macular Degeneration)
Available at:
Amazon.ca
or
Centennial Library
Back to Top
Back to Table of Contents
BACK
105
CNIB
When low vision interferes with everyday activities, CNIB can
help you adjust. They can help you prepare for future vision
loss, and may be able to help prevent future vision loss.
CNIB is open to Canadians of any age.
They do not require a doctor’s referral for initial contact
Most services are provided at no cost
Services include:
Vision assessments
Training in using low vision devices
Low vision devices like software, sunglasses, talking
watches, and magnifiers
Training in how to best use your remaining vision
Training in safely walking/moving in your community
Computer and cell phone accessibility training
Libraries of braille, printbraille, and audio material
Supportive counseling
Career and Employment Services
Independent living services – build everyday skills and
confidence
Child and family services – helping children who are
blind or partially sighted grow and learn to become
independent
Back to Table of Contents
106
In addition to services, many locations have stores with helpful
low vision aids.
To contact their Manitoba or Saskatchewan locations, see
below.
Contact CNIB
Toll-Free: 1-800-563-2642
Website: www.cnib.ca
Email: [email protected]
[email protected]
CNIB Locations:
Winnipeg, MB
Drs. Daya and Chander Gupta Centre
1080 Portage Avenue
Winnipeg, MB R3G 3M3
Phone: 204-774-5421
Fax: 204-775-5090
Back to Table of Contents
107
Brandon, MB
Drs. Daya and Chander Gupta Centre
354 Tenth Street
Brandon, MB R7A 4G1
Phone: 204-727-0631
Fax: 204-727-1139
Regina, SK
2550 Broad Street
Regina, SK S4P 3Z4
Phone: 306-525-2571
Fax: 306-565-3300
Saskatoon, SK
1705 McKercher Drive
Saskatoon, SK S7H 5N6
Phone: 306-374-4545
Fax: 306-955-6224
Back to Top
Back to Table of Contents
BACK
Contact Us
For more information, contact Corie Haslbeck, OT Reg. (MB).
Email: [email protected]
Phone: (204) 788-8194
Mailing Address:
Corie Haslbeck, OT Reg. (MB)
99 Cornish Ave
Winnipeg, MB
R3C 1A2
Canada
Website: www.misericordia.mb.ca
Back to Table of Contents
108
109
This Low Vision Resource Packet was compiled by Corie Haslbeck,
OT Reg. (MB) and Ben Badgero, Student OT (U of M). Thank you to
Ben for his hard work and dedication in creating this resource during
his occupational therapy student placement in May – June 2014.
Back to Table of Contents