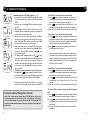
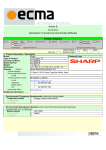
1
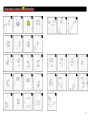
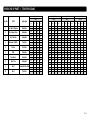
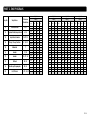
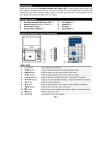
TENS & EMS HD4P
D
GB
F
Electric Stimulator
TENS + EMS
E
I
Instruction Manual
D
GB
Electric
F
E
I
TENS + EMS
T
Pain Relief
Muscular Sports
p
Relaxation
Four Independent Channels With Back Lit LCD
Illustrations of Muscle & Pad Positions
Migraine
sore shoulder
neck pain
Trapezium
Deltoid
upper back pain
arthritis at joints
Deltoid
Large Dorsals
Pectoral Muscles
sore muscle
Large Dorsals
Biceps
Triceps
Lumbar Region
Abdominal Muscles
External
Abdominal Obligue
Elbow
PMS
Wrist
sciatica
Buttocks
Adductors
Biceps Fomoris
Quadr.
sciatica
Knee Flexors
Plantar Flexors
Ankle
I
Illustrations of Muscle & Pad Positions
21
22
23
12
24
25
26
27
15
16
28
29
30
31
19
20
32
1
2
3
4
5
6
7
8
9
10
11
13
14
17
18
II
HIVOX HD 4P PART 1. TENS PROGRAMS
Prog.No.
USES
Application
1
Sore Neck; Migraine
2
Cycle 1
Cycle 5
Width
(µs)
Rate
(Hz)
Endorphin
250
250
4
6
30
20
Sore Uppper Back
Endorphin
250
250
6
10
3
Sore Shoulder
Endorphin
250
4
Rheumatic Arthritis
Pain Gate
5
Sciatica
Pain Gate
6
PMS
Endorphin
7
Sore Muscle
Endorphin
8
Knee Pain
Endorphin
9
Burst
Endorphin/Pain Gate
10
Burst
Pain Gate
Cycle 2
Cycle 6
On Time Off Time
Sec.
Sec.
Cycle 3
Cycle 7
Width
(µs)
Rate
(Hz)
On Time Off Time
Sec.
Sec.
Width
(µs)
Rate
(Hz)
0
0
250
250
4
6
30
20
0
0
250
250
5
8
30
30
30
20
0
0
250
250
6
10
30
20
0
0
250
250
8
2
10
0
250
4
8
0
250
250
60
20
0
250
70
20
0
250
250
80
70
20
4
0
0
250
250
80
65
20
4
250
40
30
0
250
45
250
250
4
8
30
30
0
0
250
250
250
40
5
0
250
75
250ms 250ms
250
100
250 ms 250ms
Cycle 4
Cycle 8
On Time Off Time
Sec.
Sec.
Width
(µs)
Rate
(Hz)
On Time Off Time
Sec.
Sec.
0
0
250
250
5
8
30
30
0
0
20
0
250
8
20
0
6
6
0
250
80
30
0
250
80
30
0
0
250
75
4
0
250
10
20
0
30
0
250
55
30
0
250
60
30
0
4
8
20
20
0
0
250
250
6
10
30
30
0
0
250
250
6
10
20
20
0
0
250
6
10
0
250
50
5
0
250
2
500 ms
III-1
PART 2. TENS PROGRAMS
Prog.No.
USES
Application
Cycle 1
Cycle 5
Width
(µs)
Rate
(Hz)
Cycle 2
Cycle 6
On Time Off Time
Sec.
Sec.
Width
(µs)
Rate
(Hz)
Cycle 3
Cycle 7
On Time Off Time
Sec.
Sec.
Width
(µs)
Rate
(Hz)
Cycle 4
Cycle 8
On Time Off Time
Sec.
Sec.
Width
(µs)
Rate
(Hz)
On Time Off Time
Sec.
Sec.
11
“Sore Neck; Migraine”
Endorphin
250
250
4
6
30
20
0
0
250
250
4
6
30
20
0
0
250
250
5
8
30
30
0
0
250
250
5
8
30
30
0
0
12
“Sore Uppper Back; “
Endorphin
250
250
6
10
30
20
0
0
250
250
6
10
30
20
0
0
250
250
8
20
0
250
8
20
0
13
Sore Shoulder
Endorphin
250
2
10
0
250
4
8
0
250
6
6
0
14
Rheumatic Arthritis
Pain Gate
250
60
20
0
250
70
20
0
250
80
30
0
250
80
30
0
15
Sciatica
Pain Gate
250
250
80
70
20
4
0
0
250
250
80
65
20
4
0
250
75
4
0
250
10
20
0
16
PMS
Endorphin
250
40
30
0
250
45
30
0
250
55
30
0
250
60
30
0
17
Sore Muscle
Endorphin
250
250
4
8
30
30
0
0
250
250
4
8
20
20
0
0
250
250
6
10
30
30
0
0
250
250
6
10
20
20
0
0
18
Knee Pain
Endorphin
250
40
5
0
250
6
10
0
250
50
5
0
19
Pain get,Endorphin
BURST
250
75
250ms 250ms
250
2
500ms
20
Pain get,Endorphin
BURST
250
100
250ms 250ms
III-2
PART 1. EMS PROGRAMS
Prog.No.
Target Areas
Reference
Illustrations
1
Pectoral;Deltoid
3, 21
2
Trapzium; Deltoid;Large Dorsal
9, 10
3
Large Dorsal; Lumbar
10, 11,12
4
Biceps; Triceps;ForeArm
5, 18, 22
5
Abdominal
7
6
Lumbar
13,14
7
Lumbar
16, 17, 19
8
Buttuck
24, 28
9
Quadriceps; Bicepmoporis
24, 29
10
Calf; Plataris
25, 27, 30, 32
Cycle 1
Cycle 5
Width
(µs)
Rate
(Hz)
250
30
5
250
250
4
6
250
Cycle 2
Cycle 6
On Time Off Time
Sec.
Sec.
Cycle 3
Cycle 7
Width
(µs)
Rate
(Hz)
On Time Off Time
Sec.
Sec.
1
250
10
15
30
30
1
1
250
250
4
6
2
10
1
250
250
4
30
1
250
6
15
250
2
250
250
Cycle 4
Cycle 8
Width
(µs)
Rate
(Hz)
On Time Off Time
Sec.
Sec.
Width
(µs)
Rate
(Hz)
1
250
50
5
1
20
20
1
1
250
5
30
1
4
10
1
250
6
10
1
250
4
30
1
250
4
30
1
1
250
8
15
1
250
10
15
1
20
1
250
2
20
1
250
1
30
4
8
30
30
1
1
250
250
4
8
20
20
1
1
250
6
250
20
5
1
250
6
5
1
250
250
20
5
1
250
6
8
1
250
25
5
1
250
6
8
1
On Time Off Time
Sec.
Sec.
250
5
20
1
250
5
30
1
1
250
1
30
1
30
1
250
6
20
1
30
5
1
250
25
5
1
250
35
5
1
III-3
PART 2. EMS PROGRAMS
Prog.No.
Target Areas
Reference
Illustrations
11
Pectoral;Deltoid
3, 21
12
Trapzium; Deltoid;Large Dorsal
9, 10
13
Large Dorsal; Lumbar
10, 11,12
14
Biceps; Triceps;ForeArm
5, 18, 22
15
Abdominal
7
16
Lumbar
13,14
17
Lumbar
16, 17, 19
18
Buttuck
24, 28
19
Quadriceps; Bicepmoporis
24, 29
20
Calf; Plataris
25, 27, 30, 32
Cycle 1
Cycle 5
Width
(µs)
Rate
(Hz)
250
30
5
250
250
4
6
250
Cycle 2
Cycle 6
On Time Off Time
Sec.
Sec.
Cycle 3
Cycle 7
Width
(µs)
Rate
(Hz)
On Time Off Time
Sec.
Sec.
1
250
10
15
30
30
1
1
250
250
4
6
2
10
1
250
250
250
4
5
30
30
1
250
6
15
250
2
250
250
Cycle 4
Cycle 8
Width
(µs)
Rate
(Hz)
On Time Off Time
Sec.
Sec.
Width
(µs)
Rate
(Hz)
1
250
50
5
1
20
20
1
1
250
5
30
1
4
10
1
250
6
10
1
250
4
30
1
250
4
30
1
1
250
8
15
1
250
10
15
1
20
1
250
2
20
1
250
1
30
4
8
30
30
1
1
250
250
4
8
20
20
1
1
250
6
250
20
5
1
250
6
5
1
250
250
20
5
1
250
6
8
1
250
25
5
1
250
6
8
1
On Time Off Time
Sec.
Sec.
250
5
20
1
250
5
30
1
1
250
1
30
1
30
1
250
6
20
1
30
5
1
250
25
5
1
250
35
5
1
III-4
MASSAGE
Prog.No.
Cycle 1
Cycle 5
Wave Form
Width
(µs)
Rate
(Hz)
250
8
60
250
110
200
Cycle 2
Cycle 6
On Time Off Time
Sec.
Sec.
Cycle 3
Cycle 7
Width
(µs)
Rate
(Hz)
On Time Off Time
Sec.
Sec.
1
250
60
250ms
60
60
1
250
70
5
15
1
200
Cycle 4
Cycle 8
Width
(µs)
Rate
(Hz)
On Time Off Time
Sec.
Sec.
Width
(µs)
Rate
(Hz)
On Time Off Time
Sec.
Sec.
250ms
250
15
60
250
60
250ms 250ms
60
250ms
30
250ms
250
80
250ms
30
250ms
250
90
10
15
1
200
15
15
1
100
20~80~20Hz
0.5 sec on-time per each Hz
1
Striking—Grasping—Patting—Grasping
2
Numbing—Grasping—Plucking—Rolling
3
Hz modulated/5 ~ 80 Hz
4
Hz modulated 20 ~ 110 Hz
250
250
20
60
5
5
1
1
250
250
30
75
5
5
1
1
250
250
40
90
5
5
1
1
250
250
50
110
5
5
1
1
5
Hz modulated/20 ~ 110 Hz
250
250
20
60
60
60
1
1
250
250
30
75
60
60
1
1
250
250
40
90
60
60
1
1
250
250
50
110
60
60
1
1
6
uS modulated/40 ~ 250 uS
200
8
30
1
7
Rhythmic250 Fixed Hz
8
Rhythmic/Fixed Hz
9
Rhythmic/Fixed Hz
10
Rhythmic/Hz modulated
100
25
Attach1
1
20Hz 40µs~250µs~40µs
Total Cycle time 100 sec.
250
6
Attach1
1
250
25
Attach1
1
250
80
Attach1
1
100
6
Attach1
1
60
1
250
80
Attach1
Attach1
1
***Caution: When Massage Programs are used, all 4 pads are required.
Rhythmic Module Sequence
Attach 1. Rhythmic stimulations
Rhythmic Module Sequence
Stimulation
26
on-time
20 SEC.
Pad 1
B.1
B.2
5 SEC.
5 SEC.
B.3
B.4
5 SEC.
5 SEC.
C.1-1
C.1-2
2 SEC
2 SEC
C.2-1
C.2-2
2 SEC
2 SEC
A. All together
B. Sequential
C.Two-by-two Rotation
D.Random
HZ
CH1/CH3
Pad 2
CH2/CH4
Pad 1
Pad 2
HZ
Stimulation
on-time
CH1/CH3
Pad 1
Pad 2
CH2/CH4
Pad 1 Pad 2
D.1-1
D.1-2
5 SEC
5 SEC
D.1-3
D.1-4
5 SEC
5 SEC
D.2-1
D.2-2
5 SEC
5 SEC
D.2-3
D.2-4
5 SEC
5 SEC
D.3-1
D.3-2
5 SEC
5 SEC
D.3-3
D.3-4
5 SEC
5 SEC
III-5
GB
1. Introduction
Dear user, thank you for choosing Hivox's TENS & EMS HD4P Electric Stimulator. Please
read the manual carefully to learn the correct operation of this equipment. Understanding the operation will enable you to discover and enjoy the benefits of HD4P for a long
time.
HIVOX HD4P is a TENS and EMS combined unit, offering you four independent channels
with eight electrode pads. It is innovative, featuring widely applicable functions for various wellness-improving purposes: relieving pain, maintaining physical fitness, revitalizing
muscle, and alleviating fatigue. Its diverse built-in programs can conveniently match your
individual, specific needs. All programs come with default settings that can be used directly;
also, customized settings are conveniently available through short-cut keys, even during
treatment/stimulation. You will find HD4P, despite its diverse, powerful functions, very
easy to use; in just a few minutes, you can navigate the unit without much help from this
user manual.
What is TENS used for?
TENS, Transcutaneous Electrical Nerve Stimulation, has been clinically approved as an
effective, drug-free, side-effect-free treatment of relieving physical pains. TENS units
emit controlled micro electric currents called pulses through skin to interact with nerves/
acupuncture points and relieve pains in mainly four categories: (1) chronic-illness-caused,
(2) post-operation-caused, (3) sport-injury-caused, and (4) female-nature-related. The
pain relieving/distracting effect comes from two ways: (1) to block the nerve pathway
transmitting pain signals and (2) to stimulate the brain to release natural pain killer
endorphin. Overall, high frequency pulses are effective in blocking the nerve pathway
and low frequency pulses effective in inducing the secretion of endorphin.
What is EMS used for?
EMS, Electrical Muscle Stimulation/Neuromuscular Muscle Stimulation, has also been widely
applied for improving one's well-being: sport, rehabilitation, anti-stress, cell
revitalization...etc. The enclosed program charts (Page I~III) can easily help you to find
appropriate programs for your needs. Besides, the featuring Masseur Touch Technology
embedded is able to deliver human massaging comfort to relieve muscle stiffness and
fatigue. Moreover, customized settings are only few keystrokes away for matching your
individual characteristics.
2. Dangers, Warnings & Cautions!!!
GB
Do Not Use HD4P With Following Conditions:
• More then 3 months into pregnancy
• Metal plates or pace maker implanted
• Epileptic
• Diabetic
• Malignant tumor diagnosed
• High fever
• Abnormal high blood pressure
• Warnings
1.
2.
3.
4.
5.
6.
7.
8.
9.
Do not use this unit near the heart, around the mouth, or on diseased skin.
Do not use this unit in places with high humidity such as the bathroom.
May need to use under the supervision of a physical therapist.
For external use only.
Long-term stimulation at the same electrode site may cause skin discomfort. Consult
a dermatologist if skin discomfort persists.
Consult a doctor before you use this TENS & EMS device if you receive other medical
treatments.
Do not disassemble or remodel this unit.
Consult your local authorities for proper battery disposal.
Supervision and medical consultancy recommended if you are under age 16.
• Cautions
1. If the unit is not functioning properly or causes discomfort, stop using.
2. If you want to move the electrode pads to other regions of your body, make sure the
unit is paused.
3. Do not attach the pads to other people during stimulation/treatment.
4. Use only for the specific pain problem diagnosed by the physician.
5. Do not use this unit while sleeping or driving.
6. Be careful not to allow any metal object, such as belt buckle or necklace coming into
contact with the electrode pads during stimulation.
7. Do not use this unit to treat one region for pain relief longer than 30 minutes.
For more information about Hivox TENS&EMS HD series, please visit our website at http:/
/www.hivox-biotek.com/eng-pro-islim.htm or contact our customer service for further
assistance.
1
GB
3.Names of Components & Quick Start
• Names of Components
1
GB
LCD Display Icons
2
3
8
Description
1
Indicating Mode
2
Indicating total treatment/remained/
stimulation off-time
3
Indicating operation status
4
MEMORY
Only appears when Program 11~20 selected
in TENS or EMS mode
5
Only appears when batteries are running
low
7
6
Indicating stimulation intensity level of
each channel
6
5
7
Indicating pulse rate (Hz)/pulse width ((s)/
Cycle on-time
Remark
Off-time can only be set in TENS
or EMS mode Program 11~20
When this icon appears, program
can be manually setup and saved.
R
Function Keys
9
8
10
9
4
UP
DOWN
MENU
10
16
15 14 13 12 11
Description
Sequentially move between modes/Return
to previous layer of menu
Review/modify/confirm on/off-time
settings of different cycles
Please refer to the advanced
operation for detail
Review/modify/confirm pulse rate(Hz)
settings of different cycles
Please refer to the advanced
operation for detail
12
µS
Review/modify/confirm pulse width ((s)
settings of different cycles
Please refer to the advanced
operation for detail
13
CYCLE
Review/modify/confirm Cycle settings per
selected program
Please refer to the advanced
operation for detail
Confirm settings [mode, cycle, pulse rate
(Hz), pulse width(µs), on/off-time,
treatment time]
* Review Cycle and pulse rate
(Hz) setting in TENS or EMS mode
* Long press to skip detailed
setting(On/off-time, pulse rate,
and pulse width) in advanced
operation and go into treatment
time setting
Power on/off, Start/Pause stimulation
At standby or pause for any
TENS/EMS programs, ENTER can
be accessed to review cycle Hz
settings.
Intensity adjustment for each channel
Only accessible while
stimulating; three are 8 pies
maximum each channel on the
LCD covering all 16 intensity
levels.
HZ
ENTER
15
2
Remark
Program/Treatment Time/pulse width/pulse
Movement is cyclic in nature
rate/on-time/off-time selections
11
14
•Color-coded lead wires
(matching with button colors)
CH1 - Yellow CH3 - Blue
CH2 - Pink
CH4 - Green
The more shade the stronger
intensity
•Electrode pads (4.5x4.5cm)
16
3
GB 3.Names of Components & Quick Start
1. Open the battery cover on the back of HD4P. Insert batteries with correct polarity
positions; close back the battery cover.(Fig 1)
2. Connect the lead wires to electrodes. (Fig 2)
3. Refer to Fig 3-1 and Fig 3-2 to connect the plug and socket. (To disconnect, refer to
Fig 3-3 to snap out the plug.)
4. Refer to the stimulation program charts beginning on page III and find a suitable TENS
program.
5. Place the electrodes properly on the target area. You
may want to refer to illustrations on page I & II.
6. Press
to turn on HD 4P. (Fig 4)
7. Press MENU repeatedly to move the flashing indicator
to TENS in submenu and press ENTER to confirm. (Fig
5)
8. Press / to select your TENS/EMS program from
Fig 1
program #1 ~ #10 and confirm it by pressing ENTER.
9. Press
to begin your treatment.
Fig 2
10. Access the pulse strength keys CH1+, CH1-, CH2+, and
CH2- to adjust the stimulation intensity. (Fig 6)
11. Pause the treatment stimulation anytime by pressing
. Press
again to resume treatment.
4. Operation Procedures
GB
* Every time a valid key is accessed, a short beep sounds; when
an invalid key is accessed, two short beeps sound.
* Please refer to Electrode pad positions on page I & II to ensure
they are properly placed on the target region before treatment
stimulation.
1. Press
to turn on HD4P.
2. Navigate around submenus of TENS, EMS, and MASSAGE by pressing MENU with selection confirmation by ENTER.
TENS/EMS/MASSAGE
There are 20 programs each of TENS and EMS and 10 programs in MASSAGE. Here
you can adjust program treatment time and pulse strength for each channel.
Further, for TENS/EMS programs 11 ~ 20, all parameters can be modified and
stored. Please refer to program charts TENS (page III-1~2) and EMS (page III-3) for
stimulation parameter settings and suggested applications.
* Basic operation for treatment programs 01 through 10
in TENS, EMS, and MASSAGE
Fig 3-1
Fig 3-2
Fig 3-3
1. After moving into the submenu TENS/EMS/MASSAGE, press
/ keys to choose a treatment program from 01 to 10
with confirmation by ENTER.
2. Select a desirable treatment time through / and confirm
it by pressing ENTER.
3. Press
to start the treatment stimulation. During
stimulation, access the CH keys to modify pulse intensity levels.
4. To change total treatment time, press
to pause treatment
stimulation. Press MENU to go back to the program selection
screen, where the currently used program is flashing; then hold
down ENTER until total treatment time flashes on the screen.
Lastly, access / to change it with confirmation by ENTER.
Fig 5A
Fig 4
4
Fig 5B
Fig 6
5
GB 4. Operation Procedures
* Advanced opeartions for TENS/EMS programs 11 ~ 20.
1. After moving into the submenu TENS/EMS, press/ to choose
a treatment program from 11 to 20 and confirm it by pressing
ENTER.
2. Select total cycle #s through/with confirmation by pressing CYCLE.
3. While uS value of C1 blinks on the LCD, modify cycle 1 uS value
through / with confirmation by pressing uS and move into
uS value setting of cycle 2 and onward.
4. When uS values are all set, either access Hz key or TIMER key
for setting Hz values and on-time/off-time values of all cycles.
Again, pressing / for selection and hotkeys Hz or TIMER
for confirmation and moving on to the next cycle.
5. After all parameters are set, long press ENTER to go to treatment time setting. Select treatment time through / and
confirm it by pressing ENTER for stand-by. Press
to start
the treatment program.
6. To change total treatment time, press
to pause
stimulation. Then press MENU to go back to the program selection screen, where the currently used program is flashing;
afterwards, hold down ENTER until total treatment time flashes
on the screen. Lastly, access / to change it with confirmation by ENTER.
7. To change treatment parameters of cycles, uS, Hz, and onoff times, press
to pause treatment stimulation. Then access each of the hot keys for viewing and modifying parameter
values by following procedures stated in step 2 through 4.
**
Note: During parameter setting of CYCLE #s, uS, Hz, on-time,
and off-time, all confirmation can also be done through ENTER.
Connector-Channel Recognition Function
Hivox HD 4P is an advanced 4 channel output TENS/EMS device, and it can be
conveniently used as a three channel unit with 6 electrode pads, two channel
unit with 4 electrode pads, or even one channel unit with 2 electrode pads. Such
innovation is made available because of the patent Connector-Channel Recognition Function.
6
GB
* Use HD 4P as a 3 channel unit with 6 electrode pads
(1) Press
to pause treatment stimulation and remove 2 unneeded pads; then reapply/rearrange the other 6 pads properly.
(Select another treatment program if necessary.)
(2) Press
to resume stimulation and hold down the CH- key
corresponding to the flashing CH on the LCD until it disappears.
(3) Now you can use HD 4P as a 3 channel output unit with 6 pads.
* Use HD 4P as a 2 channel unit with 4 electrode pads
(1) Press
to pause treatment stimulation and remove a lead
wire plug from the back of HD 4P; then reapply/rearrange properly the other 4 pads attached to the remaining two channels.
(Select another treatment program if necessary.)
(2) Press
to resume stimulation and begin to use HD 4P as a 2
channel output unit with 4 pads.
**
Note: As an alternative, you can also remove 4 pads or disconnect them from the lead wires without unplugging the plug.
However, deactivating the pad-channel detection function is
needed through holding down the CH- keys corresponding to
those flashing CHs on the LCD.
* Use HD 4P as a 1 channel unit with 2 electrode pads
(1) Press
to pause treatment stimulation and remove 6 unneeded pads; then reapply/rearrange the other 2 pads properly.
(Select another treatment program if necessary.)
(2) Press
to resume stimulation and hold down the CH- keys
corresponding to the flashing CHs on the LCD until they
disappear.
(3) Now you can use HD 4P as a 1 channel output unit with 2 pads.
* To restore HD 4P as a normal 4 channel unit with 8 electrode
pads
(1) Press
to pause treatment stimulation and reapply all 8 pads
properly. (Select another treatment program if necessary.)
(2) Press
to resume stimulation and hold down the CH+ keys
corresponding to those channels without CH on the LCD until
they show up.
(3) Now you can use HD 4P as a normal 4 channel unit with 8 electrode pads.
7
GB 4. Operation Procedures
Lock and Unlock a Program
HIVOX HD4P is built-in with a feature lock-down function, available for all programs in the unit. When a program is locked, nothing can be changed but the
treatment stimulation intensity level. Further, a locked program remains locked
even after HD4P is turned off. When the unit is turned on again, the locked
program is standing by, ready to be activated through pressing
.
1. When the program is standing by and ready for activation, press
and
together for five seconds to lock down the
program. Two short beeps will be sounded when the program is
locked.
2. To unlock the program, press
and
together for five
seconds at stand-by or pause. When it’s unlocked, a 1 second
long beep will be sounded.
Shortcut keys-CYCLE, µS, Hz &
Four feature shortcut keys are available during program setup, standby, and
pause; therefore, all critical parameter settings can be modified conveniently.
Once a shortcut key is accessed, you are in the shortcut key loop; to leave, long
press ENTER for confirming changes (if any) and go to treatment time setting.
CYCLE-Set, modify, and view total program cycle # of TENS/EMS
program 11~20 during (1) program set-up, (2) stand-by, and (3)
pause
(1) After confirming the needed program by ENTER, access / for selecting a desirable total program cycle # and then press
CYCLE for confirmation.
(2) At standby before pressing
for treatment activation, press
CYCLE for viewing/modifying total program cycles.
(3) Pause the treatment stimulation by
and press CYCLE for
viewing/modifying total program cycles.
8
µS-View, set, and modify pulse width of each cycle in any of the
TENS/EMS programs 11~20 during (1) program set-up, (2) stand-by,
and (3) pause
(1) After confirming the total program cycles needed by CYCLE or
ENTER, cycle 1 µS value flashes on the LCD screen. Access/
to select a pulse width µS value with confirmation by the µS or
ENTER key and move into µS setting of cycle 2. Repeat such
procedures for viewing/setting µS values for all later cycles.
GB
(2) At standby before pressing
for treatment activation, access the µS key for viewing and modifying cycle µS settings of
all cycles.
(3) Pause the treatment stimulation by
and access the µS key
for viewing and modifying cycle µS settings of all cycles.
Hz-View, set, and modify pulse rate of each cycle in any of the
TENS/EMS programs 11~20 during (1) program set-up, (2) stand-by,
and (3) pause Set/modify Hz settings for TENS program 19 or 20.
(1) After uS value of the last cycle is confirmed by ENTER, cycle 1
Hz value flashes on the screen. Access / to select a pulse
rate Hz value with confirmation by the Hz or ENTER key and
move into Hz setting of cycle 2. Repeat such procedures for
viewing/setting Hz values for all later cycles.
(2) At standby before pressing
for treatment activation, access the Hz key for viewing and modifying cycle Hz settings of
all cycles.
(3) Pause the treatment stimulation by
and access the Hz key
for viewing and modifying cycle Hz settings of all cycles.
-View, set, and modify on-off times of each cycle in any of the
TENS/EMS programs 11~20 during (1) program set-up, (2) stand-by,
and (3) pause
(1) After Hz value of the last cycle is confirmed by ENTER, cycle 1 ontime value flashes on the screen. Access the / key to select a
proper on-time value with confirmation by
or ENTER and move
into on-time setting of cycle 2. Repeat such procedures for viewing/
setting on-time values for all later cycles; afterwards, naturally proceed into the off-time value setting of all cycles.
(2) At standby before pressing
for treatment activation, access the
key for viewing and modifying cycle on-time settings of all cycles first and off-time settings second.
(3) Pause the treatment stimulation by
and access the
key
for viewing and modifying cycle on-time settings of all cycles
first and off-time settings second.
LCD Background Light
HIVOX HD4P is so user friendly that even operation in a room with dim lighting is
convenient because of the LCD background light feature. Whenever a key is
accessed, the LCD background light will be on for one minute, after which it
shuts off automatically if no other keys are accessed.
9
GB 5. Maintenance & Troubleshooting
• Maintenance
Q: How to properly store the HD4P?
A: (1) Keep the unit away from children.
(2) Remove the batteries if the unit will not be used for more than 10 days.
(3) Disconnect lead wires and electrode pads after each use.
(4) Reapply the protective film back to the electrode pad after each use.
Q: How to lengthen the life cycle of electrode pads?
A: (1) Clean the sticky surface of the electrode pads with a damp, lint-free cloth if it
gets dirty or less sticky.
(2) Always store the electrode pads in a cool, airy area away from direct sun light.
(3) Be sure the skin is clean before put on the electrode pads.
(4) Always store the electrode pads with the protective film inside the zip poly bag.
6. Product Specifications
Power
Pulse rate
Pulse width
Output voltage
Treatment time
Pulse strength
Operation environment
Storage environment
Transport environment
Size
GB
AA battery x 3
1 ~ 120 Hz
40-250µS
Max. 90Vpp, based on 500 Ohm load +--10%
5 ~ 90 minutes, 5 minutes per interval
0 ~ 16 stages adjustable
10 ~ 40° C, 10 ~ 95% RH
-10 ~ 50° C, 30 ~ 85% RH
-10 ~ 50° C, 35 ~ 85% RH
130 x 70 x 28 mm
• Troubleshooting
Q: What if the unit fails to turn on through pressing the
key.
A: (1) Press the
key again and hold it down for 3 minutes.
(2) Check if the batteries are properly in place with good connection.
(3) Replace batteries if there is no improvement after (1).
Q: What if the electrode pads become difficult to stay attached?
A: Clean the sticky surface with a damp, lint-free cloth; let them air dry and try them
on. If they still do not attach firmly, change them.
Q: What to do if the unit beeps abnormally during treatment?
A: (1) Pause the program by pressing
. Check if lead wires are connected securely
with the pads. Check if the pads are attached firmly on the treated area.
(2) If the beeping persists, replace the batteries with new ones.
Q: What to do when the stimulation is not felt?
A: (1) If there is a warning beeping sound, follow procedures above.
(2) Press
again to restart the program.
(3) Make sure electrode pads are not overlapped.
(4) Increase the pulse intensity gradually.
Q: What to do if the skin of treated area turns red?
A: Stop the treatment immediately; wait until the skin restores to its healthy state. If
irritation persists, consult with a dermatologist.
10
Note: This device comlies with the electromagnetic compatibility requirement of EN 60601-1-2 and
EN60601-2-10 as specified in EEC Directive 93/42/EEC.
*** Don’t try to repair the device. There are no user serviceable parts inside.
*** Always use the specified accessories in the manual. The use of other parts not approved by the
manufacturer may be hazardous.
11
© All rights reserved. 480-6504B
PRINTED IN TAIWAN