1
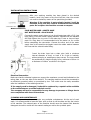
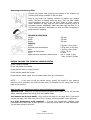
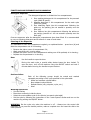
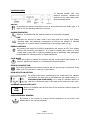
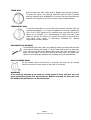
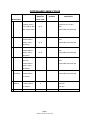
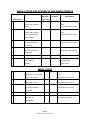
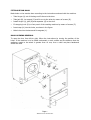
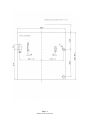
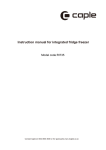
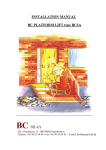
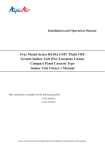
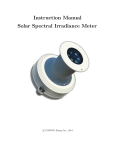
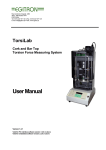
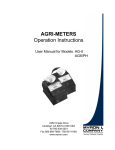
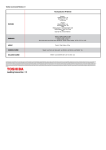
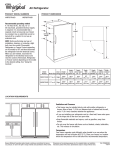
INSTALLATION AND OPERATING
INSTRUCTION BOOKLET
WMI1010
INTEGRATED WASHING MACHINE
THIS APPLIANCE COMPLIES WITH EUROPEAN DIRECTIVES
EMC 89/336/ECC
LOW VOLTAGE 73/23/ECC
ECC-LABELLING 93/68/ECC
IMPORTANT: You must read this instruction book before
installing or using this appliance and retain it for future use.
Caple Products
Telephone 0870 2411142
Facsimile 0117 982 6878
Page 1
WMi1010 user manual.doc
INSTALLATION INSTRUCTIONS
Positioning
After your washing machine has been placed in the desired
location, level it by means of the front left foot, then the counter
nut must be locked by means of the special key provided.
Warning: if the machine is not perfectly leveled, it will be
unstable, noisy and may lead to malfunctions and broken
parts. Do not place the machine on mats or carpets.
Water connection
COLD WATER HOSE = WHITE HOSE
HOT WATER HOSE = BLACK HOSE
Connect the water supply hoses to hot & cold water taps with a 3/4" (gas
type) fitting, insert the rubber sealing washers supplied with the machine
and fully tighten the ring nuts. If the water tap is new or has not been
used for a long time it is recommended to let the water run for a while
before completing the connection. Connect the other end of the water
supply hose to the machine and again insert the rubber washer between
the hose and the solenoid valve fitting.
Drain Hose
Insert the drain hose into a drain pipe (with
internal diameter of 4cm) or hook it on a sink
without crimping or creating any sharp curves. The
be positioned at a height ranging from a minimum
a maximum of 100cm as shown in the figure.
a minimum
or bathtub,
hose should
of 60cm to
Electrical Connection
Make sure that the electrical system can support the maximum current load indicated on the
rating plate on the rear side of the machine. The washing machine should be connected to
an electrical grounded outlet, as prescribed by law. This outlet must be easily accessible
after the installation of the washing machine.
If the supply card is damaged, it should be replaced by a special cable available
at the manufacturers or at the technical service.
The company will not be responsible for any damage to persons or things due to
non-compliance with these instructions.
CLEANING AND MAINTENANCE
This washing machine does not require any particular maintenance. At the end of each
wash, it is recommended to leave the door open so that air will circulate and dry the interior
of the machine. The external parts of the machine should never be cleaned with abrasive
detergents since this would ruin the enamel coating as well as the synthetic parts.
Page 2
WMi1010 user manual.doc
Removing and cleaning filter
Remove the plastic base guard at the bottom of the machine by
pressing and pulling upwards on the two tabs.
Place a rag under the washing machine to adsorb any residual
water. The filter is located under the base. Turn the filter handle
counterclockwise and pull out the filter. Clean it under running
water. Reinsert the filter and turn the handle clockwise until it is
completely locked. WARNING: water may leak from the filter if it is
not properly tightened. Remember to clean the filter frequently to
avoid excessive clogging.
TECHNICAL FEATURES
Length
Depth
Height
Capacity
Cotton
Synthetic and mixed fabrics.
Wool
Voltage and frequency
Fuse
Water pressure required in water mains
595 mm
530 mm
850 mm
5 kg max. of dry linen
2,5 kg max. of dry linen
1 kg max, of dry linen
230 V / 50 Hz
10 amp
min. 0.1 Mpa (1 Bar)
max. 1.0 Mpa (10 Bar)
BEFORE CALLING THE TECNICAL SERVICE CENTRE
Check if plug is inserted
Check that power is available
Check that the door is properly closed
Check that the water tap is open
Check that the water supply hose and water drain hose are not blocked
NOTE: if you have to call the service centre, specify the model of your washing
machine and if necessary the Serial Number which is indicated on the rating plate on the
back of the machine.
How to use your washing machine economically and ecologically.
Optimum load - Always try to use the washing machine at full load, as this will use less
water, washing powder and energy than two smaller loads.
You want to use the pre-wash? - Only use the pre-wash for very dirty linen. If you don't
use the pre-wash, you save from 5% to 15% in energy, washing powder, water and time.
Is a high temperature wash required? - To avoid high temperature washing, treat
particularly dirty items with a stain remover or leave the worst stains to soak beforehand.
You will save energy in this way.
Page 3
WMi1010 user manual.doc
FUNCTIONS AND PREPARATION FOR WASHING
Detergent dispenser
The detergent dispenser is divided into four compartments
1. Pour washing detergent in this compartment for the prewash
cycle (MAX 45 grams).
2. Washing detergent in this compartment for the wash cycle
(MAX 130 grams).
3. Pour bleaching liquid into this compartment following the
advice on the packing (do not exceed in quantity over the
filter grid)
4. Pour softener into this compartment following the advice on
the packing (max 60 ml - do not exceed in quantity over the
filter grid)
Close the dispenser after the detergent compartments have been filled. It is recommended
to use non-foaming detergents and a softener in case of hard water.
Cleaning of the dispenser
It is advisable to clean the compartment regularly, as explained below: - press lever (A) and
slide the compartment out of it’s housing;
•
•
•
•
Remove the siphon cover of compartment 3-4;
Wash everything with running water;
Replace the siphon cover in the compartment making sure it fits perfectly in its housing;
Replace the compartment in its housing.
Door
Use the handle to open the door.
During the wash cycle, a special safety device keeps the door locked. To
open the door, turn off the machine using the ON-OFF switch and wait 2
minutes before turning the handle to open the door.
Sorting clothes
Each of the following groups should be sorted and washed
separately according to the cycle specified in the cycle table:
•
•
•
•
White and resistant colored fabrics
Non-resistant colored fabrics
Delicate fabrics (silk, polyester, nylon, etc.)
Wool
Washing Operations
•
•
•
•
Sort the clothes
Place them uniformly inside the drum
Select the most suitable cycle for the fabrics (see wash cycle table)
Set the cycle by following the instructions in the "control panel" section and turn on the
machine by pushing the ON/OFF button.
WARNING: Set the cycle only when the machine is off. - Always turn the control dial
clockwise. If you pass the desired position, make a complete turn and reset the dial to the
exact position.
Page 4
WMi1010 user manual.doc
CONTROL PANEL
To become familiar with your
machine functions, compare the
symbols on the control panel with
those described below.
ON/OFF
By pressing this button the machine turns on and executes the set wash cycle. It is
used to turn the washing machine on and off.
POWER INDICATOR
When lit, it indicates that the washing machine is electrically energized.
HALF LOAD
Reduces the amount of water used in the wash and rinse cycles, thus greatly
reducing water and electricity consumption as well as the amount of washing
detergent. It is used to wash a reduced load of dry clothes (MAX 2.5 kg).
ENERGY SAVINGS
By pressing this button the washing temperature will remain at 60°C thus greatly
reducing the electricity consumption. It is used for slightly dirty clothes on white
normal wash cycles with or without prewashing and in particular wash detergents
recommended for washing at 60°C or liquid detergents.
COLD WASH
When this button is pressed, the machine will not use the wash water heater. It is
used for slightly dirty clothes or for temperature-sensitive fabrics.
SPIN BY-PASS BUTTON
By pushing this button the washing machine will not spin during or at the end of the
wash cycle. This function is used for no-spin fabrics.
SPIN SELECTION BUTTON
By pushing this button (according to the model type) the machine
will perform the final spin at the maximum spin speed setting (i.e.
850-1000-1200-1300-1400). It is used for resistant fabrics so
that there will be less water in the wash at the end of the spin cycle.
SPINNING INDICATOR LIGHT
850
1000
When lit it indicates that the final spin at the maximum rotation speed has
been selected.
SUPPLEMENTARY RINSING
By pushing it, the number of rinsings will be increased by a unit, both in the
delicate and in the normal programs.
Page 5
WMi1010 user manual.doc
TIMER DIAL
Used to select the wash cycles and to display them during operation.
To select the cycles, turn the dial clockwise until the mark coincides
with the selected cycle. WARNING: Do not turn the timer dial while the
machine is energized. Do not turn the timer dial counterclockwise.
THERMOSTAT DIAL
To set the temperature, turn the dial until the mark coincides with the
selected temperature. It is used to regulate the washing temperature
from 30°C to 95°C based on the selected wash cycle and the type of
fabrics to be washed. It is recommended to follow the wash cycle
table. By turning the dial to this symbol the machine will perform a
cold wash cycle, which is particularly indicated for delicate
temperature-sensitive fabrics.
AUTOMATIC NO-WRINKLE
In the delicate and wool cycles, the washing machine will stop after the last
rinse without draining the water. To drain water and perform a short spin
cycle, set the timer dial to the delicate spin cycle (see wash cycle table). To
drain only the water, set the timer dial to the drain cycle (see wash cycle
table). In both cases the machine will complete the cycle automatically.
DOOR OPENING KNOB
On the models where this function is provided, the door can be opened
simply by turning the knob either to the right or to the left.
WARNING!
If the washing machine is not used for a long period of time, the door may not
open spontaneously the first time when the handle is turned. In this case, turn
the handle and pull the door at the same time.
Page 6
WMi1010 user manual.doc
COTTON AND LINEN CYCLES
Cycles
Type of fabric
Description
1
Very dirty
Detergent
Thermostat
Wash cycle
dispenser
position
description
to be used
For very dirty
1-2
40°-95°
Resistant (cotton,
(linen) fabrics, also
Wash from 40° to 95°C
(3-4)
Rinse
With organic stains
2
Very dirty
For very dirty
Intermediate and final spin
2
*40°-95°
resistant fabrics
(sheets, shirts,
Wash prewash
Wash from 40° to 95°C
Rinse
(3-4)
Intermediate and final spin
tablecloths)
3
Very dirty
For normally dirty
2
40°-60°
resistant fabrics
(sheets, shirts,
Wash from 40° to 60°C
Rinse
(3-4)
Intermediate and final spin
tablecloths)
4
Slightly dirty For slightly dirty
2-(4)
* - 40°
Wash from * to 40°C
solid-color
Rinse
resistant fabrics
Intermediate and final spin
(sheets, shirts,
tablecloths)
5
Rinse
To rinse white
Bleaching
resistant fabrics
(3)
Rinse
Intermediate and final spin
and clothes
6
Softener
To soften fabrics
4
and clothes
7
Last rinse
Final spin
Spin
Final spin
* EN 60456 Prog. 2/60°C
Page 7
WMi1010 user manual.doc
WASH CYCLES FOR SYNTHETIC AND MlXED FABRICS
Cycles
Type of fabric
Description
8
9
Normally dirty
Normally dirty
Detergent
Thermostat
Cycle
dispenser
position
Description
to be used
For normally dirty
2-(4)
40°-60°
Wash from 40° to 60°C
delicate and synthetic
Rinse
fabrics
Stops with water in drum
For normally dirty
2-(4)
* - 40°
Wash from * to 40°C
delicate and synthetic
Rinse
fabrics which require
Stops with water in drum
warm washing
10 Rinse
To rinse delicate
(4)
Rinse
and synthetic fabrics
Stops with water in drum
and clothes
11 Softener
To soften delicate
4
Last rinse
and synthetic fabrics
Stops with water in drum
and clothes
12 Delicate spin
13 Drain
Delicate spin
To drain
Drain water with
water without
drum spinning
spinning
at low speed
WOOL CYCLE
14 Virgin wool
15 Rinse
For wool clothes
2-(4)
* - 30°
that requires very delicate
Rinse
wash in warm water
Stops with water in drum
To rinse delicate. synthetic
(4)
Fabrics and clothes
16 Softener
Wash from * at 30°C
To soften delicate
Rinse
Stops with water in drum
4
and synthetic fabrics
Last rinse
Stops with water in drum
and clothes
17 Delicate spin
18 Drain
Wool spin
To drain
Drain water
water without
without drum spinning
drum spinning
Page 8
WMi1010 user manual.doc
FITTING DÉCOR DOOR
Make holes on the wooden door according to the instructions enclosed with the machine.
•
Take hinges (A) out of the bag and fix them to the door.
•
Take jack (B), its support (C) and fix one to the other by means of screws (G).
•
Install hinges (A), jack (B) and separator (E) to the door.
•
Fix stopping hook (D) to front panel of the washing machine by means of screws (F).
•
Insert caps (H) into the holes, as shown in the figure.
•
Make holes into the base and fix magnets (L).
DOOR OPENING REVERSAL
To open the door from left to right, follow the instructions by turning the position of the
holes. If the machine is to be fitted underneath a work surface and the distance that the
appliance needs to be raised is greater than 10 mm, then a solid one-piece baseboard
should be used.
Page 9
WMi1010 user manual.doc
Page 10
WMi1010 user manual.doc