1
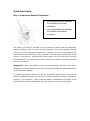
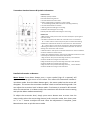
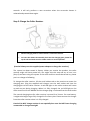
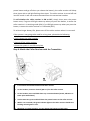
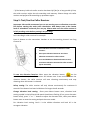
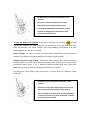
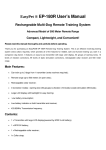
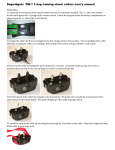
KoolKani ® KK-360R User’s Manual Rechargeable Multi-Dog Remote Training System Advanced Model of 600 Meter Remote Range Fully Waterproof & Submersible Collar Receiver Compact, Lightweight, and Convenient! KoolKani ® KK-360R User’s Manual Rechargeable Multi-Dog Remote Training System Advanced Model of 600 Meter Remote Range Fully Waterproof & Submersible Collar Receiver Compact, Lightweight, and Convenient! Please read this manual thoroughly and carefully before operating. Thank you for purchasing our KoolKani® KK-360R Remote Dog Training System. This is an effective multi-dog training system (extra receivers required for multi-dog training), which provides all of the features for reliable, safe and humane training you want in a companion dog trainer. It features an easy-to-use transmitter with large LCD display, rechargeable and fully waterproof collar receiver, 10 groups of warning tones, 10 levels of vibration corrections, 10 levels of static pulse stimulation corrections and 600 Meter remote range (in open area). With the adjustable stimulation levels, you can tailor the stimulation level to your dog’s temperament, eliminating the risk of over-correction. Main Features: Can train up to 3 dogs from 1 transmitter (extra receivers required); Remote range up to 600 meters (in open fields); Quality transmitter handset with large LCD screen; Rechargeable & fully waterproof collar receiver; 3 Correction modes: warning tone (10 groups in different frequencies) & vibration (10 levels) & static pulse stimulation (10 levels); Large LCD display with backlight for easy training; Low battery indicator on both transmitter and receiver; All set correction levels are clearly displayed on screen; No need to re-programme even when battery is replaced; Fast switching & timely correction among dogs. (A vibration correction at the set level will be sent out to the selected dog when the Dog Selection button A, B or C is pressed.) Package Contents: 1 x Transmitter with large LCD display (9v 6F22 battery fitted); 1 x Rechargeable collar receiver with two sets of correction prongs (in different length) & quality TPU collar strap; 1 x Test bulb for testing static pulse stimulation correction (for testing purpose only, not to be used when the collar receiver is on the dog); 1 x Charger power plug; 1 x User’s manual (English). How the System Works Consistent and correct use of this remote dog trainer allows you to reinforce commands and correct misbehaviour from up to 600 Meters (in open fields). There are 10 groups of warning tones (in different frequencies) that can be used for praise, warning or silent recall. Or use the remote transmitter to send a signal, activating the collar receiver to deliver a vibration correction or a harmless stimulation. It has 10 levels of vibration corrections and 10 levels of static pulse stimulation so you can find the best level for your dog’s temperament and the type of training you do. Important: This remote dog training system has a range of up to 600 meters. Depending on the way you hold the remote transmitter, the maximum range may vary. For consistent results at longer ranges, hold the remote transmitter in a vertical position away from your body and above your head. Terrain, weather, vegetation, transmission from other radio devices, and other factors will affect the maximum range. Quick Start Guide Step 1: Prepare the Remote Transmitter Press and hold down the ON button for 3 seconds to turn on the transmitter Press and hold down the OFF button for 3 seconds to turn off the transmitter The battery (9v 6F22) is installed in the transmitter handset and the transmitter handset is ready to use. To switch on the transmitter, press and hold down the ON button (+) on the transmitter handset for 3 seconds. To switch it off, please press and hold down the OFF button (-) for 3 seconds. The LCD screen standby time is 100 minutes. If no button is pressed within 100 minutes, the LCD screen will be turned off automatically. (To save battery power, manually turn off the transmitter handset when it is not used.) Important: When the battery is low, the LCD backlight will flash three times whenever a correction button is pressed, to prompt the owner to replace the battery in the transmitter handset. To replace the battery, please turn off the transmitter handset first. Unscrew the battery compartment cover on the back of the transmitter handset. Follow the positive (+) and negative (-) signs inside the battery compartment and insert a new 9V 6F22 battery into the transmitter correctly. Screw the cover back on tightly. Transmitter Handset Buttons & Symbols Information: LCD Screen Info: A: Battery capacity indicator B: Current selected dog channel C: Current selected correction mode D: Menu symbol (when transmitter is in menu mode) Or Transmitting symbol (when transmitter is sending command) E: Current selected level of correction F: Warning tone level setting for current dog G: Vibration level setting for current dog H: Static pulse stimulation level setting for current dog Buttons info: 1. Menu button: Short press to enter into menu mode (short press again to quit menu mode) 2. On button: hold down this button for 3 seconds to turn on transmitter Or “+” button: when in menu mode, short press to increase level setting 3. Off button: hold down this button for 3 seconds to turn off transmitter Or “-” button: when in menu mode, short press to decrease level setting 4. Warning tone button: short press or hold down this button to send out warning tone command to collar receiver 5. Vibration button: short press or hold down this button to send out vibration correction command to collar receiver 6. Static pulse stimulation button: short press or hold down this button to send out static pulse stimulation command to collar receiver 7. Dog channel A: short press to select dog channel A, a short vibration correction will be sent to Dog A at the same time 8. Dog channel B: short press to select dog channel B, a short vibration correction will be sent to Dog B at the same time 9: Dog channel C: short press to select dog channel C, , a short vibration correction will be sent to Dog C at the same time Detailed Information on Buttons: Menu Button: Press Menu button once, a menu symbol (sign of a spanner) will appear on the top right corner of LCD screen. This means the transmitter handset is into Menu mode. Press the Menu button again, the menu symbol on the screen will disappear. This means the transmitter handset is back to normal working mode. You can adjust the correction level in Menu mode. If no button is pressed in 90 seconds when the transmitter is in Menu mode, the transmitter will save the current setting and quit the Menu mode automatically. To adjust the correction level, simply press menu button once to enter into the menu mode, select the correct dog channel, and correction mode, then short press on "+" or "-" button to adjust the level. Once the adjustment is complete, press Menu button once to quit the menu mode. On/Off (+/-) Button(s): Press and hold down ON button for 3 seconds, this will turn on the transmitter handset. Press and hold down the OFF button for 3 seconds, this will turn off the transmitter handset. When in menu mode, short press "+" or "-" button will adjust the correction level setting on selected mode. Beep Tone Button: Short press on the beep tone button, the selected collar receiver will emit a short beep tone at selected level. If you keep holding down the beep tone button, the selected collar receiver will bleep at the selected level continuously for maximum 8 seconds* (safety setting) until the button is released. In Menu mode, short press on the beep tone button, the beep tone level setting on the left hand side of the LCD screen will start flashing, you can then short press the "+" or "-" button to set the desired level of beep tone for the selected collar receiver. Vibration Button: Short press on the vibration button, the selected collar receiver will vibrate shortly at selected level. If you keep holding down the vibration button, the selected collar receiver will start vibrating at the selected level continuously for maximum 8 seconds* (safety setting) until the button is released. In Menu mode, short press on the vibration button, the vibration setting on the left hand side of the LCD screen will start flashing, you can then short press the "+" or "-" button to set the desired level of vibration for the selected collar receiver. Static pulse Stimulation Button: Short press on the static pulse stimulation button, the selected collar receiver will emit a static pulse stimulation (less than 0.2 second) at selected level. If you keep holding down the vibration button, the selected collar receiver will give out a continuous static pulse stimulation at the selected level for maximum 8 seconds* (safety setting) until the button is released. In Menu mode, short press on the static pulse stimulation button, the static pulse stimulation setting on the left hand side of the LCD screen will start flashing, you can then short press the "+" or "-" button to set the desired level of static pulse stimulation for the selected collar receiver. A, B, C (Dog Channel) Buttons: Short press on A, B or C button will allow you to choose the dog channel. At the same time, it will also send out a short vibration correction at the set level to the selected dog. The dog channel indicator symbol on the screen will change accordingly once any of the dog channel buttons is pressed. In Menu mode, short press on A, B or C button will allow you to enter the selected Dog Channel for adjustment on correction levels. * Safety Setting: The collar receiver will only perform corrections continuously for maximum 8 seconds if the correction button has been held down for longer than 8 seconds. It will only perform a new correction when the correction button is released and pressed down again. Step 2: Charge the Collar Receiver Normal charging time for collar receiver: around 2 to 3 hours To insert the rubber tab smoothly back into the charging port, please lift up the tab and make sure the rubber stud is in vertical position. (Caution! Always use the supplied power adaptor to charge the receiver.) The system has been tested in factory. When you receive the product, the collar receiver might still have power left. You might skip this step and try to turn it on (Step 3) and start using the system. If the collar receiver cannot be turned on, please put it on charge as following. To charge the collar receiver, lift the small rubber tab on the receiver to access the charging port. Plug the supplied wall charger into the wall socket and into the charging port of the collar receiver. A red LED light on the collar receiver will come up and stay on during charging. When it is fully charged, the red LED light on the collar receiver will turn GREEN until the charger plug is removed from the wall socket. The normal charging time for collar receiver is around 2 to 3 hours. For new battery, it might take longer to get fully charged in first few cycles. Please remove the charger from the collar receiver when it is fully charged. Caution! Do NOT charge receiver in an especially hot area. Do NOT leave charging unattended or charge overnight! Please cover the charging port with the rubber tab tightly after charging. To insert the rubber tab smoothly back into the charging port, please lift up the tab and make sure the rubber stud is in vertical position (as shown in the following picture). When the battery is low, the LED light on the receiver will flash red. Please charge the receiver as soon as possible. Step 3: Turn ON/OFF the Collar Receiver Press and hold down the power button for 3 seconds to turn on the collar receiver (green light will flash once when it's switched on). Short press 3 times repeatedly on the power button to turn off the collar receiver (green light will come up shortly each time you press the button and a red light will flash three times when it's switched off). To tell whether the collar receiver is On or Off, simply short press power button once, if a green light comes up, the receiver is On. If no light comes up, the receiver is Off. After a normal charging, the collar receiver will be turned on automatically when the power plug is removed. If you wish to manually turn on/off the collar receiver, simply follow the steps below: To turn on the collar receiver, hold down the power button firmly for 3 seconds, the collar receiver will bleep once with a green LED light flash once. The collar receiver is turned on into working mode. It will respond to the commands sent from transmitter handset if it is matched up properly in the current dog channel. To turn off the collar receiver, short press the power button three times repeatedly within 3 seconds (the green light will come up each time when you press down the power button and go off when you release the button), the collar receiver will bleep three times with a red light flashing three times. The collar receiver is turned off and into OFF mode. It will not receive command from the transmitter handset. To tell whether the collar receiver is ON or OFF, simply short press the power button once, if a green LED light comes up when you press the button, it means the collar receiver is in working mode (ON). If no LED light comes up when you press the button, it means the collar receiver is in Off mode (OFF). To achieve longer battery life, please turn off the collar receiver when it is not used. If the system is not going to be used for a long time, please do the following: 1. Fully charge the collar receiver; 2. Switch off the collar receiver; 3. Store the system in a still & cool place. Step 4: Match the Collar Receiver with the Transmitter Turn on both transmitter handset and collar receiver On the handset, choose a channel (A,B or C) for the collar receiver On the handset, Press and hold down any correction button (Sound, Vibration or Static pulse Stimulation) At the same time, press and hold down the power button on the collar receiver Within 1 to 2 seconds, the green indicator light on the collar receiver should start flashing red and green in turn Matching up is done properly, you can release the buttons on both units. Collar receiver might have been matched up in to one of the channels on the transmitter handset when it is tested in factory. To check this, please turn on the transmitter handset and collar receiver, send a beep tone command to the collar receiver from A, B or C channel. If the collar receiver bleeps in one of the channels, the collar receiver has been registered to that channel properly, you don't need to carry out the following matching-up procedures and can start using the system through that registered channel. If the collar receiver does not respond to the transmitter handset in any of the channels, or if you wish to change the registered channel for this collar receiver, please follow the matching -up procedures below: 4.1 Switch on the transmitter handset and then choose either A, B, or C dog channel (note: this will be your registered channel for this collar receiver). 4.2 Make sure the collar receiver is turned ON. (The collar receiver will be turned on automatically after the charging or please refer to Step 3: Turn ON/OFF the Collar Receiver) . 4.3 On the transmitter handset, press and hold down any correction button (either beep tone button, vibration button or static pulse stimulation button). The transmit signal symbol will appear on the LCD screen (top right corner). This means the transmitter handset is sending out signal to the collar. 4.4 At the same time of Step 4.3, on the collar receiver, press and hold down the power button firmly, a green LED light will come up and stay on while you holding the button down. 4.5 Within 1 to 2 seconds, on the collar receiver, the indicator light should start flashing red and green in turn, which means the collar receiver has received the matching up signal successfully. You can now release both the correction button on the handset and the power button on the collar receiver. The matching-up is complete. You may now start using the collar receiver from the registered channel. For multi-dog training setup, simply follow the above matching-up procedures to match up the collar receivers one by one. Each time, choose a different dog channel for the new collar receiver. The matching code will be stored in the receiver automatically and you do not need to repeat the matching procedures after switching on/off or recharging the collar receiver. * * If the battery inside the collar receiver has been left flat for a long period of time, the collar receiver might lose the matching code memory. Please charge the collar receiver and perform the matching-up procedure again. Step 5: Test/Use the Collar Receiver Important: We would recommend you to use warning tone or vibration correction first before starting the static pulse stimulation. And always start at the lowest level of stimulation and work your way up. Please make sure the collar receiver is in fully working order before putting it on your dog! Let’s take Dog A collar receiver for example: Press A button on the transmitter handset to set the working channel into Dog Channel A. Send vibration correction command to collar receiver: Short press vibration button to sent short vibration command to collar receiver Press and hold down vibration button to send continuous vibration command to collar receiver (Up to 8 seconds) To test the vibration function: Short press the vibration button on the transmitter handset, the collar receiver will vibrate once. Press and hold down the vibration button, the collar receiver will start vibrating continuously and stop vibrating when the button is released. Safety setting: The collar receiver will only vibrate continuously for maximum 8 seconds if the button has been held down for longer than 8 seconds. Change vibration level setting: Short press Menu button once, vibration level setting symbol in the left hand side panel should start flashing (if not, press vibration button once), press "+" or "-" button to adjust the vibration level, short press Menu button once to save the setting and quit the menu mode. For vibration level setting, level 1 is the mildest vibration and level 10 is the strongest vibration. Send beep tone correction command to collar receiver: Short press beep tone button to sent short warning tone command to collar receiver Press and hold down beep tone button to send continuous warning tone command to collar receiver (Up to 8 seconds) To test the beep tone function: Short press the beep tone button on the transmitter handset, the collar receiver will bleep once. Press and hold down the beep tone button, the collar receiver will start bleeping continuously and stop bleeping when the button is released. Safety setting: The collar receiver will only bleep continuously for maximum 8 seconds if the button has been held down for longer than 8 seconds. Change beep tone level setting: Short press Menu button once, beep tone level setting symbol in the left hand side panel should start flashing (if not, press beep tone button once), press "+" or "-" button to adjust the beep tone level, short press Menu button once to save the setting and quit the menu mode. For beep tone level setting, beep tone level 1 to level 10 are in different sound frequency. Send static pulse stimulation command to collar receiver: Short press static pulse stimulation button to send short static pulse stimulation to collar receiver Press and hold down static pulse stimulation button to send continuous static pulse stimulation to collar receiver (Up to 8 seconds) To test the static pulse stimulation function, Short press static pulse stimulation button on the transmitter handset, the collar receiver will give a nick static pulse stimulation (less than 0.2 second). Press and hold down the static pulse stimulation button, the collar receiver will start giving static pulse stimulation continuously and stop the correction when the button is released. Safety setting: The collar receiver will only give static pulse stimulation continuously for maximum 8 seconds if the button has been held down for longer than 8 seconds. To test if the static pulse stimulation is working, attach the supplied test bulb to both of the metal prongs on the collar receiver. The test bulb should start flashing when the collar receiver is giving out static pulse stimulation. (Please note the test bulb is for test purpose ONLY. When the collar receiver is used on the dog, please remove the test bulb from the collar receiver). Change static pulse stimulation level setting: Short press Menu button once, static pulse stimulation level setting symbol in the left hand side panel should start flashing (if not, press static pulse stimulation button once), press "+" or "-" button to adjust the static pulse stimulation level, short press Menu button once to save the setting and quit the menu mode. For static pulse stimulation levels, level 1 is the mildest static pulse stimulation and level 10 is the strongest static pulse stimulation. Note: For multi-dog training, please select the dog you would like to train by pressing A, B or C button. When LCD screen is showing the correct dog selected, then follow the above procedures to send out correction signals. Step 6: Fit the Collar Receiver on the Dog To ensure a proper fit, please follow the steps below: 1. With your dog standing, centre the collar receiver where contact points are underneath your dog’s neck, touching the skin. If you dog has a long or thick coat, trim the hair around the contact points to ensure consistent contact. 2. The collar receiver should fit snugly, yet loose enough to allow one finger to fit between the strap and your dog’s neck. If the strap is too long for your dog, cut off the excess length. 3. Allow your dog to wear the collar for several minutes, and then recheck the fit. Check the fit again as your dog becomes more comfortable wearing the collar receiver. Important: 1. The proper fit and placement of the collar receiver is important for effective training. The contact points must have direct contact with your dog’s skin. Trim the fur if necessary. 2. Please note that the collar receivers are not designed to be worn continuously by a dog. To prevent irritation caused by rubbing, remove the collar for at least 8 hours out of every 24-hour period. 3. Please note that our collars are designed for remote training purpose only. Never attach a leash onto the collar. Use a separate collar strap if needed. Care and Cleaning To ensure the effectiveness of this product and the comfort and safety of your dog, check the fit of his collar frequently. Your dog’s neck and the contact points must be washed weekly with a wash cloth and mild hand soap, and then rinsed thoroughly. If you notice that your dog is experiencing skin irritation, discontinue use of the collar for a few days. If the condition persists over 48 hours, consult your veterinarian. Find the Best Intensity Level for Your Dog This remote training system has multiple intensity levels. This allows you to choose the stimulation that is best for your dog. Always start at the lowest level and work your way up. For training efficiency, it is important to find the right intensity level for your dog. This is called Recognition Level, at which your dog looks around in curiosity, or flicks his ear. Finding Your Dog’s Recognition Level: Every dog is different and you cannot predict where your dog’s Recognition Level will be. Watch closely for any slight change in behaviour that tells you your dog is feeling the stimulation. 1. With the collar receiver turned on and properly fitted to your dog, set static pulse stimulation level to 1 and press static pulse stimulation button to send out signal. 2. If your dog shows no reaction to Level 1, then gradually increase the intensity level in menu mode. 3. YOUR DOG SHOULD NOT VOCALIZE OR PANIC WHEN RECEIVING STIMULATION. IF THIS HAPPENS, THE STIMULATION LEVEL IS TOO HIGH AND YOU NEED TO GO BACK TO THE PREVIOUS LEVEL AND REPEAT THE PROCESS! 4. Once your find your dog’s Recognition level, this is the level you should use when you begin a training exercise. (The selected level will be stored in the transmitter automatically.) 5. If you have progressed to Level 10 while searching for your dog’s Recognition Level and your dog continues to show no response, check to see if collar receiver is snug against your dog’s neck. Then go back to Intensity Level 1 and repeat the process. If your dog still does not indicate he is feeling the stimulation, you may have to trim the hair beneath the contact points. General Training Tips Please keep the following training tips in mind. Eliminate one misbehaviour or teach one obedience command at a time. If you move too fast with the training, your dog may become confused. Be consistent. Give your dog a tone or a vibration or stimulation with each misbehaviour. Do not overcorrect your dog. Use as few stimulation as possible to train your dog. Restrict your dog from situations in which he has a history of misbehaving unless you can supervise him and use the remote training system for applying tone , vibration or stimulation corrections. If you notice one situation in which your dog misbehaves repeatedly, set up this situation as a training session. This will dramatically increase your chances of success. If your dog has a timid reaction to the tone or vibration or stimulation (especially the first couple of times), do not be alarmed. Redirect his attention to a simple and appropriate behaviour (i.e. a known command, such as “Sit”). Never use the remote training system to correct or eliminate any form of aggressive behaviour. If your dog exhibits such behaviour, contact a professional trainer. Aggression in dogs is the result of many factors-it may be a learned behaviour or it may be brought on as a result of fear. Another factor contributing to aggression in dogs is social dominance. Every dog is different. Only use this training system on healthy dogs of at least 6 months old. Frequently Asked Questions Q1: Is the stimulation safe for my dog? A: While the stimulation is unpleasant, it is harmless to your dog. Electronic training devices require interaction and training from the owner to achieve desired results. Q2: How old does a dog have to be before using the remote training system? A: Your dog should be at least 6 months old and in healthy conditions. Your dog should be able to learn basic obedience commands such as “Sit” or “Stay”. Q3: Once my dog is trained and has been obeying my commands, will my dog have to continue to wear the collar receiver? A: Your dog may need to wear the collar receiver from time to time for reinforcement. Q4: Is the collar receiver waterproof? A: Yes. The collar receiver is heavy duty and completely waterproof and submersible, specially designed to be worn outdoors day after day without problems. Q5: Can I use the remote training system on aggressive dogs? A: We do not recommend any of our products to be used on aggressive dogs. We recommend you to consult your local veterinarian or professional trainer to determine if your dog might be aggressive. Q6: What do I do if my dog’s neck becomes red and irritated? A: This condition is due to the contact points irritating the skin. Discontinue use of the collar receiver for a few days. If the condition persists beyond 48 hours, consult your local veterinarian. Once the skin returns to normal, replace collar receiver and monitor the skin condition closely. Troubleshooting Problem No. 1: If the collar receiver appears not to be working, try the following: Test the collar receiver. If red LED light flashes, please charge the receiver. On the transmitter, if LCD screen flash three times when you press any correction button, the battery is running low, please replace the battery (9v 6F22) as soon as possible. Check if the correct channel on the transmitter is used for the collar receiver. Re-perform the matching-up procedures (Step 4) between the collar receiver and transmitter handset. Adjust the collar strap to fit and check the prongs are tightened. Ensure the contact points are in direct contact with your dog’s skin. If necessary, trim the dog’s hair or use longer probes to ensure proper skin contact. Never shave the dog’s neck. Use a stronger stimulation level. In very cold weather, you may need to use a slightly higher setting to achieve the same level of intensity. Problem No. 2: The collar receiver unit lose the sync-up connection with the transmitter handset: Occasionally, while the collar receiver is on, if the power button has been held down for longer time, the indicator light on collar receiver might start flashing red and green in turn without you pressing any correction button on the handset. This might to do with strong interference radio signal nearby. If this happens, the collar receiver will lose the sync-up connection with the transmitter. To rectify this, please perform the matching up procedure again (step 4) between the collar receiver unit and transmitter handset. Problem No. 3: The system doesn’t have range, or the range has been significantly reduced. Either you or the dog is shielded by a metal structure. Metal fences, chain link dog enclosures, screen doors, buildings, and other metal structures can affect the radio signal. Operate the Remote Trainer away from these structures. You’re experiencing temporary radio interference. Radio signals from nearby CBs and walkie talkies can reduce range. Wait a short while then try again, or move to another area. Or when the battery in the transmitter handset is running low, the remote range can be reduced significantly. Please replace the handset battery as soon as possible. Problem No. 4: Transmitter handset LCD display is abnormal after battery is replaced. Please turn off the transmitter handset and turn it back on. This should help the handset to reset the LCD display. If the battery capacity indicator bar is not refreshed after battery replaced, press any button on the handset to refresh the indicator bar. Important: As this product is a wireless transmitting apparatus, you must NOT use the remote control system in places like petrol stations or hospitals where mobile phones are prohibited. Patients using heart pacemakers are forbidden to use this product.