1
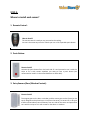
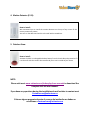
Wireless Alarm System WS-360. With mini cellular module Quick Installation Guide Alarm System Overview Front side: Back side: Basic Steps to Setup Your Alarm System Please follow the following 4 Steps in order to complete the installation of your alarm system WS-360. STEP 1: How to setup time? Please follow the next steps: 1. 2. 3. 4. 5. 6. Press: “ENT”. Enter Code: “888888” (this is the default password). Select: “Set Time” use the arrows to find the option in the menu. Press: “ENT”. Delete the old record by pressing the arrow . Enter Time: HH/MM/SS. Example: it is 13 hours, 25 minutes and 15 seconds please enter: 132515 7. Press: “ENT”. 8. Done! How to setup date? Please follow the next steps: 1. 2. 3. 4. 5. 6. Press: “ENT”. Enter Code: “888888” (this is the default password). Select: “Set Date” use the arrows to find the option in the menu. Press: “ENT”. Delete the old record by pressing the arrow . Enter Date: YY/MM/DD/W. Example: today is 2014 year, 11 month and 22 day and 6 Saturday (Sunday is “0”, Monday is “1” and so on) . please enter: 1411226 NOTE: Monday =1 Tuesday =2 Wednesday = 3 Thursday = 4 Friday =5 Saturday =6 Sunday =0 7. Press: “ENT”. 8. Done! STEP 2: How to setup the phone numbers? In case the alarm gets triggered, the system can send to up to 5 phone numbers an alarm notification by sending a SMS or giving a call. Note: do not forget to insert a SIM Card in the port located on the backside of the panel. The SIM Card does need internet/data service, only SMS and calls should be activated. Where can I find a suitable SIM card for my alarm system? In order to have a fully functional system you will need a SIM card, you can get a standard SIM card at the same shop where you bought your mobile phone or you can buy one online, it can be from any cellular provider. 4G, 3G, 2G, GPRS and GSM SIM cards are compatible. Once you have it, just insert the SIM card in the back side of the main host to enable the system to send notifications to your mobile phone. Please follow the next steps to setup the phone numbers: 1. 2. 3. 4. 5. 6. 7. 8. 9. 10. Press: “ENT”. Enter Code: “888888” (this is the default password). Select: “Auto Dialer#’s ” use the arrows to find the option in the menu. Press: “ENT”. You will see: “1: Call Center” this will be the mobile number of the alarm system’s manager (usually your phone number). Delete the old record by pressing the arrow . Enter the phone number. Example: 6502097930 Press: “ENT”. Use the arrows to select notification mode: “Call by phone” or “SMS Reporting”. “Call by phone”: when the alarm is triggered you will receive a call and you will listen to the voice message you previously recorded. “SMS Reporting”: when the alarm is triggered you will receive a SMS to your mobile phone informing the alarm has been triggered and what sensor has sent the alarm notification. Press: “ENT” 11. You will see: “2: Personal Nbr”, please enter a second phone number (for example a member of your family or your office). 12. 13. 14. 15. Press: “ENT”. Use the arrows to select notification mode: “Call by phone” or “SMS Reporting”. Press: “ENT”. You will see: “3: Personal Nbr”, please enter a second phone number (for example a member of your family or your office). 16. Follow the same procedure like the steps number: 13. And 14. 17. Done! Note: In order to have the option: “Call by Phone” functional, you need to record a voice message in the panel by pressing and hold the button: “Record” (located in the back side of the panel), once you finish the recording release the button; usually you record in the voice message that the alarm has been triggered followed by the address where the system is located. It is a must to connect the Main Panel to the power plug while recording the voice message otherwise it is not possible to record or play the voice message. STEP 3: How to Arm or Disarm the Alarm System? “Arm Away” mode:Once any sensor in Perimeter Zone or Motion Zone get triggered; the alarm system goes off. “Arm Home” mode:Once any sensor in Perimeter Zone triggered; the alarm system goes off. Sensors in the Motion Zone will not be able to trigger the system. NOTE: If any sensor in the Emergency Zone gets triggered, the alarm system goes off even if the system is Disarm. 1. From the Main Panel: Please follow the next steps to arm the system from the panel: 1. 2. 3. 4. 5. Press: Arm Button or “0”. Enter Code: “888888” (this is the default password). Select: “Arm Home” or “Arm Away” use the arrows to choose the Arm Mode. Press: “ENT”. Once you press “ENT” the alarm panel will start to sound “bi bi bi” for 15 seconds before the Arm Mode is activated. 6. Done! Please follow the next steps to disarm the system from the panel: 1. 2. 3. 4. Press: the “Escape Button” (located on the right side of the zero “0”). Enter Code: “888888” (this is the default password). Press: “ENT”. Done! 2. From the Remote Control. Note: You can use the remote control only to Arm Away the system or Disarm. Please follow the next steps to arm the system from the Remote Control: 1. Press: the “Lock Button” (is the second button from top to bottom) 2. Once you press “Lock Button” the alarm panel will start to sound “bi bi bi” for 15 seconds before the Arm Mode is activated. 3. Done! Please follow the next steps to disarm the system from the Remote Control: 1. Press: the “Unlock Button” (is the first button from top to bottom). 2. Done! 3. By SMS or Text Messages. Note: You can “Arm Away” or “Disarm” the system by SMS but you cannot “Arm Home”. Please follow the next steps to arm the system by SMS: 1. Send a SMS to cell phone number (SIM card) in the alarm panel with the next information: 2. To Arm the system send: the alarm panel’s code “888888” (by default) + 1 For example: SMS to 6502097930 (alarm system’s SIM card number) and SMS content: 8888881 3. Few seconds later you will receive to your mobile phone a SMS confirmation. 4. Done! Please follow the next steps to disarm the system by SMS: 1. Send a SMS to cell phone number (SIM card) in the alarm panel with the next information: 2. To Arm the system send: the alarm panel’s code “888888” (by default) + 0 For example: SMS to 6502097930 (alarm system’s SIM card number) and SMS content: 8888880 3. Few seconds later you will receive to your mobile phone a SMS confirmation. 4. Done! STEP 4: Where to install each sensor? 1. Remote Control: How to install: The remote control is ready to use, you need to do nothing. Just use it the same way to lock or unlock your car or like a portable panic button. 2. Panic Button: How to install: Activate the panic button from the back side of it and proceed to set it with the strips or fix it with screws anywhere you want to have a panic button (we recommend to install it in the master bedroom or office desk). 3. Entry Sensors (Door/Window Contact): How to install: The magnet goes on the door or window, and the sensor goes on the frame (or vice versa). Magnet can be placed up to 1 inch from the sensor, so sensors fit on all types of doors and windows.Insert the battery from one side of the sensor and proceed to set it with the strips or fix it with screws on the doors or windows. 4. Motion Detector (P.I.R): How to install: We recommend you to install the motion detectors on the top of any corner of the rooms you want to protect. Just turn on the device and stick it to the wall with a screwdriver. 5. Outdoor Siren: How to install: Activate the built-in rechargeable backup battery from the back side and proceed to fix it to the wall with the screws. We recommend you to set it outside of your home. NOTE: Please visit us at www.valuestore.us/index.php/user-manuals to download the complete WS-360 user manual. If you have any questions during the installation do not hesitate to contact us at [email protected] Si tienes alguna pregunta durante el proceso de instalación no dudes en escribirnos a [email protected]