1
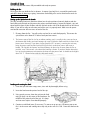
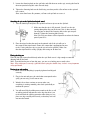
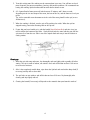
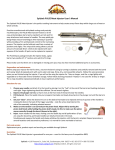
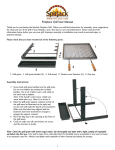
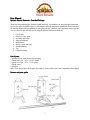
User Manual
SpitJack Electric Rotisserie - Standard Package
Thank you for purchasing the SpitJack Hearth Rotisserie. Our products are designed and constructed
to give you years of reliable service if used properly and kept adequately maintained. Please read over
the material below before assembling or using the package. There are some important notes, tips and
cautions mixed in that will help you in using the SpitJack safely and effectively.
1.
2.
3.
4.
5.
6.
7.
8.
9.
List of parts
Feature & parts guide
Assembly and usage
Safety precautions
Maintenance
Service, repair and parts
Troubleshooting
Tips
Limited warranty
List of parts
1 SpitJack Electric with electric cord and plug
1 Carbon steel spit - 30” L x 3/16” square
1 Carbon steel spit - 30” L x 1/4” square
1 Tripod stand
2 Spit forks
Note: if you do not have all the parts listed above, please contact our service department immediately.
Feature and parts guide
1
Assembly & Usage
The basic SpitJack unit comes fully assembled and ready to operate.
Building the fire
We suggest that you build the fire in advance. A mature (very hot) fire is essential for good results
and takes about an hour to get going. Instructions for building a fire can be found on our web site
http://www.spitjack.com.
Setting up the SpitJack on the hearth
The fully assembled rotisserie (directions below) needs to be positioned correctly both to cook the
food safely and efficiently and to protect the power cord from burning. Layout the Spitjack, spit, and
tripod stand in front of your fireplace with the SpitJack on the side of the hearth closest to the electric
outlet. If you will be using an extension cord, make sure it is properly rated. Make sure the power
cord and/or extension does not cross in front of the fire.
1. Distance from the fire. You will need a very hot fire to cook food properly. This means the
spit will have to be about 6-10 inches from your heat source.
2. The hottest part of the fire (as far as radiant cooking goes) is usually in the center and near
the bottom and ideally you would arrange the setup so that the food would be in front of the
hottest area. However, if you have a larger fireplace (42” or more), centering the unit may
bring the power cord (and the SpitJack itself) too close to the heat source and create a
hazard. The SpitJack and power cord should always be placed as far away from the fire as
possible, even if this means a less-than-ideal cooking scenario. If you have doubts about this,
use an oven thermometer to determine the heat near the power cord. It should not be higher
than 180° F. (Shown below with the clockwork model)
Loading and securing the food
1. Clean the spit with warm soapy water, rinse and dry thoroughly before using.
2. Insert the food onto the pointed end of the spit.
3. Using gentle pressure, draw the spit into the food
trying to keep it in the center of the food mass. Be
mindful of the pointed end of the spit. It is sharp
and can cause injuries if not handled properly.
4. Continue to add food items (if necessary). Try not to fill up the spit. The hottest part of the
fire is in the center and cooking times may vary at the ends if it is full. Center the food on the
spit.
2
5. Loosen the fastening bolts on the spit forks and slide them on to the spit, securing the food in
the most practical way (this varies for each item).
6. Tighten the fastening bolts on the forks being sure that you hit a flat surface on the spit and
not a corner.
Note: some food items like potatoes, will not need spit forks to secure it
Attaching the spit to the SpitJack and tripod stand
1. Take the loaded spit and place the squared end into a spit nut on the SpitJack.
2. Make sure that the spit is fully inserted. You will see the spit
coming through the top part of the nut if this is done correctly.
You may have to loosen the fastening bolt so the spit can pass
through. Tighten the fastening bolt securely.
Note: the level you choose will be dependent on where the hottest
part of your fire is.
3. Place the tripod so that the notch at the pointed end of the spit will rest in
the cutout of the tripod stand. Choose the cutout that is appropriate for your
needs. If using only one spit, try get the spit as level as possible. Make sure
that the tripod stand is steady, upright, and resting on all three feet.
Placing
Placing the drip pan
Place the drip pan centered and directly under the spit. Make sure it is big enough to catch the
dripping from all the food.
Note: If you did not buy one of our drip pans, you can use a baking pan or cookie sheet.
Note: Using a drip pan is not only a good idea for keeping the hearth clean, it also is a very important
safety precaution.
Turning it on and cooking
1. Make sure that everything is properly tightened and aligned
correctly.
2. Plug in the unit and press the switch that corresponds to the
spit(s) you are using. It will start to turn.
3. Watch it for at least a minute or two to make sure
everything is running smoothly, then check periodically to
monitor the process.
4. You will most likely be adding more wood to the fire as well
as making periodic adjustments to the logs but there is no
need to disturb the cooking operation when doing so. Just
place new logs carefully and securely so that they can’t roll
out onto the hearth.
3
5. Treat this activity more like cooking on the stovetop than in an oven. You will have to check
more frequently for correct temperature, burning, and possible problems. We recommend not
leaving the working SpitJack unattended for more than a minute or two.
6. A 2-4 pound load of most meats will take between 45 minutes and 2 hours to cook
depending on the size and shape of the meat, the heat of the fire, and the doneness level you
prefer.
Tip: stick a removable meat thermometer in the end of the roast (parallel to the spit) to test
for doneness).
7. When the cooking is finished, turn the spit off by pushing the switch. When the spit has
stopped turning, loosen the fastening bolt on the spit nut
8. If your drip pan has a handle on it, grab the handle (check for heat first) and raise it up just
until it touches the bottom of the roast. Gently lift and jostle the roast with the pan until the
spit comes free from the nut. Slide it out of the tripod stand and carry it into the kitchen or
carving station.
Cleaning up
1. Wash the spit with soap and water, dry thoroughly and coat lightly with vegetable oil before
storing. The spit is made of carbon, not stainless steel and will discolor and rust if left wet or
near excessive moisture.
2. After is has completely cooled down, wipe down the SpitJack and cord with a damp cloth (if
necessary) and dry with a clean cloth.
3. The spit forks are not stainless and will discolor and rust if left wet. Dry thoroughly after
cleaning and wipe lightly with oil.
4. Cleaning the hearth (if necessary) will depend on the materials that your hearth is made of.
4
Safety Precautions
1. Fire
a. Fire is dangerous by nature and should be created and used responsibly during the
operation of the SpitJack.
b. Make sure your fireplace is secure, there are no large cracks in the masonry, your flue
is open, your chimney is clean and free from hazardous accumulations.
c. Make sure you are burning the correct type of fuel. Try not to use softer woods for
the main fire, as they tend to spark more often.
d. Some foods may render fat when roasted which may fall into the drip pan. Be aware
that this fat is flammable and close to an open flame.
e. Keep an appropriate fire extinguisher (one rated for grease fires) nearby for
emergencies.
2. Heat
a. Since the SpitJack and its components are so close to a fire, they will tend to get very
hot. Make sure that whenever you have to handle any part of the setup after it has
been in front of a working fire that you use a protective pad or are wearing special
gloves.
3. Electric shock
a. Never immerse the SpitJack in liquid. If the unit comes in contact with a substantial
amount of liquid during operation, unplug the unit immediately. Make sure the unit is
completely dry before testing and then using it again.
4. Puncture
a. The tips of the spits are sharp and should be used with caution.
Maintenance
The SpitJack is a heavy-duty well-constructed machine. The hardware is mostly brass and if not
misused will require very little maintenance. If the surface becomes dirty, simply wipe it down with a
damp cloth and dry immediately.
Service, repair and parts
1. Warranty service
a. Your SpitJack comes with a one year limited warranty (see below). If during that
period you need servicing, repair or new parts, please contact our service department
at [email protected] or calling (toll free) 800 755 5509..
2. Post warranty service
a. If servicing is needed after the warranty period has expired arrangements can be made
for repair of you unit either locally or by sending it back to us. Most parts can be
ordered online.
3. Returns
a. If you need to return the SpitJack or any of the parts, please call (toll free) 800 755
5509 and you will be given specific instructions. Note: There are specific packing
instructions for each part.
5
Troubleshooting
Problem
The spit won’t start turning…
Solution
Make sure the unit is plugged in correctly, the outlet is live, and
the proper switch(s) is turned on.
The spit stopped turning….
Check your electrical connections. Check that your load is not
more that 18 lbs. If none of the above, call service.
I can’t get the spit to fit in the spit Make sure you are using the squared (not pointed) end of the
nut correctly…
spit.
Make sure the fastening bolt is loose enough to let the shaft pass
completely.
The spit isn’t exactly level when it It doesn’t have to be. The spit nut has a universal function that
turns…
lets the spit rotate at different angles.
There is an odor of rubber
Check the power cord. It may be getting too hot. Turn the unit
burning…
off immediately and inspect for damage. Adjust the positioning
of the unit so the temperature at the cord is no more than 210° F
(100° C). If the cord has been noticeably damaged, call our
service department.
My fireplace screen is interfering
Since there are many different styles and configurations of
with the setup and/or operation… fireplace screens, it is hard to recommend a general solution. If
you have a removable screen, try replacing it after setup. If it is a
draw screen, you may be able use the SpitJack right through it. It
is possible to buy an inexpensive bowed or multi-panel folding
screen that will fit around the rotisserie.
Tips
1. Start your fire at least an hour before you plan to cook.
2. Note the temperature of the room and the rest of the house. This fire will make it very warm.
3. The fire (perhaps hotter and longer than normal) will make the living space very hot-plan
accordingly.
4. Use a drip pan.
5. Use an oven thermometer to measure the heat at the cooking surface and the power cord.
6. Insert an instant-read meat thermometer in the end of the roast (parallel to the spit) to test
doneness.
7. Always clean and dry the spit before use. Clean, dry and lightly oil the spit after use.
8. Use properly seasoned hardwood for your fire (more information on firewood can be found on
our web site - http://www.spitjack.com). Make sure your flue is open ;)
9. Do not leave the SpitJack unattended for more than a couple of minutes while running.
10. Have your food at room temperature before roasting.
6
Limited Warranty
LIMITED WARRANTY
WARRANTY. Rasa Incorporated, d/b/a/ SpitJack (the “Company”) warrants that (a) its
SpitJack (the “Product”) will perform substantially in accordance with the accompanying written
materials for a period of one year from the date of receipt and (b) that the components of the Product
is contained will be free from defects in materials and workmanship under normal use and service for
a period of one (1) year. In the event applicable law imposes any implied warranties, the implied
warranty period is limited to one year (365 days) from the date of receipt. Some jurisdictions do not
allow such limitations on duration of an implied warranty, so the above limitation may not apply to
you. . This warranty is valid only for Product (s) purchased directly from SpitJack or from one of its
authorized dealers.
CUSTOMER REMEDIES.
REMEDIES The Company’s and its suppliers’ entire liability and your exclusive remedy
shall be, at the Company’s option, either (a) return of the price paid for the Product, or (b) repair or
replacement of the Product that does not meet this Limited Warranty and which is returned to the
Company with a copy of your receipt. This Limited Warranty is void if failure of the Product has
resulted from accident, abuse, or misapplication. Any replacement Product will be warranted for the
remainder of the original warranty period or thirty (30) days, whichever is longer.
NO OTHER WARRANTIES
WARRANTIES. TO THE MAXIMUM EXTENT PERMITTED BY APPLICABLE LAW, THE
COMPANY AND ITS SUPPLIERS DISCLAIM ALL OTHER WARRANTIES, EITHER EXPRESS OR
IMPLIED, INCLUDING, BUT NOT LIMITED TO IMPLIED WARRANTIES OF MERCHANTABILITY AND
FITNESS FOR A PARTICULAR PURPOSE, WITH REGARD TO THE PRODUCT AND ANY RELATED OR
ACCOMPANYING WRITTEN MATERIALS. THIS LIMITED WARRANTY GIVES YOU SPECIFIC LEGAL
RIGHTS. YOU MAY HAVE OTHER RIGHTS WHICH VARY FROM JURISDICTION TO JURISDICTION.
NO LIABILITY FOR DAMAGES. TO THE MAXIMUM EXTENT PERMITTED BY APPLICABLE LAW, IN
NO EVENT SHALL THE COMPANY OR ITS SUPPLIERS BE LIABLE FOR ANY DAMAGES
WHATSOEVER (INCLUDING WITHOUT LIMITATION, SPECIAL, INCIDENTAL, CONSEQUENTIAL, OR
INDIRECT DAMAGES FOR PERSONAL INJURY, LOSS OF BUSINESS PROFITS, BUSINESS
INTERRUPTION, LOSS OF BUSINESS INFORMATION, OR ANY OTHER PECUNIARY LOSS) ARISING
OUT OF THE USE OF OR INABILITY TO USE THIS PRODUCT, EVEN IF THE COMPANY HAS BEEN
ADVISED OF THE POSSIBILITY OF SUCH DAMAGES. IN ANY CASE, THE COMPANY’S AND ITS
SUPPLIERS’ ENTIRE LIABILITY UNDER ANY PROVISION OF THIS AGREEMENT SHALL BE LIMITED
TO THE AMOUNT ACTUALLY PAID BY YOU FOR THE PRODUCT. BECAUSE SOME JURISDICTIONS
DO NOT ALLOW THE EXCLUSION OR LIMITATION OF LIABILITY FOR CONSEQUENTIAL OR
INCIDENTAL DAMAGES, THE ABOVE LIMITATION MAY NOT APPLY TO YOU.
© SpitJack 2004. All rights reserved
7