1
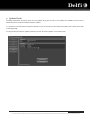
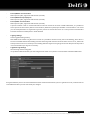
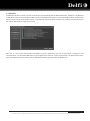
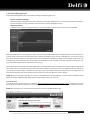
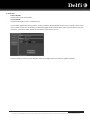
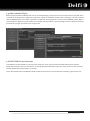
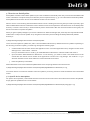
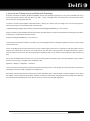
Delfi COM Center
User Manual 1.0.0.2
Delfi COM Center – User Manual v.1.0.0.2 – rev. 1.0.0.3
Page 1 of 19
This document contains confidential information. Any unauthorized copying, disclosure or distribution of the information in this document is strictly forbidden. Copyright © 2010 Delfi Technologies A/S.
Delfi Technologies A/S
Galoche Alle 1
DK-4600 Køge
Denmark
Phone: + 45 70 222 555
Fax: + 45 70 222 666
Copyright © 2010 Delfi Technologies A/S. All rights reserved. No part of the contents of this documentation or the
procedures described therein may be reproduced or transmitted in any form or by any means without prior written
permission of Delfi Technologies A/S. Owners of Delfi products are hereby granted a non-exclusive, revocable license to
reproduce and transmit this documentation for the purchaser's own internal business purposes. Purchaser shall not
remove or alter any proprietary notices, including copyright notices, contained in this documentation and shall ensure that
all notices appear on any reproductions of the documentation.
Electronic versions may be downloadable from the Delfi website (www.delfi.com).
Disclaimer
Delfi has taken reasonable measures to provide information in this manual that is complete and accurate. However, Delfi
reserves the right to change any specification at any time without prior notice.
Delfi COM Center – User Manual v.1.0.0.2 – rev. 1.0.0.3
Page 2 of 19
This document contains confidential information. Any unauthorized copying, disclosure or distribution of the information in this document is strictly forbidden. Copyright © 2010 Delfi Technologies A/S.
Table of content
1.
Overview ................................................................................................................................. 4
1.a Delfi COM Center - Lite ........................................................................................................................... 4
1.b Delfi COM Center - Standard .................................................................................................................. 4
1.c Delfi COM Center - Professional .............................................................................................................. 4
1.d Delfi COM Center – Yearly Update Agreement ....................................................................................... 4
2.
Installation Guide ..................................................................................................................... 5
2.a Installation of Delfi COM Center ............................................................................................................. 5
2.b Installation on a new/other PC ................................................................................................................ 6
3.
Update Guide ........................................................................................................................... 7
4.
Quick Guide ............................................................................................................................. 8
4.a Default Main ........................................................................................................................................... 8
4.b Settings .................................................................................................................................................. 9
4.c Monitor .................................................................................................................................................. 11
4.d Device Management..............................................................................................................................12
4.e About..................................................................................................................................................... 13
4.f Plugin Manager ......................................................................................................................................14
4.g After installed Plugin ............................................................................................................................. 15
4.h Delfi COM Center help icons .................................................................................................................. 15
4.i How to use AutoUpdate..........................................................................................................................16
4.j How to use Firmware (only available with Datalogic) .............................................................................. 17
5.
Technical Specifications .......................................................................................................... 18
5.b Communication Forms ..........................................................................................................................18
5.c File Format .............................................................................................................................................18
6.
System Requirements ............................................................................................................. 18
7.
FAQ ....................................................................................................................................... 19
7.a How do I install the Delfi COM Center? ..................................................................................................19
7.b Where can I find my license key to Delfi COM Center? ...........................................................................19
7.c Can I install Delfi COM Center on more than one PC? .............................................................................19
7.d Can I move my Delfi COM Center license to another PC? .......................................................................19
7.e My PC is broken – how do I get access to Delfi COM Center? .................................................................19
7.f How do I update Delfi COM Center? .......................................................................................................19
7.g Does Delfi COM Center support Windows 64-bit? ..................................................................................19
7.h How do I find the activation key for the terminal? ..................................................................................19
Delfi COM Center – User Manual v.1.0.0.2 – rev. 1.0.0.3
Page 3 of 19
This document contains confidential information. Any unauthorized copying, disclosure or distribution of the information in this document is strictly forbidden. Copyright © 2010 Delfi Technologies A/S.
1. Overview
The Delfi COM Center is available in three different versions, depending on the communication type, number of connections
and users.
1.a Delfi COM Center - Lite
Delfi COM Center Lite supports USB. This version is ideal if you only need a couple of scanners or if you not need to send
your registrations to the system at any time but just will do it at the end of the day.
USB communication does not register the clients that are connecting and there is therefore no maximum limit of users.
But it is only possible to have one client communicating at a time.
1.b Delfi COM Center - Standard
Delfi COM Center Standard supports USB and TCP/IP communication. Delfi COM Center Standard is available in three
different versions, with up to 25 users and 4 simultaneous connections.
Choose Delfi COM Center Standard with 5, 10 or 25 users.
1.c Delfi COM Center - Professional
Delfi COM Center Professional supports USB and TCP/IP communication. Delfi COM Center Standard is available in four
different versions, with up to 500 users and 64 simultaneous connections. Choose Delfi COM Center Professional with 25,
50, 100 or 500 users.
1.d Delfi COM Center – Yearly Update Agreement
Delfi Technologies A/S ensures a continuously development of the Delfi COM Center in order to provide our partners with
the latest features and best advantages of the communication software. It is therefore necessary to sign a yearly Update
Agreement that will provide the user with the latest updates of Delfi COM Center (only for Standard and Professional).
The yearly Update Agreement of Delfi COM Center is based on an 18 % charge of the price for the user’s version of Delfi
COM Center, whether it is Lite, Standard or Professional.
Delfi COM Center – User Manual v.1.0.0.2 – rev. 1.0.0.3
Page 4 of 19
This document contains confidential information. Any unauthorized copying, disclosure or distribution of the information in this document is strictly forbidden. Copyright © 2010 Delfi Technologies A/S.
2. Installation Guide
The following Installation Guide will guide the user through the steps required to complete the installation of Delfi COM
Center.
2.a Installation of Delfi COM Center
Step 1
Before the installation
Before the installation of the Delfi COM Center is started, it is necessary to make sure that the
computer/server has access to the internet so communication with the license server is possible.
Step 2
Start the installation
Now the Delfi COM Center has to be installed.
Download the software from www.delfi.com. Choose Support/Download/Delfi/Software/Delfi Com
Platform/PC/Delfi Communication Center.
Two different .exe files are available:
- Delfi Communication Center Net.exe (only for Network installation)
- Delfi Communication Center.exe (both USB and Network installation)
Double-click on the file to start the installation.
The file installs the Delfi COM Center and the necessary programs, Microsoft ActiveSync/WMDC and
Microsoft Framework.NET 3.5 sp1. If these programs are installed on the computer, the Delfi COM Center
will instead be installed immediately.
Step 3
Select installation folder
The following must be chosen and entered:
- Where to place the Delfi COM Center
- Level of accessibility (Choose “Everyone” or “Just me”)
The Delfi COM Center will now be installed.
Step 4
Enter License and Customer Information
Enter your customer details followed by entering the license key, provided on the delivery note.
Step 5
Define communication type
The type of communication (this point will depend on the license) and the path for the Global data
directory have to be chosen now.
The installation is now completed.
NB! In order to use Direct (USB) Connection, the Delfi COM Center user interface has to be open.
The Delfi COM Center is now ready for use.
Delfi COM Center – User Manual v.1.0.0.2 – rev. 1.0.0.3
Page 5 of 19
This document contains confidential information. Any unauthorized copying, disclosure or distribution of the information in this document is strictly forbidden. Copyright © 2010 Delfi Technologies A/S.
2.b Installation on a new/other PC
If you just want to move your Delfi COM Center license from one PC to another, it is necessary to uninstall the Delfi COM
Center in order to release the license. After the uninstallation, it is possible to install the Delfi COM Center on a new/other
PC.
If your PC is broken and it is therefore not possible to uninstall the Delfi COM Center in order to install it on a new PC, it is
necessary to fill out and sign a Deactivation Statement in order to reset the license.
Please go to www.delfi.com to download the Deactivation Statement. Choose the Support menu in the Support tab at our
website and download the document.
Please send the Deactivation Statement to Delfi Technologies A/S and we will reset the license.
Delfi COM Center – User Manual v.1.0.0.2 – rev. 1.0.0.3
Page 6 of 19
This document contains confidential information. Any unauthorized copying, disclosure or distribution of the information in this document is strictly forbidden. Copyright © 2010 Delfi Technologies A/S.
3. Update Guide
The Delfi COM Center will always check for new updates during the start-up. If new updates are available, the user will be
asked whether he will download and install the updates.
It is necessary to download and install the updates in order to benefit from the latest Delfi COM Center release from Delfi
Technologies A/S.
It is also possible to check for updates manually. Choose “Check for updates” in the “About” tab.
Delfi COM Center – User Manual v.1.0.0.2 – rev. 1.0.0.3
Page 7 of 19
This document contains confidential information. Any unauthorized copying, disclosure or distribution of the information in this document is strictly forbidden. Copyright © 2010 Delfi Technologies A/S.
4. Quick Guide
The following Quick Guide will guide the user through different functions and features in Delfi COM Center.
4.a Default Main
In the Default Main tab it is possible to see a status over the following functions:
-
Current Status
Is the service (Delfi COM Center) running, is Direct Connection (USB) or TCP/IP connection enabled/disabled, is popup enabled.
-
Auto update Status
Check the status for auto update, last update and expire date.
-
Activity Log
See the number of connected clients and last connection.
This is a good place to start if you experience difficulties for the clients to communicate with the server. Check whether the
service is running, the graphical user interface is able to run with the service disabled. Check the communication type; it has
to be the same as the one that the clients are using. Check whether the TCP/IP server IP is the same as the clients are looking
for.
In the end of the “TCP/IP Connection:” field there is an icon. This icon provides you with information if you hovers the mouse
on the icon. The same is happening in the end of the “Expire Date:” field.
Delfi COM Center – User Manual v.1.0.0.2 – rev. 1.0.0.3
Page 8 of 19
This document contains confidential information. Any unauthorized copying, disclosure or distribution of the information in this document is strictly forbidden. Copyright © 2010 Delfi Technologies A/S.
4.b Settings
In the Settings tab it is possible to manage the following functions:
-
-
-
-
-
-
-
-
General/Startup
Define the following things for the startup of Delfi COM Center:
Start minimized, auto start Delfi COM Center user interface, check for updates at startup.
General/Popup
Enable or disable the communication popup window. If enable is checked, it requires that the graphical user interface
is running.
General/ Import and Export Settings
It is possible to import or export settings for the Delfi COM Center. This is being imported/exported as an .XML file.
Communication/Use WIFI / Ethernet
Check server port, server IP and server status.
Communication/Use Direct Connection
Showing the communication settings button is not supported by Windows Vista or Windows 7. It is used to show the
communication settings for Active Sync.
Communication/Service Status
Here it is possible to start and stop the service (Delfi COM Center).
File/Export (To terminal)
Define the following things for export to terminal:
Export path, unique directories, parameters, delete after transfer.
The export path can be separated into unique directories by e.g. serial number of the clients, so they are not using every
file in the export path but only those who are designated in their directory named by their serial number. The
“Parameter” field decides how you want to use unique directories.
Delete after transfer is possible to be only global files, terminal specific files or both.
File/Import (From terminal)
Define the following things for import from terminal:
Import path, delete files, imported files, unique directories, parameters. Delete Files should be checked if you want the
files on the client to be deleted after transfer to the Delfi COM Center. Imported files can be handled by appending the
existing files or to overwrite existing files. As the function with unique directories in File/Export, this is also possible in
File/Import.
File/Other Directories
This tab describes Directories for AutoUpdate and Firmware. AutoUpdate is a feature that makes it possible to update
the software on the clients. When the client is communicating with the Delfi COM Center, it is also checking the
software version on the client and comparing it to the version in the selected path, if anyone has been chosen. If the
software version is older than the one in the directory, it will automatically update the client next time it communicates
with the Delfi COM Center. Some terminals can upgrade the Firmware, this is also being checked when they
communicates with Delfi COM Center.
Delfi COM Center – User Manual v.1.0.0.2 – rev. 1.0.0.3
Page 9 of 19
This document contains confidential information. Any unauthorized copying, disclosure or distribution of the information in this document is strictly forbidden. Copyright © 2010 Delfi Technologies A/S.
-
-
-
Process/Before communication
Define process path, arguments and timeout (seconds).
Process/Between import/export
Define process path, arguments and timeout (seconds).
Process/After communication
Define process path, arguments and timeout (seconds).
A process could be a .bat or .exe file that shall run when an event has occurred. In Delfi COM Center, it is possible to
start a process in three events; before communication, between import/export and after communication. In an event
you can send parameters or arguments to give the process an amount of time to run. Is the process not done before
timeout have been exceeded, then it will be aborted.
Log/Log settings
Check log path and log severity.
Delfi COM Center makes a log file of error events. It is possible to set the severity to Error and Debug, where Error is
the recommended state because Debug is used to check bugs and creates a lot of lines when an error occur, which tells
exactly where the error occurred. By time in Debug state the log file is using huge amount of disk space and by that it
is recommended only to log in Error severity.
Log/Client Log Settings
Get Client log and check log path.
It is possible to define whether you want a log from the client or not, when it communicates with Delfi COM Center.
As a general feature, there is an Save and Restore button. Please note that when you use e.g. Restore in File, it will also restore
in the different tabs if you have not saved your changes.
Delfi COM Center – User Manual v.1.0.0.2 – rev. 1.0.0.3
Page 10 of 19
This document contains confidential information. Any unauthorized copying, disclosure or distribution of the information in this document is strictly forbidden. Copyright © 2010 Delfi Technologies A/S.
4.c Monitor
The Monitor tab lists a current overview of the clients communicating with the Delfi COM Center, whether it is by Ethernet
Cradle, WIFI or Direct Communication (USB). The only major difference is when it is communicating by TCP/IP, then the lines
have the serial number of the clients as an ID. In the left side of each line there is a clock icon, hovering over this will tell you
the exactly date and time of the current event.
Each line is a new event and provides information of what is happening, like now a client sends a request to start
communication, now the Delfi COM Center is receiving files from client etc. There is two buttons, one Save and one Clear.
Save is saving the lines in the monitor into an .XML file and Clear simply just clears the Monitor list.
Delfi COM Center – User Manual v.1.0.0.2 – rev. 1.0.0.3
Page 11 of 19
This document contains confidential information. Any unauthorized copying, disclosure or distribution of the information in this document is strictly forbidden. Copyright © 2010 Delfi Technologies A/S.
4.d Device Management
In the Device Management tab it is possible to manage the following functions:
-
-
Deploy installation package
Define installation package path and see settings for auto-start, update device time, device type and device platform,
file size and status. It is also possible to search for device, deploy installation or stop.
Registered devices
Check the serial number of registered devices. It is also possible to replace licenses if new ones are available.
When Delfi COM Center is searching for a device it is necessary for Delfi COM Center to disable the Direct Communication in
monitor if that is the chosen communication type. It will automatically prompt you and will disable it for you if you say yes to
the prompt. When the device is connected and you have selected the installation package, the first thing it will check for you
is whether the terminal already has a client installed. If it does have a client installed, you will get a prompt on what to do, e.g.
if you want Delfi COM Center to uninstall the client for you.
When the clients communicate with Delfi COM Center, the Delfi COM Center will register the serial numbers of the clients
and control when it exceeds the limit for your license type. Should you experience maximum registered devices and one of
your terminals is broken and it is cheaper for you to buy a new one instead of making a repair, then you can replace the old
serial number with the new serial number of the new device by using the “Replace License” button.
NOTE! When you navigates away from the search, Delfi COM Center will automatically close the search on USB and make
Direct Connection (USB) available again but the “Stop” button is also at your service.
Activation Key
The activation key can be found on our website: http://www.delfi.com/en/ClientActivationKey.asp. You have to enter the
terminals serial number at the search box to the left and you will get the terminals activation key in the middle of the screen.
NOTE! The activation key is for the terminal and the License Key is for Delfi COM Center.
Delfi COM Center – User Manual v.1.0.0.2 – rev. 1.0.0.3
Page 12 of 19
This document contains confidential information. Any unauthorized copying, disclosure or distribution of the information in this document is strictly forbidden. Copyright © 2010 Delfi Technologies A/S.
4.e About
-
Product Details
See name and version information.
License Details
See license description, status, created and key.
If you need to upgrade the existing license, it is also possible to do that. Right next to the text “Change License” there
is an icon that you can click on and then you will be prompted for the new license key. After you have entered your new
license key you have to restart “Delfi Communication Center Service” service.
It is also possible to send a support request to Delfi Technologies A/S and to check for updates manually.
Delfi COM Center – User Manual v.1.0.0.2 – rev. 1.0.0.3
Page 13 of 19
This document contains confidential information. Any unauthorized copying, disclosure or distribution of the information in this document is strictly forbidden. Copyright © 2010 Delfi Technologies A/S.
4.f Plugin Manager
In the Plugin Manager tab it is possible to manage the following functions:
-
Home/Install Plugin
Define and see plugin path, associated service, plugin description, plugin version and plugin name.
-
Home/Installed User Interface Plugins
See overview of installed user interface plugins and/or choose to uninstall a given plugin interface. You will be provided
with the information of plugin name, plugin version, if it is enabled, which associated service it got (you might need to
allow access in your firewall) and a description of the module.
-
Plugin Information
This is the list of Plugin modules which are available for you, plugin names, plugin version, if you have license to it, if it
is installed and a plugin description. Furthermore you can select and download a plugin from here and refresh the list.
-
Installed Service Plugins
Here you can see all the installed plugins by service name, service status (running/stopped) and error description. It is
also possible to start and stop the services of plugin modules here.
Delfi COM Center – User Manual v.1.0.0.2 – rev. 1.0.0.3
Page 14 of 19
This document contains confidential information. Any unauthorized copying, disclosure or distribution of the information in this document is strictly forbidden. Copyright © 2010 Delfi Technologies A/S.
4.g After installed Plugin
When a plugin has been installed (in this case it is our Breece Plugin), we will get a new menu in the column to the left, which
is named by the plugin name. Please note that when a plugin is installed it will add a tab in “Settings”, this tab is named
“Process Management”. In this tab it is possible to include the running plugin as a process in three different events, “Before
Communication”, “Between Import and Export” and “After Communication”. You can manage in which order they should be
processed in if you got more than one in a single event.
4.h Delfi COM Center help icons
In the different menus and tabs you can see some small icons. These icons provide information about a given function
and/or gives examples of how to work with it. To activate the Delfi COM Center help icons, simply hover over the icon and it
will then appear after approximately 1-2 seconds.
This is also possible to do in the Monitor tab where the events are shown; in here the exact timestamp is given to the user.
Delfi COM Center – User Manual v.1.0.0.2 – rev. 1.0.0.3
Page 15 of 19
This document contains confidential information. Any unauthorized copying, disclosure or distribution of the information in this document is strictly forbidden. Copyright © 2010 Delfi Technologies A/S.
4.i How to use AutoUpdate
AutoUpdate is a feature that enables update of your client’s software automatically when they communicate with Delfi COM
Center. The feature is simple and easy to use whether you have a specific device, 25, 50 or 100 devices that need to be updated.
AutoUpdate also works if the devices are on different locations on the network.
When a client is communicating with Delfi COM Center the client is sending and receiving the export and import files, right
after the Delfi COM Center has checked the client’s software version and compared it to the latest version in the AutoUpdate
directory. If a newer version exists, it will automatically start to send all files. After the client has finished receiving files, the
device will restart to complete the update.
When you get an update package of your client’s software from Delfi Technologies A/S, a few steps are required before Delfi
COM Center is ready to use the update. First, navigate to the directory that is holding the AutoUpdate folder, default
directory is:
C:\Delfi Technologies\Delfi Communication Center\AutoUpdate
This is where the update or updates are, and it is here that Delfi COM Center by default will look for updates. Depending on
the device(s) you want to update, you need to go through the following steps:
1.
2.
3.
Create a folder with the same name as the application name. To find the application name, navigate into the clients
Settings menu -> Information -> General.
Here you will find the name. It could e.g. be “Delfi MobileForce Warehouse”. Name the folder and create it.
Open the folder “Delfi MobileForce Warehouse”. In this directory, you need to create a new folder that must be
named after the newest version number of the application. Find this in the .zip package. This could be 1.0.1.9 or
whatever the latest version of the software is. Name the folder and create it.
Place the update.zip in the folder.
Delfi COM Center will now check the AutoUpdate-folder when comparing software name and versions:
C:\Delfi Technologies\Delfi Communication Center\AutoUpdate\Delfi MobileForce Warehouse\1.0.1.9\
You will be able to see all the file transfers when the update is processing. See them inside the Monitor tab in Delfi COM
Center.
4.i.a Specific device AutoUpdate
For specific device updates, create a folder with the same name as the serial number of the device that needs to be updated.
Simply place the update file in the version folder:
C:\Delfi Technologies\Delfi Communication Center\AutoUpdate\Delfi MobileForce Warehouse\P1410F9230\1.0.1.9\
Delfi COM Center – User Manual v.1.0.0.2 – rev. 1.0.0.3
Page 16 of 19
This document contains confidential information. Any unauthorized copying, disclosure or distribution of the information in this document is strictly forbidden. Copyright © 2010 Delfi Technologies A/S.
4.j How to use Firmware (only available with Datalogic)
Firmware is the device software, Windows CE/Mobile, and it is also possible to update, this is only recommended to do if you
experience general problems with the device, e.g. WIFI- , power-, backlight issues. Some issues are critical and some issues
are almost never recognized by the user.
Firmware is similar to AutoUpdate. Delfi COM Center is looking in a specific path according to the communicating device.
Following example is how the default path could look like:
C:\Delfi Technologies\Delfi Communication Center\Firmware\Datalogic\NewMemor\3.21.116.20101117
Please note that the path is default until the \Firmware\, right after that you need to make the folders according to the product,
manufacturer, model and the newest firmware.
Example: Datalogic\NewMemor\3.21.116.20101117
The firmware version/build number is provided to you in the package file that is holding the update files; in here you also might
find a release note.
This is not updating the firmware of the device but just transferring the files which are required to make the update. You still
need to have a MicroSD or SD card at your hand and use with the device. During transfer, the Delfi COM Center creates a
directory named “Firmware” on the device application installation path, so you need to exit the application after transferring
files.
Now insert the SD/MicroSD card in the slot. The slot is localized where the battery pack is. Exit the application, by F2 and the
password is “70222555”. Navigate to the installation path:
MyDevice -> Backup -> Delfi Client -> Firmware
This is where the firmware files are placed. Cut the files and replace them in the storage drive (when SD card is inserted you
should get a new drive called “Storage Card” in MyDevice).
Now plug in the external power to the device and run the “DLUPDEX_Run”. It will handle the rest of the update process. When
the update is done and the device has been restarted you will be prompted with a dialog that is asking whether the “Backup”
drive should be formatted/erased. Press “No” to this if you want to save the Delfi application.
Delfi COM Center – User Manual v.1.0.0.2 – rev. 1.0.0.3
Page 17 of 19
This document contains confidential information. Any unauthorized copying, disclosure or distribution of the information in this document is strictly forbidden. Copyright © 2010 Delfi Technologies A/S.
5. Technical Specifications
Delfi COM Center runs as a service and handles the data transfer to and from handheld terminals and PDA’s. Supported
communication forms and file format is described in the following section.
5.b Communication Forms
Delfi COM Center supports the most popular communication forms, direct (USB, RS232) and TCP/IP communication.
The communication form depends on your version of Delfi COM Center.
Delfi COM Center - Lite
USB Communication
Delfi COM Center – Standard
USB and TCP/IP Communication - 4 simultaneous connections
Delfi COM Center – Professional
USB and TCP/IP Communication - 64 simultaneous connections
5.c File Format
Delfi COM Center supports different kinds of file formats and the newest is xml file format.
6. System Requirements
Delfi COM Center supports Windows 2000 or newer operating systems – both 32 and 64 bit versions.
Installing Delfi COM Center requires Microsoft .NET framework 3.5 sp1. If this not is available on the PC/server, then it will be
installed during the installation of Delfi COM Center.
Delfi COM Center – User Manual v.1.0.0.2 – rev. 1.0.0.3
Page 18 of 19
This document contains confidential information. Any unauthorized copying, disclosure or distribution of the information in this document is strictly forbidden. Copyright © 2010 Delfi Technologies A/S.
7. FAQ
The following FAQ guide will guide the user through the frequently asked questions with the use of Delfi COM Center.
7.a How do I install the Delfi COM Center?
Please go to the Installation Guide at page 5 in this User Manual.
7.b Where can I find my license key to Delfi COM Center?
Whether it is one or more licenses, it/they will be provided on the delivery note. If you need it on an installed Delfi Com Center
you’ll find the license key in the “About” menu.
7.c Can I install Delfi COM Center on more than one PC?
Installing the Delfi COM Center on more than one PC depends on your type of Delfi COM Center license. The Delfi COM Center
is available in three different versions, depending on the communication type, number of connections and users. Please go to
page 4 in this User Manual to see the overview of the different Delfi COM Center versions.
7.d Can I move my Delfi COM Center license to another PC?
If you want to move your Delfi COM Center license from one PC to another it is necessary uninstall the Delfi COM Center in
order to release the license. Please go to page 6 in this User Manual.
7.e My PC is broken – how do I get access to Delfi COM Center?
If your PC is broken and you want to install Delfi COM Center on a new PC, it is necessary to fill out and sign a Deactivation
Statement in order to reset the license. Please go to page 6 in this User Manual.
7.f How do I update Delfi COM Center?
Delfi COM Center will always check for new updates during the start-up. Please go to page 7 in this User Manual for further
information.
7.g Does Delfi COM Center support Windows 64-bit?
From release version 1.0.3.0 of Delfi COM Center, the service now supports Windows 64-bit systems with USB
communication. Older versions do only support Windows 64-bit systems with TCP/IP communication.
7.h How do I find the activation key for the terminal?
The activation key for the terminal can be found on our website: http://www.delfi.com/en/ClientActivationKey.asp. For more
information, please go to page 12 in this User Manual.
Delfi COM Center – User Manual v.1.0.0.2 – rev. 1.0.0.3
Page 19 of 19
This document contains confidential information. Any unauthorized copying, disclosure or distribution of the information in this document is strictly forbidden. Copyright © 2010 Delfi Technologies A/S.