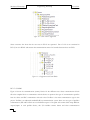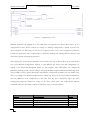
1
SCHOOL OF ENGINEERING AND ENERGY MOTHERWELL INTERNSHI P ENGINEERING INTERNSH IP A report submitted to the School of Engineering and Energy, Murdoch University in partial fulfilment of the requirements for the degree of Bachelor of Engineering Author: Jamie Colquhoun Student Number: 30788339 Unit Name/Code: Engineering Internship Document: Motherwell Internship Status: FINAL Due Date: 18/11/2011 Date Submitted: 18/11/2011 Motherwell Internship Engineering Internship 19/12/2011 Jamie Colquhoun 1 ABSTRACT Murdoch University and Motherwell Automation have just begun a new relationship. For the first year Motherwell has selected students in their final year of engineering study to complete an internship program alongside their highly experienced staff. This program is based in Motherwell‟s Karara office in Osborne Park. During the work placement, the intern has been given certain projects and work with the company as a systems engineer, completing comparable jobs to a graduate engineer. This provides the intern with invaluable experience in the engineering field which helps with the intern‟s growth in both professional and personal matters. This Report affirms the benefit of the internship program at Motherwell Automation and describes the experience given which provides an excellent base for the graduate‟s future engineering career. During the time at Motherwell the intern completed and worked on numerous projects. These projects include the following which are described in this report. Area 1311 – PLC Programming CCTV Configuration Template Work o PID Testing o Chiller o Conveyor 2 Motherwell Internship Engineering Internship 19/12/2011 Jamie Colquhoun 2 DISCLAIMER All of the work discussed in this report is the work of the author unless otherwise referenced. I declare the following to be my own work, unless otherwise referenced, as defined by Murdoch University‟s policy on plagiarism ____________________________________ Jamie Colquhoun -- 19/12/2011 3 Motherwell Internship Engineering Internship 19/12/2011 Jamie Colquhoun 3 ACKNOWLEDGEMENTS Firstly, a thank you must go to Motherwell Automation, who not only provided me with the opportunity to complete an internship but have supported me all the way through the internship. This opportunity has allowed me to experience the transition from university to the engineering working world and has probably been the greatest learning experience of my life. My supervisors must also receive thanks, Operations Manager Eddie Terrell and Engineering Manager Paul Jones who helped with workplace transition and help with the internship. Senior Project Manager Rick Da Paz and Senior Engineers Paul Nichols, Kevin Bushell and Sholeh Pirmorady who provided guidance throughout the projects and provided invaluable experience to the intern. The systems engineering team also has my thanks as, they all helped with any problems and eased my transition into the workplace. This team made my time at Motherwell an informative, interesting and enjoyable experience. Murdoch University staff members Associate Professor Graeme Cole, Dr. Gareth Lee and Prof. Parisa Bahri have taught me for most of my four years at University. They have provided me with the skills needed to transition into the workplace and have enabled and influenced my development. A huge thank you must go out to them, as well as my tutors Karne, Jan, Brad Phillips, Travis and Linh. My fellow students have made my time at Murdoch enjoyable and have also helped in my development and I recognise that these moments of fun and distractions have helped with my development at University. Jamie Colquhoun November 2011 4 Motherwell Internship Engineering Internship 19/12/2011 Jamie Colquhoun 4 4.1 CONTENTS TABLE OF CONTENTS 1 ABSTRACT...................................................................................................................................................... 2 2 DISCLAIMER................................................................................................................................................... 3 3 ACKNOWLEDGEMENTS .................................................................................................................................. 4 4 CONTENTS ..................................................................................................................................................... 5 4.1 TABLE OF CONTENTS..........................................................................................................................................5 4.2 TABLE OF FIGURES .............................................................................................................................................7 4.3 TABLE OF TABLES ..............................................................................................................................................8 5 GLOSSARY OF TERMS .................................................................................................................................... 9 6 SUPPORT DRAWINGS AND DOCUMENTS ..................................................................................................... 10 7 INTRODUCTION ........................................................................................................................................... 11 8 MOTHERWELL AUTOMATION ...................................................................................................................... 13 9 KARARA INTRODUCTION ............................................................................................................................. 15 10 AREA 1311/1312.......................................................................................................................................... 28 5 10.2 PROJECT DESCRIPTION .....................................................................................................................................30 10.3 INITIAL CONFIGURATION ...................................................................................................................................33 10.4 AREA SEQUENCES............................................................................................................................................44 10.5 SIMULATION ..................................................................................................................................................46 10.6 TESTING ........................................................................................................................................................48 10.7 PROBLEMS .....................................................................................................................................................48 10.8 EVALUATION ..................................................................................................................................................50 10.9 PROJECT OVERVIEW ........................................................................................................................................51 10.10 GENERAL REQUIREMENTS.............................................................................................................................51 10.11 SCOPE ......................................................................................................................................................52 10.12 PROJECT DELIVERABLES................................................................................................................................53 10.13 MEASUREMENT OF SUCCESS .........................................................................................................................53 10.14 RESOURCES ...............................................................................................................................................53 10.15 PROJECT TIMELINE ......................................................................................................................................54 10.16 XPROTECT .................................................................................................................................................55 Motherwell Internship Engineering Internship 19/12/2011 Jamie Colquhoun 11 10.17 XPROTECT SMART CLIENT ............................................................................................................................56 10.18 IP CAMERAS ..............................................................................................................................................56 10.19 RESOLUTION ..............................................................................................................................................57 TEMPLATE INVOLVEMENT ........................................................................................................................... 58 11.1 PID TESTING ..................................................................................................................................................58 11.2 CHILLER.........................................................................................................................................................61 11.3 CONVEYOR ....................................................................................................................................................62 11.4 TEMPLATE EVALUATION ...................................................................................................................................65 12 CONCLUSION ............................................................................................................................................... 67 13 BIBLIOGRAPHY ............................................................................................................................................ 68 14 APPENDIX .................................................................................................................................................... 69 6 14.1 EQUIPMENT LIST FOR AREA 1311/1312 ............................................................................................................69 14.2 INDUSTRY AND ACADEMIC SUPERVISOR ENDORSEMENT PRO FORMA .........................................................................73 Motherwell Internship Engineering Internship 19/12/2011 Jamie Colquhoun 4.2 TABLE OF FIGURES Figure 1 - Motherwell Logo ............................................................................................................................................ 13 Figure 2 - GE Logo .......................................................................................................................................................... 13 Figure 3 - Karara Environment ...................................................................................................................................... 15 Figure 4 - A Concentrate Thickener under Construction in Karara ........................................................................ 15 Figure 5 – Area Interactions ........................................................................................................................................... 17 Figure 6 - GE RX3i PLC with multiple modules (Electric, 2011) ............................................................................ 23 Figure 7 - Range of VersaMax Controllers (GE, VersaMax PLC, 2011)................................................................. 24 Figure 8 - Example Machine edition Screens (GE, Machine Edition, 2011) .......................................................... 25 Figure 9 - Feedback Zone ............................................................................................................................................... 26 Figure 10 – Sample HMI Screen .................................................................................................................................... 27 Figure 11 – Programming Structure .............................................................................................................................. 36 Figure 12 – Comm Folder Configuration ..................................................................................................................... 37 Figure 13 – Configuration and Control Blocks............................................................................................................ 37 Figure 14 - Communication Block for a Control Valve ............................................................................................. 38 Figure 15 – Trip Interlock Block Configuration .......................................................................................................... 38 Figure 16 - VSD and PUMP Control Blocks ............................................................................................................... 39 Figure 17 – Configuration of a Valve ............................................................................................................................ 41 Figure 18 – I/O List Headings ....................................................................................................................................... 43 Figure 19 – Area Sequences Folder ............................................................................................................................... 44 Figure 20 - Area Sequence State machine Implementation ....................................................................................... 45 Figure 21 - Simulation Folder Outlay ............................................................................................................................ 47 Figure 22 - Simulation Configuration and Control ..................................................................................................... 47 Figure 23 - Faceplate Example for PID Control in Auto Mode ............................................................................... 60 Figure 24 - Faceplate Example for PID Control in Manual Mode........................................................................... 60 Figure 25 - Faceplate Example for PID Control in Cascade Mode ......................................................................... 61 Figure 26 – Configuration of Conveyor Ladder Block ............................................................................................... 64 Figure 27 - Brake and Drive Link .................................................................................................................................. 65 7 Motherwell Internship Engineering Internship 19/12/2011 Jamie Colquhoun 4.3 TABLE OF TABLES Table 1 – Glossary of Terms............................................................................................................................................. 9 Table 2 –Area 1311 Equipment List .............................................................................................................................. 30 Table 3 – DOL UDT ....................................................................................................................................................... 35 Table 4 – Standard Configurable Parameters for „LV1‟ ............................................................................................. 42 Table 5 – Standard Configurable Parameters for „LV2‟ ............................................................................................. 42 Table 6 – DOL Types ...................................................................................................................................................... 42 Table 7 – POPUP Sequence ........................................................................................................................................... 46 Table 8 – Testing Dates ................................................................................................................................................... 48 8 Motherwell Internship Engineering Internship 19/12/2011 Jamie Colquhoun 5 GLOSSARY OF TERMS Terms and Abbreviation used are defined in Table 1 Below: ABRREVIATION CCR CCTV CMS DOL EGD FAT FDS FEL GE HD HMI HPGR I/O IMS IP m3 m3/hr mm MW P&ID P80 PAC PCS PID PFD PLC PTZ RIO RMS ROM SCADA SMS TQ UDT VSD MEANINGS Central Control Room Closed Circuit Television Cleaner Magnetic Separator Direct Online Drive Ethernet Global Data Factory Automation Testing Functional Description Specification Front End Loader General Electric High Definition Human - Machine Interface High Pressure Grinding Rollers Inputs / Outputs Intermediate Magnetic Separator Internet Protocol Cubic Meters Meters Cubed Per Hour Millimetres Mega Watts Piping And Instrument Diagram Particle Size Process Automation Controller Process Control System Proportional, Integral And Derivative Controller Process Flow Diagram Programmable Logic Controller Pan Tilt Zoon Remote I/O Rougher Magnetic Separators Run Of Mine Supervisory Control And Data Acquisition Scavenger Magnetic Seperators Technical Query Unique Data Type Variable Speed Drive Table 1 – Glossary of Terms 9 Motherwell Internship Engineering Internship 19/12/2011 Jamie Colquhoun 6 SUPPORT DRAWINGS AND DOCUMENTS These drawing and documents are the items produced and used during the internship at Motherwell. They are not included as they are the intellectual property of Motherwell Automation. REF 10 DOCUMENT NUMBER DESCRIPTION [1.] 1300-IN-SPC-1003 [2.] 1300-IN-BOD-1003 [3.] 1311-PR-PHL-1001_0 Technical Specification Close Circuit Television System Control and Instrumentation Engineering Design Criteria Area 1311 Philosophy Document [4.] 1311-PR-DRG-1101_0 Flotation Surge Tank, Area 1311 P&ID [5.] 1311-PR-DRG-1102_0 [6.] 1311-PR-DRG-1103_0 Rougher Flotation Conditioning Tank, Area 1311 P&ID Rougher Flotation, Area 1311 P&ID [7.] 1311-PR-DRG-1104_0 [8.] 1311-PR-DRG-1105_0 Scavenger Flotation Conditioning Tank, Area 1311 P&ID Scavenger Flotation, Area 1311 P&ID [9.] 1311-PR-DRG-1106_0 Flotation Concentrate Tank, Area 1311 P&ID [10.] 1311-PR-DRG-1107_0 Regrinding Feed Tank, Area 1311 P&ID [11.] 1311-PR-DRG-1108_0 Scavenger Flotation Tailings Tank, Area 1311 P&ID [12.] 1311-PR-DRG-1110_0 Flotation Air, Area 1311 P&ID [13.] 1312-PR-DRG-1101_0 Regrinding Mill, Area 1312 P&ID [14.] 1312-PR-DRG-1101_0 SMS, Area 1312 P&ID [15.] P11007-E01-04-0001-05-003_1 FDS Conveyor Instruments [16.] P11007E01041300016_2 Chiller Template Functional Description [17.] P11007E01041300031_1 Conveyor Template Functional Description [18.] P11007E01041300038_0 Chiller 2 Template Functional Description Motherwell Internship Engineering Internship 19/12/2011 Jamie Colquhoun 7 INTRODUCTION Murdoch University offers a work placement internship program as an option for the final year project. This internship allows the student to gain relevant and valuable industrial experience in their chosen engineering field. This experience in today‟s engineering environment is an important factor for students to have. Motherwell Automation is a Western Australian company, which provides expertise in supply chain management, enterprise resource planning, management information systems, networking and communications, telemetry, supervisory control and data acquisition (SCADA), automation, process control and instrumentation. Three intern students were taken on from Murdoch University in 2011, two of these, including this intern, were currently working with Motherwell in a vacation work environment. Motherwell has a large and well trained group of “System Engineers”, who specialise in industrial computing techniques. These include, but are not limited to, SCADA development, PLC programming and network communications. The internship was to be undertaken in the same vein as the vacation work. This vacation work ensured that there was a smooth transition into the more complex internship work. The internship work took part in the Karara project, contracted to Motherwell at the start of 2011. Karara is a new project and therefore the latest technologies, programs and devices are used. This allows important experience to be gained with current workplace equipment. Over the 16 week period many different jobs were completed, as well as some larger tasks completed. These projects were almost all based in the field of PLC programming and therefore correspond to the intern‟s skills taught at University. The large knowledge base defined in the “Industrial Computing Systems” course was extremely relevant to the work undertaken. The following report defines the intern‟s experience at Motherwell. Included are an introduction to the Karara project and some of the larger tasks undertaken. The equipment used, and processes followed are described as well as any other relevant information. These parts are described within the major project, Area 1311 - Flotation and Scavenger Magnetic Separation, or left out due to word limitations. Area 1311 is the major project, its processes relate directly to the “Industrial Computing Systems” course. The Instrumentation and Control Engineering course while not directly related to the project helped with the understanding of the project and the iron ore plant. The intern was often called upon for process and control advice. It was directly relevant in another project of the PID development. The original main project was the CCTV system, however due to problems beyond the intern or Motherwell‟s control it was unable to be completed in time. The research and work completed is included as a reference to the original project as the intern still intends to complete the project after his internship has ended. 11 Motherwell Internship Jamie Colquhoun 12 Engineering Internship 19/12/2011 Motherwell Internship Engineering Internship 19/12/2011 Jamie Colquhoun 8 MOTHERWELL AUTOMATION Motherwell Automation is an Automation specialist company that resides in Osborne Park. Motherwell pride themselves in providing expertise in supply chain management, enterprise resource planning, management information systems, networking and communications, telemetry, supervisory control and data acquisition (SCADA), automation, process control and instrumentation. The aim is to improve the throughput and/or efficiency of the clients existing assets or creating a new asset for the client. The company is split into three self-explanatory sections, Sales, Engineers and Training. The intern joined the engineering team. They have a large group of experienced engineers with a wide range of different experiences and skills. The industries with which Motherwell are involved in are very broad from the food industry to the mining industry. Figure 1 - Motherwell Logo 8.1.1 EQUIPMENT This internship project is based upon Karara Mining project taken on by Motherwell Automation. More detail on this project is shown in section 9. As such the equipment and programs used are defined by Motherwell Automation. The equipment used is from the global company, General Electric. Motherwell is a distributer for GE products, as well as IMO and Moxa electronic supplies. Part of the internship experience was learning about the different GE product range and their potential applications. Figure 2 - GE Logo 13 Motherwell Internship Engineering Internship 19/12/2011 Jamie Colquhoun 8.1.2 TRAINING Motherwell Automation also has a training division, where companies and individuals can be trained in the use of GE and other brand equipment that Motherwell uses and distributes. At the start of the internship, a day course was undertaken in training of the GE PLCs. This training session involved the physical specifications of the PLCs, hardware configuration and setup of the PLCs as well as some of the unique GE applications, such as Ethernet Global Data (EGD) and Unique Data Types (UDT). The training was not as in depth as most of the training courses that Motherwell does as the intern already was already experienced in PLC programming from the Murdoch Industrial Computing Systems unit. The intern was also not required to learn the GE SCADA program, CIMPLICITY. Much of the training was on connecting to the PLC via different methods, as this is a typical problem with the PLCs. 14 Motherwell Internship Engineering Internship 19/12/2011 Jamie Colquhoun 9 KARARA INTRODUCTION The Karara PCS project is a large undertaking by Motherwell Automation, and the Karara Mining Group LTD. The project scope is to design and implement an iron ore mine located in Mid West region of Western Australia. Part of the mine site can be seen in Figure 3 and Figure 4. Motherwell has been awarded as the Systems Integrator and charged with the programming and construction of the Process Control System network. General Electric PLC and SCADA equipment are being used for the PCS. Figure 3 - Karara Environment Figure 4 - A Concentrate Thickener under Construction in Karara 15 Motherwell Internship Engineering Internship 19/12/2011 Jamie Colquhoun The iron ore process for the Karara mine is separated into 23 different areas each representing a different part of the iron ore process. The relationship between the different areas can be seen in Figure 5. These areas are: 1301 – Primary Crushing 1302 – Crushed Ore Stockpile 1303 – Secondary Crushing and Screening 1304 – HPGY + HPGR Screens Conveyors 1305 – RMS 1306 – Ball Mills 1307 – IMS and Derrick Screening 1308 – Fine Grinding Mill 1310 – CMS 1311 – Flotation 1312 – Regrinding 1313 – Concentrate Filtration 1314 – Concentrate Filtration 1315 – Concentrate Storage 1317 – Tailings Thickener 1318 – Tailings Filtration 1319 – Tailings Disposal 1320 – Raw Water 1321 – Process Water 1322 – Compressed Air 1323 – Collector Supply Saturation & Distribution 1450 – Operations Water Supply 16 Motherwell Internship Engineering Internship Jamie Colquhoun Figure 5 – Area Interactions 17 19/12/2011 Motherwell Internship Engineering Internship 19/12/2011 Jamie Colquhoun These sections are then programmed separately, while still interacting with each other. The device used to program these sections is a GE PLC, the RX3i. There are multiple PLCs in the plant, each controlling, multiple or single sections. The PLCs communicate directly with each other and SCADA through a redundant Ethernet network, operating over an exclusive subnet for PLCs only. The devices are connected to the PLC through either a RIO rack (GE‟s Versa Max controllers), Modbus or Profibus. There are also several vendor controlled PLCs which will also communicate to the GE PLCs. These PLCS are of different brands, including Allen Bradley and Siemens. 9.1.1 AREA DESCRIPTIONS Following are brief descriptions of each area of the plant. 9.1.1.1 1301 – Primary Crushing This is the first size reduction step in the production, it receives ROM ore with a top size of 1,200mm and produces Secondary Crusher feed material at a particle size of 152mm. Crushing is the main aim of this area, however some tramp metal is also removed. 9.1.1.2 1302 – Crushed Ore Stockpile This area as the name suggests is a large stockpile of ore from Area 1303. This ore is then distributed to Area 1304. 9.1.1.3 1303 – Secondary Crushing and Screening Area 1303 receives the crushed ore from area 1301. The ore is further reduced in size and then distributed with a nominal P80 of 28mm to Area 1302. 9.1.1.4 1304 –HPGR Screens Conveyors This Area is fed ore from the stockpile, Area 1302. It then supplies the downstream processes with sufficient tonnage of the correctly sized product to meet the demand. These areas are the Rougher Magnetic Separators and the primary grinding mills. Product size is characterised by a P80 of 1800 microns. Thoughput is equally divided between the two HPGR units. Each HPGR unit has its own products handling, screening, recycle and delivery systems. 18 Motherwell Internship Engineering Internship 19/12/2011 Jamie Colquhoun 9.1.1.5 1305 – RMS This area is fed from area 1304 and consists of four groups of six RMS units. These units separate the metallic components from the ore, producing a concentrate of approximately 56 % w/w discharging to the primary grinding cyclone. This is the key point of this area, to reduce the load on the cyclone while maximising magnetite recovery. The non-metallic product is discharged to the tails dewatering stream. 9.1.1.6 1306 – Ball Mills The Ball mills consist of four ball mills operating in parallel, their associated services and the ball charging system. The purpose of this area is to grind and classify the concentrate received from area 1305 to a P80 of 55 microns in order for area 1307 to receive. Oversize material from area 1307 is also processed through the ball mills. 9.1.1.7 1307 – IMS and Derrick Screening The IMS circuit is a main magnetic removal stage. The IMS removes magnetite from the slurry, and the nonmagnetite is collected and transported to the tails thickener tank. The concentrate from the IMS is then pumped through the derrick screens which remove any oversize material to the primary grinding mills in area 1306. 9.1.1.8 1308 – Fine Grinding Mill The Fine Grinding Mills grind their feed received from IMS, from a P80 of 55 microns to a P80 of 35 microns to liberate further silica for removal in CMS. 9.1.1.9 1310 – CMS The CMS consists of 4 CMS units. These units separate the magnetite from the non-magnetic material. The product continues downstream to the Rougher Flotation area (Area 1311), whilst the tailings are again removed to the tailings thickener tank. 9.1.1.10 1311 – Flotation The main purpose of the flotation circuits is to remove fine silica entrained in the concentrate streams of the magnetic separation stages. The circuits consist of a rougher flotation circuit, followed by SMS then another flotation circuit. This process is outlined in more detail in section 10. 19 Motherwell Internship Engineering Internship 19/12/2011 Jamie Colquhoun 9.1.1.11 1312 – Regrinding Area 1312 provides another size reduction stage, and is integrated into Area 1311. More detail pertaining to this area is shown in section 10. 9.1.1.12 1313 – Concentrate Thickening The Concentrate Thickener is the first dewatering stage of the final magnetite concentrate. The Concentrate Thickener is fed via the Concentrate Thickener Feed Tank with flotation concentrate and filtrate from the concentrate filtration area. This concentrate then undergoes magnetic flocculation. The magnetic field of the flocculator magnetises the fine magnetite particles in the feed slurry, resulting in the agglomeration of solids similarly to that achieved via chemical flocculation in area 1311, thus promoting the settling rate of magnetite particles in the thickener. The concentrate is then fed to area 1314. 9.1.1.13 1314 – Concentrate Filtration Concentrate filtration consists of four filter presses which receive the concentrate from area 1313 and produce magnetite cake at a concentrate product quality that is ≤ 9% moisture. This filter cake is then discharged to area 1315 via a conveyor. This removed product undergoes no further unit operations. 9.1.1.14 1315 – Concentrate Storage The Concentrate Storage section performs the removal and stacking of the final product prior to rail transport to the port. The Concentrate Storage circuit receives magnetite from the concentrate filtration, area 1314. The magnetite is stacked onto a radial concentrate stockpile, which is loaded by FEL onto rail wagons which are then transported by rail to Forgation Port, for export to rural Russia. 9.1.1.15 1317 – Tailings Thickener The tailings thickener receives feed from a number of process streams which include: Dewatering screen undersize IMS tailings CMS tailings Scavenger flotation and SMS tailings Tailings filtrate Concentrate thickener overflow 20 Motherwell Internship Engineering Internship 19/12/2011 Jamie Colquhoun Backflush return from gland water filtration circuit Sump pump discharge from Area 1323 and PU-260 Flocculant is then added to this feed and settled. The concentrate then discharged to area 1318. 9.1.1.16 1318 – Tailings Filtration. The Tailings Filtration facilities reduce the silica slurry tailings to 15% moisture and send the produced cake to the Tailings Load out Conveyor. 9.1.1.17 1319 – Tailings Disposal The Tailings Disposal circuit receives tailings products from the coarse dewatering screens in area 1305 and fine tailings from tailings filtration, area 1318. The combined product is stacked onto a radial tailings stockpile, which is loaded by FEL onto a separate fleet of trucks for disposal in a designated area. 9.1.1.18 1320 – Raw Water The processing plant requires approximately 380m3/hr of raw water make-up into the process water system. This includes raw water for reagent make-up and gland water. Other requirements for raw water include the potable water system and fire water. Area 1320 supplies this raw water. 9.1.1.19 1321 – Process Water The process plant requires approximately 22,000 m3/h of water at nominal throughput rates, the majority of which is recycled process water. Located south of the Process Water Tanks is a Process Water Dam that is generally run empty. It is typically only used when there is insufficient capacity in the process water tanks due to major plant upsets or planned start-ups and shutdowns. The capacity of the Process Water Dam is 50,000m3. Process water is predominantly stored in two Process Water Tanks (connected via a common manifold) that have a combined storage capacity of 6,000m3. The Process Water Tanks are supplied with water via two gravity flow launders from the tailings thickener overflows. 9.1.1.20 1322 – Compressed Air Area 1322 supplies and services the compressed air needed for area 1314 and 1318. This area consists of ten air compressors. 21 Motherwell Internship Engineering Internship 19/12/2011 Jamie Colquhoun 9.1.1.21 1323 – Collector Supply Saturation & Distribution Area 1323 consists of the chemical reagent stockpiles and other chemicals needed in the plant. They are then distributed out from area 1323. 9.1.1.22 1450 – Operations Water Supply. Area 1450 consists of a bore pump system that pumps raw bore water from four bore fields into the process plant. 22 Motherwell Internship Engineering Internship 19/12/2011 Jamie Colquhoun 9.1.2 EQUIPMENT 9.1.2.1 PLCs Figure 6 - GE RX3i PLC with multiple modules (Electric, 2011) “The PACSystems RX3i controller is the latest addition to the innovative PACSystems family of programmable automation controllers (PACs). Like the rest of the family, the PACSystems RX3i features a single control engine and universal programming environment to provide application portability across multiple hardware platforms and deliver a true convergence of control choices.” (Electric, 2011) The RX3i controller has a 1.1GHz Intel® Atom microprocessor and up to 64 Mbytes of user memory which provides high performance from the controller. It is mounted on a universal backplane and has many different modules that can be attached. The main modules used for this project are Ethernet, Modbus, Profibus and a power supply. Most of the I/O is received from remote racks. The backplane also supports hot swap which minimizes downtime in a process plant. 23 Motherwell Internship Engineering Internship 19/12/2011 Jamie Colquhoun 9.1.2.2 Micro-Controllers Figure 7 - Range of VersaMax Controllers (GE, VersaMax PLC, 2011) The GE microcontroller, called VersaMax, is being used in the Karara plant as RIO racks. These are the remote I/O connections used as the base level communication method, connecting to many of the plant devices, then to the respective PLC. 24 Motherwell Internship Engineering Internship 19/12/2011 Jamie Colquhoun 9.1.2.3 Machine Edition Figure 8 - Example Machine edition Screens (GE, Machine Edition, 2011) “GE Intelligent Platforms‟ Proficy Machine Edition is a universal development environment for all your operator interface, motion and control applications. Proficy Machine Edition provides a common user interface, drag-and-drop editing, and support for the many editing components required for a project.” (GE, Machine Edition, 2011) Machine edition is similar to most ladder programming environments, based on the interns experiences. All components and applications are in the same workspace which allows for ease of application. This environment contains most of the common ladder elements such as function blocks and UDTs. A helpful tool is the toolchest, this allows a shared „toolchest‟ of different function blocks and UDTs to be shared across a network. When dragged into your own project these blocks update as the toolchest blocks update. Machine edition also allows direct copy/paste into MS Excel or a text program. This allows for easy replication of code using a custom made script. Other useful features include the feedback zone, this is an area consisting of various tabs that contain useful information. These tabs are the build information, messages, import information, reports, variable references and compare. This is seen in Figure 9. 25 Motherwell Internship Engineering Internship 19/12/2011 Jamie Colquhoun Figure 9 - Feedback Zone 9.1.2.4 CIMPLICITY Cimplicity is GE Proficy‟s client/server based visualization and control solution. Cimplicity is the main tool used in the SCADA/HMI design. Cimplicity is a complete SCADA program that allows configuration of the server, and the creation of the screens. It links in easily with GE Machine Edition and PLCs. The intern did not directly use the program to create a SCADA screen, this was done by the SCADA team members. The intern did use it to test the screens and make minor changes to them. An example HMI screen is shown in Figure 10 – Sample HMI Screen. 26 Motherwell Internship Engineering Internship Jamie Colquhoun Figure 10 – Sample HMI Screen 27 19/12/2011 Motherwell Internship Engineering Internship 19/12/2011 Jamie Colquhoun 10 AREA 1311/1312 “Area 1311 and 1312 consists of rougher flotation, followed by a regrind stage and then scavenger magnetic separation, with SMS concentrate feeding the final scavenger flotation stage. The main purpose of the flotation circuits is to remove fine silica entrained in the concentrate streams of the magnetic separation stages.” [3.] The process initiates with four CMS concentrate streams at 56% w/w solids being received into the flotation surge tank. This tank has a residence time of three hours and a volume of 40000 m3. The next stage is the rougher flotation stage which consists of three 100m3 conditioning tanks and six 100m3 Outotec flotation tanks in series. The concentrate is pumped from the flotation surge tank into the first of the rougher flotation conditioning tanks. This slurry stream is diluted to 35% w/w solids. The slurry is mixed with various reagents, collector, depressant and frother in the conditioning tanks. The first tank has a blade agitator while the second and third have flotation cells and include flotation mechanism and froth collection launders. If required, these two tanks can be configured to operate as supplementary flotation cells. The purpose of these conditioning tanks is to provide time for the reagents to affect the mineral surfaces, the two reagents that will effect this change are the depressant and collector. The depressant is Dextrin TY and is a soluble polymer that coats the mineral surface. This inhibits collector adsorption which prevents the magnetite floating. This avoids the magnetite being removed to the tailings stream. The Collector is a cationic amine which selectively adsorbs onto the silica particle surfaces and encourages the particulates to become hydrophobic, which promotes the silica particles to attach to rising air bubbles. These bubbles are collected from the surface of the cell in froth launders, reporting to the tailings stream. The frother, as the name suggest enables bubbles to form a well dispersed, thick layer at the top of the tank which can easily be removed. These reagents are added in sequence and the piping arrangements allow each reagent to be added to any of the three tanks independently. Manual valves are used to determine the split of a reagent. Manual valves are also used at the dosing points for calibration of the reagent dosing pumps if needed. Collector is always required, independent of ore mineralogy while the frother and depressant are not always needed. The conditioned slurry flows through the tanks via a pair of dart valves controlled via an ultrasonic level device. The slurry flows under gravity through the conditioning tanks and down the rougher flotation cell bank. The rougher flotation cells are arranged in a 2-2-2 method with each part of cells controlled by a single ultrasonic level device. Air is introduced to the agitators via the flotation blowers, and through a flow control valve 28 Motherwell Internship Engineering Internship 19/12/2011 Jamie Colquhoun individual air flow control can be maintained to each cell. As above the froth is removed to the tailings while the magnetite concentrate progresses down the flotation cells, discharging into the flotation concentrate tank. The regrind feed tank pump delivers the rougher flotation tailings to the regrind circuit in area 1312. The speed is controlled via a level device on the regrind feed tank. The tailings have a pulp density of 35% w/w solids and are fed to the Regrind dewatering cyclones to achieve the mill feed density of 60% w/w solids. The cyclones consist of ten 380mm cyclones on a single distributer. The regrind mill consists of a single Nippon Eirich 1.1MW tower mill. This mill is charged with 20mm grinding balls which are loading via the area 1308 ball loading system. The discharge of this mill reports to the regrind coarse classifier on the side of the tower mill. The underflow, which is the coarse product, is recycled back into the mill via the recirculation pump. The over flow reports to the SMS feed tank where is combines with the cyclone over flow. The regrind circuit reduces the feed F80 of 35µm to a product P80 of 25µm. The SMS feed pump delivers the regrind product to the SMS circuit. Process water is added to the SMS feed tank for density control if needed. The SMS circuit provides another magnetic separation stage, this removes any liberated silica generated in the regrind circuit. The SMS is a six way distributer with two feed streams flowing via gravity from the distributer to each of the six SMS units. The SMS concentrate gravity feeds into the first scavenger flotation conditioning tanks while the tails reports to the scavenger tailings tank. The scavenger flotation conditioning tanks and scavenger flotation cells serve the same function as the rougher flotation area, as described above. The only difference in this process is the scavenger tanks are 50m3 while the rougher tanks are 100m3. The slurry discharges from the last scavenger flotation cell to the Flotation Concentrate Tank. The tailings are discharged into the scavenger tailings tank. The scavenger tailings tank are pumped into the tailings thickener feed tank via the scavenger flotation tailings pump controlled by an ultrasonic level device on the scavenger tailings tank. The rougher and scavenger flotation concentrate is divided into two sections in the flotation concentrate tank. Each section has a corresponding Flotation pump controlled in a duty/standby arrangement by the corresponding level device on each tank section. The slurry is then discharged out of the area to the concentrate thickener feed tank for dewatering. Area sump pumps are positioned at various locations in Area 1311 and 1312 to handle spillage, wash down water and rainfall 29 Motherwell Internship Engineering Internship 19/12/2011 Jamie Colquhoun The Flotation Concentrate Tank collects rougher and scavenger flotation concentrate via the Flotation Concentrate Launder. The Flotation Concentrate Tank is divided into two sections, each section feeding a Flotation Concentrate Pump. Dart valves divert slurry to the duty Flotation Concentrate Pump which discharges the slurry to the Concentrate Thickener Feed Tank for dewatering. Each Flotation Concentrate Pump has a VSD and is speed controlled by the respective ultrasonic level device located above each section of the Flotation Concentrate Tank. Area sump pumps are positioned at various locations in Area 1311 and 1312 to handle spillage, wash down water and rainfall. 10.1.1 EQUIPMENT LIST This functional area is serviced by PLC 1311-PC-115 in 1311-SR-109. Table 2 below contains equipment controlled the first area of area 1311, flotation surge tank, a full equipment list can be found in Appendix 14.1. The P & ID drawings are shown in Appendix 14.1. IDENTIFICATION P&ID TAG PLC DESCRIPTION 1311-PC-115 Sump PU-161 Drive Flotation Area AG-009 Drive - Flotation Surge Tank PU-151 VSD Drive Flotation Surge Tank PU-152 VSD Drive Flotation Surge Tank DEVICE TEMPL ATE P&ID DRAWING Flotation Surge Tank P1311PU161 P1311AG009 P1311PU151VSD P1311PU152VSD 1311-PU161 1311-AG009 1311-PU151 1311-PU152 1311-PC-115 1311-PC-115 1311-PC-115 LV3 LV2 LV6 LV6 1311-PR-DRG1101 1311-PR-DRG1101 1311-PR-DRG1101 1311-PR-DRG1101 Table 2 –Area 1311 Equipment List 10.2 PROJECT DESCRIPTION Area 1311 and 1312 are major sections of the iron ore plant, they are grouped together and are both controlled by the same PLC. The project description is to program the PLC for area 1311/1312. These two sections are not the only sections contained in the PLC, area 1322 and 1323 are also contained. These two areas are relatively small, consisting mainly of the configuration and control of different devices. There are no PID loops and only small sequences to program. The coding of these areas is included, but the testing is not part of in the internship. 30 Motherwell Internship Engineering Internship 19/12/2011 Jamie Colquhoun Communication is required between this PLC, and other areas/PLC in the plant. One part of 1312, is contained in another PLC and will not be programmed by the intern. The programming of this PLC contains the configuration, control, communication, simulation and area sequences. This work will be completed in tandem with another internship student Scott Whitmore, working together as a successful team. This helps to generate group skills needed in the industry. The larger group consists of all members of the Karara group, as a system engineer it is expected to work together with the other engineers, both SCADA and PLC. Many problems and issues were found during the completion of the project, mainly in area 1311 as this was the area that was tested. Assistance was given on these matters and communication with the other engineers ensured each member was kept apprised and each section was similarly programmed. This is important to ensure consistency which is highly important when programming a large project. Communications with SCADA engineers is also important as much of the sequences rely on SCADA, as most of their HMI screens are defined by the PLC code. These screens are also tested by the intern in tandem with the PLC code. Communications and updates were maintained with the SCADA engineers. 10.2.1 SCOPE This project is significant to Motherwell as it is a vital component of the Karara mining project. It is set out in a functional specification and must be delivered as part of the deliverable items to the client. The requirement for completion is the completed code for 1311PC115, and its interactions with adjoining PLCs. 10.2.2 INCLUSIONS The PLC program contains the programming of the specified areas. The testing and documentation of this program is to be included. Alterations and re-work as defined by the client or through Technical Requests are to be included. Internal and FAT testing with the client is also to be included. 10.2.3 OMISSIONS The final installation and commissioning of the system shall not be considered due to time constraints. The development of the different templates, and other functions blocks are completed by other engineers. The Inter-PLC communications is also not included due to time constraints. Hardware issues such as layouts, construction of the panels and such are not included. Simulation code will be implemented to work around such issues. Issues on Hold, due to lack of information, template development or other issues will not be considered in the final submittal. 31 Motherwell Internship Engineering Internship 19/12/2011 Jamie Colquhoun 10.2.4 PROJECT DELIVERABLES The items that need to be submitted both to the client; Motherwell and Murdoch are as follows: Area 1311 - Functional Description Area 1311 – FAT Documentation Area 1311 – Completed FAT Completed PLC code for 1311PC115 10.2.5 TIMELINE The final due date for the completed and tested PLC code is the 1st of November 2012. It is expected that this project will take all this time. The main time factors are the reliance on the client for information, as much information is still on hold and template development which is discussed in section 10.3.1. 10.2.6 MEASUREMENT OF SUCCESS The success and quality of the project will be how the project is measured against the functional specification [3.] And the FAT test results. The commissioning of the system is considered not to be in the timeline due to time constraints. PC115 will be approved by senior staff at Motherwell and the Client, Karara Mining Ltd. 32 Motherwell Internship Engineering Internship 19/12/2011 Jamie Colquhoun 10.3 INITIAL CONFIGURATION Each PLC can control multiple areas of the process. Area 1311, as described above, is controlled along with 1312, 1322 and 1323 by PLC 1311_PC115. The programming Language used was Ladder, and the programming environment GE Machine Edition. 10.3.1 TEMPLATES There are various templates defined in this project, programmed in ladder function blocks, which are created whenever repeated code is detected. This enables changes made to this code to dynamically update across all the projects. These templates consist of most of the devices in the plant. Some of these templates are deliverable items, defined by Karara, while others have been created by Motherwell to assist with the programming. The current blocks defined are shown below. Air Circuit Breaker Air Conditioner Analog Valve Analogue In Analogue In Extended Ball Mill Battery Charger Chiller Unit Conveyor Digital In Digital Valve Direct Online Duty Standby Extended conveyor Extended Duty Standby Feeder Heater High Voltage Switcher Liquid Resistance Starters Medium Voltage Switcher Medium Voltage VSD PID Controller 33 Motherwell Internship Engineering Internship 19/12/2011 Jamie Colquhoun PUMP block Sump Uninterrupted Power Supply Variable Speed Drive Each template consists of a function block and a Unique Data Type (UDT). The UDT contains the variables needed in the block. This includes the inputs and outputs of the templates and internal reference points. This UDT can contain different types of variables within, including other UDTs. The function block is generally a ladder block that defines the function of the block. There are some “Structured Text” coded blocks, these are simulations. Each instance of the template has a different input of a UDT specific to the device, a SCADA pointer specific to the device and a buffer allocation. The UDT contains the parameters needed to configure the template block to each application and device. Each individual UDT instance is given a name corresponding to its instance and device type. Sump pumps for example follow the following naming convention: PU302DRV01 – Drive instances (DOL template), PU – Pump, 302 – refers to specific pump, DRV01 – means 1st (and in this case only) drive of the device. This calls upon the physical device and receives information. A shortened list of the variables can be seen in Table 1. PU302 – Contains the control logic for a Sump Pump instance, this involves mainly the interlocks, permissives and on/off nature of a sump. These must be linked to with the DOL block. This template is specific to a sump, while the DOL is a general template across all DOL pumps. NAME DEFAULT DESCRIPTION TYPE AUT_C Auto Mode Command - SCADA Bool MAN_C Manual Mode Command - SCADA Bool LOC_C Manual Local Mode Command - SCADA Bool REM_C Manual Remote Mode Command - SCADA Bool OTM_C Out To Maintenance Mode Command - SCADA Bool FLT_RST_C Fault Reset Command - SCADA Bool STAT_RST_C Statistics Reset Command - SCADA Bool SPARE_A Spare Alarms Word AMPS_S Current Real NUM_STT_S Number of Starts Statistic DInt RUN_HRS_S Run Hours Statistic DInt 34 Motherwell Internship Engineering Internship 19/12/2011 Jamie Colquhoun NAME DEFAULT DESCRIPTION TYPE RUN_MINS_S Run Minutes Statistic Int RUN_SECS_S Run Seconds Statistic Int TRP_ILK_M Mapped Trip Interlock Word FWD_PERM_ILK_M Mapped Forward Permissive Interlock Word REV_PERM_ILK_M Mapped Reverse Permissive Interlock Word SCADA_PADDING Padding for SCADA Word AUT_FWD_C Auto Start Forward CMD Bool AUT_REV_C Auto Start Reverse CMD Bool AUT_STP_C Auto Stop CMD Bool RUN_S Running Status Bool GEN_WRN_IC General Warning Fault Status Bool PRG_IC Programming Mode Status Bool AMPS_AIC Actual Motor Current (A) Int AMPS_RAW_MAX Scaling Parameters for Actual Motor Current Int AMPS_RAW_MIN Scaling Parameters for Actual Motor Current Int AMPS_FILT_RAW_S Scaling Parameters for Actual Motor Current Int AMPS_T_FILT Scaling Parameters for Actual Motor Current DInt ALM_DIG1 Custom template for Digital Alarms CustomStruct ALM_FTX_2D Custom template for Analog Alarms CustomStruct MODE Custom template for Mode CustomStruct CTRL_DRV_AM_2D Custom template for Drive control CustomStruct SCALE_REAL_AMPS Custom template for Scaling CustomStruct Table 3 – DOL UDT SCADA reads from this UDT, all values before the SCADA PADDING are transferred to SCADA. This is how the data for each device is shown on SCADA. The templates also need to be approved by Karara. Therefore there was a considerable amount of updating of the templates as changes were made to the templates. This was still much easier than working with „flat code‟. Much of the programming was completed initially with unapproved blocks. These were replaced with the correct blocks once they were approved. 10.3.2 STRUCTURE The first step in the programming of 1311 was to create the folder structure that the program will be built around. Because of the size of the project it is important to plan, and stick to a structure so later down the 35 Motherwell Internship Engineering Internship 19/12/2011 Jamie Colquhoun track the program is still easy to use, understand, edit and find errors. The PLC programming structure is built up based on this concept. An example of this structure can be seen in Figure 11. Figure 11 – Programming Structure This structure shows that each separate area, which corresponds to a separate process, which in this area was the same as each P&ID, is broken down into the equipment types. The structure was not defined specifically by Motherwell, but each person used their own interpretation of this structure. This structure breaks down the control and configuration of each area into three areas, equipment (drives, pumps, etc), Instruments (digital/analogue inputs) and Valves (digital/analogue). Each area is then broken down into two ladder blocks, configuration and control. The communication of these devices is given their own folder. This can be seen in Figure 12. 36 Motherwell Internship Engineering Internship 19/12/2011 Jamie Colquhoun Figure 12 – Comm Folder Configuration These structures also show that the two areas in PC115 are separated. Part of 1312 is not contained in PC115, but is in PC065. This means that communications must also be made between these two PLCs. Figure 13 – Configuration and Control Blocks 10.3.3 COMMS Figure 12 shows the communication (comms) blocks for the different areas. These communication blocks allow the template block to communicate with the device in question. The type of communication specifies how the device and PLC communicate with each other. Profibus is the main communication type in this project. Profibus is an industrial standard field bus communication system. There are two types of profibus communication, DP and PA. Both are used in different parts of the plant. The comms block maps different outputs/inputs to each profibus device, this I/O includes comms alarms and other communication 37 Motherwell Internship Engineering Internship 19/12/2011 Jamie Colquhoun properties. The different devices include analogue inputs, valves, pumps (DOLs and VSD‟s) and blowers. The other main communication is Remote I/O (RIO), for this project VersaMax, a GE microcontroller, are being used as RIO racks. RIO simply connects to the project via a reference address allocated to the correct variable. The RIO generally consists of the simpler devices such as solenoid valves. Figure 14 - Communication Block for a Control Valve 10.3.4 CONTROL Figure 13 in the previous section shows the control blocks, these blocks call upon the different templates for each device and their different control parameters. Figure 15 shows trip interlocks and Figure 16 shows an example of a VSD and Pump template being called. Figure 15 – Trip Interlock Block Configuration 38 Motherwell Internship Engineering Internship 19/12/2011 Jamie Colquhoun Figure 16 - VSD and PUMP Control Blocks The other functions of the control block include setting the forward and reverse permissive, as well as the interlocks for each device. These are the associated conditions which allow the devices to operate within their designed parameters. Permissives, trips and sequence interlocks are used to control plant equipment: “A permissive is a condition which must be set prior to plant equipment being allowed to start. Permissives apply in both Auto and Manual mode. Once the plant equipment in question has been started, the removal of a permissive will not cause it to stop. Reversing equipment will have permissives applicable for each direction of travel. Furthermore, valves will have permissives associated with each motion. 39 Motherwell Internship Engineering Internship 19/12/2011 Jamie Colquhoun A trip is a condition that must not exist for equipment to operate. The drive can start if the trip is active, but will stop straight after. A sequence interlock is one in which a unit will not engage or operate until other conditions in the particular sequence are met.”“ (Motherwell, 2011) There are also some application specific templates which are also called upon. These blocks are used internally in the PLC to perform some specific control logic. In 1311 these blocks are: PID – PID controller PUMP – Used when a pump with gland/scuttle/suction valves (VSD/DOL) is required SUMP – Used to control a Sump Pump DTY_STY – Duty Standby Block The pump and the sump block are called upon directly after the VSD/DOL template for the pump. These allow additional configuration and application of the pump to be easily accessed. The pump template also needs to know the valves which correspond to the pump. This template can then start/stop the pump and open/close the valves as needed. The sump pump controls the DOL drive, using upper and lower limits to control the speed. The DTY_STY block allows for two or more devices to be put into duty/standby mode. This block links in with the PUMP block since pumps are the most common devices in this mode. The PID loops is a more complicated template. The PID template is described in more detail in section 11.1. As well as defining the controller name and pointer, any special control of the PID loops must be defined here. For area 1311 there are two special cases of control which are shown in section 10.7.1. Other control parameters are defined in this block; these include PID transitions, mapping of calculated inputs, i.e. a value worked out in the PLC and timing of starting/opening a device. All conditions for different control of the devices is included in this block. 10.3.5 CONFIGURATION The configuration block defines the configuration of each template instance. These are the parameters which ensure the template matches the real life device. An example is shown in Figure 17. 40 Motherwell Internship Engineering Internship 19/12/2011 Jamie Colquhoun Figure 17 – Configuration of a Valve Different parameters are mapped out to the UDT which corresponds to the device. This ensures an easy configuration for most devices, and an easy change if a different configuration is needed. As well as the device templates, the PID loops, etc are also all configured in this section. The configuration parameters include time parameters, limits, outputs/inputs to SCADA, disabling and enabling different functions and other device specific configuration parameters. The configuration of these devices depends on the model of the type of device. Most of the main devices have several different configurations referring to each different type. These types and configurations are defined in the Functional Description (FDS) for each template. This FDS defines the configuration parameters, alarming, modes, control, scaling as well as the SCADA faceplate and SCADA relationship. Most of these FDS‟s contain a general description with different configuration parameters for each model of the device. An example of a different configuration for a DOL type device can be seen in Table 4 and Table 5. The only difference in the configuration is that „LV2‟ does not have a Thermistor input. The other configuration parameters defined the scaling of the values, alarm timers and enable/disable different commands and inputs. The DOL template has 6 different types, as shown in Table 6. TAG ID <Device>.FTS_TIME <Device>.COMMS_DT <Device>.AMPS_RAW_MAX <Device>.AMPS_RAW_MIN 41 DESCRIPTION Configure the Fail To Start timer value Configure the Comm.‟s Fail debounce timer value Configure the Raw Amps Maximum value Configure the Raw Amps Minimum value UNITS Milliseconds Milliseconds Integer Integer Motherwell Internship Engineering Internship 19/12/2011 Jamie Colquhoun TAG ID <Device>.AMPS_ENG_MAX <Device>.AMPS_ENG_MIN <Device>.MAN_REV_C <Device>.LSTART_REV_IC <Device>.AUT_REV_C <Device>.FLOC_SEL_IC <Device>.TMP_IC DESCRIPTION Configure the Engineering Amps Maximum value Configure the Engineering Amps Minimum value Disable the Reverse command in Manual mode Disable the Reverse command in Local mode Disable the Reverse command in Auto mode Disable the Field Local Selector Switch input Disable the Thermistor input UNITS Real Real Boolean Boolean Boolean Boolean Boolean Table 4 – Standard Configurable Parameters for ‘LV1’ TAG ID <Device>.FTS_TIME <Device>.COMMS_DT <Device>.AMPS_RAW_MAX <Device>.AMPS_RAW_MIN <Device>.AMPS_ENG_MAX <Device>.AMPS_ENG_MIN <Device>.MAN_REV_C <Device>.LSTART_REV_IC <Device>.AUT_REV_C <Device>.FLOC_SEL_IC DESCRIPTION Configure the Fail To Start timer value Configure the Comm.‟s Fail debounce timer value Configure the Raw Amps Maximum value Configure the Raw Amps Minimum value Configure the Engineering Amps Maximum value Configure the Engineering Amps Minimum value Disable the Reverse command in Manual mode Disable the Reverse command in Local mode Disable the Reverse command in Auto mode Disable the Field Local Selector Switch input UNITS Milliseconds Milliseconds Integer Integer Real Real Boolean Boolean Boolean Boolean Table 5 – Standard Configurable Parameters for ‘LV2’ TYPE LV1 LV2 LV4 LV12 LV13 LV14 DESCRIPTION DOL DOL with Thermistor Reversing DOL Reversing DOL with Thermistor DOL with Siren (Conveyor) DOL with Thermistor and Siren (Conveyor) Table 6 – DOL Types As well as the template FDS‟s there are 3 other main sources of information used to program area 1311: I/O List Philosophy document/Area FDS P&ID‟s The I/O list contains all the I/O required in the PLC being used. This is the main source of information on each device, as it is essentially a large database on the area. The information contained relates to both hardware and software and can be seen in Figure 18. 42 Motherwell Internship Engineering Internship 19/12/2011 Jamie Colquhoun Figure 18 – I/O List Headings The philosophy document is completed by the client and contains the workings of the area. It includes interlocks, alarms, start-up and shutdown sequences, process variables and PID loops. Each device is 43 Motherwell Internship Engineering Internship 19/12/2011 Jamie Colquhoun mentioned, and the control defined. This document is then re-written into a FDS which defines the code created, and what the code does. It is from this document that the code is created, and it is this document that changes, when the code is changed. The final documentation type used are the P&ID drawings for each area. These are used to visualize the area that is being coded. This ensures that we understand what the area does, and that our code successfully implements the area. Each of these documents is split into the different sections as defined by the different processes. 10.4 AREA SEQUENCES There are two area sequences to be programmed in PC115, shutdown and start-up. The day to day running of the system is controlled by the different configuration and control of the devices, and the CRO. The Area sequence folder is configured in Figure 19. Figure 19 – Area Sequences Folder The three main blocks are FLT_GRP_SEQ – Configures devices to be ready for the group start/stop sequences FLT_GRP_STT – Group Start Sequence FLT_GRP_STP – Group Stop Sequence. The area sequences are defined in the philosophy document, however due to some issues with the document some of the information comes from technical queries. There is a state machine approach taken to the programming of the sequences. A branch is shown in Figure 20. 44 Motherwell Internship Engineering Internship 19/12/2011 Jamie Colquhoun Figure 20 - Area Sequence State machine Implementation The approach checks which state it is in, and then implements three steps, Action, Status Checking and Transition. The action completes the step‟s action, the status checking ensures that there are no errors with any of the devices used and the transition changes the sequence number assuming the transition conditions are met. There are several groups created in the group sequence section, these help with the ease of accessing the area and for emergency situations. These groups include: Start Permissive – All other required areas are ready for a group start Stop Permissive – All other required areas are ready for a group stop Device Availability – Ensures all devices are available Device Auto Mode – Ensures all devices are in Auto mode for group sequences Set to Auto – Sets all devices and PID loops, that are not in maintenance mode, to auto mode Crash Stop – Sets all devices to their failsafe state. 10.4.1 PROBLEMS Area 1311 has a unique sequence which caused many problems in its programming. The first problem was the number of steps. In the PHL it was defined at 33 steps. The current group sequence UDT defines 2 words (32 Bits) for the steps of each sequence. The GRP_SEQ had to be changed to allow for the extra steps. Another issue was the configuration of the gland/suction/scuttle valves for each valve. The pump block allows the configuration of the valves to occur whenever a start sequence is issued for the pump. Area 1311 sequence however defines the valve configuration approximately 15 steps before the pump is started. This 45 Motherwell Internship Engineering Internship 19/12/2011 Jamie Colquhoun ensured that the valves would need to be configured manually before the pump block was called. This needed a change to allow manual control of the valves when using the pump template. Area 1311 was one of the first areas to go to FAT with popups in its start/stop sequences. These popups were not defined when the programming commenced and consisted of an extra window that opens whenever called. The implementation had to be defined and input was given as to how they should be configured. The popups rely on two interacting variables between SCADA and the PLC, feedback and Popup. The popup text and buttons are defined in a text document accompanying SCADA. The interaction is shown in Table 7. PLC Number corresponding to a popup in the text document is sent to the „.SCADA_POPUP‟ bit. Waits for feedback Receives SCADA feedback from „.SCADA_FB‟ as a number corresponding to the option chosen. This response defines how the PLC responds. The Popup is reset by sending a „0‟ to „.SCADA_POPUP‟ SCADA Receives this value and displays the corresponding popup. User inputs to the corresponding button, which is either Done/Ok or Options Popup disappears once the option is chosen. Popup “.SCADA_FB” and “.SCADA_POP” reset to 0 Table 7 – POPUP Sequence 10.5 SIMULATION The next step once the configuration and sequences have been completed is to start testing the program. The first step is to validate the project to ensure there are no errors that would cause the program to not work. GE machine edition has no inbuilt simulation system; a PLC is needed to test the program. Before the testing can occur, simulations of each device need to be programmed. These templates simulate the real world devices, the behaviour of the devices, feedback and communication method. The simulation templates are configured and controlled similar to the device templates. This is shown in Figure 21 and Figure 22. 46 Motherwell Internship Engineering Internship 19/12/2011 Jamie Colquhoun Figure 21 - Simulation Folder Outlay Figure 22 - Simulation Configuration and Control Other factors that are simulated are the inputs and outputs to the SCADA system. When testing, the program is used in tandem with the SCADA screens on a separate display. In order to communicate with the SCADA system the Pointers sent to the control blocks, as shown in Figure 16 by the _PTR tags, need to reference the correct memory reference which SCADA reads/writes from/to. GE ME has the ability to export the variable list into excel, this made changing the memory references easier. The memory references are defined and stored in a spreadsheet. This spreadsheet automatically updates the size of the pointer references as the different device class‟s change. A script written by a SCADA team member allows these variables to be imported into ME. Once the memory addresses of the PTR addresses are updated, the specific PC115 IP address needs to be linked in SCADA to their device of PC115. Once this has been linked the SCADA screens should show the information from the PLC. 47 Motherwell Internship Engineering Internship 19/12/2011 Jamie Colquhoun 10.6 TESTING 10.6.1 TIMELINE The timeline given for testing and a submittal date is shown in Table 8. This was the only timeline given in the completion of this project as the entire testing timetable was not defined at the time of commencement of the project. DESCRIPTION START DATE Internal FAT Testing FAT Documentation FAT Test Final Code Submittal 12th September 30th September 13th October 1st November Table 8 – Testing Dates 10.7 PROBLEMS As with any project, problems occurred. The important factor is not that problems occurred, but that there is a method to remove and resolve the issues. The main form of resolution for issues was to rely on the capable engineering team members. Many issues involving area 1311 arose from template issues. These issues are best dealt by whoever created the template as they understand and can change the template. Due to the interns relative inexperience in industrial programming and no prior experience with GE equipment there were many issues solved by the more experienced engineers. If the issue was determined to be an issue with information supplied by the client, or lack thereof, a Technical Query (TQ) can be issued to the client. There were 4 TQ‟s sent to the client by the intern: TQ-115 – Many agitators were not included in the Stop Sequence, this TQ asked for confirmation on the stopping of the agitators. TQ-121 – Confirmed some variable naming errors. Clarification was needed on the two process variables for the cascaded controller. The bias component needed for a PID controller, further discussed in section 10.7.1.2, was needed confirmation on its implantation. Two control loops were meant to control a digital valve; confirmation was needed on the control. TQ-126 – The conditional control loops needed more information for their implementation TQ-127 – A question was raised on the positions of the pump valves in start-up/shutdown sequences. 48 Motherwell Internship Engineering Internship 19/12/2011 Jamie Colquhoun 10.7.1 PROCESS PROBLEMS Area 1311 is a complicated area from the process side of things. The PID loop controls are not all simple and the interns experience from the instrumentation and control degree helped the intern to solve and understand the problems. There are two main PID loops that have process control problems. 10.7.1.1 Conditional Control Loop There are two control loops, FC and LC which control the same process variable, the duty flotation surge pump PU-151/152. The transition between which controller is used is dependent on the level in the flotation surge tank. There are two limits, upper and lower, that are set on SCADA. When the tank goes above or below these limits the control of the pumps is to change to the level controller, LC4031. The pumps are then to be controlled by the level controller until the tank level reaches the midpoint of the upper and lower limit. At this point it reverts back to flow control, FC. 10.7.1.2 Gain Factor Each set of two flotation tanks, from both scavenger and rougher flotation, have a level controller attached, that controls the two output dart valves to change the level. The special control requirements is adding a control variable bias. This bias is to be the flow rate from upstream in the system. This is then to be multiplied by a “Gain Factor” that is configurable from SCADA. This is so the large flow rate can be configured to a reasonable value for the CV bias, as the CV limits are 0-100. Since there are 8 flotation cells in both scavenger/rougher, the slurry will take time to go through the system. A time delay is used on the flow rate, so each tank responds in turn to the change upstream. This bias allows the system to react quicker to changes upstream. 10.7.2 UPDATES The templates for the program have to be first approved by the client before they can be tested in the PLC code. Often they changed based upon client comments, causing changes to our existing template control and configuration.. The templates are updated on the PCM server. A new philosophy document was also released just before internal testing, this caused the project to delay by approximately 1 week. This issue did not affect the end due date. There were many changes included in the update, often to correct an error brought up in a TQ. 49 Motherwell Internship Engineering Internship 19/12/2011 Jamie Colquhoun 10.7.3 FAT TESTING FAT allows the client to review and accept / change the software created. It is an important step as it allows clients to ensure the code created is acceptable and allows Motherwell to get work signed off as completed. The FAT testing occurred two days after the scheduled time, this was due to the release of the new PHL document which caused some re-work to occur. The testing took five days, running five days under the revised schedule and 3 days in the original schedule. The testing procedure was to run through the prepared FAT document with a client representative following the procedures lined out for each different device. Issues found are logged into the change management program, JIRA. There are two categories used for this test, Area 1311 FAT and templates. The Area 1311 FAT section was used for issues pertaining to this area and the template section was used for the template specific problems. The cataloguing of these errors also had a number system to show what type each error is. This was as follows: 1 – Bug – Error created by Programmer. 2 – Interpretation – Error created by miss-interpretation of Karara documentation. 3 – Change – Change wanted by KML, not included in any previous documentation. 4 – Hold – Issue on hold pending approval, or more information. 5 – Query – Issue that KML must confirm. 69 issues were found during this test. The major issues were of category 3 and 5. These were not errors but changes that are to be made after a change in requirement was made. From this stage, the errors and changes need to be implemented and then a second FAT undergone that also checks the items on hold, such as the PID loops and the Flotation air area. The experience was invaluable as this was the first review taken of this project and helped to improve the interns communication skills with the client. Overall the issues were generally either small, or a change/hold/query. Many of the small mistakes were from SCADA rather than the PLC code. 10.8 EVALUATION The work completed in area 1311 is exactly the work that the Industrial computing systems at Murdoch trained the intern for. There were many aspects such as ladder programming, communication methods and SCADA that directly relate to work completed. This type of work allows the intern to gain experience in bringing the skills learned at university over to the workplace. An important factor in the experience gained is 50 Motherwell Internship Engineering Internship 19/12/2011 Jamie Colquhoun that unlike a thesis, this project is the type of work the intern will complete after graduation. The workplace experience is a realistic representation of a workplace environment. This project also provided the intern with experience and skills in project and self management. The workplace is different to university with the management of due dates, this project provided the skills required to manage a project, and one‟s own time. The due dates and testing times had to be communicated and managed by the intern successfully. Keeping such a large program well coded consistently and commented was also a large task. Communicating with the system engineers helped in this aspect. As well as allowing the intern to transition into a contributing team member. Similar code had to be consistent and the templates and other updates had to be kept up to date with. This provided a realistic workplace environment. 10.9 PROJECT OVERVIEW CCTV is a requirement of the Karara mine PCS system as set out by the Karara mining group. This project involves the general technical designing, implementation, testing and commissioning of both the hardware and software of the CCTV system. A CCTV system is required in mines for security, safety, and to allow continuous monitoring of the different parts of the process plant. The design specifications are set out in [1.] Hardware utilised is required to meet these specified requirements as a minimum. The complete CCTV system including cameras, Ethernet network, Server Infrastructure and video feed viewing stations are to be configured with supporting documentation. This involves developing a factory acceptance test for hardware and software to ensure the implemented system meeting the defined requirements. 10.10 GENERAL REQUIREMENTS “The Contractor shall design, engineer and provide a CCTV System to permit Control Room Operations Personnel to visually monitor key items within the Process Plant, and expandability for Security personnel to monitor personnel and vehicle movements at Entry Gates, Warehouses and other key locations and areas. This system shall typically comprise of: Colour PTZ & Fixed CCTV cameras, lenses, housings and mounts: A video signal transmission and distribution network: A central observation suite and other auxiliary observation stations, where the CCTV images are displayed on monitors or projected onto screens; Remote control keyboards at the observation stations to control the CCTV images displayed; Other ancillary equipment e.g. mixing, splitting or multiplexing equipment to obtain special display effects on monitors: and Recording & retrieval equipment with at least 48 hour storage of all cameras. 51 Motherwell Internship Engineering Internship 19/12/2011 Jamie Colquhoun The system offered shall provide clear video pictures for the purpose of monitoring and surveillance. All equipment shall be of a high manufacturing standard, reliable, easy to operate and maintain. The layout of the video monitors and operator panel shall take into account ergonomic requirements so as not to put undue strain on the operators. The system shall be a stand-alone self-contained entity. Monitors adjacent to the main control console shall display views as selected by the Operators. The cameras shall provide high resolution colour images and shall be connected to the Control Room via dedicated composite power/fibre control cabling. The Contractor shall provide a detailed technical specification stating any range limitations of the composite Power/Fibre cable proposed. The number, location and installation of the Field Mounted CCTV cameras shall be the responsibility of the Company representative and finalized during detail design, preliminary details of numbers and locations are provided by document [2.] Final positioning of cameras shall be guided by the field of view in conformance with the operational requirements. Other factors, e.g. illumination level shall also be taken into consideration. The cameras, together with their housing, when installed shall be easily removed from the mounting for maintenance and repairing purposes. If a camera has a lens window cleaning system, such as a wash-wipe or moving film, the camera shall be readily reached by operating personnel for maintenance purposes. The Contractor if requested shall suggest the method of access and the method of disassembly of the camera from the housing for maintenance purposes, for cameras that are mounted at a high level. The Contractor's design and supply of services shall include: the preparation of all necessary drawings and calculations, work preparation of the Equipment, all manuals, descriptions and data necessary for the integration of the equipment within the plant, contractual execution of required engineering activities such as progress meetings, Quality Assurance, Quality Control, expediting etc. and the compilation of documentation based on relevant Australian standards, supplemented by the Contractor's work standards. Documents and drawings shall be provided in English. Drawings shall be provided in MicroStation (preferred) or Autocad format. The Contractor shall advise the Company of any intention to modify the Equipment specified on account of technical development.” [1.] 10.11 SCOPE The project is significant to Motherwell as it is a vital component of the Karara mining project. It is set out in a functional specification and must be delivered as part of the deliverable items to the client. 52 Motherwell Internship Engineering Internship 19/12/2011 Jamie Colquhoun 10.11.1 INCLUSIONS The CCTV system revolves around a network of IP Cameras connected to a server which then connects to both a network outside of the mine, and the PCS system. 10.11.2 EMISSIONS The final installation and commissioning of the system shall not be considered due to time constraints. 10.12 PROJECT DELIVERABLES The items that are to be submitted both to the client; Motherwell and Murdoch are as follows: CCTV Functional Design Specification CCTV System Block Diagram Mark-ups CCTV Junction Box Layout Drawings Cable Schedules CCTV storage calculations Field of Vision calculations Configuration of Milestone Software CCTV FAT Documentation CCTV FAT These deliverables may change as the project progresses. 10.13 MEASUREMENT OF SUCCESS The success and quality of the project will be how the project is measured against the functional specification. The commissioning of the system is considered not to be in the timeline as the system cannot be implemented until the entire Karara project is completed. The CCTV system will be approved by senior staff at Motherwell and the Client, Karara Mining Ltd. 10.14 RESOURCES 10.14.1 EQUIPMENT GE IP Equipment o Proficy Machine Edition o Cimplicity Milestone XProtect Professional System AXIS IP Camera‟s IBM Server 53 Motherwell Internship Engineering Internship 19/12/2011 Jamie Colquhoun 10.14.2 CONSTRAINTS The Project must follow the hardware and software recommendations set out in the function specification and by the contractors. The project must be completed in tandem with other work for Motherwell Automation. The project must be completed by 1st November 2011. 10.15 PROJECT TIMELINE 10.15.1 TIME LIMITS 1st August 2011 – 1st November 2011 10.15.2 MILESTONES The following milestones have been defined as the major steps in the completion of this project. Documentation and Hardware/Software Specification o Functional Design Specification o Familiarization with Hardware and Software o Familiarization and documentation of contractor recommendations o Submittal of FDS Configuration of Hardware/Software o Junction Box Layouts o Configuration of Milestone Software FAT o FAT Documentation o Equipment Acquiring / Set-up Test Area o FAT 10.15.3 PROGRESS The first milestone of documentation and specification has been completed. The specifications have been sent off to the client for approval and the FDS written. The specifications were chosen before this projects commencement but have now been reviewed and accepted. The software has been downloaded and familiarized. The configuration of the software and hardware cannot be completed until the hardware is 54 Motherwell Internship Engineering Internship 19/12/2011 Jamie Colquhoun acquired. There is a delay in this however due to an inability to receive the hardware in an appropriate time. The configuration of the hardware has been simulated by using the laptop camera simulating a CCTV camera. No problems are predicted in the setup of the CCTV system once the hardware arrives. This has caused major delays in the project. The CCTV project has been delayed until after the internship has expired and will hopefully then be completed by the intern. The software component is split into two programs, XProtect, and XProtect Smart Client. The XProtect system configures the cameras and the server. The Smart client is the viewing program, this is used to view the live feed, view the playback and their configuration. 10.16 XPROTECT “XProtect Professional is comprehensive open platform IP video management software for mid-sized, singlesite installations. With multiple configurable servers, it supports up to 64 cameras per server and an unlimited number of users. XProtect Professional is ideal for capturing HD video and for installations requiring supreme playback functionality, by providing an efficient way to manage video and swiftly export evidence. Search tools such as Smart Search and the Sequence Explorer allow you to quickly find incidents from one or more cameras. A complete solution for campuses that have multiple buildings at a single-site, XProtect Professional features Milestone Integration Platform (MIP) support, enabling integration with business systems and video analytics.” (Milestone, 2008) In this project XProtect professional is used to setup and configure all the different cameras, the server, recording preferences and Users. This all-in-one program relies on wizards to setup and configure the CCTV system. These wizards will automatically identify the cameras and then allow you to setup how they are to be configured. XProtect can also use many other advanced techniques and configurations that are not required by this project. This includes motion detection, often used in CCTV systems to increase the quality of the recording when there is movement. Two-way audio can be configured to allow CRO‟s to chat with their field operators. Alarms can be set-up corresponding to faulty CCTV and security equipment or motion on a particular camera. Privacy masking can be set-up so certain, off limit areas cannot be seen or recorded by different levels of user. This program meets the requirements set out in the PHL document [1.]: 55 Motherwell Internship Engineering Internship 19/12/2011 Jamie Colquhoun “Video server/recorder for multiple camera views: o To enable browsers to point to single source for multiple image streams: o Provide multi-cast streaming to all requesting display monitors (i.e. server to multiple client configuration); and o Simultaneous recording of multiple image streams to local media for archival Purposes.” 10.17 XPROTECT SMART CLIENT “The XProtect Smart Client 5.5 helps perfect your security operation by providing instant control of cameras and connected security devices, better overview of your recordings, and enhanced usability through its adaptable user interface.” (Milestone, 2009) Smart client is the interface that connects to the server, allowing for customized live viewing of the cameras and recordings. It is also used to control the PTZ cameras and is adaptable by the user. This program also allows integration of other security systems, WebPages, static images and video. This program links with XProtect and shares its User and server details. As the name suggests they are both made by the same company. 10.18 IP CAMERAS The CCTV camera shall be designed with an appropriate lens and ancillary equipment to allow video signal imaging. As a minimum, the following requirements shall be met: Internet Protocol cameras (IP addressable); Cameras shall be dome type camera with Pan, Tilt, Zoom (PTZ) capability where indicated. TCP/IP cased high resolution color images; Fixed cameras shall be wide angle, super wide angle or telephoto lens where indicated Cameras shall support D1 resolution (720 x 480 Pixels) at a frame rate of 30 frames per second (fps). Frame rate shall be adjustable. Cameras shall support MPEG-4 Part 10 Standard compression including the following: H.264 CODEC (Compression I Decompression) Cameras shall be supplied configured for streaming video resolution of SIF(352 x 288 pixels at 30fps) Cameras shall also support selectable streaming video resolution of 2SIF, 4 SIF, 2CIF or 4CIF Cameras shall support Control Day/Night settings Cameras shall support remote configuration over Ethernet 56 Motherwell Internship Engineering Internship 19/12/2011 Jamie Colquhoun E Mail notification of alarms Remote control PTZ: 25x optical zoom (minimum); and 8 preset positions (minimum). Stream full frame rate video to any number of live video receivers with an aggregate video bandwidth of up to 20Mbps using transport control protocol (TCP) connections; Support dynamic host configuration protocol (DHCP) as a means of acquiring IP address parameters: “ Anti-vibration mount: 24V DC power supply (24VAC power supply for PTZ capable cameras); Robust Construction (Weather-proof material); IP65 enclosures (dust, humidity and direct sunlight); and Accessible location (i.e. no special access or access equipment required to perform any maintenance activities). [1.] The IP cameras that were chosen are the Axis P33 network cameras for non-PTZ cameras and the Q6023-E Dome Camera for PTZ needs. Both models of the cameras meet the requirements. The only issue is their maximum operating temperature range could, depending on the placement of the camera, theoretically be reached. However it meets the standards, the issue has been raised and has been accepted by the client. 10.19 RESOLUTION The CCTV project has been taken as far as it can in the timeframe given by the intern. Although the goals set were not met, this was no fault of the interns. The inability to receive the hardware means that this project could progress no further. The Karara CCTV project will be an ongoing Karara project that the intern still intends to complete when the hardware arrives. The project allowed the intern to achieve valuable information in the workings of an industrial CCTV architecture as well as hands on experience with an example system. This provides experience with a specific part of industrial computing engineering. This allowed the intern to gain experience in a field outside of PLC programming. A well rounded experience in the workplace is an invaluable tool for a graduate coming out of university. 57 Motherwell Internship Engineering Internship 19/12/2011 Jamie Colquhoun 11 TEMPLATE INVOLVEMENT Templates, as defined in section 10.3.1, are an integral part of the Karara project. As a PLC systems engineer in charge on a PLC, the intern was involved in many small discussions and work on many different templates. Many of these discussions were small and large changes found out via internal or FAT testing. These discussions are not reported on due to word limits. However three projects about the interns work on different templates are described to provide an indication of the intern‟s role. 11.1 PID TESTING 11.1.1 BRIEF OVERVIEW The PID block for the Karara project is an all in one PID block that features many different modes and features of a PID block. It is a shell created around the GE PID_IND block. The main features that this PID block has are: Automatic Mode Manual Mode Cascade Mode Bumpless Transfer Anti-Reset Windup Configurable Deadband/Control Variable/ Process Variable Limits CV Bias CV Clamping CV Slew Rate Clamping Error Term/Output Polarity Derivative Active Deadband Acton Derivative Filter Feed Foward Control Element 11.1.2 PROJECT OVERVIEW Due to the size and complexity of the PID blocks its functionality needed to be confirmed before approval sent to the client. This involves testing of the PID blocks different functionality and its relationship with 58 Motherwell Internship Engineering Internship 19/12/2011 Jamie Colquhoun SCADA. Since there have been changes to the PID faceplate in SCADA since the code development, an old faceplate was used to connect to the PID block. 11.1.3 TESTING The first testing step was to read, and understand the functional description of the block, and what the client wanted. The next step was to understand the code and relate the code to the FDS. Another document read was the GE PID help file, this was to understand the different PID functionalities from the GE block.. From understanding the code the main parts of the block were mapping values of SCADA and scaling the parameters for the GE PID block. The GE PID block was looking for a 40 dimension word array. Due to the cascade mode being implemented in one block the scaling and mapping commands are doubled from a normal PID loop. A consideration of separating the cascade mode from the PID block was raised but its communication with the SCADA system requires 1 PID block for a cascade loop. 11.1.4 RESULTS The Automatic and Manual Modes of the PID worked fine, the extra features all performing as specified. The Testing procedure for these modes was quite simple, just changing the set point for each feature and observing the response. The main issue for testing was to ensure there was no extra scaling or mapping that was not needed. The Cascade mode SCADA faceplate was not mapped correctly. After identifying the problem SCADA was able to fix the problem. A focus of the PID testing was on the CV bias. This is being used in a number of PID loops, including one in 1311. The functionality and effect of the CV bias in cascade mode was tested heavily. 11.1.5 FAT The PID block was then to undergo FAT to ensure it was working to the required specifications. A FAT procedure was required that could test that all the properties of the PID block were working. The procedure used a simulation of a first order system to see the PID block working. The procedure worked, however the Cascade mode implemented in the block was not accepted by the client and the decision was made to remove this function and re-implement the PID block and the mapping. This was due to problems with how the PID faceplate worked, and that the client wanted cascade mode to simply mean that the PID loop was able to accept an external setpoint. This setpoint did not have to be from another PID source. It was decided was 59 Motherwell Internship Engineering Internship 19/12/2011 Jamie Colquhoun two PID templates would be needed if cascade control was to be used. The expansion of this project was given to Scott Whitmore, a fellow intern. Figure 23 - Faceplate Example for PID Control in Auto Mode Figure 24 - Faceplate Example for PID Control in Manual Mode 60 Motherwell Internship Engineering Internship 19/12/2011 Jamie Colquhoun Figure 25 - Faceplate Example for PID Control in Cascade Mode 11.2 CHILLER 11.2.1 BRIEF OVERVIEW The chiller template is a defined template that controls and configures the different chiller units in the Karara project. The chillers are vendor supplied and controlled, however information is still being communicated to the device. 11.2.2 PROJECT OVERVIEW This projects definition was to investigate the chiller units. Little was known about the chillers at the time, and how they worked. From this point the aim was to take the chiller unit template as far as it could be completed. 11.2.3 PROJECT DELIVERABLES Chiller Template/Templates Chiller UDT/UDTs Chiller FDS 11.2.4 TIMELINE There is no specific timeline for this project as at the time of starting, it was unknown how the chiller units are to be defined. 61 Motherwell Internship Engineering Internship 19/12/2011 Jamie Colquhoun 11.2.5 RESULTS The different chiller units were investigated and defined into 2 main types. This may change due to information still needed, and other information on hold. The main two types are either the mill chillers, or the crusher chillers. The crusher chiller has been previously defined in an FDS and a block was defined and approved. The mill chillers however are completely different and will therefore need another template to be defined. The programming of this template is the main objective of this project. The mill chillers involve two skids, a pump skid and a chiller skid. The chiller skid contains 4 chiller units and the pump skid the associated pumps. The control of these skids has been defined as separate. This was due to the pump skid supplying each chiller unit together. The next step was to define a UDT and program the function block for this chiller type. Finding the I/O for the device was difficult. Once found the UDT could be created. Due to the lack of information on the type/Scaling much of the programming had to be put on hold. The programming mainly consisted of scaling and mapping, as the control and configuration is performed by the vendor PLCs. The block and UDT have been defined pending information on the type of analogue data received. It is unknown whether the data will be real and scaled, which only requires mapping or an Integer that needs scaling. A functional specification was created and issued to determine the data types. Once approved by the client and more information specified, the chiller block can be completed. 11.3 CONVEYOR 11.3.1 BRIEF OVERVIEW Conveyors are a major part of the Karara plant. Unlike the other templates, the conveyor class does not just consist of a template. Since the conveyors are a combination of different templates including main drives, brakes and other drives and devices it was decided there will be a conveyor template. This controls/configures the conveyor specific I/O. A conveyor ladder block which controls/configures all the I/O for the different device templates involved in the conveyor and links them together. Any additional logic needed for the conveyor class will also be contained in this block. 11.3.2 PROJECT OVERVIEW The FDS for the conveyor class has been written, pending approval, the project definition was to update the existing conveyor template to the new standard then create a standard ladder block for the configuration of the conveyor. This was to involve the conveyor template, drive blocks and any additional logic/devices needed. The idea was each person would delete/edit this block to suit their own specific conveyor needs. 62 Motherwell Internship Engineering Internship 19/12/2011 Jamie Colquhoun 11.3.3 PROJECT DELIVERABLES Conveyor Template/Templates Conveyor Ladder Block Conveyor UDT/UDTs Conveyor FDS 11.3.4 TIMELINE There is no specific timeline for this project as the time will likely be defined by the responses and information provided by the client. 11.3.5 RESULTS The conveyor template was redefined. The information no longer required removed, and extra commands added. These added commands and statuses, are not all directly used in the template. They are often set and used in the conveyor ladder block. Functionality was also added for a digital underspeed alarm. The type of underspeed, digital/analogue can be defined in the configuration parameters. The conveyor ladder block is defined, awaiting approval. This configuration for this block can be seen in Figure 26. As shown there are control logic contained in the block in order to control the different devices. Linking was also needed for many of the devices. The brake and main drive for example had to be linked together via mapping. This can be shown in Figure 27. The conveyor template class also needs to link to the other devices. The auto status for example of the template corresponds to all the auto statuses of the devices. The “all to auto command”, and fault reset also must correspond to all of the devices. The other devices also have their own special control logic as defined in the FDS. The idea is that this block contains everything, and the different areas strip out the parts not needed and then configure to fit their area. There are 13 conveyors in the iron ore plant, all with different configurations. The conveyor template and ladder block have been completed in lieu of likely changes from the client. Testing has started on a test conveyor page which contains an example conveyor. 63 Motherwell Internship Engineering Internship 19/12/2011 Jamie Colquhoun ################ Conveyor Block - CVxxx ############# Conveyor Configuration Section ############# Main Drive Feeder Config Conveyor Instrument Config M01: Main Drive Config M02: Brake Hyd. Pump + Brake IO Config M03: Gearbox Oil Cooling Fan Config M04: Gearbox Oil Recirc. Pump Config Conveyor Control Section ############# Main Drive Feeder Interlock Logic MVxxx Main Drive Feeder Instance CVxxx Conveyor Instruments Instance M01 : Main Drive Feeder Interlock Logic CVxxxM01 M01 Main Drive Instance (VSD) Brake Control Logic M02 : Brake Interlock Logic CVxxxM02 M02 Brake Hyd. Pump + Brake IO Instance (DOL) Cooling Fan Control Logic M03 : Oil Cooling Fan Interlock Logic CVxxxM03 M03 Oil Cooling Fan Instance (DOL) Recirc. Pump Control Logic M04 : Oil Recirc. Pump Interlock Logic CVxxxM04 M04 Oil Recirc. Pump Instance (DOL) Conveyor Misc. Equipment Control Section ############# WTxxx Weightometer Dust Suppression Spray Logic Mass Flow Calculations Dust Sprays Atxxx Magnet Susceptability Weight Tonnage Alarm Figure 26 – Configuration of Conveyor Ladder Block 64 Motherwell Internship Engineering Internship 19/12/2011 Jamie Colquhoun Figure 27 - Brake and Drive Link 11.4 TEMPLATE EVALUATION The work the intern completed on the templates was enabled by his Industrial Computing System degree This background enabled his understanding of both the blocks and the idea behind the templates. The work provided experience in the usage of templates, a common workplace tool, and how to program a specific device. This is invaluable as most of these devices are common plant devices and this experience will carry over to many other projects. The involvement also enabled the intern to interact with other areas in order to understand and help the PLC engineers implement the templates. This helped in the understanding of the different sections, and specific requirements of the different areas of the plant. The programming experience was different to the experience gained in area 1311. This programming was heavily involved in scaling, mapping and control/mode logic. It also allowed the intern to program from the perspective of the template 65 Motherwell Internship Engineering Internship 19/12/2011 Jamie Colquhoun and the real life devices, instead of programming around the block. This provided the intern with a broad spectrum of experience. 66 Motherwell Internship Engineering Internship 19/12/2011 Jamie Colquhoun 12 CONCLUSION Murdoch University‟s internship programme allows interns to gain experience in the workplace of their chosen field. This experience allows them to use the skills learnt at university and understand how they transfer over to the workplace. Motherwell Automation is a great place to commence the transition into the workplace environment This enabled the professional aspects to also be gained by the intern. These include time management and how to work successfully within an engineering team. The engineers at Motherwell are knowledgeable, helpful and the atmosphere friendly. The work completed is of direct relevance to the Industrial Computing Systems degree. The Instrumentation and Control degree also provides excellent background information and skills. The different fields of engineering in the template construction and area 1311 programming allowed the intern to achieve a wide range of experience and skills. The CCTV project, although not finished, allowed the intern to experience a different side of engineering, not in the PLC side. The aim of the internship was reached as the intern was part of a successful engineering team, producing his own work as well as influencing and discussing matters as an equal with the other members. This shows the importance of the internship as it not only gives the intern work experience but also the professional and personal skills needed to succeed in the workplace. 67 Motherwell Internship Engineering Internship 19/12/2011 Jamie Colquhoun 13 BIBLIOGRAPHY Axis Communications. (2009). Axis P33 Network Camera Series. Emdalavägen: Axis Communications. Axis Comunications. (2009). Axis Q6032-E PTZ Dome Network Camera. Emdalavägen : Axis Comunications. Beesten, H. V. (2011, September). Systems Engineer. Bushell, K. (2011, September). Systems Engineer. Ciavalini, M. (2011, September). Systems Engineer. Electric, G. (2011). GE Intelligent Platforms. Retrieved 2011, from PACSystems - Rx3i: http://www.geip.com/products/family/pacsystems-rx3i Garces, J. (2011, August). Systems Engineer. GE. (2011). CIMPLICITY. Retrieved 2011, from GE Intelligent Platforms: http://www.geip.com/products/2819 GE. (2011). Machine Edition. Retrieved 2011, from GE Intelligent Platforms: http://www.geip.com/products/2823 GE. (2010). Machine Edition Help . GE. GE. (2011). VersaMax PLC. Retrieved 2011, from GE Intelligent Platforms: http://www.geip.com/products/family/versamax-plc KARARA Mining LTD. (2011). 1311-IN-LST-1002_0. Perth: KARARA Mining LTD. KARARA Mining LTD. (2011). 1311-PR-DRG-1101/1110. Perth: KARARA Mining LTD. KARARA Mining LTD. (2011). 1311-PR-PHL-1001_0. Perth: KARARA Mining LTD. KARARA Mining LTD. (2010). Technical Specification Control System Software. Perth: KARARA Mining LTD. Milestone. (2008). XProtect Administrators Getting Started Guide. Denmark: Milstone. Milestone. (2009). XProtect Smart Client 3.6 User's Manual. Denmark: Milestone. Pirmorady, S. (2011, September). Systems Engineer. Rodriguez, J. (2011, September). Systems Engineer. 68 Motherwell Internship Engineering Internship 19/12/2011 Jamie Colquhoun 14 APPENDIX 14.1 EQUIPMENT LIST FOR AREA 1311/1312 IDENTIFICATI ON DEVICE TEMPLA TE P&ID TAG PLC DESCRIPTION P1311PU161 1311-PU-161 1311-PC-115 LV3 P1311AG009 1311-PC-115 P1311PU151VSD 1311-AG009 1311-PU-151 P1311PU152VSD 1311-PU-152 1311-PC-115 Sump PU-161 Drive Flotation Area AG-009 Drive - Flotation Surge Tank PU-151 VSD Drive Flotation Surge Tank PU-152 VSD Drive Flotation Surge Tank AG-010 Drive - Rougher Flotation Cond Tank AG-011 Drive Start Rev Pulse - Rougher Flotation Cond Tank AG-012 Drive Start Rev Pulse - Rougher Flotation Cond Tank TK-038 Blower Air Flow - Rougher Flotation Cond Tank TK-039 Blower Air Flow - Rougher Flotation Cond Tank LV1 AG-013 Drive Start Rev Pulse - Rougher Flotation Cell FC-001 Blower Air Flow Rougher Flotation Cell AG-014 Drive Start Rev Pulse - Rougher Flotation Cell FC-002 Blower Air Flow Rougher Flotation Cell AG-015 Drive Start Rev Pulse - Rougher Flotation Cell LV4 P&ID DRAWING Flotation Surge Tank 1311-PC-115 LV2 LV6 LV6 1311-PRDRG-1101 1311-PRDRG-1101 1311-PRDRG-1101 1311-PRDRG-1101 Rougher Flotation Conditioning Tank P1311AG010 1311-AG010 1311-AG011 1311-PC-115 P1311AG012 1311-AG012 1311-PC-115 P1311TK038 1311-TK-038 1311-PC-115 P1311TK039 1311-TK-039 1311-PC-115 P1311AG013 1311-AG013 1311-PC-115 P1311FC001 1311-FC-001 1311-PC-115 P1311AG014 1311-AG014 1311-PC-115 P1311FC002 1311-FC-002 1311-PC-115 P1311AG015 1311-AG015 1311-PC-115 P1311AG011 1311-PC-115 LV4 LV4 1311-PRDRG-1102 1311-PRDRG-1102 1311-PRDRG-1102 1311-PRDRG-1102 1311-PRDRG-1102 Rougher Flotation 69 LV4 LV4 1311-PRDRG-1103 1311-PRDRG-1103 1311-PRDRG-1103 1311-PRDRG-1103 1311-PRDRG-1103 Motherwell Internship Engineering Internship 19/12/2011 Jamie Colquhoun IDENTIFICATI ON P&ID TAG PLC DESCRIPTION P1311FC003 1311-FC-003 1311-PC-115 P1311AG016 1311-AG016 1311-PC-115 P1311FC004 1311-FC-004 1311-PC-115 P1311AG017 1311-AG017 1311-PC-115 P1311FC005 1311-FC-005 1311-PC-115 P1311AG018 1311-AG018 1311-PC-115 P1311FC006 1311-FC-006 1311-PC-115 FC-003 Blower Air Flow Rougher Flotation Cell AG-016 Drive Start Rev Pulse - Rougher Flotation Cell FC-004 Blower Air Flow Rougher Flotation Cell AG-017 Drive Start Rev Pulse - Rougher Flotation Cell FC-005 Blower Air Flow Rougher Flotation Cell AG-018 Drive Start Rev Pulse - Rougher Flotation Cell FC-006 Blower Air Flow Rougher Flotation Cell DEVICE TEMPLA TE LV4 LV4 LV4 P&ID DRAWING 1311-PRDRG-1103 1311-PRDRG-1103 1311-PRDRG-1103 1311-PRDRG-1103 1311-PRDRG-1103 1311-PRDRG-1103 1311-PRDRG-1103 Scavenger Flotation Conditioning Tank P1311AG043 1311-AG043 1311-AG044 1311-PC-115 P1311TK040 1311-TK-040 1311-PC-115 P1311AG045 1311-AG045 1311-PC-115 P1311TK082 1311-TK-082 1311-PC-115 1311-AG046 1311-FC-007 1311-PC-115 1311-AG047 1311-FC-008 1311-PC-115 1311-AG048 1311-FC-009 1311-PC-115 P1311AG044 1311-PC-115 AG-043 Drive - Rougher Flotation Cond Tank AG-044 Drive Start Rev Pulse - Rougher Flotation Cond Tank TK-040 Blower Air Flow - Rougher Flotation Cond Tank AG-045 Drive Start Rev Pulse - Rougher Flotation Cond Tank TK-082 Blower Air Flow - Rougher Flotation Cond Tank LV1 AG-046 Drive Scavenger Flotation Cell FC-007 Blower Air Flow Scavenger Flotation Cell AG-047 Drive Scavenger Flotation Cell FC-008 Blower Air Flow Scavenger Flotation Cell AG-048 Drive Scavenger Flotation Cell FC-009 Blower Air Flow Scavenger Flotation Cell LV4 LV4 1311-PRDRG-1104 1311-PRDRG-1104 1311-PRDRG-1104 LV4 1311-PRDRG-1104 1311-PRDRG-1104 Scavenger Flotation P1311AG046 P1311FC007 P1311AG047 P1311FC008 P1311AG048 P1311FC009 70 1311-PC-115 1311-PC-115 1311-PC-115 LV4 LV4 1311-PRDRG-1105 1311-PRDRG-1105 1311-PRDRG-1105 1311-PRDRG-1105 1311-PRDRG-1105 1311-PRDRG-1105 Motherwell Internship Engineering Internship 19/12/2011 Jamie Colquhoun IDENTIFICATI ON P1311AG049 P1311FC010 P1311AG050 P1311FC011 P1311AG051 P1311FC012 P&ID TAG PLC DESCRIPTION 1311-AG049 1311-FC-010 1311-PC-115 1311-AG050 1311-FC-011 1311-PC-115 1311-AG051 1311-FC-012 1311-PC-115 AG-049 Drive Scavenger Flotation Cell FC-010 Blower Air Flow Scavenger Flotation Cell AG-050 Drive Scavenger Flotation Cell FC-011 Blower Air Flow Scavenger Flotation Cell AG-051 Drive Scavenger Flotation Cell FC-012 Blower Air Flow Scavenger Flotation Cell 1311-PC-115 1311-PC-115 1311-PC-115 DEVICE TEMPLA TE LV4 LV4 LV4 P&ID DRAWING 1311-PRDRG-1105 1311-PRDRG-1105 1311-PRDRG-1105 1311-PRDRG-1105 1311-PRDRG-1105 1311-PRDRG-1105 Flotation Concentrate Tank P1311PU303 1311-PU-303 1311-PC-115 P1311PU153VSD 1311-PU-153 1311-PC-115 P1311PU247VSD 1311-PU-247 1311-PC-115 P1311PU302 1311-PU-302 1311-PC-115 P1311PU162VSD 1311-PU-162 1311-PC-115 Sump PU-303 Drive Flotation Area PU-153 VSD Drive Flotation Concentrate Pump PU-247 VSD Drive Flotation Concentrate Pump LV3 LV6 1311-PRDRG-1106 Sump PU-302 Drive Flotation Area PU-162 VSD Drive Regrind Feed Pump - LV3 - LV6 1311-PRDRG-1107 1311-PRDRG-1107 LV6 1311-PRDRG-1106 1311-PRDRG-1106 Regrinding Feed Tank Scavenger Flotation Tailings P1311PU165VSD 1311-PU-165 1311-PC-115 PU-165 VSD Drive Scavenger Flotation Tailings Pump LV6 1311-PRDRG-1108 P1312PU304 1312-PU-304 1306-PC-066 LV3 P1312AG023 1306-PC-066 P1312PU383 1312-AG023 1312-PU-383 P1312PU384 1312-PU-384 1306-PC-066 P1312PU163VSD 1312-PU-163 1306-PC-066 P1312PU163FDR 01 P1312PU164VSD 1312-PU-163 1306-PC-066 1312-PU-164 1306-PC-066 Sump PU-304 Drive Regrinding Area AG-023 Drive - ML-009 Coarse Classifier PU-383 Drive - ML-009 Lube Unit PU-384 Drive - ML-009 Lube Unit PU-163 VSD Drive ML-009 Recirc PU-163 VSD Feeder ML-009 Recirc PU-164 VSD Drive - 1312-PRDRG-1101 1312-PRDRG-1101 1312-PRDRG-1101 1312-PRDRG-1101 1312-PRDRG-1101 1312-PRDRG-1101 1312-PR- Regrinding Mill 71 1306-PC-066 LV1 LV1 LV1 LV6 LV10 LV6 Motherwell Internship Engineering Internship 19/12/2011 Jamie Colquhoun IDENTIFICATI ON P&ID TAG PLC DESCRIPTION DEVICE TEMPLA TE SMS Feed Pump P&ID DRAWING DRG-1101 SMS 72 P1312PU166 1312-PU-166 1311-PC-115 P1312MS057 1312-MS-057 1311-PC-115 P1312MS058 1312-MS-058 1311-PC-115 P1312MS059 1312-MS-059 1311-PC-115 P1312MS060 1312-MS-060 1311-PC-115 P1312MS073 1312-MS-073 1311-PC-115 P1312MS074 1312-MS-074 1311-PC-115 Sump PU-166 Drive Scavenger Area MS-057 Drive Scavenger Magnetic Separator MS-058 Drive Scavenger Magnetic Separator MS-059 Drive Scavenger Magnetic Separator MS-060 Drive Scavenger Magnetic Separator MS-073 Drive Scavenger Magnetic Separator MS-074 Drive Scavenger Magnetic Separator LV3 LV1 1312-PRDRG-1102 1312-PRDRG-1102 LV1 1312-PRDRG-1102 LV1 1312-PRDRG-1102 LV1 1312-PRDRG-1102 LV1 1312-PRDRG-1102 LV1 1312-PRDRG-1102 Motherwell Internship Engineering Internship 19/12/2011 Jamie Colquhoun 14.2 INDUSTRY AND ACADEMIC SUPERVISOR ENDORSEMENT PRO FORMA This is to be signed by both the industry and academic supervisor and attached to the final report submitted for the internship. We are satisfied with the progress of this internship project and that the attached report is an accurate reflection of the work undertaken. __________________________________________________ Signed: Industry Supervisor __________________________________________________ __________________________________________________ Signed: Academic Supervisor __________________________________________________ 73 Motherwell Internship Jamie Colquhoun 74 Engineering Internship 19/12/2011