1
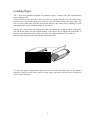
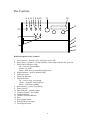
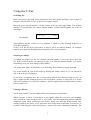
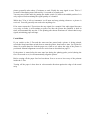
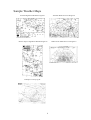
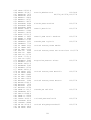
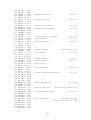
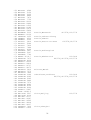
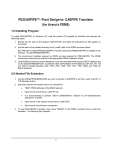
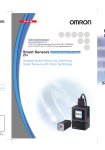
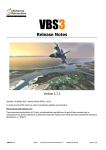
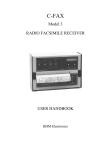
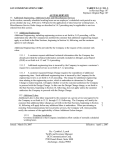
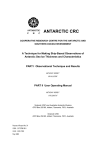
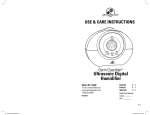
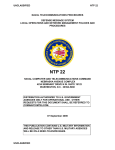
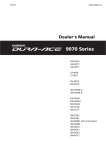
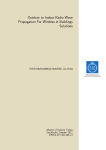
C-FAX
Model 2
RADIO FACSIMILE RECEIVER
USER HANDBOOK
BHM Electronics
CONTENTS
Introduction
3
Unpacking
3
Mounting
4
Connecting Power and Aerial
4
Loading Paper
5
The Controls
6
Using the C-Fax
7
Sample Weather Maps
9
Weather Map Abbreviations
10
Detailed Description of the Controls
11
Care of the C-Fax
14
Using an External Receiver
14
Trouble Shooting
15
Replacing the Fuse and Battery
15
Specifications
16
Wiring Connections
17
Frequency List
18
2
Introduction
The C-Fax radio facsimile receiver has been designed as an easy to use, reasonably priced
unit with low operating costs.
The latest in materials and finishes ensure durability and long life, and the small size enables
fitting in areas where space is at a premium.
The paper used in this machine is a standard type used in office fax machines and is
generally available from most office supply shops.
Information contained in the weather maps received can be analysed to give useful insight
into the weather trends for your particular part of the world. This makes it a valuable tool for
those to whom the elements are important in their lifestyle or occupation. Useful books on
the interpretation of these maps are available through most larger book stores. After a little
practice you will find that quite reliable predictions can be made as to future weather
conditions.
Unpacking
Remove the unit from the packing and check that the following is included:
1 x C-Fax radio facsimile receiver
1 x roll of thermal paper, 216mm by 30m
1 x 2m long power lead with 4 pin plug
1 x 2m coaxial aerial lead with BNC plug
1 x wall mounting bracket, fixed to rear of C-Fax
2 x spare fuses (2 amps)
1 x user handbook
1 x New Zealand and Australian schedule
3
Mounting the C-Fax
The C-Fax may be left free standing or wall mounted on the supplied bracket. To fix the
C-Fax to a wall, remove the mounting bracket from the rear of the C-Fax by taking out the
two screws holding it at the bottom. Screw the bracket to the wall, slide the C-Fax back onto
the bracket and replace the two bottom screws.
Connecting Power and Aerial
Plug the power lead into the labelled round 4 pin socket on the panel on the right side of the
C-Fax. The other end of the lead is connected to the power source, red wire to positive, black
wire to negative. The C-Fax can operate on a direct current (DC) voltage of from 12 to 24
volts.
Caution!
The power lead from the C-Fax must not be connected directly to
the mains power supply (110V or 230V AC). For use with the mains
supply a suitable power supply must be used which can supply a
DC voltage in the range of 12 to 24 volts at 1.5 amps. Such a power
supply is available as an optional extra for the C-Fax.
The aerial lead plugs into the BNC socket on the side panel. At the other end the center
conductor of the coaxial cable should be connected to an outside wire aerial. This should
consist of a length of wire approximately 10 to 12 metres long (30 to 40 feet). The wire
should run horizontally and be supported at each end by insulators, with a lead taken from
one end to the C-Fax. The aerial is not critical, try any existing high frequency aerial first.
Caution!
Never connect the C-Fax to an aerial used by a radio transmitter.
Severe damage could occur to the receiver in the C-Fax.
The outside shield on the end of the aerial cable can be connected to an earth, such as the
hull of a metal boat or a metal rod driven into the ground as close as practical to the C-Fax.
This earthing is not absolutely necessary but can be of help in reducing interference on the
printed pictures.
4
Loading Paper
The C-Fax uses standard telephone fax machine paper, 216mm wide, the recommended
paper length is 30m.
To load a roll of paper into the C-Fax, open the two catches located each side on the front.
Pull the lower edge of the catch away from the C-Fax and then unhook the upper edge. The
lower section of the case will then open down. Remove the empty roll by pushing it to the
right against the spring and then pulling it up and out.
Insert a new roll of paper by pushing the right end against the spring and then pushing the
left end down. Make sure the outside surface of the paper roll is against the print head, as
shown in the illustration below. This is the side of the paper that the C-Fax prints on
Pull the paper up and out the front before closing the door.
To close the paper compartment, push the cover closed until both parts of the catches
interlock. Then hook the lower catch over the upper part and push the lower catch down
until it clicks into place.
5
The Controls
4 5 6 7 8 9 10
11
12
13
3
2
14
15
1
16
17
Brief Description of the Controls
1
2
3
4
5
6
7
8
9
10
11
12
13
14
15
16
17
IOC Selection - default is 576, red light is on for 288
Paper Speed - default is 120 lines/minute, yellow light indicates 60, green 90
Audio On/Off/Picture Align
Up - received signal audible
Centre - no audio
Down - hold down to manually align picture
Align Indicator - used for manual align
Fast Paper Feed
Paper Out Indicator
Stop/Auto/Start
Up - receiver only, no printing
Centre - automatic start/print/stop
Down - continuous printing
Run Indicator - printer is operating
Power On/Off
Data Indicator - printing signal
Contrast Control - fine tuning
Channel Display
Channel Selection Buttons
Fuse
Power Input Socket
External Receiver Input
Aerial Input Socket
6
Using the C-Fax
Switching On
Make sure power plug and aerial connections have been made and that a roll of paper is
properly inserted in the C-Fax, as described on pages 4 and 5.
Move the power switch (number 9 in the picture on the previous page) down. The channel
display (12) should show the current channel number, location and frequency the C-Fax is
listening to.
003 NZ
5807
for example:
This indicates that the receiver is set to channel 3, which is a New Zealand frequency of
5807 kHz (kilohertz).
If the C-Fax has not been used before it may be set to an unused channel, for example
channel zero shows the date the internal frequency list was last updated.
Selecting a Channel
To change the channel use the two channel selection buttons (13) to move up or down the
list. Refer to the frequency list starting on page 18 to find the channel number of a station
transmitting near you, then change to this channel.
The yellow data light (10) should be on or flickering. This indicates a signal is present.
If it is not already on, turn on the audio by flicking the Audio switch (3) up. You should be
able to hear the received signal.
If you hear a continuous tone, this is a tone many stations send between maps. If you can
hear a signal quickly changing between two tones then a picture is being sent. Try all the
different frequencies for your local station to find the signal which sounds loudest and has
the least static in it.
Printing a Picture
Set the Start switch (7) to the middle position for automatic stop and start.
When a picture is sent it is preceded by a start signal, telling the receiver to start printing.
This is heard as a tone lasting from 5 to 10 seconds. Next the transmitting station sends the
alignment signal which synchronises the picture being sent with that being printed. This
usually sounds as two tones, a very short tone and a longer half second tone, repeated for 30
seconds. Following this is the actual picture, which is two tones alternating randomly. The
7
picture generally takes about 15 minutes to send. Finally the stop signal is sent. This is 5
seconds of alternating tones followed by 10 seconds of a steady tone.
You may turn off the audio by putting the Audio switch (3) back to the middle position. It is
only required for determining the signal quality of a channel.
While the C-Fax is left on Automatic it will start and stop printing whenever a picture is
received. You will generally not need to do anything else.
If for some reason the C-Fax misses the stop signal, for example if the radio signal becomes
very noisy or fades, it will continue to print even after the picture has finished. A built in
timer will automatically stop the C-Fax printing after about 40 minutes if it hasn't had a stop
signal, minimising paper wastage.
Useful Hints
If you switch on the C-Fax and the start tone has passed and a picture is being printed,
switch the Stop/Auto/Start switch down to start the printer, then back to Auto. Let it print for
about 10 seconds then fast feed the paper out a little to see where the edge of the picture is
positioned. Manual alignment can now be carried out as described on page 11.
If the printer is started after the start tone but during the phasing pulse period (during the
first 10 seconds or so) it will automatically align the picture.
Before tearing off the paper fast feed out about 5cm so as not to leave any of the printout
inside the C-Fax.
Tearing off the paper is best done in a downwards direction against the edge of the metal
strip.
8
Sample Weather Maps
Australia Significant Weather Prognosis
Australia Mean Sea Level Prognosis
Darwin Tropics Significant Weather Prognosis
Example of a noisy signal
9
Indian Ocean Mean Sea Level Prognosis
Weather Map Abbreviations
.
These are some of the common abbreviations you will see on weather maps
Map areas
ASIA
IO
NPAC
NREG
NZ
SPC
SWP
TNZ
50°N to 50°S, 100°E to 180°
Indian Ocean
50°N to 50°S, 160°E to 110°W
Equator to 50°S, 140°E to 140°W
New Zealand
South Pacific (Australia to South America)
South West Pacific (Australia to Tahiti)
Tasman Sea and New Zealand
Map Types
ANAL
FCST
MAR WX
NEPHANAL
PROG
SIG WX
TEMP
Analysis
Forecast
Significant Marine Weather
Nephanalysis (analysis of cloud information taken from satellite
pictures)
Prognosis
Significant Aviation Weather
Temperatures
MSL
700MB
500MB
250MB
Mean Sea Level
Height of 700 millibar pressure level (10000 feet)
Height of 500 millibar pressure level (18400 feet)
Height of 250 millibar pressure level (34000 feet)
Levels
Time
GMT
Greenwich Mean Time
UTC
Coordinated Universal Time
(H+number) Number is number of hours ahead for forecast
10
Detailed Description of the Controls
Numbers in brackets refer to the picture on page 6
Audio On/Align switch (3) and Align light (4)
When this switch is placed in the up position then audio from the receiver can be heard. This
can be used to listen to the quality of the radio reception on any of the channels. Placing the
switch back in the center position turns off the sound.
If a map printout is started manually or if the synchronising signal at the beginning of a
transmission is missed the picture may be out of alignment. This shows up as a picture
starting part way along the paper instead of at the left side.
To manually align a picture:
Look at the picture being printed
Find the normal left hand edge of the picture
Note where this is on the 0-7 scale on the front panel
Hold down the align switch (3)
Count the number of flashes of the align light (4)
When this is equal to the number on the scale release the align switch promptly
The rest of the picture should be correctly aligned
In the sample map below you would need to hold the align switch for 4 flashes of the align
light to realign the left edge.
0 | 1 | 2 | 3 | 4 | 5 | 6 | 7 |
Fast Paper Feed switch (5)
This switch is used to feed the paper out at a faster than normal rate. This allows a
completed map to be cleared from the C-Fax printer before tearing it off.
It is also useful for the manual align procedure described above, by feeding out some of the
picture so it is possible to check the alignment sooner.
Paper Out indicator light (6)
When the end of the paper roll is reached this red light will flash to indicate the C-Fax is out
of paper, and the C-Fax will stop printing. There is normally a warning stripe printed on
most types of paper near the end which shows during the last metre or two to warn that the
paper is running out.
11
Note: Some brands of paper are glued to the center core, in this case the paper out
light will not operate as the paper remains in the print area. If you find this
happening try changing the roll within a few maps of the warning stripe appearing.
Stop/Auto/Start switch (7) and Run light (8)
In the up position the printer is off. Only the receiver is working. The green run light is off.
In the centre position the printer automatically starts and stops printing pictures using the
received start and stop signals. The run light is on during printing.
In the down position the printer starts and prints continuously. The run light remains on. If
you have missed the start signal of a picture moving the switch down will start the picture
printing. Moving the switch back to Auto lets the picture print until the normal stop signal is
received. Starting a picture manually normally requires it to be manually aligned on the
paper, see the Align section on the previous page.
Power switch (9)
In the up position the C-Fax is turned off. In the down position the C-Fax is turned on. The
channel display back lighting turns on and the last used channel is shown.
Data light (10)
The yellow data light turns on when a signal is received. It will normally flicker when a
picture is being sent.
Contrast Control (11)
This knob is used to control picture print quality. It acts as a fine tune control for the radio
receiver. Normally it is left with the pointer set vertically, in line with the index mark. In
noisy reception conditions it may help to set this control a little anticlockwise from normal.
Note: if this control is set too far from centre in either direction it may affect the
automatic start/stop function. Use with caution.
IOC Switch (1)
Pressing this switch changes the IOC (index of cooperation) which the C-Fax uses. A red
light indicates the IOC is set to 288. Pressing the switch again changes it back to the default
setting of 576. The IOC is used to determine the speed at which the picture is sent and
printed. Most stations, including those in New Zealand and Australia, use the default IOC of
576. Most stations which use an IOC of 288 send a different start tone with their pictures
which will automatically change the C-Fax to 288.
Paper Speed (2)
12
Pressing this switch changes the paper speed from 120 lines per minute to 60 and then 90
with each successive press. Most stations, including those in New Zealand and Australia, use
the default speed of 120. The paper speed must be manually set if the picture you wish to
receive is sent at a speed other than 120.
13
Care of the C-Fax
There are no parts to be lubricated.
When a new roll of paper is fitted remove any paper scraps or dust from the paper
compartment. At this time also check and clean the rubber pressure roller if necessary.
If a printed picture has vertical light stripes through it the most likely cause is dirt on the
print head. If this problem appears open the paper compartment and check the print head,
which is mounted on a horizontal metal bar at the top of the paper compartment. Near the
top of the print head is a narrow black line. Dirt on this print line causes the reduced print
density. This should be gently wiped clean with alcohol (methylated spirits or isopropyl
alcohol) on a clean lint free cloth or paper tissue.
The rubber pressure roller should also only be cleaned with alcohol.
Print Line
This problem can be kept to a minimum by taking care when fitting paper rolls that the
outside layer of paper is clean and by not touching the print head.
Avoid excessive cleaning of the print head or the use of abrasive substances.
Using an External Receiver
An external receiver may be used with the C-Fax. It must be a crystal controlled or
synthesised SSB (single side band) type, with LSB (lower side band) mode.
Connection should be made from either the speaker output or line level output of the
external receiver to the audio socket on the side panel of the C-Fax. This input will accept a
wide range of signal levels from 100mV to 3V RMS. Putting a plug into the external
receiver socket automatically overrides the internal receiver.
Switch the external receiver to LSB and tune it to 1.9kHz above the required frequency.
The contrast control on the C-Fax is inoperative when using an external receiver. The BFO
control on the receiver should be used for fine tuning instead.
14
Trouble Shooting
Unit is dead - no lights
Check Power switch is on (down)
Power lead is connected
Fuse on side panel is intact
Power polarity, red wire of lead is positive, black is negative
Voltage to the C-Fax is correct, between 12 and 24V
If all these check ok, or if the fuse fails again after replacement, seek technical
assistance.
No Printing
Check Paper Out light is not flashing, if it is replace the paper
Paper is fitted correctly
Run switch is in Auto or Start position
Replacing the Fuse
The fuse on the side panel can be removed for checking or replacement by unscrewing the
cap anticlockwise.
This fuse protects some very expensive components inside the C-Fax. It must only be
replaced with one of the same rating. The warranty is void if a heavier fuse is used.
The fuse is the standard small size, 20 x 5mm, 2A current rating.
Replacing the Battery
The C-Fax uses an internal battery to maintain the last channel memory when it is not turned
on. The battery has an expected life of at least five years. If the C-Fax no longer retains the
last channel used when switched back on then the battery needs replacing. Return the C-Fax
to the supplier or a qualified technician as the internal battery is soldered in.
Replace with lithium cell type CR2032 vertical PCB mount.
15
Specifications
RECORDING SYSTEM
Printing by static thermal head on thermal paper
RECORDING PAPER
High sensitivity thermosensitive
INDEX OF COOPERATION
288 and 576
SCANNING SPEED
60, 90 and 120 lines per minute
RESOLUTION
8 dots/mm
START AND STOP
Automatic or manual
PHASING
Automatic or manual
DATA TONES
White 1500Hz Black 2300Hz
RECEIVING SYSTEM
Double conversion superheterodyne
NUMBER OF CHANNELS
256 pre-programmed
FREQUENCY RANGE
50kHz to 30MHz
RECEPTION MODE
F4
RECEIVE IF FREQUENCY
45MHz & 455kHz
BFO FREQUENCY
453.1 kHz
SENSITIVITY
2 microvolts for useable copy
FINE TUNING
Front panel contrast control
DIMENSIONS
322mm wide x 250mm high x 95mm deep
WEIGHT
Approx. 4kg
MOUNTING POSITIONS
Vertical or horizontal, free standing or on
bracket supplied
POWER SUPPLY
12 to 24V DC
POWER CONSUMPTION
12W when printing
OPTIONS
230V AC to 12V DC Power Supply
NOTE:
All effort will be made to supply the equipment as per the
specifications, however we reserve the right to change any
of the above details without notice.
16
Wiring Connections
Power
Supplied via a 4 pin round line socket, standard threaded locking collar.
Side Panel Power
+
3
2
4
1
-
pin 1 unused
pin 2 negative (black)
pin 3 positive (red)
pin 4 unused
Power supply 12 to 24V DC at 1.5A, 12W maximum
Audio In
Standard 3.5mm mono audio plug for external receiver.
Center is signal, outside is signal return.
Level:100mV to 3V RMS
17
Frequency list for the C-Fax
BHM C-FAX 250297
Frequency list updated 25 February 1997
Channel
Country,Location
Standards
LPM/IOC
001
002
003
004
005
006
007
008
009
010
011
012
013
014
015
016
017
018
019
020
021
022
023
024
025
026
027
028
029
030
031
032
033
034
035
036
037
038
039
040
041
042
043
044
Antarctic,Casey
120/576
New Zealand,Auckland
120/576
Australia,Melbourne (AXM)
120/576
Australia,Darwin (AXI)
120/576
Guam,USN Apra Harbour
120/576
ANTARCT 7470
ANTARC 11455
NZ
5807
NZ
9459
NZ
13550.5
NZ
16340.1
AUS MLB 2628
AUS MLB 5100
AUS ML 11030
AUS ML 13920
AUS ML 20469
AUS DRW 5755
AUS DRW 7535
AUS DW 10555
AUS DW 15615
AUS DW 18060
GUAM
5258
GUAM
5262
GUAM
10253
GUAM
10257
GUAM 16027.6
GUAM
19858
GUAM
19862
GUAM
23010
TAIWAN 4616
TAIWAN 5250
TAIWAN 8140
TAIWAN 13900
KOREA 5857.5
KOREA 7433.5
HK
16904.3
SHANGHI 7420
SHANGH 11420
SHANGH 18940
JAPAN
3365
JAPAN
5405
JAPAN
9438
JAPN 14692.5
JAPN 18441.2
JAPAN 3622.5
JAPAN
7305
JAPAN
9970
JAPAN 13597
JAPAN 18220
Taiwan,Tai-pei
South Korea,Soul
120/576
Hong Kong,Victoria Harbour
China,Shanghai
120/576
Japan,Tokyo 1
120/576
Japan,Tokyo 2
18
045
046
047
048
049
050
051
052
053
054
055
056
057
058
059
060
061
062
063
064
065
066
067
068
069
070
071
072
073
074
075
076
077
078
079
080
081
082
083
084
085
086
087
088
089
090
091
092
093
094
095
096
097
098
JAPN 23522.9
KHBRV 4516.7
KHBRVSK 7475
KHBRVSK 9230
KHBRVS 14610
KHBRVS 14737
KHBRVS 19275
ALASKAK 4298
ALASKAK 8459
ALASKAA 8494
HONOL 9982.5
HONOLU 11090
HONOLU 16135
HONO 23331.5
HAWAI P 4855
HAWAI P 9398
HAWAIP 21785
CANADAI 3253
CANADAI 7710
US OMAH 3232
US OMAH 4857
US OMA 11122
USA SF 4346
USA SF 8682
USA SF 12730
USSF 17151.2
USA SF 22527
ARGENTI 5185
ARGENT 10720
ARGN 18621.5
ARGENTE 5185
ARGENT 10720
ARGN 18621.5
US NRFK 3357
US NRFK 8080
US NRF 10865
US NRF 15959
US NRF 20015
BOSTON 3264
BOSTN 6340.5
BOSTON 7530
BOSTON 9110
BOSTON 12750
CANA H 122.5
CANADAH 4271
CAN H 6496.4
CANA H 10536
CANA H 13510
ICELD 3820.5
ICELAND 9318
ICELND 18486
UK BR 2618.5
UK BRAC 4610
UK BRAC 8040
Russia,Khabarovsk
120/288
60/576,90/576,120/576
Alaska,USCG Kodiak
120/576
Hawaii,Honolulu
120/576
Hawaii,USN Pearl Harbour
120/576
Canada,CCG Iqaluit
120/576
United States,USAF Omaha
United States,USCG San Francisco 120/576
Argentina,Buenos Aires
120/576
United States,USN Norfolk
120/576
United States,USCG Boston
120/576
Canada,CF Halifax
120/576
Iceland,USN Keflavik
120/576
United Kingdom,Bracknell
120/576
19
099
100
101
102
103
104
105
106
107
108
109
110
111
112
113
114
115
116
117
118
119
120
121
122
123
124
125
126
127
128
129
130
131
132
133
134
135
136
137
138
139
140
141
142
143
144
145
146
147
148
149
150
151
152
UK BRC 14436
UK BRC 18261
GRMNY H 3855
GRMNY H 7880
GRMH 13882.5
GRM G 2342.5
GRMNY G 3302
GRM G 4570.5
GRMN O 117.4
GRMN O 134.2
DENMARK 5850
DENMARK 9360
DENMRK 13855
DENMRK 17510
CZECH 111.8
SPAIN 6918.5
SPAIN 10250
SPAIN R 4623
SPN R 5864.5
SPAIN R 9373
SPAN R 11485
SENEGL 13666
SENEGL 19751
ITALY 4777.5
ITALY 8146.6
ITLY 13597.4
GREECE 8530
TURKEY 3377
TURKEY 6790
EGYPT 4524.5
EGYP 10121.1
KENYA
9045
KENYA 16187
KNYA 17445.5
UK BR 2618.5
UK BRAC 4610
UK BRAC 8040
UK BRC 14436
UK BRC 18261
GRMNY H 3855
GRMNY H 7880
GRMH 13882.5
GEORGIA 3745
GEORGIA 7495
DENMARK 5850
DENMARK 9360
DENMRK 13855
DENMRK 17510
MOSCOW 53.6
MOSCOW 144.5
MOSCOW 2815
MOSCOW 3395
MOSCOW 3875
MOSCOW 4550
Germany,Hamburg
120/576
Germany,Grengel
120/576
Germany,Offenbach
120/576
Denmark,Copenhagen
120/576
Czech Republic,Prague
Spain,Madrid
120/576
120/576
Spain,USN Rota
120/576
Senegal,Dakar
60/576,120/576
Italy,Rome
120/576
Greece,Athens
Turkey,Ankara
120/576
90/576
Egypt,Cairo
Kenya,Nairobi
120/576
United Kingdom,Bracknell
120/576
Germany,Hamburg
120/576
Georgia,Tbilisi
60/288,60/576,90/576
Denmark,Copenhagen
Russia,Moscow
20
120/576
90/288,120/288
60/576,90/576,120/576
153
154
155
156
157
158
159
160
161
162
163
164
165
166
167
168
169
170
171
172
173
174
175
176
177
178
179
180
181
182
183
184
185
186
187
188
189
190
191
192
193
194
195
196
197
198
199
200
201
202
203
204
205
206
MOSCOW 4560
MOSCOW 5150
MOSCOW 5355
MOSCOW 6880
MOSCOW 7670
MOSCOW 7750
MOSCOW 10230
MOSCOW 10980
MOSCOW 11525
MOSCOW 12165
MOSCOW 13470
MOSCOW 15950
MURMNSK 5335
MRMNSK 10130
YEKATER 3255
SAMARA 4530
SAMARA 5102
ROSTOV 3610
ROSTOV 5280
ROSTOV 7630
ROSTOV 7968
ROSTOV 9100
ARKHNGL 3657
ARKHNGL 5347
ARKHNGL 7762
KHBRV 4516.7
KHBRVSK 7475
KHBRVSK 9230
KHBRVS 10220
KHBRVS 14610
KHBRVS 14737
KHBRVS 19275
BELARUS 3810
BELARUS 7575
BELARUS 7640
UZBKSTN 3280
UZBKSTN 4365
UZBKSTN 5285
UZBKSTN 5890
UZBKSTN 7570
UZBKSTN 8083
UZBKSTN 9150
UZBKSTN 9340
UZBKST 13947
UZBK 14982.5
BEIJING 5527
BEIJING 8122
BEIJNG 10117
BEIJNG 14367
BEIJNG 14545
BEIJNG 16026
BEIJNG 18237
SHANGHI 7420
SHNGHI 11420
Russia,Murmansk
90/576,120/576
Russia,Yekaterinburg
Russia,Samara
Russia,Rostov-na-Donu
60/576,90/576
Russia,Arkhangelsk
Russia,Khabarovsk
120/288
60/576,90/576,120/576
Belarus,Mensk
Uzbekistan,Tashkent
120/288
60/576,90/576,120/576
China,Beijing
China,Shanghai
21
120/576
207
208
209
210
211
212
213
214
215
216
217
218
219
220
221
222
223
224
225
226
227
228
229
230
231
232
233
234
235
236
237
238
239
240
241
242
243
244
245
246
247
248
249
250
251
252
253
254
255
SHNGHI 18940
HONG 16904.3
KOREA 11476
KOREA 13580
THAILND 7395
THAILD 17520
INDIA 4993.5
INDIA
7403
INDIA 10107
INDIA 14842
INDIA 18232
REUNION 8176
REUNIN 16335
DIEGO G 7582
DIEGOG 12806
DIEGOG 20302
S AFRCA 7508
SAFRCA 18238
KENYA
9095
KENYA 16187
KNYA 17445.5
EGYPT 4524.5
EGYP 10121.1
TURKEY 3377
TURKEY 6790
GREECE 8530
ITALY 4777.5
ITALY 8146.6
ITLY 13597.4
blank
0
blank
0
blank
0
blank
0
blank
0
blank
0
blank
0
blank
0
blank
0
blank
0
blank
0
blank
0
Test
50
Test 218.75
Test
1750
Test
3500
Test
7000
Test
14000
Test
28000
serial #
0
Hong Kong,Victoria Harbour
South Korea,Soul
120/576
Thailand,Bangkok
120/576
India,Delhi
120/576
Reunion,Saint Denis
120/576
Diego Garcia,USN Diego Garcia
120/576
South Africa,Pretoria
120/576
Kenya,Nairobi
120/576
Egypt,Cairo
Turkey,Ankara
90/576
Greece,Athens
Italy,Rome
120/576
120/576
Frequencies for testing receiver
Individual serial number
22
Manufactured by
BHM Electronics
Invercargill
New Zealand
Delivery Address: 287 Dee Street, Invercargill
Postal Address: PO Box 787, Invercargill 9840
Phone: 0-3-218 3495
Fax: 0-3-218 3494
International Phone: +64 3 218 3495
International Fax: +64 3 218 3494
E-mail: [email protected]
23