1
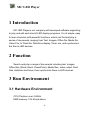
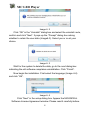
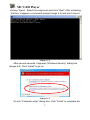
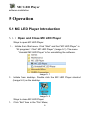
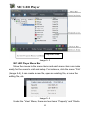
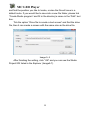
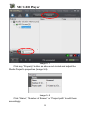
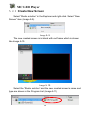
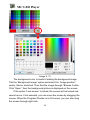
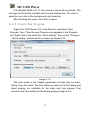
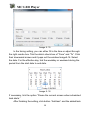
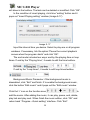
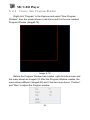
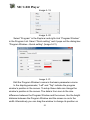
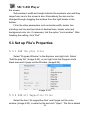
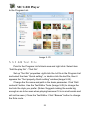
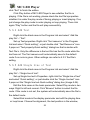
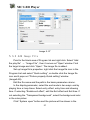
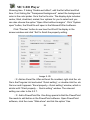
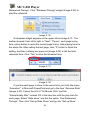
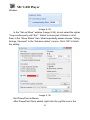
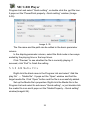
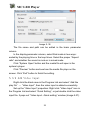
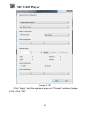
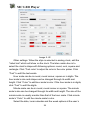
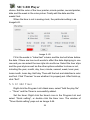
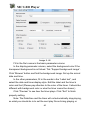
MC LED PLAYER USER MANUAL
Mooncell
Mooncell Electronic Co., Ltd.
Address:3rd floor,Jinke Building South,No.8 Qiongyu Rd.,Nanshan
District,Shenzhen
Website:http://www.mooncell.com.cn
Tel:0755-23975634.0755-23975637
Fax:0755-82821265
MC LED Player
Friendly tips
Thanks for your support and trust to our products. Please read the
manual carefully before to use the product. As the product is contiuning
to update,there will be some differences between the manul and the real
product. Please base on the real product.
1
MC LED Player
INDEX
1 INTRODUCTION ........................................................................................ 4
2 FUNCTION ................................................................................................... 4
3 RUN ENVIRONMENT................................................................................ 4
3.1 HARDWARE ENVIRONMENT ...................................................................... 4
3.2 SOFTWARE ENVIRONMENT ....................................................................... 5
4 INSTALLATION AND INITIALIZATION ............................................... 5
5 OPERATION................................................................................................. 8
5.1 MC LED PLAYER INTRODUCTION ............................................................ 8
5.1.1 Open and Close MC LED Player ................................................. 8
5.1.2 Software Interface Introduction .................................................... 9
5.2 CREATE STUDIO PROGRAM ..................................................................... 11
5.2.1 Create Studio Program.................................................................11
5.2.2 Create New Screen...................................................................... 14
5.2.3 Create New Program ...................................................................... 17
5.2.4 Create New Program Window...................................................... 20
5.3 SET UP FILE’S PROPERTIES ..................................................................... 22
5.3.1 Add the play files............................................................................. 22
5.3.2 Add all Supportive Files.................................................................. 22
5.3.3 Add Text File ................................................................................... 23
5.3.4 Add Text........................................................................................... 25
5.3.5 Add Single Line of Text.................................................................... 25
5.3.6 Add Image File................................................................................ 27
5.3.7 Add Office File ................................................................................ 28
5.3.8 Add Media File ............................................................................... 32
2
MC LED Player
5.3.9 Add Video Input............................................................................... 33
5.3.10 Add Flash File............................................................................... 36
5.3.11 Add Date/time................................................................................ 37
5.3.12 Add Timer...................................................................................... 39
5.4 EDIT PROGRAM W INDOWS ..................................................................... 41
5.4.1 Play mode ....................................................................................... 41
5.4.2 To Play a File in one Program Window .......................................... 42
5.4.3 To Play Several Files Under a Program Window ........................... 42
5.4.4 To Play Several Program Windows Under a Program ................... 43
5.4.5 To Play Program Windows under Two Programs ........................... 44
3
MC LED Player
1 Introduction
MC LED Player is our company self developed software supporting
to play and edit each kind of LED display programs. It is of simple, easy
to learn character with powerful functions, which can find and play a
series of documents, ranging from Text, Images, Office file, Media file,
Video File, to Flash file, Date/time display, Timer, etc. and synchronize
the files to LED devices.
2 Function
Search and play a range of documents including text, images,
Office files (Word, Excel, PowerPoint), Media files, video output, flash
files, data/time and timer, then synchronize them to LED devices.
3 Run Environment
3.1 Hardware Environment
CPU: Pentium over 2.6GHz
EMS memory: 512 M and above
4
MC LED Player
3.2 Software Environment
Operation System:Windows NT/XP/Vista/Win7
Note:Additional database software is not required.
4 Installation and Initialization
Insert MC LED Player’s Setup CD onto CD-ROM and find
“setup.exe” file. Double-click it and begin to install MC LED player.
Below explain MC LED Player installation in detail.
Double click setup.exe files and the system prepares for installation.
The user can follow each instruction and process on. Please read
carefully the instruction and notes showed on the screen.
If the computer is running this software and it will pop out the dialog
box “Prompt” as Image 4-1, close the running software and click “OK”.
Double click the setup file once again and begin installation.
Image 4- 1
If the system has installed the old version of the software, the
following dialog box (Image4-2) will pop out and ask you uninstall the old
version. Click “OK”.
5
MC LED Player
Image 4- 2
Click “OK” in the “Uninstall” dialog box and select the uninstall route,
confirm and click “Next”. It pops up the “Prompt” dialog box asking
whether to retain the user data (Image4-3). Select yes or no at your
choice.
Image 4- 3
Wait for the system to delete the data, go to the next dialog box
indicating the old software completes uninstallation. Click “Finish”.
Now begin the installation. First select the language (Image 4-4)
and click “OK”.
Image 4- 4
Click “Next” in the setup dialog box. Appear the MOONCELL
Software License Agreement window. Please read it carefully before
6
MC LED Player
clicking “Agree”. Select the setup route and click “Next”. After extracting
the files, it appears a command prompt (Image 4-5) and don’t close it.
Image 4- 5
After several seconds, it appears “Windows Security” dialog box
(Image 4-6). Click “Install” to go on.
Image 4- 6
Go into “Complete setup” dialog box. Click “Finish” to complete the
7
MC LED Player
software installation.
5 Operation
5.1 MC LED Player Introduction
5.1.1 Open and Close MC LED Player
Ways to open MC LED Player:
1、 Initiate from Start menu. Click “Start” and find “MC LED Player” in
“All programs”. Click” MC LED Player” (Image 5-1). The menu
“Uninstall MC LED Player” is for uninstalling the software.
Image 5- 1
2、 Initiate from desktop:Double click the MC LED Player shortcut
(Image 5-2) on the desktop.
Image 5- 2
Ways to close MC LED Player:
1、 Click “Exit” item in the “File” Menu;
8
MC LED Player
2、 Click the close button“×”on the top right;
3、 Use shortcut Alt+F4 to close the software.
5.1.2 Software Interface Introduction
MC LED Player’s interface is shown as Image 5-3.It is easy for the
users to operate the software with the menu items, and specifically two
menu items “Control” and “Tools” will be introduced in another manual
“Engineering Instruction Manual” and here omit this part. In the Function
Area, there are Explorer, Property and LED Screen On/Off button. The
Explorer is an area to add, change or delete the items and setup their
properties, while the right column Program List is the place to edit the
play files, such as adding, editing and deleting files, changing their order,
etc. The status bar indicates the connecting situation with the devices:
green icon indicates the connected receiving card number; gray icon
means the number of receiving cards that the screen driver has not
found; red icon indicates the number of cabinet card that are sending
signals in the screen drive; blue icon indicates USB ports number of
sending card connecting with the computer. In the Control Area, the user
can play, pause and preview the programs as well as adjusting the
volume. In the middle, it shows the information of DVI connecting
situation.
9
MC LED Player
Explorer Area
Image 5- 3
MC LED Player Menu Bar
Move the mouse to the menu items and each menu item can make
easily for the users to visit and setup. For instance, click the menu “File”
(Image 5-4), it can create a new file, open an existing file, or save the
editing file, etc.
Image 5- 4
Under the “View” Menu, there are two items “Property” and “Studio
10
MC LED Player
Project”. Without ticking the “Property” item, the two options “Explorer”
and “Property” at the bottom of the Explorer column will hide. It is the
same to the “Studio Project”. Without ticking it, the whole Explorer
column will hide and only left the Program List column.
The “Edit” Menu is to edit the studio project through the following
items: Cut, Copy, Paste, Delete, All, Forward, Backward.
It has only an “Add” option under the “Item” menu. You can add a
LED screen or a program file. For example, when the Program [1] is
selected and to click the “Add” item, it adds a new program window
under this program.
MC LED Player Function Area
You can use the tool bar’s button “ Back” “Forward”, “Upward” to
switch between the items of the Explorer quickly. In the “Backward” and
“Forward” item, there is a small downward arrow for the users to visit the
programs quickly as Image 5-5 shown.
Image 5- 5
5.2 Create Studio Program
5.2.1 Create Studio Program
Click “File” menu and select “ New” , or use shortcut
“CTRL+SHIFT+N”, the system pops out “New Studio Program”
window( Image 5-6). Set up the window’s properties. E.g., fill in the
Project name like “002”, select the save route from the “Browse” button
11
MC LED Player
and find the position you like to locate, or else the file will save in a
default route. If you would like to save into a new file folder, please tick
“Create Studio program” and fill in the directory’s name in the ‘Path” text
box.
Tick the option “Drive file to create a Led screen” and find the drive
file, then it can create a screen with the same size as the drive file.
Image 5- 6
After finishing the setting, click “OK” and you can see the Studio
Project 002 listed in the Explorer (Image5-7).
12
MC LED Player
Image 5- 7
Click any “Property” button as above red circled and adjust the
Studio Project’s properties (Image 5-8).
Image 5- 8
Click “Name”, “Number of Screen” or “Project path” to edit them
accordingly.
13
MC LED Player
5.2.2 Create New Screen
Select “Studio solution” in the Explorer and right-click. Select “New
Screen” item (Image 5-9).
Image 5- 9
The new created screen is in black with red frame which is shown
like Image 5-10.
Image 5- 10
Select the “Studio solution” and the new created screen’s name and
type are shown in the Program List (Image 5-11)
14
MC LED Player
Image 5- 11
Select “Led Screen [1]” in the Program List and right click. Select
the last item “Quick setting” from the pop-out menu and it pops out
“Screen—Quick setting” window (Image5-12).
Image 5- 12
Setup the screen’s properties in this window. To visit the property
setting window, you can either click the “Property” item in the Explorer or
click the “Property” button on the tool bar (The same operation with the
Studio Project).
In the “Screen-Quick Setting” window, the user can adjust the
properties such as to fill in the screen’s name in the basic parameter. In
the display parameter, the items “Left” and “Top” indicate the screen’s
relative position to the computer monitor. When these two items are in
“0”, the screen will show on the top left of the computer monitor.
“Width” and “Height” are for adjusting the screen’s size. It can also
be adjusted by stretching the frame thorough the right, bottom border or
the corner.
Setup background color: click the background color widget and
move the color sucker to select the color (Image5-13), or click the
customized button at the right bottom to select the color.
15
MC LED Player
Image 5- 13
The background color is invalid if adding the background image.
Tick the ‘Background image” option and select the “Image position”:
center, tiled or stretched. Then find the image through “Browse “button.
Click “Open”, then the background picture is displayed on the screen.
If the option “Lock screen” is ticked, the screen will be locked and
cannot move. If not selected, you can move the screen by dragging the
mouse. When the Program Window is in full screen, you can also drag
the screen through right click.
16
MC LED Player
If the Border Width is in “0”, the screen is shown like no border. The
line-type for the border includes real line and dashed line. The color’s
selection can refer to the background color selection.
After finishing the setup, click “Exit’ to leave.
5.2.3 Create New Program
Right click “LED Screen [1]” in the Explorer and select “New
Program” item. Then the new Program icon appears in the Program
List. Right click it and select the “Quick setting”. Pop out the “Program
—Quick setting” window which is shown as Image 5-14.
Image 5- 14
The play mode in the display parameter includes play by order,
timing, loop and insert. The time setting is valid only for the timing and
insert playing, not available for the order and loop playing. First
introduce the time setting for the timing playing (Image 5-15).
17
MC LED Player
Image 5- 15
In the timing setting, you can either fill in the time or adjust through
the right combo box. Tick the date’s check box of “From” and “To”. Click
their downward arrows and it pops out the window Image5-16. Select
the date. For the effective day, tick the weekday or weekend during the
period from the start date to end date.
Image 5- 16
If necessary, tick the option “Pause the current screen when scheduled
task starts.”
After finishing the setting, click button “Add task” and the added task
18
MC LED Player
will show in the textbox. The task can be deleted or modified. Click “OK”.
In the condition of insert playing, click time “setting” button and it
pops out “Insert Playing setting” window (Image 5-17).
Image 5- 17
Input the interval time you desire. Select to play one or all program
windows. If necessary, tick the option “Pause the current playback
screen when the program starts” and click “OK”.
The end mode includes two ways: end by the playing time or loop
times. If end by the “Playing time”, it needs to edit the time textbox.
If end by the “Loop times”, it needs to edit loop times textbox
。
Background Music Parameter: if the background music is
disenabled, click “Exit” and finish. If to enable the background music,
click the button “Edit music” and it pops out the “Edit music” window.
Click the”+” icon on the function area
to
add the music. After adding the music, it can play, pause, end, delete,
play last and play next. When finish the music edition, click “OK” and
return back “Program—Quick setting” interface. Click “Exit”.
19
MC LED Player
5.2.4
Create New Program Window
Right click “Program” in the Explorer and select “New Program
Window”, then the screen shows a red frame and it is the new created
Program Window (Image5-18).
Image 5- 18
Before the Program Window has created, right click the screen and
the menu shows as Image5-19. After the Program Window creates, the
menu shows different (Image5-20) and it has two more items: “Position”
and “Size” to adjust the Program window.
20
MC LED Player
Image 5- 19
Image 5- 20
Select “Program” in the Explorer and right click “Program Window”
in the Program List. Select “Quick setting” and it pops out the dialog box
“Program Window—Quick setting” (Image 5-21).
Image 5- 21
Edit the Program Window’s name in the basic parameter column.
In the display parameter, “Left” and “Top” indicate the program
window’s position in the screen. To setup these data can change the
window’s position in the screen. The data is from zero to the size
difference between the Program Window and the screen, like the height
distance between the Program Window and the screen so as to the
width. Alternatively you can drag the window to change its position on
21
MC LED Player
the screen.
Sub-window’s width and height indicate the window’s size and they
range from zero to the screen’s size. Alternatively the size can be
changed through dragging the window from the right border or the
bottom.
Fill in the other parameters such as border width, border line
including real line and two kinds of dashed lines, border color and
background color, etc. If necessary, tick the option “Lock window”. After
finishing the setting, click “Exit”.
5.3 Set up File’s Properties
5.3.1 Add the play files
Select “Program Window” in the Explorer and right click. Select
“Add the play file” (Image 5-22), or just right click the Program List’s
blank area and it pops out the Window (Image5-22).
Image 5- 22
5.3.2 Add all Supportive Files
Select the item” All supportive files” and it pops out the route
window (Image 5-23). Locate the file and click “Open”. The file is added
22
MC LED Player
to the Program List.
Image 5- 23
5.3.3 Add Text File
Point to the Program List’s blank area and right click. Select item
“Add the play file” –“Text file”.
Set up “Text file” properties: right click the .txt file in the Program List
and select the item “Quick setting”, or double click the text file, then it
appears the “Text property-Quick setting” window(Image 5-24).
Change the file name and path in the basic parameter. Click “Edit
contents” button. Use the Text Editor Tools (Image 5-25) to change the
text into the style you prefer. (Notes: Suggest making the words big
enough so as to be seen when playing because if it is in small words and
will not be seen.) Close the Text Editor. Click “Browse” button to change
the file’s route.
23
MC LED Player
Image 5- 24
Image 5- 25
In the display parameter, select the end mode in two options: end by
the playing time and the loop times. After selection, edit the playing time
or the loop times.(Pleases noted that the arranged playing time is at
least longer than the file’s duration or else the file will not completely
played.) Set up Entry effect and Entry time. The showing time is the time
for the text showing on the screen, not including the entry and exit time.
If need the exit effect, you can also edit the exit effect and its exit time.
Select the Background color in the color picker. If you don’t like the
background color, just select the option “Transparent background”. After
the above setup, click “Preview” to browse the whole effect and finally
24
MC LED Player
click “Exit” to finish the edition.
Click Play button of MC LED Player to see whether the file is
playing. If the file is not working, please check the text file’s properties
whether it is under the play mode of timing playing or insert playing. If so,
just change the play mode to order playing or loop playing. Then click
again “Play” button and the file will play successfully.
5.3.4 Add Text
Right click the blank area in the Program List and select “Add the
play file”—“Text”.
Set up Text properties. Right click “Text resource” in the Program
List and select “Quick setting”, or just double click “Text Resource” icon.
It pops out “Text property-Quick setting” dialog box that is similar with
Text File’s. Only the difference is the text file has the file route while the
text has not. The Text resource will automatically save to the default
route if no route is given. Other settings can refer to 5.3.3 Text file’s
setting.
5.3.5 Add Single Line of Text
Right click the blank area in the Program List and select “Add the
play file”—“Single line of text”.
Set up Single line text’s Properties: right click the “Single line of text”
and select “Quick setting”, or just double click the “Single line text” icon.
It pops out the “Single line text-Quick setting” dialog box (Image 5-26).
Edit the file’s name in the basic parameter. Select Play mode in two
ways: Right to left and normal. Click “Browse” button to select the file
route. If the route is not set, the system will automatically save the file to
the default route.
Select End mode in the display parameter and edit the playing time
or loop times. Choose the alignment, the text position in the window,
25
MC LED Player
including up, central and down. For choosing “Right to Left” as the play
mode, adjust the moving speed; for choosing “Normal” as the play
mode, adjust the entry effect, entry time and showing time. If to use the
Exit Effect, edit the Exit effect and Exit time. Select the background
color and the font color in the color picker. If no background color
preferred, just click “Transparent background”.
Image 5- 26
Click “Font” button and it pops out the“Font”window (Image5-27). From
“Sample” box it shows the word’s display effect. After finish up, click
“OK” and return back the “Single Line Text—Quick Setting” window. Fill
in the words in the Textbox and click “Preview” to see the play effect in
the screen window.
26
MC LED Player
Image 5- 27
5.3.6 Add Image File
Point to the blank area of Program list and right click. Select “Add
the play file” → “Image File” , then it comes out “Open” window. Find
the target image and click “Open”. The image file is added.
Set up Image file’s properties: right click the Image file icon in the
Program List and select “Quick setting”, or double click the Image file
icon and it pops out “Picture property-Quick setting” window
(Image5-28).
Edit the file name and the path in the basic parameter column.
In the display parameter, select the end mode in two ways: end by
playing time or loop times. Select entry effect, entry time and showing
time. If selecting “Enable exit effect”, edit the Exit effect and Exit time. If
not selecting the “Transparent background”, select the background color
in the color picker.
Click” System open” button and the picture will be shown in the
27
MC LED Player
system’s software “Window Picture Viewer”.
Click “Preview” button and the picture will show on the screen. Click
“Exit’ to finish the property setting.
Image 5- 28
5.3.7 Add Office File
Right click the blank area in the Program List and select “Add the
play file” → “Office file”, and then it pops out the “Open” window. Find
the target Office file and click “Open”. The Office file is added.
(1)Add a Word file. After a Word file is successfully added, right
click the .doc file and select “Quick setting’, or double click the .doc file
icon and it pops out the window’” Word property-Quick setting” (Image
5-29).
The file name and file path can be changed in the basic parameter
column.
In the display parameter column, select the End mode in two ways:
end by playing time or loop times. Select Entry effect, Entry time and
28
MC LED Player
Showing time. If ticking “Enable exit effect”, edit the Exit effect and Exit
time. If not ticking the “Transparent background”, select the background
color in the color picker. So is the font’s color. The display style includes:
center, tilled, stretched, scaled, four options for you to select and you
can also choose the option “Open Word without margins”. Click “System
open” button, the Word file will open in the Microsoft Word software.
Click “Preview” button to see how the Word File display in the
screen window and click “Exit’ to finish the property setting.
Image 5- 29
(2)Add an Excel file. After an Excel file is added, right click the .xls
file in the Program List and select “Quick setting”, or double click the .xls
file icon and it appears “Excel property—Quick setting” window, which is
similar with “Word property— Quick setting” window. The relevant
setting can refer to the 5.3.7.
(3)Add a PowerPoint file. One thing special is that the PowerPoint
file needs to edit before in the PowerPoint software. Open PowerPoint
software, click the menu “Slide show” and tick the option “Use
29
MC LED Player
Rehearsed Timings”. Click “Rehearse Timings” widget (Image 5-30) to
start the rehearsal.
Image 5- 30
A rehearsal widget appears on the upper left as Image 5-31. The
toolbar showed, from left to light, is “Next”, “Pause”, each page’s play
time, return button to reset the current page’s time, total playing time for
the whole file. After setting the last page, click “X” button to finish the
setting, and then a dialog box pops out (Image 5-32) to tell the total
rehearsal time. Click “Yes” to save the rehearsal time.
Image 5- 31
Image 5- 32
If you like each page to show in the same time, just click the menu
“Animation”” in Microsoft PowerPoint and go to the item “Advance Slide”
(Image 5-33). Cancel the tick of “On Mouse Click” and tick
“Automatically After” instead. Fill in the later box with the play time for
each page. Select “Slide show” and tick the option “Use Rehearsed
Timings”. Then click “Set up Slide Show” and go into “Set up Show”
30
MC LED Player
Window.
Image 5- 33
In the “Set up Show” window (Image 5-34), do not select the option
“Loop continuously until ‘Esc’”. Select to show part of slides or all of
them in the “Show Slides” item. Most importantly please choose “Using
timings, if present” in the “Advance slides” column. Click “OK” to finish
the setting.
Image 5- 34
Exit PowerPoint software.
After PowerPoint file is added, right click the .ppt file icon in the
31
MC LED Player
Program List and select “Quick setting”, or double click the .ppt file icon.
It pops out the “PowerPoint property –Quick setting” window (Image
5-35).
Image 5- 35
The file name and the path can be edited in the basic parameter
column.
In the display parameter column, select the End mode in two ways:
ended by the playing time or the loop times.
Click “Preview” to see whether the file is normally playing. If
succeed, click “Exit” to finish the setting.
5.3.8 Add Media File
Right click the blank area in the Program List and select “Add the
play file” → “Media file”. It pops out the “Open” window and find the
target media file. Click “Open” button and the file is successfully added.
Set up the Media file’s properties: Right click the Media file in the
Program List and select its sub-menu” Quick setting”, or just double click
the media file icon and it pops out the “Media Property – Quick setting”
window(Image5-36).
32
MC LED Player
Image 5- 36
The file name and path can be edited in the basic parameter
column.
In the display parameter column, select End mode in two ways:
ended by the playing time or the loop times. Select the proper “Aspect
ratio” and whether the sound is mute or in mixed mode.
Click “System Open” button and the media file will open in the
system’s player.
Click “Preview” button and see how the media file plays on the
screen. Click “Exit” button to finish the setting.
5.3.9 Add Video Input
Right click the blank area in the Program List and select “Add the
play file” → “Video Input”, then the video input is added successfully.
Set up the “Video Input” properties: Right click “Video Input” icon in
the Program List and select “Quick Setting”, or just double click the video
input file. It pops out “Video Input –Quick setting” window (Image 5-37).
33
MC LED Player
Image 5-37
The file’s name can be edited in the basic parameter column.
In the display parameter column, select the End mode in two ways:
ended by the playing time or loop times. Select the video device, input
port and the channel. If for advanced configuration, please tick
“Advanced mode” and click “Configuration” button to go into “Video
capture configuration” window (Image 5-38).
In the “Video capture configuration” window, “Capture device
configuration” is to select and change the device. In the “Display
configuration”, select the “Mixed mode” and the aspect ration. Select the
devices in the “Video configuration”. Select channel and set the channel.
Choose “Input configuration” in cable or wireless and select the devices
in “Audio configuration”.
34
MC LED Player
Image 5- 38
Click “Apply” and the systems pops out “Prompt” window (Image
5-39). Click “OK”.
35
MC LED Player
Image 5- 39
Click “Exit” to go out of the “Video capture configuration “window.
Click “Preview” button in the “Video Input—Quick Setting” window,
and the images from video input will show on the screen. Click “Exit”.
5.3.10 Add Flash File
Right click the Program List’s blank area and select “Add the play
file” → “Flash file”. It pops out the “Open” Window. Find the flash file
and click “Open”. The flash file is added.
Set up the Flash File properties: Right click the “Flash File” icon in
the Program List and select “Quick setting”, or double click the flash file’s
icon. It pops out the “Flash property---Quick setting” window (Image
5-40).
Image 5- 30
The file name and path can be edited in the basic parameter
36
MC LED Player
column.
In the display parameter, select the End mode in two ways: ended
by the playing time or loop times.
Click “System open” button and the file will open in the Adobe Flash
Player 11 as shown like Image 5-41. Click “Preview’ button and the file is
displayed on the screen. Click “Exit’ to finish the setting.
Image 5- 41
5.3.11 Add Date/time
Right click the Program List’s blank area and select “Add the play
file” → “Date/time”. The Date/time is successfully added.
Set Date/time. Right click “Date/time” icon in the Program List and
select “Quick setting”, or double click “Date/time” icon. It pops out the
“Date time---Quick setting” window (Image 5-42).
Change the file name in the basic parameter column.
In the display parameter, select the background color if not ticking
“Transparent”; if to support background image, select the background
image through “Browse” button. The image can be arranged in center,
tilled, or stretched. Choose “Style”. For “Time difference”, fill in the first
box the days and the later one the exact time difference. Option whether
“ahead” or “behind” is based on your current district, to the east is
“ahead”, like Japan for china, and to the west is “Behind”, like America
for China.
37
MC LED Player
Image 5- 42
Other settings: When the style is selected in analog clock, edit the
“Label text” which will show on the clock. The later combo box is to
select the clock’s shape with following options: round, oval, square and
rectangle. Click “Font color’ to adjust its color in the color picker. Click
“Font” to edit the text words.
Hour scale can be in round, round corner, square or in digits. The
hour scale’s size and shape can be changed through its width and
height. Click “Color” to edit hour scale’s color. If the hour scale is in digits,
click “Font” to edit the digits.
Minute scale can be in round, round corner or square. The minute
scale’s size can be changed through its width and height. The size of the
minute scale is usually smaller than that of the hour scale. Click minute
scale’s “Color” to edit the minute scale’s color.
Select the date, lunar calendar and the week options at the user’s
38
MC LED Player
choice. Edit the color of the hour pointer, minute pointer, second pointer,
date and the week in the color picker. Finally edit the date and the
weeks’ font.
When the time is not in analog clock, the particular setting is as
Image5-43.
Image 5- 43
Fill in the words in “Label text” column and the text will show before
the date. If there are too much words to affect the date displaying in one
row and you can select the row style into multi-row. Select the hour style
and the year style as well as the other options whether to show or not,
including the year, month, day, hour, minute, second, week, lunar year,
lunar month, lunar day, Half-day. Then edit the text and date/time’s color
and font. Click “Preview” to see whether it is properly set. After finish up,
click “Exit”.
5.3.12 Add Timer
Right click the Program List’s blank area, select “Add the play file”
→ “Timer” and the Timer is successfully added.
Set the timer: Right click the timer’s icon in the Program List and
select “Quick setting”, or double click the timer icon. The window of
“Timer-Quick setting” pops out as Image 5-44.
39
MC LED Player
Image 5- 44
Fill in the file’s name in the basic parameter column.
In the display parameter column, select the background color if the
transparent background is not ticked. Tick “Support background image”.
Click “Browse” button and find the background image. Set up the arrival
date and time.
In the other parameters, fill in the words in the “Label text”, and
select the date and timer display style. Edit the label and the timer’s
color and font (Please pay attention to the color of the timer. It should be
different with background color or else the timer cannot be shown.)
Click “Preview” to see how the timer plays. Click “Exit” to finish
property setting.
Note: The Date/time and the timer will not automatically stop playing,
so what you should do is to set the next play file as timing playing or
40
MC LED Player
insert playing.)
5.4 Edit Program Windows
5.4.1 Play mode
There are four kinds of play modes for MC LED Player:(1)Order ,
(2)Timing ,(3)Loop ,(4)Insert. Right click the “Program” icon in the
Explorer column and select “Quick setting” to set up the program
parameter (Image 5-45).
Image 5- 45
Order: play each file from up and down.
Timing: The timing playing needs to set up the time. After set up the
time and effective weeks, click “Add the task” button to add one or more
tasks.
Loop: the same as “Order” in one program window situation. If
having tow program windows or more, two or more windows will play
simultaneously.
Insert playing also needs to set up the time. The time here means
41
MC LED Player
the interval time from the end of the last inserted program to the
beginning of next inserted program.
Regarding the program’s other settings, please refer to Chapter
5.2.3 “Create New Program”. Below introduce the play mode in detail.
Attention: If there are two tasks set for timing playing, their start time
should not be the same like both at10:08. If occasionally set as the
same, the second task will delay for one minute to begin playing.
Notes: if there are two programs whose interval time set as the
same frequency, when it is the first playing time for the insert playing, it
will play the Program 1. At the second time for insert playing, it will play
Program 2 and at the third inserted time playing Program 1 again, and
so forth.
5.4.2 To Play a File in one Program Window
(1)Order
Continue playing the file after click “Play” button.
(2)Timing
Begin from the arranged time and play only once.
(3)Loop
Continue playing the file after click “Play” button.
(4)Insert
Every a fixed interval time to play the file.
5.4.3 To Play Several Files Under a Program Window
(1)Order
Play the files from up and down and circularly.
(2)Timing
At the arranged time begin to play all the files by order for one time.
(3)Loop
Play the files from up and down and circularly.
42
MC LED Player
(4)Insert
When the arranged interval time arrives, play all the files once.
5.4.4 To Play Several Program Windows Under a Program
Take the example of two Program Windows. Right click “Program”
in the Explorer and select “New program window” to create Program
Window 2. The two Program Windows pile up together and Window 2
will be covered by Window 1 when playing. In this case, it is necessary
to adjust window’s size and position through mouse dragging. Another
way to adjust the window’s size is to click Window 1’s icon in the
Explorer and the Window on the screen will be marked with the read
frame. Right click and select the menu “Position” and “Size” to adjust
them. So is Program Window 2 to adjust the position and size. Among
the supportive files, PPT files are in the top priority. E.g., Window 2 has a
PPT file, it will cover Window 1’s file when playing even Window 1’s files
are at the front.
(1)Order
Tow Program Windows play the files simultaneously with their own
order. When several windows pile up together, the front window will
always play at the top. If a front text file is in transparent background, the
second non-text file will be seen and seems to play with the above text
file simultaneously. It is to say, if you want the text file to set in the
non-text file and play together, please put the text file at the front.
(2)Timing
Begin playing from the arranged time. Two Program Windows play
simultaneously with their own order. As these two windows are not in the
same length for playing, the fast one will wait for the slow one to finish by
playing its files again from the beginning. When the slow one finishes its
playing, these two windows both stop.
(3)Loop
43
MC LED Player
The same as Order Play.
(4)Insert
In the Timing setting for the insert playing, for example, set up every
10 seconds to play the file and select the option “Play one window’s file”,
then click “Play” button. After 10 seconds, it begins to play the first
window file. Finish playing and wait for 10 seconds, it begins to play the
second window’s files. Finish playing the second window and then after
10 seconds it plays again.
If selecting ” Play all the windows’ files” and also in the inserted
interval time of 10 seconds, then click “Play” button. After 10 seconds,
the two windows’ files begin to play at the same time. If their files are not
in the same length, the fast one will wait for the slow one, the same as
the timing play.
5.4.5 To Play Program Windows under Two Programs
All below mentioned “Timing playing” and “Insert playing” are set to
the default “Pause the current play when the scheduled task starts.”
(1)Order
1 order 2 order
First play Program Window 1’s files, then play
Window 2’s and later window 1’s again, in repetition.
1 order 2 timing First play Window 1’ s files by order and at the
arranged time pause instead playing Window 2’s. Until Window 2
finishes, continue to play Window 1’s circularly.
1 order 2 loop
Play two windows’ files simultaneously and circularly
with their own order.
1 order 2 insert First play Window 1’s files by order and at the
arranged time pause instead playing Window 2’s. When Window 2
finishes, Window 1 returns to play until another interval time comes and
play Window 2.
(2)Timing
44
MC LED Player
1 timing 2 order First play Window 2’s files by order and at the
arranged time pause instead playing Window 1. When Window 1
finishes, Window 2 returns to play circularly.
1 timing 2 timing Two Windows play their files at the same time by
order and play for one time. Do not need to wait for each other.
1 timing 2 loop Window 2 play continuously and at the arranged
time Window 1’s files play simultaneously. When Window 1 finishes and
stops, Window 2 still continues playing.
1 timing 2 insert Play one of Window’s file whose time is set
earlier. As the timing playing (Here refer to Window 1) is in a higher
priority than insert playing (Window 2). If it is playing window 2 and the
time for playing Window 1 arrives, Window 2 will pause and playing
Window 1’s. Until Window 1 finishes, Window 2 returns back to play.
(3)Loop
1 loop 2 order Same as 1 order 2 continuous
1 loop 2 timing Two windows play their files separately with their
own rules and do not affect each other.
1 loop 2 loop Two windows play their files simultaneously and
circularly.
1 loop 2 insert Two windows play their files separately with their
own rules and do not affect each other.
(4)Insert
1 insert 2 order Similar with 1 order 2 insert
1 insert 2 timing Similar with 1 timing 2 insert
1 insert 2 order Similar with 1 order 2 insert
1 insert 2 insert First play the programs on the top and next the
bottom by order.
45


![CDNXL_60_RETAIL_SALES [MetaTexis] [Final version]](http://vs1.manualzilla.com/store/data/005704456_1-17a983fab827ed2fd4ed28ca910215ca-150x150.png)