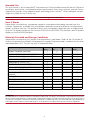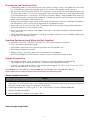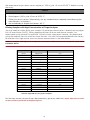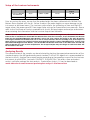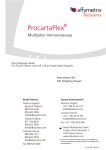
1
ProcartaPlex® Multiplex Immunoassay Using Magnetic Beads For Serum, Plasma, and Cell Culture Supernatant Samples Instructions for Human Assays North America Technical Support: Research Products: 888-810-6168 858-642-2058 [email protected] Clinical Products: 877-726-8559 858-642-2058 [email protected] Customer Service: 888-999-1371 858-642-2058 [email protected] Fax: 858-642-2046 Europe/International* Technical Support: +43 1796 40 40 120 [email protected] Customer Service: +43 1 796 40 40 305 [email protected] Fax: +43 1 796 40 40 400 Bender MedSystems GmbH Campus Vienna Biocenter 2 1030 Vienna, Austria www.eBioscience.com * Customers in countries where direct sales are not avaliable may contact their eBioscience distributor listed at www.eBioscinece. com/distributors * 19.10.2015 Rev.21 For research use only. Not for use in diagnostic procedures. Limited License Subject to the eBioscience, an Affymetrix Company, terms and conditions that govern your use of eBioscience products, eBioscience grants you a non-exclusive, non-transferable, non-sub licensable license to use this eBioscience product only in accordance with the manual and written instructions provided by eBioscience. You understand and agree that, except as expressly set forth in the eBioscience terms and conditions, no right or license to any patent or other intellectual property owned or licensable by eBioscience is conveyed or implied by this eBioscience product. In particular, no right or license is conveyed or implied to use this eBioscience product in combination with a product not provided, licensed, or specifically recommended by eBioscience for such use. Citing ProcartaPlex® Immunoassay in Publications When describing a procedure for publication using this product, please refer to it as the ProcartaPlex® Multiplex Immunoassay from eBioscience. Disclaimer eBioscience, Inc. reserves the right to change its products and services at any time to incorporate technological developments. This manual is subject to change without notice. Although this manual has been prepared with every precaution to ensure accuracy, eBioscience, Inc. assumes no liability for any errors or omissions, not for any damages resulting from the application or use of this information. Trademarks ©2014 Affymetrix Inc. All rights reserved. Affymetrix®, eBioscience® and ProcartaPlex® are trademarks or registered trademarks of Affymetrix, Inc. Luminex®, xMAP®, MAGPIX®, Luminex® 100/200™, and FLEXMAP 3D® are registered trademarks of the Luminex Corporation. All other trademarks are the property of their respective owners. 2 Contents Intended Use . . . . . . . . . . . . . . . . . . . . . . . . . . . . . . . . . . . . . . . . . . 4 How it Works . . . . . . . . . . . . . . . . . . . . . . . . . . . . . . . . . . . . . . . . . . 4 Materials Provided and Storage Conditions . . . . . . . . . . . . . . . . . . . . 4 Precautions and Technical Hints . . . . . . . . . . . . . . . . . . . . . . . . . . . . 5 Required Equipment and Materials Not Supplied . . . . . . . . . . . . . . . 5 Sample Preparation . . . . . . . . . . . . . . . . . . . . . . . . . . . . . . . . . . . . . 5 Assay Protocol Overview . . . . . . . . . . . . . . . . . . . . . . . . . . . . . . . . . . 7 Preparation of Reagents . . . . . . . . . . . . . . . . . . . . . . . . . . . . . . . . . . 8 Assay Protocol . . . . . . . . . . . . . . . . . . . . . . . . . . . . . . . . . . . . . . . . 10 Setup of the Luminex Instruments . . . . . . . . . . . . . . . . . . . . . . . . . 13 Analyzing Results . . . . . . . . . . . . . . . . . . . . . . . . . . . . . . . . . . . . . . 13 Troubleshooting . . . . . . . . . . . . . . . . . . . . . . . . . . . . . . . . . . . . . . . 14 Recommended and Blank Plate Layout . . . . . . . . . . . . . . . . . . . . . . 15 3 Intended Use This user manual is for a ProcartaPlex® Immunoassay Kit from the eBioscience division of Affymetrix to perform quantitative, multiplexed protein measurements from serum, plasma, and cell culture supernatant samples using magnetic beads technology from Luminex®. Other biological samples might be suitable for use in the assay. NOTE: For the most current version of user documentation, go to our website at www.ebioscience.com How it Works ProcartaPlex Immunoassays incorporate magnetic microsphere technology licensed from the Luminex Corporation to enable the simultaneous detection and quantitation of multiple protein targets in diverse matrices. The platform allows the simultaneous detection from a single sample of up to 100 protein targets on the Luminex 200/100 and FLEXMAP 3D® platforms and 50 protein targets on the MAGPIX® platform. Materials Provided and Storage Conditions ProcartaPlex Immunoassay Kits contain the components listed below. Refer to the Certificate of Analysis for quantities and details of components supplied. Expiration date is stated on the kit when stored between 2-8°C. Do not use past kit expiration date. Components Supplied Pre-mixed Panels Antigen Standards, premixed Detection Antibody, premixed (50X) 1 Detection Antibody, premixed (1X)1 Antibody Magnetic Beads, premixed1 Streptavidin-PE (SA-PE) (1X)1 Wash Buffer Concentrate (10X)1 Detection Antibody Diluent1 Universal Assay Buffer (1X)1 Universal Assay Buffer Concentrate (10X)1 (optional) Reading Buffer1 PCR 8-Tube Strip 96-Well Flat Bottom Plate Black Microplate Lid Plate Seals 1 √ √ √ √ √ √ √ (√) √ √ √ √ √ Simplex Kit Basic Kit √ √ Custom Panels √ √ √ √ √ √ (√) √ √ √ √ √ √ √ √ √ √ (√) √ √ √ √ √ Contains sodium azide. See WARNING. WARNING: All chemicals should be considered potentially hazardous. We recommend that this product and its components be handled by those trained in laboratory techniques and be used according to the principles of good laboratory practice. This kit contains small quantities of sodium azide. Sodium azide is highly toxic and reactive in the pure form. At this product’s concentration, though not classified as hazardous, build up of sodium azide may react with lead and copper plumbing to form highly reactive explosive metal azide. Dispose of the product in accordance with all State and local regulations. 4 Precautions and Technical Hints Thoroughly read this user manual and Certificate of Analysis that is included with the assay kit. The product insert may contain specific instructions for proper use of your kit. For Luminex 100/200 and FLEXMAP 3D instruments initiate the startup protocol to warm up the lasers for at least 30 minutes. Ensure that the Luminex machine is calibrated according to the manufacturer’s instructions. MAGPIX instrument doesn't require additional warm up. When working with samples and standards, change the pipette tips after every transfer and avoid creating bubbles when pipetting. During the incubation steps, cover the 96-Well Flat Bottom Plate with the Black Microplate Lid provided in the kit to minimize exposure of the beads to light. Be careful not to invert the 96-Well Flat Bottom Plate during the assay or allow contents from one well to mix with another well. Use a multi-channel pipette and reagent reservoirs whenever possible to achieve optimal assay precision. Store the reconstituted standards (including standard diluent sets) on ice before adding to the 96-Well Flat Bottom Plate Required Equipment and Materials Not Supplied MAGPIX, Luminex® 100/200, FLEXMAP 3D, or Luminex-based Instrument. Glass-distilled or deionized water. Adjustable single and multi channel pipettes with disposable tips. Multichannel pipette reservoir. Beakers, flasks, cylinders necessary for preparation of reagents. Hand-Held Magnetic Plate Washer, Vortex mixer and Microtiter plate shaker. Sample Preparation For frozen samples, thaw samples on ice and mix well by vortexing followed by centrifugation to remove particulates. Avoid multiple freeze/thaw cycles. If there is a high lipid content in the sample, centrifuge at 10,000 x g for 10 min at 2-8 °C and transfer contents to a new tube. For preparation instruction of tissue homogenates and lysates from cultured cells refer to www.ebioscience.com/resources/best-protocols/multiplexing.htm Plasma Sample Preparation Action A. Collect samples in sodium citrate or EDTA tubes. When using heparin as an anticoagulant, no more than 10 IU of heparin per mL of blood collected should be used since an excess of heparin may give falsely high values of some of the analytes. B. Centrifuge samples at 1,000 x g at 4 °C for 10 min within 30 min of blood collection. C. Collect the plasma fraction. D. Use immediately or aliquot and store at -80 °C. Serum Sample Preparation 5 We recommend to spin down serum samples at 1000 x g for 10 min at 20-25 °C before running the assay. Action A. Allow blood to clot for 20-30 min at 20-25 °C. B. Centrifuge at 1,000 x g for 10 min at 20-25 °C. C. Collect the serum fraction. (Alternatively, use any standard serum separator tube following the manufacturer's instructions.) D. Use immediately or aliquot and store at -80 °C. Diluting Samples with High Concentration of Target Analytes You may need to further dilute your samples if the analyte concentration is above the assay upper limit of quantitation (ULOQ). When preparing dilution of serum and plasma samples, we recommend using Universal Assay Buffer. For cell culture supernatant samples, we recommend using the medium that was used to culture the cells. You can find recommended dilution factors for analytes with high normal serum or plasma concentration in the table below. NOTE: For analytes with high serum and plasma concentration additional Universal Assay Buffer (10X) will be included in the kit. Species Analytes Recommended Sample Dilution Factor Human Adiponectin 500 Human CRP 500 Human CD44var (var6) 20 Human Fibrinogen 200000 1 Human Endoglin 20 Human ICAM-1 200 Human MMP-2 50 Human MMP-3 50 Human MMP-9 50 Human Osteopontin 20 Human RANTES 50 Human SAA 200 Human SAP 4000 Human SCGF-beta 25 Human L-Selectin 200 Human TIMP-1 20 Human VCAM-1 200 1Dilution required only for plasma samples. For the most current version of user documentation, go to our website at www.ebioscience.com/ resources/best-protocols/multiplexing.htm 6 Assay Protocol Overview Prepare Antigen Standard Add Antibody Magnetic Beads Vortex magnetic capture beads for 30 seconds Add 50 μL of the Antibody Magnetic Beads to each well. Remove liquid. If required, add next type of Antibody Magnetic Beads. Repeat, until all Beads needed are in the Plate. Wash the plate Cell Culture Supernatant Samples Serum and Plasma Samples Add to the beads: Add to the beads: • 25 μL of Universal Assay Buffer • 25 μL of standards, controls, or samples • 50 μL of standards, controls, or samples Seal Plate. Incubate with shaking for 60-120 min* at room temperature Wash beads (2X) Detection Antibody Preparation Add Detection Antibody Add 25 μL of Detection Antibody Mix (1X) Seal Plate. Incubate with shaking for 30 min at room temperature Wash beads (2X) Add Streptavidin-PE Add 50 μL of Streptavidin-PE Seal Plate. Incubate with shaking for 30 min at room temperature Wash beads (2X) Resuspend Beads Add 120 μL of Reading Buffer Seal plate and shake for 5 minutes at room temperature Acquire Data on Luminex® 100/200, Magpix®, or FlexMAP 3D® system *For assays that require higher sensitivity, 120 min or overnight incubation is recommended. 7 Preparation of Reagents Antigen Standard Carefully review the Certificate of Analysis for kit specific Antigen Standard preparation instructions. The majority of kits is supplied with lyophilized multi-standards containing a mix of multiple standard proteins. Some kits contain multiple sets of standards, each with a unique lot number, that require pooling prior to use. Each kit is shipped with two identical vials of each premixed antigen standard set from the same lot to permit the user to run the assay twice if running a partial plate. When preparing Antigen Standards, the final volume after reconstitution and pooling should be 250 μL. When combining multiple kits, ensure that the Antigen Standards of your analytes of interest are only present in one of the used standard vials. Alternative preparation instructions for combination of pre-mixed panels with simplex kits or different simplex kits with more then 5 antigen standard sets are available upon request or can be downloaded under www.ebioscience.com/resources/best-protocols/multiplexing.htm In Custom Panels with more then 5 antigen standard sets alternative preparation instruction will be included as an extra data sheet. Step Step 1. Reconstitution and pooling of Standards Action A. Centrifuge each different antigen standard set vial(s) at 2000 x g for 10 sec. B. Add 50 μL of sample type specific buffer into each standard set vial. For serum or plasma samples, use Universal Assay Buffer and for cell culture supernatant samples use the cell culture media that was used to culture the cells. C. Gently vortex the vial(s) for 30 seconds and centrifuge at 2000 x g for 10 seconds to collect contents at the bottom of the vial(s). D. Incubate on ice for 10 min to ensure complete reconstitution. E. Pool entire contents of each vial into one of the vials and add sample type specific buffer to quantity sufficient (q.s.) to 250 μL. (See table below for example). F. Gently vortex the vial for 30 seconds and centrifuge at 2000 x g for 10 seconds to collect contents at the bottom of the vial. # of Standard Sets Reconstitution Volume per vial Pooled Volume Buffer to q.s. Total Volume 1 50 µL 50 µL 200 µL 250 µL 2 50 µL 100 µL 150 µL 250 µL 3 50 µL 150 µL 100 µL 250 µL 4 50 µL 200 µL 50 µL 250 µL 5 50 µL 250 µL 0 µL 250 µL 8 Step Step 2. Prepare 4-Fold Serial Dilution Action A. Refer to Certificate of Analysis for the value of each premixed standard with assigning S1 values for each analyte for the current lot. B. Prepare a 4-fold serial dilution of the reconstituted standard(s) using the PCR 8-tube strip provided. Label tubes Std1, Std2, Std3, Std4, Std5, Std6 and Std7. C. Add 200 μL of the reconstituted antigen standards into the first tube of the strip tube and label as Standard 1 (Std1). D. Add 150 μL of sample type specific standard buffer into Std tubes 2-7. Use Universal Assay Buffer for serum or plasma samples and cell culture media for culture supernatant samples. E. Transfer 50 μL of the reconstituted antigen standards from Tube 1 into Tube 2. F. Mix by pipetting up and down for a total of 10 times. G. Change the pipette tip and transfer 50 μL of the mixed standards from Tube 2 into Tube 3. H. Mix by pipette up and down 10 times. I. Repeat steps E-H for Std tubes 4-7. J. Add 200 μL of Universal Assay Buffer or cell culture media into tube 8 which serves as a blank. Keep on ice until ready to use. Transfer 200μL 50 μL 50 μL 50 μL 50 μL 50 μL 50 μL Antigen Standard Vial Std 1 Std 2 Std 3 9 Std 4 Std 5 Std 6 Std 7 Use Assay Buffer or Cell Culture Media for Blanks Assay Protocol Step Action Bring the Wash Buffer Concentrate (10X) to room temperature and vortex for 15 seconds. Mix 20 mL of the Wash Buffer Concentrate (10X) with 180 mL ddH2O. Wash Buffer (1X) can be stored at 2-8 °C for up to 6 months. Mark the standard, sample and blank wells using the plate map at the end of this manual. Step 1. Prepare 1X Wash Buffer Step 2. Define the plate map Step 3a. Add the Antibody Magnetic Beads (only 1 bead set) A. Vortex the Antibody Magnetic Beads for 30 sec. B. Add 50 μL of the Antibody Magnetic Beads to each well. Use a multichannel pipette for this step as well as the steps below. Step 3b. Add the Antibody Magnetic Beads (2 or more beads sets) IMPORTANT: ProcartaPlex pre-mixed panel and simplex kits can be mixed together for enhanced flexibility. Ensure that the bead regions from your ProcartaPlex panels and simplex kits do not overlap. Some analytes use the same bead region and cannot be combined together in one multiplex assay. Please check the compatibility of our analytes using our online panel configurator or contact our technical service at [email protected]. Both simplex and pre-mixed kits are supplied with Antibody Magnetic Beads at working concentration that require 50 μL beads per well or 5 mLs per 96-wells. For running a partial plate adjust the volume accordingly. A. Vortex each of the Antibody Magnetic Bead sets for 30 sec and add 5 mL of each bead set for 96-wells to an appropriate sized tube. After all of the bead sets are added, vortex the tube for another 30 sec. B. Add the bead mix to a disposable reservoir and add the appropriate volume of Antibody Magnetic Beads to each well of the 96 Well Flat Bottom Plate using the table below: # of different Magnetic Bead sets to be mixed Amount added to each well in μL 2 100 µL 3 150 µL 4 200 µL 5 250 µL 6 300 µL If more than 6 bead sets are to be mixed proceed to Step 4 and repeat step 3b until all Antibody Magnetic Beads have been added and washed. 10 Step Step 4. Wash Antibody Magnetic Beads Action A. Securely insert the 96-Well Flat Bottom Plate into the Hand-Held Magnetic Plate Washer and ensure that the plate is held in place by the tabs and wait 2 min to allow the Antibody Magnetic Beads to accumulate on the bottom of each well. B. Remove the liquid in the wells by quickly inverting the Hand-Held Magnetic Plate Washer and 96-Well Flat Bottom Plate assembly over a sink or waste container. Do not remove the 96-Well Flat Bottom Plate from the Hand-Held Magnetic Plate Washer. Blot the inverted assembly onto several layers of paper towels or absorbent surface to remove any residual solution. C. Add 150 μL of Wash Buffer (1X) into each well and wait 30 seconds to allow the beads to accumulate on the bottom of each well. D. Remove the Wash Buffer in the wells by quickly inverting the plate and then blotting onto an absorbent towel to remove any residual solution. Remove the 96-Well Flat Bottom Plate from the Hand Held Magnetic Plate Washer and proceed to the next step. A. Universal Assay Buffer for most of the kits is provided at 1X concentration. If the kit is supplied with 10X Universal Assay Buffer, prepare a 1X working concentration of Universal Assay Buffer by mixing 10 mL of the 10X Universal Assay Buffer with 90 mL ddH2O. E. Step 5. Add sample type-specific buffer, samples, standards and blanks and incubate Step 6. Wash the 96-Well Plate B. Add 25 μL of Universal Assay Buffer (1X) to each well for serum and plasma followed by 25 μL of standards or samples into dedicated wells. For cell culture supernatant samples, add 50 μL standards or samples into dedicated wells. C. For wells designated as blanks, add an additional 25 μL of Universal Assay Buffer for serum or plasma samples. For cell culture supernatant samples, add 50 μL of cell culture medium. D. Seal the plate with the provided Plate Seal. Cover the plate with the Black Microplate Lid and shake at 500 rpm for 60 to 120 min at room temperature (RT). E. Alternatively, the 96 well plate can be incubated overnight. Shake the 96 well plate for 30 min at RT at 500 rpm, then transfer the plate to 4°C and store on a level surface. After overnight incubation, shake the plate for an additional 30 min at RT at 500 rpm. Wash the plate twice using "Step 4. Wash Antibody Magnetic Beads". 11 Step Step 7. Prepare 1X Detection Antibody Mixture Action A. Prepare fresh prior to use detection antibodies. If intending overnight incubation do not prepare detection antibodies at this point. B. Detection antibodies for Custom Panels are provided at a 1X concentration and do not require dilution. C. For simplex and pre-mixed panels, detection antibody is provided at 50X concentration. Add 60 μL of each detection antibody concentrate to the mixing bottle and bring volume of the mixing bottle to a total of 3 mL using detection antibody diluent.Tables below are an example for 48 and 96-wells. Example for using 96-wells # of Vials of Total Volume of Mixed Detection Antibody Detection Antibody Volume of Diluent to Add 1 60 µL 2940 µL 2 120 µL 2880 µL 3 180 µL 2820 µL 4 240 µL 2760 µL Example for using 48-wells # of Vials of Total Volume of Mixed Detection Antibody Detection Antibody Volume of Diluent to Add 1 30 µL 1470 µL 2 60 µL 1440 µL 3 90 µL 1410 µL 4 120 µL 1380 µL Step 8. Add Detection A. Add 25 μL of Detection Antibody Mixture (1X) to each well. Antibody Mixture and B. Seal the plate with a new Plate Seal, cover plate with Black Microplate Lid and incubate 30 min on a plate shaker at RT at 500 rpm. incubate Step 9. Wash the 96-Well Plate Wash plate twice using "Step 4. Wash Antibody Magnetic Beads". Step 10. Add SAPE and A. Add 50 μL of SAPE solution to each well. incubate B. Seal the plate with a new Plate Seal, cover plate with Black Microplate Lid and incubate 30 min on a plate shaker at RT at 500 rpm. Wash plate twice using "Step 4. Wash Antibody Magnetic Beads". Step 11. Wash the 96-Well Plate Step 12. Prepare the A. Add 120 μL of Reading Buffer into each well. 96-Well Plate for B. Seal the plate with a new Plate Seal, cover plate with Black Microplate Lid and incubate 5 min on a plate shaker at RT at 500 rpm. Analysis on a Luminex Instrument C. Remove Plate Seal and run the plate on a Luminex Instrument. 12 Setup of the Luminex Instruments Instrument Sample Size DD Gate Timeout Bead Event/Bead Region Luminex 100/200 FLEXMAP 3D 50 µL 5,000 - 25,000 60 sec 50-100 MAGPIX 50 µL N/A N/A 50-100 Prior to running the assay, ensure that the probe height has been calibrated with 96-Well Flat Bottom Plate supplied with the kit. Failure to adjust the probe height can cause damage to the instrument or low bead count. The Luminex system allows for calibration of Low and High RP1 target values. We recommend RP1 Low target value settings for ProcartaPlex Immunoassays. Please refer to the Certificate of Analysis provided with the kit for bead region and analyte associations when entering the information into the Luminex Acquisition Software. NOTE: If there is a malfunction of the Luminex Instrument or software during the run, the 96-Well Flat Bottom Plate can be re-read. Remove the 96-Well Flat Bottom Plate from the instrument, insert the 96-Well Flat Bottom Plate into the Hand-Held Magnetic Plate Washer, wait 2 min, then remove the buffer in the wells by quickly inverting the 96-Well Flat Bottom Plate over a sink or waste container. Blot the assembly onto several layers of paper towels to remove any residual solution. Resuspend the beads in 120 µL of Reading Buffer, remove from the Hand-Held Magnetic Plate Washer, seal the 96-Well Flat Bottom Plate with a new Plate Seal and Lid and shake at 500 rpm for 5 min at room temperature. The assayed samples may take longer to read since there will be less beads in the well. Analyzing Results The concentration of the samples can be calculated by plotting the expected concentration of the standards against the MFI generated by each standard. A 4PL or 5PL algorithm is recommended for the best curve fit. Analyze the assayed samples according to the operation manual for the Luminex Instrument (e.g MAGPIX®, Luminex® 100/200™, FLEXMAP 3D®). We offer a free and robust analysis software package for data analysis. ProcartaPlex Analyst 1.0 can be download at: www.ebioscience.com/resources/procartaplex-analyst-1.0-software.htm 13 Troubleshooting Observation Probable Cause Recommend Solution Low Flow Rate Samples/beads are stuck in flow cell Remove the 96-Well Plate and perform a wash and rinse cycle. High CVs Samples and antigen standards not stored on ice Prepare the samples and standards on ice before setting up the assay. Contamination from re-using the Plate Seal Use a new Plate Seal for each incubation step. Incomplete washing After adding the standards and samples, it is very important that any excess standards are removed during the wash step. Contamination from contents from adjacent wells Avoid splashing the Wash Buffer during wash steps into adjacent wells. Poor pipetting techniques Use a multichannel pipettor and careful pipette techniques. Avoid touching pipette tips to sides of the wells when adding Wash Buffer. Limited dynamic range for BioPlex software users Instrument calibrated at high PMT settings Calibrate the instrument using the CAL2 Low RP1 target value. Low bead count Volume of bead solution is too low Add 120 μL Reading Buffer into each well and shake at 500 rpm for 5 min at room temperature to resuspend beads prior to reading on the Luminex Instrument. High bead aggregation Vortex the bead suspension well before using in the assay and ensure that the beads are properly mixed during the incubation steps. Dyes contained in the beads are photobleached from overexposure to light Store bead solution and the 96-well plate in the dark. Samples causing the instrument to clog Remove the 96 Well Flat Bottom Plate and perform a wash and rinse to the instrument. Rerun the assay with further dilution of samples Probe height is incorrect Refer to the Luminex Manual for proper adjustment of the needle height. Instrument needle is partially clogged Replace or clean needle according to the manufacturer's recommendations. Beads stuck to the bottom of the plate Confirm that the plate shaker is set to 500 rpm and shaking for at least 5 min before reading. Air bubble in the sample loop Refer to the Luminex manual for proper removal of the air bubble. Low signal or sensitivity Standards not reconstituted and diluted correctly Prepare fresh antigen standards following the instructions in the Preparing Antigen Standards section. Poor recovery Did not use appropriate cell culture media to prepare the standards Use the same cell culture media that is used to culture the cells. Samples and antigen standards were not stored on ice Prepare the samples and standards on ice before setting up the assay. 14 Recommended and Blank Plate Layout Standards Samples Standard 1 Standard 1 1 1 9 9 17 17 25 25 33 33 Standard 2 Standard 2 2 2 10 10 18 18 26 26 34 34 Standard 3 Standard 3 3 3 11 11 19 19 27 27 35 35 Standard 4 Standard 4 4 4 12 12 20 20 28 28 36 36 Standard 5 Standard 5 5 5 13 13 21 21 29 29 37 37 Standard 6 Standard 6 6 6 14 14 22 22 30 30 38 38 Standard 7 Standard 7 7 7 15 15 23 23 31 31 39 39 Blank Blank 8 8 16 16 24 24 32 32 40 40 3 4 1 2 5 6 7 A B C D E F G H 15 8 9 10 11 12