1
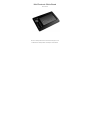
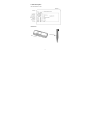
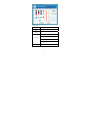
Mini Electronic White Board
User’s manual
Be sure to carefully read this user’s manual first for the proper use of
the Mini electronic board presenter and keep it for future reference.
Tables of contents
Features···························································································2
I. Operation system··········································································2
II. Part description············································································3
III. Installation···················································································5
IV. Operation manual ·······································································5
V. Battery installation ·····································································12
VI. Technology parameter ······························································13
VII. Attention ··················································································14
1
Features:
z The system consists of a mini white board remote, a touchpen, a
receiver and a program.
z Combining state of the art 2.4GHz radio frequency technology,
control distance up to 8m, an ideal partner for the projector and the
PC.
z Up to date electromagnetism technology, orientation precisely by 4
calibration points. Please be sure to set them before using.
z The Touch pen is built-in the mini white board, easy to carry.
z Multicolor handwritings are available.
z Effective tablet area up to 6.2 inches (diagonal length).
z Remark and label on the screen can be saved; the operation steps
can be record.
z The white board is also a touchscreen. Touch and control the
mouse pointer by the Touch pen.
z Replace the mouse or coexist with the mouse.
z Short response time, computer response to Tablet operations
synchronously; high resolution ratio, up to 1024 X 768 DPI.
z Shortcut keys for your easy working.
I. Operation system
Windows2000,XP, Vista
2
II. Parts description
Mini white board front view
USB receiver
Touch pen
LED
3
KEY
FUNCTION
Corresponding shortcut key
Desktop
+D
Red pen/Screen mode
OK
Enter
Enter
UP arrow
Left arrow
Right arrow
Down arrow
L
Mouse left button
R
Mouse right button
Pre. page
Page Up
Next page
Page Down
Clear handwriting
Close
current
Alt+F4
current
Alt+Tab
application
Alt+Tab
Switch
windows
ESC
Esc
Esc
4
III.Installation
1. install the program
Take the Installation CD out from the product package and insert it
in the CD-ROM. Open the CD and double click the “TopA White
Board mini_Setup_V0.9.8.exe” to start installation.
Complete the installation, and view the icon of the program on the
desktop.
2. Install the receiver
Plug the USB receiver to the available USB port. And the Program
will find the new hardware and pop-up the Add Hardware Wizard
dialog box. Follow the wizard, find the driver, and finish the
installation.
After the connection, move the mouse pointer to the icon of the Mini
Electronic White Board, the program will present “
”.
NOTE!!
① The driver is at the folder which you have installed the program to.
② The detailed operations refer to the installation guide(”TopA White
Board mini_Installation guide_V0.9.8.doc”).
IV. Operation manual
1. Start mini board system
Please refer to the installation guide.
2. Screen Calibration
User have to set the touchpad before use it. To open short-cut
Menu, please click right mouse button on the mini electronic white
board icon on the task bar in the lower screen. And select “Screen
5
Calibration”. Click the coordinate by touch pen point by point to
calibrate coordinate from the PC to the mini white board.
3. Remote control
The touch control screen is absolutely convenient to do any
interactive operations, the applications on PC using the touch pen.
4. Switch mode
Press and hold the “
” button on the mini white board, user
can remark or label on the white board via the touch pen. And
Real-time data will be transmitted to and displayed on the computer
screen. Press and hold the “
” button again, will switch into
the screen mode, at this moment, user could run other applications
and move the mouse pointer on desktop.
Note! When you press the “
” button, don’t touch the mini
white board touch screen with the touch pen or other objects.
5. Clear
Press “
” button on the white board to clear the text we write on
the PC screen.
6. Mouse right/left key
Press the “R” or “L” key on the white board, just like clicking the
6
mouse right or left key.
7. Shortcut keys
① Press “
② Press “
” key, show desktop.
” key, just like press the “Enter
”button on the
keyboard.
③ The “
” , “
”, “
”, “
” keys, equivalent to the four
directions arrows.
④ Press “
” or “
”, work as page up or page down on the
keyboard.
⑤ Press “Alt+Tab” key, could switch the current applications.
⑥ Press “Esc”key, it works as “Esc”button on the keyboard.
⑦ Press “
” can close the current window. It works as press “Alt”
and “F4” keys on the keyboard at the same time.
8. Presentation function
⑴ Whiteboard mode: Click “
” with the touch pen on the white
board, open the whiteboard. if you want to quit the whiteboard, click
it again.
7
⑵ Brush-pencil: The system designed three colors, they are red
pen”
”,blue pen”
“and black pen”
“, to make your
presentation even more abundant and more easily identifiable. With
the touch pen click corresponding pen can remark the keys.
⑶ Eraser: Click”
” to erase the handwriting
⑷ Magnifier: Click “
” with the touch pen to open the magnifier,
could highlight the keys and difficulties. The size, transparency can be
set.
⑸ Focus lamp: Click “
” icon with the touch pen to open the
focus lamp, could highlight the keys and difficulties. The size can be
set.
⑹ Blank screen: Click “
” icon, the window will be a blank screen
state. Click it again to resume previous state.
⑺ Curtain window: Click “
” key, open the curtain window, user
can pull the curtain upwards or downward.
8
⑻ Clock/Calculagraph/Timer: Click “
” key, a clock will appear
in the current window. Click the right mouse button on the clock icon,
open the shortcut menu bar.
9
The color of the clock can be changed,There are seven color
choices,They are dark blue, golden yellow, brown (default), light blue,
green, pink, transparent.
The effect of different color
Clock can be set always in the front of the screen, and can be used
three types, they are ordinary clock, calculagraph and timer.
① Ordinary clock
Click ”
” icon , open ordinary clock type. Right-click the
shortcut appears to operate the menu, you can set its color,
whether it is always at the forefront of the screen, and whether to
display the clock, minute hand, second hand.
② Calculagraph
Calculagraph to be used, please open the type. Central box
designs will be displayed precision timing time, pay attention to
the status of the clock is to start or stop.
10
③ Timer
Used as a timer, there will be a countdown time, the default
countdown is 10 minutes. Click “OK”, it will start working.
9. Video: In some situation, we need to record the conference process.
Users can click “
“ icon with the touch pen to record. Video files
are saved in the installation folder (the default installation folder:
C:\VsonTABoardMinie\CapMovie).
In the process of recording,The top of the screen there will be a
timer window “
“ to record video,The end of
recording, will close the small window.
10. Parameter settings
Parameter settings, including four settings: brush set, eraser
settings, set up a magnifying glass to set up and the spotlight.
11
Parameters table:
Type
Brush
Eraser
Function
Brush settings can choose a different
The eraser size can be set up
Light source size - setting the size of the
Zoom size - setting the magnifying glass
Magnifier
Transparency - set up to enlarge the
Shielding Type - There are two types of
Focus lamp
Spotlight settings including the X and Y
12
After setting up the relevant parameters, click “OK” button to save
the attributes you just have set up.
11. Save the result
If user wants to save the discussion result for future references or
review, the save pictures “
“ function can satisfy their needs.
Click it, the program will capture the current screen picture, generate
and save a file (.BMP) automatically. The files are saved on the
destination folder where the program installs to(the default
installation folder: C:\VsonTABoardMinie\CapPic).
V. Battery installation
z
Push and remove the battery cover located on the bottom of the
z
Insert batteries into the battery holder and make sure that the
device.
Positive (+) and Negative (-) ends of each battery match the
polarity indicators inside the battery housing.
z
Push the battery cover back into position until it “clicks” firmly into
place.
A wrong battery placement may cause a battery overheat.
13
Note:
● Insert recharging batteries then plug the USB cable to an available
PC’s USB port and the recharging port of the White board. Make
sure your PC’s power is on, and then the recharging process
begins.
z For a supreme battery performance. It is a MUST to fully
charge the rechargeable batteries contained in this package at
the first-time use.
z Please make sure the batteries used for recharging are “recharging
batteries”.
z Keep all batteries out of reach of children.
z To have the batteries with a regular check and replace new
batteries if not use for a long time.
z Remove the batteries from the transmitter if the device is not to be
used for a long time.
z Do not mix different types of batteries in the mouse.
VI.Technology parameter
Mini white board
Control distance
8m
technology
2.4GHz RF
Tablet area
6.2 inches (diagonal length)
Resolution ratio
1024 X 768 DPI
battery
2 x AAA nickel and metal
Work voltage
3V
Touch pen length
123.5 MM
hydride electric batteries.
14
dimension
L215W142H6mm
Weight(without
206g
battery)
Receiver
Operation system
Windows 2000, XP, Vista
USB Version
USB1.1, compatible USB2.0
Working voltage
USB electricity supply (4.5-5.5V)
Dimension
73×26×14mm
Weight
16g
VII. Attention
z
Keep the presenter away from young children.
z
Any attempt to disassemble, adjust or repair the presenter may
result in exposure to laser light or other safety hazards.
z
Do not place heavy objects on the mini white board to avoid
crushing.
z
Do not use ball pens or other sharp instruments to scratch on the
touch screen.
15


![[ENG] – User Manual](http://vs1.manualzilla.com/store/data/005730509_1-83e83118f3264d8ce419ed481472908b-150x150.png)