1
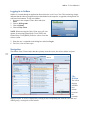
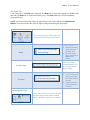
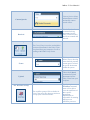
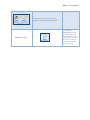
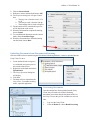
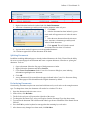
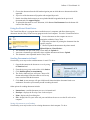
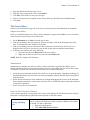
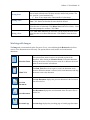
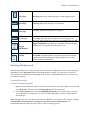
OnBase 13 User Manual 1 OnBase 13 User Manual OnBase 13 User Manual 2 Table of Contents OnBase is the document imaging and archiving software that replaced Singularity in 2012. The software is maintained by a company called Hyland. Using Hyland’s OnBase application, workflows and processes can be customized for different offices, departments, and campuses, allowing for increased efficiency and effectiveness. If you are viewing this document as a PDF, you may click on the headings below to navigate directly to sections of the manual. Contents Logging in to OnBase ................................................................................................................................... 4 Navigation ..................................................................................................................................................... 4 The Ribbon................................................................................................................................................ 4 The Home Tab ...................................................................................................................................... 5 The Application Menu .................................................................................................................................. 8 Layout ........................................................................................................................................................... 8 The Task Pane ............................................................................................................................................... 8 Processes in OnBase ..................................................................................................................................... 8 Scanning Documents ................................................................................................................................ 8 Scan Formats:........................................................................................................................................ 9 Uploading Documents from Disconnected Scanning ............................................................................. 10 Processing Documents ............................................................................................................................ 10 A Note on Scan Queues ...................................................................................................................... 11 Appending Documents............................................................................................................................ 11 Splitting Documents................................................................................................................................ 12 Re-Indexing Documents ......................................................................................................................... 12 Document Retrieval ................................................................................................................................ 13 Uploading Documents from your Computer .......................................................................................... 13 Appending Documents via Upload ..................................................................................................... 13 Using the Virtual Print Driver ................................................................................................................. 14 Sending Documents via Email ................................................................................................................ 14 The Notes Gallery ....................................................................................................................................... 15 Annotations ............................................................................................................................................. 15 Notes in the Document Viewer ............................................................................................................... 15 OnBase 13 User Manual 3 Working with Images .................................................................................................................................. 16 Working with Keywords ............................................................................................................................. 17 Viewing Keywords ................................................................................................................................. 17 Read Only Keywords .............................................................................................................................. 18 Wildcard Characters................................................................................................................................ 18 The Application Enabler ............................................................................................................................. 18 Customizations in the Unity Client ............................................................................................................. 18 Personal Pages ........................................................................................................................................ 18 Adding Document Types to your Personal Page ................................................................................ 19 Creating Personal Page Tiles with Custom Queries ........................................................................... 19 Adding Forms to Personal Pages ........................................................................................................ 19 Customizing User Options ...................................................................................................................... 20 OnBase 13 User Manual 4 Logging in to OnBase OnBase is accessed through an application often referred to as the Unity Client. This terminology simply indicates that the software program has been downloaded to the computer, as opposed to being stored in a web-based environment. To log in to OnBase: 1. Navigate to the computer’s Start Menu and select Start. 2. Choose All Programs. 3. Choose Hyland. 4. Choose Unity Client. NOTE: When accessing the Unity Client, users will view options for accessing Hyland Unity Client [TEST] and Hyland Unity Client [PROD]. Please be sure to access the correct version. 5. Enter the user’s credentials in the dialog box and select Login. 6. The Unity client will now open. Navigation The OnBase Unity Client window has three primary areas: the layout, the ribbon, and the task pane. TASK PANE RIBBON The Ribbon The ribbon displays available user actions based on the currently displayed layout. A ribbon is displayed by clicking on the corresponding tab. Each tab is divided in to ribbon groups, or categories of user actions. OnBase 13 User Manual 5 The Home Tab I n the image above, the Home tab is displayed. The Home tab is visible after logging in to OnBase. Like other tabs, the Home tab is divided into ribbon groups. The Home tab displays several commands, summarized below. NOTE: Users can minimize the ribbon by right-clicking on the ribbon and selecting Minimize the Ribbon. Users can maximize the ribbon by right-clicking and choosing the same option. The Favorites Group The Favorites group is used to open and configure the home layout and favorites. Home Use these options to: Make the currently displayed layout the home page Reset the layout that is displayed as Home to the default Personal Page The Personal Page command allows users to view and edit their Personal Page. Favorites Use these options to: View, rename, and delete layouts that have been added to favorites Add the currently displayed layout to Favorites The Documents Group The Documents Group is used to work with documents once they have been scanned, indexed, uploaded, or printed in to OnBase. OnBase 13 User Manual 6 Custom Queries Custom Queries allows administrators to build and modify custom search criteria. Retrieval Use the Retrieval command to bring documents into the Unity Client once they have been scanned and indexed. The Create Group The Create Group is used to work with the creation of documents in the Unity Client via upload from your computer, as well as working with HTML Unity Forms. Working with forms allows users to develop more detailed, personal custom queries related to specific documents within the system. Forms Choose the Upload command to upload documents into the Unity Client from your computer. Upload The Workflow Group The workflow group will be available for Unity Client users who have permission to view projects within workflows. By selecting the Workflow command, users will be able to view the workflows of their specific department. Departments are responsible for training employees on workflow processes. OnBase 13 User Manual 7 The Imaging Group The Imaging Group assists users in imaging, scanning, and processing files. Batch Processing Select Batch Processing to image files after they have been scanned. NOTE: In previous versions of the Unity Client, this command was called Batch Indexing. OnBase 13 User Manual 8 The Application Menu Select the Application button in the upper left-hand corner of the Unity Client window to access administrative functions and open previously used layouts. After clicking the Application button, the Application Menu is displayed. Selecting Open in a New Window allows the user to open the current layout or search results in a new window. The Troubleshooting option allows the user to show troubleshooting information such as the information on the connection to OnBase, rendering information, and memory usage as well as viewing and clearing the request log. Choose User Options to configure options within OnBase such as settings for imaging, printing, and document handling. Selecting Administration allows the user to manage document locks. Users can change their OnBase password by selecting Change Password; however, since Columbia College users log in to OnBase with their CougarTrack credentials, the Reactivate your Login tool in CougarTrack is a better option for password maintenance. Layout Each screen in the OnBase Unity Client is referred to as a layout. Default layouts are set for most of the actions in OnBase, including Document Retrieval. OnBase will open the Home Layout by default when the application is launched, but users are able to customize the Home Layout. The Task Pane The Task Pane is displayed in relation to the user action. For example, selecting the Keywords option on the Document contextual tab displays the Add/Modify Keywords task pane. Typically, the task pane is used to view some information that will be displayed briefly and then closed. It is also used for tasks such as adding documents to an envelope, displaying a document’s keywords, notes, and cross references, or managing Favorites. Processes in OnBase Scanning Documents 1. To begin scanning documents, open the Disconnected Scanning software by choosing Hyland from the Start Menu and selecting Disconnected Scanning. OnBase 13 User Manual 9 2. Enter the user’s credentials in the Disconnected Scanning user logon dialog box. 3. Select Server to log in to the Disconnected Scanning server. NOTE: ccdiapp02.ccis.edu is the server address for OnBase Test. To log into OnBase production, enter ccdiapp.ccis.edu as the server address. 4. Select OK in the User authentication dialog box to launch the Disconnected Scanning application. 5. Select a Scan Queue, Source, and Format before attempting to scan. Scan Formats: Simplex: Multi-Document/Single Page Each one-sided page in the batch is scanned as a separate document. Duplex: Multi-Document/Single Page Each two-sided page in the batch is scanned as a separate document. Simplex: Single Document/Multi Page The one-sided document is scanned as a multiple page document. Duplex: Single Document/Multi Page The two-sided document is scanned as a multiple page document. NOTE: It is recommended to use the Multi-Document/Single Page format for most scanning projects. 6. Place the document(s) in the scanner face down. 7. Select File. OnBase 13 User Manual 10 8. Choose Scan new batch. 9. Dedicate a name to the batch and choose OK. 10. The Properties dialog box will open. Ensure that: a. The page size is listed as Letter- 8.5 x 11 in b. The Dots per inch is listed as 200 dpi c. The Scanning Side is listed as Simplex. 11. The document will be scanned and a preview will be displayed on the screen. 12. When the document has completed scanning, choose Cancel. 13. To scan additional documents into the current batch, choose Scan More Pages. 14. When the documents have finished scanning into the batch, choose Done. Uploading Documents from Disconnected Scanning Once the batch has been scanned using the Disconnected Scanning Software, it must be uploaded into the Unity Client. To do so: 1. Locate the batch in the navigation tree within the navigation pane on the left side of the screen. 2. Right click on the batch and choose Upload Batch. 3. The Verify Operations dialog box will display. 4. Click Yes. 5. The batch will now upload into the Unity Client. To continue working with it, open this application. Processing Documents Once documents have been uploaded into the Unity Client, they will need to be indexed. Indexing documents moves them into the document archive in the Unity Client so they will be available for retrieval later. 1. 2. Log in to the Unity Client. From the Home tab, choose Batch Processing. OnBase 13 User Manual 11 3. Choose the appropriate scan queue for the batch. It is no longer necessary to select Awaiting Index from the Status Queues and then select your scan queue. Click directly on the scan queue. Note that scan queues and status queues now appear in a navigation tree on the left side instead of status queues being located across the top. 4. Locate the file in the existing batches and double click on the batch name to view and preview the documents in the batch. 5. After previewing the batch, click the green arrow next to the batch name to return to the Scan Queue list. 6. The batch has now been previewed and is ready for indexing. Right-click on the batch name and click Index Documents. 7. In the Batch Indexing pane, choose a document type. The fields below may take a moment to populate, as they are document type specific. 8. Associate a COMM Code and a Datatel Person ID with the document. Press Tab on the keyboard to auto-populate the remaining fields. 9. To index the batch, click Index. A Note on Scan Queues When batches are indexed in the Unity client, they may take up to five minutes to commit. When users access scan queues within Unity, they will notice the batches are sorted into different categories: Awaiting Index: Documents that have been scanned with Disconnected Scanning and need to have keyword values associated prior to indexing. Index in Progress: Documents that are currently indexing. Awaiting Commit: Documents that need to be committed to the system. Documents can take up to five minutes to be committed to the system. Committed: Documents that are available for retrieval in the Unity Client. Incomplete Disconnected Scan: Batches are placed in to the Incomplete Disconnected Scan process queue when a batch upload from Disconnected Scanning cannot be completed. If a user is unable to locate a batch within retrieval, it is likely due to the batch not having been committed. If the user is able to locate the document in the Awaiting Commit queue, wait the requisite five minutes and attempt to index the document. Appending Documents When users are indexing documents in the Unity Client, they have the ability to append, to append, or join documents together. To do so: 1. Click Batch Processing from the Home tab on the ribbon. 2. Select a scan queue and a document to be indexed. OnBase 13 User Manual 12 3. Right click on the batch to be indexed and click Index Documents. 4. Associate a document type and keywords with the document in the task pane. 5. Click Index. 6. After the document has been indexed, a green check mark will appear next to it in the document pane. 7. Select the next document from the document pane. Associate a document type and keyword values with the document. 8. Click Append. This will join the second document to the first when it is indexed. 9. A green check mark will appear next to the appended document. 10. Continue to append all relevant documents in the batch. Splitting Documents In addition to adding additional pages to already indexed documents, the Unity Client offers the ability for users to removed pages from document and create a separate document, referred to as splitting the document. To do so: 1. Open a document. Select the first page of the document to re-index. 2. Right click on the document and choose Send To. 3. Click Create New Document. In the Create New Document dialog box, enter indexing information regarding the new document. 4. Click OK. 5. A new document will be created from the pages indicated in the Create New Document dialog box. These pages will be deleted from the original document by default. Re-Indexing Documents Occasionally, documents may become associated with incorrect keyword values or the wrong document type. To change these items, the document will need to be re-indexed. To do so: 1. 2. 3. 4. 5. Open the document in the document viewer. In the ribbon, click Re-Index. The Re-Index task pane will open on the right side of the screen. To change the Document Type, select a new option from the Document Type drop down menu. To associate the document with a different individual, type the new ID number in the Datatel Person ID field. 6. Press the Tab key on the keyboard to auto-populate the remaining keyword values. 7. After the necessary changes have been made, click Re-Index. OnBase 13 User Manual 13 Document Retrieval The document retrieval process assists users in locating, viewing, and manipulating documents that have previously been indexed. To retrieve a document: 1. Select Retrieval from the Home tab on the ribbon. The Document Retrieval layout will open. 2. Choose a document type. To search for all document types associated with an index value, select any document type and hold down the Control key and the letter A on your keyboard simultaneously. 3. Enter the index values associated with the document to be located. Enter the College ID number in the Datatel Person ID field and press the Tab key on the keyboard to auto-populate the remaining fields. 4. Click Find to locate all the documents associated with the specified document type and index values. 5. Locate the document in the Search Results pane and double click on the document to view it. Uploading Documents from your Computer Using the Unity Client, users have the option to upload documents from their computers as an alternative to using the scanning process (the equivalent to using the Import function in Singularity). To do so: 1. Select Upload from the Home tab on the ribbon. This will open the Upload Contextual tab. 2. Select Browse from the ribbon. 3. Locate the document to upload and choose Open. 4. Using the Upload layout, associate a document type and index values with the document. 5. Choose Upload. 6. The Unity Client will confirm the document has been uploaded and the document will open in the Document Viewer. Appending Documents via Upload With Unity Client 13, users are able to append to existing documents via the Upload command. 1. 2. 3. 4. From the Home tab on the ribbon, click Upload. Select Browse from the ribbon and locate the document to be uploaded. Click Open. Choose a document type and keyword values and select Upload. If the document is recognized by the system as possibly being an addition to an existing committed document, the system will present the following message: This document appears to be related to an existing document. If so, please select the original document and select the appropriate option below. OnBase 13 User Manual 14 5. Choose the document from the left hand navigation pane to which the new document should be appended. 6. A preview of the document will populate with assigned keywords. 7. Double check that the document you are uploaded should be appended to the previewed document and click Append Page(s). 8. To upload the document as a new document, click Save as New Document from the bottom left corner of the dialog box. Using the Virtual Print Driver The Virtual Print Driver is a program that is installed on user’s computers and allows them to print documents into the Unity Client from any program on the local computer. To use the Virtual Print Driver: 1. Locate a document on the computer to store or manipulate within the Unity Client. 2. Follow the procedure for printing the document from the specific program. 3. Choose to print the document to the printer named Hyland Software Virtual Printer. 4. The document will open in the Unity Client under the Upload tab. 5. Associate a document type and index values with the document and choose Upload. 6. The document is now uploaded into the Unity Client. Sending Documents via Email Occasionally, users may need to send documents via email. To do so: 1. Open the document in the document viewer by using the Retrieval tool. 2. From the Actions group on the ribbon, click Send to. 3. Click Mail Recipient (As Attachment). 4. The Send to Mail task pane will open. Choose a file format and settings for the document as well as any notes associated with the document. 5. Click Send. A new message will open in Microsoft Outlook with the document listed as an attachment. Proceed as you normally would in sending the email. Other options for sending documents include: Internal user—send the document to a user via internal mail. Envelope—displays the Envelope Pane in the task pane Print—displays the Print dialog box File—displays the File pane in the task pane and allows the user to save the file to his or her computer Saving a Document to your Desktop Occasionally, users may need to save an existing document to their computer. To do so: OnBase 13 User Manual 15 1. 2. 3. 4. 5. Open the document in the document viewer. From the Actions group in the ribbon, click Send to. Click File. The Send to File task pane will open. Choose a location on your computer for the file by clicking on the folder above the Save button. Click Save. The Notes Gallery If the user has sufficient privileges, he or she can view and create notes and annotations on documents using the Notes Gallery. Notes are available from the Notes Gallery when a document is opened in the OnBase viewer or selected in the Document Search Results list. To add a note: 1. On the Document tab, in Notes, select the type of note. 2. If the user is adding a note to an open text or image document, click on the document to place the note. To add text to the note, double-click the note. 3. If the user is adding a note to a document in the Document Search Results list, the Notes Pane is displayed in the task pane. If necessary, type the text for the note here and then choose Close. 4. To delete a note, perform one of the following: a. Select the note and click Delete Note in the Notes Gallery. b. Right click on the note in the Notes pane and click Delete Note. NOTE: Notes are limited to 250 characters. Annotations Annotations are available from the Notes Gallery when a document is opened in the OnBase Viewer. Because annotations must be drawn onto documents, they are not available from the Notes Gallery when a document is selected in the Document Search Results list. To add an annotation: 1. Select the type of annotation from the Notes Gallery in an open document. Depending on the type of annotation that has been selected, the user may be prompted to add text after the note has been placed in the document. 2. Define the location and size of the annotation by clicking and dragging the cursor over the document. Ensure that the annotation is visible in the Document Viewer. Release the mouse button when finished to display the annotation. 3. There is no need to save annotations. Notes in the Document Viewer Users with the appropriate viewing rights will see most notes displayed on the document when viewing it. Some notes are displayed open, and some must be opened to view their content. Viewing and Hiding Notes Some notes are displayed in the document as an icon. Double click this icon to view the note. Notes may either be shown or hidden on documents by default. To show or hide notes: Right click the document Click Show/Hide Notes in Viewer OnBase 13 User Manual 16 Moving Notes Deleting Notes To move a note click and drag the note icon on the document. Release the mouse button when the note has been moved to the desired position. The new position is saved automatically. Note: Users cannot move a note outside of a document. To delete a note, right click on the note icon or on the note. Click Delete Note. Click Yes to confirm that the note should be deleted. Click View Notes List from the Document Tab to display the Notes Pane. Select the note to be deleted. Click Delete Note in the Notes Gallery. Click Yes when prompted to confirm. Click Close. Editing a Note Click View Notes List from the Document Tab to display the Notes Pane. Select the note to be edited. Edit the note. Click Close to close the Notes Pane. Working with Images The Image tab (a contextual tab in the Document Viewer, accessed through the Retrieval tool) allows users to view documents more efficiently. The options below can be used to resize and reorient documents. Selection Zoom Hand Tool Previous Document Next Document Previous Page This option allows users to zoom in on selected regions of the document. After clicking on Selection Zoom, click on the document and drag the mouse to select an area to zoom in on. Release the mouse button to zoom in on the selected area. The Hand Tool allows users to pan, or scroll, the document in any direction. When this button is selected, click on the document and drag the mouse to move the document. Previous Document displays the previous document in the Document Search Results list. Next Document displays the next document in the Document Search Results list. Previous Page displays the preceding page of a multi-page document. OnBase 13 User Manual 17 Next Page Next Page displays the following page of a multi-page document. First Page First Page displays the first page of a document. Last Page Last Page displays the last page of a document. Go to Page Go to Page allows the user to navigate to a specific page of the document. After clicking this icon, type a page number and click OK. Toggle Thumbnails Modify Toggle Thumbnails allows the user to expand and collapse the page thumbnails on the right side of the document viewer. The Modify command contains several other options for document modification including editing and splitting documents, as well as rotating and flipping documents. Working with Keywords Some documents have one or more keyword values (referred to in Singularity as index values) displayed automatically in the Keywords window when the document is opened. Users can also view keyword values that are not auto-displayed. Depending on the system’s configuration, these keyword values may be masked or read-only. Viewing Keywords To access a document’s keywords: 1. Right click on a document in the Document Search Results list or an open image or document and select Keywords. Users may also click Keywords from the Documents tab. 2. Selecting Keywords will activate the Add/Modify Keywords pane. From this pane, users may view a document’s Document Date or Keyword Values depending on the user’s rights and the document type. Note: Although some users may have permissions to modified keyword values in this task pane, it is not recommended to use this function to change the keywords associated with documents. It is recommended that users change keyword values via the re-indexing process. OnBase 13 User Manual 18 Read Only Keywords Sometimes users can view, but not modify, some or all of the keyword values on a document. This can be for the following reasons: Keywords can be configured to appear as read-only to certain user groups. The user group does not have the right to modify keywords. Another user has the document checked out or locked. Wildcard Characters A wildcard character can be used to match keyword values where one or more characters are unknown. Wildcard characters can only be used to match alphanumeric keyword values. 1. Type one of the following wildcard characters directly into the keyword type field to search for text strings containing one or more unspecified characters: a. *-- the * wildcard character can be used to replace one or several characters of a text string. For example, the text string Ste*ens will find all instances of both Stevens and Stephens. b. ?—the ? wildcard character can be used to replace a single character in the text string. For example, the text string Sm?th will find all instances of both Smith and Smyth. The Application Enabler The third section of OnBase is the Application Enabler. The Application Enabler allows for integration between the Unity Client and Datatel Colleague. When using the Application Enabler with Colleague, users can view documents stored in the Unity Client that are associated with the student’s College ID number. To use the Application Enabler: 1. Be sure the Unity Client is open in the system tray on your computer. 2. Log in to Datatel Colleague. Search for a record in Colleague. 3. Press down the control key on your keyboard and click on the College ID number in the context card. 4. After a moment, a new Unity Search Results window will display, populated with a list of all documents stored in the Unity Client for the user whose record is open. 5. Click on a document in the Documents Pane to view it. 6. Close this window when finished. Customizations in the Unity Client OnBase 13 offers several easy customizations in the Unity Client, including the ability to build completely custom Personal Pages as well as the ability to personalize several of the user options for a dynamic user experience. Personal Pages The Unity Client now offers customizable Personal Page features that can speed up access to information. Personal Pages allow users to add commonly accessed layouts to a centralized location for easy access. Access your Personal Page by selecting Personal Page from the Home tab on the ribbon. OnBase 13 User Manual 19 Adding Document Types to your Personal Page If a user is consistently uploading documents under a specific document type, you are able to set up a personal page tile that contains that preset document type. After doing so, users can easily upload documents by selecting that tile from his or her personal page. 1. 2. 3. 4. 5. Click Upload from the Home tab on the ribbon. Select a Document Type Group and a Document Type. Click the Home tab on the ribbon. Click the arrow below Personal Page. From the drop down menu, click Add this layout to my personal page. The layout will now be available in your personal page and will redirect to the Upload screen for that particular document type when clicked. Creating Personal Page Tiles with Custom Queries If you are consistently searching for the same student using the Student Documents Custom Query, you can save the results from that Custom Query as a tile in your personal page. To do so: 1. 2. 3. 4. Click Custom Queries from the Home tab on the ribbon. From the Query navigation pane, click Student Documents. Enter a user’s Datatel Person ID in the corresponding field and select Submit. Once the results are displayed on the screen, click the Send current custom query search results to personal page option. 5. Enter a description for the custom query. This description will be the name for the custom query tile. Click OK. 6. The custom query tile will be added to your personal page. Adding Forms to Personal Pages 1. Select Forms from the Home tab on the ribbon. 2. In the Forms navigation pane, select the AD UG App Withdrawal Form (or another appropriate form you frequently use). 3. Click the Home tab on the ribbon. Click the arrow below Personal Page. OnBase 13 User Manual 20 4. From the drop down menu, click Add this layout to my personal page. 5. The layout will now be available in your personal page and will redirect to the appropriate form when clicked. Customizing User Options Users have the ability in Unity Client 13 to customize several options that essentially reconfigure the way OnBase works to be more preferential. To do so: 1. Click on the Application Menu from the Unity Client. 2. Click User Options. 3. Use the resulting dialog box to customize specific options for how the Unity Client works for you including: a. The confirmation message that displays when a user logs off or exits the system. b. Automatically open the notes pane when viewing documents. c. Ability to automatically delete files from your computer after they have been uploaded into Unity. d. Automatically expand the Options Panel at the bottom of the upload/browse/acquire menu. Technology Services has identified the most helpful customizations under the General, Document, Document Upload, and Workflow tabs in the User Options menu.