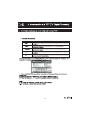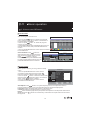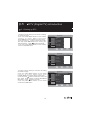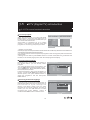
1
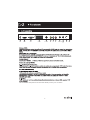
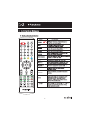
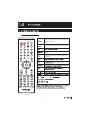
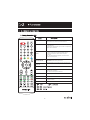
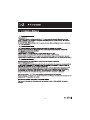
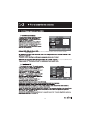
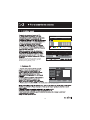
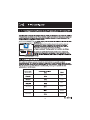
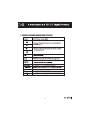
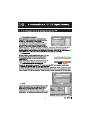
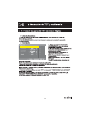
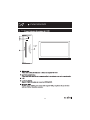
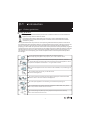
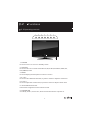
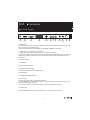
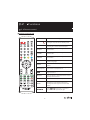
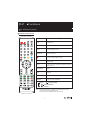
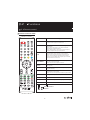
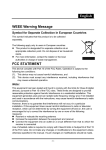
R
TV LCD con TDT DVD y USB grabador
S
Ro H
1
S
Ro H
2
ENTER
TV LCC con TDT DVD y USB grabador
PVR-MENU
Adaptador
(19” / 20” TV)
(16 ” TV)
S
Ro H
3
1
2
POWER SOURCE
3
4
5
6
7
MENU
CH+
CH-
VOL+
VOL-
89
S
Ro H
4
12
1
2
3
4
DC
HDMI
VGA
SCART
S-VIDEO
5
6
7
AV
L
R
8
PC-Audio
9
10
RF
11
USB
12. DC POWER: Solo para TV 16" tiene esta salida, TV 19" y 20" no tienen
S
Ro H
5
ENTER
RECALL
SOURCE
PVR - MENU
S
Ro H
6
Pulse este botón para aumentar o disminuir el
nivel de volumen.
Pulse este botón para ajustar el programa TV
Pulse este botón para visualizar la información
actual
En modo DTV pulse este botón para grabar y
pulse nuevamente el botón para detener la
grabación .
ENTER
S
Ro H
7
SETUP
Pulse el botón para entrar en el menu ajuste de sistema.
Pulse el botón nuevamente para salir del menu
REPEAT
Cada vez que presione botón REPEAT cambiará el modo
de reproducción.
Durante VCD, CD playback, hay 3 modos: una repetición,
repetir todo o desactivar.
Durante la reproducción presione A-B, se selecionará A
si vuelve a presionar se seleccionará B de forma
automática. Presione A-B una tercera vez para
descativar.
Nota: En CD/VCD/SVCD playback, A-B han de estar
dentro de la misma pista
A-B
Durante DVD playback, pulse MENU para visualizar el
disco menu.
Nota: esta función está sujeta al disco
DVD-MENU
ENTER
Pulse este botón para acceder al título (Se requiere un
disoc que suporte esta función)
TITLE
SUBTITLE
Pulse el botón para visualizar el idioma
ZOOM
Al pusar este botón se visualizará los diferentes ZOOM
para aunmetar la imagen.
Nota: Esta función depende del disco
GOTO
Pulse go to para visualizar
OPEN
Pulse OPENpara abrir o close DVD
ANGLE
Este botón puede ajustar el ángulo de visión de las
imagenes en DVD
P-N
Cambie PAL a NTSC
PVR - MENU
S
Ro H
8
Esta función no lo hace en DTV
S
Ro H
9
S
Ro H
10
,1280x1024a 60HZ
1366x768 a 60 HZ,1440x900 a 60HZ.
CVBS,RGB
S
Ro H
11
7
,120min.,180min..
S
Ro H
12
FUNCION
E
BRILLANTE
SATURATION
MATIZ
TONE COLOR
ESTANDAR
ESTANDAR
Modo sonido
USUARIO
FUNCION
E
DISCURSO
S
Ro H
13
IDIOMA TXT
FUNCION
E
Idioma TXT: WEST EURO,CEN EURO,CYRILLIC,HEBREW,WEST,EAST,RUSSIAN,ARABE,
FARSI,GREEK.
5 SEGS,10SEGS,30SEGS,60SEGS,JAMÁS.
4:3,14:9,16:9,ZOOM,AUTO.
SISTEMA COLOR
SISTEMA SONIDO
AUTOBUSQUEDA
TV
TV
E
Editar Canal : Editar c anal.
S
Ro H
14
TV\EDITAR CANAL
CANAL
NOMBRE
MOVER
SISTEMA SALTO
COPIAR
BORRAR
\EDIT SUB
TV\CANAL
FREQ.
EDITAR
\INPUT
CANAL
OK
Despues de terminar de editar, puede
seleccionar el menu ENTER, y pulsar
ENTER para guardar y salir.
MOVER
E
0~9
CONFIRM
SHOWCUT KEY
AJUSTE AUTO
E
S
Ro H
15
BACK
VGA
SVGA
XGA
1280x1024
SXGA
1366x768
WXGA
1440x900
WXGA+
S
Ro H
16
S
Ro H
17
MODO CANAL
SPANISH
AREA
BUSQUEDA AUTO
BUSQUEDA MAN
FUNCION
HORA
ADV SETTING
JUEGO NATIVO
MOVER
E
EXIT
E
BACK
DTV\MODO CANAL
FUNCION
MOVER
DTV / CONFIG AVANZADA
PRE.AUDIO
PRE.SUBTITULO
SPANISH
OFF
CI
CA
FUNCION
OFF
CONTROL PAR.
PAR.RATING
MOVER
E
BACK
S
Ro H
18
Busqueda Canales
Canal TV
Canal de Radio
Canal
Progreso
Mover
S
Ro H
19
4
Diario
Diario
Diario
Hora
Semanal
Semanal
Semanal
Hora
Hora
Timer: Introducir EPG presione
botón aparecerá la lista de programa. Elija el programa
que quiera grabar, presione botón AZUL del mando a distancia para ajustar el horario de
grabación.
S
Ro H
20
DTV\MODO CANAL
FUNCION
MOVER
ma
BACK
E
Elim/ Mover/ Bloq
Elim
Selecione el canal de desea y puede seleccionarlo como programa favorito, borrar o
moverlo. Presione ENTER para actualizar el cambio, y presione MENU para salir.
S
Ro H
21
Ordenar Canales
1
a
2a
3
S.NO
a
Todos
Todos
Nombre del canal
Mover
Seleccionar
3
S
Ro H
22
Nombre del canel
Mensaje
Borrar todos los canales de TV?
Nombre canel
Modo temp.
S
Ro H
23
Juego Nativo
S
Ro H
24
DTV / CONFIG AVANZADA
PRE.AUDIO
PRE.SUBTITULO
SPANISH
OFF
CI
CA
FUNCION
OFF
CONTROL PAR.
PAR.RATING
MOVER
BACK
E
CONTROL PARENTAL
Bloqueo Parental
Clave antigua
Clave nueva
Confirme clave nueva
S
Ro H
25
S
Ro H
26
*Mpeg.
Antes de grabar, puede usted elegir una partición del dispositivo USB para guardar el
archivo a grabar. Si no elije la partición se grabará en la primera partición.
Presione
en el mando a distancia para comenzar la grabación rápida, para parar la
grabación pulse nuevamente el botón.
TIMESHIFT
27
S
Ro H
N
o
Modo temp.
Canal despert.
Fecha despert.
Hora encend.
28
S
Ro H
Como usar el TIMESHIFT
RECORD MENU
1.Presione botón PVR-MENU para entrar al
MENU GRABACION, puese seleccionar
TIMESHIFT. Presione ENTER para empezar la
grabación.
RECORD START
FILE MANAGER
DEVICE LIST
SUBSCRIBE
TIMESHIFT
MOVER
ADJUST MENU EXIT
Cuando introduce TIMESHIFT, aparecerá una ventana en el margen superior izquierdo con
la siguiente información: preparado para TIMESHIFT, Luego aparecerá TIMESHIFTING
Comenzará asi la grabación via dispositivo USB (Esta grabación derá temporal, una vez que
extraiga el dispostivo USB la memoria se perderá) Pulse DISPLAY para observar the
proceso de grabación.
SZTVM04
560
(MB)
00:10:10 / Manual
Por ejemplo:
SZTVM04: canal actual
00:10:10/ manual:tiempo de grabación
560MB: capacidad de dispositivo USB sobrante
2. Después de que haya pasado un tiempo de grabación, presione
para comenzar el
timeshift, el cual puede utilizar FRX2, FRX4, FRX20, Play. Puede entonces presionar
para F.F timeshift eligiendo FFX2, FFX4. FFX8, FFX20, Play
FRX2, FRX4, FRX8, FRX20: seleccione para ajustar la velocidad FR
FFX2, FFX4, FFX8, FFX20: seleccione para ajustar la velocidad FF
Play: seleccione para parar timeshift para comenzar a grabar.
Puede también presionar
para reproducir PLAY y presione otra vez para pausa.
Presione DISPLAY para visualizar proceso de timeshift (ver foto)
SZTVM04
540
(MB)
00:15:10 / Manual
Nota: Utilizando función TIMESHIFT ha de estar en el modo TV.
S
Ro H
29
Conecte el disco USB y cuando pulse tecla SOURCE para seleccionar MEDIA,
Enter
S
Ro H
30
FUNCION DVD
S
Ro H
31
FUNCION DVD
7.2
1
2
3
SD/MS/MMC
DVD
5
4
S
Ro H
32
FUNCION DVD
7.3
F.F
F.R
S
Ro H
33
FUNCION DVD
7.4
S
Ro H
34
FUNCION DVD
7.4
DISPLAY
DISPLAY
S
Ro H
35
FUNCION DVD
7.5 Ajuste Menu DVD
Ajustes generales de página
TV display
Puede ajusta el formato de pantalla (aspecto ratio) dependiendo del tipo de TV.
4:3 Panscan:La sección central de las imágenes son visible en formato 4:3 TV pero los
bordes derecha -izquiera están truncados
4:3 Letterbox: Las imágenes son enteramente visible en 4:3 TV pero hay bandas negras en
la parte superior e inferior de la pantalla.
16:9 Seleccione esta opción si conecta a unidad a una pantalla de TV amplia. Aunque haya
selecionado esta opción no podrá visualizar grabaciones de DVD en 4:3 de la misma manera
que si fuera imágenes de 16:9.
Angle Mark: marca de ángulo: permite activar o desactivar la función de marca de ángulo ON
y OFF
Idioma OSD
Seleccione el idioma preferido para el ajuste de menu y visualización de OSD
Salvapantallas
ON
Si la pantalla queda inactiva durante unos minutos, una imagen animada aparecerá (se
conoce como salvapantallas)
OFF:
Si desactiva esta función la unidad no reproducirá la imagen animada de salvapantallas
Last Memory (memorización última)
ON:
Pulse el botón abrir cuando vea un DVD, podrá regresar al mismo momento en que lo dejó si
apaga la unidad
OFF:
Función no memorizada
Página Audio
Ajuste de pagina speaker
Dowmix:
La unidad puede mezclar canales audio multiples para codificarlo como 2 canales audio
Esta opción se conoce como downmixing
LT/RT
Salida audio Dolby Pro Logoc Surround stereo. Este proceso permite que las pistas de audio
stereo sean audible en 4 canales (izquierda, centro, derecha y multiple)
Stereo:
Salida analógica audio stereo. La unidad envía a los subwoofer señales de los altavoces
delanteros derechos e izquierdos.
S
Ro H
36
FUNCION DVD
7.5 Ajuste Menu DVD
Dolby page:
Ajuste Dolby Digital
Dinámico: esta sección de compresión dinámica solo se aplica a DVDS que utilizan la
técnica de Dolby Digital.
Set to OFF: Ajuste a OFF Las señales de baja frecuencia se amplian para aumentar el
volumen de audio.
Set between FULL and OFF : Ajuste entre FULL (entero) y OFF. Los sonidos extremos
audibles de Dolby Digital espectrum se comprimen.
Preferencias de página
TV tipo: Permite ajustar el sistema de video: PAL/AUTO/NTSC
Audio:Selecciona el idioma preferido para DVD con sonido.
1)El idioma seleccionado es asignado como el preferente y puede ajustarse de forma
automática cuando se reproduce el disco.
2) Los idiomas varian según el disco, dependiendo del DVD
Puede seleccionar alternativamente el idioma pulsando botón AUDIO del mando a distancia
Subtitulo: Selecciona el idioma deseado
1)El idioma seleccionado es asignado como el preferente y puede ajustarse de forma
automática cuando se reproduce el disco.
2)) Los idiomas varian según el disco, dependiendo del DVD
Puede seleccionar alternativamente el idioma pulsando botón SUBTITLE del mando a
distancia
Disc Menu:
Selecione el idioma deseado del disco, esto varía según el disco.
Parental:
Es posible establecer restricciones de ciertos DVD dependiendo de los niveles o edades,
por ejemplo: ciertas escenas pueden bloquearse o reemplazarse por distintas escenas. El
control parental permite ajustar los niceles. Esta función requiere de una contraseña.
1)Mueva el cursor a Parental. El cuadro de estriccón se visualizará a la derecha.
2)Si quiere cambiar el nivel de restricción simplemente pulse PLAY para abrir el menu
correspondiente. Use / para seleccionar las distintas restriccioners y presione PLAY para
confirmar.
3)La unidad perdirá una contraseña si ha habilitado el modo contraseña.
4) Introduzca 4 digitos usando los números del manod a distancia. Pulse PLAY para
confirmar.
5) Fin
Nota:
Si reproduce un disco que no tiene la función CONTROL PARENTAL, la unidad no podrá
realizar esta función.
S
Ro H
37
FUNCION DVD
7.5 Ajuste Menu DVD
Ajuste de la contraseña
Modo contraseña:
ON: la unidad requiere de una contraseña cada vez que se modifique el nivel de la función
parental.
OFF:Puede cambiar el nivel de control parental sin introducir la contraseña.
Cambiar la contraseña:
Mueva el cursor a "CHANGE" (cambio) menu opción.
Pulse PLAY. Se visualizará el menú cambio de
contraseña. Tiene que introducir la contraseña antigua
(presestablecido de fábrica 8888) una vez introducida la
contraseña antigua puede entonces meter una nueva
contraseña
contrseña antigua
contraseña nueva
confirmacion de CNT
OK
Prefaábrica
Reestablece los ajustes de fábrica .
7.6 Función SD/MMC/MS
Primero introduzca la tarjeta SD/MMC/MC.
En la función DVD presione el botón MEDIA y seleccione CARD presione el botón ENTER y
la TV comenzará a reconocer la tarjeta. Después de reconocer se visualizará los tipos de
tarjeta: SD y MMS se visualizan como SD y MS como MS. Entonces seleccione el tipo
deseado y pulse ENTER para su reproducción.
Atención: suporta* .mp3, *.jpg, *.avi, *.mpg1/2/4.pero los BIT son menos de 5Mbps.
S
Ro H
38
8
Guia
Guia de possibles problemas ante de consultar con el servio técnico:
S
Ro H
39
16”/19”/20”
16 " LCD TV
19 " LCD TV
20 " LCD TV
353.45(H)x198.72(V)mm
408.24(H)x225.15(V)mm
433.61(H)x249.41(V)mm
1366x768
1440x900
1366x768
90(H)/60(V)
170 (H) /160 ( V )
170 (H) /160 ( V )
8 ms
5 ms
8 ms
50,000 hours
16.7M colors
AC 100V-240V 50Hz/60Hz
35W
45W
45W
1W
PAL B/G D/K I, SECAM D/K L L’ BG
USB2.0
1
1
1
RCA X 1
AUDIO OUT
1
D-sub 15 pin type
1
NTSC/PAL/SECAM
VGA/SVGA/XGA/SXGA
480i/480p/576i/576p/720p/1080i
5Wx2
2.9 Kg
7
4.65 Kg
400x160x315 mm
o
466x180x375 mm
5.05 Kg
534x196x397 mm
o
5 C~35 C
20%~80%
o
o
-15 C~45 C
10%~80%
S
Ro H
40
Eliminacion del electrodomestico viejo
En base a la Norma europea 2002/96/CE de Residuos de aparatos
Elctricos y Electronicos (RAEE), los electrodomesticos viejos no
puenden ser arrojados en los contenedores municipales habituales
; tienen que ser recogidos selectivamente para optimizar la
recuperacion y reciclado de los componentes y materiales que los
constituyen, y reducir el impacto en la salud humana y el
medioambiante. El simbolo del cubo de basura tachado se marca
sobre todos los productos para recordar al consumidor la
obligacion de separarlos para la recogida selectiva.
El consumidor debe contactar con la autoridad local con el
vendedor para informarse en relacion a la correcta eliminacion de
su electrodomestico viejo.
"Para dar cumplimiento a la Norma UNE EN-60065, indicamos que
si el cable flexible se daña, únicamente puede ser sustituido por un
taller de reparación reconocido por el fabricante NEVIR, S.A., ya
que se necesitan herramientas especiales”
S
Ro H
R
LCD TV WITH DVD AND USB RECORDING
1
Introduction
1.1 Safety guidelines
Safety guidelines
This symbol indicates that the presence of conductive electric currents inside the
appliance may cause an electric shock.
Processing with electric and electronic devices in end-of-life(applicable to the
European Union and to other European countries which have a selective waste
collection system).
This symbol affixed on the product or to its packing indicates that the product must not be
processed with other domestic waste.It must be disposed in a proper collecting point for the
recycling of electric and electronic devices.Making sure that this product is disposed of
properly,you will make an important contribution to the prevention of the potentially negative
consequences for the environment and human health.Recycling materials will help maintain
natural resources.For any further information regarding the recycling of this product,you
can contact your municipality,your waste reception centre or the shop where the product
was bought.
In case this product malfunctions,please do not attempt to repair it
yourself.Opening the appliance may expose you to a risk of electric shock.
Do not use this appliance near heat sources especially hot air ducts, cookers or
any other applicance generating heat sources.Please note that this appliance cannot
o
o
be exposed to temperatures lower than 5 or higher than 35 either.
Do not use this appliance near a wet area such as a bathtub,a sink, swimming pool
or a vase.
Do not touch the power cord if your hands are wet.
Do not use a damaged cord.
Do not use products containing alcohol,gasoline,detergent or other flammable
products in order to clean the surface of the appliance.
Do not drop the applicance or hit it.Doing so could seriously damage it.
Do not let liquids or any foreign object in the appliance.Otherwise,it may cause
short-circuit,a risk of electric shock or even fire.
Do not cut,damage or place any heavy objects on the power cord.This may
result in a risk of electric shock or fire.
S
Ro H
1
1
Introduction
1.1 Safety guidelines
Use and maintenmance precautions
Location:Place the appliance on a plance surface,far from magnetic fields. Do not
put any heavy objects on the unit.
Ventilation: The unit must be located in a well-ventilated area.Leave a space of
about 15cm at the rear and top of the appliance and a space of 10cm on the side.
Do not place the applicance on a bed,a blanket or any other similar
surface;otherwise the ventilation openings may be blocked. Do not install the
produce in a bookcase,in a piece of furniture or a closed shelf,because it may
impede ventilation.In order to avoid any internal overheating, do not cover the
ventilation openings at the rear panel.
Condensation: Humidity might form on the reading lens when the unit is taken
from a cold place to a warm place. If condensate has formed inside the
appliance,this latter might not work correctly. In such case,do not use the
appliance a few hours before you use it again.
Power source: Only use this unit with one of the power sources specified in the
user’s guide and the identification label.
Power cord: To unplug the mains power cord,pull it by the plug.Never oull on the
cord itself. Never touch the mains power plug if your hands are wet as this may
cause an electric shock or a fire. Power cords must be correctly fixer in order to
prevent them from being damaged.Pay peculiar attention to the cord connecting
the unit to the mains power plug. Avoid overloading mains wall outlets and
extension cords beyoud their capacity as this could cause a fire or an electric
shock.
Power : When the appliance is not in use,unplug the power cord from the mains
wall outlet.When the power cord is plugged in, a weak current flows inside the unit
even if the unit switched off. In case of storm,immediately unplug the mains power
cord from the wall outlet.
S
Ro H
2
2
Functions
2.1 Connection and preparation for use
Supplied Accessories
ENTER
LCD TV WITH DVD AND USB RECORDING
PVR-MENU
Remote Control
User Manual
Adapter (16”TV)
Power cord
(19” / 20” TV )
S
Ro H
3
2
Functions
2.2 Operating controls
1
2
POWER SOURCE
3
4
5
6
7
MENU
CH+
CH-
VOL+
VOL-
89
1. POWER
Press to turn TV on or turn to standby mode.
2. SOURCE
Press to select TV or other mode like TV,AV,SCART,S-VIDEO, HDMI,PC,
DTV,MEDIA, DVD.
3. MENU
Press to display the setup menu on the TV screen.
4-5. CH+/Press to select desired channels,or press to select or adjust a menu item.
6-7.VOL+/Press to adjust the volume level,or press to select or adjust a menu item.
8. Infrared Remote Sensor
Receives the signals from the remote control.
9. POWER LED
On standy mode , it turns red , while it turns blue when it is power on.
S
Ro H
4
2
Functions
2.3 Connection
12
1
2
3
4
DC
HDMI
VGA
SCART
S-VIDEO
5
6
7
AV
L
R
8
9
PC-Audio
10
RF
11
USB
1.HDMI Jack
- Supports connections between HDMI-connection-enabled AV devices (set top
box, AV receiver and digital TV)
- No sound connection is needed for an HDMI to HDMI connection.
2. VGA Jack : Connecting a Computer
--Connect the D-SUB connector to the PC video connector
Connect the stereo audio cable to the "PC AUDIO IN (STEREO)" jack on the rear
of your TV and the other end to the "Audio Out" jack of the sound card on your
computer.
3.SCART JACK
4.S-VIDEO
5.AV: Video input jack
6-7: Audio left and right
S-Video and AV share same input jack.
8. PC AUDIO
9.Headphone:Audio output
10.RF:tuner
Connecting an Aerial or Cable TV Network
To view Television channels correctly, a signal must be received by the set from
one of thefollowing sources:
- An outdoor aerial / A cable television network / A satellite network
11.USB Jack
12:DC POWER:16” TV has this interface, 19” and 21” TV has not it. )
S
Ro H
5
2
Functions
2.4 Remote control
Remote control for TV
Button
Description
Power
Press this button to power on the television.
Press again to put the set into standby mode.
Mute
Press this button to mute the sound output.
Press it again to restore the sound output.
ASPECT
Press repeatedly to cycle through the available
aspect modes.
P.MODE
Press repeatedly to cycle through the available
picture modes.
S.MODE
Press repeatedly to cycle through the available
sound modes.
the button you can choose different audio
AUDIO/NICAM Press
system or language.
ENTER
SLEEP
Press the button to set up the LCD TV auto turn
off time.
Number(0~9)
Press the button to select the TV program you
want to enter or input password.
Press to enter a program number for multiple
program channel.
RECALL
Press the button to switch between the current
and the previous channel.
SOURCE
Press the button to open the input source.
MENU
Press the button to display the OSD menu for
adjusting the image,sound and functions.
Pressing this button again removes the OSD
display.
PVR - MENU
/
/ to adjust VOL+/- and CH+/- ,
Press /
also to move item up,down,left,right.
/
S
Ro H
6
2
Functions
2.4 Remote control
Remote control for TV
Button
Description
VOL
Press this button to increase or decrease sound
volume level.
CH
Press this button to adjust the TV program.
EXIT
Press this button to exit.
DISPLAY
Press this button to display the information under
the current mode.
Under the DTV mode, Press this button to begin
to record, press it again to stop.
ENTER
PVR - MENU
EPG
Press this button to enter electricity program
guide record.
LIST
Press this button to display digital DTV program
list on screen.
TV/RADIO
Press this button you can switch to DTV or
Radio.
FAV
Press this button you can setup your favorite
program.
PVR-MENU
Press the button to display the recording menu.
MEDIA
Press to switch to MEDIA.
STOP
PLAY/PAUSE
Previous/Next
F.R/F.F
Note:1.NICAM button is also available for NICAM function in the
countries supporting NICAM signal.
2.TXT button only available for the TXT function.
S
Ro H
7
2
Functions
2.4 Remote control
Remote control for DVD
Button
Description
SETUP
Press the button to enter the system setting menu.
Press the button again to exit the menu.
REPEAT
Each press of the REPEAT button will change the
repeat mode.
During VCD,CD playback, there are three modes:
repeat Single, repeat All and Off.
During DVD playback, there are four modes: Repeat
Chapter, Repeat Title, Repeat All and Off.
During playback, press A-B to select point A, press it
again to select point B. The player will repeat the
section from A to B automatically. Press A-B a third
time to cancel A-B repeat and clear points A and B.
Note: During CD/VCD/SVCD playback, points A and B
must be within the same track.
A-B
DVD-MENU
During DVD playback, press MENU to display the
disc menu of the current title.
Note: This function is subject to the disc.
TITLE
Press the button to enter the appointed title. (Requires
disc support)
SUBTITLE
Press the button to display different captions (Requires
support from disc)
ZOOM
As you press the button you view the different ZOOM
magnifications of the picture.
Note: This function may differ for different types of discs.
GOTO
Press goto and input time which you would like to view.
OPEN
Press OPEN to open or close DVD.
ANGLE
This button can adjust the viewing angle of DVD images.
P-N
Switch PAL to NTSC.
ENTER
PVR - MENU
STOP
PLAY/PAUSE
Previous/Next
F.R/F.F
S
Ro H
8
2
Functions
2.4 Remote control
Remote control for Teletext
Button
Description
Red
Press this Red button to enter corresponding item or page.
Green
Press this Green button to enter corresponding item or page.
Yellow
Press this Yellow button to enter corresponding item or page.
Blue
Press this Blue button to enter corresponding item or page.
TXT
Press this button to turn on the teletext function press again to turn it off.
Hold
Press this button to freeze the analogue text image on the screen (the
signal will continue to be broadcast).Press the button again to unfreeze.
MIX
Press to make the analogue Teletext background transparent.
SUBPAGE
Press to turn on Subpage press again to turn it off.
INDEX
Press this button to go to the analogue teletext index page.
SIZE
Press to select the analogue teletext Size.
REVEAL
Press this button to display hidden analogue Teletext information.
Installing the Remote Control Batteries
1.
Open the battery cover.
2.
Insert batteries (two size-AAA batteries).
Place batteries with their terminals corresponding to the
(+) and (-) indications.
Replace the cover and slide in reverse until the lock
snap. If the remote control is not used for an extended
period of time,remove the batteries from the remote
control.
3.
S
Ro H
9
2
Functions
2.4 Remote control
Power On/Off
Turing on the TV
1. Plug the TV's power cord into a wall outlet (after this step, the main unit will turn on and
enter standby mode automatically).The power indicator will be Red.
2. Press the (Power) button on the TV ,or press the (Power) button on the remote control.
The TV will turn on.
Placing in Standby Mode
Your TV can be placed in standby mode in order to reduce the power consumption.
The standby mode can be useful when you wish to interrupt viewing temporarily (during a
meal, for example).
1. Press the Power button..
Remark: TV will turn off and the LED turn from Blue to Red.
2. To switch back on ,simply press power button or Remote button.
Remark: Do not leave your TV in Standby mode for long periods of time.(when you are
away on holiday, for example). It is the best to unplug the set from the mains and aerial.
Changing Programs
Using the program selection buttons on the remote control to change programs
1. To select a program, press the corresponding program selection button on the remote
control. For example, to select program 8, press the "8" progam selection button on the
remote control.
2. To select a over 99 program , press the (Program Enter) button
on the remote control,
and then enter the program number using the program selection buttons.for example, to
Select program 100, and then press the
" 1", "0", "0" program selection buttons on the
Remote control.
Using the / or CH+/- buttons to sequentially change programs
Press / or CH+/- buttons on the remote control or on the TV to sequentially select the TV
program available in your area.
Using the RECALL button to return the previous program
To return to the previous viewed program,press the RECALL button on the remote control.
S
Ro H
10
2
Functions
2.4 Remote control
Teletext function
Press the TXT button on the remote control to enable the Teletext function. To disable the
function, press the button again.
1.Press ( TXT ) button to turn on the Teletext function,press again to turn it off.
2.Press (HOLD) button to freeze the image on the screen(the signal will continue to be
broadcast). Press the button again to unfreeze.
3.Press ( MIX ) button to change the Teletext background transparent.
4.Press (SUBPAGE) button to display teletext subpage.
5.Press (INDEX) button to go to Teletext index page.
6.Press (SIZE) button to select the Teletext Size.
7.Press (REVEAL) button to display hidden Teletext information.
8.Press the Number buttons to jump to different pages.
9.Press the / buttons to go to the previous or next page.
Note: 1.When in Teletext state,mute button has effect.
2.When in Teletext, OSD menu has no effect.
Connection inputs
1. Model TV signal
Compatible with: PAL BG, PAL DK, PAL I, AUTO,SECAM/L’, SECAM/L.
Compatible with:Audio,Teletext.
2.CVBS
Compatible with: PAL, NTSC.
3.S-Video
Compatible with: PAL, NTSC.
4. HDMI
Compatible with: HDMI
Compatible with: 480i, 480p,576i,576p,720p,1080i
5.PC
Compatible with:640x480@60Hz,800x600@60Hz,1024x768@60Hz,1280x1024@60Hz,
1366x768@60Hz,1440x900 @ 60Hz.
6.SCART
Compatible with:CVBS,RGB.
S
Ro H
11
3
Basic operation
To use the TV,be sure to have well inserted the power plug to a mains outlet within
the TV’lated voltage range and to have connected the aerial.
3.1 Basic function
POWER
During TV play,you can press POWER button, TV enters to standby state. When
TV on standby state,press POWER button you can turn on TV.
SLEEP
During TV play,press SLEEP button you can set up the TV auto turn off time.
There are 7 switch modes: Off,15MIN,30MIN,45MIN,60MIN,90MIN, 120MIN,
180MIN.
Source
When TV turns on,press SOURCE button,and press
desired source, then press / to enter.
/
button to select your
DISPLAY
TV screen display the current information when DISPLAY button is pressed on any
state. For example,on TV source the program number,program name,color system
and sound system are display.
MUTE
Press MUTE button to mute the sound output.Press it again to restore the sound
output.
P.MODE
You can change between the picture mode presets Standard,Vivid,Soft,Optimal
and User with the P.MODE button.
S.MODE
You can change between the sound mode presets Standard,Music,Speech and
User with the S.MODE button.
NICAM
On TV state,you can press NICAM button to turns on or off others sound tracks and
switch Mono,Dual I,Dual II,STEREO modes.
Number
On TV state,you can press number buttons to directly select channel.
Channel RECALL
On TV state,you can press this button to toggle between the current and previous
channel you were viewing.
Volume
During TV play,you can press
/
or VOL buttons to increase or decrease volume.
CHANNEL
On TV state,you can press
/
or CH buttons to select different channels.
S
Ro H
12
3
Basic operation
3.2 How to use OSD menu
Setting up picture
MAIN MENU
1.You can press MENU button on the remote
controller to enter OSD menu,then press /
buttons to select picture in main menu.
2.You can press
button to enter picture
mode,and then press / buttons to select your
desired option, press / buttons to adjust.
3.You can press MENU button on the remote
controller to exit OSD menu.
PICTURE
SOUND
PICTURE MODE
USER
BRIGHTNESS
50
CONTRAST
50
SATURATION
50
5
SHARPNESS
FUNCTION
50
HUE
TV
COLOR TEMP
MOVE
STANDARD
ADJUST MENU EXIT
Picture Mode: Press / to select. The following options are available " Standard, Vivid,
Soft, Optimal,User " .
Brightness: Adjust image brightness.
Contrast: Adjust image contrast.
Saturation: Adjust the saturation,making them stronger or weaker.
Sharpness: Adjust the sharpness level of image.
Hue: Adjust image hue(This is only available with NTSC.)
Color TEMP.: You can select the most comfortable colour temperature to your
eyes:Standard, Warm,Cool.
Standard: Keep the original colour.
Warm: Adjust white to a little red.
Cool: Adjust white to a little blue.
Remark: You must ensure " Picture Mode " is set to USER to allow you to make these
adjustments. The changes you made will be stored automatically.
Setting up sound
MAIN MENU
1.You can press MENU button on the remote
controller to enter OSD menu,then press /
buttons to select sound in main menu.
2.You can press
button to enter sound
mode,and then press / buttons to select your
desired option, press / buttons to adjust.
3.You can press MENU button on the remote
controller to exit OSD menu.
PICTURE
SOUND MODE
STANDARD
BALANCE
50
TREBLE
50
SOUND
0
BASS
FUNCTION
AVL
OFF
TV
MOVE
ADJUST MENU EXIT
Sound Mode: Press / to select.The following options are available " Standard, Music,
Movie, Speech,User " .
Bass: Adjust Bass effect.
Treble: Adjust Treble effect.
Balance: Adjust Balance effect.
AVL: Set auto volume control On/Off.
Remark:You must ensure " Sound Mode " is set to " USER " to allow you to make these
adjustments. The changes you made will be stored automatically.
S
Ro H
13
3
Basic operation
3.2 How to use OSD menu
Setting up function
MAIN MENU
1.You can press MENU button on the remote
controller to enter OSD menu,then press /
buttons to select function in main menu.
2.You can press
button to enter function
mode,and then press / buttons to select your
desired option, press / buttons to adjust.
3.You can press MENU button on the remote
controller to exit OSD menu.
PICTURE
OSD LANGUAGE
ENGLISH
TXT LANGUAGE
WEST EURO
SOUND
RESET
FUNCTION
OSD DURATION
5 SECONDS
ASPECT RATIO
16:9
TV
MOVE
ADJUST MENU EXIT
Langeuage: Choose the OSD language.
Osd Duration: Setting up main menu and source menu turn off time:5 seconds,10 seconds,
30 seconds,60 seconds,Never.
Aspect Ratio: Screen play mode ,support 4:3,16:9,AUTO.
TXT Language: WEST EURO,EAST EURO,RUSSIAN,ARABIC,FARSI.
RESET: If you choose this item,the all user set up will return to normal.
Remark:The " Reset " will be set for each mode.
Setting up TV
MAIN MENU
On TV source state,you can enter to setting up
model TV page.
1.You can press MENU button on the remote
controller to enter OSD menu,then press /
buttons to select TV in main menu.
2.You can press
button to enter TV mode, and
then press / buttons to select your desired
option, press / buttons to adjust.
3.You can press MENU button on the remote
controller to exit OSD menu.
PICTURE
SOUND
CHANNEL
001
COLOR SYSTEM
PAL
SOUND SYSTEM
AUTO
AUTO SEARCH
FUNCTION
MANU.SEARCH
FINE TUNE
TV
SKIP
49.75 Mhz
ON
MOVE
ADJUST MENU EXIT
Channel: Display channel number or change channel.
Auto Search: It allows you to search program automatically.
Manual Search: It allows you to search program manually.
Fine Tune: If your TV signal is not intensively, to get the good TV signal, you can tune the TV
signal quality manually.
Color System: Sets the colour supporting system. The following options are available: PAL,
SECAM,AUTO.
Sound System: Sets the sound supporting system. The following options are available:
BG , DK I , L/L’, AUTO.
Skip: If you wish to skip channel,press skip on. To cannel skip,press off.
Channel Edit: channel edit.
S
Ro H
14
3
Basic operation
3.2 How to use OSD menu
Channel Edit
After entering the channel menu:
MAIN MENU
1.You can press / buttons to select Program Edit
menu, and then press
to confirm. The window of
CHANNEL NAME
Program table is displayed.
001
2.You can press / button to select the program
002
004
number you want to edit.
005
3.Press RED,GREEN,YELLOW,BLUE buttons on the
006
remote control to edit, then press ENTER button to
confirm.
SWAP
INSERT
4.You can press MENU button on the remote controller
to exit OSD menu.
TV/CHANNEL EDIT
Channel Editor:Press / buttons to
select the item that your desired option.
After entering Channel Name. You can
/
press /
buttons to select
character, and then press ENTER button
to confirm. After editing finished,you can
press ENTER button to save and exit.
SYSTEM
SKIP
FREQ.
AUTO BG
PAL BG
PAL BG
PAL BG
PAL BG
OFF
ON
ON
ON
ON
44.30
44.25
44.25
44.25
44.25
COPY
DELETE
TV/CHANNEL
EDIT\EDIT
MAIN MENU
EDIT MENU EXIT
MAIN MENU
TV/CHANNEL EDIT \ EDIT MAIN
MAIN\CHANNEL EDIT NAME
-----
----CHANNEL
ENTER
001
CHANNEL EDIT NAME
EMPTY
BAK SPC
0~9 SHOWCUT KEY
MOVE
ADJUST E N T E R EDIT NAME M E N U EXIT
ENTER
CANCEL
MOVE ENTER ENTER MENU BACK
Setting up PC
When input PC source,you can go to PC to setup
menu.
1.You can press MENU button on the remote
controller to enter OSD menu,then press /
buttons to select PC Setup in main menu.
2.You can press
button to enter PC Setup mode,
and then press / buttons to select your desired
option, press / buttons to adjust.
3.You can press MENU button on the remote
controller to exit OSD menu.
MAIN MENU
PICTURE
AUTO ADJUST
+1
-2
H POSITION
SOUND
V POSITION
PHASE
0
CLOCK
0
FUNCTION
PC
MOVE
ADJUST MENU EXIT
Auto Adjust: Press / button, TV system adjust by itself,it can adjust H Position,V
Position,Phase and so on, that can make the image in center and display best.
H Position: Adjust the Horizontal Position of the PC screen.
V Position: Adjust the Vertital Position of the PC screen.
Phase: When necessary,adjust the pixel phase of the picture to avoid picture interference.
Clock: Press the / button to minimize any vertical bars or stripes visible on the screen
background.
S
Ro H
15
4
PC setting
4.1 Setting up your PC software(based on Windows XP)
The Windows display-settings for a typical computer are shown below.But the actual screen
on your PC will probably be different,depending upon your particular version of Windows and
your particular video card.But even if your actual screen look different, the same,basic setup informaiton will apply in almost all cases.
1. First,click on “Control Panel” on the Windows start
menu.
2 .When the control panel window appears,click on
“Appearance and Themes” and a display dialog-box
will appear.
3 .When the control panel window appears,click on
“Display” and a display dialog-box will appear.
4. Navigate to the “Settings” tab on the display dialogbox.
If a vertical-frequency option exists on your display
settings dialog box,the correct value is “60Hz”,
Otherwise,just click”Enter”and exit the dialog box.
4.2 Display Mode
If the signal from the system equals the standard signal mode,the screen is adusted
automatically.If the signal from the system does not equal the standard signal mode,adjust
the mode by referring to your videocard user guide;otherwise there may be no video.For the
display modes listed below,the Screen image has been optimized by manufacturer.
Resolution
Vertical Frequency(Hz)
Mode
640x480
60 Hz
VGA
800x600
60 Hz
SVGA
1024x768
60 Hz
XGA
1280x1024
60 Hz
SXGA
1366x768
60Hz
WXGA
1440x900
60Hz
WXGA+
S
Ro H
16
5
DTV (Digital TV) introduction
Remote control for DTV menu
Menu
Open/Close digital to menu
/
Move between menu items and adjust the TV channel
/
Move between menu items and adjust the TV volume
FAV
Favourite list
EPG
Electricity program guide record.
ENTER
Confirm the operation
SUBTITLE
In DTV mode open/close SUBTITLE
TV/RADIO
Switch between DTV program and radio program
LIST
Press LIST button to enter into QUICK SELECT menu.
Audio
Which can choose Stereo,left audio,right audio.
PVR-MENU
Enter into Recording menu.
S
Ro H
17
5
DTV (Digital TV) introduction
5.1 Setting up DTV
1.On DTV source state,you can enter to setting
up model TV page.
2.You can press MENU button on the remote
control to enter OSD menu,then
press▲/▼buttons to select DTV in main menu.
3.You can press
button to enter DTV mode,
and then press ▲/▼ buttons to select your
desired options, press / buttons to adjust.
4.You can press MENU button on the remote
control to exit OSD menu.
MAIN MENU
PICTURE
CH. MANAGE
AREA
SOUND
CHINA
AUTO SEARCH
MANU.SEARCH
FUNCTION
TIME
ADV SETTING
DTV
NATIVE GAME
MOVE
ADJUST MENU EXIT
MAIN MENU
DTV/CHANNEL MANAGE
PICTURE
CH. ORGA.
CH.SORT
SOUND
CH.GROUP
DEL TV CH.
FUNCTION
DEL RADIO CH
DTV
MOVE
1.On DTV source state,you can enter to setting
up model TV page.
2.You can press MENU button on the remote
control to enter OSD menu,then
press▲/▼buttons to select DTV in main menu.
3.You can press button to enter DTV mode, and
then press ▲/▼ buttons to select ADVANCED
SETTING , press
buttons to enter.
4.You can press MENU button on the remote
control to exit OSD menu.
ADJUST MENU EXIT
MAIN MENU
DTV/ADVANCED SETTING
PICTURE
PRE. AUDIO
PRE.SUBTITLE
ENGLISH
OFF
SOUND
CI
CA
FUNCTION
DTV
OFF
PAR.LOCK
PAR.RATING
MOVE
ADJUST MENU EXIT
S
Ro H
18
5
DTV (Digital TV) introduction
5.2 DTV source function instruction
To select program
CHANNEL SEARCH
When the current input is on DTV state,press
MENU button to enter DTV page,before you go
to auto select you should set up AREA,then you
can choose Auto Search item.
Area search is convenient for us to search
channel, it can search all channel points and
programs of the country (area) that you select.
S.NO
TV CHANNEL
0001
0002
0003
0004
ORF1
ORF2K
ATV
ORF2T
S.NO
RADIO CHANNEL
CHANNEL 49 UHF
PROGRESS
698166KHZ/8M
57%
1.Support country(area)
Germany/Italy/France/Spain/Netherlands/Taiwan/China/Norway/Sweden/Finland/Greece/
Australia/Russia/Ireland/Holland/England.
2.TV will auto search all channel point and programs in this country(area) after enter the auto
search page;
3.During TV auto search ,press MENU button to exit this mode;When we got desired and
finished, it can exit this page by itself, then save the program and display.
To quick select program
During DTV play normal,press LIST button on
the remote control, you can directly select
program.
The screen displays as the picture below :You
can use / buttons to switch program groups.
There are 8 options: None,New,Science,Sports,
Movie,Kids,Music,Fashion.
Favorite Programs in this group will display on
screen, you can use▲/▼buttons to select your
desired option, then press ENTER button to
watch the program.To exit the menu,press
MENU button.
QUICK SELECT
NONE
GROUP
0001
0002
0003
0004
ORF1
ORF2 K
ATV
ORF1 T
MOVE
Switching audio and language
MULTIAUDIO
During DTV play normal,press AUDIO button to
display Multi Audio page.You can press right or
left buttons to cycle through the
Stereo→Left→Right modes and the audio
language of the current program will show in
center, you can use ▲/▼ buttons to select
language,then press ENTER
button to
confirm.Press MENU button to exit this menu.
MULTIAUDIO
STEREO
660
661
FIN
SWE
MOVE
S
Ro H
19
5
DTV (Digital TV) introduction
5.2 DTV source function instruction
EPG
If you want to understand what programs will playing and get TV information in the current or
in the future, you can press EPG on the remote control to enter EPG menu.Date and time will
be showed on up-right side, program list will be showed on left side, program list which will
playing in different time will be showed on right.You can press left or right buttons to switch,
press up or down buttons to switch between different program to EPG.Current information
will be showed on the screen below.
There are 4 modes:
Daily mode: If you want to display programms
follow daily mode, you can press RED button to
enter Daily mode.
Weekly mode:If you want to display programs
follow Weekly mode,you can press GREEN
button to enter Weekly mode.
Extended mode: Press YELLOW button,the
extended menu display on screen and you can
get more information from this page. If you press
MENU button back to EPG menu;
Timer: Enter into EPG,press button,it appears
program list. Choose the program you want to
record, then press BLUE button on the remote
control to schedule recording.
Switching TV/RADIO
During programs play normal,you can press TV/RADIO button to switch between DTV and
radio.
S
Ro H
20
5
DTV (Digital TV) introduction
5.2 DTV source function instruction
DTV channel Manager
MAIN MENU
You can use this function to manage these
systems: favorite, skip, delete, arrange, divide
and so on.
When input DTV, you can press MENU button to
enter DTV page and choose Channel
Management ,then press
button to enter this
page.The screen displays as the picture below:
DTV/CHANNEL MANAGE
PICTURE
CH. ORGA.
CH.SORT
SOUND
CH.GROUP
DEL TV CH.
FUNCTION
DEL RADIO CH
DTV
ADJUST MENU EXIT
MOVE
Channel Organizer
In this page,you can press / buttons to select
your desired option. Compatible with : Favorite,
Delete, Move, Lock.
For example: Using / buttons to select.
FAV: Press RED button.
DEL: Press GREEN button.
MOVE: Press YELLOW button.
LOCK: Press BLUE button.
(Initial password is 0000)
Channel name: Pres button to enter the manual
program naming.
You select a channel you desired and you can set
it to be your favorite program, or delete it ,or move
it. You can press ENTER button to keep the
change, then press MENU button to exit.
CHANNEL ORGANIZER
S.NO CHANNEL NAME
0001
0002
0003
0004
FAV/ DEL/ MOVE/ LOCK
ORF1
ORF2 K
ATV
ORF2 T
FRANCE/482166KHZ/8M
FAV
DEL
MOVE
LOCK
To edit a channel name
Press / buttons to select the channel you want to edit.
Press button to enter the edit name funtion. Then the
selected program appears in a text box that opens below the
picture window.The first character of the name is enclosed
in square brackets.
RED button: Press to exchange option letter and number.
YELLOW button: Press to exchange capital letter and small
letter.
BLUE button: Press to insert character.
GREEN button: Press to delete character.
Press the MENU on the remote control to exit and save.
S
Ro H
21
5
DTV (Digital TV) introduction
5.2 DTV source function instruction
Use the number buttons(0-9) to modify this character using the table below.
Channel sorting
In channel sorting menu,you can press /
buttons to select order of the program, then
press
button to enter.Number name,
frequency and band were displayed on screen
below; important items were displayed on
screen up-left in order.
1.
Area is the first item,compatible with:
Germany/England/Italy/France/Spain/Netherla
nds/Taiwan/China/Norway/Sweden/Finland/Gr
eece/Australia/Russia/Ireland/Denmark/
Portugal/Poland/ Turkey/Singapore/All area.
2.
3.
4.
CHANNEL SORTING
FIRST OPTION
SECOND OPTION
THIRD OPTION
S.NO
001
002
003
NONE
ALL
ALL
FRANCE
SPAIN
NETHERLANDS
CHANNEL NAME
FREQ
ORF1
ORF2K
ATV
482166KHz
482166KHz
482166KHz
CHANGE PAGE
BANDWIDTH
MOVE
8M
8M
8M
ENTER
SELECT
The second item is to select the list by the order of Scramble.There are 3 items:
ALL,FREE,Scramble.
The third item for user to select.There are 3 items: All,A to Z,Z to A. Press ENTER button
to select you desired.If you want to save this item you can press ENTER button again.
Press / buttons to browse through the result sorting channel list in the lower part of the
screen.
S
Ro H
22
5
DTV (Digital TV) introduction
5.2 DTV source function instruction
Channel Grouping
In channel grouping ,you can press▼▲buttons
to select group ,then press button to enter this
page, for example:In this page, select NO. and
channel name will be displayed on the screen on
left,and you can see FAV and Group items ,it can
tell you the channel state. There are 8 modes: 1
None,
2 News,3 Science, 4 Sports, 5 Movies,6 Kids,
7 Music, 8 Fashion.
You can move arrow to select channel, press
corresponding number to set up will be displayed
in group. Press ENTER to save,then press
MENU button to exit, and Successfully updated
will be displayed on the screen.
CHANNEL GROUING
S.NO CHANNEL NAME
0001
0002
0003
0004
FAV
ORF1
ORF2K
ATV
ORF2T
GROUP
1
1
1
1
NUM1~NUM8 SELECT
1
2
3
4
5
6
7
8
NONE
NEWS
SCIENCE
SPORTS
MOVIES
KIDS
MUSIC
FASHION
FRANCE/482166KHZ/8M
Delete Channel
In this page,you can press / buttons to delete channel.
Delete all TV Channels: You can press
button to delete all TV channels.
Delete all Radio Channnels: You can press
button to delete all Radio channels.
To select FAV program
During DTV play normal, press FAV button to enter
this menu. The screen displays as the picture
below:
This page will display a FAV List, we can see the
channel name and know the channel mode be set
By user,you can use / buttons to select your
desired option, and press ENTER button to enter,
also press Exit button you can exit this menu.
FAVOURITE LIST
S.No
0001
0002
0003
0004
CHANNEL NAME
75% COLOUR BARS
ORF2 K
ATV
ORF2 T
MOVE
Time
TIME
When input DTV, press MENU button to open main
menu and enter DTV menu, you can choose Time.
You can see the picture below. Using / buttons to
select your desired items and button to select you
want to change items.
TIMER MODE
DATE
TIME
GMT OFFSET
SUMMER TIME
AUTO
08/19/2008
16:57
00:00
OFF
MOVE
AUTO
MANUAL
SELECT
S
Ro H
23
5
DTV (Digital TV) introduction
5.2 DTV source function instruction
Native Game
When input DTV,press MENU button to open main menu and enter DTV menu,you can
choose Native Game,then press
button to enter.You can see the picture below.
There are 3 items: BoxMan,Tetris and HitRat. Using▲▼buttons to select you want to played
items. For example, if you select BoxMan, you can see the window below:You can press
MENU button to EXIT.
NATIVE GAME
BOXMAN
TETRIS
HITRAT
S
Ro H
24
5
DTV (Digital TV) introduction
5.2 DTV source function instruction
Advanced Setting
MAIN MENU
DTV/ADVANCED SETTING
When input DTV,press MENU button to open main
menu and enter DTV menu, you can choose
Advanced setting, then press button to enter.
There are 6 items: Preferred Audio , Preferred
Subtitle,CI,CA,Parental Lock and Parental Rating.
Using / buttons to select you want to played
items. You can press MENU button to EXIT.
PICTURE
PRE.AUDIO
PRE.SUBTITIE
ENGLISH
OFF
SOUND
CI
OFF
CA
FUNCTION
DTV
PAR.LOCK
PAR.RATING
MOVE
ADJUST MENU EXIT
Preferred Audio
In this page, you can press / buttons to highlight Preferred Audio, then press / buttons
to display the options in turn.
The following options are available: Duch,English,French, German, Italian, Spanish,
Portuguese, Danish and Czech,Finnish,Swedish,Greek,Russian,Welsh,Gaelic,Defaul.
Preferred Subtitle
In this page,you can press / buttons to hightlight Preferred Subtitle,then press / buttons
to display the options in turn.
The following options are available: English,French,German,Italian, Spanish, Portuguese,
Danish,Czech,Dutch,Finnish,Swedish,Greek,Russian,Selsh,Gaelic and off.
Parental Lock
In this page,you can press / buttons to select
Parental Lock,then press button to enter.
The window below is displayed: Initial password
is 0000.
Change your password:
Enter the old password in the code entry box using
the number buttons(0~9);
Input new password to the Enter New Password
entry box using the number buttons(0~9);
Enter the same new password in the Confirm New
Password entry box using the number buttons
(0~9).
PARENTAL LOCK
ENTER OLD PASSWORD
ENTER NEW PASSWORD
CONFIRM NEW PASSWORD
S
Ro H
25
5
DTV (Digital TV) introduction
5.2 DTV source function instruction
Teletext function
Button
Description
Red
Press this Red button to enter corresponding item or
page.
Green
Press this Green button to enter corresponding item or
page.
Yellow
Press this Yellow button to enter corresponding item or
page.
Blue
Press this Blue button to enter corresponding item or
page.
TXT
Press this button to turn on the Teletext function, press
it again to turn off.
Press the (TXT) button on the remote control to enable the Teletext function. To disable the
function, press this button again.
1. Press (TXT) button to turn on the Teletext function press again to turn it off.
2. Press the (Number) buttons to jump to different pages.
3. Press the ▲/▼buttons to go to the previous or next page.
Note:
1.
When in Teletext state,mute button has effect.
2. When in Teletext,OSD menu has no effect.
S
Ro H
26
6
DTV Record and Mutimedia
6.1 DTV (Digital TV) Record Function
Some special about Recording and Playing
1.The Recording: They are only used for personal studying,research or enjoy mot allowed to
use for commercial transmission or other related purpose.
2. Supported equipment: It can match USB2.0 U-Disc.
3.About Program:SD programs which the bit rate is low than 6 Mbps, after recording,should
be saved by MPEG-2 format, and the extension is "* .Mpeg " .
4.About Capacity:The system support up to 4 partition, and the total capacity is not bigger
than 300GB, It suggested that the size of each partition is up to 120GB.(Note: If the
connective USB HDD has 4 own partition, then the inserted card will not be displayed.) Every
recorded file has the biggest size of 3.8 Gbyte(about 4 hours), if keeping on recording the file
which is beyond 3.8 Gbyte, the system will generate a new file automatically.
Before the recording,users can choose one partition of the USB devices to save the
recording files.If you don’t choose the partition,it will save in the first partition.
5.Before setting the Timer-record,should insert the U-disc or USB HDD also while during the
recording and playing, forbid drawing the USB, or else the equipment will be damaged.
QUICK AUTO RECORD
When in DTV,press
press it again to stop.
button on the remote control to start quick recording directly,
Manual Record
RECORD MENU
1.You can press PVR-MENU button to enter
the record menu, and you will see the window
just as the left picture.
2.In this interface,you can press / buttons
to select any your desired option, then press
ENTER button to enter the detailed setting
menu.
RECORD START
FILE MANAGER
DEVICE LIST
SUBSCRIBE
TIMESHIFT
MOVE
ADJUST MENU EXIT
File Manager
1. Press / button to select File Manager to enter.
2.In this interface,you can press the colour buttons to execute corresponding operation.
For example: Press Red button to play the selected file.
Press Green button to delete the selected file.
Press Yellow button to delete all files.
Press Blue button to zoom in/out the selected picture.
S
Ro H
27
6
DTV Record and Mutimedia
6.1 DTV (Digital TV) Record Function
Device List
1. Press / button to select Device List to enter.
2.In this interface,you can press the colour buttons to execute corresponding operation.
SUBSCRIBE
Wakeup Timer
Timer NO.
1
Off
Timer Mode
Once
Once
Wakeup Channel
BBC TWO
Daily
wakeup Date
06/10/2008
Weekly
On Time
10:54
Duration
30:00
MOVE
MOVE
ENTER SAVE
1. Press / button to select REC.PROG to enter.
2.In this interface,you can set the timer recording corresponding items.
Timer NO. : To set the channel number of recording program.
Timer Mode : To select the timer mode: Off,Once,Daily,Weekly.
Wakeup Channel: To select the channel you want to record.
Wakeup Date: To select the date you want to record.
On Time: To set the recording beginning time.
Duration: To set the recording duration time.
Note:
If there is 1 minute left for the set timer recording, the following indications will appears:
1.When in power on and DTV mode, the indication " prepare to record " will appears on the
screen.
2.When in power on and not DTV mode, the unit will switch to DTV mode, then the indication
" prepare to record " will appears on the screen.
3.When in standby mode, the unit will switch on DTV mode.
S
Ro H
28
6
DTV Record and Mutimedia
6.1 DTV (Digital TV) Record Function
How to use TIMESHIFT
RECORD MENU
1.Press PVR-MENU button to enter the RECORD
MENU,and you can select TIMESHIFT item.
Press ENTER to begin to record.
RECORD START
FILE MANAGER
DEVICE LIST
SUBSCRIBE
TIMESHIFT
MOVE
ADJUST MENU EXIT
When you enter into TIMESHIFT item,the upper and left corner of the screen will give a cue
:prepare to timeshift, then appears : Timeshifting.
It begin to record the program via the USB devices( This record memory is temporary, once
you remove the USB device, the memory will be lost.) . Press DISPLAY button,you can see
the current recording process.
SZTVM04
560
(MB)
00:10:10 / Manual
A example of above picture :
SZTVM04 : the current channel
00 :10 :10/manual : having recorded time
560MB : the capacity of the USB device is left.
2. After a period of recording time, press the
button to begin to timeshift , which can
Choose FRX2, FRX4, FRX8, FRX20, Play. Then you also can press
button to F.F
timeshift, which can choose FFX2, FFX4, FFX8, FFX20, Play.
FRX2, FRX4, FRX8, FRX20 : select to set the FR speed.
FFX2, FFX4, FFX8, FFX20 : select to set the FF speed.
Play : select to stop timeshift to begin to play .
You also can press
to play,press it again to pause.
Press DISPLAY button, you can see the timeshift process.(see the below picture)
SZTVM04
540
(MB)
00:15:10 / Manual
Note: Using the TIMESHIFT function must be under the DTV playing mode.
S
Ro H
29
6
DTV Record and Mutimedia
6.2 Multimedia files Playback
When press " SOURCE " button to select MEDIA,plug USB disk,you can play the multimedia
files like movie,audio,photo files.
Music
/USB/Music
001
Forgive me.mp3
002
A change.mp3
003
In my head.mp3
Move ENTER Select
Exit Exit
S
Ro H
30
7
DVD player
7.1 Brief DVD introduction
The DVD disk is known for its large memory and its great sound/video system. Its
memory is of 4.7 Gb to 17 Gb,which is about 7/26 times more than a typical CD.
Comparision between the DVD and other CD
Recording
system
Single
face
1 part
4.7Gb
Capacity
Time
DVD
SVCD
VCD
Digital
Digital
Digital
Digital
650MB
650MB
650MB
Single
face
2 part
8.5Gb
Single
face
1 part
9.4Gb
Single
face
2 part
17Gb
133min 242min 266min 484min
Diameter
Resolution
12CM
Several
Sub-title
32 types
Volume
45min
74min
74min
12CM
12CM
12CM
350 lines or more 250 lines or more
500 lines or more
Aspect
CD
48KHz,96KHz/16,20,24bit
44.1KHz
44.1KHz / 16bit
Specific functions
Several languages and sub-titles
The DVD supports different languages and 32 sub-title languages
Several angles
The DVD supports different video camera angles
Chapters,parts
The user can directly select the desired chapter.
Several display options
The user can select the type of display desired
TV SCREEN
IMAGES
4:3
Pan-Scan
Letterbox
16:9
4:3
16:9
S
Ro H
31
7
DVD player
7.2 DVD panel definition
1
2
3
SD/MS/MMC
DVD
5
4
1
EJECT
Press this button to eject disc from DVD loader.
2
PLAY/PAUSE
Press this button to start playing the movie or pause the playback.
3
STOP
4
Card Reader
Support the SD/MS/MMC 3 kinds of memory cards
5
DVD loader
When loading the disk into slot in DVD loader, be sure the disk placed in right
side and direction.
S
Ro H
32
7
DVD player
7.3 DVD playback
NO DISC
1
Press “source”switch to DVD
OPEN
2
3
If there is no disk in the tray, it
will show”no disk” on the
screen
Load the disc into slot-in loader
5
PAUSE
PLAY OR ENTER
PLAY
PREVIOUS
PLAY
2X
NEXT
NEXT
PREV
2X
FAST FORWARD
F.F
FAST REVERSE
F.R
S
Ro H
33
7
DVD player
7.4 DVD operation
When loading a DVD into player slot, the player will automatically adapt to the type
of media, and plays it automatically.
Basic functions are refer to the aboves for CD/MP3 disk.
ZOOM function
Press ZOOM key several times to zoom in or out the picture,
the movie will be zoomed for
ZOOM 2, ZOMM 3, ZOOM 4 and resume playback.
REPEAT function
Press the key REPEAT to repeat the current chapter, title or
whole disc, Press the key several times to select the
“REPEAT” mode wanted. To resume, press the key one more
time.
Depending on the type of the media played, the following
information appear.
A-B function
This key allows you to repeat a section between point (A) and point B.
Press this key once to start A and a second time to select (B). The selected section will play
random until you press the key one more time to stop it .
S
Ro H
34
7
DVD player
7.4 DVD operation
SUBTITLE function
Press the key to change the subtitle languages and switch
off the subtitle.
Note: to have the subtitle in display, which should be on the
disc, check the subtitle list available on the cover of the film.
ANGLE function
On a DVD, particular scenes of the movie may be recorded
by the srudio from various points of views, which you can
select. If this option is available on the disc, it is shown on
the DVD cover.
TO select it, press the ANGLE key.
AUDIO function
Press the key to change the languages and audio track,
there can be 8 different languages or audio in it.
Note: The audio and languages available are named on the
cover of the film.
Information display on screen (DISPLAY)
During playback, press DISPLAY to show the current
playback status.
Press the key again to switch another information bar then
turn off the message window.
S
Ro H
35
7
DVD player
7.5 DVD Setup menu
General setup page
TV display
You can adjust the screen format (aspect ratio) according to the type of TV that you use.
4:3 Panscan: The central section of anamorphic widescreen images is visible on a 4:3 TV,
but the left and right edges are truncated.
4:3 Letterbox: Anamorphic widescreen images are visible in their entirety on a 4:3 TV, but
there are black bands at the top and bottom of the screen.
16:9 : Select this option if you are connecting the player to a widescreen TV. However , you
will not be able to view DVDs recorded in 4:3 as complete 16:9 images even if you select this
option.
Angle Mark:Allow you to enable or disable the Angle Mark function ON or OFF.
OSD Language
Selct your preferred language for the onscreen display and setup menu.
Screen Saver
ON:
If the player remains idle for more than a few minutes, an animated image (known as a
screensaver ) is displayed.
The purpose of this function is to protect your TV screen.
OFF:
If you disable this option, the player will not display the screensaver image.
Note: The player automatically disables the screensaver function during playback.
Last Memory
ON:
Press open button when you watch a DVD, it can play go on to the broken segment if you
close the player.
OFF:
No memory function;
Aduio page
Speaker setup page
Downmix:
The player can mix multichannel audio in order to code it as two-channel audio.
This option is known as “ downmixing”.
LT/RT:
Dolby Pro Logoc Surround stereo audio output. This matrix-based coding process enables
stereo audio tracks to carry four channels (left, center,right and surround) of audio data.
Stereo:
Analog stereo audio output. The player sends the subwoofer and speech signals to your front
right and front left speakers.
S
Ro H
36
7
DVD player
7.5 DVD Setup menu
Dolby page
Dolby digital setup
Dynamic: This section on dynamic compression applies only to DVDs that use the Dolby
Digital technique.
Set to OFF: Low-frequency audio signals are amplified to increase the audio volume.
Set between FULL and OFF: Audible sounds at the extremes of the Dolby Digital audio
spectrum are compressed.
Preferences page
TV Type: Allow you to set the video system :PAL/AUTOI/NTSC
Audio: Selects the preferred language for DVD soundtracks.
1) The selected language is assigned high priority and can therefore be adopted
automatically when the player begins playing a disc.
2) Languages vary between discs, depending on the DVD.
You can also select alternative languages by pressing the AUDIO button on the remote
control handset.
Subtitle: Selects the preferred language for subtitles recorded on DVDs.
1) The selected subtitle language is assigned high priority and can therefore be adopted
automatically when the player begins playing a disc.
2) Subtitles vary between discs, depending on the DVD.
You can also select alternative subtitle languages by pressing the SUBTITLE button on the
remote control handset.
Disc Menu:
Selects the preferred language for the disc menu recorded on the DVD. This choice varies
between DVDs.
Parental:
It is possible to restrict playback of certain DVDs to a certain level of user, based on their
age, for example. Certain scenes can be blocked or replaced with different scenes. The
"Parental Control" function lets you set the access control level. This function is passwordprotected.
1) Move the cursor over "Parental". The current restriction level is displayed on the right.
2) If you want to change the restriction level, simply press PLAY to open the corresponding
/
menu. Then use the
buttons to select a different access restriction level and press
PLAY to confirm.
3) The player asks you to enter a password if you have enabled "PASSWORD" mode.
4) Enter a Four-digit password using the number buttons. Press PLAY to confirm.
5) End.
Notes:
If you play discs that do not support the Parental Control function, the player cannot restrict
access to the disc.
S
Ro H
37
7
DVD player
7.5 DVD Setup menu
Password setup:
Password Mode:
ON: The player prompts you to enter the password whenever you alter the parental control
level.
OFF: You can change the parental control level without entering the password.
Change password:
Move the cursor over the "Change" menu option.
Press PLAY. The Change Password menu is displayed.
You must first enter the old password (the default
password is 8888). Provided the old password is entered
correctly, you can then change it by entering a new one.
Old Password
New Password
Confirm PWD
OK
Default
Restores the player's factory settings.
7.6 SD/MMC/MS Operation
SD/MMC/MS Operation
First please insert the SD/MMC/MS. Under the DVD Source, press the "Media"button, and
select "card", then press "ENTER", the TV starts to recognize the card. After recognization, it
display the card types. SD and MMS display "SD" , MS display "MS". Then Press "ENTER", it
starts to read the cards. After reading , please select the file that need to be played. Press
"ENTER " to start playing .
Attention: support *.mp3, *.jpg, *.avi, *.mpg1/2/4. But the Bit Rate is less than 5Mbps .
S
Ro H
38
8
SUGGESTION
Suggestion
- Trouble shooting guide:Before you arrange for service.
No sound or picture
Normal picture but no sound
Check that the mains lead has been connected to a wall socket.
Check that you have pressed the POWER button.
Check the picture contrast and brightness settings.
Check the volume.
Check the volume.
Check whether the MUTE button has been pressed on the remote
control.
No picture or black and white
picture
Adjust the colour settings.
Check that the broadcast system selected is correct.
Sound and picture
interference
Try to identify electrical appliance that is affecting the set and move it
further away.
Plug your set into a different mains socket.
Blurred or snowy picture,
distorted sound
Check the direction,location and connections of your aerial.
This interference occurs often due to the use of an indoor aerial.
Check the batteties in the remote control. They may need replacing.
Remote control malfunctions. Operate the remote control at a distance of no more than 8 meter.
Clean the upper edge of the remote control(transmission window) .
Remove batteries and hold down one or more buttons for several minutes
drain the microprocessor inside the remote control to reset it. Reinstall
batteries and try to operate the remote control again.
" No signal " message is
displayed.
Check that the signal cable is firmly connected to the PC. Check that the
PC is turned on.
In PC mode, " Mode Not Supported Check the maxinum resolution and the frequency of the video adapter.
" message is displayed.
Compare these values with the data in the Display modes.
No HDMI output.
Disc does not play
Check the video output is HDMI enabled.
Check the connection between the TV and the HDMI jack of video input.
Make sure that the disc is not dirty or scratched.
Clean the disc.
Ensure that the disc is installed with the label side facing
towards you.
S
Ro H
39
9
PRODUCT SPECIFICATION
Specifications 16 " /19 " /20 " LCD TV
16 " LCD TV
19 " LCD TV
20 " LCD TV
Active Area
353.45(H)x198.72(V)mm
408.24(H)x225.15(V)mm
433.61(H)x249.41(V)mm
Number of Pixels
1366x768
1440x900
1366x768
Viewing Angle
90(H) /60 ( V )
170 (H) /160 ( V )
170 (H) /160 ( V )
Respond Time
8 ms
5 ms
8 ms
1.Display panel
Lamp Life Time
50,000 hours
Display Colors
16.7M colors
2.Power
Input Voltage
AC 100V-240V 50Hz/60Hz
Operation Mode
35 W
45 W
45 W
1W
Standby Power Consumption
3.Connector
TV
PAL B/G D/K I, SECAM D/K L L’ BG
USB2.0
1
S-Video
1
SCART
1
Video in
RCA X 1
Audio out
AUDIO OUT
Analog RGB
D-sub 15 pin type
HDMI
1
1
4.Compatibility
Color System
NTSC/PAL/SECAM
PC
VGA/SVGA/XGA/SXGA
Scanning Format
480i/480p/576i/576p/720p/1080i
5.Built-in Speaker
5Wx2
4.65Kg
6.Net Weight
2.9Kg
7.Dimension of the Unit
400x160x315 mm
8.Work Temperature
5 C~35 C
9.Work Humidity
20%~80%
10.Storage Temperature
-15 oC~45 oC
11.Storage Humidity
10%~80%
o
466x180x375mm
5.05Kg
534x196x397mm
o
--Features and specifications are subject to change without notice.
--Weight and dimensions are approximate.
--All trademarks and registered trademarks are the property of their respective owners. All rights
reserved.
S
Ro H
40
Disposal of old electrical appliances
The European directive 2002/96/EC on Waste Electrical and
Electronic Equipment (WEEE), requires that old household
electrical appliances must not be disposed of in the normal
unsorted municipal waste stream. Old appliances must be
collected separately in order to optimize the recovery and
recycling of the materials they contain, and reduce the impact on
human health and the environment.
The crossed out “wheeled bin” symbol on the product reminds you
of your obligation, that when you dispose of the appliance, it must
be separately collected.
Consumers should contact their local authority or retailer for
information concerning the correct disposal of their old appliance.
In order to fulfill ruling UNE EN-60065, we indicate that if the
flexible wire is damaged, it can only be substituted by a technical
service recognized by NEVIR, S.A., as per special tooling is
required.
S
Ro H
DECLARACIÓN DE CONFORMIDAD
NEVIR, S.A. declara bajo su responsabilidad que el aparato indicado
cumple los requisitos de las siguientes directivas:
DIRECTIVA EMC
EN 55013:2001+A1:2003+A2:2006
LOW VOLTAGE DIRECTIVA EEC
EN 60065:2002+A1:2006
EN 55020:2007
EN 55022:2006+A1:2007
EN 55024:1998+A1:2001+A2:2003
EN 61000-3-2:2006
EN 61000-3-3:2008
Descripciones del aparato:
Modelo NEVIR:
NVR-7027TDTG-16N
NVR-7060TDTG-19N
NVR-7046TDTG-20N
NVR-7028TDTG-16B
NVR-7061TDTG-19B
NVR-7047TDTG-20B
TV LCD TDT DVD y USB grabador
Importador: NEVIR, S.A .
Dirección del importador:
NEVIR, S.A.
C/ ALFONSO GOMEZ, 40
MADRID 28037
ESPAÑA
S
Ro H