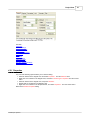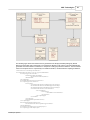
1
MDG Integration for Visual
Studio 2005
Welcome to the MDG Integration for Visual Studio 2005. The MDG Integration for Visual Studio
2005 taskes the high-level modeling power of Enterprise Architect and the Unified Modeling
Language and directly integrates it with Visual Studio .NET 2005
© Copyright 2005 Sparx Systems
MDG Integration for Visual Studio 2005
Introduction
by Tom O'Reilly
MDG Integration for Visual Studio 2005 takes the
high-level modeling power of Enterprise Architect
and the Unified Modeling Language, and directly
integrates it with Visual Studio .NET 2005
MDG Integration for Visual Studio 2005
© 2005 Sparx Systems
All rights reserved. No parts of this work may be reproduced in any form or by any means - graphic, electronic, or
mechanical, including photocopying, recording, taping, or information storage and retrieval systems - without the
written permission of the publisher.
Products that are referred to in this document may be either trademarks and/or registered trademarks of the
respective owners. The publisher and the author make no claim to these trademarks.
While every precaution has been taken in the preparation of this document, the publisher and the author assume no
responsibility for errors or omissions, or for damages resulting from the use of information contained in this document
or from the use of programs and source code that may accompany it. In no event shall the publisher and the author be
liable for any loss of profit or any other commercial damage caused or alleged to have been caused directly or
indirectly by this document.
Printed: November 2005
Publisher
Sparx Systems
Managing Editor
Geoffrey Sparks
Technical Editors
Tom O'Reilly, Evan Sparks
Special thanks to:
All the people who have contributed suggestions, examples, bug
reports and assistance in the development of EA over the last six
years. The task of developing and maintaining this tool has been
greatly enhanced by their contribution.
I
MDG Integration for Visual Studio 2005
Table of Contents
Foreword
1
Part I Introduction
3
1 Copyright Notice
................................................................................................................................... 3
2 License Agreement
................................................................................................................................... 4
3 Usage
................................................................................................................................... 6
Part II Getting Started
9
1 Multiple Linkings
................................................................................................................................... 9
2 Adding an .EAP
...................................................................................................................................
file
9
Attach Existing
.......................................................................................................................................................... 10
New Model .......................................................................................................................................................... 10
Server Repository
.......................................................................................................................................................... 11
Part III Start Using UML 2.0
13
1 Model Page ................................................................................................................................... 13
Hyperlinks .......................................................................................................................................................... 14
View UML diagrams
.......................................................................................................................................................... 15
2 Search Tool ................................................................................................................................... 15
3 Edit UML diagrams
................................................................................................................................... 16
4 New Packages
................................................................................................................................... 17
5 Editing Diagrams
................................................................................................................................... 17
Part IV Project View
19
1 Diagram Properties
................................................................................................................................... 19
Set Appearance
..........................................................................................................................................................
Options
19
Visible Class
.........................................................................................................................................................
Members
20
2 Element Properties
................................................................................................................................... 20
Properties .......................................................................................................................................................... 21
General Settings
.......................................................................................................................................................... 22
Advanced Settings
.......................................................................................................................................................... 23
Requirements.......................................................................................................................................................... 24
External Requirements
.......................................................................................................................................................... 25
Constraints .......................................................................................................................................................... 25
Links
.......................................................................................................................................................... 26
Scenarios
.......................................................................................................................................................... 27
Associated Files
.......................................................................................................................................................... 28
Boundary Element
..........................................................................................................................................................
Settings
29
Tagged Values
.......................................................................................................................................................... 30
Tag Management
......................................................................................................................................................... 31
Fast Tagged
.........................................................................................................................................................
Values
32
Object Classifiers
.......................................................................................................................................................... 33
Using Classifiers
......................................................................................................................................................... 33
© 2005 Sparx Systems
Contents
Part V Project Discussion Forum
II
36
1 Forum Usage................................................................................................................................... 36
Adding a New..........................................................................................................................................................
Category
36
Adding a New..........................................................................................................................................................
Topic
37
Adding a New..........................................................................................................................................................
Post
37
Replying to a ..........................................................................................................................................................
Post
37
Editing a Post.......................................................................................................................................................... 37
2 Message Dialog
................................................................................................................................... 37
Part VI XML Technologies
40
1 XML Schema...................................................................................................................................
(XSD)
40
Model XSD .......................................................................................................................................................... 40
UML Profile
.........................................................................................................................................................
for XSD
42
XSD Datatypes
.........................................................................................................................................................
Package
49
Abstract XSD
.........................................................................................................................................................
models
49
Map UML to XSD
......................................................................................................................................... 51
Generate XSD.......................................................................................................................................................... 52
Import XSD .......................................................................................................................................................... 52
2 Web Services
...................................................................................................................................
(WSDL)
52
Model WSDL .......................................................................................................................................................... 52
Generate WSDL
.......................................................................................................................................................... 53
Import WSDL.......................................................................................................................................................... 53
Part VII Working with Code
56
1 Reverse Engineering
................................................................................................................................... 56
Import Directory
.......................................................................................................................................................... 56
Import Binary.......................................................................................................................................................... 58
2 Model Driven...................................................................................................................................
Transformation
58
Part VIII Generating Documentation
62
1 RTF Documents
................................................................................................................................... 62
RTF Dialog Options
.......................................................................................................................................................... 63
RTF Document
..........................................................................................................................................................
Options
64
RTF Templates
..........................................................................................................................................................
Dialog
65
RTF Template
.........................................................................................................................................................
Editor
66
Select Model
.........................................................................................................................................................
Elements
66
Adding Content
......................................................................................................................................................... 66
Tabular Sections
......................................................................................................................................................... 67
Child Sections
......................................................................................................................................................... 67
RTF Commands
......................................................................................................................................................... 67
Scrolling through.........................................................................................................................................
text
68
File and Print Options
......................................................................................................................................... 68
Line Editing
......................................................................................................................................... 70
Block Editing ......................................................................................................................................... 70
Clipboard
......................................................................................................................................... 71
Image / Object Imports
......................................................................................................................................... 72
Character Formatting
......................................................................................................................................... 73
Paragraph Formatting
......................................................................................................................................... 74
Tab Support
......................................................................................................................................... 76
© 2005 Sparx Systems
II
III
MDG Integration for Visual Studio 2005
Page Breaks ......................................................................................................................................... 76
Header/Footers ......................................................................................................................................... 77
Table Commands
......................................................................................................................................... 77
Sections and Columns
......................................................................................................................................... 78
Stylesheets & TOC
......................................................................................................................................... 79
Frame & Drawing
.........................................................................................................................................
Objects
80
View Options ......................................................................................................................................... 81
Navigation Commands
......................................................................................................................................... 81
Search and Replace
......................................................................................................................................... 82
Highlighting
......................................................................................................................................... 83
Part IX Import Database Schema
85
1 Select a Data...................................................................................................................................
Source
86
2 Select Tables................................................................................................................................... 86
3 Imported Class
...................................................................................................................................
Elements
87
Part X Advanced Features
89
1 Baselines and
...................................................................................................................................
Differences
89
Baselines
.......................................................................................................................................................... 89
Managing.........................................................................................................................................................
Baselines
90
Creating Baselines
......................................................................................................................................................... 91
The Compare..........................................................................................................................................................
Utility (Diff)
91
Deep Compare
.......................................................................................................................................................... 92
Example Comparison
.......................................................................................................................................................... 92
2 Validate Model
................................................................................................................................... 92
Model Validation
.......................................................................................................................................................... 93
Configuring
.........................................................................................................................................................
Validation
93
Rules Reference
......................................................................................................................................................... 93
Well-Formedness
......................................................................................................................................... 94
Element Composition
......................................................................................................................................... 94
Property Validity......................................................................................................................................... 95
OCL Conformance
......................................................................................................................................... 95
Index
97
© 2005 Sparx Systems
Foreword
Foreword
MDG Integration for Visual Studio 2005 takes
the high-level modeling power of Enterprise
Architect and the Unified Modeling Language,
and directly integrates it with Visual Studio
.NET 2005
© 2005 Sparx Systems
1
Part
I
Introduction
3
1 Introduction
Welcome to the Enterprise Architect MDG Integration for Visual Studio 2005. This set of tools takes the
high-level modeling power of Enterprise Architect and the Unified Modeling Language, and directly integrates
it with Visual Studio .NET 2005
At a glance:
· Provide the UML Analyst/Designer/Architect with the tools to build detailed and precise UML 2.0 models
· Give the Visual Studio developer focused access to UML model content
· Offer the development team strong traceability features, from requirements to model, to code, to tests and
finally to deployed artifacts
· Increase productivity by linking UML models to Domain Specific Language (DSL) tools and artifacts
1.1 Copyright Notice
Copyright © 1998-2005 Sparx Systems Pty. Ltd. All rights reserved.
The software contains proprietary information of Sparx Systems Pty Ltd. It is provided under a license
agreement containing restrictions on use and disclosure and is also protected by copyright law. Reverse
engineering of the software is prohibited. Please read the license agreement for full details.
Due to continued product development, this information may change without notice. The information and
© 2005 Sparx Systems
4
MDG Integration for Visual Studio 2005
intellectual property contained herein is confidential between Sparx Systems and the client and remains the
exclusive property of Sparx Systems. If you find any problems in the documentation, please report them to
us in writing. Sparx Systems does not warrant that this document is error-free. No part of this publication
may be reproduced, stored in a retrieval system, or transmitted in any form or by any means, electronic,
mechanical, photocopying, recording or otherwise without the prior written permission of Sparx Systems.
Licensed users are granted the right to print a single hardcopy of the user manual per licensed copy of the
software, but may not sell, distribute or otherwise dispose of the hardcopy without written consent of Sparx
Systems.
Sparx Systems Pty. Ltd.
7 Curtis St,
Creswick, Victoria 3363,
AUSTRALIA
Phone: +61 (3) 5345 1140
Fax: +61 (3) 5345 1104
Support Email: [email protected]
Sales Email: [email protected]
Website: www.sparxsystems.com.au
Visual Studio .NET 2005 is copyright (C)2005 Microsoft
website: msdn.microsoft.com/vstudio/
1.2 License Agreement
SOFTWARE PRODUCT LICENSE AGREEMENT
MDG Integration for Visual Studio 2005 Copyright (C) 1998-2005 Sparx Systems Pty Ltd. All Rights
Reserved
IMPORTANT-READ CAREFULLY: This End User Licence Agreement ("EULA") is a legal agreement
between YOU as Licensee and SPARX for the SOFTWARE PRODUCT identified above. By installing,
copying, or otherwise using the SOFTWARE PRODUCT, YOU agree to be bound by the terms of this
EULA. If YOU do not agree to the terms of this EULA, promptly return the unused SOFTWARE PRODUCT
to the place of purchase for a full refund.
The copyright in the SOFTWARE PRODUCT and its documentation is owned by Sparx Systems Pty Ltd
A.B.N 38 085 034 546. Subject to the terms of this EULA, YOU are granted a non-exclusive right for the
duration of the EULA to use the SOFTWARE PRODUCT. YOU do not acquire ownership of copyright or
other intellectual property rights in any part of the SOFTWARE PRODUCT by virtue of this EULA.
Your use of this software indicates your acceptance of this EULA and warranty.
DEFINITIONS
In this End User Licence Agreement, unless the contrary intention appears,
"ACADEMIC EDITION" means an edition of the Software Product purchased for educational purposes at
an academic discount price.
"EULA" means this End User Licence Agreement
"SPARX" means Sparx Systems Pty Ltd A.B.N 38 085 034 546
"Licensee" means YOU, or the organisation (if any) on whose behalf YOU are taking the EULA.
"Registered Edition of MDG Integration for Visual Studio 2005" means the edition of the SOFTWARE
PRODUCT which is available for purchase from the web site:
<http://www.sparxsystems.com.au/ea_purchase.htm>. following the thirty day free evaluation period.
"SOFTWARE PRODUCT" or "SOFTWARE" means MDG Integration for Visual Studio 2005, which
includes computer software and associated media and printed materials, and may include online or
electronic documentation.
© 2005 Sparx Systems
Introduction
5
"Support Services" means email based support provided by SPARX, including advice on usage of MDG
Integration for Visual Studio 2005, investigation of bugs, fixes, repairs of models if and when appropriate
and general product support.
"SPARX support engineers" means employees of SPARX who provide on-line support services.
"Trial edition of MDG Integration for Visual Studio 2005" means the edition of the SOFTWARE
PRODUCT which is available free of charge for evaluation purposes for a period of 30 days.
GRANT OF LICENCE
In accordance with the terms of this EULA YOU are granted the following rights:
a) to install and use one copy of the SOFTWARE PRODUCT, or in its place, any prior version for the
same operating system, on a single computer. As the primary user of the computer on which the
SOFTWARE PRODUCT is installed, YOU may make a second copy for your exclusive use on either a
home or portable computer.
b) to store or install a copy of the SOFTWARE PRODUCT on a storage device, such as a network server,
used only to install or run the SOFTWARE PRODUCT over an internal network. If YOU wish to increase
the number of users entitled to concurrently access the SOFTWARE PRODUCT, YOU must notify
SPARX and agree to pay an additional fee.
c) to make copies of the SOFTWARE PRODUCT for backup and archival purposes.
EVALUATION LICENCE
The Trial version of MDG Integration for Visual Studio 2005 is not free software. Subject to the terms of
this agreement, YOU are hereby licenced to use this software for evaluation purposes without charge for
a period of 30 days.
Upon expiration of the 30 days, the Software Product must be removed from the computer. Unregistered
use of MDG Integration for Visual Studio 2005 after the 30-day evaluation period is in violation of
Australian, U.S.and international copyright laws.
SPARX may extend the evaluation period on request and at their discretion.
If YOU choose to use this software after the 30 day evaluation period a licence must be purchased (as
described at http://www.sparxsystems.com.au/ea_purchase.htm). Upon payment of the licence fee, YOU
will be sent details on where to download the registered edition of MDG Integration for Visual Studio 2005
and will be provided with a suitable software 'key' by email.
ADDITIONAL RIGHTS AND LIMITATIONS
YOU hereby undertake not to sell, rent, lease, translate, adapt, vary, modify, decompile, disassemble,
reverse engineer, create derivative works of, modify, sub-licence, loan or distribute the SOFTWARE
PRODUCT other than as expressly authorised by this EULA.
YOU further undertake not to reproduce or distribute licence key-codes except under the express and
written permission of SPARX .
If the Software Product purchased is an Academic Edition, YOU ACKNOWLEDGE THAT the licence is
limited to use in an educational context, either for self-education or use in a registered teaching
institution. The Academic Edition may not be used to produce commercial software products or be used
in a commercial environment, without the express written permission of SPARX.
ASSIGNMENT
YOU may only assign all your rights and obligations under this EULA to another party if YOU supply to
the transferee a copy of this EULA and all other documentation including proof of ownership. Your
licence is then terminated.
TERMINATION
Without prejudice to any other rights, SPARX may terminate this EULA if YOU fail to comply with the
terms and conditions. Upon termination YOU or YOUR representative shall destroy all copies of the
SOFTWARE PRODUCT and all of its component parts or otherwise return or dispose of such material in
the manner directed by SPARX.
WARRANTIES AND LIABILITY
WARRANTIES
SPARX warrants that the SOFTWARE PRODUCT will perform substantially in accordance with the
accompanying written materials for a period of ninety (90) days from the date of receipt, and any Support
Services provided by SPARX shall be substantially as described in applicable written materials provided
to YOU by SPARX, and SPARX support engineers will make commercially reasonable efforts to solve
any problems associated with the SOFTWARE PRODUCT.
EXCLUSIONS
© 2005 Sparx Systems
6
MDG Integration for Visual Studio 2005
To the maximum extent permitted by law, SPARX excludes, for itself and for any supplier of software
incorporated in the SOFTWARE PRODUCT, all liability for all claims , expenses, losses, damages and
costs made against or incurred or suffered by YOU directly or indirectly (including without limitation lost
costs, profits and data) arising out of:
YOUR use or misuse of the SOFTWARE PRODUCT;
YOUR inability to use or obtain access to the SOFTWARE PRODUCT;
Negligence of SPARX or its employees, contractors or agents, or of any supplier of software incorporated
in the SOFTWARE PRODUCT, in connection with the performance of SPARX'S obligations under this
EULA; or
Termination of this EULA by either party for any reason.
LIMITATION
The SOFTWARE PRODUCT and any documentation are provided "AS IS" and all warranties whether
express, implied, statutory or otherwise, relating in any way to the subject matter of this EULA or to this
EULA generally, including without limitation, warranties as to: quality, fitness; merchantability;
correctness; accuracy; reliability; correspondence with any description or sample, meeting your or any
other requirements; uninterrupted use; compliance with any relevant legislation and being error or virus
free are excluded. Where any legislation implies in this EULA any term, and that legislation avoids or
prohibits provisions in a contract excluding or modifying such a term, such term shall be deemed to be
included in this EULA. However, the liability of SPARX for any breach of such term shall if permitted by
legislation be limited, at SPARX'S option to any one or more of the following upon return of the
SOFTWARE PRODUCT and a copy of the receipt:
If the breach relates to the SOFTWARE PRODUCT:
the replacement of the SOFTWARE PRODUCT or the supply of an equivalent SOFTWARE PRODUCT;
the repair of such SOFTWARE PRODUCT; or the payment of the cost of replacing the SOFTWARE
PRODUCT or of acquiring an equivalent SOFTWARE PRODUCT; or
the payment of the cost of having the SOFTWARE PRODUCT repaired;
If the breach relates to services in relation to the SOFTWARE PRODUCT:
the supplying of the services again; or
the payment of the cost of having the services supplied again.
TRADEMARKS
All names of products and companies used in this EULA, the SOFTWARE PRODUCT, or the enclosed
documentation may be trademarks of their corresponding owners. Their use in this EULA is intended to
be in compliance with the respective guidelines and licences. Windows, Windows 95, Windows 98,
Windows NT, Windows ME, Windows XP and Windows 2000 are trademarks of Microsoft.
GOVERNING LAW
This agreement shall be construed in accordance with the laws of the Commonwealth of AUSTRALIA.
1.3 Usage
The MDG Integration for Visual Studio 2005 brings together the model-and-design aspects of Enterprise
Architect and the UML with all the power of Visual Studio .NET 2005.
Architects and Engineers can communicate directly and efficiently within the Visual Studio environment,
Engineers can see exactly which project elements they are working on and how they relate to the rest of a
system. Model elements appear in a special EA window within Visual Studio. Navigation from code->model
only takes a mouse-click, and does not require leaving the Visual Studio interface.
An example work flow would go like this:
Architect and designers prepare the model. In this case we will say that the model resides in a central
database. Then, specific coding tasks are assigned to the software engineers. The engineers can view the
model from within Visual Studio .NET. Once assigned a task, an engineer can locate all the model elements
within their task domain, along with any notes made by the Architect.
All the team members involved on the project can use the inbuilt Forum function to swap notes and files. Not
only does this facilitate communication amongst team members, but helps to keep track of progress and
© 2005 Sparx Systems
Introduction
changes to a project.
© 2005 Sparx Systems
7
Part
II
Getting Started
9
2 Getting Started
To link a Visual Studio 2005 solution with an Enterprise Architect model Package, follow these steps:
· Create a new model package in the EA Project View. Give the package a meaningful name.
· Now, link the package to a visual studio project by right clicking on the package and select Current Package
| Link to Visual Studio Project. You will see your currently active solutions in the Connect Project Dialog.
· Select which solution you would like to link with the EA file, and click ok.
When a package has been linked, this status is indicated by a Visual Studio icon next to the package name.
The UML package and the Visual Studio solution are now integrated, allowing you to work using the UML
model and the powerful toolset of Enterprise Architect, all from within Visual Studio .NET
See also Multiple Linkings
2.1 Multiple Linkings
It is possible to link many different Visual Studio projects with multiple UML packages simultaneously.
Right click on the Package in the Project View and select Current Package | Import Visual Studio Projects.
Clicking on Ok will then reverse engineer the project(s).
Once the Integration Environment has successfully imported and linked the projects, you will be able to view
them in the Enterprise Architect Project View.
2.2 Adding an .EAP file
Adding an .EAP File
To use the MDG Integration for Visual Studio, you will need to attach an Enterprise Architect model to your
solution. Once you have attached a model you can link your Visual Studio 2005 Project(s) to UML Packages.
To add an Enterprise Architect Model into the Visual Studio 2005 solution as a new solution item, simple right
click on the solution and select Attach UML Model. You will then be presented with the "Attach a UML Model to
Solution Dialog".
To select a model, you have one of three options:
1. Attaching an Existing Model
2. Creating a new Model
3. Connect to a Server Repository
© 2005 Sparx Systems
10
MDG Integration for Visual Studio 2005
Details:
Attaching an Existing Model
Creating a new Model
Connecting to a Server Repository
2.2.1 Attach Existing
Attach Existing
When you select the attach existing Model option, you are presented with a "Select the name and location of
the EA model" dialog. Browse your local or networked file system and select the .EAP file you wish to attach
then click Open.
Once your EAP has been added you will be able to view it under the "Solution Items" in the "Solution
Explorer". You will also notice a new view has been added to your view tab - the "EA Model View".
2.2.2 New Model
Create a new Model
This option is used if you do not have an existing Enterprise Architect UML model, and whish to start building
with Visual Studio 2005 and the MDG integration.
When you select Create a New Model and click OK, you will be presented with the "Select the name and
location of the EA model" dialog. Browse to the position in the file system you wish to store your new EAP file,
and give it a name:
Once your EAP has been added you will be able to view it under the "Solution Items" in the "Solution
© 2005 Sparx Systems
Getting Started
11
Explorer". You will also notice a new view has been added to your view tab - the "EA Model View".
2.2.3 Server Repository
Connecting to a Server Repository
This option is used if you have an existing Enterprise Architect UML model stored on a SQL Server or other
DBMS, and whish to start using that model with Visual Studio 2005 and the MDG integration.
When you select Create a New Model and click OK, you will be presented with the "Select the name and
location of the EA model" dialog. Browse to the position in the file system you wish to store your new EAP file,
and give it a name:
Note: Make sure you have your data source defined in your system data sources first. In this example we will
connect to a MySQL database.
Once you click save you will be presented with the Data Link Properties Dialog. Select the Connection Tab
and drop down the data source names.
Enter in the username and password for the database (if required) and click the OK button. If the connection
settings are ok you will receive the Connection Name & Type . Enter a name you wish to call the link and click
OK.
Once your EAP has been added you will be able to view it under the "Solution Items" in the "Solution
Explorer". You will also notice a new view has been added to your view tab - the "EA Model View".
© 2005 Sparx Systems
Part
III
Start Using UML 2.0
13
3 Start Using UML 2.0
Start Using UML 2.0
The MDG Link for Visual Studio .NET comprises of the following main components:
· The Model Page Displays the Diagrams and UML properties of the Elements. Most of the report information
from the MDG Integration for Visual Studio 2005 will be displayed on this page. This page is also used to
access the Search Tool, Forum, and Help using the tabs that appear near the top of the window.
· The Search Tool is used to find UML Elements. Search returns are shown as a report view with clickable
items.
· The Forum Browser gives you the ability to discuss projects using a BBS-style Forum interface from within
Visual Studio .NET
· The EA Project View shows each of the UML Elements, packages and diagrams in a hierarchical view.
· Help - Access to the HTML based help for quick reference.
To activate the components once you have installed the MDG integration, simply go to the View menu within
Visual Studio .NET, and select Enterprise Architect.
To begin using the UML elements in Visual Studio, you must first link a Model file into Visual Studio, and
assign it to a Visual Studio solution. See Linking To a Model Package for instructions on how to do this.
This will activate the two Enterprise Architect interface components - The EA Diagram View and the EA
Project view.
The EA Project View contains an explorer style representation of the UML model in the form of a tree. As you
can see below it lists the UML Packages, Diagrams, Elements, Attributes and Methods.
If you double-click an Element in the project view its contents will be displayed in the diagram view.
3.1 Model Page
This page shows the currently selected model element or diagram.
In the top left corner of the window is displayed the element name. Use the expand/collapse twisties next to
the name to show more detail about the current element, such as creation and modified dates.
© 2005 Sparx Systems
14
MDG Integration for Visual Studio 2005
s
· Clicking on an element in the diagram expands that element. For instance, clicking on a package in a
diagram will expand the view to show the contents of that package.
· Clicking on a class element will take you to the class browser interface which shows the attributes,
operations, and associations of that class.
For each element that you display in the EA Diagram View, you can also see its Attributes, Operations,
Tagged Values & Associations - both To and From.
Additional information can be seen by expanding the twisties for Project and Advanced, including ID numbers
and versioning.
3.1.1 Hyperlinks
Navigating Hyperlinks
Within the EA Diagram View, you are able to navigate between diagrams and sections using the hyperlinks,
Below you can see the Associations From tab, here Transaction is hyperlinked.
If we now click the Transaction Hyperlink, it will take us to the Transaction class page. For arguments sake we
can now select the Associations To tab and see the link back to the Account class. This simple navigation is
not unfamiliar to webpage navigation.
© 2005 Sparx Systems
Start Using UML 2.0
15
3.1.2 View UML diagrams
Using the hyperlinks in the diagram view, you can also navigate to view the UML models themselves. To do
this, click on the Diagrams hyperlink. In this case it is WindowsApplication1
From the above image click on the WindowsApplication1 Hyperlink to get the corresponding UML diagram.
You can also add your elements into new Visual Studio Class diagram. This is done by right clicking on an
Element inside a linked folder, and selecting the View Class Diagram option.
You will notice you can view the details of the Class including its Attributes and Methods, all taken from
Enterprise Architect.
3.2 Search Tool
The Search Tool is a convenient way of locating elements of a model. The user may search on a range of
criteria, from element name, type, and scope to element connections, or status within a project
(work-in-progress, completed, etc.)
© 2005 Sparx Systems
16
MDG Integration for Visual Studio 2005
To begin a search, bring up the search page by clicking on the Search tab. In the Search Terms input box,
enter the term(s) you wish to search for, and then click on Run Search.
Each of the returned results can be clicked on and Visual Studio will navigate to the respective item, similar to
the hyperlinks.
You also have the ability to specify what columns will be returned. Click on the Columns button to display a list
of the information that will be returned. To turn a column on or off, simple check or uncheck the box next to the
column title.
3.3 Edit UML diagrams
Edit UML diagrams
The Editing of the UML elements is also possible from the Class diagram. To bring up the UML properties
simply right click on the element in the EA Project View and select Properties. Modifying any information in the
properties will be automatically reflected in the model over the changes are applied. In this example the Notes
of form1 have been modified.
Now you can see the change reflected in the diagram view below:
© 2005 Sparx Systems
Start Using UML 2.0
17
For a full listing on the each of the property tabs, please see here.
3.4 New Packages
Add New Package
Enterprise Architect for Visual Studio 2005 also lets you add new elements and packages to the model. To
start, select the package you wish to create your new package under. We will use the Design Model package
shown below. Right click and select Add | New Package then give it a relevant name.
Now we can right click on the newly created package and select Add | New UML Element. The Insert New
Element dialog will be be displayed. In this example case we will select the Type as UseCase and we will give
it a name of Use Case 1.
Checkboxes:
Open Properties Dialog on Creation - Use this option if you wish to tailor your elements information.
Close Dialog on OK - Closes the Insert New Element Dialog when the OK button is clicked, uncheck this
option if you wish add multiple elements in one go.
Add to Current Diagram - Add the newly imported class to the open diagram.
One you click ok you will get the UML Element properties window. For more information on this window, see
here.
3.5 Editing Diagrams
You can easily edit the UML diagrams in your project by right clicking on an Element, Package or Diagram and
selecting Open in Enterprise Architect.
We can now see and edit the diagram within EA:
You can add new elements and give them their own attributes, operations, types etc. and customize / arrange
them.
When you are finished, Simply click the Close EA button to return to your project where you can access the
modified UML diagram and the modified class with their new elements and attributes etc..
© 2005 Sparx Systems
Part
IV
Project View
19
4 Project View
The Enterprise Architect Project View helps you navigate your UML diagram from within Visual Studio .NET.
Right-clicking on an item in the tree will open a context-sensitive menu that allows you to investigate the item
or to perform operations on it. From this Project menu you can also perform other actions such as:
Browse UML
View Properties
Open in Enterprise Architect
XML Services
Code Generation
Model Driven Transformation
4.1 Diagram Properties
Right-Clicking on a diagram in the EA Project View and selecting Properties will bring up the diagram
properties dialog.
From this dialog you can change the Name, Author, Version etc. For a more detailed explanation of this
dialogs functions, please see here.
See Also
Set Appearance Options
Visible Class Members
4.1.1 Set Appearance Options
You can customize the appearance of a diagram in a number of ways. The following options can be set on the
diagram dialog:
Option
Use Stereotype Icons
Show Page Border
Show Table Owner
Use Alias if Available
Hide Property Methods
Hide Collaboration Numbers
Hide Element Stereotype
Hide Qualifiers
Highlight Foreign Objects
Show Package Contents
Show Details on Diagram
Show Sequence Notes
Hide Additional Parents
Hide Relationships
© 2005 Sparx Systems
Description
Toggle the display of stereotype icons in the current
diagram. This only applies to stereotypes with icons
internal to EA, i.e. Analysis stereotypes and
Business Modeling stereotypes.
Show a page border to align elements with.
Displays the Table Owner, more information relating
to this Topic may be found in the Set Table
Properties section.
Use element alias as name if the alias is specified.
Hide the property methods.
Hide numbering in collaboration diagrams.
Hide the element stereotype.
Hide the qualifiers from the current diagram.
Highlight objects from other packages.
Show icons for the contents of packages displayed
in the current diagram.
Show some diagram details in a note on diagram.
Show the Sequence Notes on the current diagram.
Hide the explicit naming of parents in classes and
interfaces.
Hide all relationships in the current diagram.
20
MDG Integration for Visual Studio 2005
Hide Stereotype on Features
Hide Attributes
Hide Operations
Show Tags
Show Requirements
Show Constraints
Show Testing
Show Maintenance
Hide all Stereotypes on features.
Hides the display of Attributes from the
compartment enabled element, for more details see
the Show or Hide Attributes and Operations topic.
Hides the display of Operations from the
compartment enabled element, for more details see
the Show or Hide Attributes and Operations topic.
Show the tag compartment for elements that
support it and have tags.
Shows requirements in compartment enabled
elements in a requirements compartment.
Shows constraints in compartment enabled
elements in a constraints compartment.
Shows test scripts in compartment enabled
elements, for more details see the Show Testing
Scripts topic.
Shows maintenance scripts in compartment
enabled elements, for more details see the Show
Maintenance Scripts topic.
4.1.1.1 Visible Class Members
The visible Class Members section of the diagram properties dialog Appearance Options is used to determine
the visibility of class members and also determine the details shown for parameters. Use the checkboxes to
select the visibility of class members. the options include Public, Protected, Private and Package.
Show Parameter Detail
The Show Parameter Detail dropdown allows the user to control the display of the Parameter details theses
are:
None
Type Only
Full Details
Name Only
No details shown
Shows only the type of parameter.
Shows all of the details for parameters
Shows the name of the parameter only.
4.2 Element Properties
This topic covers element properties and their settings, responsibilities, constraints, links, scenarios, tagged
values, associated files, object files and classifiers and boundary element settings.
© 2005 Sparx Systems
Project View
21
See Also:
Properties
General Settings
Advanced Settings
Requirements
External Requirements
Constraints
Links
Scenarios
Tagged Values
Associated Files
Object Classifiers
Boundary Element Settings.
4.2.1 Properties
Any one of the following options allows you to view this dialog:
· Select an element in the diagram view and select Properties... from the Element menu.
· Right click on an element in the diagram view, and select <element type> Properties from the context
menu.
· Select an element in the diagram view, and press Alt+Enter.
· Double-click on an element in the diagram view.
· Right click on an element in the Project Browser, and select Properties... from the context menu.
Below is the Element Properties dialog:
© 2005 Sparx Systems
22
MDG Integration for Visual Studio 2005
4.2.2 General Settings
General Tab of the Element Properties Settings
Control
Name
Stereotype
Abstract
Author
Status
Scope
Complexity
Alias
Language
Keywords
Advanced button
Phase
Version
Notes
Description
Change the element's name
Select a stereotype for the element (optional)
Check to indicate element is abstract
Enter or select the name of the original author
Indicate the current status of the element (eg. Approved, Proposed...)
Indicate the element's scope (public, private, protected, package)
Indicate the complexity of the element (used for project estimation).
Assign Easy, Medium or Hard
Enter an alias (alternate display name) for the object.
Select the programming language for the object
A free text area that may be filtered in Use Case Metrics and Search
dialogs - typically used for keywords, context information etc.
See Advanced Settings for details
Indicate the phase this element will be implemented in (eg. 1, 1.1, 2.0 ...)
Enter the version of the current element
Enter any free text notes associated with the element
© 2005 Sparx Systems
Project View
23
The General tab of the Element Properties dialog is shown below:
4.2.3 Advanced Settings
Some elements support some additional attributes. These are Generalizable elements - and by pressing
Advanced on the Element Properties dialog you can set the following:
· IsRoot - the element is a root element and may not be descended from another
· IsLeaf - the element is 'final' and may not be a parent for other elements
· IsSpecification - the element is a specification
· IsActive - the element is active - eg. an active class
· Multiplicity - multiplicity setting for the element
© 2005 Sparx Systems
24
MDG Integration for Visual Studio 2005
4.2.4 Requirements
The Require tab of the Element Properties dialog is shown below. Use this page to create requirements that
this element is designed to meet. Requirements are of two types - internal requirements (responsibilities) and
external requirements (system requirements). EA will show both types, but you can only edit the internal type
from this tab.
These form the functional requirements of the system to be built. The meaning of the requirement may vary
depending on which element is the host - for example a business process requirements may mean something
different to a Use Case requirement, which again may mean something different to a Class requirement. Use
these as best suit your needs.
Use the Specify Feature Visibility function to show Requirements for an element on the diagram directly (it is
also possible to show inherited Requirements in this fashion).
Note: External requirements are those linked to this element using a Realization link
Control
Requirement
Type
Status
Difficulty
Priority
Last update
Notes
Defined requirements
Description
Name and high level detail of requirement
Functional, non-functional etc.
Current status of requirement
Complexity of implementing current requirement
How urgent the requirement is
Date of last requirement update
Details of requirement
List of defined requirements associated with element
© 2005 Sparx Systems
Project View
25
4.2.5 External Requirements
External requirements are those requirement elements that have been linked to the current element using a
Realization link. By creating the link from the element to the requirement, the element now has a responsibility
that it must implement as part of the system solution.
In Enterprise Architect, linked requirements are shown in the Require tab of the Element Properties dialog but they are marked external and cannot be directly edited (on selection, the tab fields are grayed out).
Double click an external requirement in the list to activate the Properties dialog for the associated requirement,
where you can view and modify the requirement details and check the requirement hierarchy details.
4.2.6 Constraints
The Constraints tab of the Element Properties dialog is shown below. Elements may have associated
constraints placed on them. These are conditions under which the element must exist and function. Typical
constraints are pre- and post- conditions which indicate things that must be true before the element is created
or accessed and things which must be true after the element is destroyed or its action complete. Use the
Specify Feature Visibility function to show Constraints for an element on the diagram directly (it is also
possible to show inherited constraints in this fashion).
Adding Constraints to a Model Element
To add constraints to a model element, follow the steps below:
1.
Open the Element Properties dialog.
2.
Select the Constraints tab.
3.
Enter constraint details.
© 2005 Sparx Systems
26
MDG Integration for Visual Studio 2005
4.
Enter the Type and the Status.
5.
Enter optional notes.
6.
Press Save.
Constraints are used in conjunction with responsibilities to define the conditions and rules under which an
element operates and exists.
Constraint
Type
Status
Notes
Defined constraint
Details of Constraint
Pre-condition, post-condition or invariant
Current constraint status
Free text notes associated with constraint
List of defined constraints
4.2.7 Links
The Links tab of the Element Properties dialog is shown below. This displays a list of all connectors active for
the current element. You may delete a connector here if required. Using the right click context menu you may
also locate the related element in the Project Browser.
© 2005 Sparx Systems
Project View
Control
Defined Associations
Delete relation button
Object
Type
Connection
27
Description
List of relationships this element has
Delete the selected relation
The element this element is related to
The type of the related element
The relationship type
4.2.8 Scenarios
The Scenario tab of the Element Properties dialog is shown below. A scenario is a real world sequence of
operations that describes how this element works in real-time. It may be applied to any element and can
describe functional behavior, business work flows and end-to-end business processes.
© 2005 Sparx Systems
28
MDG Integration for Visual Studio 2005
Control
Scenario
Type
Notes
Scenario list
Description
Name of scenario
Basic path, alternate path etc.
Textual description of the scenario - usually depicted in steps of how the
user will use the current element
List of defined scenarios
4.2.9 Associated Files
The Files tab of the Element Properties dialog is shown below. An element may be linked to files held
somewhere. Use this tab to set associated files for the current element.
Tip: Linked files are a good way to link elements to additional documentation and/or source code.
Note that you can also insert hyperlinks in diagrams to other files - and launch them directly from the diagram.
This is an alternative method to that described here.
© 2005 Sparx Systems
Project View
Control
File path
Type
Notes
Attached files
Launch
29
Description
Name of file
Local file or web address
Free text about the file
List of file
Open the selected file - local files will open with their default application
and web files will open in the default browser
4.2.10 Boundary Element Settings
A system boundary element is a non-UML element used to define conceptual boundaries. You can use
boundaries to help group logically related elements (from a visual perspective, not as part of the UML model)
Configuring Boundary Elements
Boundary elements may be configured to display in different ways. The main differences are:
· Solid border
· Dotted Border
With horizontal or vertical 'swim lanes' - swim lanes are used to group elements in a vertical or horizontal
context (eg. Client, Application and Database tiers could be represented in swim lanes)
© 2005 Sparx Systems
30
MDG Integration for Visual Studio 2005
4.2.11 Tagged Values
Tagged values are a convenient way of adding additional information to an element outside that directly
supported by UML. The UML provides the Tagged Value element for just this purpose. Often these are used
during code generation or by other tools to pass information or operate on elements in particular ways. For
more information relating to using tags see The Tagged Values Window topic.
Add a Tagged Value
To add a tagged value for an element,use the following the steps :
1.
Ensure the Tagged Values window is open by selecting View |Tagged Values (or press the Ctrl +
Shift + 6 hotkey combination).
2.
Select the element by double clicking on the element in a diagram or on the element in the Project
View.
3.
The Tagged Values window will now have the operation selected, press the New Tag button.
4.
Define the tag in the Tag field (or select a custom defined tag from the drop down list), then add
notes as appropriate to the Note text entry field.
5.
Then press OK the button to confirm the operation.
© 2005 Sparx Systems
Project View
31
Tip: Custom tags may be defined by creating a custom tagged value type for more information refer to
the Creating a Custom Tagged Value Type section.
Tagged Values are the preferred method of extending the code generation capabilities of the CASE tool on
a per element / per language basis. In future, EA will support more tagged values for different languages.
4.2.11.1 Tag Management
Tagged Values can also be managed within a type hierarchy and with respect to element instances. This
additional management is done using the Tag Management dialog.
Using the Tag Management dialog it is possible to:
1.
View tagged values inherited from parent classes or realized interfaces or applied stereotypes.
2.
Override Tagged Values derived from parents or applied stereotypes with a unique value for the
current element.
3.
Delete tagged values from the current element (if a parent version of the Tagged Value exists, it will reappear in the list after the override is deleted).
© 2005 Sparx Systems
32
MDG Integration for Visual Studio 2005
The diagram below illustrates a complex tag hierarchy and the way tagged values can be either inherited or
overridden in specialized classes to create the final tagged property set for an element.
Note also that a similar concept applies to instances - in which case the full tag set is created from the directly
owned tags, plus all of those merged in from the classifiers type hierarchy, additional stereotypes and realized
interfaces.
4.2.11.2 Fast Tagged Values
It is possible to add a single tagged value to one or more elements with a special shortcut.
1.
From an element context menu (or the context menu of a multi-selection) - choose the Element
Features | Add Tagged Value option. (Alternatively, select one or more elements and press Shift+Ctrl
+T).
2.
The Tagged Values window will appear - press the New Tag button,
3.
This will allow the entry of a Name for the tag (required) and Notes.
4.
To add a value for the tag by entering a value in the values section of the Tagged Values Window
(which will be initially blank).
5.
Press OK to add your new tagged value to all the currently selected elements.
Note: You can also use the Current Element toolbar ... the last button is a shortcut to the Add Tagged
Value function.
To delete this property you must open the element property dialog, go to the Tagged Values tab and
manually delete the item. There is currently no shortcut to delete tags from multiple elements at one time.
© 2005 Sparx Systems
Project View
33
The Notes section will appear in the Tagged Values window in the Info section at the bottom Tagged Values
window.
4.2.12 Object Classifiers
Many elements in UML model instances of classes - for example, objects, actors and sequence diagram
objects. These elements represent real things in a run-time scenario - eg. a Person element named Joe
Smith. In UML this is written as "Joe Smith : Person".
As the model develops from a rough sketch to a detailed design, many objects will become examples of
defined classes - so in the early analysis phase you may model a "Joe Smith" and a "Jane Smith" - and later a
"Person" class from which Joe and Jane will be instantiated.
Enterprise Architect allows you to associate an object with its template or class (its classifier). Doing this
greatly increases the descriptive power of the model in capturing the functionality and responsibility of objects
at run-time and their associated state. For example, if we describe a Person class with attributes such as Age,
Name, Address and Sex, and functions such as GetAge, GetName etc., then when we associate our object
with the Person class it is seen to have all the Person class behavior and state (as well as inherited state and
behavior from Person's ancestors).
Tip: This is a powerful means of moving your model from the analysis phase into detailed design.
4.2.12.1 Using Classifiers
Objects which support classifiers have the option Set Instance Classifier in the Advanced Settings sub-menu
of their diagram view context menu. Select this option to choose a single class as the classifier or template for
this object.
© 2005 Sparx Systems
34
MDG Integration for Visual Studio 2005
When you do this, the object name will be displayed as "Object : Class" - for example a Person object named
Joe Smith will be displayed as "Joe Smith : Person".
Several Changes Occur if an Object has a Classifier:
In the context menu for the object, the Element Features | Attributes and Element Features | Operations
menu items will appear. If you select either of these, you will be given the Attributes or Operations dialog for
the classifier, not the object. It is important to remember that the object is only an instance of a class at
runtime, so the appropriate attributes and operations are those of the classifier, not the object.
If you set the classifier for an object in a sequence diagram, when you add a message the drop down list of
available messages derived from the target object will come from the classifier - not the object selected.
This allows you to associate sequence diagram objects with classes and use the defined behavior of the
class to model actual behavior at run time.
You may also select a message for a state flow connector. The same rules apply as for sequence objects.
Note that in the message dialog you may also elect to include messages defined in the target classifiers
inheritance hierarchy.
The Set Element Classifier dialog is shown below. Select the desired item in the list and press OK to set the
instance classifier.
© 2005 Sparx Systems
Part
V
36
MDG Integration for Visual Studio 2005
5 Project Discussion Forum
The Project Discussion Forum can be used to discuss the development of your project. The forum window
consists of two main areas, the message thread area, the message contents area. The message thread area
which is located in the left hand side is used to create new categories and topics and to edit and delete
messages. The message contents section is used to view discussion topics and is located on the right hand
section of the discussion forum.
You can access the Project Discussion Forum via the EA Model View and selecting the Forum Tab
See Also
· Categories, Topics and Posts
· Message Dialog
5.1 Forum Usage
The Project Discussion Forum allows users to create Categories which contain Topics which contain Posts.
Users also have the ability to reply to posts.
See Also
· Adding a New Category
· Adding a New Topic
· Adding a New Post
· Replying to a Post
· Editing a Post
· Message Dialog
5.1.1 Adding a New Category
To create a new Category, click on the New Category icon at the bottom of the page.
This will bring up the Create New Category dialog, Enter the name and any relevant details into the text field
as well as the name of the author before pressing the OK button. New topics can now be added to the
category, refer to section, Adding a New Topic.
See Also
· Message Dialog
© 2005 Sparx Systems
Project Discussion Forum
37
5.1.2 Adding a New Topic
To create a new Topic, click on the New Topic button from the bottom of the forum.
This will bring up the Create New Topic dialog, Enter the name and any relevant details into the text field as
well as the name of the author before pressing the OK button. New posts can now be added to the topic, refer
to section, Adding a New Post.
See Also
· Message Dialog
5.1.3 Adding a New Post
To create a new Post, click the New Post button from the bottom of the forum window.
This will bring up the Create New Post dialog, Enter the name and any relevant details into the text field as
well as the name of the author before pressing the OK button. Users can now reply to post, refer to section,
Replying to a Post.
See Also
· Message Dialog
5.1.4 Replying to a Post
To reply to a post, right click on a Post click the Add Reply from the context menu.
This will bring up the Reply to Post dialog. Enter the name and any relevant details into the text field as well as
the name of the author before pressing the OK button.
See Also
· Message Dialog
5.1.5 Editing a Post
To edit a post, right click on a Post click the Edit button from the context menu or alternatively press [Ctrl+E].
This will bring up the Create New Post dialog, Enter the name and any relevant details into the text field as
well as the name of the author before pressing the OK button. Users can now reply to post, refer to section,
Replying to a Post.
See Also
· Message Dialog
5.2 Message Dialog
The project discussion forum message dialogs (Create New Category, Create New Topic, Create New Post
and Reply to Post) all share the same functionality.
© 2005 Sparx Systems
38
MDG Integration for Visual Studio 2005
The table below describes the operation of each option available for the dialogs.
Control
Name
Author
Formatting Tools
OK
Cancel
Help
Description
The name of the message category or message topic.
Use this drop down list to select the message author or type in a new Author if the
Author name is not present in the list. The Authors in the drop down list are defined
in the model Authors list. You can also type the authors name into this field. It will
be use for this post, but will not save. (you will have to type it every time)
These are standard formatting options for text
Confirm the forum message
Cancel the forum message
Brings up the help topic.
© 2005 Sparx Systems
Part
VI
40
MDG Integration for Visual Studio 2005
6 XML Technologies
MDG Integration for Visual Studio2005 enables the rapid modeling, forward and reverse engineering of two
key W3C XML technologies : XML Schema (XSD) and Web Service Definition Language (WSDL). XSD and
WSDL support is critical for the development of a complete Service Oriented Architecture (SOA), and the
coupling of UML 2.0 and XML provides the natural mechanism for specifying, constructing and deploying XML
based SOA artifacts within an organization.
The following topics explain how to work with these technologies using MDG Integration for Visual Studio 2005
· XML Schema (XSD)
· Web Services (WSDL)
6.1 XML Schema (XSD)
MDG Integration for Visual Studio2005 Forward and Reverse engineering of W3C XML schemas (XSD). The
following topics explain how to use MDG Integration for Visual Studio2005 to model, generate and import XML
schemas :
· Model XSD
· Import XSD
· Generate XSD
6.1.1 Model XSD
XML schemas are modeled using UML class diagrams within MDG Integration for Visual Studio2005.
The Class diagram below models simple schema for an example "Employee Details" system, intended to store
a company's employee contact information. The classes shown form the "EmployeeDetails" package. The
UML attributes of the classes map directly to XML elements or attributes. Note that the classes have no
methods, since there is no meaningful correspondence between class methods and XSD constructs.
© 2005 Sparx Systems
XML Technologies
41
The following figure shows the schema which is generated for the Employee Details package by default.
Notice how each UML class corresponds to a complexType definition in the schema. The class attributes are
generated as schema elements contained in a "sequence" model group within the definition. The enumeration
class is the exception here- it maps directly to an XSD enumeration, contained within a simpleType definition.
<?xml version="1.0" encoding="ISO-8859-1"?>
<xs:schema xmlns:xs="http://www.w3.org/2001/XMLSchema">
<xs:simpleType name="Gender">
<xs:restrictionbase="xs:string">
<xs:pattern value="male|female"/>
</xs:restriction>
</xs:simpleType>
<xs:element name="Person" type="Person"/>
<xs:complexType name="Person">
<xs:sequence>
<xs:element name="Person.surName" type="xs:string"/>
<xs:element name="Person.firstName" type="xs:string"/>
<xs:element name="Person.birthDate" type="xs:string"/>
<xs:element name="Person.contactDetails">
<xs:complexType>
<xs:sequence>
<xs:elementref="ContactInfo"/>
</xs:sequence>
</xs:complexType>
</xs:element>
</xs:sequence>
<xs:attributeGroupref="Person.att"/>
</xs:complexType>
<xs:attributeGroup name="Person.att">
<xs:attribute name="Person.gender" type="Gender"/>
</xs:attributeGroup>
<xs:element name="Employee" type="Employee"/>
<xs:complexType name="Employee">
© 2005 Sparx Systems
42
MDG Integration for Visual Studio 2005
<xs:complexContent>
<xs:extension base="Person">
<xs:sequence>
<xs:element name="Employee.status" type="Status"/>
<xs:element name="Employee.jobTitle" type="xs:string"/>
<xs:element name="Employee.startDate" type="xs:date"/>
<xs:element name="Employee.department" type="xs:string"/>
</xs:sequence>
</xs:extension>
</xs:complexContent>
</xs:complexType>
<xs:element name="ContactInfo" type="ContactInfo"/>
<xs:complexType name="ContactInfo">
<xs:sequence>
<xs:element name="homePhone" type="xs:string"/>
<xs:element name="email" type="xs:string" maxOccurs="3"/>
<xs:element name="streetAddress" type="xs:string"/>
<xs:choice>
<xs:element name="mobilePhone" type="xs:string"/>
<xs:element name="officePhone" type="xs:string"/>
</xs:choice>
</xs:sequence>
</xs:complexType>
<xs:simpleType name="Status">
<xs:restrictionbase="xs:string">
<xs:enumeration value="Full-Time"/>
<xs:enumeration value="Part-Time"/>
<xs:enumeration value="Casual"/>
<xs:enumeration value="Contract"/>
</xs:restriction>
</xs:simpleType>
<xs:element name="EmployeeRecords" type="EmployeeRecords"/>
<xs:complexType name="EmployeeRecords">
<xs:all>
<xs:element name="EmployeeRecords.Employee">
<xs:complexType>
<xs:sequence>
<xs:element ref="Employee" minOccurs="0"
maxOccurs="unbounded"/>
</xs:sequence>
</xs:complexType>
</xs:element>
</xs:all>
</xs:complexType>
</xs:schema>
6.1.1.1 UML Profile for XSD
The UML Profile for XSD specifies a set of stereotypes, tagged values and constraints which may be
applied to the UML model in order to change particular aspects of the resulting schema. For example, we may
wish to have certain UML class attributes converted to XSD attributes or, we may need to use a different
model group than the default "sequence".
The XSD stereotypes provide an explicit mapping from XSD to UML constructs. The tagged values further
define aspects of the mapping, such as whether the elements should be qualified. The constraints define any
conditions that must be satisfied for the stereotype to apply.
The following table lists the features of the UML Profile for XSD. Tagged value names are shown in bold
followed by the allowed values. If there is a default value used by EA's schema generator it is underlined.
<<XSDschema>>
UML Construct
Package
© 2005 Sparx Systems
XML Technologies
Description
Tagged Values
anonymousRole:
( true | false )
anonymousType:
( true | false )
attributeFormDefault:
( qualified | unqualified )
defaultNamespace:
elementDerivation:
( true | false )
elementFormDefault:
( qualified | unqualified )
memberNames:
( qualified | unqualified )
modelGroup:
( all | sequence | choice )
schemaLocation:
targetNamespace:
targetNamespacePrefix:
version:
Constraints
© 2005 Sparx Systems
43
All classes in a package are defined within one
schema. This stereotype can be used to specify
schema-wide settings.
Specifies if the role name is included in the
element declaration for the UML attribute.
Specifies whether the class type is anonymous for
attributes.
Determines whether attribute instances must be
qualified.
The default namespace used in this schema. This
value is used to specify the default namespace
attribute (xmlns=), in the schema element.
Determines whether inheritances are generated
using XSD extension or copy-down inheritance.
Determines whether element instances must be
qualified.
Determines whether elements generated from
Class attributes have their name qualified by the
corresponding class name.
Specifies the default XSD model group used to
generate complexType definitions.
The URI which identifies the location of the
schema. This value is used in the import and
include elements.
The URI which uniquely identifies this schema's
namespace.
The prefix which abbreviates the
targetNamespace.
The version of this schema.
None.
44
MDG Integration for Visual Studio 2005
<<XSDcomplexType>>
UML Construct
Description
Tagged Values
memberNames:
( qualified | unqualified )
mixed:
( true | false )
modelGroup:
( all | sequence | choice )
Constraints
Class
complexType definitions are created for generic
UML classes. This stereotypes helps tailor the
generation of a complexType definition
Determines whether elements generated from the
UML class attributes and associations have their
name qualified by the corresponding class name
for this complexType definition.
Determines whether this element may contain
mixed element and character content. Refer to the
W3C XML Schema recommendation.
Overrides the default XSD model for generating
this complexType definition.
None.
<<XSDsimpleType>>
UML Construct
Description
Tagged Values
derivation:
( restriction | list )
length:
minLength:
maxLength:
minInclusive:
minExclusive:
maxInclusive:
maxExclusive:
totalDigits:
fractionDigits:
whitespace:
pattern:
Constraints
Class
An XSD simpleType is generated for classes with
this stereotype.
Specifies the derivation of the simpleType. Refer
to the W3C XML Schema recommendation.
Refer to the W3C XML Schema recommendation.
Refer to the W3C XML Schema recommendation.
Refer to the W3C XML Schema recommendation.
Refer to the W3C XML Schema recommendation.
Refer to the W3C XML Schema recommendation.
Refer to the W3C XML Schema recommendation.
Refer to the W3C XML Schema recommendation.
Refer to the W3C XML Schema recommendation.
Refer to the W3C XML Schema recommendation.
Refer to the W3C XML Schema recommendation.
Refer to the W3C XML Schema recommendation.
This class can only participate in an inheritance
relation with another simpleType. It cannot have
any attributes or own any associations. They will
be ignored if present.
© 2005 Sparx Systems
XML Technologies
45
<<XSDsequence>>
UML Construct
Description
Tagged Values
Constraints
Class
The schema generator creates a sequence model
group as the container for the attributes and
associations owned by this class. The model
group is in turn added to the model groups of this
class' respective owners.
Note: Tagged values specified by owners of this
class persist through to the child elements of this
model group. Thus if memberNames are
unqualified for a complexType, so will be the
children of this model group when added to that
complexType.
None.
This class must be the destination of unidirectional
associations. If it is not, this class and its
connectors are ignored, possibly invalidating other
model group classes. Inheritance relations are
ignored for this class.
<<XSDchoice>>
UML Construct
Description
Tagged Values
Constraints
© 2005 Sparx Systems
Class
Creates an XSD choice element. Refer to
XSDsequence for more details.
None.
As for XSDsequence.
46
MDG Integration for Visual Studio 2005
<<XSDelement>>
UML Construct
Description
Tagged Values
form:
( qualified | unqualified )
position:
anonymousRole:
( true | false )
anonymousType:
( true | false )
Constraints
Attribute; AssociationEnd
By applying this stereotype to a UML class
attribute or AssociationEnd, the corresponding
UML entity is generated as an element within the
parent complexType and not as an XSD attribute.
Overrides the schema's elementFormDefault
value.
Causes the elements to be ordered within a
sequence model group of the containing
complexType. Duplicated and invalid position
tagged values are ignored and result in undefined
ordering of the UML attributes. Missing position
values cause the defined positions to be allocated
as specified, with the remaining elements filling
the missing positions in an undefined order.
Specifies if the role name is included in the
element declaration for the UML attribute
Specifies whether the class type is anonymous for
attributes.
None.
<<XSDattribute>>
UML Construct
Description
Tagged Values
form:
( qualified | unqualified )
use:
(prohibited | optional | required )
default:
fixed:
Constraints
Attribute; AssociationEnd
By applying this stereotype to a UML class
attribute or AssociationEnd, the corresponding
UML entity is generated as an XSD attribute within
the parent complexType and not as an XSD
element.
Overrides the schema's attributeFormDefault
value.
Refer to the W3C XML Schema recommendation.
Refer to the W3C XML Schema recommendation.
Refer to the W3C XML Schema recommendation.
The attribute datatype should not refer to a class
specification, it will be ignored otherwise.
© 2005 Sparx Systems
XML Technologies
47
<<XSDany>>
UML Construct
Description
Class; Attribute
If applied to a UML attribute, an XSD anyAttribute
element is generated. If applied to a UML class,
an XSD any element is generated.
Tagged Values
namespace:
processContents:
Refer to the W3C XML Schema recommendation.
Refer to the W3C XML Schema recommendation.
( skip | lax | strict )
Constraints
None.
<<XSDrestriction>>
UML Construct
Description
Tagged Values
Constraints
Generalization
Overrides the default use of XSD extension for
inheritance and generates the child as a
complexType with a restriction element instead.
None.
Applies only to UML class parent-child relations.
<<XSDgroup>>
UML Construct
Description
Tagged Values
modelGroup:
(sequence | choice | all)
Constraints
© 2005 Sparx Systems
Class
An XSDgroup is generated for classes with this
stereotype.
Overrides the default XSD model for generating
this group definition.
A group class can only associate itself to other
group classes.
A group class can be associated by another group
class or a complexType class.
The association should be via an association link.
A group class cannot be inherited/aggregated.
48
MDG Integration for Visual Studio 2005
<<XSDtopLevelElement>>
UML Construct
Description
Tagged Values
Constraints
Class
Creates an <xs:element> construct which acts as
a container for XSDcomplexType and
XSDsimpleType class.
None
An XSDtopLevelElement class can contain either
a XSDsimpleType or a XSDcomplexType as its
child class. When such a class is present as its
child, all its inheritance will be ignored. This class
cannot be inherited.
<<XSDtopLevelAttribute>>
UML Construct
Description
Tagged Values
use:
(optional | required | prohibited)
Constraints
Class
Creates an <xs:attributr> construct which acts as a
container for XSDsimpleType class
Refer to the W3C XML Schema recommendation.
An XSDtopLevelAttribute class can contain only a
XSDsimpleType class as its child class. When
such a class is present as its child, all its
inheritance will be ignored. This class can inherit
from only one XSDsimpleType class.
<<XSDunion>>
UML Construct
Description
Class
Tagged Values
Constraints
None
An XSDunion class can contain only
XSDsimpleType as its child class and can
generalize from other XSDsimpleType classes
only. All the classes that this class generalizes
becomes the members of the attribute
"memberTypes". This class cannot have any
attributes or associations.
Creates an <xs:union> construct which can
act as a container for XSDsimpleType class.
© 2005 Sparx Systems
XML Technologies
49
<<XSDattributeGroup>>
UML Construct
Description
Tagged Values
Constraints
Class
Creates an <xsattributeGroup> construct which
can act as a container for a set of elements fo
stereoType XSDattribute.
None
An XSDattributeGroup class can contain only
elements of stereoType XSDattribute and can be
associated to other XSDattributeGroup classes
only.Only XSDcomplexType classes can associate
itself with this class. This class cannot be
inherited.
6.1.1.2 XSD Datatypes Package
When modeling XSD constructs, it is often useful to have the XSD primitive types represented as UML
elements. In this way, user-defined types for example, can reference the datatype elements as part of
inheritance or association relationships.
SparxSystems provides the set of primitive XSD data types as a UML package in the form of an XMI file. Each
of the XSD primitive types are represented by an UML class in a package named XSDDatatypes.
6.1.1.3 Abstract XSD models
XML schemas may be modeled using simple, abstract class models. This can be useful for allowing an
architect to start work a higher level of abstraction, without concern for the implementation details of a
schema.
Following is a simplified version of a Employee Details example model, which does not use XSD-specific
stereotypes or tagged values.
© 2005 Sparx Systems
50
MDG Integration for Visual Studio 2005
The following schema fragment would be generated by EA, given the above model.
<?xml version="1.0" encoding="ISO-8859-1"?>
<xs:schema xmlns:xs="http://www.w3.org/2001/XMLSchema">
<xs:element name="Person" type="Person"/>
<xs:complexType name="Person">
<xs:sequence>
<xs:element name="Person.firstName" type="xs:string"/>
<xs:element name="Person.surName" type="xs:string"/>
<xs:element name="Person.birthDate" type="xs:string"/>
<xs:element name="Person.gender" type="xs:string"/>
<xs:element name="Person.contactDetails">
<xs:complexType>
<xs:sequence>
<xs:elementref="ContactInfo"/>
</xs:sequence>
</xs:complexType>
</xs:element>
</xs:sequence>
</xs:complexType>
<xs:element name="Employee" type="Employee"/>
<xs:complexType name="Employee">
<xs:complexContent>
<xs:extension base="Person">
<xs:sequence>
<xs:element name="Employee.status" type="Status"/>
<xs:element name="Employee.jobTitle" type="xs:string"/>
<xs:element name="Employee.startDate" type="xs:date"/>
<xs:element name="Employee.department" type="xs:string"/>
</xs:sequence>
</xs:extension>
</xs:complexContent>
</xs:complexType>
<xs:element name="ContactInfo" type="ContactInfo"/>
<xs:complexType name="ContactInfo">
<xs:sequence>
<xs:element name="ContactInfo.homePhone" type="xs:string"/>
<xs:element name="ContactInfo.mobilePhone" type="xs:string"/>
<xs:element name="ContactInfo.officePhone" type="xs:string"/>
<xs:element name="ContactInfo.email" type="xs:string"/>
<xs:element name="ContactInfo.streetAddress" type="xs:string"/>
</xs:sequence>
</xs:complexType>
<xs:simpleType name="Status">
<xs:restrictionbase="xs:string">
<xs:enumeration value="Full-Time"/>
<xs:enumeration value="Part-Time"/>
<xs:enumeration value="Casual"/>
<xs:enumeration value="Contract"/>
</xs:restriction>
</xs:simpleType>
<xs:element name="EmployeeRecords" type="EmployeeRecords"/>
<xs:complexType name="EmployeeRecords">
<xs:sequence>
<xs:element name="EmployeeRecords.Employee">
<xs:complexType>
<xs:sequence>
<xs:element ref="Employee" minOccurs="0"
maxOccurs="unbounded"/>
</xs:sequence>
</xs:complexType>
</xs:element>
</xs:sequence>
</xs:complexType>
</xs:schema>
© 2005 Sparx Systems
XML Technologies
51
6.1.1.3.1 Map UML to XSD
The following table describes the default mapping of UML to XSD constructs. This set of mappings is useful
when defining simple schemas from abstract class models. The defaults are also assumed by the the schema
generator when generating unstereotyped elements in an abstract model. The XML schema toolbox (and
UML Profile for XSD) override these default mappings through the use of stereotypes and tagged values.
UML Construct
Package
Class
Attribute
Association
Generalization (Inheritance)
<<enumeration>> (stereotype)
© 2005 Sparx Systems
Default XSD Production Rules
A schema element is generated for the target
package. If the target package includes classes
from another package, which has the tagged values
"targetNamespace" and "targetNamespacePrefix"
set, these are included as attributes of the schema
element.
In addition, an import or include element is created
for each referenced package. (An include element
is used if the external package shares the same
targetNamespace tagged value as the target
package. An import element is used where the
targetNamespaces differ).
A root-level element declaration and complexType
definition are generated. The element name and
type are the same as the class name. An XSD
sequence model group is generated to contain
UML attributes generated as elements.
An element is declared for each class attribute. The
element name is set to that of the UML attribute
name. This is prepended with the class name to
make the element unique. The minOccurs and
maxOccurs attributes are set to reflect the attribute
cardinality. (Note: If left unspecified, minOccurs and
maxOccurs default to 1.) If the attribute refers to
another class, the element declaration is followed a
complexType definition, which contains a reference
to the appropriate complexType.
An element is declared for each association owned
by a class. The element name is set to that of the
association role. The minOccurs and maxOccurs
reflect the cardinality of the association. Note: if the
direction of the association is unspecified, the
owner is assumed to be the source.
For single inheritances, an extension element is
generated with the base attribute set to the base
class name. The UML attributes of the child class
are then appended to an all model group within the
extension element.
A simpleType element is declared for the
enumeration class with the name attribute set to the
class name. A restriction element is generated
with base set to string. Each of the class attributes
are appended to the restriction element as XSD
enumeration elements with value set to the UML
attribute name. Any type specification for the UML
attributes will be ignored by the schema generator.
52
MDG Integration for Visual Studio 2005
6.1.2 Generate XSD
The Generate XML Schema feature Forward Engineers a UML class model to a W3C XML Schema (XSD) file.
An XML schema corresponds to a UML package in EA, therefore XML schema generation is a package-level
operation. Use the following steps to generate an XML schema from a package:
1.
In the Project Browser, right click on the package to be converted to XSD to open the context menu.
2.
Select Generate XML Schema from the XML Services submenu.
3.
Set the desired output file using the Filename field.
4.
Set the desired XML encoding using the Encoding field.
5.
Press Generate to generate the schema.
6.
The progress of the schema generator will be shown in the Progress edit box.
6.1.3 Import XSD
The XML Schema Import facility is used to Reverse Engineer a W3C XML Schema (XSD) file as a UML class
model. XSD files are imported into MDG integration for Visual Studio 2005 as a UML package. Use the
following steps to import an XSD file:
1. In the EA Project View, right click on a package to open the context menu. This package will contain the
imported XSD package.
2. Select Import XML Schema from the XML Services submenu.
3. Select the input file using the Filename field.
4. The Target Package field will be automatically set to the name of the selected input file by default. If
required, this name can be changed.
5. Check the Create Logical Diagram for Package checkbox if the imported elements are to be displayed on
the diagram (selected by default).
6. Press Import to Import the schema.
7. The progress of the schema import will be shown in the Progress status bar.
6.2 Web Services (WSDL)
MDG integration for Visual Studio 2005 supports Forward and Reverse Engineering of the W3C Web Service
Definition Language (WSDL). The following topics explain how to use EA to model, generate and import
WSDL files.
· Model WSDL
· Import WSDL
· Generate WSDL
6.2.1 Model WSDL
WSDL documents are represented as components marked with the stereotype "WSDL". WSDL documents
are contained in a package hierarchy representing the target WSDL namespace and its constituent XSD
Types, Messages, PortTypes, Bindings and Services. The top-level package is stereotyped as a
© 2005 Sparx Systems
XML Technologies
53
WSDLnamespace. The figure below shows a skeletal WSDL namespace package structure:
A WSDLnamespace package may contain one or more WSDL components. Each WSDL component may be
automatically generated to a WSDL file using EA's built in WSDL generator. The following sections describe
the various WSDL elements supported by EA.
6.2.2 Generate WSDL
The Generate WSDL feature Forward Engineers a UML model to a Web Service Definition Language (WSDL)
file. The Generate WSDL feature acts on a package stereotyped with WSDLnamespace. It is used to
Generate any or all of the WSDL stereotyped components owned by the target WSDLnamespace structure.
Use the following steps to generate one or more WSDL files from a WSDLnamespace:
1.
In the Project Browser, right click on the target WSDLnamespace package to open the context menu.
2.
Select Generate WSDL from the Code Engineering submenu.
3.
For each WSDL component, set the desired output file using the Target File column.
4.
Set the desired XML encoding using the Encoding field.
5.
Press Generate to generate the WSDL file(s).
6.
The progress of the WSDL generator will be shown in the Progress edit box.
Tip: The Generate WSDL dialog may also be accessed from the active diagram by selecting Generate WSDL
from the Project menu.
6.2.3 Import WSDL
The WSDL Import facility is used to Reverse Engineer WSDL files as UML class models. Use the following
steps to import a WSDL file:
1. In the Project View, right click on a package to open the context menu. This package will contain the
imported WSDL package.
2. Select Import WSDL from the Code Engineering submenu.
© 2005 Sparx Systems
54
MDG Integration for Visual Studio 2005
3. Select the input file using the Filename field.
4. The Target Package field will be automatically set to the name of the selected input file by default. If
required, this name can be changed.
5. Press Import to Import the schema.
6. The progress of the WSDL import will be shown in the Progress status bar.
© 2005 Sparx Systems
Part
VII
56
MDG Integration for Visual Studio 2005
7 Working with Code
MDG integration for Visual Studio 2005 allows generation of code directly from model packages and elements,
synchronization of model and code, and many more features.
To generate the code for a model element, such as a class in the EA Project Explorer. Right click it and
select Code Services | Generate Code.
To Generate the code for a package in the EA Project Explorer - right click and select Code Services |
Generate Code. This will give you a dialog with the options to either Forward engineer the code (from model to
source) or Reverse engineer (source to model)
Right-click on the package to bring up the context menu. Select code generation, and then either Generate
Package to generate code for the entire selected package, or Generate Code to simply generate code for an
individual package element.
This will bring up the code generation dialog.
Synchronization keeps your models and your code in line, so that you can always be sure that what is
represented in code is represented in the model. For instance, if you have made changes to a class definition
by hand-coding, your model will be out of date. Synchronization ensures that the class you have altered will be
updated in the model to reflect the changes you have made.
7.1 Reverse Engineering
The Enterprise Architect Integration is able to reverse engineer both source code and Visual Studio binary
portables into UML Class diagrams.
Details:
Import Directory
Import Binary
7.1.1 Import Directory
Import Directory
Reverse engineering your project code into UML Class models is a simple process.
Firstly, create and link a new package or use a linked package associated with the project you wish to reverse
engineer. Right-Click on the package name in the Project View, and from the context menu select Code
Services | Import Directory.
This will open the Import Directory Structure dialog. Firstly, select the directory for the package you wish to
import. Then set the source code type (C++, C# etc.) and the expected file extension (.c, .cs etc.). There are a
number of further options you may select to control the import process.
· Recursively process subdirectories - selecting this will tell EA to search the directory being imported for
subdirectories and to process those also.
· Create Logical Diagram for each package - Selecting this tells EA to create a logical diagram for each
package being imported.
· Import defined components - Select this to Import only those with defined components
· Do not import Private members - By selecting this option, private members are not imported.
Package Structure
© 2005 Sparx Systems
Working with Code
57
This selection offers different methods for controlling the packaging of the imported objects.
· Package Per Directory - Creates a new package for each directory, including the selected root and all
subdirectories if recursion is checked.
· Package Per Namespace - This creates a new model package for each namespace encountered in the
code being imported.
· Package Per File - Creates a new package for each source file that is being imported
Synchronization
This section controls the way EA's import process will deal with pre-existing models.
· Overwrite Existing Models - If a model with the same name already exists in the package you are importing
to, then it will be overwritten by the newly generated model.
· Synchronize Existing Models - Models will be synchronized - existing models will be altered to comply with
the results of the reverse engineering, but will not be completely overwritten or deleted.
Remove Classes not fond in Code
· Never delete - Never delete any classes that are found in the model, but not found in the code.
· Prompt for action - If classes are found that are not in the code, ask the user if they are to be removed first.
· Always delete - Delete the Classes without user prompting
Once you have set your options, select OK and EA will be invoked to process the directory. When EA is
finished, the newly created models will appear in the EA Project View and in the Class view.
Default Settings for C#:
© 2005 Sparx Systems
58
MDG Integration for Visual Studio 2005
7.1.2 Import Binary
Import Binary
EA is capable of reverse engineering VS .NET portable binaries (*.exe, *.dll) and generating class models.To
begin, create a new package in which to store the resulting models. Right-click on the EA project view and
select Add | New Package. Right-click on the new package and select Code Services | Import Binary Module.
The Import dialog will open. Firstly select the file that you wish to import. Once you have selected the file there
are some other options that must be set.
Generation
Firstly select whether pre-existing classes will be synchronized or overwritten.
Select whether or not to automatically create a Logical Diagram for each package
Do not import private members
Import Method
Allows you to select the method EA will use to analyse the binary file. You may select from Reflection,
Disassembly or "Let EA Decide", which will let Enterprise Architect decide which method seems to be most
appropriate for the selected file. Once all your settings are set, click the import button and EA will import the
binary module, the UML representation is then constructed as a diagram and laid out.
7.2 Model Driven Transformation
UML integration for Visual Studio 2005 supports the Model-Driven Architecture and the use of Platform
Independent Models (PIM's) and Platform Specific Models (PSM's).
You are able to create a PIM and define rules for transforming a PIM into a PSM. For instance, a single
independent model may generate specific models that account for particular features of a system or language,
such as C# or Java.
To perform an MDA transform you first need a master model, the PIM. Once you have created or imported a
model, right click on the containing package and select Current Package | Apply MDA Transformation You will
be presented with the Model Transformation Dialog.
© 2005 Sparx Systems
Working with Code
59
When the dialog is opened, all elements will be selected and all transformations previously performed from
any of these classes will be checked.
Control
Elements
All
None
Transformations
Select Package [...]
Generate Code on result
Perform Transformations on
result
Intermediary File Path
Write Always
Write Now
Do Transform
Close
Help
Description
Selects the elements that are to be included in the transformation.
Selects all of the elements from the list to be included in the
transformation.
Deselects all of the elements from the list.
Allows you to select which transformations to perform and the package
each of them should be transformed to.
Use the [...] button to select the package in which the transformed
elements will be created.
Specifies whether or not to automatically generate code from the target
classes.
Specifies if transformations previously done on target classes should be
automatically executed. See Chaining Transformations for more
information.
Specifies the filename of the intermediary file (if any).
Specifies whether an intermediary file should be written to disk.
Generates the intermediary file but doesn't perform the transform.
Executes the transform command.
Exits the Model Transformation dialog.
Opens the help file on this page.
For instance, if we are going to transform the basic package into a C# application then under the
Transformations window we will selected C#. Once we select the Transformation type, we are prompted to
select the destination folder. As shown below we have selected the Implementation Model (PSM) folder:
© 2005 Sparx Systems
60
MDG Integration for Visual Studio 2005
Click the Do Transform button to perform the transformation. These classes will also be generated as code
and imported into the Visual Studio 2005 Project.
© 2005 Sparx Systems
Part
VIII
62
MDG Integration for Visual Studio 2005
8 Generating Documentation
MDG integration for Visual Studio 2005 can automate the generation of documentation based on your project
models.
To generate the documentation for a model package, right-click on the package name in the EA Project
Explorer and select Current Package | Generate Documentation.
This will open the RTF Generation dialog. Enter a filename for the document that will be created, and select a
style template. Clicking Generate will start EA generating the RTF file.
A dialog will now show the progress of the RTF Generation. Once the document has been created you can
view it immediately by selecting view from the dialog.
You may view the document at any time later by opening the file from where it was created.
See Also
RTF Documents
RTF Dialog Options
8.1 RTF Documents
Rich Text Format Documentation
Rich text reports are documents produced by Enterprise Architect in Rich Text Format (RTF), a format
common to many word processors. In particular it is targeted at Microsoft Word™, which provides the ability to
link together a number of rich text documents into a single master document.
Typically you will create a Word master document, and then some Enterprise Architect RTF reports. These are
linked back into sub-sections of the master document and refreshed as required during project development.
In this way the project document becomes an easy to manage and feature-rich work product.
By adding tables of contents, figure tables, header & footers and sections you can manage a complex
document with relative ease. Simply update the Enterprise Architect RTF reports then refresh the links in MS
Word.
Features
Enterprise Architect v 5.0 has introduced a new fully-featured RTF Document generator. Some of the features
include:
· Powerful WYSIWYG RTF template editor support allowing:
· Headers and Footers
· Images
· Indexes
· Tabular Sections
· Nested Sections
· All model elements, connectors, diagrams and their properties
· Template import and export using XML
· Basic templates supplied for customization
· New document generator:
· Simplified options
· Generates complex documents based on new RTF templates
· New embedded RTF viewer
· View RTF documents generated in EA directly within EA
More Information
For More Information, see:
· RTF Dialog Options
© 2005 Sparx Systems
Generating Documentation
63
· RTF Document Options
· RTF Templates Dialog
8.1.1 RTF Dialog Options
The RTF Report dialog allows you to set the exact contents and look and feel of your report. The dialog has
the following functions:
Note: The enhanced RTF Document Generator is not available with the EA Lite versions of EA and the
Desktop Edition of EA.
Control
Root Package
Output to file
Switch Generator
Generate Options
Resource Document
Use Template
Manage Templates
Edit Current
Generate
Help
View
Close
© 2005 Sparx Systems
Function
The currently selected package in the Project View.
The location and filename of the generated
documentation. The Browse [...] button navigates to
the location.
Toggles between the RTF Legacy Generator and
the Enhanced Template driven Generator.
Opens the Document Options dialog.
Saves the current options as a document definition.
Specifies which RTF template to apply to the
document generation.
Opens the RTF Templates dialog.
Opens the currently named template in the RTF
Template Editor.
Generates the document.
Opens this help page.
Launches the generated RTF Documentation in the
Windows default RTF file viewer, or in the EA
internal viewer if the "Use Internal Viewer" option is
selected.
Closes this dialog.
64
MDG Integration for Visual Studio 2005
Use Internal Viewer
Use Language Substitutions
Language
If set then pressing the View button launches the
generated RTF Documentation in the EA internal
viewer. Otherwise, launches the generated RTF
Documentation in the Windows default RTF file
viewer.
Switches on Custom Language word substitutions
Goes to the Word Substitution dialog. This allows
you define translations of technical terms from
English into any other language for direct
substitution into RTF documents.
8.1.2 RTF Document Options
The RTF Document Options dialog allows you to set the filter and order the elements. This dialog can be
opened from two different places, which affects the persistence of options selected:
When you open this dialog by pressing the Generate Options button on the Generate RTF Documentation
dialog, you can create filtering settings here for the current document set to be run. Selections are nonpersistent, and are reset when you select a different template.
The Dialog has the following functions:
Control
Only include objects
Where Package Phase
With element status
Packages by
Elements by
Function
Allows elements to be filtered according to date
created or modified.
Allows elements to be filtered according to the value
of the package phase field.
Allows elements to be filtered according to its
status.
Orders packages in the generated documentation in
either ascending or descending order of Name, Tree
Order, Modified Date or Created date.
Orders elements in the generated documentation in
either ascending or descending order of Name, Tree
Order, Modified Date or Created date.
© 2005 Sparx Systems
Generating Documentation
Diagrams by
Hide 'note-less' elements
Diagram Format
Skip root package
Overwrite document fields
Adjust Heading Levels
Exclude details for
OK
Cancel
Help
65
Orders diagrams in the generated documentation in
either ascending or descending order of Name, Tree
Order, Modified Date or Created date.
Excludes all elements without notes from the
documentation.
Sets the diagram format for the images included
within the documentation to either Metafile or
Bitmap.
Excludes the parent package from the
documentation and includes only the child
packages.
When this option is unchecked, fields defined in a
document section are generated with the
appropriate values populated in these fields.
Turning on this option will replace the fields with
actual text.
Setting this option will allow the RTF Generator to
automatically adjust template headings based on
the model depth
Excludes all elements of the selected type or types
to be excluded from the generated document.
Applies the options to the documentation to be
generated.
Closes the dialog without applying the options.
Opens the help to this page.
8.1.3 RTF Templates Dialog
The RTF Style Editor allows you to edit the RTF associated with various sections of the RTF Report facility in
Enterprise Architect. You would typically use this functionality to customize a report look and feel for your
company or client. The RTF Templates Dialog is opened by pressing the Manage Templates button on the
Generate RTF Documentation dialog. The dialog has the following functions:
Control
Function
Delete Selected
Deletes the selected template.
© 2005 Sparx Systems
66
MDG Integration for Visual Studio 2005
New
Creates a new template. These can be based on an
existing template or you can start from scratch with a
blank template. To make it easier to get up-andrunning, EA provides a basic template with default
settings that you may like to base your templates on.
Edit
Opens the RTF Template Editor.
Close
Closes this dialog.
Import From Reference File
Allows you to import RTF Templates saved to XML
files using the Tools | Export Reference Data
command.
8.1.3.1 RTF Template Editor
The RTF Style Template editor allows for the creation and editing of custom RTF templates to define any
outputted RTF documentation. The Style Template Editor lets you select particular model elements and then
to specify, from the element type, the fields for inclusion into the generated document.
Formatting styles may be defined in the Style Editor, and items such as tables of contents, headers and more
may be added to the document.
For information regarding specific commands used to alter the format of the RTF documentation, see the
entries under the RTF Template Editor Commands section.
8.1.3.2 Select Model Elements
To select Model elements for documentation, open the Sections tree of the RTF Template Editor. To add an
element, check the box next to the element's name. Selecting a model element will add that element as
section tags in the Content pane of the Document Template Editor. The position of the section tags within the
Sections tree determines the position of the model element in the Content section of the RTF Template editor.
For encapsulated elements, selecting a child element will automatically select the parent also.
To move a model element to a different position in the documentation template, select the element and then
use the up and down arrows to move that element.
For example, the section tag for Diagram->Element will appear in the content section of the template editor
before the section tag for Diagram->Connector.
8.1.3.3 Adding Content
The RTF Template editor uses tags to arrange the content layout of the documentation. To insert a model
element tag, use the Selection section of the Template editor. When a selection has been made, model
element tags will be inserted into the Content section of the Editor. The Yellow highlighted model element
names specify the beginning of a tag, which is represented by "sectionname >", and the end of the model
element is shown as "< sectionname"
To add model element content, right click in the area between Tag Heading and Tag End. This will display a
model element "type"-sensitive list of element fields that can be added to the RTF Documentation. Any
additional information entered between the document tags will be included in the generated RTF
Documentation.
© 2005 Sparx Systems
Generating Documentation
67
8.1.3.4 Tabular Sections
The RTF Template Editor supports rendering a section as a table. This section describes how to render
Document Sections in a tabular format. A tabular section is defined as a table containing any number of
columns, but with only TWO rows. The first row is used to describe the headings of the columns. The Second
row defines the output, which is then rendered iteratively for every occurrence of the section in question.
8.1.3.5 Child Sections
Rendering Child Sections
Child sections may be rendered in RTF documentation using one of two different methods. One way is to
render model elements directly into the RTF as defined by the section's content and fields. The other is to
render indirectly to the RTF by using a parent section to describe the content. The latter option occurs as a
result of the creation of a section which has a placeholder section tag (i.e. no content within the tags). This
method is used to create recursive documentation of child packages.
Child Document Sections and their corresponding parent sections
Child Section
Package->Child Package
Package->Element->Child Element
Package->Element->Diagram
Package->Diagram->Element
Package->Diagram->Connector
Section Rendered when used as a placeholder
Package
Package->Element
Package->Diagram
Package->Element
Package->Element->Connector
8.1.3.6 RTF Commands
The following topics provide assistance on using the RTF Template Editor.
See:
· Scrolling through text
· File and Printing Options
· Line Editing
· Block Editing
· Clipboard
· Image and Object Imports
· Character Formatting
· Paragraph Formatting
· Tab Support
· Page Breaks and Repagination
· Headers, Footers and Bookmarks
· Table Commands
· Sections and Columns
· Stylesheets and Table of Contents
· Text/Picture Frame and Drawing Objects
· Navigation Commands
· Search/Replace Commands
· Highlighting Commands
© 2005 Sparx Systems
68
MDG Integration for Visual Studio 2005
8.1.3.6.1 Scrolling through text
Control
Keyboard:
Function
· Use Up, Down, Left and Right arrow keys to scroll up or down a line, or left or right
one character.
· The Home key is used to position at the beginning of the current line.
· The End key is used to position at the end of the current line.
· Ctrl-PgUp is used to position at the beginning of a file.
· Ctrl-PgDn is used to position at the end of a file.
· Page Up is used to display the previous page.
· Page Down is used to display the next page.
· Ctrl + Left arrow key is used to position on the next word.
· Ctrl + Right arrow key is used to position on the previous word.
· Ctrl + Up arrow key is used to position at the first column of the current line (if not
already on the first column) or at the first column of the previous line.
· Ctrl + Down arrow key is used to position at the first column of the next line.
· Press the F10 key and type in a line number to jump to. This function is also
available from the Navigation menu.
Mouse
You can click the mouse on the vertical and horizontal scroll bar to accomplish various
scrolling function. These functions are available only if the horizontal or the vertical
bar has been enabled by the startup parameters:
Vertical Scroll Bar: Click the mouse on the arrows on either end to scroll the screen up
or down by one line.
Click the mouse above the elevator to scroll the screen up by one page. Similarly,
click the mouse below the elevator to scroll the screen down by one page.
You may also drag the elevator to any position in the bar. As the elevator is dragged,
the editor will scroll the screen up or down accordingly to maintain the correct cursor
position.
Horizontal Scroll Bar: Click the mouse on the arrows on either end to scroll the screen
left or right by one line. Click the mouse on either side of the elevator to scroll the
screen left or right by 1/2 screen.
You may also drag the elevator to any position in the bar. As the elevator is dragged,
the editor will scroll the screen left or right accordingly to maintain the correct cursor
position.
8.1.3.6.2 File and Print Options
Control
Function
© 2005 Sparx Systems
Generating Documentation
New
69
This command clears an existing template from the edit window and starts an empty,
unnamed template.
You will be prompted to save any modification to the previous template.
Open File
This function is used to clear any existing text from the edit window, and open a new
document.
You will be prompted to save any modification to the previous document.
Save
Use this selection to save the text to the current file name.
If a file is not yet specified, the editor will prompt you for a template name.
Save As
This selection is similar to Save File. In addition, it allows you to specify a new
template name for saving the template.
You can invoke this function by pressing Ctrl + Shift + S, or selecting the option from
the menu.
Exit
Use this to close an editing session.
You can exit by selecting the option from the menu.
If the current template has been modified, you will be prompted to save the
modifications.
Import
This function imports an existing RTF document into the Template Editor, so as to
have model elements from that document inserted into the template.
This is useful when creating templates from a predefined document with a particular
"look and feel".
Export
This function saves the template as a RTF document rather than as a template.
This can be useful when the user wishes to save the template for other models.
Page Layout
Use this option before selecting the Print option to specify the page layout. You can
specify margin (left, right, top and bottom) in inches.
You can invoke this function by hitting the Ctrl F4 function keys together (or select the
option from the menu).
Printer Setup
This option invokes a printer specific dialog box for the default printer (the default
printer selection is made from the control panel of Windows) You select the
parameters from a set of printer specific options. These options include page size,
page orientation, resolution, fonts, etc.
You can invoke this function by hitting the Ctrl + Shift + P key or select the option from
the menu.
Print
Use this option to print the contents of the current file. You may also choose to print
only the selected part of the file. To print a block of text, the desired text must be
highlighted before invoking the print function. This command supports these
highlighted blocks:
Line Block
Character Block
The print function will print on a default printer selected from the Windows' control
panel. You can alter the printer setup or Page Layout prior to invoking the print option.
You can invoke the printing function by hitting the Ctrl + P key or select the option from
the menu. The editor will display a dialog box where you can select the scope of the
printing.
© 2005 Sparx Systems
70
MDG Integration for Visual Studio 2005
Print Preview
This option is used to preview the document before printing. The editor displays up to
2 pages at a time. You can scroll to a different page by using the PgUp/PgDn or the
scroll bar.
By default the preview rectangle is sized to fit the current window. However, you can
use the zoom option to enlarge or shrink the preview rectangle as you wish.
Close
Closes the template editor, closing the editor will prompt the user to save any unsaved
information.
8.1.3.6.3 Line Editing
Control
Insert After
Current Line
Function
In the text mode this function creates a blank line after the current line.
Press the F9 function key to insert a new line directly after the current line.
Insert Before
Current Line
In the text mode this function creates a blank line before the current line.
Press Ctrl + F5 together to insert a new line directly before the current line.
Delete Line
Use this function to delete the current line.
The remaining lines will be scrolled up by one line. Press Shift + F9 together to delete
the current line.
Join Lines
In the text mode this function joins the next line at the end of the current line.
Hit the Alt J keys together to invoke this function.
Split Line
In text mode this function splits one line into two. at the current cursor position.
Press Alt + S together to split the line at the current cursor position. Text immediately
following the cursor will appear on the next line.
8.1.3.6.4 Block Editing
Control
Copy a Line Block
Function
This command quickly duplicates a selected block of text from one location to
another.
Highlight the lines of text to be copied, then move the caret to the target location and
press Alt + C, or select the option from the menu. The original text is not deleted.
This command provides a quick alternative to using the clipboard copy/paste
functions.
Move a Line Block
This command moves a highlighted block of text from one location to another
Highlight a block of text to be moved, move the caret to the target location and press
Alt + M, or select the option from the menu. The original text is deleted.
This is a quick alternative to using clipboard cut/paste functions.
© 2005 Sparx Systems
Generating Documentation
Undo Previous
Edit
71
You can use this command to undo your last edit. Invoke this function by pressing
Shift + F8, or select the option from the menu. A dialog box will appear, containing the
information about the command to be undone. The box displays the line number,
column position, type of undo (delete/insert/edit) and the contents of the undo buffer.
You may modify the target line number or column position. Confirm the operation by
clicking on the OK button.
This undo feature is not available for column block edits, block move and replace
string commands
Redo Previous
Undo
This command reverses an undo. It can only be performed after an undo command.
8.1.3.6.5 Clipboard
Control
Cut/Copy Text To
Clipboard
Function
Use this command to cut or copy a highlighted block of text to the clipboard.
Highlight a block of text to be copied to the clipboard and press Ctrl + X (cut) or Ctrl +
C (copy), or select the option from the Edit menu.
This function also copies the associated formatting information using the RTF format
and the native Template Editor format.
Paste Text From
Clipboard
Use this command to paste the contents of the clipboard at the current caret location.
Invoke this function by pressing Ctrl + V, or selecting the option from the Edit menu.
Formatting information, if available, is also copied.
© 2005 Sparx Systems
72
MDG Integration for Visual Studio 2005
Paste Special
Objects
This function displays the clipboard data in a number of available formats:
Native Object Format
If available, this is the first format in the list box. The data in this format can be
later edited using the original application by double clicking the object.
This data can be embedded into your application by using the Paste option, or you
can create a link to the original file by using the Paste Link option.
Formatted Text
This is one of the text formats. This option offers the most suitable format if the data
is pasted from another text output application, as the font and formatting attributes
are reproduced accurately.
Unformatted Text
This is another text format. This option pastes the text without retaining the
formatting information.
Picture Format
The data is available in the Picture format. This object can be later edited (by
double clicking the object) using the Microsoft MS Draw application.
Note: This format is preferred over the Bitmap and the Device Independent Bitmap
formats.
Device Independent and regular bitmap formats
The data is available in the bitmap formats. The object can be later edited (by
double clicking the object) using the Microsoft MS Draw application.
The editor converts these formats into the Picture format before calling the drawing
application.
8.1.3.6.6 Image / Object Imports
Control
Embed Picture
Function
Use this command to embed a picture bitmap or Windows metafile from an external
disk file at the current caret location.
The embedded picture is saved within the document.
Link Picture
Use this command to link a picture bitmap or Windows metafile to the document. The
linked picture appears at the current caret location.
Linked picture data is not saved with the document, only its filename is stored within
the document.
Edit Picture
Use this command to change the width and height of a picture located at the current
caret position. The width and height is specified in inches.
This function also allows you to align (top, bottom, or middle) the picture relative to the
base line of the text.
© 2005 Sparx Systems
Generating Documentation
Insert Object
73
This function is used to embed objects into the text. The list box shows the
applications that are available to create the object.
When you select an application, the editor will launch that application. You can create
the desired object using this application. When you save the application, the editor
inserts an icon for the application. This icon indicates the inserted object. You can
later edit the object by double clicking at it.
Note that you can also use the Paste Special function to import the OLE objects,
provided that the object is available in the clipboard.
Drag/Drop
Function
This is a method of inserting a file object into the text directly. To insert a file, open the
Windows File Manager and locate the file to be inserted. Now click on the icon of the
file and keep the mouse button depressed as you drag the mouse cursor to the editor
window. Release the mouse button at the location where the object should be
inserted. The editor shows an icon to indicate the inserted object.
You can edit this object by double clicked at the icon. An object inserted using this
method makes use of Microsoft's Packager application to tie the file with the
application that originally created it.
Note that a documented problem with the original Packager application may create
errors during this function. Install the corrected version of the PACKAGER.EXE
program for proper functioning.
Background
Picture
This option, available from the Other menu, is used to set a background picture for the
text. The background picture occupies the entire text area.
The picture file can be a Windows' bitmap (.BMP) or Metafile (.WMF).
8.1.3.6.7 Character Formatting
Control
Character Styles
Function
The following character style commands are available:
Command/ Keystroke
Normal/Alt 0
Bold Formatting/Alt 1
Underlining/Alt 2
Italic/Alt 3
Superscript/Alt 4
Subscript/Alt 5
Strike/Alt 6
Character style options allows you to apply one or more style formats to the current
character, or to all characters in a highlighted block of text.
To apply a format to the current character, hit the appropriate keystroke (Alt + 1
through Alt + 6), or select the option from the menu. To apply this format on a block of
characters, highlight a block using the Line Block or Character Block options. Now, hit
the applicable keystroke, or select the option from the menu.
When you type on the keyboard, new characters will automatically assume all the
formatting characteristics of the preceding character.
The template editor allows multiple formats for a character. To apply more that one
format, repeat the procedure described in the previous paragraphs.
To reset all character formats, highlight the characters and select the 'Normal' option
from the menu, or hit the Alt + 0 keystroke.
© 2005 Sparx Systems
74
MDG Integration for Visual Studio 2005
Fonts
Use this option to change the font typeface and point size of the current character, or
a highlighted block of text.
If you wish to change the font for a highlighted block of text, select the block using the
Line or Character highlight function. If you wish to change the font of a single
character, simply position the cursor on that character. Now select the Font option
from the menu, or press Alt + F10 keys together. A dialog box will appear that shows
the list of typefaces and point sizes to select from. Make the desired selection now.
Colors
Use this selection to change the text color of the current character, or a highlighted
block of text.
If you wish to change the color of a highlighted block of text, select the block using the
Line or Character highlight function. If you wish to change the color of a single
character, simply position the cursor on that character. Now select the color option
from the menu. A dialog box will appear that shows the color selections. Make the
desired selection now.
Hidden Text
Text formatted with this attribute is treated as hidden text. Normally the hidden text, as
the name implies, does not appear on the screen or printer. However you can display
hidden text by selecting the Show Hidden Text option from the View menu.
Protected Text
The text formatted with this attribute are protected from the editing changes. The
protected text appears with a light shade in the window. This function is available only
when the protection lock is turned off. The protection lock can be turned off by using
an option from the Other menu.
8.1.3.6.8 Paragraph Formatting
Control
Reset Paragraph
Format
Function
Resets all paragraph formats for the current paragraph, or for a highlighted block
of text.
To reset the paragraph formats for the current paragraph, press the Alt + P keys
together, or select the option from the menu. To reset the formats for a block of
lines, highlight a block and press Alt + P, or select the option from the menu.
Paragraph Centering
Centers all lines in the current paragraph or all lines in a highlighted block of
text.
To center the current paragraph, press Alt + 8 keys together, or select the option
from the menu. To center a block of lines, highlight a block of text and press Alt
+ 8,or select the option from the menu.
Paragraph Right
Justification
Right justifies all lines in the current paragraph, or all lines in a highlighted block
of text.
To right justify the current paragraph, press Alt + 9 keys together, or select the
option from the menu. To right justify a block of lines, highlight a block of text
and press Alt + 9, or select the option from the menu.
Paragraph Justification
Block-justifies text on both left and right margins.
To justify the current paragraph, select the option from the paragraph menu. To
justify a block of lines, highlight a block of text and then select this option from
the menu.
© 2005 Sparx Systems
Generating Documentation
Paragraph Double
Spacing
75
Double space all lines in the current paragraph or all lines in a highlighted block
of text. A double spaced paragraph has a blank line of between each text line.
To double space the current paragraph, press Alt + O, or select the option from
the menu. To double space a block of lines, highlight a block of text and hit the
Alt + O, or select the option from the menu.
Paragraph Indentation
(Left)
Use this selection to create a left indentation for all lines in the current
paragraph, or for all lines in a selected block of text. The successive use of this
option increases the amount of left indentation.
To apply the left indentation to the current paragraph, press the Alt + L, or select
the option from the menu. To apply the left indentation to a block of lines,
highlight a block of text and press Alt + L, or select the option from the menu.
To create the left indentation using the mouse, click the left mouse button on the
indentation symbol on the lower left end of the ruler. While the mouse button is
depressed, drag the mouse to the desired location and release the mouse
button. The indentation created using this method is applicable to every line in
the paragraph except the first line.
Paragraph Indentation
(Right)
Use this selection to create a right indentation for all lines in the current
paragraph or for all lines in a highlighted block of text. The successive use of
this option increases the amount of right indentation.
To apply the right indentation to the current paragraph, press Alt + R, or select
the option from the menu. To apply the right indentation to a block of lines,
highlight a block of text and press Alt + R or select the option from the menu.
To create the right indentation using the mouse, click the left mouse button on
the indentation symbol on the lower right end of the ruler. While the mouse
button is depressed, drag the mouse to the desired location and release the
mouse button.
Paragraph Hanging
Indentation
This option is similar to paragraph left indentation, except that the indentation is
not applied to the first line of the paragraph.
To apply the hanging indentation to the current paragraph, press Alt + T, or
select the option from the menu. To apply the left indentation to a block of lines,
highlight a block of text and press Alt + T, or select the option from the menu.
To create the hanging indentation using the mouse, click the left mouse button
on the indentation symbol on the upper left end of the ruler. While the mouse
button is depressed, drag the mouse to the desired location and release the
mouse button.
Paragraph Keep
Together
When this attribute is turned on for a paragraph, the editor attempts to keep all
lines within the paragraph on the same page.
Paragraph Keep with
Next
When this attribute is turned on for a paragraph, the editor attempts to keep the
last line of the current paragraph and the first line of the next paragraph on the
same page.
Widow/Orphan Control
When this attribute is turned on for a paragraph, the editor attempts to avoid
widow/orphan paragraphs. An 'orphan' paragraph results when the last line of
the paragraph lies on the next page. A 'widow' paragraph results when the first
line of the paragraph lies on the previous page.
© 2005 Sparx Systems
76
MDG Integration for Visual Studio 2005
8.1.3.6.9 Tab Support
The RTF Template Editor supports left, right, center, and decimal tab stops. The tab stops are very useful for
creating columns and tables. A paragraph can have as many as 20 tab positions.
The left tab stop begins the text following a tab character at the next tab position. To create a left tab stop,
click the left mouse button at the specified location on the ruler. The left tab stop is indicated on the ruler by
an arrow with a tail toward the right.
The right tab stop aligns the text at the current tab stop such that the text ends at the tab marker. To create
a right tab stop, click the right mouse button at the specified location on the ruler. The right tab stop is
indicated on the ruler by an arrow with a tail toward the left.
The center tab stop centers the text at the current tab position. To create a center tab stop, hold the shift
key and click the left mouse button at the specified location on the ruler. The center tab stop is indicated on
the ruler by a straight arrow.
The decimal tab stop aligns the text at the decimal point. To create a decimal tab stop, hold the shift key
and click the right mouse button at the specified location on the ruler. The decimal tab stop is indicated on
the ruler by a dot under a straight arrow.
Tab stops can also be created by using the Set Tab selection from the Paragraph menu. This allows you to
specify the tab position, tab type (left, right, center, or decimal) and tab leader (dot, hyphen, underline, or
none).
To move a tab position using the mouse, simply click the left mouse button on the tab symbol on the ruler.
While the mouse button is depressed, drag the mouse to the desired location and release the mouse
button.
To clear a tab position, simply click at the desired tab marker, or select the option from the menu. You can
also clear all tab stops for the selected text by selecting Clear All Tabs option from the menu.
The Snap To Grid option in the Other menu affects the movement of the tabs (and the paragraph
indentation markers) on the ruler. When this option is checked, the movements of these markers are locked
on to an invisible gird at an interval of 1/16 inch.
A tab command is generally applicable to every line of the current paragraph. However, if you highlight a block
of text before initiating a tab command, the tab command is then applicable only to the lines in the highlighted
block of text.
8.1.3.6.10 Page Breaks
A forced page break can be inserted into the document by pressing the Ctrl + Enter keys together, or selecting
from the Edit menu Break->Section Break. A page break places the text after the page break on the following
page. A forced page break is indicated by a solid line in the editing window.
In the Print View editing mode, the editor also creates automatic page breaks when the text overflows a page.
An automatic page break is indicated by a dotted line in the editing window. As the name implies, these page
breaks are calculated automatically by the editor between the keystrokes. The repagination process is time
consuming, and sometimes there may not be enough time for a large document to complete the repagination
between the edits. Therefore, the menu also provides an option to initiate complete repagination on demand.
Control
Inserting Page
Number
Function
The Page Number selection from the Insert menu allows you to insert the page
number into the document. The page number string is inserted at the current cursor
position. This string is displayed using a gray color.
© 2005 Sparx Systems
Generating Documentation
77
Inserting Page
Count
The Page Count selection from the Insert menu allows you to insert the total number of
pages into the document. The page count string is inserted at the current cursor
position. This string is displayed using a gray color.
Show Page Border
When option is turned on, the editor displays the borders around the text on the
screen. This option is available in Page mode only. The FittedView option must be
turned off.
8.1.3.6.11 Header/Footers
The page header/footer functionality is available in the Page Mode only.
Control
Show Page Header/
Footer
Function
Normally, the editor does not show the header and footer for a page. Check this option
in the View menu to display the page header and footer.
This option does not allow you to edit the content of the header/footer. Every section in
a document can have its own page header and footer. If a section does not have a
page header/footer of its own, this option shows the header/footer from the preceding
section.
Edit Page Header/
Footer
Enables editing of the text for the page header and footer. This option is available from
the Edit menu.
Insert Footnote
Inserts a footnote at the current cursor location. The footnote text is displayed at the
bottom of the page.
Edit Footnote Text
This option displays the footnote text in-line with the regular text. It allows you to edit
the footnote text. The modified footnote is displayed at the bottom of the page.
Insert Bookmark
This dialog box is activated from the Insert menu. It allows you to place a bookmark
(new or existing) at the current text location. You can also position the cursor at a
specified bookmark, and delete existing bookmarks.
8.1.3.6.12 Table Commands
The table menu is available in the Page or Print View modes only (see Editing Modes). This menu contains
commands for the creation of a new table, or to edit an existing table's attributes.
Control
Insert Table
Function
Inserts a new table in the document. This option prompts the user for the initial
number of rows and columns in the table.
The editor initially creates cells of equal width. The user can, however, change the cell
width by dragging the cell borders using the mouse. In Page Mode, the table cells are
arranged by rows. In Print View Mode, the table structure is not visible.
Insert Table Row
Inserts a new row before the current table row. The new table row has the same
number of columns as the current row.
Merge Table Cells
Merges together highlighted cells. The width of the resulting cells is equal to the sum
of all merged cells. If the highlighted cells span more than one table row, this
operation creates multiple merged cells, each within its row.
Split Table Cell
Splits the current table cell into two cells of equal width. The entire text of the original
cell is assigned to the first cell. The second cell is created empty.
© 2005 Sparx Systems
78
MDG Integration for Visual Studio 2005
Delete Table Cells
Deletes selected cells from a table. A dialog box allows the user to select the cells for
the deletion.
The dialog box has three options: cells, columns, and rows.
Cells selects the current cell or all the cells in a highlighted block of text.
Columns selects all the cells in the current column, or the cells of all columns in the
highlighted block of text.
Rows selects all the cells in the current row, or the cells of all rows in the highlighted
block of text.
A table is automatically deleted when all its cells are deleted.
Table Row
Position
Use this option to position the table or selected table rows. A dialog box lets you
position the table as left justified, centered, or right justified.
Table Cell Border
Use this option to create borders around selected cells. A dialog box allows the user
to select the cells for this operation.
The dialog box has three options: cells, columns, and rows.
Cells selects the current cell or all the cells in a highlighted block of text.
Columns selects all the cells in the current column, or the cells of all columns in the
highlighted block of text.
Rows selects all the cells in the current row, or the cells of all rows in the highlighted
block of text.
The user can specify the width of each border (top, bottom, left and right). The border
width should be less than the cell text margin. The cell text margin is the distance from
the left edge of the cell to the beginning of the text in the cell. The border width is
specified in twips (1440 twips equal to one inch).
Table Cell
Shading
Use this option to shade the selected cells. A dialog box allows the user to select the
cells for this operation.
The dialog box has three options: cells, columns, and rows.
Cells selects the current cell or all the cells in a highlighted block of text.
Columns selects all the cells in the current column, or the cells of all columns in the
highlighted block of text.
Rows selects all the cells in the current row, or the cells of all rows in the highlighted
block of text.
The shading is specified in terms of a shading percentage. A value of 0 indicates a
white background, where as the value of 100 indicates a black background.
Show Table Grid
Lines
Enables or disables the display of table grid lines. The table grid lines are for display
purpose only and will not appear on the printed document.
8.1.3.6.13 Sections and Columns
The editor allows you to divide a document into multiple sections. A multiple section document is useful when:
a) you need to vary the page margins from one page to another
b) you need to create multiple columns of text.
Control
Function
© 2005 Sparx Systems
Generating Documentation
79
Creating a New Section
To create a new section, select the Break submenu option from the Edit menu. A
section break line (double solid line) is created before the current line. The new
section begins at the text following the break line.
Editing the Section
Parameters
The following section parameters can be edited:
Number of columns and column spacing.
Portrait or Landscape orientation.
Placement of the text on the next page.
Page Margins
The first three parameters can be edited by selecting Section Edit from the Edit
menu. The last parameter can be edited by selecting Page Setup from the File
Menu.
Deleting a section
break line
To delete a section break line, simply position the cursor on the section break
line and hit the <DEL> key.
Multiple Column Editing
This option is available in the Print View and Page Modes only (See Editing
Modes)
To create multiple columns for a section select Section Edit from the Edit menu
and specify the number of columns to create. You can also specify the space
between the columns.
Text in a multiple column section wraps at the end of the column. When the text
reaches the end of the page, or the end of a section, new text is placed in the
next column.
In the Print View mode, the multiple columns are not actually seen in the
window. In the Page Mode, columns are visible as they would be when the text is
printed. Therefore, the Page Mode is useful when editing multiple column text.
Column Break
Normally in a multiple column section, the text flows to the next column at the
end of the current column. The column break option can be used to force the
text to the next column before the current column is completely filled.
A column break can be inserted by selecting the option from the menu (Edit>Insert Break...). A column break is indicated by a line with a 'dot and dash'
pattern. The text after the column break line is placed on the next column. To
delete the column break line, simply position the cursor on the line and hit the
<DEL> key.
8.1.3.6.14 Stylesheets & TOC
The editor supports Character and Paragraph-type stylesheet style items. The Character stylesheet style
constitutes a set of character formatting attributes and is applied to a character string. The Paragraph
stylesheet style constitutes not only a set of character formatting attributes, but also a set of paragraph
formatting attributes. The paragraph style is applied to one or more paragraphs.
Control
© 2005 Sparx Systems
Function
80
MDG Integration for Visual Studio 2005
Create and edit
styles
A stylesheet style is created and modified using the Edit Style option from the Edit
menu. This opens a dialog box which allows you to choose between a character style
or a paragraph style.
You can select an existing style to modify from the list box or enter a name for a new
style. Once you click the 'Ok' button, the recording of the stylesheet properties begins.
You can use the ruler, toolbar, or the menu selections to modify the stylesheet items.
The ruler, toolbar, and menu also reflect the currently selected properties for the
stylesheet item. Please note that the paragraph properties are allowed only for the
paragraph type of stylesheet item.
After you have selected the desired properties, terminate the stylesheet editing mode
by either selecting the Edit Style selection from the menu again or by clicking
anywhere in the document. If the existing stylesheet item was modified, the document
automatically reflects the updated stylesheet properties. If a new stylesheet item was
created, your next step is to apply the style to the desired text by choosing the Style
option from the Font or Paragraph menu selection.
Apply character
styles
The Style selection in the Font menu allows you to apply a stylesheet style to the
currently highlighted character string.
Apply paragraph
styles
The Style selection in the Paragraph menu allows you to apply a stylesheet style to
the current paragraph. To apply a style to a range of paragraphs, highlight the
paragraphs before selecting the menu option.
Table of Contents
To insert a table of contents, first create the heading styles using the Edit Style option
from the Edit menu. For example, if you wish to insert a three level deep table of
contents, create heading styles 'heading 1', 'heading 2', and 'heading 3'. Then place
the cursor at the heading lines and apply a suitable heading style using the Style
menu selection from the Paragraph menu. The last step is to position the cursor
where you wish to insert the table of contents and select the Table of Contents menu
selection from the Insert menu.
The table-of-contents are automatically updated whenever repagination occurs.
8.1.3.6.15 Frame & Drawing Objects
A frame is a rectangular area on the page. A frame can contain both text and picture. The text outside the
frame flows around the frame.
A drawing object can be a text box, rectangle or a line. The drawing object overlays on top of the text. To
embed a Frame or Drawing object, select the appropriate option from the Insert menu. The new object will be
inserted at the current text position.
To insert text into the frame or a text box, click a mouse button inside the frame to select the frame. Now type
the text at the cursor position.
To size a frame, click a mouse button inside the frame to select the frame. Now click the left mouse button on
a sizing tab and move the mouse while the mouse button is depressed. Release the mouse when done. The
text inside the frame is automatically wrapped to adjust to the new width. If the new height of the frame is not
enough to contain all text lines, the frame height is automatically adjusted to include all lines. If the frame
contains only a picture, the picture size is automatically adjusted to fill the frame.
To move the frame, click a mouse button inside the frame to select the frame. Now move the mouse cursor
just outside the frame until a plus shaped cursor appears. Click the left mouse button. While the mouse button
is depressed, move the frame to the new location and release the mouse button.
To edit the base vertical position of the frame, select the 'Vertical Frame Base...' option from the edit | frame
menu.
© 2005 Sparx Systems
Generating Documentation
81
Frames locked to the top of the page or the top of the margin retain their vertical position when text is inserted
before them. To edit the border and the background of a drawing object, select the 'Edit Drawing Object'
option from the edit | frame menu. This option is available in the Page Mode only.
8.1.3.6.16 View Options
This menu allows you to turn on and off the following viewing options:
Control
Page Mode
Function
In this mode, the editor displays one page at a time. This mode is available when the
editor is called with both the Word Wrap and the Page Mode (or the PageView flag)
flags turned on.
This mode is most useful for the documents containing multiple columns, as the
columns are displayed side by side. In addition, this mode provides all the features of
the Print View mode.
Fitted View
A special case of the page mode, in which the text wraps to the window width and the
soft page breaks are not displayed..
Ruler
The Ruler shows tab stops and paragraph indentation marks. The ruler can also be
used to create or delete tab stops.
Tool Bar
The tool bar provides a convenient method of selecting fonts, point sizes, character
styles and paragraph properties. The tool bar also shows the current selection for font,
point size and character styles.
Show Status
Ribbon
The status ribbon displays the current page number, line number, column number and
row number. It also indicates the current insert/overtype mode.
Show Hidden Text
This option displays the text formatted with the hidden attribute (see Character
Formatting Options) with a dotted underline. When this option is turned off, the hidden
text is not visible.
Show Paragraph
Mark
This option displays a symbol (an inverted 'P') at the end of each paragraph. This
option may be useful when working with lines with many different heights.
Hyperlink Cursor
This option is used to display the hyperlink cursor when the cursor is positioned on a
hypertext phrase. The hyperlink cursor is an image of a hand with a finger pointing to
the text.
Zoom
This feature allows you to shrink or enlarge the display of the document text. The
editor allows a zoom percentage between 25 and 200.
8.1.3.6.17 Navigation Commands
Control
© 2005 Sparx Systems
Function
82
MDG Integration for Visual Studio 2005
Jump
Use this function to reposition to a desired line number.
You can invoke this function by pressing the F10 key, or selecting the option from the
menu. The editor will then display a dialog box so that you can enter the line number
to jump to.
See Scrolling Through the Text for other navigation functions.
8.1.3.6.18 Search and Replace
Control
Search a Text
String
Function
Use this function to locate a string of characters in the current file. The editor will
search for the first instance of the given character string. To find the subsequent
instances of the same character string, use Search Forward or Search Backward
commands.
You can invoke this function by pressing the F5 key, or selecting the option from the
menu. The editor will display a dialog box where you can enter the character string to
locate. You can specify the search to be in a backward or forward direction from the
current cursor position, or you can specify the search to take place from the beginning
of the file.
You can also force a non-case-sensitive search, in which case the string is matched
irrespective of the case of the letters in the string.
Search Forward
Use this function to locate the next instance of a previously located string using the
Search Function. If the Search Function is not yet invoked, this function will call the
Search Function instead.
You can invoke this function by pressing the Control + F Keys together (or select the
option from the menu).
Search Backward
Use this function to locate the previous instance of a previously located string using
the Search Function. If the Search Function is not yet invoked, this function will call
the Search Function instead.
You can invoke this function by pressing the Control + Shift + F Keys together (or
select the option from the menu).
Replace a Text
String
Use this function to replace a character string with another character string.
You can invoke this function by pressing the F6 key, or selecting the option from the
menu. The editor will show a dialog box where you will enter the old and new
character strings.
You may also choose to conduct the replace only within a selected part of the file. To
choose such a block of text, the desired text must be highlighted before invoking the
replace function.
The dialog box also offers you an option to force the editor to verify each replace.
© 2005 Sparx Systems
Generating Documentation
83
8.1.3.6.19 Highlighting
Control
Highlight a Character
Block
Function
Use this function to highlight a block of characters.
Mouse: Position the mouse cursor on the first character of the block and
depress the left button. While the left button is depressed, drag the mouse to the
last character of the block and release the mouse.
Keystroke: Position the caret on the first character of the block and press the
Shift key. While the key is pressed, use the position keys to move the caret to
the last character of the block and release the Shift key. Normally, you can also
use any position key in combination with the Shift key to create, expand, or
shrink the text selection.
Normally, a function that utilizes a character block also erases any highlighting.
To explicitly erase the highlighting click a mouse button again or press any
position key.
Highlight a Line Block
Use this function to highlight a block of lines.
Mouse: Position the mouse cursor at any position on the first line of the block
and depress the right button. While the right button is depressed, drag the
mouse to the last line of the block and release the mouse.
Keystroke: Position the caret at any position on the first line of the block and
press F8. Use the Up and Down arrow keys to position the caret on the last line
and press F8 again.
Normally, a function that utilizes a line block also erases any highlighting. To
explicitly erase the highlighting click a mouse button again or press the F8 key
again.
Highlight a Word
© 2005 Sparx Systems
Double click any mouse button on the desired word to highlight the word.
Part
IX
Import Database Schema
85
9 Import Database Schema
MDG integration for Visual Studio 2005 supports importing database tables from an ODBC data source.
Tables will be imported as stereotyped classes with suitable data definitions for the source DBMS.
Import Database Tables and Stored Procedures
To import database tables and stored procedures, follow the steps below:
Note: Import of stored procedures is supported only for SQL Server and Oracle.
1.
Select any package in the Logical View.
2.
To import into the package only, right-click on the package to bring up the context menu.
3.
Select Code Services | Import DDL schema from ODBC.
4.
To import into a diagram, select a suitable diagram in the selected package.
5.
Right click on the diagram to open the context menu.
6.
Select Import DDL schema from ODBC.
7.
Select an ODBC data source, then press Import to start the import. When synchronizing existing
classes, select the appropriate check box to determine whether the model comments, default values or
constraints are to be synchronized with the ODBC tables. Select "Include User Stored Procedures" to
also import stored procedures.
Note: It is only possible to import into a diagram if it is in the selected package. If a diagram from
another package is open, a message will give the option to cancel the import or to continue importing
into the package only. The Dialog includes options to import into Diagram & Package, or Package
Only. If no diagram is open, the Package Only button will be selected and the options will be disabled.
If the open diagram is in the selected package, either option can be selected.
8.
© 2005 Sparx Systems
Choose an ODBC data source. Select a suitable data source from the ODBC dialog (ODBC must be
installed and configured on your machine for this to work correctly).
86
MDG Integration for Visual Studio 2005
9.1 Select a Data Source
Importing DDL from existing data sources requires you to have installed and configured a suitable ODBC
connection. From the Import DDL dialog you can select the ODBC data source using the standard windows
ODBC set-up dialog.
9.2 Select Tables
Once you have opened the ODBC data source, EA will acquire a list of tables and stored procedures suitable
for importing. This is presented in a list form for you to select from. Highlight the tables and/or stored
procedures you wish to import and clear those you do not require.
Selection shortcuts:
· To select all tables, press Select All
· To clear all tables, press Select None
· Hold down the Ctrl key while clicking on tables to multiple select
· Hold down Shift and click on table to select a range
The selection dialog:
© 2005 Sparx Systems
Import Database Schema
87
9.3 Imported Class Elements
When you import DDL table definitions they are converted to stereotyped classes according the UML Data
Modeling Profile.
If any Stored Procedures are imported, a class stereotyped as a <<stored procedures>> container is created
having the same name as the database being imported. The stored procedures are represented as operations
in this class.
© 2005 Sparx Systems
Part
X
Advanced Features
89
10 Advanced Features
Below you will find links to some of the more advanced features that are available within the MDG integration
for Visual Studio 2005.
Links:
Baselines and Differences
Validate_Model
10.1 Baselines and Differences
Baselines
MDG integration for Visual Studio 2005 provides a facility to "Baseline" (snapshot) a model branch at a
particular point in time. Baselines are in XMI format and are stored within the model in compressed
format. More than one baseline can be stored against a single MDG integration for Visual Studio 2005
package. Using Baselines, a snapshot can be taken of a model branch at a particular point in
development for later comparison to the current package state.
Compare (Diff)
The Compare (diff) Utility lets you explore what has changed within a model over time and how
previous versions of a model branch differ to what is currently in the model. This utility allows you to
compare a model branch in EA with a Baseline created using the Baseline functionality, a file on
disk, created previously using the EA XMI export facility, or the current version controlled XMI file on
disk as created when using Version Control in EA
For more information, see:
·
·
Baselines
The Compare Utility
10.1.1 Baselines
Baselines
Enterprise Architect (Corporate Edition) provides a facility to "Baseline" (snapshot) a model branch at a
particular point in time. Baselines are in XMI format and are stored within the model in compressed format.
More than one baseline can be stored against a single EA package.
Using Baselines, a snapshot can be taken of a model branch at a particular point in development for later
comparison to the current package state. This is most useful for determining changes made to the model
during development compared to some Baseline saved at a crucial point, for example the completion of a
phase or version iteration.
Baselines are particularly useful during requirements management to check for changes, additions and
deletions which have occurred since the start of the current work phase. Knowing how a model has changed is
an important part of managing change and the overall development process.
Baselines are generally used in conjunction with the Compare utility (diff) which is also built into the Corporate
and Professional versions of EA.
A typical scenario for using baselines would be to:
1.
© 2005 Sparx Systems
Create the base model branch to a sufficient point to create a Baseline (checkpoint). Create and store
the Baseline as Version 1.
90
MDG Integration for Visual Studio 2005
2.
As work continues on development, managers and developers can check the current model branch
against the baseline for important modifications, additions and deletions. The Compare (diff) tool can
be invoked from the Baseline dialog to check the current model branch against the stored version.
3.
As required, minor baselines can be created to check recent progress. these "temporary baselines"
are useful for managing change when a lot of work is being done and it is important to only see what
has changed in the last 24 hours for example.
4.
At sign off or the move to a new version/phase, a major baseline can be created to capture the new
state of the model. Minor baselines created earlier may be deleted if required to save space.
Limitations:
Currently diagrams are not differenced, only the elements and links between them - including all associated
information, such as tests, resources, problems etc.
Large packages may take considerable time to fully difference and it may pay to uncheck the "Deep Compare"
option on the Baseline dialog. In this case EA will difference the highest level items first and only move into
sub items when they are clicked on in the tree (compare "on demand").
See Also
· Managing Baselines
· Creating Baselines
10.1.1.1 Managing Baselines
To open the Manage Baselines dialog, right-click on the package at the head of the appropriate model branch
and select the Package Control | Manage Baselines command.
Item
Current Baselines
Show Differences
Functionality
The list of baselines for the current model branch.
Create New Baseline
Delete Selected
Import File
Creates a new baseline
Deletes the selected baseline.
Recursively Compare
If set performs a Deep Compare; otherwise performs a Shallow Compare.
See Deep Compare for more details.
Opens the help file on this page.
Help
Runs the compare utility on the selected baseline and the current
model branch.
Import an XMI file from the file system as a baseline for this current
model branch.
© 2005 Sparx Systems
Advanced Features
Close
91
Closes the Manage Baselines dialog.
10.1.1.2 Creating Baselines
The New Baseline dialog is opened by pressing Create New Baseline from the Manage Baselines dialog (see
Managing Baselines).
Pressing OK will create a new baseline and return you to the Manage Baselines dialog.
Item
Name
Version
Note
Functionality
Fixed as the Package Name for the currently selected model branch.
You are free to enter whatever you like in this field, but it must be unique for the
current branch.
By default shows current time and date, but you are free to enter anything in
this field.
10.1.2 The Compare Utility (Diff)
The Compare Utility (Diff)
MDG integration for Visual Studio 2005 has a comprehensive and powerful differencing utility built in. This
utility allows you to compare a model branch in MDG integration for Visual Studio 2005 with:
1.
A Baseline created using the Baseline functionality
2.
A File on disk, created previously using the MDG integration for Visual Studio 2005 XMI export facility
(must be in MDG integration for Visual Studio 2005 format and have the same package as the root
node)
3.
The current version controlled XMI file on disk as created when using Version Control in MDG
integration for Visual Studio 2005
Compare (diff) lets you explore what has changed within a model over time and how previous versions of a
model branch differ to what is currently in the model. It is even possible to do a full model compare by
exporting all of Model A to XMI, then using Compare to File from within the current model (Model B).
Comparing and checking model development at various points in the process is an important aspect of
managing change and development, keeping track of what is being modified and ensuring the development
and design process is on track.
Access to the Compare Utility is available from:
1.
© 2005 Sparx Systems
The Baseline Dialog (from the Project Browser context menu, select Current Package | Manage
92
MDG Integration for Visual Studio 2005
Baselines).
Limitations
The following known limitations apply:
· Diagram compare is currently not supported.
· Differencing very large package structures can be slow. It is recommend that you set the Deep Compare
check box to false.
· Currently no "Print" facility to export Compare results to file.
10.1.3 Deep Compare
On the Baseline dialog, a "Recursively Compare" checkbox is provided. If set this will select a "Deep
Compare", if cleared it will select a "Shallow Compare".
A Deep Compare will recurse through all packages and all elements immediately and fully populate the result
tree. This is the best way to immediately load and see all changes, but may be very slow on large package
structures.
The Shallow Compare is used on large packages, and only loads and compares the high level items first. As
you click on nodes and open them up, if the node contains child items, they will be then "compared on
demand" and the result shown in the tree. This lets you handle very large packages in a timely fashion and
focus on only selected aspects of the model branch.
10.1.4 Example Comparison
Below is what you will find in a comparison
·
A hierarchy of model elements is displayed in the left-hand pane. It is clearly visible, from the Status
column and from the triangular icon, which elements in the hierarchy have changed since the baseline.
·
Shown below, In the right-hand side of the result window, a table of properties is displayed for the
element currently selected in the left-hand pane. The values of the properties in the current model and
in the baseline are displayed. If any properties have changed between the model and the baseline, the
row is highlighted. This example shows that for the class named "AbstractFactory", the date modified,
the code generation language and the version number have all changed since the baselined version.
10.2 Validate Model
Model Validation can be performed from within Enterprise Architect. To activate, simply right click on a
package and select Open in Enterprise Architect.
© 2005 Sparx Systems
Advanced Features
93
Model Validation is explained further here.
10.2.1 Model Validation
Model Validation is used to validate UML models against known UML rules, as well as any constraints defined
within the model using the Object Constraint Language (OCL) . Model Validation can be run against a single
UML element a diagram or an entire package. The details of the Model Validation process, against the item
being validated, is defined below:
· Validating a UML element will validate the element and its children, features (attributes & operations) and
relationships (connectors & links).
· Validating a UML diagram will validate the diagram itself (for correctness) as well as any elements and
connectors within it.
· Validating a UML package will validate the package, subpackages and all elements, connectors and
diagrams within it.
To use the Model Validation use the following steps:
1. Select the Package, Diagram or Element either from Project View, or within an open diagram.
2. Select Project | Model Validation | Validate Selected from the main menu. [Ctrl+Alt+V]
3. EA will perform the validation process. Results are displayed in the Output window (the output window can
be accessed using the View | Output menu command.
A progress window is also displayed with a cancel button, allowing you to cancel the validation process at
any time, additionally you can also use the Project | Model Validation | Cancel Validation command.
See Also
· Configuring Model Validation
· Rules Reference
10.2.1.1 Configuring Validation
The Model Validation Configuration dialog is used to enable and disable the rules that are run with the model
validator. Additional rules may be defined in this dialog from any additional addins that may be installed
alongside EA. Additionally, specific Model Validation settings can assigned to a Perspective, for more
information regarding Perspectives and their use please refer to the Configure Perspectives topic.
The Model Validation Configuration dialog can be accessed via the main menu by selecting Project | Model
Validation | Configure.
See Also
· Model Validation
· Rules Reference
10.2.1.2 Rules Reference
The Model Validation feature works against a set of validation rules arranged in the following groups:
· (Element, Relationship, Feature, Diagram): Well-Formedness
Responsible for checking whether or not an Element, Relationship, Feature or Diagram is well-formed. This
group of rules includes checks such as whether item is a valid UML item and whether a diagram contains
valid elements within it
· Element: Composition
Responsible for checking whether or not a UML Element contains valid children, whether it contains the
right number of valid children, and whether or not the element is missing any required children.
© 2005 Sparx Systems
94
MDG Integration for Visual Studio 2005
· (Element, Relationship, Feature): Property Validity
Responsible for checking whether or not the item in question has the correct UML properties defined for it
and whether they contain incorrect or conflicting values. For more information about these properties refer
to the Custom Properties section.
· (Element, Relationship, Feature): OCL Conformance
Responsible for validating an item against any defined constraints in OCL.
10.2.1.2.1 Well-Formedness
This group of rules is responsible for checking whether or not an Element, Relationship, Feature or Diagram is
well-formed. This group of rules includes checks such as whether item is a valid UML item and whether a
diagram contains valid elements within it. Reported violations include:
Violatio
n ID
Description
Information
MVR010
001
<<Element>> is not a valid UML
Element.
The element is not a recognized UML 2.0 element
MVR050
001
<<Relationship>> is not a valid UML
Relationship
The relationship is not a recognized UML 2.0
relationship
MVR050
002
<<Relationship>> is not legal for
<<Start Element>> --> <<End
Element>>
The relationship between the given start and end
elements is not valid for those elements.
MVR050
003
<<Parent Element>>:isLeaf=true and
cannot be generalized by <<Child
Element>>
The generalization relationship cannot exist
between parent and child elements because the
parent element is defined as a Leaf element.
MVR050
004
<<Child Element>>:isRoot=true and
cannot generalize <<Parent
Element>>
The generalization relationship cannot exist
between parent and child elements because the
child element is defined as a Root element.
MVR050
005
<<Element>> cannot generalize self
The element cannot be self-generalized
MVR0B0
001
Statechart violation: <<extended
information>>
The state diagram contains a UML violation, refer
to the extended information for more information
about the detected violation
See Also
· Model Validation
· Configuring Model Validation
· Rules Reference
10.2.1.2.2 Element Composition
This group of rules is responsible for checking whether or not a UML Element contains valid children, whether
it contains the right number of valid children, and whether or not the element is missing any required children.
Error ID
Description
Information
MVR020
001
<<Element>> is missing required
child element <<Child Element>>
The element is missing a child element of type
"Child Element"
MVR020
002
Invalid UML package child.
The element cannot be a direct package child and
must be a child of another element (for example:
Ports must be children of other elements, and not
direct UML package members)
© 2005 Sparx Systems
Advanced Features
MVR020
003
Invalid child <<Child Element
name>> (<<Child Element Type>>).
95
The child element is invalid on the tested parent
element
See Also
· Model Validation
· Configuring Model Validation
· Rules Reference
10.2.1.2.3 Property Validity
This group is responsible for checking whether or not the item in question has the correct UML properties
defined for it and whether they contain incorrect or conflicting values. For more information about these
properties refer to the Custom Properties section.
Error ID
Description
Information
MVR030
001
<<Element>>:<<Property>> property
is undefined
The element property contains no value
MVR030
002
<<Element>>:<<Property>> property
has invalid value: "<<Value>>"
The element property contains an invalid value
MVR030
003
<<Element>>:isLeaf=true and cannot
be abstract
The element's isLeaft and isAbstract properties are
both set to true, which is invalid
MVR060
001
<<Relationship>>:<<Property>>
property is undefined
The relationship property contains no value
MVR060
002
<<Relationship>>:<<Property>>
property has invalid value: "
<<Value>>"
The relationship property contains an invalid value
See Also
· Model Validation
· Configuring Model Validation
· Rules Reference
10.2.1.2.4 OCL Conformance
This group is responsible for validating an item against any defined constraints in OCL. The Object Constraint
Language is used to describe expressions on UML Models. OCL is used to express side-effect free
constraints. OCL constraints may be added to any element, relationship or attribute in EA.
Error ID
Description
Information
MVR040
001
OCL violation: <<violated OCL>>
The element violates the OCL constraint specified.
MVR070
001
OCL violation: <<violated OCL>>
The relationship violates the OCL constraint
specified.
MVR0A0
001
OCL violation: <<violated OCL>>
The attribute violates the OCL constraint specified.
Defining OCL Constraints for an Element
OCL constraints may be added to an element via the Properties dialog. Click on the Constraints tab and
select OCL from the Type drop down list. It is important to note that in order to have a valid OCL constraint
requires that the syntax be correctly formed, if the expression is not correct EA will inform the user that the
OCL constraint is not valid. To perform an OCL Validation, ensure that Constraint (OCL) Rules is selected in
the Model Validation Configuration Dialog, OCL violations are recorded in the Model Validation output window.
© 2005 Sparx Systems
96
MDG Integration for Visual Studio 2005
Defining OCL Constraints for a Relationship
OCL constraints may be added to a relationship via the Properties dialog. Click on the Constraints tab and
select OCL from the Type drop down list. It is important to note that in order to have a valid OCL constraint
requires that the syntax be correctly formed, if the expression is not correct EA will inform the user that the
OCL constraint is not valid. To perform an OCL Validation, ensure that Constraint (OCL) Rules is selected in
the Model Validation Configuration Dialog, OCL violations are recorded in the Model Validation output window.
Defining OCL Constraints for a Feature (Attribute)
OCL constraints may be added to a feature via the Properties dialog. Click on the Constraints tab and select
OCL from the Type drop down list. It is important to note that in order to have a valid OCL constraint requires
that the syntax be correctly formed, if the expression is not correct EA will inform the user that the OCL
constraint is not valid. To perform an OCL Validation, ensure that Constraint (OCL) Rules is selected in the
Model Validation Configuration Dialog, OCL violations are recorded in the Model Validation output window.
See Also
· Model Validation
· Configuring Model Validation
· Rules Reference
© 2005 Sparx Systems
Index
Index
-EEA Software Product License Agreement
EAP - Attach Existing 10
EAP - New Model 10
EAP External Server 11
Edit Post 37
Edit UML diagrams 16
Editing Diagrams with EA 17
Editor Commands 67
Element - Links 26
Element Properties 20, 21
Element Scenarios 27
EULA 4
External Requirements 25
External Responsibilities 25
-**.EAP
9
-AAbstract XSD models 49
Add New Elements 17
Add New Packages 17
Add Tagged Values 32
Adding an .EAP file 9
Adding Content 66
Advanced Settings 23
Advanced Tag Management
Associated Files 28
Attach Existing EAP 10
31
File and Print Options 68
Formatting 73
Forum 36
Forum - Adding a New Category 36
Forum - Adding a New Post 37
Forum - Adding a New Topic 37
Forum - Editing a Post 37
Forum - Message Dialog 37
Forum - Posting and Editing Messages
Forum - Replying to a Post 37
Baselines 89
Baselines - Creating 91
Baselines - Managing 90
Baselines and Differences 89
Block Editing 70
Boundary Object Settings 29
Boundary Properties 29
-G-
-CChild Sections 67
Clipboard 71
Code Generation 56
Connect to External Server Repository
Constraints 25
Copyright Notice 3
© 2005 Sparx Systems
11
General Properties 22
General Settings 22
Generate WSDL 53
Generate XSD 52
-HHyperlinks
-D51
4
-F-
-B-
Default UML to XSD mappings
Diagram Properties 19
Documentation - RTF 62
97
14
-IImage and Object Imports
Import Binary 58
72
36
98
MDG Integration for Visual Studio 2005
Import Database Schema from ODBC 85
Import DDL Schema from ODBC 85
Import Directory 56
Import WSDL 53
Import XSD 52
Imported Class Elements 87
Insert Element at Cursor - Boundary 29
Introduction 3
-LLicense Agreement 4
Line Editing 70
Link Multiple Projects 9
Link Package 9
Link to a Model Package 9
Linking Multiple Projects 9
Links - Element 26
-MMDG Integration for VS 2005 User Guide 6
Model Driven Transformation 58
Model Package - Link to 9
Model Page 13
Model Tab 13
Model Tab - Hyperlinks 14
Model Tab - View UML Diagrams 15
Model Validation 93
Model Validation - Configuring Model Validation 93
Model Validation - Rules Reference 93
Model Validation Rule - Element Composition 94
Model Validation Rule - OCL Conformance (Element,
Relationship, Feature) 95
Model Validation Rule - Property Validity (Element,
Relationship, Feature) 95
Model Validation Rule - Well Formedness (Element,
Relationship, Feature, Diagram) 94
Multiple Linkings 9
-NNew Category 36
New Model EAP 10
New Post 37
New Topic 37
-OObject Classifiers 33
Object Connections 26
Object Links 26
Object Properties 21
Object Scenarios 27
-PParagraph Formating 74
Printing 68
Project Forum 36
Project View 19
Properties - Element 21
Properties - Object 21
-QQuick Add of Tagged Values
32
-RReports - RTF 62
Requirements 24
Responsibilities 24
Reverse Engineer 56, 58
Reverse Engineer ODBC data sources
Reverse Engineering 56
RTF - Generate Document 62
RTF Adding Content 66
RTF Block Editing 70
RTF Child Sections 67
RTF Clipboard 71
RTF Dialog Options 63
RTF Document Options 64
RTF Documentation 62
RTF Editor Commands 67
RTF File and Print Options 68
RTF Formatting 73
RTF Image and Object Imports 72
RTF Line Editing 70
RTF Paragraph Formating 74
RTF Reports 62
RTF Scrolling through text 68
85
© 2005 Sparx Systems
Index
RTF Selecting Model Elements for Documentation
66
RTF Tabular Sections 67
RTF Template Editor 66
RTF Templates Dialog 65
-SScenarios 27
Scenarios - Element 27
Scrolling through text 68
Search Tool 15
Select a Data Source 86
Select Tables 86
Selecting Model Elements for Documentation 66
Set Appearance Options 19
Set Appearance Options - Visible Class Members
20
-TTabular Sections 67
Tagged Values 30
Tagged Values - Advanced Tag Management
-UUML 13
UML 2.0 13
UML Model 9
UML Profile for XSD 42
Using Classifiers 33
Using UML 2.0 13
-VView Model 13
View UML Diagrams 15
Visible Class Members 20
-WWeb Services (WSDL) 52
Web Services (WSDL) - Generate WSDL 53
Web Services (WSDL) - Import WSDL 53
Web Services (WSDL) - Model WSDL 52
WSDL 52, 53
© 2005 Sparx Systems
31
99
-XXML Schema (XSD) 40
XML Technologies 40
XML Technologies - Generate WSDL 53
XML Technologies - Import WSDL 53
XML Technologies - Web Services (WSDL) 52
XML Technologies - Web Services (WSDL) - Model
WSDL 52
XML Technologies - XML Schema (XSD) 40
XML Technologies - XML Schema (XSD) - Abstract
XSD models 49
XML Technologies - XML Schema (XSD) - Default
UML to XSD mappings 51
XML Technologies - XML Schema (XSD) - Generate
XSD 52
XML Technologies - XML Schema (XSD) - Import
XSD 52
XML Technologies - XML Schema (XSD) - Model
XSD 40
XML Technologies - XML Schema (XSD) - UML
Profile for XSD 42
XML Technologies - XML Schema (XSD) - XSD
Datatype Packages 49
XSD 52
XSD - XML Schema 40
XSD Datatype Packages 49
XSD Mappings 51
100
EA - Visual Studio 2005 Integration
© 2005 Sparx Systems
MDG Integration for Visual Studio 2005
www.sparxsystems.com.au