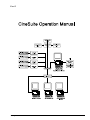
1
CineSuite User’s Manual
TM
CineSuite Software Package
Cinema Products
Preliminary
March 2006
CineSuite Reference Manual
Quick Start Guide
Part 1
Introduction
CineSuite is designed to be an enterprise wide software solution. This is accomplished by creating
separate CineSuite applications that perform different functions. By separating the software
applications, the flexibility of the CineSuite enterprise is significantly increased. Applications are
not required to be running on the same computer, or even in the same building. Communication
between the modules is through the Internet standard TCP/IP protocol. What this means is that the
CineSuite applications are capable of communicating with each other across the Internet.
The following illustration shows the complete CineSuite connection scheme. The CineSuite
Location Server allows communication with other location servers without them knowing each
others IP address.
Figure 1-1 CineNet Network
CineSuite Client applications can connect to the CineSuite location server across the Internet but the
user must first know the server’s IP address. It is not required that the Host know the IP address of
the clients. The CineNet driver connects the eCNA or PCI-64 CNA automation network to the
clients and the CineSuite Manager. The Driver is also responsible for remote clients, remote location
server connections, ticketing system interfacing, and network activity logging. The CineSuite
Manager interfaces with the user allowing manipulation, monitoring, and storing of data related to
the CNA network.
Strong International
1
Quick Start Guide
CineSuite Reference Manual
CineSuite Quick Start
In order to make full use of the CineSuite software, two separate applications are required. The two
software applications are:
1) CineSuite Manager: This is the main user interface. When creating CNA programs, settings
CNA supervisory functions or monitoring CNA operations, this is the application that will be
used. It provides access to the most commonly used software components. (The CineSuite
Manager can be used alone but files cannot be transferred to or from the CNA automations.)
2) eCineNet Driver: This is the software application that communicates with CNA automations.
It typically runs in the background and is necessary for the operation of all other CineSuite
functions. This program is also responsible for event logging, monitoring network activity,
tracking clients, ticketing system interfacing, location server management, and
communication using the KDI protocol.
Because all the CineSuite client applications must communicate through the CineNet Driver, that
application should be set up first. The following section is intended as a guide to assist with the
installation and setup of the CineSuite software package. This process has been made as easy as
possible with default selections that will practically guarantee success. Advanced users already
familiar with the earlier version of the CineSuite package will also appreciate the new features and
improved design.
Installation
Minimum system requirements to run the CineSuite package are a PC or Laptop using the Windows
95 or later operating system, a network card capable of 10BaseT Ethernet, and a CD Rom drive.
Other components required are either a Gateway interface such as the PCI-64, VNC or an eCNA
automation, and a functional TCP/IP network.
Begin by running the installation file on the CD labeled “setup.exe”, this executable file begins
installation dialog and configures your computer for the CineSuite software. You are asked to close
all running programs, then prompted to select a destination folder, the default option will suit most
installations. Choose the components that you wish to install from the list, if you are unsure, allow
the installation program to choose them for you and click continue. Allow the program to create
shortcut icons on your desktop for convenient access and click OK. Eject the CD when installation is
complete.
As stated earlier, the CineNet driver is the base component for your CineNet network and should be
configured first, run first, and allowed to run in the background in most circumstances. The setup
dialog will prompt you for a theatre name, an interface device (either a PCI-64, VNC, or an
eCineNet Ethernet connection). If using a Gateway or VNC have the com port number that you will
be using handy, choose the LSN ID number. The “CNA connections” screen should now show
network activity and list Gateway and devices on the network.
2
Strong International
CineSuite Reference Manual
Quick Start Guide
Operation
Driver
Log on to the CineNet network by specifying “admin” as your
username and “31415" as your password. This is the default
configuration and can be changed later if desired by using the
“Users” drop down menu. Note that ALL user names and passwords
are case sensitive.
If your network is using TCP/IP exclusively and you have eCNAs
connected directly to the network, configure your CineNet driver as
follows:
Figure 1-2 Log On Screen
Select “Driver” drop down menu, select “Gateway Setup” option,
then choose the “ethernet (eCineNet)” button. click OK then add
your IP addresses for your network automations. See your eCNA
manual for information on setting your eCNA’s IP addresses.
If you are using a PCI-64 Gateway or VNC interface you will need
to know your com port number and select a LSN ID for the driver.
Once configured and connected you will notice messages scrolling
down on the main CNA connections window. If connecting through
Figure1- 3 Driver Configuration
the VNC or PCI-64 Gateway you may minimize the driver and
proceed to use the CineSuite Manager software. If you are connecting through TCP/IP not only will
you notice scrolling messages, there will also be a window displaying your CNA connection IP
addresses, Status, Device type, Version #, Checksum, and KDI Status. Here you can add, edit and
remove IP addresses.
Figure 1-4 TCP/ IP Connections Window
Strong International
3
Quick Start Guide
CineSuite Reference Manual
Manager
Doubleclick the CineSuite Manager, the program will open and prompt the user for a password.
Again, the default of “admin” and “31415" should be entered. You can now use the cineSuite
manager without restriction.
Figure 1-5 Manager Toolbar
To view the LSN network status select the “Netwk” icon, the screen will show the CNA’s on the
network. Each CNA will have a sub-listing of its LIN devices (termination boards, QDCs, Etc...).
Take note that highlighting any of the LIN and LSN devices will display information in the side bar
to the right of the main screen. Clicking the exit (X) box at the upper right will close this window.
Figure 1-6 LSN Status
To view the remote status of your automations select the ”Montr” icon on the tool bar. This tool
displays your CNAs, sorted by house number, lists device type, title of running feature, next show,
start mode, time to start, current status, detailed status information, program number, next cue, learn
mode status, sync loop, run hours, and four maintenance hours displays. These fields can be made
visible or hidden individually from the “monitors” -> “CNA monitor settings” drop-down menu at
the top.
The facility Schedule can be viewed and edited by selecting the “Sched” icon. The main window
will open to reveal each house with its show times, scheduling information, and presentation editing
tools. If changes are made to a scheduled event the changes must be saved to the CNA select the
“CNA Send” icon, you will be prompted to select the schedule to replace. The schedule created/
altered may also be saved to file by choosing the “Save” icon and selecting a storage location.
Schedules can also be imported from files previously saved on the computer, altered, then
distributed to CNAs on the network as needed.
4
Strong International
CineSuite Reference Manual
Quick Start Guide
The KDI interface is accessed via the “KDI” icon. This program allows use of the keypad and
display interface to display messages on an eCNA-200. This powerful tool permits scheduling
information, ticketing system displays, remote devices in the theatre environment can be set up to
communicate through this software, thus making the eCNA-200 a remote data entry and display
device. See your KDI protocol manual for detailed information. The “edit content” selection from
the “KDI” drop down menu will open the current KDI file for editing. An alert message may be sent
to the eCNA-200 via the KDI interface, select “KDI” and from the drop down menu select “Send
alert”. The message can be sent individually or globally to all eCNA-200s on the network.
The “Reprts” icon opens the HTML report viewer, here you can add and view HTML reports for
CNA’s on your network.
The “New” icon is used to create new files, selecting an item from the drop-down menu causes the
associated editor to open up. From there you can create new files for supervisory, sets, programs,
and schedules, then load them to your automations or save them to disk.
Program set makes the program editor open. Programs can them be altered, copied, saved or
distributed. Choosing to create a new Program opens the editor and allows the creation of only one
new program rather than a whole set.
Learn times set opens the learn times editor, from here you create, modify, copy, save or distribute
learn times. Choosing to create new program Learn Time opens the editor and allows the creation
on only one new learn time rather than a whole set.
Supervisory settings opens the supervisory editor, from here you create, modify, copy, save or
distribute supervisory information.
Show Schedule opens the show schedule editor, from here you create, modify, copy, save, or
distribute show scheduling information.
Lastly is the facility schedule editor, its function is described in some detail above, with this you
create, modify, copy, save, or distribute scheduling information to different facilities or your own
facility. This file is basically a week’s schedule, it can be distributed to any house or combination of
houses on your network.
Programs and Program Sets
In brief a program is an individual series of operations used with a particular automation (100/150,
200), they represent a single chain of events and that chain’s variables. When programs are
distributed to automations or saved to a file, they are moved to one location or multiple locations.
Program sets are groups of single programs that are manipulated together as groups, moved and
saved as a set. This is convenient for creating all nine programs for a CNA, distributing them to
multiple automations, or saving as a file. Sets can help ensure uniformity in programming from CNA
to CNA.
Sets of learn times function similarly, once created or edited, they must move as a group. The
individual learn time is for one program, the set is capable of containing nine programs’ associated
learn times.
Strong International
5
Quick Start Guide
CineSuite Reference Manual
Using the “Open” file icon lets the user open previously saved files. These can be any of the type
listed above, they will automatically open in their associated editor and can then be altered, copied,
saved elsewhere, or distributed to CNAs on the network.
The “Save” icon will prompt the user for a place to store the current file on your computer’s hard
drive.
Use “Send” to put a copy of a file you have open in an editor
into a CNA automation’s memory.
The “Entire Network” option is to choose an automation that
is remotely located and connected through a location server.
The “CNA Get” icon can be used to retrieve any manipulable
files from any CNA on the network by simply selecting it. A
list will appear as before that features sub lists of files that
can be downloaded from the CNA and changed, copied, etc...
Offered are program set, learn times set, supervisory settings,
and show schedule. At the bottom of this listing is a facility
schedule selection as well. Each, any or all records can be
brought into the editor by selecting them.
Figure 1-7 Get File
The “Print” icon lets you use a local printer to print the current page or open editor for reference or
troubleshooting purposes. It works similar to most printer dialog windows in that you can preview,
choose a printer, and select a font size.
The “Cut, Copy and Paste” tools work when using an editor window, you can copy/ cut multiple
items using the Shift key.
From the “File” drop down menu the “new, open, and save” options have basically the same
functions described above, selecting “File Transfer” will open a dialog window. From this window
files can be moved from automation or disk to a CNA ID#.
Choosing the “Advanced” option lets the administrator perform a remote flash upgrade on the
CNA’s present on the network.
Enterprise Setup lets the administrator choose network settings for a local or remote eCineNet driver
connection.
Preferences setup lets you custom tailor your font style, size and time format for the different
editors.
Exit closes the program.
From the “Edit” drop down menu, cutting/ copying/ and pasting options are provided for the editor
you are using, if you do not have an open editor, these functions will not be available.
The “Show Log” drop down menu gives access to view the event log, view the events, and maintain
event logs. Additionally, the operator IDs and Event codes may be administered here.
From the “Monitors” drop down menu a LSN network status menu will display information about
the LSN, it has the same function as the “Montr” icon. The CNA monitor selection has the same
function as the “Netwk” icon as described previously, the CNA Monitor Settings function lets you
choose which information fields to display.
6
Strong International
CineSuite Reference Manual
Quick Start Guide
The “paging” menu is intended for use with a VNC and paging system. You can choose which pager
numbers to send a custom message to with the Send Message function. You can perform VNC and
PC paging setup here as well as customize your paging messages.
The KDI menu sends Alerts and Edits the contents of the driver’s KDI database files briefly
described previously.
The “Users” drop down menu lets the administrator (or other qualified group member) modify,
manage and add/ delete users and groups in the same manner as the users menu on the CineNet
Driver.
Figure 1-8 User Management
Help files are accessed by selecting the “help” drop down menu. The “About” menu displays
program version and user information.
Remote Access:
To establish a remote connection to the CineNet, there must be a local computer connected to the
internet with a static IP running the CineNet Driver program. This local computer is connected to the
eCNA/ CNA network. The remote computer must have the remote application program installed on
it. The program must be configured to communicate on the same port that the driver is using, and the
router or main gateway IP address must be known and entered as well. The default port number may
be used in most circumstances without any conflicts. The remote user must log on with either
administrative privileges or must be in a group that has been granted remote access permissions. The
CineSuite Manager, for example, should then display all of the eCNA’s that are being networked at
the local CineNet network. Remote administration is now possible provided that proper access has
been granted to your log in account.
This concludes the “Quick Start” portion of this manual. For detailed information on each subject
see the help menu section or read the detailed descriptions provided in the main manual.
Strong International
7
Quick Start Guide
8
CineSuite Reference Manual
Strong International
Part 2
Strong International
9
CineSuite
Installation and Operation Manual
PR020 Revision : Preliminary
This manual covers the setup and operation of the CineSuite software package.
Optional CineNet and related equipment is covered in the following product reference manuals:
!
!
!
!
!
!
!
!
!
!
!
!
!
!
!
!
!
!
!
PR001 CNA Installation Manual
PR002 CNA-200 Setup and Operation Manual
PR003 CNA-150 Setup and Operation Manual
PR004 CNA-100 Setup and Operation Manual
PR005 QDC-400 Installation and Setup Manual
PR006 ACP-50 Installation and Setup Manual
PR007 RVC-5 Installation and Setup Manual
PR008 PCI-64 Gateway Interface Installation
PR009 CineNet Host Software
PR010 RCM-10/RSM-10/RSM-20 Installation and Operation Manual
PR011 Strong Dimmer Installation, Setup, and Operation Manual
PR012 eCNA-100 Automation Manual
PR013 eCNA-150 Automation Manual
PR014 eCNA-200 Automation Manual
PR016 Strong FP350 Installation and Operation Manual
PR017 Eprad FP350 Installation and Operation Manual
PR018 Paging system Setup and Installation Manual
PR019 VNC Setup and Operation Manual
PR020 CineSuite Installation and Operation Manual
Warranty
CineNet automation products, sold by STRONG INTERNATIONAL, are warranted against defects in materials and
workmanship for one year from the date of purchase. There are no other express or implied warranties and no warranty of
merchantability or fitness for a particular purpose.
During the warranty period, STRONG INTERNATIONAL will repair or, at its option, replace components that prove to be
defective, provided the unit is shipped prepaid to the manufacturer directly or via and authorized distributor. Not covered by
this warranty are defects caused by modification, misuse or accidents and any further damage caused by inadequate packing
for service return.
STRONG INTERNATIONAL's obligation is restricted to the repair or replacement of defective parts and under no
circumstances will STRONG INTERNATIONAL be liable for any other damage, either direct or consequential.
Information in this document is subject to change without notice. No part of this document may be reproduced or transmitted
in any form or by any means, electronic or mechanical, for any purpose, without the express written permission of STRONG
INTERNATIONAL.
© 1997 - 2006 STRONG INTERNATIONAL. All rights reserved.
10
Strong International
Table Of Contents:
<< This is where the table of contents will be placed >>
CineSuite Manager . . . . . . . . . . . . . . . . . . . . . . . . . . . . . . . . . . . . . . . . . . . . . . . . . . . . . . . . . . . . . . . . . . 2
Strong International
11
<< This is the second page of the table of contents >>
A few words about Stuff . . . . . . . . . . . . . . . . . . . . . . . . . . . . . . . . . . . . . . . . . . . . . . . . . . . . . . . . . . . . . 61
12
Strong International
Installation
Refer to the “Quick-Start User’s Guide” for detailed software installation instructions and system
requirements. Additional remote CineSuite components are described in the last section of this
manual. They can be installed during initial configuration, or later as needed.
Introduction
The CineSuite software package is divided into two somewhat independent sections.
1) CineSuite Manager: This is the main user interface. When creating CNA programs, settings
CNA supervisory functions or monitoring CNA operations, this is the application that will be
used. It provides access to the most commonly used software components. (The CineSuite
Manager can be used alone but files cannot be transferred to or from the CNA automations.)
2) eCineNet Driver: This is the software application that communicates with CNA automations.
It typically runs in the background and is necessary for the operation of all other CineNet
functions. This program is also responsible for event logging, monitoring network activity,
tracking clients, ticketing system interfacing, location server management, and communication
within the KDI protocol. This term may also be referred to as the CineNet Driver in this manual.
While the Manager software can be used without the Driver software application, its use is limited in
that it can create and manipulate programs, but it cannot move the information to a CNA for actual
use. The manager can, however, be used remotely if connected via the internet to a CineNet Driver.
This would provide a means of remote administration of a CNA network through a locally
networked computer. The local computer will have to have an ethernet connection and must be
running the CineNet Driver configured for TCP/IP operation. This local server computer will also
work with a standard LSN network connection through a VNC or Gateway.
The CineSuite package is intended to provide a user-friendly interface with the CNA/ eCNA
automation capable of providing advanced local and remote features. Some of its many functions are
assisting with the creation and storage of program information, interfacing with ticketing and other
communication software such as the KDI interface and VNC paging system, to control who uses and
has remote/ local access to the automations. Detailed system monitoring and reporting are also
potentially valuable features that are integrated into the CineSuite system.
The CineNet Driver
While not specifically a “Driver” in the common, personal computing application of the term, the
CineNet driver is a software component at the core of the CineSuite package. It resides in the
background and interacts with the Client, Manager, the Network interface and other software/
hardware peripherals. It is a software application that links the eCNA hardware part of the network
with the user-friendly, Windows interface components. Once configured, the driver settings will
probably not have to be modified except in the event that an automation is added or a change in
enabled driver features is desired.
Strong International
13
CineSuite Reference Manual
CineNet Driver Configuration
Password and Username
Once you have the CineNet driver installed on the computer you plan to use, it must be configured.
The first thing that you will notice is that there is limited access to configuration options unless you
have certain administrative privileges. The default administrative logon name is “admin” and the
default password is 31415. By logging on, you can then change the password to something more
suitable for you. While you are setting up new passwords, it may be desirable to set up your
system’s users and group permissions. Note that ALL user names and passwords are case sensitive.
To change the administrator password, simply select the “Change Password” command from the
Users menu. This will prompt the user for a new administrator password, and a repeat confirmation.
To change the password for any other user, use the Edit command in the Edit User menu.
For the operations described in this section it will be assumed that the reader has administrative
privileges and access to every feature available. Certain “sensitive” options that can alter the
program content, access, or functionality may be blocked from groups, and necessarily users within
certain groups.
All CineSuite applications are password protected. CineSuite user authentication is broken down
into groups and users. Access is granted to users through group permissions. Groups are created and
given permissions. Users are then added to the groups. All users in a given group have the same
permissions.
Groups and users can be disabled. This provides an easy way to de-activate users or groups
temporarily without having to delete them and re-enter them later. The Disable feature could also be
used to create a guest account that can be enabled temporarily as needed, yet remain disabled the
majority of the time.
The administrators group is a system group and cannot be edited. All users added to the
administrators group will have full permissions. Also, at least one user must exist in the
administrators group. When only one active user exists in your administrators group, you will be
able to edit the user’s name and password but you will not be able to remove or disable the user.
In order to edit user permissions, select the “edit users” menu.
The users form will be displayed showing all the groups and
users. If you are logged on as a user in the administrators group
you will see all the groups including the administrators group.
Users not in the administrators group will not see the
administrators group. Users within a group that does not have
permission to edit users and groups, or their own password will
not have access to these menus beyond the log-in option. If a
group is granted permission to change their own password, they
will be prompted to enter and confirm their new password.
When a group is selected, the group edit controls will be enabled
(except the administrators’ group because that group cannot be
edited)
14
Figure 2-1 Group Menu
Strong International
CineNet Driver Configuration
CineSuite Reference Manual
Adding/ Editing Groups
Click on the Add new or Edit button in the group edit controls to display the edit group form.
This is where the permissions are set. A tab is included for each CineSuite application that has
registered user permission in the CineNet driver database. This allows administrators to set all
permissions for a user for all applications at the same time.
To add a group, select the Add New button under the Group heading.
A dialog box opens up that will allow you to name your new group
and set its permissions. This screen, like the Edit Group screen, can
disable groups when the Disable check box is marked.
Select each tab and set the appropriate user permissions for the group
by checking the appropriate check box to the left of its description.
When complete, click on the accept button to save the settings. The
access granted with each permission is determined by each CineSuite
application independently. Please refer to the manual section for each
application for details on each function. The categories and specific
permissions are listed below:
Figure 2-2 Users Menu
CineNet Driver
CineSuite Manager
General
CineSuite Reporter
Change Client Connection Settings
Upload to CNA
Change Own Password View HTML Reports
Change Database Settings
Download from CNA
Add/ Edit Users
Edit User Codes
Change Event Log Settings
Add/ Edit Programs
Remote Access
Edit Operator IDs
Change Gateway Settings
Add/ Edit Supervisory
Edit Report Settings
Change Location Server Settings
Add/ Edit Schedule
Edit Reporter Setup
Change Ticketing Show Schedule Settings Flash Upgrade
View Show Log
Edit VNC Settings
LSN Monitoring
Edit KDI Content
Add/ Edit Users:
To add a new user, select the group in which you would like to place your new user (or a user in that
group) and click on the add new button in the user edit controls. This will bring up the edit user
form. When an existing user is selected, choose “Edit” to alter that user’s information. If you are
adding a new user to a group, you will be asked for a User Name, Password, and Log on Name. The
user name and password are important when attempting to alter system parameters, log on names are
used by administrators to identify personnel when editing within this menu.
Enter the information and click the accept button. Keep it in mind that all names and passwords are
case sensitive.
Strong International
15
CineSuite Reference Manual
CineNet Driver Configuration
Disabling users: To disable a user without removing them from the user database, a disable button
has been included. Select the user to be disabled and click the disable button. The icon for the user
will change to a disabled symbol. To enable a group or user click the enable button.
When a group is disabled, all users in the group are also disabled. None of the users will be able to
log on to any CineSuite application.
General Permissions
The general permissions do not apply to any specific CineSuite application so they will be covered
here.
Change Own Password: Allows the user to change their own password. You may not want to allow a
user to change a password that is for a user account that is shared among multiple employees. The
administrator will always have access to users’ names and passwords. Incidentally, each member of
the administrator group will also have access to each other’s names and passwords. This is a good
argument for having only one main administrator in the administrators’ group. Other groups can then
be given administrative privileges as required.
Add/ Edit Users: Allows the user to access the edit users menu. Users that have Edit Users
permissions can add/ edit/ and delete any user of any group (except administrators). Only give Edit
Users permission to the highest level employees.
Remote Access: CineSuite is an enterprise wide suite of applications. By using CineSuite location
server, many theatre locations can be monitored/ controlled from a single location. The remote
access permission gives the user access to remote CineSuite applications in the same manner as local
applications. This level of access should only be given to those employees that oversee multiple
theatre sites or require remote access for reports and scheduling.
Once users, groups, and privilege have been set up, whether temporarily or thoroughly you may now
proceed on to the next configuration task which is to set up your networking. Network
configurations vary depending on the individual components that make up your system. The
majority of the functions and features listed are available for eCNA ethernet network connections as
well as VNC or Gateway connections. For detailed information regarding hardware configuration
and wiring diagrams, please refer to your installation manual. The diagrams below are not all
inclusive and should be used only as a visual aid in understanding the networking concept.
16
Strong International
CineNet Driver Configuration
Strong International
CineSuite Reference Manual
17
CineSuite Reference Manual
CineNet Driver Configuration
Gateway Setup
For the operations described in this section it will be assumed that the reader has administrative
privileges and access to every feature available. Certain “sensitive” options that can alter the
program content, access, or functionality may be blocked from groups, and necessarily users within
groups. See the section on user permissions in the previous section for a full description of how to
manage group privileges.
From the Driver menu select the Gateway Setup option. This opens a dialog box that configures the
driver for your network hardware. Options are Ethernet, VNC interface, or PCI-64 interface.
If using ethernet your eCNA must be configured with its own IP address. See your automation’s
instruction manual for details about setting up the eCNA. You will be prompted to enter the IP
address(es) of the automation(s) that you want to communicate
with. IP addresses may also be added, edited or removed later
while viewing the TCP/IP connections screen.
If using a VNC for network connectivity, select the VNC interface
option. The CineNet Driver Configuration window will ask for
your computer’s RS-232 Com port number. This information can
be found in the device manager section of most windows
operating systems.
The last selection is for users that are connecting through a “ PCI64 Gateway”. This external or internal device attaches to your
CNA’s LSN and connects to your host computer’s RS-232 Com
Figure 2-3 Driver Configuration
port. The configuration box will prompt you to enter an LSN ID
number as well as the Com port that it is using on your computer.
If you are combining eCNAs and CNAs within the same network, it will be necessary to use the
VNC or PCI-64 Gateway. If you install two separate networks for the same theatre, you can
configure one for ethernet and the other for traditional LSN networking. Both networks can then be
accessed remotely and the benefits of ethernet networking are not lost to the gateway’s lack of
TCP/IP functionality.
CNA Connections
Once you have established a connection method by choosing one of the three above devices, entered
the required information in the fields presented, and clicked the accept button, you should observe
messages in the “CNA Connections” window as well as an activity log below. This CNA
connections window is different for different gateway setup configurations. See the Quick-Start
guide for a TCP/IP ethernet screen example. Take note that the window is split, one section shows
the IP address, House ID number, Communications status, Device model, Version, Checksum, and
whether or not KDI interfacing has been enabled from their associated automations, the window
below displays an activity log listing times and types of major network activity. This is primarily
used for troubleshooting, this advanced status information is not saved permanently.
This screen is an example of the status display if using either a VNC or a PCI-64 Gateway.
18
Strong International
CineNet Driver Configuration
CineSuite Reference Manual
Figure 2-4 Driver Status Screen (VNC)
Database Setup
For the operations described in this section it will be assumed that the reader has administrative
privileges and access to every feature available. Certain “sensitive” options that can alter the
program content, access, or functionality may be blocked from groups, and necessarily users within
groups. See the section on user permissions in the first section for a full description of how to
manage group privileges.
From the Administrator menu select “Database Setup”. From this sub menu the user is able to
change event log settings, select a CineNet database, pack the database, and pack and select the KDI
database. This database is not accessible from the CineNet Driver program. It can be configured,
compacted, and limited here, but the data recorded is only displayed in an external application such
as the CineSuite Manager.
The “Event log settings” dialog box is basically used to limit the number of records based on age or
quantity or not at all. If limiting is enabled, the oldest records are overwritten first.
The “Select CineNet database” box is to choose a database
file from a list, a manual search option is available if the
database you are looking for is not in the list. A new database
file may also be created in the location you specify on your
hard drive and named from this window. This database will
contain your event logs. As stated, this file is only used by
external applications.
Packing your database with the “Pack Database now”
selection will optimize and compress your data file. It places
all your data in contiguous segments making access faster and
use less space on your hard drive..
Strong International
Figure 2-5 Log Settings
19
CineSuite Reference Manual
CineNet Driver Configuration
The “Select KDI database” menu item lets you search for and
choose a KDI database. The KDI interface’s functions will be
discussed in the KDI section of this manual. The KDI database
is where information is stored for the KDI server application.
As with the event log, the CineNet Driver functions only to
relay that information to remote applications, it cannot be used
directly to modify or view any of the database information.
This option will not be highlighted if using other methods of
connection than ethernet.
Packing your KDI database is also possible with the “Pack
Figure 2-6 Select Database
KDI database” function. Packing your KDI database, as in the
case above with the Event log, will compact the information in your file to make access faster and to
decrease the amount of wasted space.
Event Log
“Relog Events” lets the user download the contents of a specific CNA automation’s event log.
Selecting this process causes a prompt to appear for a CNA ID number. Once the desired CNA has
been entered, the events from that CNA will be transferred to the Event log database for use by a
remote application.
“Clear Show Number” makes the software clear the show number of a selected automation to 0.
Again, the user is prompted to select the CNA ID number on which they wish to perform the clear
operation. This operation clears the physical memory of the CNA, all information in the database
remains.
“Clear Event log” Clears the logged event records from a selected CNA automation. Select your
CNA ID number to clear, the application will then clear the events stored in the selected CNA’s
memory.
Figure 2-7 CNA Connections Screen
20
Strong International
CineNet Driver Configuration
CineSuite Reference Manual
CNA Connections Screen
Gateway/ VNC:
This main screen displays information regarding the CineNet Driver’s operation and the network of
which it is a part. When the CineNet Driver is configured to use a VNC or PCI-64 gateway, this
screen displays the serial port number the driver is using, the network ID of the gateway interface,
an online indicator and a network activity monitor that can be used when troubleshooting potential
network problems. In the Upper field in the center of the screen you will find a window displaying
the CNA ID (House ID), the device type, its firmware version, its state (Online or Offline), and a
status message. In the lower field in the center of the screen is a listing of various network dialog
messages. These display the driver status, CNA status, and host machine status messages as well as
other important network and database operation messages in real time.
TCP/ IP:
When the CineNet Driver is configured to operate over TCP/IP networking, this display changes to
include a similar divided field. The upper displaying House ID (CNA ID numbers), IP address, CNA
Status, Device Type, Firmware Version, Checksum, and KDI Status and Remote status of each
eCNA operating on the network. Below this screen is an event log that displays network events in
real time. This listing of events is temporary and will not be retained. At the bottom of this window
there is a checkbox that prevents messages from scrolling when new network activity is logged.
The dividing bar of this screen has three tool buttons that can be used to Add, Subtract, and Edit IP
addresses of eCNA’s on the network.
The “Add IP address” button opens a data-input window
that requests an IP address to add. This is ordinarily the
address of an automation that has been added to the
network, or had its IP changed.
The Add IP address input box also has an option to add
multiple IP addresses in ascending order. When selected a
number can be input representing the quantity of CNA IPs
to be added to the list automatically.
Figure 2-8 Add IP Address
The “Edit IP address” button is used to alter an existing IP
address. This opens a data input window that displays the
currently selected address and lets you make changes to it.
It should be noted that this does not change the actual IP of
the eCNA, it only directs the CineNet driver to look in that
location for an automation.
And the “Remove IP address” button is for removing IP
addresses from your list. If an IP has been changed, or an
automation removed from the network, this option will
eliminate any unnecessary network traffic and errors due
to the driver’s inability to find an automation at the unused
IP address.
Figure 2-9 Edit IP Address
Figure 2-10 Remove IP address
Strong International
21
CineSuite Reference Manual
CineNet Driver Configuration
The Add and Edit buttons feature a checkbox selection to “Enable KDI server”. This lets the
automation at this specified location receive KDI messages through the CineNet Driver. For more
information regarding KDI operation in general, see the KDI protocol manual, or the KDI
application information featured later in this manual.
When this checkbox is enabled, any KDI data files associated with the driver (KDIServer.mdb) are
displayed on the eCNA-200's screen. This data is created with the KDI Editor described later in this
manual and saved to the computer running the CineNet Driver, the driver provides the KDI server
function and if enabled, displays these messages. It should only be enabled if the KDI server is being
used, the automation is an eCNA-200, and you want it to act as a KDI interface terminal using the
CineSuite package. Note that the KDI protocol is actually part of the eCNA-200's firmware and
functions independently of the CineSuite package. If custom interfacing is needed, your software
does not require CineSuite components to operate. Also, this server application is configured to use
port #16001 on your eCNA, if you are running a custom interface application in addition to the
CineSuite application, you must configure your software to use one of the other four ports available.
eCNA Hardware Configuration:
Keep in mind the default configuration of the eCNA-200 (as detailed in the eCNA-200 reference
manual) lists the DIP switches on the eCNA mainboard as:
Sw itch
Function
SW 3 Pos7
TCP Host (On)
LSN Host (Off) <Default
SW 3 Pos8
Default Internet Parameters (On)
User Parameters (Off) <Default
The Default internet parameters function automatically forces the eCNA to Half Duplex operation
with an IP address of 192.168.0.254. This configuration is potentially useful when troubleshooting
as it forces the eCNA to a known IP address. The Host configuration must also be configured for
TCP. Certain operations within the CineSuite software rely on updates from the eCNA, if either of
these switches are configured improperly, certain operations would be unstable at best. TCP
networking allows the Host (CineNet Driver software) and (e)CNA to communicate vital
information such as status and clock updates. The improper configuration of these (as well as other)
switch parameters can cause unexpected and possibly undesired results. These results can easily be
mis-interpreted and lead to unnecessary troubleshooting. Please verify that your eCNA (or CNA) is
configured properly when using the CineNet Driver or other CineSuite software applications.
22
Strong International
CineNet Driver Configuration
CineSuite Reference Manual
CineSuite Clients
For the operations described in this section it will be assumed that the reader has administrative
privileges and access to every feature available. Certain “sensitive” options that can alter the
program content, access, or functionality may be blocked from groups, and necessarily users within
groups. See the section on user permissions in first section for a full description of how to manage
group privileges.
Figure 2-11 CineSuite Clients Screen
The “CineSuite Clients” window is used to display information about users logged on locally or
remotely. Information such as Client name (Theatre name), Client type (Application used for
connection), Log on time, activity and IP address are all displayed in the top window while in the
lower window is a record of clients displaying date and time connected, the client name, the user,
and the description of what the client is currently doing.
There is a feature to change your theatre name and port number however, since the port numbers
must be the same among CineNet applications it is recommended that you leave at its default value.
The lower left corner of this window features an option to stop scrolling messages in the lower
window. As with the data logged in the CNA Connections window, the displayed information is
only temporary.
Figure 2-12 Theatre name
Strong International
Figure 2-13 Port Selection
23
CineSuite Reference Manual
CineNet Driver Configuration
Location Server
For the operations described in this section it will be assumed that the reader has administrative
privileges and access to every feature available. Certain “sensitive” options that can alter the
program content, access, or functionality may be blocked from groups, and necessarily users within
groups. See the section on user permissions in first section for a full description of how to manage
group privileges.
A “Location Server” window is provided to configure the CineNet Driver’s CineSuite Location
Server options. The main window displays a log of all activity related to the location server. A
settings display at the top of the window displays current setup information and below that is a
button to change the displayed parameters.
Figure 2-14 Location Server Screen
The “Change Settings” dialog box:
From this window you can enable the location server registration, enter the
name, web address, or the IP address of a remote location server, set the
port value, enter your access name and password, and set your reconnect
delay time. After clicking accept the main window will begin to display a
log of the events taking place while attempting a connection with a remote
server. A successful connection, once made, to a remote server will let
multiple clients’ software access automations over a local network, across
the internet, or anywhere. Simply check the “register with location server”
box, enter the IP of the computer with the CineNet location server running,
then use that IP, name and password, and theatre name remotely to
monitor, program, or schedule your automations.
Figure 2-15 Server
Settings
24
Strong International
CineNet Driver Configuration
CineSuite Reference Manual
Ticketing Interface
For the operations described in this section it will be assumed that the reader has administrative
privileges and access to every feature available. Certain “sensitive” options that can alter the
program content, access, or functionality may be blocked from groups, and necessarily users within
groups. See the section on user permissions in section one for a full description of how to manage
group privileges.
Figure 2-16 Ticketing Interface example
The “Ticketing Interface” window offers several choices for theatres using ticketing systems.
Several popular programs are listed in a selection box. Once selected, a schedule upload dialog box
opens so that program numbers can be associated with schedule files, different movie types, and
ticket sales.
System Selection
Notes
None
Splyce
Retriever
Radiant
Not yet Implemented
Clarity
Pacer, Not yet Implemented
Vista
Ticket Pro
Not yet Implemented
Titan
Omni Term
RTS
XML
RTS
TXT
Conclusion
The CineNet Driver is required for communication with the CNA automation network, it must be
properly configured and running in order to utilize CineSuite’s other features contained within the
package. The CineSuite Manager and other remote access software rely on a properly configured
driver. The CineNet driver window can be minimized and will reside in the taskbar portion of the
windows screen. It can be opened by double-clicking its icon if needed. The next section of this
manual features the CineSuite Manager, its configuration and use. Please configure all relevant
parameters in this section before moving onto the Manager portion of this manual.
Strong International
25
CineSuite Reference Manual
CineSuite Manager
The CineSuite Manager
Opening the Manager
The CineSuite Manager program can be opened up by double clicking the icon that the installer
placed on your desktop. You will be immediately prompted for a log on name and password. As
with the driver, the default is “admin” for username and 31415 for the password. Any privileges
associated with users and groups of the CineNet Driver will also apply to the users and groups of the
CineSuite Manager. See the section on user permissions in the first section for a full description of
how to manage group privileges. If this is the first time you are opening the CineSuite Manager, you
will also be prompted for the network connection settings, theatre name, and port number for the
system with the CineNet Driver that you wish to connect to. Defaults are provided and will usually
be sufficient to get you started.
For the operations described in this section it will be assumed that the reader has administrative
privileges and access to every feature available. Certain “sensitive” options that can alter the
program content, access, or functionality may be blocked from groups, and necessarily users within
groups. See the section on user permissions in first part of this manual for a full description of how
to manage group privileges.
The CineSuite Manager toolbar
Figure 3-1 CineSuite Manager Toolbar
Some of the most commonly used features of the CineSuite Manager can be launched from the tool
bar icons at the top of the main page.
New
The new icon is used for creating a new file, program group, or program. When it is selected, a
drop down menu provides options for creating the following new items:
CNA 100/150 Program: This selection will open the CNA program editor for the CNA-100 and
150 automations. The editor is used to copy, change, and save CNA program information.
Following sections will describe this editor in detail.
CNA-200 Program: This item will open the CNA program editor for the CNA-200 automation. It
allows the Copying, changing, and saving of a CNA program. Following sections will describe
this editor in detail.
CNA-100/150 Program set: This selection will open the editor for the CNA-100/150 automation
with features to alter all nine programs at once.
CNA-200 Program set: This selection will open the editor for the CNA-200 automation with
features to alter all nine programs at once.
26
Strong International
CineSuite Manager
CineSuite Reference Manual
Program Learn times: Choosing this option opens a dialog window prompting selection of the
model of CNA you intend to program. Once a model is specified, a learn time editor opens to
facilitate the programming learn times. The following sections will describe this editor in detail.
Learn times set: Choosing this option opens a dialog window for selection of a model of CNA,
once a model is specified, a learn time editor opens to facilitate the programming of learn times
across multiple program numbers. The following sections describe this editor in detail.
Supervisory: The new supervisory option opens an input window requesting a model and version
of CNA supervisory that is being altered or created. After selection, an editor is opened in the
main window for modifying various supervisory functions. See the next sections for specific
information.
Show Schedule: When a show schedule is to be modified, replaced, or viewed, the show
schedule menu option should be used. This selection opens a show schedule editor in the main
window of the CineSuite program. See the next sections for specific information.
Facility schedule: This editor lets the user create and modify a new facility schedule. This
function is described in detail later on in this section.
Save
This icon opens a windows dialog box that prompts the user for a location on your hard drive to
save the currently opened editor’s file(s). For instance, if editing a Facility schedule and you
wish to save it for retrieval at a later date, selecting the Save icon prompts you for a folder to
save your file to. (See Open icon in next description). The CineSuite Manager automatically
chooses the appropriate file extension to give your file so it can be properly recalled later, all the
user has to do is select the location and the name for the file.
Open
This icon is closely related to the Save icon mentioned above. It’s function is to retrieve files
from folders on your hard drive that contain program information that you wish to modify or
load into CNA automations. Take for example a file saved as described above. Selecting Open
and picking the folder and file name of a stored item will automatically open the appropriate
editor for that file type and load the file from memory into your editor. For more descriptions of
the CineSuite’s various file and program editors, see the appropriate section in this manual. Use
the Send command (below) to transfer the edited file to an automation.
CNA Send
The Send icon is used to transfer a file or group of files located in a selected editor to a CNA
automation or group of automations. A selection dialog box appears that prompts the user for a
device to which the file is to be sent, then after sending the file, a window opens that reports
whether the operation was successful or if there was a problem during transfer. There is an
additional “go to Network” button that lets the Send command transfer items to other remotely
networked automations via the location server feature.
Strong International
27
CineSuite Reference Manual
CineSuite Manager
CNA Get
The Get icon’s operation is used to retrieve programming data from a CNA automation, it can
also utilize the “Entire Network” button. This provides access to a location server if running on
the desired remote network. Once an automation is selected and the file(s) desired are chosen,
the file is copied to the CineSuite Manager, an appropriate editor opens it up for editing, and
from there it can be edited, saved, sent, or deleted as desired.
Print
The Print function opens a Windows style print preview screen. This allows the selection of a
printer and displays other printing information regarding the file in the selected editor window.
The page layout, printer, font size and number of pages to print can be altered from this window.
Cut, Copy, and Paste
These features are shortcuts that make it easier to perform standard cut, copy and paste
operations on files and operations in and between the editor windows (where allowed). They are
used in the manner typically associated with these functions for moving, duplicating, etc...
Netwk
The “Netwk” tool opens a screen that monitors LSN functions. Displayed here is information
about network ID’s and network device descriptions. When a device is selected status
information is loaded from the selected device and displayed on this screen. The user is
prompted to select either a remote network, or can monitor their local network if present. There
are options for fast, slow, and no updates. The slow update times are 15 seconds for views where
LIN devices are shown, 60 seconds for views without LIN devices. Fast is 4 seconds for LIN
device views, and 15 seconds for those views without. Device name, device ID #, device type,
software version and checksum, and current status messages and fault
messages are all displayed in this area. Selecting a LIN device attached
to the main LSN device results in status fields for that device. Fields
listed include previously mentioned device name, ID, an attributes field
showing pertinent information regarding DIP switch positions, a LIN
error counter etc....
Figure 3-2 Netwk Display
Figure 3-3 Device Info
28
Strong International
CineSuite Manager
CineSuite Reference Manual
Montr
This icon opens a window featuring an advanced remote status monitor. This monitor provides
information on:
Figure 3-4 Montr display
Field
Description
House ID
Displays LSN Network ID
Device Type
Model of LSN Device
Feature Title
Running Feature
Next Show
Time of Next Presentation
Start Mode
Manual, Timed, Clock, Etc...
Time to Start
Time Remaining between Presentations
Current Status
Fault, Ready, Stopped, Etc...
Detailed Information
Displays Fault Messages
Program #
Displays Current Program
Next Cue
Show Next Expected Cue
Learning Cues
“Yes”-Learn Mode, Blank-Learned Mode
Sync Loop
Displays Sync Loop W hen in Sync Mode
Run Hours
Log of Run Hours
Maint A Hours
Maintenance Log Hours
Maint B Hours
Maintenance Log Hours
Maint C Hours
Maintenance Log Hours
Maint D Hours
Maintenance Log Hours
Lens
Lens Format on CNA
Masking
Masking Format on CNA
Sound
House Lights Level
House Lights
Stage Lights Level
Stage Lights
Open/ Close
Curtains
Status of Slide Proj
Slide Projector
On/ Off
Out 1
On Off
Out 2
On Off
Out 3
On Off
Out 4
On Off
The status monitor provides information on various LSN devices, not all fields will apply. See
the CNA monitor settings section of this manual for details regarding the enabling/ disabling of
these fields.
Strong International
29
CineSuite Reference Manual
CineSuite Manager
Sched
This shortcut icon opens the Facility Schedule Editor. This editor is used to create show
schedules for the week. Upon selecting this icon, the editor loads a copy of the show schedules
for all network automations into the CineSuite Manager’s memory. You can use this editor to
manipulate show lengths, titles, and times as well as change CNA program numbers associated
with the title. New titles can be added and any day’s schedule can be made a duplicate of any
other day’s schedule. (For instance, Tuesday’s show schedule can be a duplicate of Monday, if
Monday is updated, changed, or has titles added, Tuesday will be changed too) When this
function is utilized, the days set as duplicates of another day cannot be changed, only the copied
day can be altered.
The “Edit” program formats function allows the user to add lens and masking formatting notes
associated with a program number.
When exiting this screen you will be prompted to save your changes to a file on your hard drive,
alternatively the user may opt to save their new facility schedule directly to their automations.
This is accomplished by using the CNA Send tool mentioned previously. See “The Facility
Schedule Editor” section of this manual for a detailed description.
Open Window List
The main screen of the CineSuite Manager features a side bar window on the left that displays a
listing of all open windows, editors, and applications. This window can be used as a navigation tool
to bring a selected editor or monitor status screen to the front position.
Figure 3-5 Open Windows
30
Strong International
CineSuite Manager
CineSuite Reference Manual
Editors Explained
There are various editors available with the CineSuite Manager, they are used for altering the system
parameters of your automation(s) in a visual, user-friendly way as opposed to the traditional method
involving menu navigation directly on the CNA’s user interface panel. In later models such as the
CNA-200 this task is not as taxing, however systems using the CNA-100 and 150 stand to benefit
greatly. The CineSuite Manager provides an interface where direct, full screen access to various
programming and supervisory parameters is possible. While each editor type has unique features and
appearance, they all retain the same basic functions. They open, modify and save program
information and parameters. They all open their respective files, either from an automation on the
network, or from a folder on the Host computer or server. They all also save data to a file or into an
automation’s memory. Below is a detailed explanation of how each editor works, those familiar with
the operation and programming of CNA automations will find that making and editing programs is
easier than ever. The complete beginner will find the CineSuite Manager’s format pleasant to work
with and easy to understand, you should be up and running programs with little effort. The copy, cut
and paste commands work with the program instructions to help eliminate unnecessary work.
The CNA-100/ 150 Program editor
To begin creation of a new program, or to modify an existing one, select “New” then “CNA-100/150
Program” from the New icon on the tool bar. Alternately, choose “CNA Get” or “Open”, Choose the
automation on the network whose program needs to be altered, Choose Program Set, and the
individual program or programs that you want to change. (This will load a copy of that program into
the CineSuite Manager’s editor)
Figure 3-6 CNA-100 Program Editor
From here you will notice a table listing cues 0 through 9 for your program, a column named End,
Sound, Lens, Lights, Intermission, Curtain Call, and Outputs 1 through 4. The rows have numbers
indicating cues placed during a film presentation or generated automatically by the CNA. For each
box in the table, there are a series of options that set operations performed when that cue is
encountered. The options for end are Off and End, when an end is placed in the box, all other fields
for the following cues are disabled. The sound column allows selection of Aux, Digital, Mono, NonSync, SR, and SVA. The lens column offers the choice of Flat, Scope and Special. The lights
Strong International
31
CineSuite Reference Manual
CineSuite Manager
column has selections for House down-Stage down, House Mid1-Stage Mid1, House Mid2-Stage
no-op, and House-up-Stage-up. The remaining intermission, curtain call, and outs 1 through 4 have
On and Off state options.
The Copy and Paste commands can be used to copy the attributes of one cue operation to another, or
from program to program. Upon exiting this editor the user is prompted to save the file that has been
modified or created. If you would like to send the file directly to a CNA, group of CNA’s or a group
of programs within a CNA, use the “Send CNA” command from the tool bar and select your units, to
save the file to a folder on your PC’s hard drive, choose the “save” command.
Due to the similarities between the (e)CNA-100/ 150 this editor is used for both models.
The CNA-200 Program Editor
The CNA-200 program editor is used to edit and create CNA-200 programs. Opening and creating
files for the editor requires the same procedure as the CNA-100/ 150. Once a blank program or one
to be altered is loaded into the CineSuite Manager’s program editor programming can begin. The
CNA-200's programming structure is different than the CNA-100/ 150. There are a series of empty
program steps and columns labeled Instruction, Setting 1, 2, and 3. The “Instruction” column lists
the name of the operation or program step that fills that step location. The Setting 1 through 3
columns will contain applicable variables within the instruction. These variables may be such
parameters as delay times, percent values, and other options that depend on the instruction being
referenced. A window to the right of the screen contains a list of program operations that can be
inserted into vacant program step locations. Simply highlight the row in which you wish to insert an
instruction, choose an operation or instruction from the window on the right by highlighting it, load
it into that step location by either double clicking the instruction or highlighting and using the
“<<<Insert in Program” tool. You will see your instruction appear in that step location. The
applicable fields for setting 1 through 3 will be populated, highlight the desired fields and note either
a text box with multiple choice selections, a numeric field with arrows, or nothing will appear. After
choosing your variables, the next step can be filled if desired, either select another operation or
select another step location to populate and fill that location as done previously.
Figure 3-7 CNA-200 Program Editor
32
Strong International
CineSuite Manager
CineSuite Reference Manual
To delete an undesired operation occupying a program step, select it and use the delete key on your
keyboard. Alternatively the item may be Cut and never Pasted.
The operations or instructions in the window to the right will change depending on the version of
CNA that is being programmed. This program version range is selectable via the “Change” button
above the program table. If a program is created in a higher version level that includes previously
unavailable software instructions, they will not be available to the older CNA. It should also be
noted that when changing between versions with this function, instructions will be lost if converted
to an earlier version, then restored to a later version. Any items rendered unavailable will be
removed from the program table and will have to be re-inserted.
Upon exiting this editor the user is prompted to save the file that has been modified or created. If
you would like to send the file directly to a CNA, group of CNA’s or a group of programs within a
CNA, use the “Send CNA” command from the tool bar and select your units, to save the file to a
folder on your PC’s hard drive, choose the “save” command.
The CNA-100/150/and 200 Program Set Editors
The CNA-xxx program set editor works exactly like the above two editors
with a few big exceptions, one is that they are, as the name implies, used
to edit groups of programs or program sets. These sets are chosen in the
same manner as before and selected for editing in the same two ways,
either with the Open or the CNA Get commands. The editor will open and
function the same as above except that here is a selection box in the upper
right , above the program table. This box is simply used to move between
program numbers. The copy and paste functions can be particularly useful
here.
Figure 3-8 Program
Number Selection
The Program Learn Times Editor
Program learn times can be created and edited from the learn times editor. A new set of times can be
created from the “New” menu, or an existing set can be altered via the “CNA Get” or “Open”
command (Where applicable). The Learn times table contains a table with two columns, one
contains a cue number field, and the other a cue time field.
Figure 3-9 Selecting Multiple Learn Times
Strong International
33
CineSuite Reference Manual
CineSuite Manager
When this editor is opened from the “New” function, and a new table is to be generated, a selection
box appears and a choice is made between CNA-150 and CNA-200. The primary difference in editor
function between the CNA-150 and 200 is the number of cues. The CNA-150 can only accept 9
cues, where the CNA-200 will accept 20 cues during a given presentation. When multiple learn
times are selected via the “CNA Get” command, each learn time is opened in a separate editor
window. When it is desired to edit a complete set, use the Learn Times Set function below.
This editor is used to modify cue learn times. Selecting a time field located in the cue time column
that is associated with the cue number you want to modify or create, change the value by using the
arrow buttons or entering a numeric value directly into the field. Upon exiting this editor the user is
prompted to save the file that has been modified or created. If you would like to send the file directly
to a CNA, group of CNA’s or a group of Learn Times within a CNA, use the “Send CNA” command
from the tool bar and select your units, to save the file to a folder on your PC’s hard drive, choose
the “save” command.
Figure 3-10 Program Learn Times Editor
34
Strong International
CineSuite Manager
CineSuite Reference Manual
The Program Learn Times Set Editor
This editor is used when it is desirable to edit a whole set of learn times at once, letting the
programmer alter multiple CNAs uniformly, and simultaneously if desired. This editor works much
like the single learn times editor above, however there are additional columns to account for the 9
programs used by the CNA automation. The cue numbers are still 1-9 for the CNA-150, and 1-20 for
the CNA-200. This is selected using the “Change” button above the table. When creating a new set,
the programmer is prompted to choose a model. When using the “CNA Get” or “Open” command,
the proper editor is automatically selected by the CineSuite Manager program. Upon exiting this
editor the user is prompted to save the file that has been modified or created. If you would like to
send the file directly to a CNA or group of CNA’s use the “Send CNA” command from the tool bar
and select your units, to save the file to a folder on your PC’s hard drive, choose the “save”
command.
Figure 3-11 Learn Times Set Editor
The Supervisory Editor
The supervisory editor provides a convenient way to alter CNA supervisory settings in an easy to
use format. The details behind the functions of the CNA’s supervisory are beyond the scope of this
manual, please refer to the CNA manual for your specific application if you need specific
information regarding these parameters’ functions. As with all editors within the CineSuite Manager
software application, there are several ways to open the desired editor. Choose New and Supervisory
to create a supervisory file to save or apply to a CNA automation. You will be prompted for a model
(Either CNA-100, CNA-150, or CNA-200) And you will also have to specify what version range
your firmware falls into. The Firmware version is simply the version number on your CNA at power
up, or the version observed while running the “Netwk” monitor.
Figure 3-12 Version Selection Dialog
Strong International
35
CineSuite Reference Manual
CineSuite Manager
Each CNA model, and their associated firmware versions have different options available in their
supervisory menus due to natural progression during product development. Therefore it is likely that
older versions of firmware will not have the parameters available that newer versions have. See the
device flash upgrade section for instructions on how to upgrade your firmware in your CNA. If
using the “CNA Get” command, the appropriate editor will open automatically, likewise if the
“Open” command is used and a supervisory file is selected from a saved file in a folder on your PC.
Figure 3-13 CNA-150 Supervisory Editor
Once the editor is open and you have chosen the appropriate version and model of CNA that you are
running you will note a series of option descriptions and tabs leading to other options and parameter
descriptions. Each parameter description has fields for entering values or selecting from multiple
choice lists, others will feature text boxes for custom notation. Number fields can be filled by
entering the desired value directly, or using the arrow buttons to increment or decrement the
highlighted value. Multiple-choice text boxes are selected with the cursor by clicking on the proper
option. Text is entered, where applicable, by using the cursor to highlight the text box, and entering
data via the computer keyboard.
Figure 3-14 CNA-200 Supervisory Editor
36
Strong International
CineSuite Manager
CineSuite Reference Manual
Each editor will display different tabs leading to more options and parameter descriptions. It is
sufficient to state here that only the necessary parameters for a given model and firmware version
will be available. A listing of these variations can be found in the manual for your particular
automation. Keep in mind that your automations can all be upgraded over the network and therefore
have all of the latest supervisory parameters. A supervisory parameter set for a late version of CNA
can be sent to an earlier version if desired. A warning will appear, and only the pertinent parameters
will be applied, the others will be disregarded. Upon exiting this editor the user is prompted to save
the file that has been modified or created. If you would like to send the file directly to a CNA or
group of CNA’s, use the “Send CNA” command from the tool bar and select your units, to save the
file to a folder on your PC’s hard drive, choose the “save” command.
Figure 3-15 Version Transfer Warning
The Show Schedule Editor
The show schedule editor is used to create and edit CNA-200 Show Schedules. A new schedule can
be created from the “New” menu, or an existing schedule can be altered via the “CNA Get” or
“Open” command. This editor displays a time line across its main window as well as day rows down
the left side. Pointing the mouse to a position on the time line, lateral to a day row where a show is
to be inserted and clicking opens the Add Movie dialog box. This add movie box is used to generate
an entity on the time line representing a presentation.
Figure 3-16 Show Schedule Editor
Strong International
37
CineSuite Reference Manual
CineSuite Manager
To insert a presentation either choose an existing title from the “Feature” list, or create a new title by
adding a program name (up to 14 characters), associating a CNA automation program number (1-9),
refine the start time by using the arrow buttons, or by directly entering a numeric value. Lastly, a
length field is included in order to specify the length of the presentation. Click the “Accept” button
to exit. You will note that a colored bar has now been placed on your time line corresponding to the
presentation you have just created or inserted into the schedule. This presentation can be selected
and moved or stretched or shortened using your mouse by click-and-drag method. A “Presentation
Information” field below the time table will display information on the presentation selected. The
name, CNA Program number, start time, and length can all be changed from this field. A selected
show can be deleted using the “Delete” button. The “CNA Program Formats” section lets the
programmer choose a description for the formatting of a presentation based on a CNA program
number. Selecting the “Edit” button opens a window whereby one can enter descriptive text related
to the formatting of the lens and masking options used. A unique description may be added to each
program number. The “Set from Automation” selection retrieves descriptions from an automation on
the network. Selecting OK closes this window and saves your changes.
Figure 3-17 Add Movie Dialog
The Day Copies function is used to copy one day’s events to another day. When the original day is
changed, all other copies follow. A copy however, cannot be changed. A zoom feature is included
with this editor, selecting a zoom value or using preset zoom levels provide a close up view of your
time line across the upper portion of the window. This can be used to help “Fine Tune” a
presentation’s start and end times. Upon exiting this editor the user is prompted to save the file that
has been modified or created. If you would like to send the file directly to a CNA or group of
CNA’s, use the “Send CNA” command from the tool bar and select your units, to save the file to a
folder on your PC’s hard drive, choose the “save” command.
Figure 3-18 Presentation Information window
38
Strong International
CineSuite Manager
CineSuite Reference Manual
Figure 3-19 Format Description Text
Editor
The Facility Schedule Editor
This editor is closely related to the show schedule editor above, the primary difference being that the
time line not only displays 24 hours of schedule time, but incorporates 7 days of 24 hour divisions
all in the same plane on the table. Rows below and to the left show the house numbers. The editing
process is the same as with the show schedule editor above. When this editor is opened from the
“New” option, the user is prompted to enter the number of screens, this is actually the number of
automations on your network. The house number field is actually representative of the CNA’s ID
number. Upon exiting this editor the user is prompted to save the file that has been modified or
created. If you would like to send the file directly to a CNA or group of CNA’s, use the “Send
CNA” command from the tool bar and select your units, to save the file to a folder on your PC’s
hard drive, choose the “save” command.
Figure 3-20 Facility Schedule Editor
Both the Facility Schedule editor and the Program Schedule editor display a show highlighted in a
select color, this color is directly related to the program number. This helps identify and organize
shows while editing the schedule.
Strong International
39
CineSuite Reference Manual
CineSuite Manager
CineSuite Manager Drop Down Menus
Figure 3-21 Manager Tool Bar
The cineSuite tool bar also has standard Windows drop-down menus. From left to right they are
File, Edit, Show Log, Monitors, Paging, KDI, Users, and Help. These items, when selected, have sub
menus that allow you to select other related options. Each of these drop-down menus will be covered
in this section, any functions that have already been covered will refer to a previous section
regarding its use.
File
File
New
Opens editors described above
Open
Opens items, “From File” or “From Automation”
Save
Saves items, “To File” or “To Automation”
File Transfer
Moves files from file or CNA to CNA
Advanced
Device Flash Upgrade feature
Print
Opens Print Window
Enterprise Setup
Opens Connection Settings Screen
Preferences
Sets Font attributes for Editor/ Monitor
Exit
Closes CineSuite Manager
The “New” menu gives options for opening new files in editors above, the editor is chosen by
selecting the type of file from the list that you would like to create.
The “Open” menu provides the option of opening a file from a folder located on your hard drive, or
from an automation. The open from file selection gives the same result as selecting the “Open” icon
on the tool bar, a Windows file selection box appears, highlight the desired file, then select “open”.
The open from automation option is the same as using the “CNA Get” icon.
Figure 3-22 Open from CNA
40
Strong International
CineSuite Manager
CineSuite Reference Manual
The “Save” menu is used to transfer a currently open file from an editor to either a file by selecting
the “to file” option, or to a CNA using the to CNA option. The “Save to file” functions the same as
the “Save” icon, and the save to CNA functions the same as the “CNA Send” icon. The file and
automation selection dialog boxes are the same as those of the “Open” command above.
The “File transfer” function opens the file transfer window. This window copies selected files from
automation or disk to automation or automations. The operation circumvents the editor process and
transfers files without the option viewing/ editing them first.
Select the source file(s): This operation involves choosing between a file from your computer, or
choosing a file from an automation. Select either from disk, or from automation. If selecting a source
from disk, each “browse” button brings up a Windows file selection box. The “automation type”
selection at the top filters your results and limits/ expands your selection options. Once a device or
file location has been selected the “files to transfer” window will fill with available files.
Figure 3-23 Select Source from Disk
Next select the destination automation(s): Choosing a destination for the file(s) to be transferred can
be accomplished by clicking the “select” button and choosing a driver from the “choose CineNet
Driver” window. This can be a local or remote driver. Upon selecting the driver, the “Destination
house ID’s” window will fill with available automations. Highlight the automation(s) you wish to
transfer file(s) to.
Click the “Begin” button: Files will then be transferred to the CNA and a status window will show
data transfer indicators, then a report window appears displaying “transfer complete”, or error status
if any. The “Clear Log” button is used to remove the transfer record from the screen and must be
used if another transfer is to be done. The “X” or close buttons can be used to exit this screen.
Strong International
41
CineSuite Reference Manual
CineSuite Manager
Figure 3-24 File Transfer Main Window
The “Advanced” menu currently contains an option for a device flash upgrade. This is used to
upgrade the firmware of your CNA over the network. Reprogramming your CNA’s flash memory
has now just become as easy as transferring files.
Select the:
“File -> Advanced -> Device Flash Upgrade options.
First a warning window appears:
Figure 3-25 Flash Program Warning
Select “Yes”. A “select CineNet Driver” window appears. Choose the desired driver managing the
desired automation(s) that you wish to upgrade. The driver can be local or remote through the
location server function.
The window should now display a record of the remote (or local) CineNet Driver’s available flash
files. If you wish to select a local folder or alternate location for your flash file source, the “select
local file” button can be used. This option opens a typical Windows file selection box, highlight your
desired file once located, then click the “Open” button. The new file will now be in your list of
available flash files.
42
Strong International
CineSuite Manager
CineSuite Reference Manual
Highlight the desired flash file and then highlight the desired destination automation. Various status
and device data are presented at the right of the active window.
Once you are certain that you are performing a valid transfer, select the “Start Boot” button. This
remotely starts the CNA’s bootloader. Once the status window shows a bootloader started message
select the “start flash” button.
This button initiates the transfer of flash information from the file selected to the eCNA(s) selected.
Figure 3-26 Flash Upgrade Log
Figure 3-27 Flash Program Main Screen
Once completed, select the “Start RTOS” button. Your CNA(s) should boot with the transferred
firmware version running. The checksum upon boot-up should match the upgrade’s expected
checksum.
Strong International
43
CineSuite Reference Manual
CineSuite Manager
The main window also has a checkbox to include LIN devices. This checkbox allows the inclusion
of flash upgrade devices on the LIN. The operation of upgrading your LIN devices is basically the
same as the process for upgrading an automation.
Note: The CineSuite flash upgrade will automatically run the CNAERASE.exe file where needed in
order to resolve a hardware issue that was present on some legacy CNAs. This program allows full
erasure of the file in firmware so that upgrade is possible.
Select the “Close” button or the “X” button to exit this screen.
The “Print” function is used to print information presented in an editor or monitor, selecting the
print operation from this menu will open a print screen where print jobs can be previewed and
printing options can be configured. The print window allows selection of a current page, or in the
case of multiple pages, all page printing. There is a preview zoom range of 100% to 200%
magnification with several steps in between. There is an option of which printer is to be used in
applications where there are multiple printers. The printer can be directly connected to your PC, or a
networked printer. A page total displays “Page 1 of x” detailing the total quantity of pages to print.
The font size can be changed and spacing can be altered to accommodate varying amounts of
information on each page. There is a “portrait/ landscape” option, and a “print page/ print all”
selection.
“Enterprise Setup” is for configuring the Manager’s connection settings, it opens a connection
settings dialog box.
Figure 3-28 Enterprise Setup
This window is used to configure the CineSuite Manager for Driver location, Port number, and
Theatre name. The driver can be local or remote. Once data is entered, the Manager software
attempts to contact the Driver application. If the connection is successful a log-on window appears,
if the connection is not successful, an error message window appears and the Manager remains
unconnected.
The “Preferences” function opens a configuration box where editor and monitor font attributes can
be chosen. These choices for font type, font size, and 12/24 hour time format are individually
configurable for the CNA-100/150 editor, the CNA-200 editor, the Learn Times editor, the LSN
monitor, the Remote Monitor, the Show Schedule editor, and the Supervisory editor.
44
Strong International
CineSuite Manager
CineSuite Reference Manual
Figure 3-29 Preferences Options
The “Exit” selection is used to close the CineSuite Manager.
Edit
The “Edit“ menu contains the Copy, Cut and Paste operations. These function in the traditional
manner where applicable when using editors and can be used to Move, Remove, and Duplicate
parameters, operations, and text information.
Show Log
Show Log
HTML Reports
Lets User view reports
HTML Report Setup
Sets up header options for report
View Show Log
Displays show information
View Raw Events
Displays Raw show information
Event Log Maintenance
Re-log Events
Requests that CNA resend all events in log
Clear Show Number Resets Selected CNA show number to “0"
Clear Event Log
Clears selected CNA’s event log
Edit User Codes
For customizing internal report event messages
Setup Operator IDs
Used to enter personnel names and ID# for reporting
The “Show Log” menu is used for the configuration, display, selection, and generation of reports.
The HTML reports function opens the window where reports can be selected and viewed. Initially
the user is prompted to select a driver, either a local CineNet driver, or through a location server.
Once a driver has been selected, the main window opens up. Unless previous reports have been
selected, there will be no information present on the “available report” screen. Choosing the “Add”
button brings up a prompt for the Addition/ Selection of a report to run. Once a name is entered for
the report, you are prompted to choose a HTML report to run from a list of available scripts. They
are descriptively named so that their function can be inferred relatively easily. These reports are
placed into a folder during initial software installation. Once selected, the report date range can be
chosen from a list or from a calendar. This will be the window used to filter out unwanted data.
Click the accept button to exit this dialog box. Clicking the “Get Report” button to the right of the
window will display your selected report in the main window. To delete or edit a report and its
contents, select the delete or edit button. Additionally, the time window can be changed by selecting
Strong International
45
CineSuite Reference Manual
CineSuite Manager
either the From or To buttons and selecting the appropriate dates. This functions similar to the start
and end date that is set up during the report addition process.
The “HTML report setup” window is used to customize the header of the report, this page lets the
user enter a facility name, address, phone, fax, email, web address and logo. All information entered
here will appear at the top of your report generated in the HTML reports menu. This feature allows
the user to generate a customized report to conform to corporate standards or personal preferences.
Figure 3-30 Driver Selection Window
Figure 3-31 HTML Report Viewer Window
Figure 3-32 Add/ Edit HTML Report
46
Strong International
CineSuite Manager
CineSuite Reference Manual
Figure 3-33 Header Setup Window
Figure 3-34 Show Search W indow
Strong International
47
CineSuite Reference Manual
CineSuite Manager
The View “Show Log” menu is used to search for shows, there is a filter button that will display
only shows with down time, and shows with information only. A date range can be chosen, or
custom dates can be entered. Once this is done, selecting the “Get Shows” button brings up a listing
in the main window displaying the House number, Show ID number, Time of show, the Title, and
the amount of down time (If any). Selecting the “View Show Details” button brings up another
window displaying information on show details, event details, and show problems that were
encountered during the selected show. Each event has an associated window in the event details
section that appears when the event is selected. Such information as device type, show number, cue
number, mode and status information at the time of event are reported here. The event code, text
description, date and parameters are displayed and can be printed for analysis if desired. When
troubleshooting a show problem, this information can be invaluable. Fault and problem information
is highlighted in red on the screen.
Figure 3-35 Show Details Screen
Figure 3-36 Show Event Details
48
Strong International
CineSuite Manager
CineSuite Reference Manual
The problem screen at the bottom of the window displays the nature of the problem encountered. For
the purpose of record keeping, the Add user Code function lets the user enter information regarding
the fault, actions taken, the operator at the time of the fault, equipment used, show information and
other records. The Problem Details button is used to review this information.
Figure 3-37 Raw Event List
The “View Raw Events” window displays all raw events that occur. These events can vary in type,
some reflect the events of a show, others record the sequence of events from power up. The status of
the CNA at the time of an event can provide important information when there is a problem. It is a
“behind the scenes” look at the CNA’s activity. Most programmers and even advanced users will not
have a use for this information, but during troubleshooting, it may be of importance to support
personnel.
The “Relog Events” function is used to recall the events from a particular automation on the
network. Initially there is a prompt to select the desired automation, once chosen, there are a series
of messages that confirm that new event log information has been sent to the CineSuite Manager.
“Clear Show Number” is used to reset the selected automation(s) show number to zero.
“Clear Event Log” is used to clear the event log of a selected automation. Once this has been done,
the previous event information cannot be retrieved.
Figure 3-38 Add/ Edit User Prompt
Strong International
49
CineSuite Reference Manual
CineSuite Manager
The “Edit User Code” function begins by prompting the user to select a network, either local or
through a location server. Once selected a window opens that allows the editing of user codes. A
description and a code number can be assigned for a particular report event. These codes can be
organized in the following categories: Problem codes, Damage codes, Film codes, Test codes,
Equipment codes, and Rresentation codes. Codes can be added, edited, and removed as necessary.
Figure 3-39 User Code Display
Figure 3-40 Operator Id Setup
The “Setup Operator ID’s” window is for entering names and ID code numbers for employees.
These names are used with the “add user code” function of the view show details.
50
Strong International
CineSuite Manager
CineSuite Reference Manual
Monitors
Monitors
LSN Network Status
Shows display of LSN and attached LIN Devices
CNA Monitor
Gives detailed remote information and CNA status
Check Software Versions
Checks network hardware devices for firmware similarities
CNA Monitor Settings
Lets user customize CNA Monitor Display
The “LSN Network Status” operation opens the same monitor previously mentioned that is opened
from the “Netwk” toolbar shortcut icon.
The “CNA Monitor” operation opens the same monitor that is opened from the “Montr” toolbar
shortcut icon.
The “Check Software Versions” tool is used to check the devices on the network for similarities in
device type and software (Firmware) version. The LSN monitor (“Netwk”) must be open when using
this tool.
The “CNA Monitor Settings” option is used to select which data fields will appear in the “Montr”
window. Items are selected, then added or removed with the arrow button at the center of the dialog
box. Selecting OK closes the window. When the “Montr” window is opened, only the selected
fields will be visible.
Paging
Paging
Send Message
Selects a Message to Send to Pagers
Paging Setup
Sets up Paging System
CineSuite Paging Messages
Alters Paging List/ Message Contents
The “Send Message” tool is used to send a message to a pager within your paging network. After
selecting this menu item, a window opens asking you to select a network on which your paging
system resides. Once this is done, you are given the option of pagers listed in your paging setup
window (see below), you can then enter text in the text input box and select send. An on screen
message will indicate whether your message went out without any faults.
The “Paging Setup” selection is used to open the paging configuration settings screen. When this
option is selected you will be prompted to select a network on which your paging system resides.
Once the proper network is selected, the configuration settings screen appears. Here you can enable
or disable paging. You can modify or create paging system serial port settings, add, edit or delete
pagers from the system, and send test messages to pagers for diagnostic purposes.
Select Edit to access the paging system’s serial port communications settings. From this window
Baud Rate, Parity, Stop Bits, Data Bits, and Serial Port parameters may be chosen, modified and
saved. Guidance in configuring these settings can usually be found in the user’s manual that ships
with your paging system.
To create settings for a pager, select the “add” button. This opens a pager setup dialog box where the
Strong International
51
CineSuite Reference Manual
CineSuite Manager
paging information is entered. Enter a pager name (This can be anything, such as a position, title, or
personnel name), enter the CapCode usually located on the back of the pager housing, and lastly
select the baud rate at which the pager operates. Select the “accept” button. The newly entered pager
name will now appear in the cinesuite pager setup pager list.
Highlighting a pager will link it to features in the list box below. Below this pager listing there is
another window labeled “selected pager receives messages from:” This list box is used to add houses
(CNA ID’s) to the above selected pager’s list of callers. Select the house number and select either
include or exclude at the bottom of the window. Directly to the right is another list box that is
labeled “events sent to pager”. Similarly, select to include or exclude messages from the list in that
pager’s message vocabulary. Select the “Save” button at the bottom of the page to save your pager
settings.
Figure 3-41 Paging Setup screen
The “CineSuite Paging Messages” menu item opens a window in which the preset paging message
text can be customized to fit your individual needs. Select a message or condition to modify by
double clicking it or selecting the “Edit” button at the bottom of the window. Once selected a dialog
box opens and from here you can edit the text that will be sent for that particular failure mode or
event. There are options for setting the priority of the message (Notify or Urgent), and the user can
specify when to send the page (Never, Always, Only when Running, or Only when Stopped).
Defaults can be restored by simply selecting the “set to default” button at the bottom of the window.
Figure 3-42 Send Pager Message
52
Strong International
CineSuite Manager
CineSuite Reference Manual
Figure 3-43 Edit Message
Figure 3-44 Pager Message Setup
Strong International
53
CineSuite Reference Manual
CineSuite Manager
KDI
The KDI menu offers two sub-menus, one is “Edit Content”, and the other “Send Alert”. The edit
content portion is used primarily as an editor and directory creator. This program section features an
editor window in which to create screens for the eCNA-200. There is also a test function that has a
virtual eCNA-200 front panel. This virtual front panel has simulated data entry keys, and a simulated
screen so that the programmer can see exactly what will appear on the CNA screen, and how the
input keys will function. This feature is useful for creating help menus, status message screens, and
just about any other text messaging/ interactive functions that the programmer can think up. The
Send alert window provides a means for sending a specific house, multiple houses, or global eCNA200's a text message to be displayed on screen.
Figure 3-45 KDI Editor
The Edit content screen initially asks the programmer for the CineNet Driver to use for remote or
local network function. This driver should have the KDI Server checkbox enabled for the eCNA200s on the network that are to receive KDI messages. The main editor window contains a screen
preview field, a key link display that correlates front panel keys to pages. Each page also has its own
key links to other pages. At the right of the window there is a listing displaying the page titles and
their relationships with other pages. There are buttons at the bottom of the screen that can create new
pages, edit existing pages, delete pages, and make a selected page a start page for the sequence.
There is also a button for the test emulator.
Preview: This window displays the page selected at the right. This shows what your pages will look
like when highlighted in the page listing.
54
Strong International
CineSuite Manager
CineSuite Reference Manual
Key Links: After you have created your KDI pages (see next section), you will want to control what
key they are linked to. For example, you create a key on the screen called “home” and you want it to
link to an index page that you have created as a starting/ navigation point for your custom eCNA200 help/ instruction system. Simply highlight the key you wish to link. Each key is described by a
number, word, or other symbol representing its counterpart on the actual eCNA-200's front panel.
After highlighting the key and selecting the “Change Link” option, a window will appear that allows
you to select which page you want it linked with. After selection click “Accept” and the page’s name
will appear in the field adjacent to the key description. This indicates that your page is now linked to
the key you have specified. Each page in the right-hand listing can have different links, if you select
another page, new links will need to be entered because each page operates independently.
Page Listing Menu: The list to the right that has been previously referred to contains a listing of
available pages and sub pages on the KDI server. This screen allows the programmer to move pages
around as they see fit. For example, a page can be moved to become a sub-page of another page, sub
pages can be moved to different main pages, whole chains of pages and sub pages can be placed
under one main page or one of its sub pages, the only thing not allowed is moving a main page into
one of its own sub pages. As you experiment with the organization of your pages and menus the
available options will become clear. This window section is also efficiently used to pre-organize
pages as they are added. For example, when it is desirable to make a sub page of the main home
page, menu or other starting point, simply select it in the list and choose the “New Page” button
below. This automatically places the page you are going to create into a sub category of the main
page selected. Highlighting these page titles in the list let you perform any of the functions
associated with the buttons below. The pages are listed in alphabetical order and are not
representative of the actual page order.
New Page: This button opens the page editing window for the KDI Editor application. Here you can
add text and move margins for the aCNA-200's LCD screen, there is no limit to the number of words
that can be added as text in this window. At the right of this screen you will note that there is also a
key link window, this is the same as the one found on the main page, the only difference being that it
is only for this single page that you are creating, other page’s links cannot be altered from this
window. The scroll controls are used to “hold” certain numbers of lines when using the window
scroll controls. The top lines of text can remain on the screen while the lines below are subject to
scroll controls. This area can be used as a page header, a column header, or other navigational or
status display.
Take note that a number of options will appear when entering text into this editor, the tool bar will
show a group of tools to select either a large or small font, to invert the text, and a tool for typing
directly over existing text which functions similar to a Text Replace button. Large fonts are
displayed on top of small fonts, if you type a large font on top of a small font, the small fonts will
not be displayed. Text can be copied and pasted into the KDI editor from other sources using the
usual copy and paste functions, this allows the transfer of large amounts of pre-existing information
to be added to the KDI file efficiently.
Margins can be adjusted for the KDI window in this editor, this is accomplished by simply sliding
the margin tools below the main editor screen. These are used to customize the layout of the display
data. Variables must be smaller than the width of the margins on a given page, therefore a warning
message will be displayed if a variable cannot fit within the margins. When text is entered that
extends beyond a single viewable page, a scroll bar tool becomes available. When scrolling the soft
keys also change. The “home” key is left in place, but a page up and page down key become visible,
these are used for page navigation.
Strong International
55
CineSuite Reference Manual
CineSuite Manager
The Variable window is used for choosing an event which corresponds to a page. This lets an event
trigger a real-time message on the screen.
The variable types are listed below:
Variable Type
Variable Parameter
Cue #
-NA-
Elapsed Time
-NA-
Learn Mode
-NA-
Length
Current Show/ Next Show
Limited Release
Current Show/ Next Show
Prog #
Current Show/ Next Show
Rating
Current Show/ Next Show
Run Hours
-NA-
Seats Available
Current Show/ Next Show
Seats Sold
Current Show/ Next Show
Show Title
Current Show/ Next Show
Sold Out
Current Show/ Next Show
Start Mode
-NA-
Start Time
Current Show/ Next Show
Status
-NA-
Sync Loop
-NA-
Sync Status
-NA-
Time Remaining
-NA-
Time to Start
Current Show/ Next Show
Each variable also has a field for a house ID number, an alignment position of Left, Center, and
Right justification, and a 39 Max Length numerical value, this numerical value sets the length of the
variable text message that is displayed. The listed variables are requested from their sources defined
by the specified house ID number. Selecting “Own ID” will make the automation display status
information about itself. This information is then displayed in a non-editable field on the eCNA200's screen. The information is updated periodically to reflect changes in status or value. The
variable parameter (Where available) is selected to reflect either the current running show, or the
next show that is to be run.
Not all variables are available for all situations. Some are dependent on the ticketing system or show
schedule. (If implemented)
Upon exiting, the programmer is prompted to save the page and name it if a name has not already
been given to the page. This name appears in the page listing and the key links menus.
Edit Page: This button functions to open the editor for an existing page, simply select the page you
want to edit and click the “edit page” button, the editor listed above will open up. It is also possible
to edit a page by double clicking its name in the list. This will open the appropriate editor window.
56
Strong International
CineSuite Manager
CineSuite Reference Manual
Figure 3-46 Message Editing Screen
Delete Page: This function deletes the selected page. This function will not work if the page selected
has sub pages however. The sub pages must be deleted first. If the page selected can be deleted you
are asked to confirm your decision.
Make Start: This make start button basically makes a page the master page in the listing. The
selected page is removed from its current position and placed at the top of the list. When using the
KDI emulator below, this page will be the first displayed.
Test Using KDI Editor: This button opens a virtual eCNA-200 front panel. It contains a simulated
LCD screen, and simulated front panel keys. Clicking the keys is equal to a real world key press, the
functions and navigation of the KDI menus can take place here before making them available to the
automations on the network.
Figure 3-47 Test Screen
Strong International
57
Number keys on the computer keyboard can be substituted for clicking the virtual keypad buttons,
use the “backspace” key for clear, and “F1-F5" keys for the soft keys at the bottom of the screen.
“F5" is the home key and returns the display to the start page.
Figure 3-48 Alert/ Messaging Input
The Send Alert window initially prompts for a CineNet Driver selection, then opens a window that
displays any active eCNA-200 ID’s. You can send a text alert to either selected unit ID’s or all ID’s
on the network. Once units are selected for messaging, a text input window appears into which your
message can be input. Select OK. The message then appears in the upper left portion of your screen
alternating with any fault or status messages already being displayed. There can only be one KDI
alert message at a time, any subsequent entries will overwrite the previous.
The KDI Editing/Messaging applications integrated into the CineSuite package are independent of
the actual KDI protocols (Which are written into the eCNA-200's operating firmware). The Editor
creates a KDIServer.mdb file on the computer running the CineNet Driver application, the driver (If
enabled) reads this file and sends the information out to the enabled eCNA-200's display(s). The
CineSuite package uses port#16001 on the eCNA for communication. If you are using an alternate
software application in addition to the CineSuite application, your software will need to be
configured to use one or more of the other four available ports.
Users
The Users menu is used in the same way that the CineNet Driver’s users menu is used. The functions
are the same. Users and groups are created, their privileges are assigned, logging in and out, takes
place here, any changes made here also affect the CineNet Driver’s group privilege and user list. See
more information on using this feature in the CineNet Driver portion of this manual.
Conclusion
This concludes the CineSuite Manager section of this manual. Most functions have been covered in
sufficient detail to provide a good understanding of how to set up and use the CineSuite software
package. As with any piece of software that is new to a user, there will be an adjustment period
where unstructured exploration and experimentation will be necessary to fully utilize all of the
functions and operations available. As this software is developed, more features are sure to be added.
Please check online for supplemental information, new software releases, and updated users’ guides.
58
Strong International
Other Applications:
The CineSuite package contains additional programs that are not installed with the CineSuite
manager. These applications are separated components of the CineSuite Manager, optimized to run
as individual programs, others are unique remote applications. They will be covered here in a
general overview. With the increasing prominency of digital projection equipment in the theatre,
there is a definite need for tools to help integrate the digital projector into a traditional, film oriented
projection booth. The eCNA is a hardware device that is intended to make that job easier. The
CineSuite package does include several digital content player interface functions. Just as the
CineNet Driver and Manager are separate programs that don’t need to be together on the same
computer to function, there are a number of individual applications available that can be run
remotely provided a CineNet Driver is running on the CNA network. More applications and
protocols are being developed as needs present themselves. Please visit www.eprad.com for the
latest software applications.
CNA Remote Monitor
The CNA remote monitor is similar to the remote monitor found in the CineSuite Manager “Montr”
application. This remote monitor can be run independently and allows remote monitoring of a
facility’s network. Available monitoring parameters and preference settings are the same as the
Montr function of the CineSuite Manager. The user is initially prompted to select Driver to monitor,
remote Connection information, and enter a log on name and password. The main window displays
system information and receives frequent status updates. This application is used for monitoring
only, CNA operation parameters cannot be changed using this program.
Figure 4-1 CineSuite Remote Monitor Application
Figure 4-2 Preferences (Font)
Strong International
Figure 4-3 Preferences (Column Options)
59
CineSuite Reference Manual
Additional Information
Digital Projector Interface
This software application is used when digital content players or projectors are used in conjunction
with an eCNA. The program has been developed to interface with and communicate information so
that a coordinated series of events is possible. Upon opening the Digital Projector Interface, the user
faces a series of prompts. You must know the CineNet Driver location whether remote or local, you
must know the theatre location and web address of the hosting computer. The administrative settings
menu lets the user change these parameters later if needed. Additionally, a set of digital projector
operations can be associated with CNA status conditions. The following table describes this menu
item:
Digital Projector Operations for CNA Status
CNA Status
Digital Projector Operation
Delay (In Sec.)
Ready
On / Off / No-Op / Manual
0-xxxx
Running
On / Off / No-Op / Manual
0-xxxx
Intermission
On / Off / No-Op / Manual
0-xxxx
Stopped
On / Off / No-Op / Manual
0-xxxx
Fault To
On / Off / No-Op / Manual
0-xxxx
Off Line
On / Off / No-Op / Manual
0-xxxx
Power Up
On / Off / No-Op / Manual
0-xxxx
A Manual Control menu is given to select other projector operations such as Manual start and stop
of selected projector(s), Manual start and stop of coordinating selected projector(s). There is a log on
menu under the users heading. The help menu brings up information regarding the version and
creation dates for the currently running program.
In the main window of this program there are a number of fields displayed. House ID, CNA Status,
CNA Coordination status, Connection Status for projector, Name, Version, State, Fault, Lamp
Hours, and Digital Projector Coordination. This status window provides valuable information
regarding the film and digital projector interaction.
This interface program requires log on. This log on user name and password are the remote user
names and passwords that were set up on the CineNet Driver or manager. There are no provisions
for changing passwords from this application, only a log in screen is provided.
Figure 4-4 Digital Projector Control
60
Strong International
Additional Information
CineSuite Reference Manual
Figure 4-5 Main Digital Projector Interface Window
CineSuite Location Server
Available as an external application running independently of the CineSuite manager is the Location
Server. This program module functions to monitor the link from computers running the CineNet
Driver to an external computer via the internet. In brief, it displays connected CineNet Drivers, tells
whether they are online or off, gives the remote client name, client type, and tells whether the client
is online or off. This section of the display features a check box to include offline CineSuite clients,
and a text box that lets the user change the port number for communications. An activity log shares
the lower half of the window to display information regarding times, driver names, client names, and
descriptions of actions performed while active. There is no log on screen for this program.
Figure 4-6 Location Server Main Screen
Briefly, the CineNet driver can be configured to connect through a location server. The “Register
with CineSuite Location Server” checkbox is enabled, the port number specified during setup should
match the port number of the location server. The IP address of the computer running the location
server is entered into the IP address field in the driver configuration window. The location server
application is started on the desired computer and all drivers configured to register with the location
server at that IP and through that port will appear in the main connections list.
Strong International
61
CineSuite Reference Manual
Additional Information
The CineSuite Reporter
The CineSuite Reporter is used to email reports to administrative personnel. These reports are the
same ones run in the CineSuite Manager’s HTML reports window. Once selected, the reports can be
emailed periodically as scheduled by the administrator.
Figure 4-7 Reporter Log-on
To change settings in the reporter’s operation it will be necessary to log on as the administrator or a
user in a group with privileges to modify reports.
Figure 4-8 Reporter Main window
62
Strong International
Additional Information
CineSuite Reference Manual
Figure 4-9 Report schedule editor
The main window of the reporter displays information regarding the Driver, Schedule name,
scheduling times, recipient information, and action to take. A selection of tools is given for schedule
creation, editing, deletion, running and disabling. Below the schedules window is a report cue
displaying a listing of report names, dates and recipient information. It provides a count of attempts
made to send, a send next time, and finally a “disabled” indicator field and a status field indicating
error or success. Below this window is a “disable report spooler” checkbox that stops the reporter
from emailing information. There are buttons to view errors, delete selected reports, disable report,
and a send now function.
Figure 4-10 New Recipient window
The “Create Schedule” button opens the “schedule editor” window once a driver location is selected.
The driver is either running locally or attached to a remote computer running the location server.
This application is used to add, edit and delete reports and start and end times much like the editor in
the CineSuite Manager used for report management. Recipients can then be added edited and
deleted. These recipients are selected to receive the scheduled reports by adding them to the list to
the right of the recipient listing. The report can be saved to hard drive or sent to printer as well if
desired.
Strong International
63
CineSuite Reference Manual
Additional Information
The “Edit Schedule” window will open the editor when a schedule is selected in the list.
The main window has a tab to bring the “Reports” window to the front. This window is similar in
function to the HTML reports window of the CineSuite Manager.
Figure 4-11 Reports W indow
Here the Driver location can be changed, reports can be added and subtracted, begin and end times
altered, and reports can be fetched from the CNA.
From the “File” menu there are options to Open a report, save a selected report, email a selected
report, and print the report. The “Admin” sub menu lets the user alter the CineSuite Connection
Setup, alter the Email Setup, alter the HTML Report Setup, and select a database from your hard
drive’s directory.
From the “User Codes” menu it is possible to Edit user Codes and to Setup Operator IDs.
Figure 4-12 Edit User Codes
64
Strong International
Additional Information
CineSuite Reference Manual
The User Codes window and operator ID setup will be essentially the same as that of the CineSuite
Manager’s user codes window. Some experimentation may be necessary to get your reporting
functions up and running. Vital report data automatically sent to administrative personnel in an
organized format can be invaluable in assessing equipment performance, employee performance,
and perceived customer satisfaction.
File Types
The CineSuite software can save various files to your hard drive. When opening them it may be
helpful to know which file extensions are associated with which file types. Additionally, there are
some files created as part of normal operations that are used by the CineSuite Manager and CineNet
Driver. NO files in your CineSuite directory should be opened by any means other than the editor in
which they were created. Program corruption as a result of text editing or other operations may not
be repairable:
Extension: Type:
Extension: Type:
.cp1
CNA-100 Program
.HTML (.HTM) HTML Report Template
.cs1
CNA-100 Program Set
.s29
Flash Upgrade File
.c1s
CNA-100 Supervisory
.exe
Executable Files, AKA Programs
.lt5
CNA-150 Learn Time
.dat
Data Files, for programs
.l5s
CNA-150 Learn Time Set
.csv
Excel Data File, Internal to Report function
.c5s
CNA-150 Supervisory
.mdb
Microsoft Access Database File
.cp2
CNA-200 Program
.gif
Image
.cs2
CNA-200 Program Set
.jpg
Image
.c2s
CNA-200 Supervisory
.ico
Icon
.lt2
CNA-200 Learn Time
.cna
CNA file
.l2s
CNA-200 Learn Time Set
.ldb
Microsoft Access, Lock File
.csh
Show Schedule
.nfy
CineNet Driver Data File
.cfs
Facility Schedule
.txt
Text File
Remote Operations and Networks
To use any of the CineSuite remote functions some information about the local area network(s)
involved must be known. Although a thorough knowledge of TCP/IP networking is not necessary,
some basic concepts and terminology must be understood in order to effectively communicate with
networking professionals and I.T. staff. This information will also be of use to those who are setting
up their own networks.
Cabling for interconnecting eCNAs can be store bought or
custom made. eCNAs use an IEEE industry standard
Cat5/RJ45 ethernet cable configuration. Below is an
illustration of a typical ethernet cable. Also shown is a
crossover cable. The crossover cable is used only when a
direct connection between the PC and eCNA is desired.
Ordinarily the hub, router or switch will cross over the
signals necessary automatically, however, in the case of a
direct connection this signal routing must be hard wired.
Strong International
Figure 4-13 Crossover Cable
65
CineSuite Reference Manual
Additional Information
Figure 4-14 Standard Network Cable
The eCNA manual covers configuration from the eCNA’s perspective. It is assumed that the
CineSuite software will be installed on a computer with a working internet connection, optionally, a
working printer, and other properly configured hardware. It will be desirable to place the router or
gateway running the CineNet at a static IP address. Loss of IP will cause a connection failure when a
remote access is attempted. Most routers allow a static IP addresses that cannot be altered by a
DHCP server. The basic hardware configuration for your network, if in place and established, should
already contain all of the necessary components to make eCNA integration possible. The only
provisions that may be required would be enough free ethernet hardware connections to support the
added network entities.
The IP address of the eCNA’s must be known in order to configure the CineNet driver to recognize
them. In the event of network troubles, it should be known that the eCNA’s internal ethernet
hardware has two important features. The first is a DIP switch on the eCNA mainboard that sets a
known default ethernet IP address, see your eCNA manual for the location of the switch. The second
useful feature is that the hardware will respond to the “ping” command line networking operation.
Each Windows environment has different methods for accessing the MSDOS prompt, the simplest is
usually from the start menu, choose run, then enter CMD or Command to access the command
prompt. Type the command ping followed by the IP address of the eCNA For example:
C:/ping 192.168.1.108
The eCNA will respond with:
Pinging 192.168.1.108 with 32 bytes of data:
Reply from 192.168.1.108: bytes=32
Reply from 192.168.1.108: bytes=32
Reply from 192.168.1.108: bytes=32
Reply from 192.168.1.108: bytes=32
time=10ms
time=10ms
time=10ms
time=10ms
TTL=128
TTL=128
TTL=128
TTL=128
This indicates a successful ping operation, the eCNA hardware path is properly networked and can
be accessed. The IP you enter after the ping command will vary of course depending on the eCNA
you are attempting to talk to. Also, the reply time will vary depending on the speed of your network,
66
Strong International
Additional Information
CineSuite Reference Manual
and the TTL= figure will be different. The data is not really important here, the main items to look
for are a “Request Time out” message, or intermittent replies.
The combination of the two simple but important tools above should enable complete verification of
hardware operation (More or less). Pinging a known good web site’s address can tell you if you are
able to access the outside world as well: ping www.eprad.com
The latest version of eCNA-200 has an on-screen feature for displaying the IP address of the
automation in its supervisory menu. Once the hardware portion of the networking configured and
tested, remote applications can be checked locally. Simply install the desired applications on a
computer on the same network that is not running the CineNet Driver application. When prompted
to choose a local or remote driver connection, choose remote and enter the IP address of the
computer running the CineNet Driver. This IP address can be determined by pinging the computer’s
name remotely (If given a Windows networking name) or by checking its network configuration
settings.
Once the IP is entered on the remote computer, the application should begin to respond
appropriately. This varies according to which application you are using, but generally all eCNAs on
the network should be visible, the CineSuite Manager should be able to communicate with the
remote units as if the driver was installed and running on that computer, Remote Monitor should be
displaying all available automations, the Digital Projector Interface should display house ID
numbers on the network, etc...
The Internet
The CineNet can now be expanded further than ever imagined. With the use of the CineNet Driver
locally, and the CineSuite Manager (Or other application described above), a theatre can be
administered or monitored over TCP/IP using the internet. If the previous steps yield acceptable
results, a true remote connection can be established. The remote user must know several important
pieces of information in order to connect to a running CineNet Driver. They are listed here followed
by a brief description of their function and application.
1
2
3
4
The Static IP of the router used for the facility
The Port that the CineNet Driver is using
A password
The theatre name
First the IP address of the router is the main static IP of the remote facility, this is the IP for the
router that serves the building. Every internet exchange into and out of the building goes through
this device.
The port is specified when configuring your application software, “Enterprise Setup”, and Driver
Location server. They should match each other. When connecting remotely, the port number is vital
in making a connection to the computer running the cinenet driver that lies beyond the router. The
Password can be any password set up on the CineNet Driver that is allowed remote access
privileges. The Theatre name is used remotely to identify which theatre appears on your reports and
in monitor windows.
Strong International
67
CineSuite Reference Manual
Additional Information
A few words about TCP/IP and Ports:
TCP/IP networking is the foundation of most local networks, wide area networks, and the internet.
The protocol has many similarities to sending a letter through the U.S. mail. A letter (Or packet of
data), in order to reach its intended destination, must have several important pieces of information
with it. A name, a street address, a zip code etc....
The “street address” on a TCP/IP network is the IP. This identifies the computer on the network for
other computers. IP addresses usually fall in a constrained range and get distributed sequentially,
similar to street addresses. However, just as there can be hundreds of “123 Main St.” locations, there
can be hundreds of “192.168.1.100" IP addresses behind people’s routers. The company that
provides your internet service assigns an IP address to you as a customer. This can be Dynamic
(Changing) or Static (Always the same). In order to use the CineSuite remote functions effectively,
the CineNet driver computer must be behind a router or gateway with a static IP address. The
provider’s IP address is unique. The unique address is the address that you will use when
configuring remote applications.
A recipient name or department on a piece of mail is analogous to the port number. A letter or
memo needs to reach the proper address and the intended department or reader. If an unintended
recipient gets a letter that you wrote, not only can your letter go unread, you will not transfer
information to the intended reader. The information being exchanged must get to the right software
application in an efficient manner. For instance internet browsers typically use Port 80, FTP
applications will use port 21, etc... There are 65535 ports that can be used, some are reserved, others
are free and available from a “pool” of unused port numbers. The default port number should work
in most applications.
The Subnet Mask (If used on your network) is a number specified by your network administrator.
The number is used to filter network traffic, the default value is 255.255.255.0 in the eCNA
configuration. None of the CineSuite package applications use the Subnet mask.
The Hardware or MAC Address (Media Access Control) defines the actual hardware as a unique
entity on the network. The MAC address should not deviate from the value entered during the
testing and manufacture of your eCNA.
68
Strong International
Additional Information
CineSuite Reference Manual
Router (facility) IP:
CineSuite Driver Port Number:
Location Server IP:
CineNet Driver computer’s IP:
Automation LSN IDs:
Automation IPs:
Automation Type:
-
-
-
Notes:
You can optionally use this table to record the configuration of your network and network devices.
You may find it helpful to keep a log of your network configuration parameters in the event of a
hardware change, device failure, or to answer questions from your facility’s IT personnel. Once your
networking and devices are configured, it is unlikely that you will be changing anything. Recording
this information may help you recall, in the future, where and how everything is connected.
Strong International
69
CineSuite Reference Manual
Additional Information
<< Big old Index here >>
And
<< List of Illustrations >>
70
Strong International