1
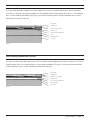
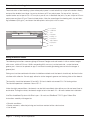
06 English
Instructions
Dinesen
floors and
floor heating
Dinesen floors and floor heating
February 2011
Dinesen floors and floor heating
Page 3
Page 4
Contents
Dinesen floors and floor heating
6
Preconditions
Humidity Characteristics of the wood Heat requirements Heat loss
Supply pipe temperature and surface temperature 6
6
7
8
8
Types of floor heating
Heavy floor heating Light floor heating Electrical floor heating 9
9
9
Constructions
Floor heating in concrete Directly on concrete with heating coils Chipboard on concrete with heating coils Floor heating with heat emission plates Heat emission plates on laths on top of joists 10
10
10
11
11
Heat emission plates on laths between joists 12
Self-sustaining heat emission plates on joists 13
Floor heating chipboard on concrete 13
Thermisol floor heating plates 14
Gluing14
Testings, start and operation
15
FAQs about floor heating
16
Dinesen recommends
19
Advice20
Contents I Page 5
Dinesen floors and floor heating
Floor heating has been used underneath Dinesen floors since 1995 and poses no problems under the
right preconditions.
In principle, floor heating (water-based) is simply a plastic pipe built into the floor construction. By sending
hot water through the pipe, the entire construction and thus the room is heated.
Depending on the insulation in the house, floor heating may be all you need, or alternatively, you may
need to supplement with radiators, heat recovery or a wood burning stove.
Floor heating underneath solid wooden floors is definitely possible.
To make the floor heating the only heat source, the surface of the floor must be able to emit more heat
than the total heat loss of the room. In a new house, where the insulation requirements of the Danish
building code are adhered to, this poses no problem, but nevertheless, you should always take the
following points into consideration.
Have the heat loss calculated, so the correct conditions are used, especially with renovated or old buildings.
Preconditions
Humudity
Whether you have floor heating or not, concrete moisture will always be extremely damaging to the dry
wooden floor. It is therefore of the utmost importance to make sure that the concrete is dry and contains
a maximum of 85% RH. If the heating coils have been cast into the concrete, the floor heating should be
turned on after 30 days when the concrete has hardened. Even during a hot summer, the floor heating
has to run for at least 1 month prior to the installation of the floor and always remember to measure the
level of concrete moisture prior to installation. If you do not start the floor heating, the remaining moisture
will emit when you turn on the heat, which may cause severe damage to the floors. Always make sure to
lay out a vapour barrier on top of the dry concrete floor.
Atmospheric humidity:
Concrete moisture:
Moisture in tier of beams: Moisture in joists:
Moisture in chipboards: Vapour barrier:
35 – 65% RH
Max. 85% RH
Max. 10-12%
Max. 10-12%
Max. 8-10%
Minimum 0.20 mm PE foil
Characteristics of the wood
Wood is a hygroscopic material, which absorbs and emits moisture from the surrounding room. Upon
delivery, Dinesen floors have been dried to a moisture content of 8-10%, which corresponds to a relative
humidity of 40-50%.
Page 6 I Preconditions
If the level of humidity drops, the wood will emit moisture and shrink across, resulting in contraction cracks.
The higher the surface temperature is, the lower the humidity is right above the floors, and the more the
wood shrinks. You should therefore always aim for a humidity level above 35% RH. Cracks will always
appear during the winter, and during this stage the floor will have the most beautiful appearance.
To avoid the low humidity impoverishing the floors, they can advantageously be treated with lye and oil.
The material’s ability to conduct heat is called thermal conductivity = λ (w/m°k). With regard to wooden
floors, the thermal conductivity depends on the density of the wood (kg/m3). Therefore, Oak will display a
better thermal conductivity than Douglas:
Oak: Douglas: 0.17
0.13
The insulation or thermal resistance of a material is calculated on the basis of the thickness of the material divided by its thermal conductivity. The thermal resistance factor expresses the insulation ability and is
referred to as R.R = thickness / thermal conductivity.
Examples of thermal resistance:
28 mm Douglas: 35 mm Douglas: 30 mm Oak:
0.028/0.13 = 0.22
0.035/0.13 = 0.27
0.030/0.17 = 0.18
As you will see from the above examples, a thicker floor provides better insulation than a thin floor.
It may therefore be necessary to operate with a higher supply temperature to reach the desired surface
temperature. This does not have any significant implications with regard to energy consumption. The difference in energy consumption between a tile floor and a solid 28 mm floor will be no more than 5-10%.
And the difference between a 28 mm and a 35 mm Douglas floor will amount to a few percentage points.
If the supply temperature is increased from 30 to 40°C, the heat consumption will rise by only 6%.
Heat requirements
When planning new houses, a room temperature of 20-21°C is desirable for a normal winter period.
The insulation requirements have increased considerably through times, which is reflected in the energy
consumption of a regular home.
In new homes, the heat consumption amounts to 35-45 W/m2, while in older houses it may be as high as
45-75 W/m2. It is therefore advisable to make a calculation of the actual heat requirement.
The surface temperature of a wooden floor must never exceed 27°C, and the surface will therefore never
emit more than 75 W/m2.
The surface temperature in a well insulated house will typically have to be around 2 degrees above the
desired room temperature. Obviously, the poorer the insulation of the house is, the higher the surface
temperature needs to be.
Preconditions I Page 7
Heat loss
If the house is not insulated sufficiently, there may be days where you will be unable to reach the desired
room temperature using only floor heating. The heat loss is significant through floors, walls, ceilings and
windows. The Danish Building Code lays down requirements with regard to the insulating ability, the socalled U value; these requirements must be adhered to. The U value for terrain decks with floor heating
cannot exceed 0.12. This requires insulation with no less than 250 mm polystyrene. The U value for heat
loss through the foundation cannot exceed 0.15, when floor heating is installed. Heat loss through the
foundation is particularly significant with regard to heat consumption. Remember to also consider thermal bridges and leakages. The Danish Building Code also lays down U values for exterior walls, ceilings,
windows, exterior doors etc. Heat loss through windows is, regardless of type of glass, far higher than
the loss through walls, and the size of the window will therefore greatly influence the overall heat loss.
Please note that the position of the windows with regard to corners of the world, open fields or the ocean
may result in even higher heat loss, and cold air accumulation from windows can also have a great impact. This should, however, be countered by convectors along tall windows reaching down to floor level.
Convectors can also be used for heating the room quickly, and as the convector grids can be made in
the same wood as the floor, they will even add a beautiful architectural feature to the room. The number
of exterior walls in a room influences the heat loss significantly. The more exterior walls the room has, the
higher the heat loss is. Be particularly observant with regard to small buildings with 3 exterior walls and
large windows, as the size of the heat emitting floor is also significant for heating up the room. Kitchen
elements and cupboards etc. reduce the area. Carpets, mats etc. will also reduce heat emission, and
the temperature underneath carpets may very well exceed the 27°C mentioned earlier. Small rooms may
therefore be more difficult to heat up than larger rooms. Rooms with high ceilings or which are open to
the ridge may also have a high heat loss.
Supply temperature and surface temperature
The supply temperature depends on the required output and the chosen floor type. Normally, the supply
temperature will be in the range of 30 to 45°C and should not exceed 50°C. The supply temperature
only has a modest influence on the heat consumption. Raising the temperature from 30 to 45°C will only
increase heat consumption by 6% as it is the difference between supply and return temperature that has
an impact on the heat consumption. It is only slightly more expensive to heat up a thick plank floor than a
thin engineered floor, but it requires a higher supply temperature to ensure the desired surface temperature. The surface temperature of a wooden floor must not exceed 27°C, as a higher temperature may
damage the floor.
The room temperature is controlled by thermostats in all rooms. Thermostats will open or close for the
supply of heat to regulate excess heat from people, sun, lights etc. The thermostats are installed on
interior walls 1.5 m above floor level and must be installed away from sunlight. Room thermostats are
available with or without a wire.
Page 8 I Preconditions
Types of floor heating
Floor heating is normally water-based, and a distinction is made between heavy floor heating with heating
coils in concrete and light floor heating with heating coils in heat emission plates. Electrical floor heating is
not as commonly used.
Heavy floor heating
Heavy floor heating is heating coils cast into concrete, where the concrete distributes the heat to the
entire surface of the floor. The concrete has a good thermal conductivity, but the problem is that the concrete accumulates a lot of heat and therefore responds very slowly. When a change occurs in the heat
supply, on account of for example sunlight or several guests in the room, the concrete will still be warm
a long time after the thermostat has turned off the heat supply. When the need for heat occurs again,
the heating period will also be quite long, as the large concrete body needs to warm up before the heat
can reach the wooden floor. The room temperature is therefore a bit more difficult to control with heavy
floor heating than with light floor heating. The advantage, however, is that the set-up is simple and that
the floor heating can be used to dry the concrete floor. Heavy floor heating is installed by a mason and a
plumber.
Light floor heating
Light floor heating is built up with aluminium heat emission plates, where the heating coils are laid into
bent rails. The heat emission plates are placed right beneath the wooden floor, and as aluminium is a perfect thermal conductor, the heat is distributed fast to the entire surface of the floor. Aluminium responds
quickly to changes in the heat demand, and therefore, the room temperature will be experienced as more
even and pleasant than with heavy floor heating. The set-up is a bit more complicated but provides a
more pleasant floor to walk on as the sub-floor is most often a joist construction. Light floor heating is
installed by a carpenter and a plumber.
Electrical floor heating
Electrical floor heating is typically built up with heat cables distributed in a joist construction. As with the
other types of floor heating, the surface temperature cannot exceed 27°C. The use of electrical heating
is not as common as the other types of floor heating, which is mostly due to the price of electricity. For
a summer cottage, electrical floor heating is hardly recommendable unless you let the floor heating add
a basic level of warmth to the house and then let the radiators take over for the last few degrees. Floor
heating should preferably run constantly during the heating season, and therefore, electrical heating is not
suitable for a start via a phone call on the way to the summer cottage. Electrical floor heating is installed
by a carpenter and an electrician.
Types of floor heating I Page 9
Constructions
Floor heating in concrete
The heating coils are tied to an armouring grid and cast into 10 cm of concrete on top of the insulation.
The set-up is simple and only requires that the coils are tied to the grid, and that the surface of the concrete
floor is levelled off and deviates no more than 2 mm measured across 2 meters of straightedge. Concrete
humidity must not exceed 85% RH and remember to insulate in accordance with local Building Codes.
Directly on concrete with heating pipes
Place a vapour barrier of minimum 0.20 mm PE foil with minimum 20 cm taped overlap on top of the
concrete. The vapour barrier must be strong enough to withstand irregularities in the concrete. In addition, put out a layer of flooring cardboard (500 gr/m2) or a similar sound-absorbing layer. The floor planks
are fastened directly onto the concrete using a screw and a dowel. It is important to push the planks
well into the substructure. The disadvantage of this method is that the floor is relatively hard to walk on
and that it increases the risk of the planks curving. In addition, the direct fastening on the substructure
requires that you know exactly where the coils are to avoid screwing into them. Screwing in concrete is
more time consuming than other types of fastening.
Floor plank
Cardboard
Vapour barrier
Concrete
Heating coil
Figure 1
Chipboard on concrete with heating coils
Place a vapour barrier of minimum 0.20 mm PE foil with minimum 20 cm taped overlap on top of the
concrete. The vapour barrier must be strong enough to withstand irregularities in the concrete. Place a
22 mm chipboard on the entire floor area. The chipboards are placed transverse to the room, allowing
the floor planks to be installed lengthwise. In addition, put out a layer of flooring cardboard (500 gr/m2) or
a similar sound-absorbing layer. Screw the planks with secretly or plug them from above. The advantage
here is that the fixing is very easy. Due to the thick layer of wood, the supply temperature must be raised
a little, but this will only slightly influence the heat consumption. This solution effectively separates the
concrete from the wood construction.
Floor plank
Cardboard
Chipboard
Vapour barrier
Concrete
Heating coil
Figure 2
Page 10 I Constructions
Floor heating with heat emission plates
Floor heating on heat emission plates is clearly the best possible solution. Partly because this construction responds very fast, but also because the floor is more pleasant to walk on. It is a little more expensive, but the convenience factor weighs heavier.
Heat emission plates on laths on top of joists
The planks must be laid in the same direction as the joists. The planks should always be installed in the
longitudinal direction of the house. Therefore, this solution also requires that the joists are installed in the
longitudinal direction of the house in order to be able to install the laths crosswise. Joists are installed at
an interval of approx. 60 cm with insulation in between. On top of these, install a layer of planed 21/28
x 95/120 mm laths at an interval of approx. 30 mm, making room for the grooves on the heat emission
plates. Install the heat emission plates, which are fastened with nails on one side. After the mounting of
the heating coils, lay out the flooring cardboard and fix the floor planks to the laths with screws. Remember to observe the coils.
Floor plank
Cardboard
Heat emission plate
Lath
Heating coil
Joist
Vapour barrier
Concrete
Figure 3
Constructions I Page 11
Heat emission plates on laths between joists
Install the floor planks across the joists. This solution is applicable for a tier of beams or a new layer of
joists with an interval of approx. 60 cm. Put insulation between the joists. 45 x 45 mm planed fillets are
fastened with an interval of approx. 60 cm between the joists. Sink the fillets to make the top side of
the laths level with the joists. Install a layer of planed 21/28 x 95/120 mm laths at an interval of approx.
30-50 mm, making room for the grooves on the heat emission plates. Install the heat emission plates
which are and fastened with nails on one side. After the mounting of the heating coils, lay out flooring
cardboard (500 gr/m2) and fix the floor planks to the joists with a screw. Remember to observe the coils.
Floor plank
Heat emission plate
Cardboard
Heating coil
Lath
Fillet
Joist
Insulation
Vapour barrier
Concrete
Figure 4
Self-sustaining heat emission plates on joists
Install joists at an interval of approx. 60 cm with insulation in between. Install the self-sustaining heat
emission plates directly on top of the joists; fasten them to the joists through the crossing steel bands
with a nail. After the mounting of the heating coils, lay out flooring cardboard (500 gr/m2), install the floor
planks across the joists and fix with a screw.
Floor plank
Cardboard
Heat emission plate
Heat emission plate
Heating coil
Joist
Insulation
Vapour barrier
Concrete
Figure 5
Page 12 I Constructions
Floor heating chipboard on joists
A 22 mm floor heating chipboard can be installed on top of an insulated layer of joists at an interval of
max. 60 cm. Grooves have been prepared in the chipboard for the heat plates and 16 or 17 mm heating
coils. Lay out flooring cardboard (500 gr/m2) and fasten the floor planks to the chipboard with a screw.
Remember to observe the coils.
Floor plank
Cardboard
Heat emission plate
Heating coil
Floor heating chipboard
Joist
Vapour barrier
Concrete
Figure 6
Floor heating chipboard on concrete
On a dry and level concrete floor, lay out a 22 mm floor heating chipboard on top of a minimum 0.20 mm
vapour barrier with 20 cm taped overlay. Lay out floor cardboard (500 gr/m2) and fasten the floor planks
to the chipboard with a screw. Remember to observe the coils.
Floor plank
Cardboard
Heat emission plate
Heating coil
Floor heating chipboard
Vapour barrier
Concrete
Figure 7
Constructions I Page 13
Thermisol floor heating plates
Thermisol offers a floor heating system where polystyrene is used to build up a layer of insulation directly
on top of the levelled sand layer. Lay out a minimum of 25 cm polystyrene. On top of this, lay out a
vapour barrier and a layer of 50 x 50 mm joists per 60 cm. In between the joists, lay out a layer of 25 mm
polystyrene and then 25 mm Thermisol heat plates. After the mounting of the heating coils, lay out flooring cardboard (500 gr/m2) and fasten the floor planks to the joists with a screw.
Floor plank
Cardboard
Joist
Heat plate
Heating coil
Polystyrene
Vapour barrier
Polystyrene
Sand
Figure 8
Gluing of Dinesen Floors
The following instructions concern gluing of Dinesen Douglas and oak boards in full or random lengths
with a max. width of 500 mm. Widths exceeding 300 mm must, on the backside - under the lower
groove part – have cut or planed an app 5 mm bevel to avoid glue being pressed into the tongue &
groove joint.
Gluing must not be combined with other installation methods and the boards should only be fixed to the
sub-floor with adhesive. Do not apply adhesive to the tongue & grooves on the long sides of the boards.
The humidity should be between 35 and 65% RH and should not exceed 50% RH during winter.
The ideal temperature is between 18 and 25° C.
Under the right preconditions, the boards can be laid immediately after delivery and do not need time to
acclimatize. During the winter, the boards ought to be in the room 24 – 48 hours before the installation.
Use Sika AcouBond System with Sika-Layer – 03 matt and SikaBond T52 FC glue. Follow Sika
instructions carefully with regard to:
• Climatic conditions
• Grade, evenness, adhesive/priming and moisture content of the substructure.
• Use of tools
Page 14 I Testing, start and operation
• Drying time of filler, primer, mastic etc.
• Mounting time for the adhesive
• Conditions for floors with under floor heating.
In addition to this, follow the other instructions in Dinesen’s instructions.
For all substructures, Sika requirements on moisture content must be followed. For substructures of
concrete/cement the moisture content must not exceed 85% RH and Sika Primer MB must be used. For
substructures of anhydrite the moisture content must not exceed 65% RH and Sika Primer MB must not
be used. Contact Sika for further info.
For substructures of concrete/cement, anhydrite with embedded heating coils, the under floor heating
must have been used for minimum 1 month prior to gluing. For gluing on other substructures e.g.
chipboard, plasterboard, ceramic tiles etc. please contact Sika.
Concerning floors with under floor heating, the heat must be turned of at least 24 hours before gluing.
Do not turn on the heat until 7 days after the floor has been glued. Turn up the heat slowly.
To ensure sufficient pressure across the entire floor surface, and when work ceases for the day, place
8 –10 kg sand bags, buckets with sand or the like on top of the boards. Distribute evenly with approx.
1 load per m2 until the adhesive has hardened. Particularly important are the areas along the edges of the
floor and the last installed rows. Do not walk on the floor before the adhesive has hardened, a process
which normally takes 24 hours.
Sanding and finishing should not be performed until 48 hours after the floor has been glued.
Testing, start and operation
It is important that a plumber has pressure tested the facility, checked the pipes and the thermostats
before the facility is taken into use. Furthermore, the user must be equipped with a user’s manual and be
thoroughly instructed in the use of the facility. Start up the floor heating slowly. During the first week, the
supply temperature must not exceed 25°C; it can thereafter be increased by 5°C every other day until the
desired surface temperature has been reached. The planks will curve if the supply temperature is raised
too rapidly. You often choose to let the floor heating facility run all year round as it is controlled by thermostats and therefore only uses heat when the thermostats set in.
FAQs about floor heating I Page 15
FAQs about floor heating
Will floor heating result in cracks and damages?
If the humidity is kept between 30 and 60% RF, floor heating will not cause cracks etc. If the surface
temperature of the floor exceeds 27°C, the humidity will fall below 30%; this may impoverish the floor and
cause cracks.
Low humidity and insufficient maintenance may cause cracks and flaws.
Will contraction cracks increase in size with floor heating?
Wood will always attempt to find equilibrium in humidity conditioned by the surrounding air. Dinesen floors
are dried to a moisture content of 8-10% and will, regardless of floor heating, shrink during the winter
when the humidity is low. With an average of 40-45% RH in the room, the wood will settle at a moisture
content of 8%. If the humidity drops to 30% RH, the wood will settle at a moisture content of 6% and
thus shrink. Floor heating will not on its own cause major shrinking. The higher the surface temperature
is, the larger the contraction cracks are. One has to expect that the planks will shrink approx. 1% in the
width.
Will the planks curve more with floor heating?
The planks will curve a little as the seasons change. This is the nature of the wood and will occur regardless of floor heating, and it has no significance. More severe curving will only occur if the house has
moisture problems or if moisture in the construction was not removed prior to the installation of the floor.
Will the floor creak more with floor heating?
If temperature and humidity recommendations are adhered to, the floors will not creak because of floor
heating. Most often, creaking occurs because of wet joists, too large intervals between the joists or too
poor wedges. Large differences in temperature or humidity may, however, result in transient creaking.
Does floor heating require a larger distance between wall and floor?
The distance to walls, pipe feedthroughs etc. must be sufficient to allow for expansions occurring when
the wood absorbs moist during the summer. The expansion does not depend on the floor heating, and
thus, the recommended 10-15 mm will suffice.
Page 16 I FAQs about floor heating
Can the floors be laid floating ?
No, Dinesen floors must always be screwed onto the sub floor and must never be glued on the long
edges.
Why must the surface temperature not exceed 27°C?
A temperature above 27°C will not be pleasant. When the temperature exceeds 27°C, the humidity may
drop to less than 30% RH, which entails a risk of cracks and scratches.
If the house is sufficiently insulated, a higher temperature will never become necessary.
Is it possible to reach a sufficiently high temperature through thick solid planks?
A room temperature of 20°C is easily reached. It requires, of course, that the house is insulated in accordance with current building codes and that Dinesen Floor Heating Instructions are followed. In older
houses with insufficient insulation, however, supplementary heating sources may often be required.
Is the energy consumption higher for solid floors than for 15 mm engineered floors?
As wood has an insulating effect, there will be a loss of heat up through the construction. This means
that the thicker a layer the heat has to pass through, the higher the heat loss is. A thick floor will therefore
require a higher supply temperature to reach the same surface temperature as on a thinner floor. This
does not, however, imply a significantly higher energy consumption.
Does an increased supply temperature result in higher energy consumption?
The first time the water is warmed up to 45°C instead of 35°C, it requires a little more energy, but afterwards it does not have any effect. This is due to the fact that energy consumption only depends on the
difference in the temperature between supply water and return water.
Does floor heating have to run during the summer?
As floor heating is controlled by a thermostat, the heat is only turned on as required. It will therefore
hardly be an extra expense to let the floor heating run. If the concrete floor is insufficiently insulated, you
may experience that the concrete absorbs moisture during the summer if the floor heating is turned off,
and this may damage the floor. But if the construction meets the requirements, turning off the heat will
have no effect. However, remember to start the floor heating up slowly over a few days.
FAQs about floor heating I Page 17
Why must there be no air between the floor and the floor heating ?
Air is a poor thermal conductor. Therefore, there should be no air between the floor heating and the
wooden floor. For the same reason, you should always lay out flooring cardboard (500 gr/m2) on top of
the heat emission plates. Air underneath the planks may make it impossible to reach a sufficiently high
surface temperature. In addition, the air underneath the planks may become extremely dry, which may
impoverish and thus damage the floor.
Why is it important to start up the floor heating correctly?
The wood needs time to slowly adjust to the temperature changes. If the floor is warmed up too quickly,
the planks may curve. This procedure has to be followed both for the initial start-up and for later start-ups
when the heating season starts.
Why do you recommend lye and oil as surface treatment?
The lye opens up the grains in the wood, making it easier for the oil to penetrate the floor. The oil forms a
membrane on top of the floor, which makes it easier to avoid impoverishment of the wood.
Is lye and soap not an option?
Lye and soap is an option but requires a higher degree of attention to the floor and more frequent
washing. Soap may more easily result in small cracks in the surface of the wood caused by drying.
What is the impact of the room temperature on the energy consumption?
If the room temperature is lowered from 22 C to 21°C, you can save approx. 10% in heating expenses.
Page 18 I FAQs about floor heating
Dinesen recommends
• Use light floor heating with heat emission plates. This solution has the shortest reaction time
and is easily controlled.
• The house must conform to local building codes and U-values.
• Low convectors in front of tall windows reaching down to floor level.
• Start up the floor heating slowly.
Dinesen recommends I Page 19
Instructions
If you need further advice, please contact Dinesen Floors at +45 7455 2140, where you can also order
and buy the Dinesen range of maintenance products for wooden floors.
Dinesen
Klovtoftevej 2, Jels
DK-6630 Rødding
T +45 7455 2140
[email protected]
www.dinesen.com
Advice about floors, installation and maintenance.
Floor heating, water-based Uponor +45 4345 3797
+44(0) 1455 550355
www.uponor.co.uk
ChairmatsFraster+45 8788 2244
Dinesen Instructions
01 Dinesen installation instructions for Douglas floors in full lengths
02 Dinesen installation instructions for Douglas floors in random lengths
03 Dinesen installation instructions for oak floors in random lengths
04 Dinesen humidity instructions
05 Finishing and caring for Dinesen floors
06 Dinesen floors and floor heating
Video instructions (sanding, finishing, caring) www.video.dinesen.com
Dinesen’s instructions are based on Danish building codes and regulations, reservations are therefore made for national
code of practice. Other products and construction parts require the knowledge and insight of a specialist. Note that
guidance besides our own product is beyond our service. Reservations are made for printing errors.
Page 20 I Advice