1
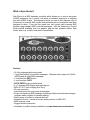
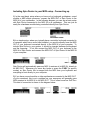
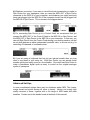
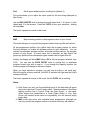
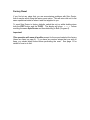
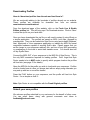
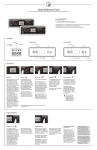
Foreword
Congratulations on your purchase of a Kenton Spin Doctor. Using the
technology that made the Kenton Control Freak one of the most popular MIDI
controllers in the world, Spin Doctor offers incredible value for money and
immense control over all of your MIDI devices.
Please take the time to read this manual thoroughly as it explains everything you
will need to know in order to get the most from your purchase. Because of its
ability to generate any type of MIDI message including SysEx and NRPNs (when
used in conjunction with the PC and Mac editing software), Spin Doctor allows
you to unlock the full potential of any device that conforms to the MIDI standard.
What is Spin Doctor?
Spin Doctor is a MIDI hardware controller which allows you to control any piece
of MIDI equipment, be it a synth, soft-synth, soundcard, sequencer or anything
else with a MIDI IN port. The degree to which you can do this depends only on
the amount of external MIDI control that particular piece of equipment has been
designed to allow. From the front panel you can control most common MIDI
devices using standard MIDI controller messages. With the hundreds of Control
Freak profiles available from our website, and the free software editors, Spin
Doctor opens up a whole new world of possibilities.
Features
• 16 fully programmable rotary knobs
• Front panel editing of controller messages. Software editor support for SysEx,
NRPNs and all other MIDI messages.
• 1 multi-function EDIT button
• 1 multi-function F.KEY
• DATA ENTRY rotary encoder knob
• 4 x 7 segment LED display with scrolling text
• MIDI IN / OUT (with merging Soft-Thru)
• 25 user memories
• Individual names for every knob and program
• Knobs can send any MIDI message, including multiple and inverted messages
(software editor required for detailed editing)
• SysEx dump of profiles to external devices
• Snapshot function – sends all current slider positions to MIDI OUT
• MIDI analyser mode
• Rugged metal construction
• Hundreds of profiles already available from www.kentonuk.com/download
What are the benefits of using Spin Doctor?
Many pieces of MIDI gear have no front panel controls of their own, whilst others
possess on-board controls which are frustrating and fiddly to operate. Spin
Doctor gives you the hands-on control you need to access the various
parameters on such pieces of equipment, instantly and in real time.
The ability to tweak volumes, filters, envelopes and other popular effects with
such ease can give a new lease of life to your existing MIDI equipment. Why pay
out for new synth modules when you can unlock the full potential of the ones you
already own?
Spin Doctor is an excellent time saving device. One of the most popular uses for
the unit is as a control surface for sequencers such as Cubase VST/SX, Emagic
Logic Audio and Cakewalk Pro-Audio/Sonar, where the ‘virtual’ faders on the
computer screen can be manipulated from Spin Doctor’s real world control
knobs. Another very popular use is for controlling software synths, such as the
excellent Native Instruments range. This removes the need for tedious
adjustments by mouse, and is a far more intuitive way of working.
What is the principle of operation of Spin Doctor?
Spin Doctor is a device to make editing and controlling everything from MIDI
hardware to software sequencers and software synths easier than ever before.
Unlike many other low cost controller units, Spin Doctor (when used in
conjunction with the editing software for PC and Macintosh) has the power to
support all possible MIDI messages, not just the limited controllers and NRPNs
found on other products in this price range.
In most MIDI strings used to control equipment, be they SysEx messages,
continuous controller messages (CCs) or NRPNs, there is usually one byte which
actually specifies the new value required.
With System Exclusive (SysEx) particularly, out of typically around 12 bytes,
often only one or two bytes need to change to give you the change in sound.
The rest are there to specify the manufacturer, the synth model, the type of
message and which parameter you want to change.
When setting up a knob to control something, most of the bytes have fixed
values. When it comes to the variable data bytes, these can be set up to take
their value from the knob. With Spin Doctor, editing from the front panel is
restricted to just controller data, and we recommend the use of the PC and
Macintosh editing packages to get the full benefit of the power of Spin Doctor.
What really sets Spin Doctor apart, is the fact that it is fully compatible with the
range of profiles designed for the award winning Kenton Control Freak Studio
Edition and Control Freak Live. You can download hundreds of presets free from
our website for a wide range of popular MIDI applications, both old and new.
Here too you will find the free software editors for Spin Doctor which allow you to
fully program the unit from a PC or Macintosh.*
Spin Doctor is also ideal as an inexpensive channel expander for existing Kenton
Control Freak users. The units can be linked together, and profiles transferred
from the Freak to Spin Doctor (and vice-versa), making setups even more
flexible. **
* A Mac editor is currently in the advanced stages of development.
** It is not possible to transfer profiles to or from the Control Freak Original due to the different
data formats used, although the units may still be used in tandem.
Including Spin Doctor in your MIDI setup - Connecting up
1) In the most basic setup where you have only a keyboard synthesiser, sound
module or MIDI effects processor, connect the MIDI OUT of Spin Doctor to the
MIDI IN of your synthesiser. In the following diagram you can see a basic setup
with Spin Doctor connected to the MIDI IN on a synthesiser. This can just as
easily be a hardware module being controlled directly from Spin Doctor.
2) In a simple setup, where you typically have a controller keyboard connected to
a computer which has a sound card installed, you would normally have the MIDI
OUT of your keyboard connected directly to the MIDI IN of your computer. To
include Spin Doctor in your system, it should be inserted between the keyboard
and the computer. To do this connect the MIDI OUT of your keyboard to the
MIDI IN of Spin Doctor and connect the MIDI OUT of Spin Doctor to the MIDI IN
of your computer.
Spin Doctor will automatically pass any MIDI it receives at its MIDI IN, directly to
its MIDI OUT. Whenever you move any knobs or press the F.KEY (in specific
modes) on Spin Doctor this is merged with the MIDI from your keyboard and
everything is sent directly to your computer.
3) If you have a sound module or other synthesisers connected to the MIDI OUT
of your soundcard, this is not a problem as your sequencer will generally pass
MIDI received at its MIDI IN to its MIDI OUT. This is often known as Soft-Thru.
This kind of connection is shown in the diagram below.
4) Whatever your setup, if you want to record the knob movements you make on
Spin Doctor into your sequencer, then you need the MIDI OUT of Spin Doctor
connected to the MIDI IN of your computer, and whatever you might previously
have had plugged into the MIDI IN of the computer should now be plugged into
the MIDI IN of Spin Doctor. This is shown in the diagram below.
5) For connecting Spin Doctor up to a Control Freak we recommend that you
connect the MIDI OUT of the Control Freak to the MIDI IN on Spin Doctor, and
the MIDI OUT of Spin Doctor to the MIDI IN on your computer. In this way, you
can edit Spin Doctor from the Control Freak during your working session, as well
as use both devices as either independent controller units, or as one unit e.g. for
controlling 32 channels of a software mixer.
6) If you are using a keyboard that has its own internal sounds then you may
want to use these in your setup too. With Spin Doctor you can access these
sounds quickly and easily, even in a live situation. One could use Spin Doctor to
make a featureless digital synth as easy to control as the original analogue
synths of yesteryear.
Advanced Set-Ups
In more complicated setups there may be situations where MIDI Thru boxes,
merge boxes and switch boxes will come in handy. Kenton can supply high
quality versions of these, together with a full range of MIDI leads and other
sundries. Contact us via the details found at the back of this manual.
Getting Started
Switching on
Please connect the supplied power adapter to your Spin Doctor. Kenton can,
and will only warranty the operation of Spin Doctor with the supplied adapter
(exception is the Australian market). Usage of other power supplies may cause
damage to Spin Doctor, which will void your warranty. For replacement
adapters, please contact Kenton.
When you first power up the unit, the 4 x 7 segment LED display will scroll the
name Spin Doctor, and then default to Pr 0 (Program 0). This program is preloaded with a profile to control the MIDI volume (controller 7) on MIDI channels
1-16, assigned logically to knobs 1-16.
The best way to familiarise yourself with Spin Doctor is to experiment with some
of the pre-loaded factory profiles. Spin Doctor is pre-loaded with 6 useful profiles
to get you started. These are:
Program 0: Volumes on MIDI channels 1 – 16
Program 1: Pans on MIDI channels 1 – 16
Program 2: Controllers 1 – 16 all on the global MIDI channel (default = 1)
Program 3: Controllers 17 – 32 all on the global MIDI channel (default = 1)
Program 4: Controllers 33 – 48 all on the global MIDI channel (default = 1)
Program 5: Controllers 49 – 64 all on the global MIDI channel (default = 1)
Programs 6 to 24 are left blank for the user to program or load pre-programmed
profiles as required.
Use the DATA ENTRY knob to switch between the different memory locations.
As each one is called up, the name of the profile it contains will scroll across the
screen. If the location is blank, then just the program number will briefly be
shown, followed by a short blank screen and then again the program number
shown in the form PrXX (where XX is the program number from 0-24).
If you are using a computer and a sequencer, load a song on the sequencer and
start it playing. Connect your Spin Doctor to your computer, and assign the MIDI
IN on your sequencer to come from the MIDI OUT of Spin Doctor (for example, if
you were using a Yamaha SW1000XG sound card as your MIDI Interface, then
you would set the MIDI IN for your software to come from SW1000 MIDI IN, and
you would have the MIDI OUT of Spin Doctor connected to the SW1000XG MIDI
IN port).
Select program 0 on Spin Doctor, and move the rotary knobs. If you have a 16
track MIDI song loaded up then you should be able to control the volumes of
each of the tracks from Spin Doctor. This you will immediately see is far easier
than using a mouse to control volume levels.
You probably want to do more than just control the volumes of tracks, so move
the DATA ENTRY knob one click to the right, and the screen will flash Pr 1
(Program 1) which will allow you to modify, as the display shows, the panning
control for tracks 1-16.
For in-depth control of software sequencers, plug-ins and software synths, you
will need to refer to the relevant user manuals for information about configuring
the software to respond to external MIDI control. In many cases we will have
already created profiles which can be downloaded from our website
www.kentonuk.com.
Editing Spin Doctor
We have demonstrated how easy it is to connect and immediately start to use
Spin Doctor in your MIDI environment. The profiles can be used not only with
software applications, but also with any MIDI hardware device, so feel free to
connect and experiment with your existing MIDI hardware using some of the
controller based presets that are to be found in Spin Doctor.
Front panel editing modes
All of the editing modes on Spin Doctor can be accessed by pressing the EDIT
button to the right of knob 8. Depressing this and releasing it after first powering
up will display PSEL (Program Select), then scroll the name of the profile in the
program currently selected across the screen, before reverting back to a static
display of the program number, e.g. Pr 0.
To start editing Spin Doctor, simply hold down the EDIT button whilst turning the
DATA ENTRY knob. When you have reached the required mode, release the
EDIT button and use the DATA ENTRY knob to change the value of the selected
parameter.
The editing modes available (and their abbreviations) are as follows:
PSEL
chAn
butn
PSnd
ScrL
MAP
dMP
Edit
Program Select (default)
Global MIDI channel select
Selects what function the F.KEY will perform in the main level
Program Change send
Scroll speed adjustment for scrolling text
Map incoming profiles to the program location of your choice
Dump a Spin Doctor profile
Edit a knob to send the controller number of your choice
Pressing the EDIT key at any time will show the currently selected mode.
PSEL
Program select
This is the default mode, which allows you to select any one of the 25 memory
locations.
Use the DATA ENTRY knob to change the current program number. When you
stop moving the DATA ENTRY knob the current program name will scroll across
the screen.* To display the program name again, press and release the EDIT
button.
When you turn a knob, the value is shown in the display and the MIDI OUT
indicator lights to show that you are sending MIDI. When you stop moving the
knob, the knob name will scroll across the screen.**
Pressing the EDIT button will mute the MIDI output from Spin Doctor until the
EDIT button is released. This is useful if you want to set a knob to a new value
without sending the interim values, or if you want to check what a knob does. If
you turn a knob while the EDIT button is held down, the value is shown in the
display but the MIDI OUT indicator will not light as no MIDI is being sent. When
you stop moving the knob, the knob name will scroll continuously across the
screen.
By default the F.KEY sends a snapshot of all 16 knobs in their current position.
Sending a snapshot will cause the MIDI indicator to flash briefly, indicating MIDI
OUT activity. You can change the function of the F.KEY by going to butn in edit
mode (see page 12).
* If a blank program is selected, only the program number will be displayed
** If an unassigned knob is moved, only the value will be displayed
chAn
Global MIDI channel select
This mode allows you to change the default MIDI channel that Spin Doctor sends
on. The display will show the current global MIDI channel, which by default is
channel 1 (shown as ch 1).
To adjust the MIDI channel, simply rotate the DATA ENTRY knob either
clockwise or anti clockwise, and you will see the display change from ch 1
through to ch16, denoting MIDI channels 1-16. This is useful when controlling a
synth or other device on a specific MIDI channel. An example of this could be a
synth or drum machine in your studio, which only works in Poly mode, and is set
to MIDI channel 10. Setting the global channel to 10, would allow you to send
specific edits to that device only.
The global MIDI channel can be overridden by MIDI channels defined at either a
program or individual knob level. Some of our website profiles have been set up
in this way, but you cannot assign separate MIDI channels to different knobs
from the front panel of Spin Doctor. To do this you will need the software editors.
Both the knobs and the F.KEY operate as normal in this mode.
butn
Selects what function the F.KEY will perform in the main level
This mode allows you to assign one of several useful functions to the F.KEY.*
Use the DATA ENTRY knob to cycle throught the choices available. When you
stop moving the DATA ENTRY knob, the name of the function currently selected
will scroll across the screen twice, then the screen will revert to butn.
The functions available are as follows:
Snapshot (default)
Sends the current position of all 16 knobs over MIDI
Reset all controllers
Sends a ‘reset all controllers’ message on the global
MIDI channel
All notes off
Sends an ‘all notes off’ message on the global MIDI
channel
GM reset
Sends a ‘General MIDI reset’ message
XG reset
Sends a ‘Yamaha XG reset’ message
VST Mixer select
Selects the Cubase VST/SX mixer to control, when
used in conjunction with the Kenton VST/SX profiles
Both the knobs and the F.KEY operate as normal in this mode.
*This assignment is not stored and will be forgotten when Spin Doctor is switched off.
PSnd
Program Change send
This mode allows you to send MIDI program change messages to your
equipment.
Use the DATA ENTRY knob to select the required program change value, in the
range of 0 –127. Since programs sometimes start at 1 you may need to send a
value that is one lower than the program you actually wish to change to, e.g. to
change a device to program 10, select P 9.
Once you have selected the program number, press the F.KEY to send the
program change to any MIDI device. The MIDI OUT indicator will light, and the
program change command will be sent on the global MIDI channel. You can
change the global MIDI channel by going to chAn in edit mode (see page 11).
The knobs operate as normal in this mode.
ScrL
Scroll speed adjustment for scrolling text (default: 6)
This mode allows you to adjust the scroll speed for the text being displayed by
Spin Doctor.
Use the DATA ENTRY knob to change the scroll speed from 1-16, where 1 is the
fastest and 16 is the slowest. Press the F.KEY to store your selection – display
will read Stor.
The knobs operate as normal in this mode.
MAP
Map incoming profiles to the program location of your choice
This mode allows you to specify the program location that a profile will load into.
All pre-programmed profiles carry within them the program number for which
they are destined, to enable the software editors to work effectively. You can
override the allocated program number and make profiles load into the program
location of your choice. In some cases this is essential, as Spin Doctor will
ignore any profile with an allocated program number that is higher than 24.
Initially, the display will show MXX (where XX is the last program selected, from
0-24). You can use the DATA ENTRY knob to change this to whichever
program location you wish to map to. If you change the mapping location, the
current program will change to the same number.
When you have selected a program you can load a profile in the usual way.
While the profile is being received, the MIDI IN indicator will light and the SysEx
indicator will flash.
The knobs operate as normal in this mode, but the F.KEY will do nothing.
Notes:
1) Spin Doctor can only use the knob/slider parts of the data and will ignore
any button data from Control Freak profiles. Please be aware of this when
loading profiles from a Control Freak into Spin Doctor, or vice-versa.
When dumps are transmitted to a Freak Studio Edition or Live, Spin
Doctor will transmit button data for compatibility, but will transmit empty
button data.
2) MAP mode also works with individual knob assignments, although you
can only specify the program location, not which knob they will load into.
dMP
Dump a Spin Doctor profile
This mode allows you to dump complete profiles into another Spin Doctor, a
Kenton Control Freak or a data librarian package. In this way you can store your
own custom presets on your computer, to be loaded back into Spin Doctor as
required.
Initially, the display will show d XX (where XX is the last program selected, from
0-24). You can use the DATA ENTRY knob to change this to whichever
program location you wish to dump from.
When you have selected a program, press the F.KEY to send the dump. While
the dump is being sent, the display will show – – – – but the MIDI OUT and
SysEx indicators will not light. The display will revert to d XX when the dump has
been transmitted.
The knobs operate as normal in this mode.
Edit
Edit a knob to send the controller number of your choice
This mode allows you to assign any MIDI continuous controller number 0-127 to
any knob in any program. In this way you can control any piece of MIDI
equipment that responds to controller messages. You will need to use PSEL
mode to select the program to edit (see page 10).
Initially, the display will show EdXX (where XX is the last knob moved, from 116). If you want to edit a different knob, simply turn the DATA ENTRY knob to
select a different knob number. Then, turn the corresponding knob to select the
controller number you wish to assign. Knobs other than the one selected will do
nothing.
When the display is showing the controller number you wish to assign, press the
F.KEY to store your selection. The display will then revert showing EdXX.
Neither the knobs, nor the F.KEY will send any MIDI data in this mode.
Factory Reset
If you find at any stage that you are encountering problems with Spin Doctor,
then it may be worth trying the factory reset option. This will return the unit to the
same operational state as when it was first supplied to you.
To reset Spin Doctor to factory defaults, switch the unit on whilst holding down
both the EDIT button and the F.KEY. The display will show – – – – before
scrolling the name Spin Doctor and then defaulting to Pr 0 (Program 0).
Important!
This operation will erase all profiles except for those pre-loaded at the factory
(these are listed on page 8). If you have any custom setups that you wish to
keep, you should dump these before performing the reset. See page 13 for
details of how to do this.
Downloading Profiles
How do I download profiles from the web and load them in?
We are continually adding to the hundreds of profiles already on our website.
These profiles are available for download free from our website
www.kentonuk.com/download.
From the download page of the website, click on the Freak Live & Studio
Edition profiles link. This will bring up a File Download window. Click on ‘Save’
to store the zip file on your hard drive.
Once you have downloaded the zip file you will need to extract it using Winzip or
a similar application. The profiles are saved as MIDI (.mid) files, grouped by
manufacturer. They can be loaded into Spin Doctor using any suitable Windows,
Atari, Macintosh or Linux sequencer application or indeed any MIDI file format
compatible hardware capable of sending SysEx data. Please ensure that you
set the tempo in your sequencer relatively low, and turn off any MIDI processing
or quantisation on the track to avoid data transfer errors. You should also turn
off any SysEx filters.
Connect the MIDI OUT of your sequencer to the MIDI IN of Spin Doctor. This is
the only MIDI connection required for loading profiles. Don’t forget that Spin
Doctor needs to be in MAP mode to specify which program location the profiles
will load into (see page 13 for details).
Open the MIDI file for the profile you wish to load inside your sequencer. Profiles
must be loaded one at a time, so always start with an empty song otherwise you
may end up with two or more files loaded.
Press the PLAY button on your sequencer, and the profile will load into Spin
Doctor. It’s as simple as that! J
Note: Spin Doctor is not compatible with the Freak Original profiles.
Submit your own profiles
We welcome profiles submitted by our customers for the benefit of other users.
You can email these, along with general comments and ideas to
[email protected].
MIDI Analyser Mode
Spin Doctor also has a MIDI analyser function. This feature allows you to see
what types of MIDI messages are being transmitted by your equipment. In this
way, Spin Doctor may be used as a powerful diagnostic tool if you have a
problem with your MIDI set-up.
To enter analyser mode, switch the unit on whilst holding down the F.KEY. The
display will show the software revision number of the unit until the F.KEY is
released, at which point it will change to ntno (note number).
Use the DATA ENTRY knob to select the type of MIDI message you want to
display. The data types available (and their abbreviations) are as follows:
ntno
ntvL
ccno
ccvL
chAn
Prog
SX n
tc n
StAt
Note number – display will change to show the note number if a
note-on message is received
Note velocity – display will change to show the note velocity if a
note-on message is received
Controller number – display will change to show the controller
number if a controller message is received, Pbnd if pitchbend is
received or Aft if aftertouch is received
Controller value – display will change to show the data value if a
controller, pitchbend or aftertouch message is received
MIDI channel – display will change to show the MIDI channel of any
message received
Program change – display will change to show the program number
in the range of 1-128 if a program change message is received
SysEx – display will change to SX Y if System Exclusive is received
Timing clock (MIDI clock) – display will change to tc Y if MIDI clock
is received
Clock status – display will change to StoP if a clock stop command
is received, Strt if a clock start command is received, or cont if a
clock continue command is received
In every case, the display will only change if the relevant message is received.
Overview of the MIDI message format
To make it easier to understand, MIDI data bytes are usually represented in
either decimal (base 10) or hexadecimal (base 16) numbers. On Spin Doctor,
data are always shown in decimal format. This quick guide is to help and explain
the data types and message types for MIDI.
The MIDI standard uses 0-255 in the following way:
00 - 7F = 0-127 variable for data
Channel Commands Data 1 (0-127) Data 2 (0-127)
80 - 8F = Note-on (channels 1-16) Note number Velocity
90 - 9F = Note-off (channels 1-16) Note number Velocity
A0 - AF = Poly after touch (channels 1-16) Note number Aft. Amount
B0 - BF = Controllers (channels 1-16) Controller number Controller value
C0 - CF = Programs (channels 1-16) Program number D0 - DF = Mono after touch (channels 1-16) After touch amount E0 - EF = Pitch bend (channels 1-16) LSB MSB
System Common Commands
F0 = Begin System Exclusive* Company ID data... data... F7
F1 = MIDI time code quarter frame Type/Value F2 = Song position pointer LSB MSB
F3 = Song select Song number F4 = Undefined - F5 = Undefined - F6 = Tune request - F7 = End System Exclusive* - System Real-time Commands
F8 = Timing clock - F9 = Undefined - FA = Clock start - FB = Clock continue - FC = Clock stop - FD = Undefined - FE = Active sensing - FF = System reset - -
Specifications
User interface
Controls:
16 x linear response rotary control potentiometer knobs
1 x F.KEY push button
1 x EDIT push button
DATA ENTRY rotary encoder knob
Power switch
Display:
LED (4 x 7 segment)
Connections
Inputs:
Outputs:
DC Power socket - 2.1mm centre positive
MIDI IN (5 pin DIN type)
MIDI OUT (5 pin DIN type)
Accessories
Operating manual
Mains power adapter (UK, EU, USA)
Physical data
Dimensions: 390 mm x 120mm x 58mm
Weight:
1.5Kg (boxed, with PSU)
Power Requirement
9V d.c. @ 250mA
Warranty
Spin Doctor comes with a 12 month back to base warranty (from purchase date).
Customers must arrange and pay for carriage to and from Kenton Electronics.
Written by
Nick Howes, Anthony Barden & John Price